|
|
|

|
|
| Search | Car Forums | Gallery | Articles | Helper | AF 350Z | IgorSushko.com | Corporate |
|
| Latest | 0 Rplys |
|
|||||||
| WIP - Street Post topics for any "Works In Progress" street vehicles projects in this sub-forum. |
 |
 Show Printable Version | Show Printable Version |  Email this Page | Email this Page |  Subscribe to this Thread
|
|
|
Thread Tools |
 12-18-2018, 12:54 PM
|
#1 | |
|
AF Regular
Join Date: Feb 2009
Location: Moscow, Russia
Posts: 294
Thanks: 5
Thanked 14 Times in 14 Posts
|
90' GMC TopKick C7500-C8500
Hello my dear colleagues!
I haven't write here for a long time.... Here is my current project for couple years already. As I am American Medium Duty trucks fan, I can't stand to work (make a model) on this one. :  The only thing I will change is the rooth. I like standart one. And I not sure about the bumper. May be I will use the stock one. I bought the trans-kit on e-bay couple years before. I guess it's Perry's:  The grill is fited to suit.  There are couple fuel tanks and acumulator boxes in kit. Plus chequered plates and buckles for hood and boxes in separate bag:  I like this kit. Quality of the cast rather high. No boubles.  There is pimple on a back wall, like the real cab has. Also bottom line need correction.  Door handles are made through   Interior tub is flat as usuall.  I have PDF with dimensions, so I can say the scale of a kit is something in between 1/24 and 1/25.  Toolbar sits rather high. Next photo shows it better.  The steering wheel is too small for this truck. It's a pitty - no head lights lenses or wind screen in a kit. No instruction too.....
__________________
 "Precious and fragile things Needs special handling.." "Precious and fragile things Needs special handling.."
|
|

|

|
|
12-18-2018, 12:56 PM
|
#2 | |
|
AF Regular
Thread starter
Join Date: Feb 2009
Location: Moscow, Russia
Posts: 294
Thanks: 5
Thanked 14 Times in 14 Posts
|
Re: 90' GMC TopKick C7500-C8500
So, the bottom of back wall of the cab has filled up:
 Almost finised on the left side, not on the right. Here is the original:   Door pockets and elbow-rest are up graded too:   So, the steering wheel has been remade. I used the rim from Ford LNT kit. The rest of steering wheel are styrene, epoxy patty, wire, piece of sprue. Though Ford's rim is 1mm bigger, TopKick's will have an ideal cirkle.  I also made the gear shift lever. 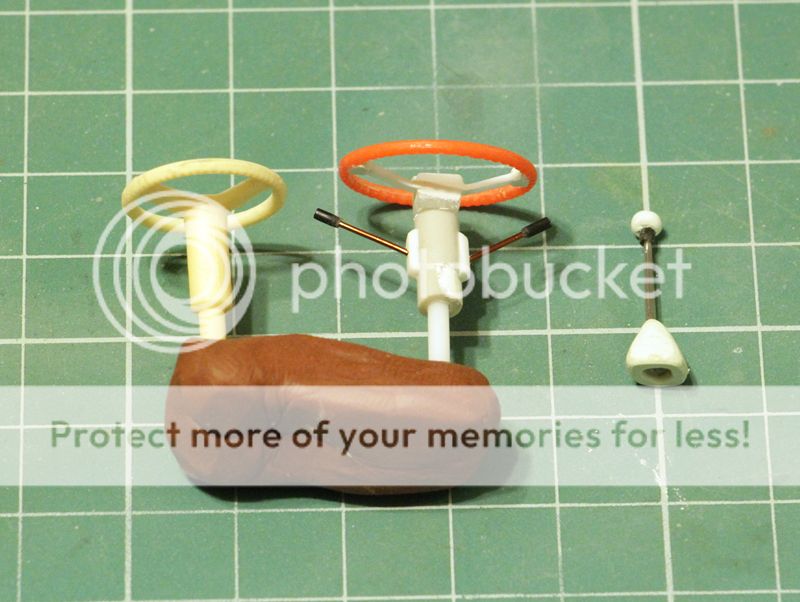 Here is how it should be: 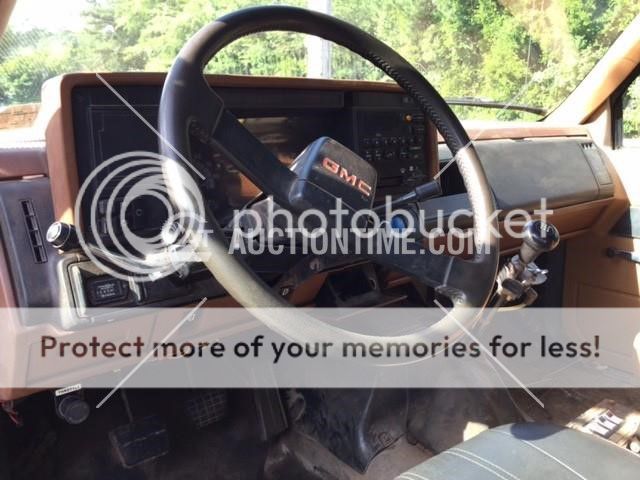 I also filed down the bottom and back side of the dash. Now it sitssits a litle lower.  Almost like at home. Erly Tahoe and Silverado have the same cab and dash.  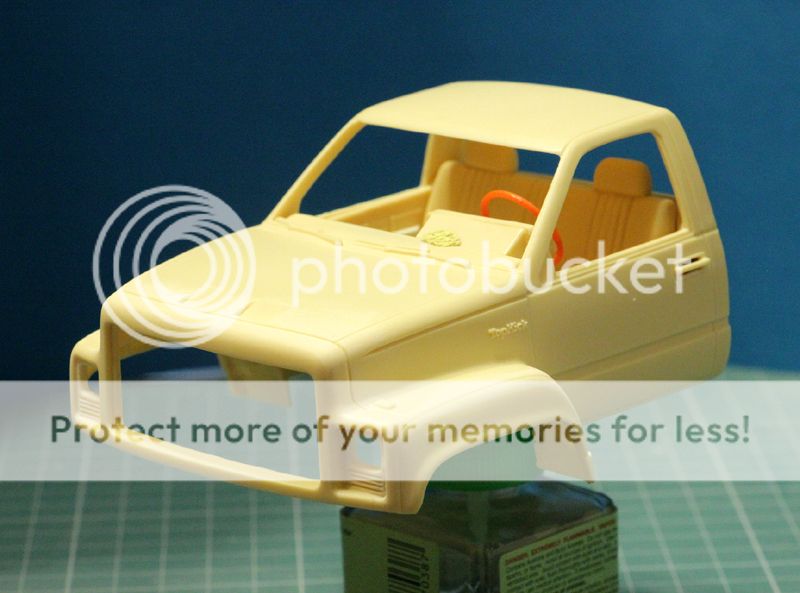  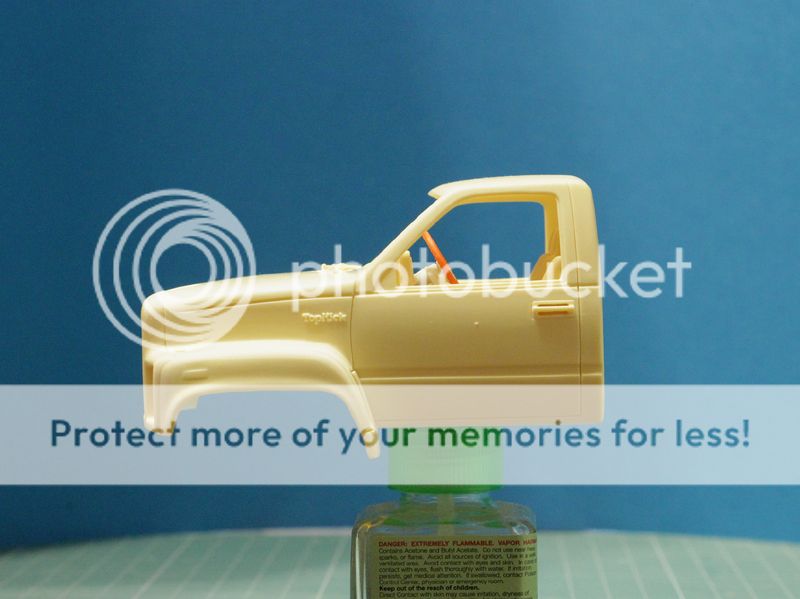
__________________
"Precious and fragile things Needs special handling.."
|
|
|
|
|
|
12-18-2018, 01:16 PM
|
#3 | |
|
AF Regular
Thread starter
Join Date: Feb 2009
Location: Moscow, Russia
Posts: 294
Thanks: 5
Thanked 14 Times in 14 Posts
|
Re: 90' GMC TopKick C7500-C8500
The more I work on TopKick cab, the more imperfection I found....
 Here we see, that the bottom of the back wall of the cab is not parallel to under grill bar. So the cab/hood is twisted slightly.  Here are headlight windows was depressed on hood corners. Stock state on the left. Now let's make a frame. I tried CNC-milled frame from KFS.  There are nice cross members in a kit, though it is hard to glue bottom and upper strips to the main strip at once.... I think I must make a jig next time  There should be reinforcement abowe rear bogie. This was made of right angle and styrene. Perhaps I will change it a little. Try on.  The inside of the grill was treated with ceramic blade to open the holes. Here they are almost opened. The side columns of the grill shouldn't be opened on a real truck. That's why I used ceramic blade for accuracy.  Head light bezels was made of halves of 5 mm plastic tube and pieces of styrene by sides. Also I found head light lenses in my spares  I guess it's a resin copy of this Ford's face  The only probleme, that sikkens resin has tinted yellow in time. I will cast new one...  Here I used Italeri's steering axle + suspension, although steering link was altered.  Notice a piece of plastic between frame rail and front suspension bracket. Original Italeri frame has a radiator pocket this place.  Rear suspension is a copy of AMT's one. You can see different tubes to fix axles in suspension brackets.  Rear tyres are from Mo luminium. Bought some years before. I plan to use hubs from Mo luminium too.  Some semi result. It takes time to drill rear axle through.  It is temporary asembly. I think to shorten the frame by 9 mm to fit 14 ft. Dump body.  All I left to do is to make a dump body for fitting. Here I made a blank (I hope it correct word) from balsa wood to make wind screen. 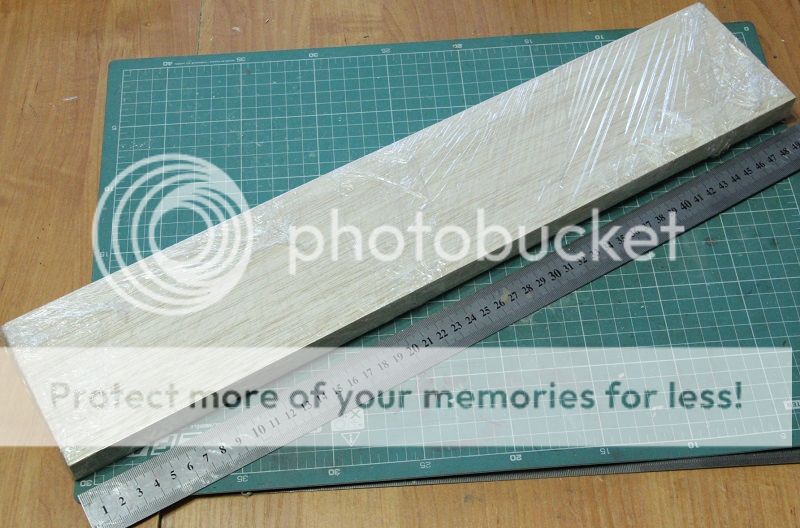 Steplered an acetate to frame 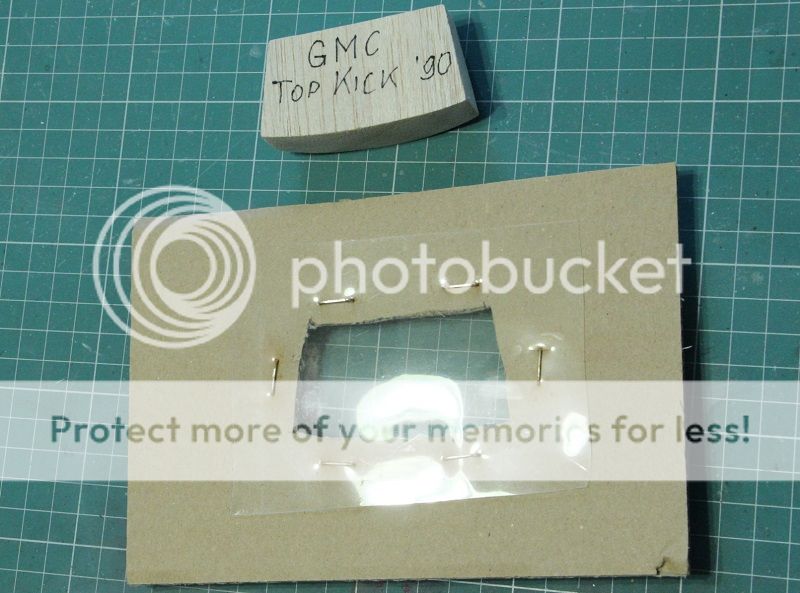 Warmed it over gas oven and cover a blank with acetate.  Unfortunatelly plactic goes covered with very small pimples. Acetate thickness is 0,1mm. 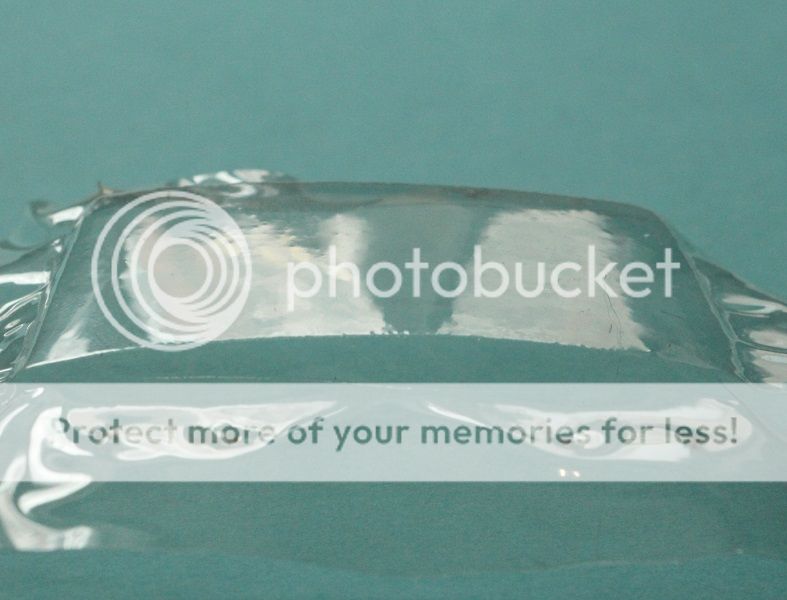 Why could it happen?
__________________
"Precious and fragile things Needs special handling.."
|
|
|
|
|
|
12-18-2018, 01:44 PM
|
#4 | |
|
AF Regular
Thread starter
Join Date: Feb 2009
Location: Moscow, Russia
Posts: 294
Thanks: 5
Thanked 14 Times in 14 Posts
|
Re: 90' GMC TopKick C7500-C8500
Finally I had a free day to open the box with TopKick parts. I didn't build 3 months, but I have something to show:
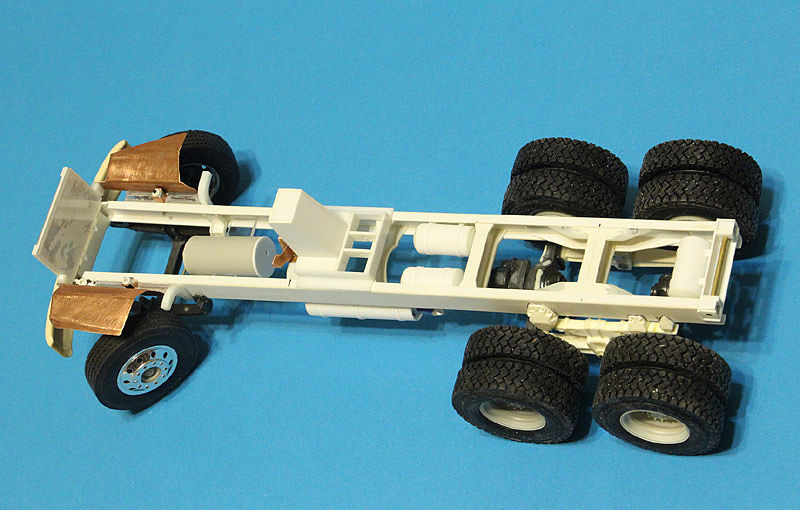
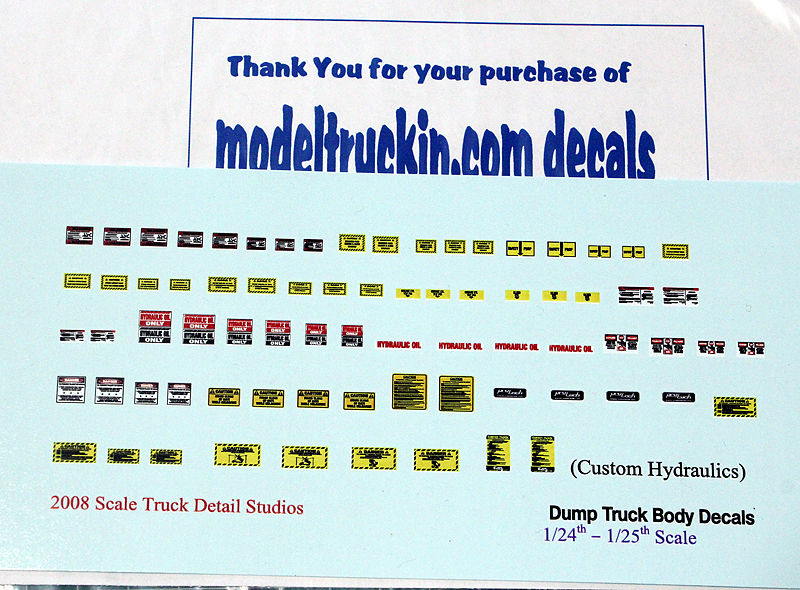 I have bought dump truck decals at ModelTrucking 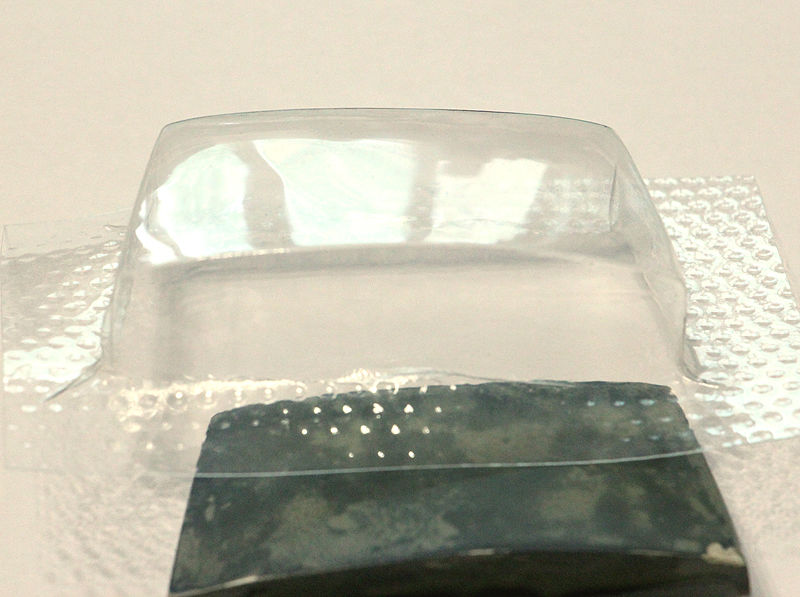 Also Oleg Malakhov helped me to vacuum form new wind shield! 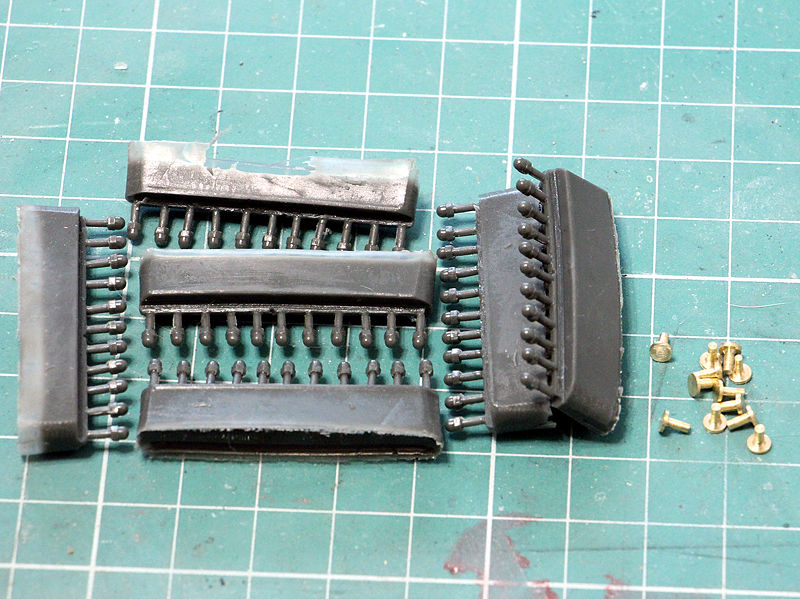 Some wheel nuts and rear suspension pins (if it correct term). I will show latter what it for. 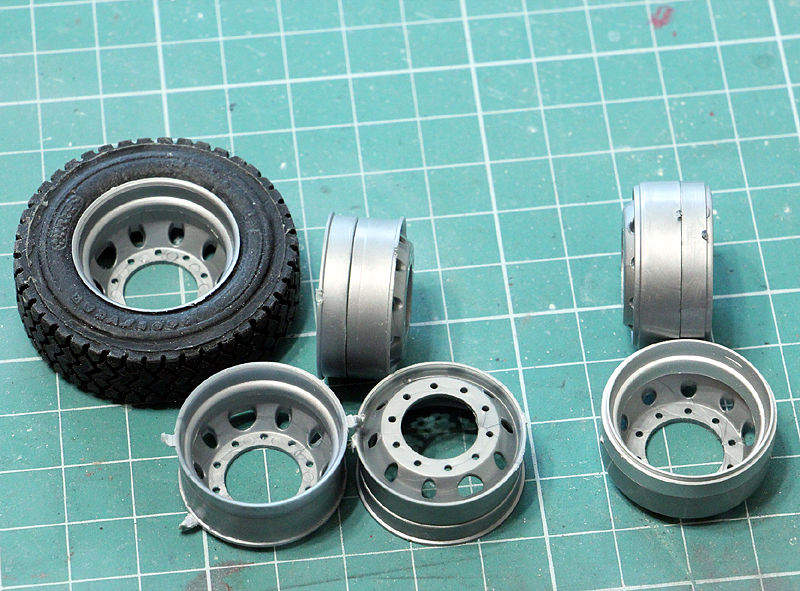 I've found 4 spare disks in my spares for drive wheels. 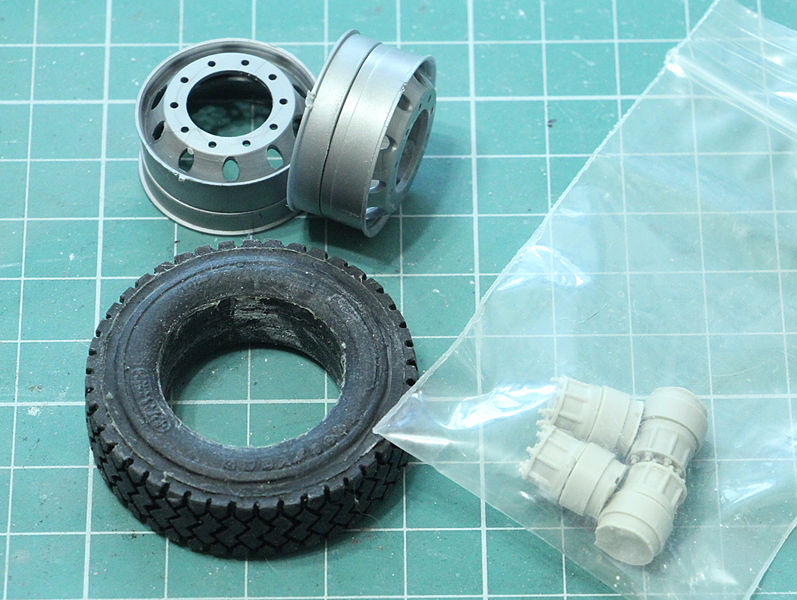 Here are MoLuminium hubs, that I will use, BUT.... 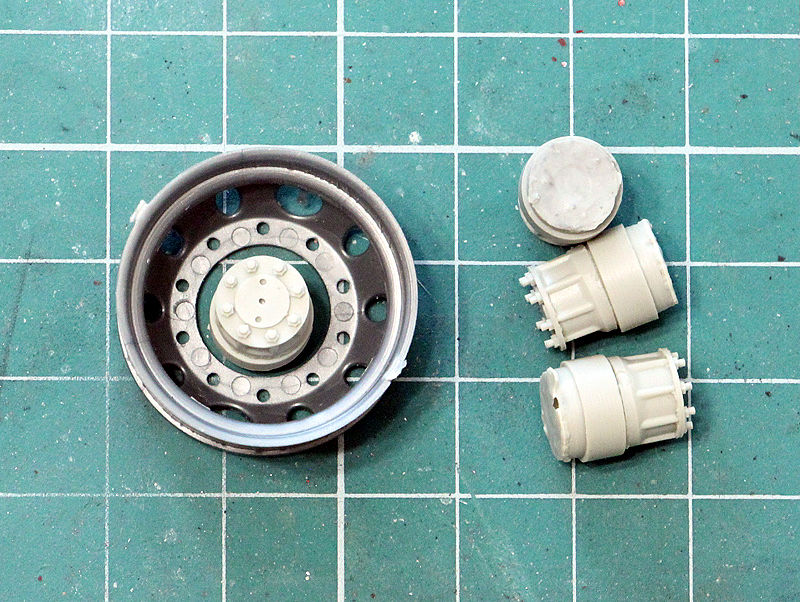 ...they are smaller, then disk holes. I should punch some rings from styrene. 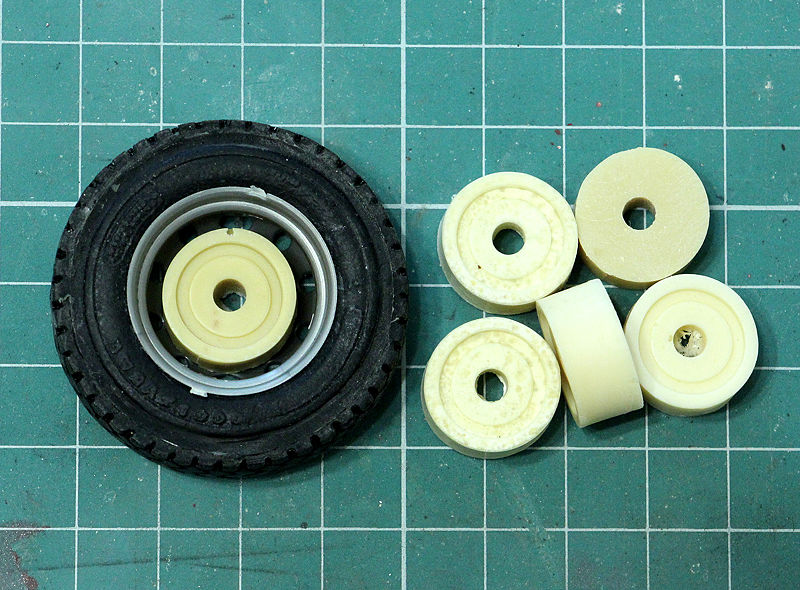 Some brake drums. 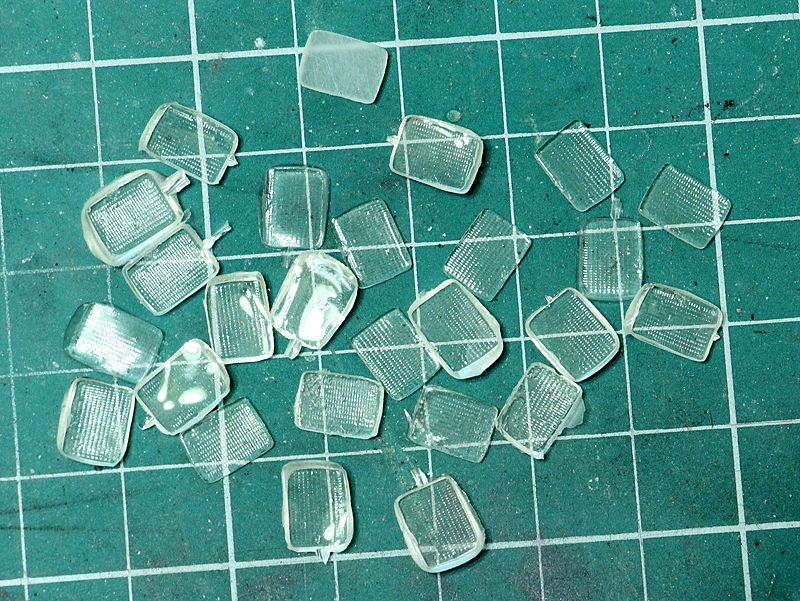 Here I made clear headlight lenses. I used moulding compaund & resin like these: 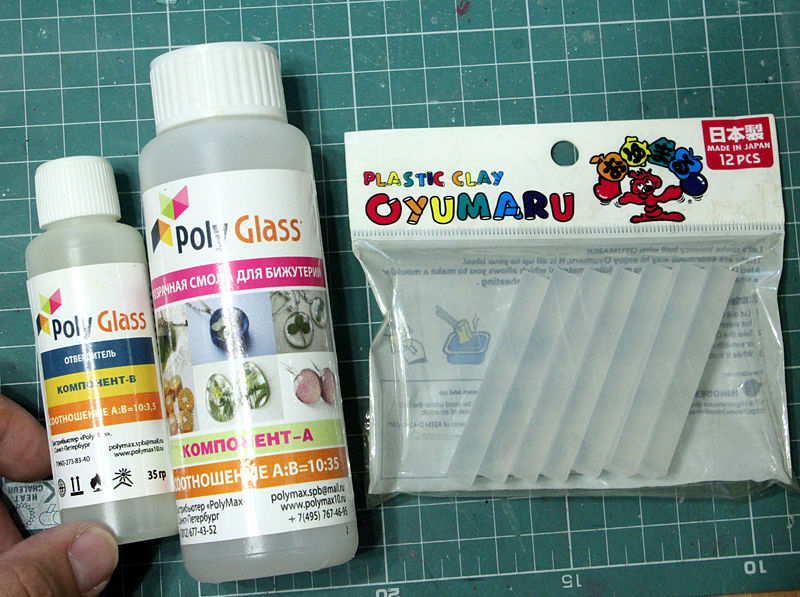 Here is my efort to make working rear suspension. And tools I used. 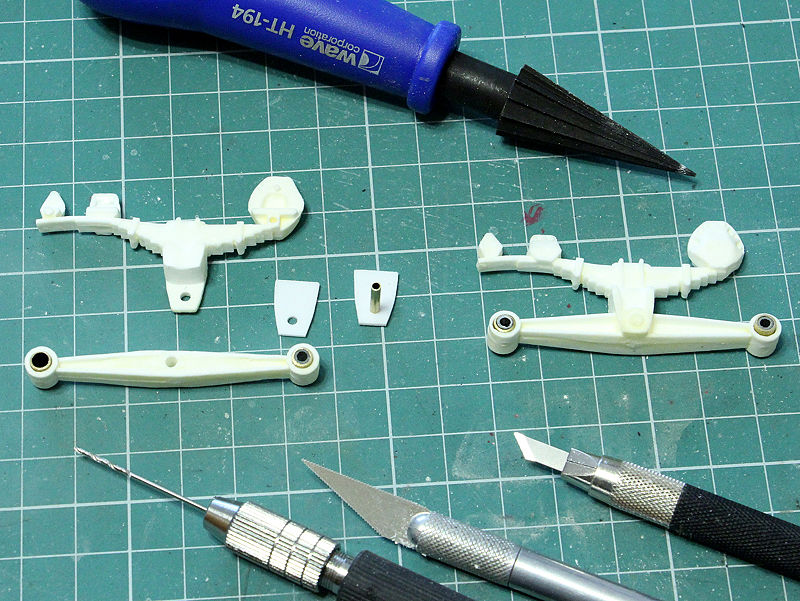 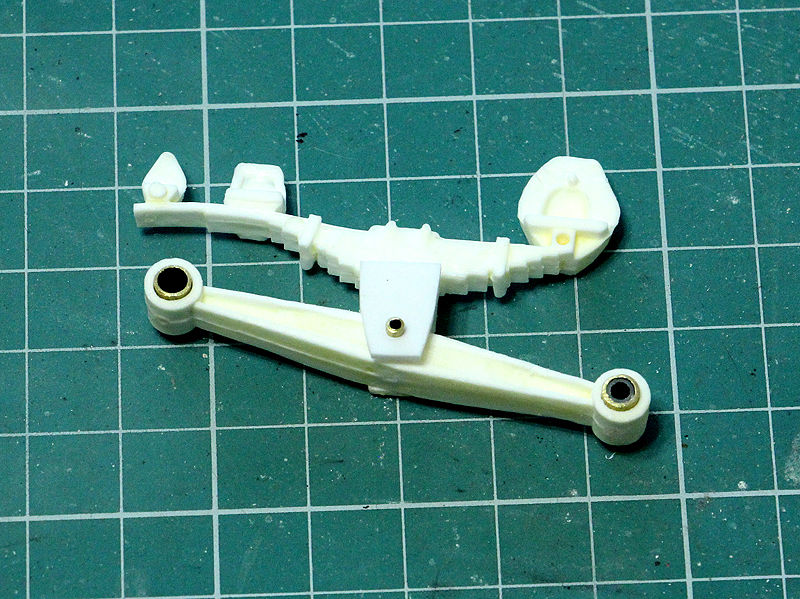 Inner part of saddle is made, using existing one as a patern.  I will use "suspension pins" to fix everithing moving. 6 pieces on the left spring & 6 - on the right.  A little more progress. Scratchbuilt front cross members and finally asembled the frame. 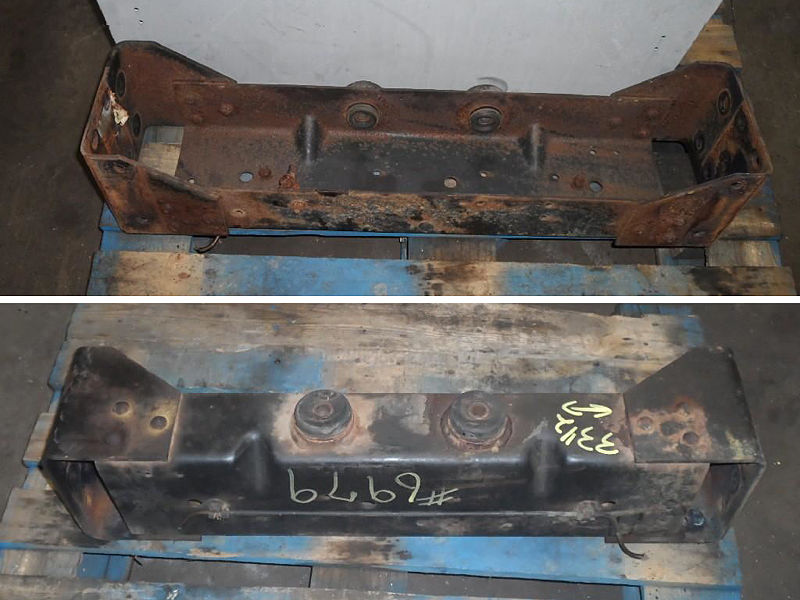 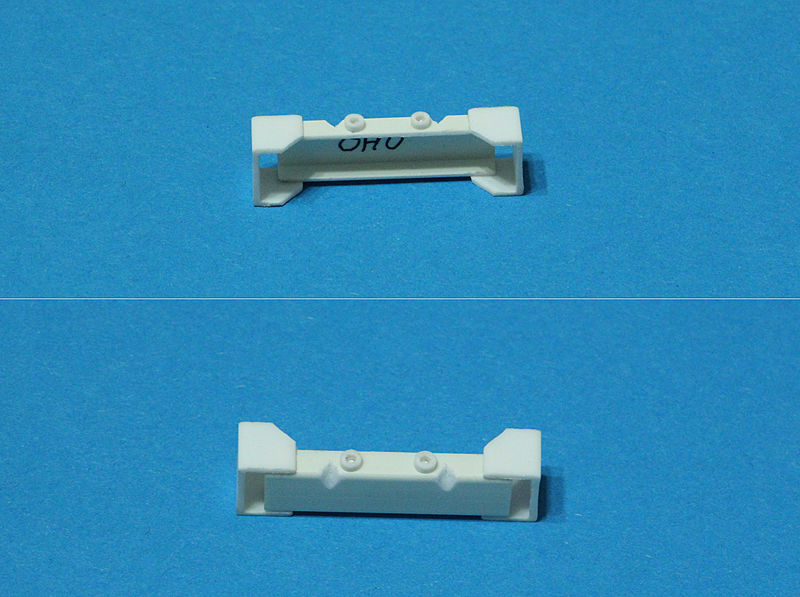      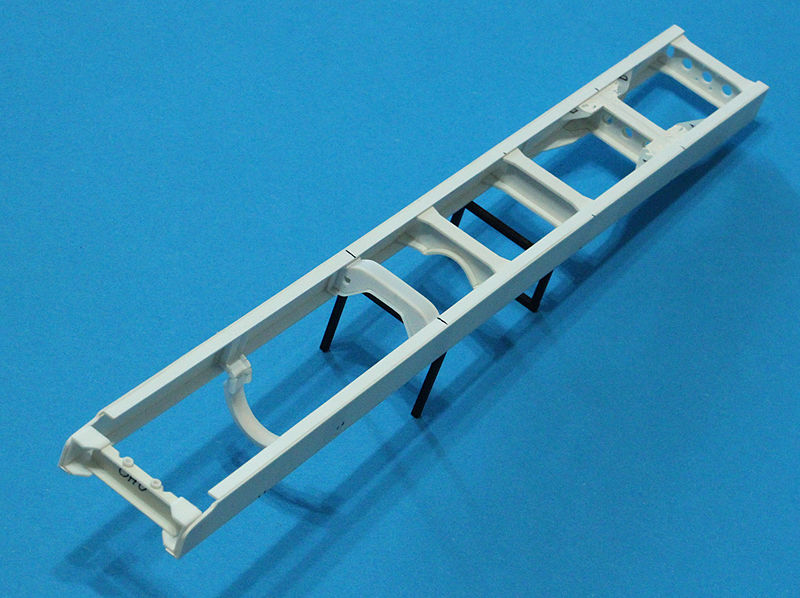  Couple more photos of built rear bogie 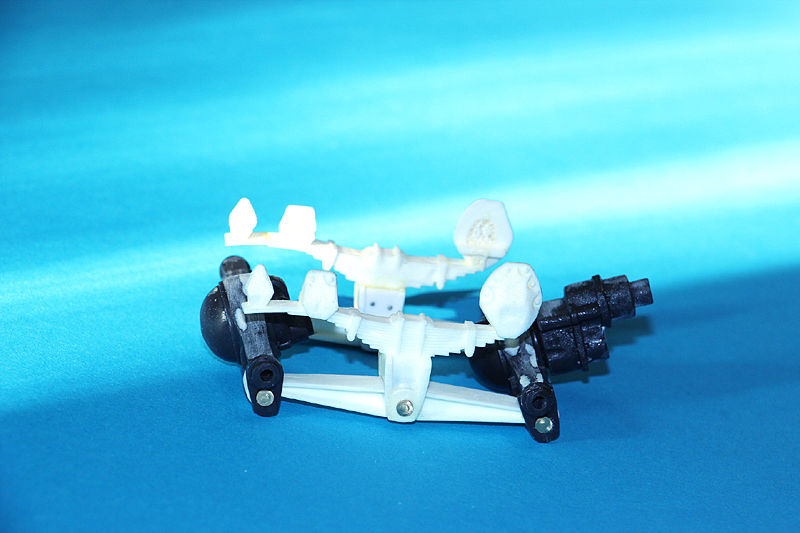 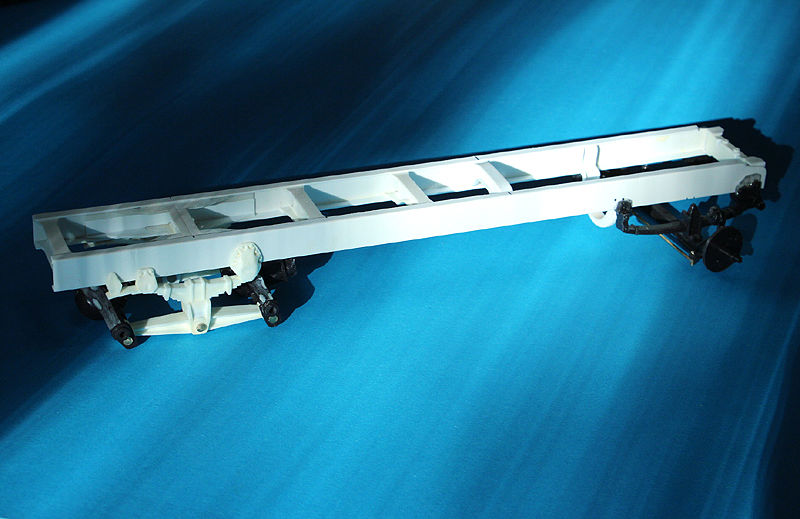
__________________
"Precious and fragile things Needs special handling.."
|
|
|
|
|
|
12-18-2018, 01:52 PM
|
#5 | |
|
AF Regular
Thread starter
Join Date: Feb 2009
Location: Moscow, Russia
Posts: 294
Thanks: 5
Thanked 14 Times in 14 Posts
|
Re: 90' GMC TopKick C7500-C8500
A very small update. Just a little one:
Made up front shock absorbers 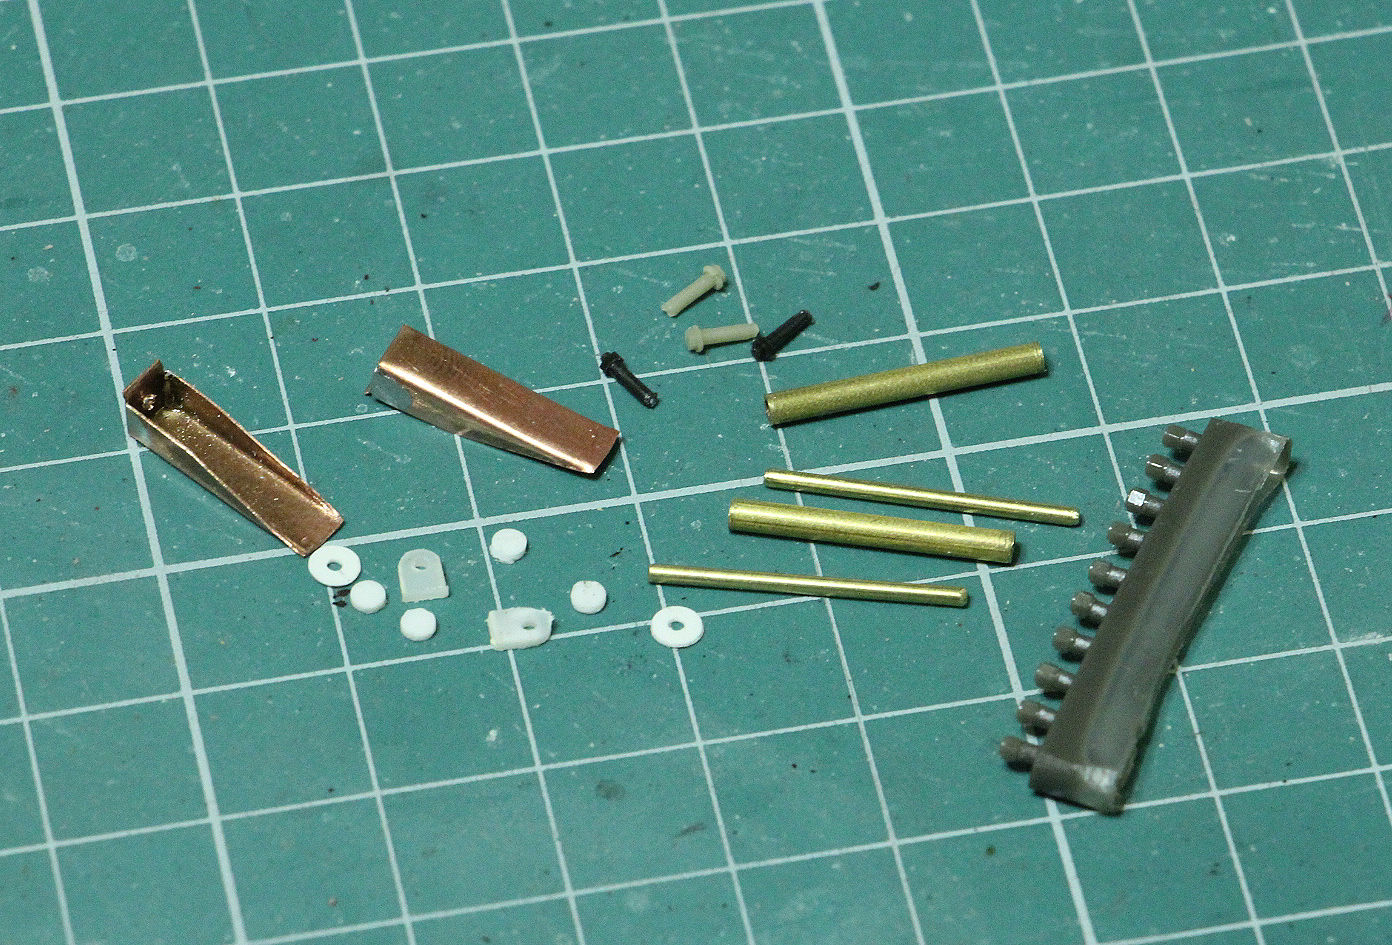  Here I cut out front hubs from Italery's wheels. I used 0,2mm Line chisel from Creos. 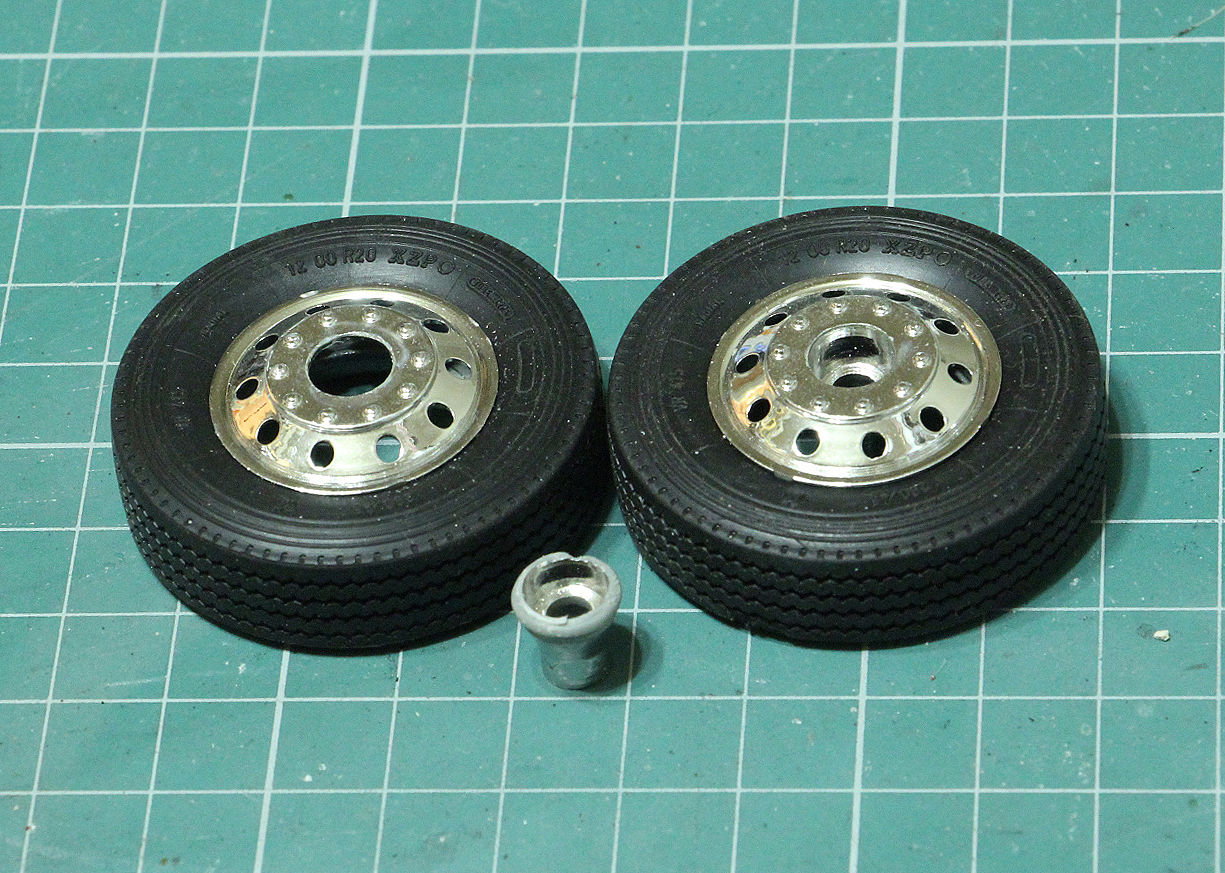 A little update with the wheels. I have bought couple wheel sets at Jamie  This is trailer set, but I will use them for rear bogie. Jamie's Rear tyres, I bought several years before at Sourcraut, turn out 1mm wider than discs. Modern Jamie's tyres are narrower. 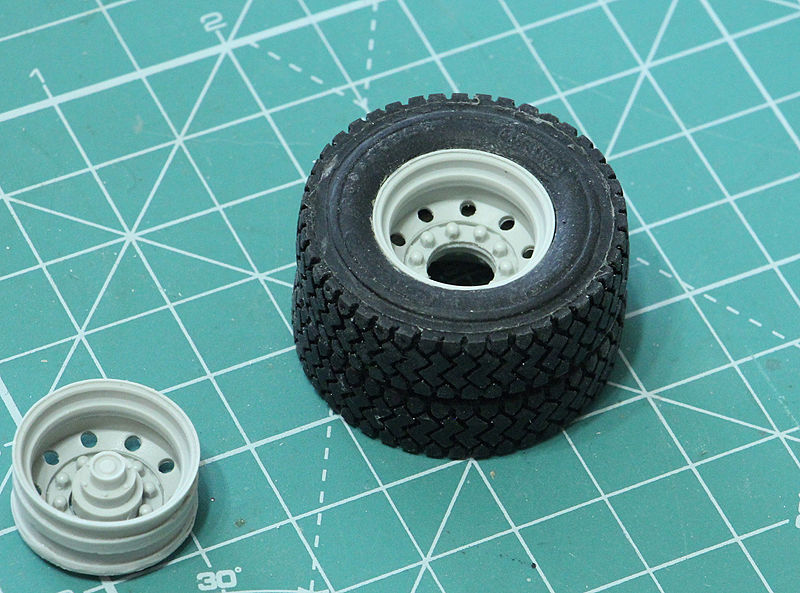 And there is no gap between rear wheels. Iguess I should make 1mm spacer from styrene. 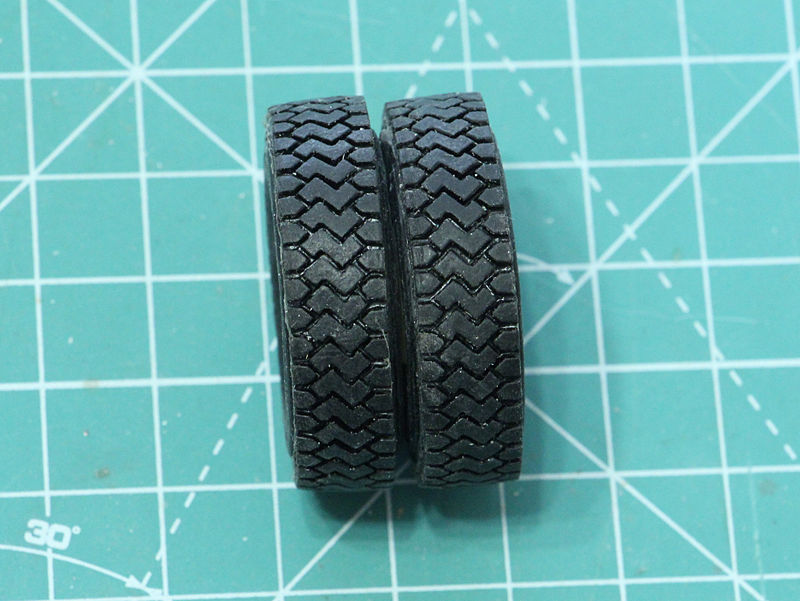 Slightly increased the center hole on the front Italery's disc 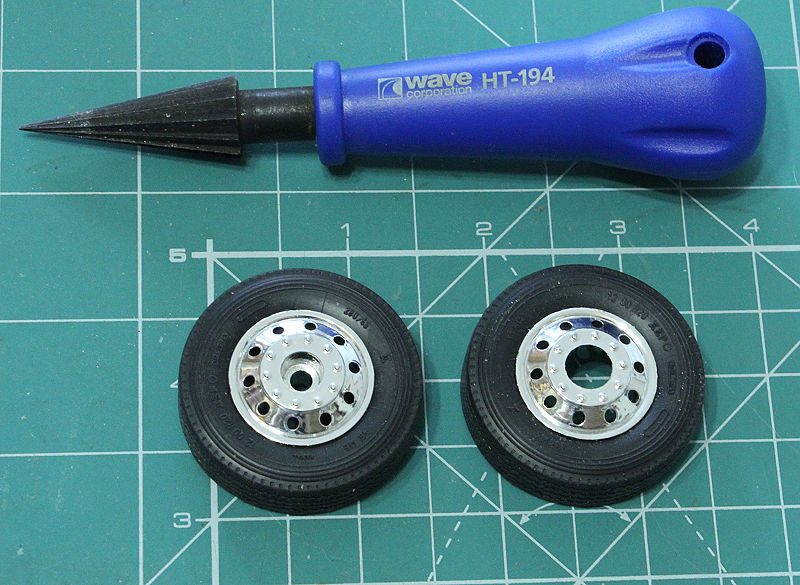 Yeah, the second set of wheels had a couple extra front hubs. 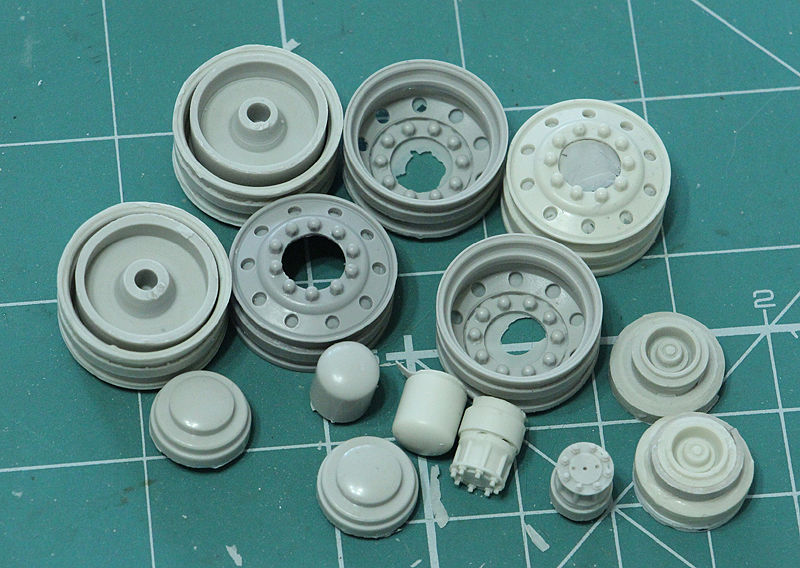 ...BUT somehow, let's call it the mating plane (marked with arrow) is very narrow and the width of the brake drum - the same 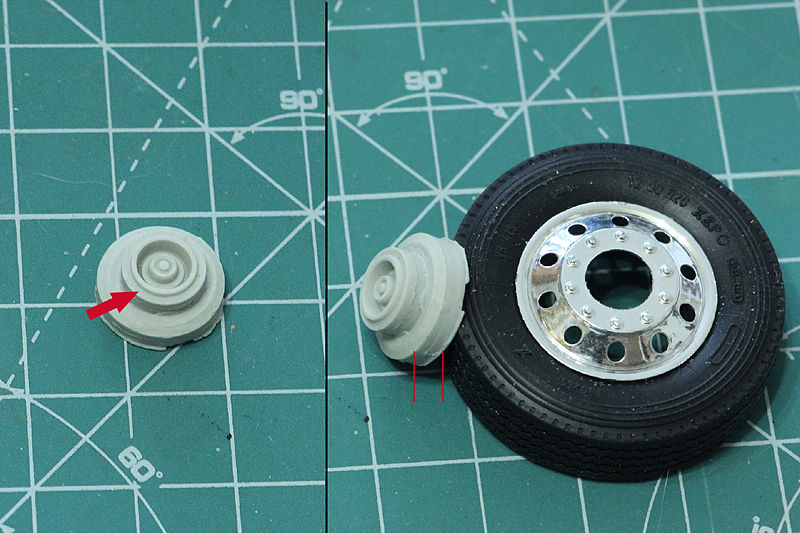 And if the second thing was treated with cut down spacers of 1mm polystyrene, then the first needed a piece of tube with 12-14mm diametr. I had to cut a piece out of a 16mm tube. 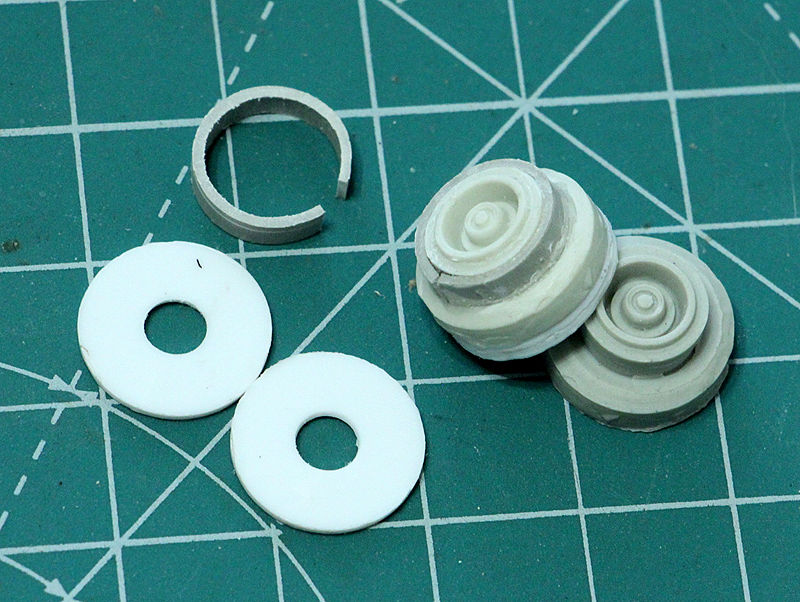 Here is how it looks like. 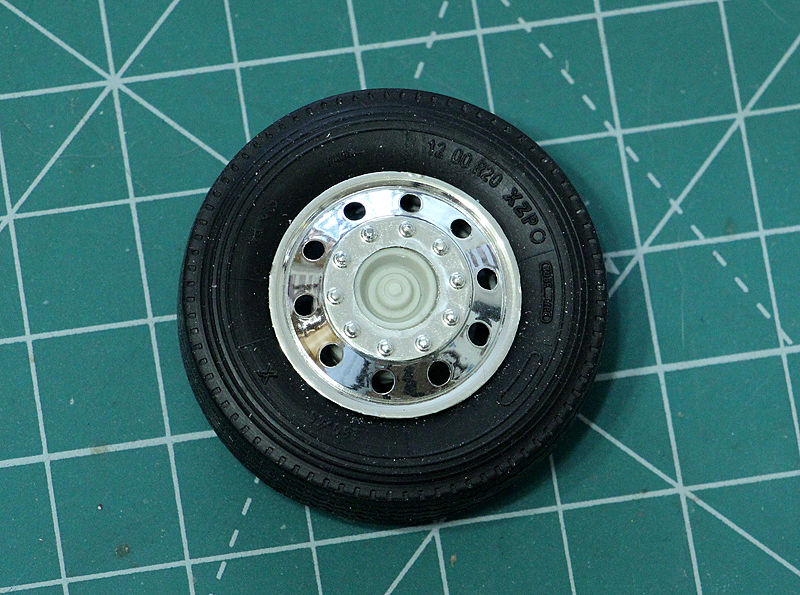
__________________
"Precious and fragile things Needs special handling.."
|
|
|
|
|
|
12-18-2018, 02:00 PM
|
#6 | |
|
AF Regular
Thread starter
Join Date: Feb 2009
Location: Moscow, Russia
Posts: 294
Thanks: 5
Thanked 14 Times in 14 Posts
|
Re: 90' GMC TopKick C7500-C8500
Let's go!
Here are cardan shaft, break chambers and I guess I can call it reactive bar: 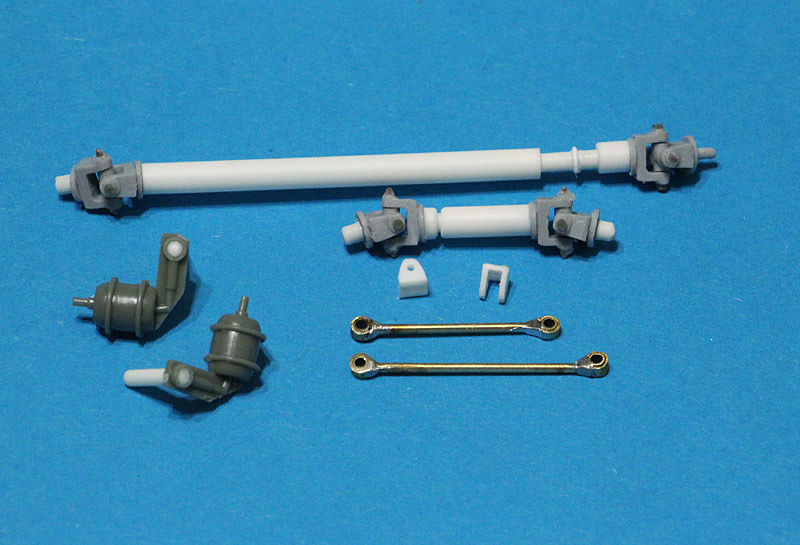 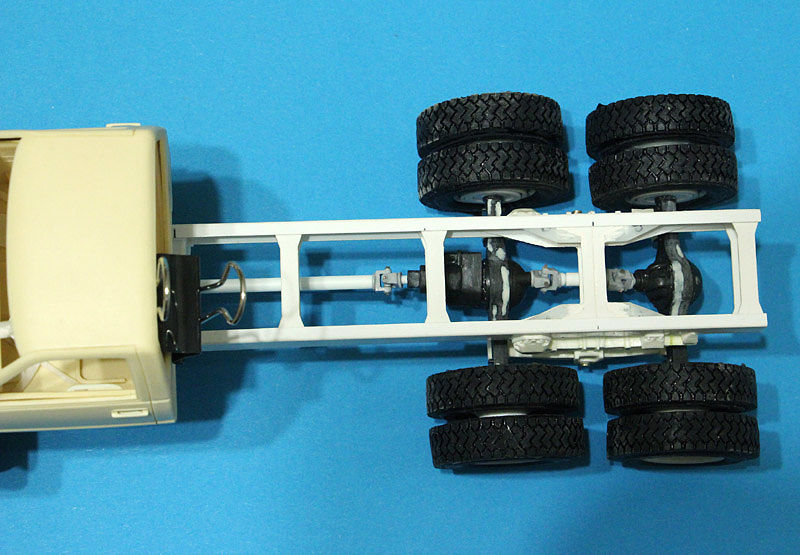 Common view 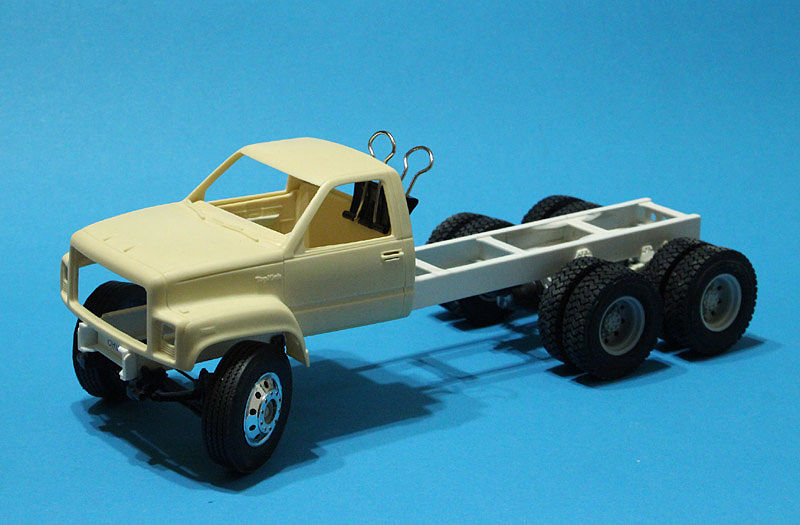 All, except front springs, glued with Craft bond 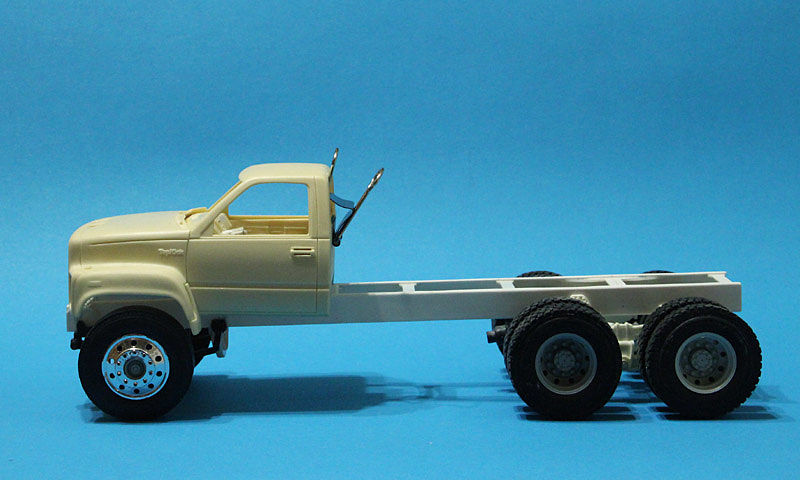 Radiator of the real thing 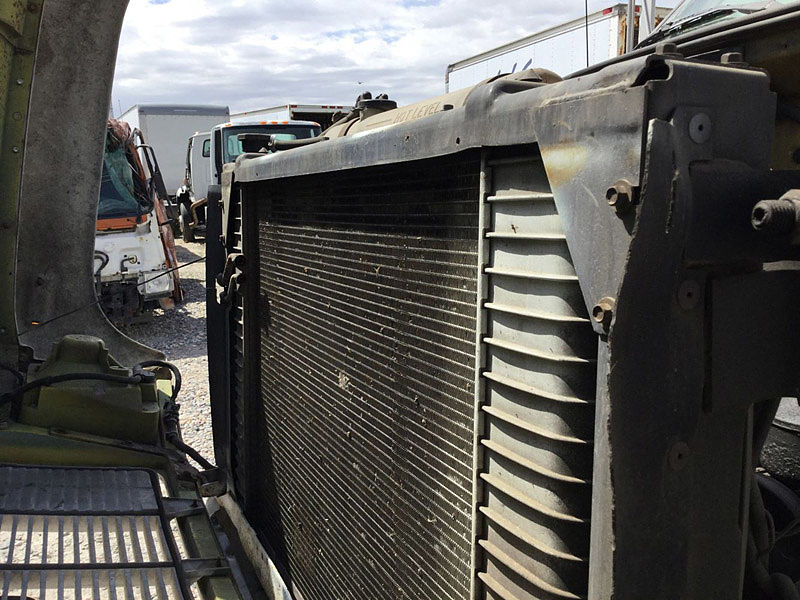 And my version  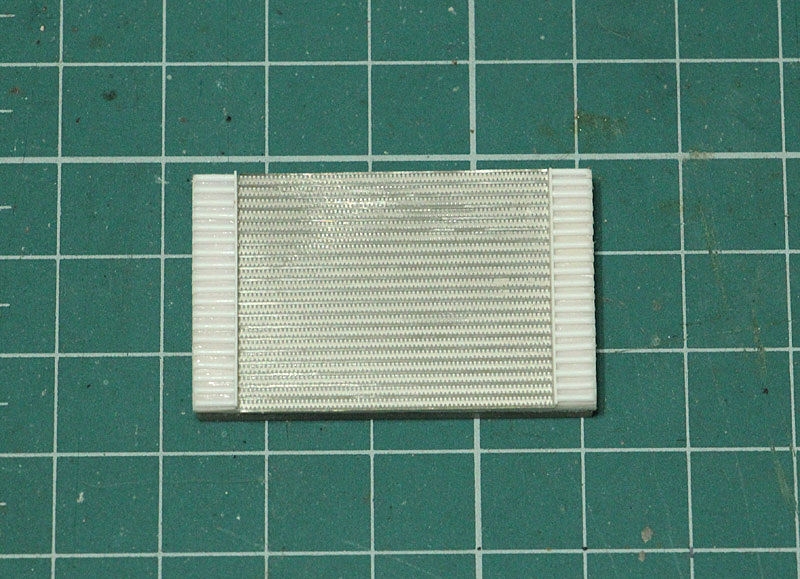 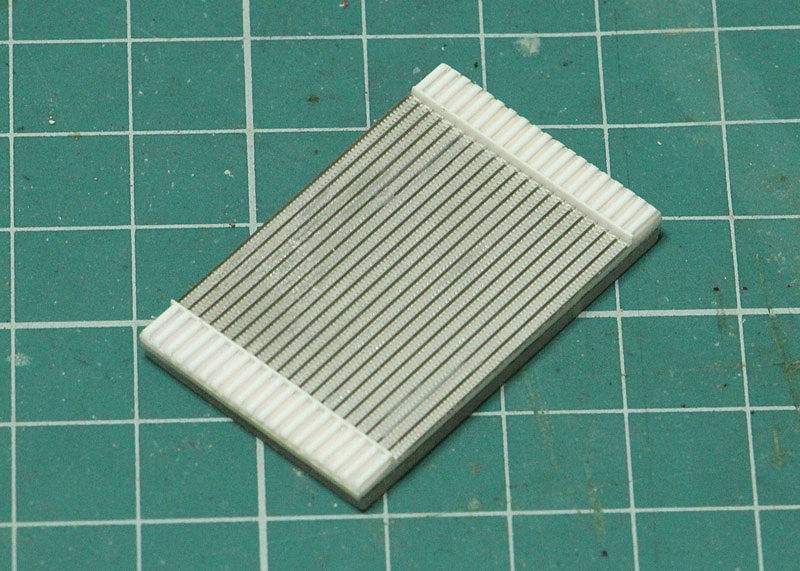 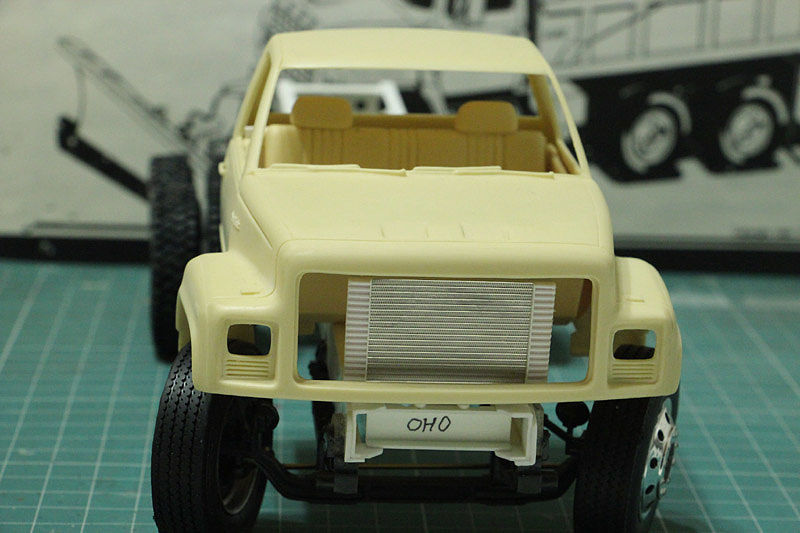 About rear whells spacers: they were made and instaled  I've took some time to make sun visors and wind shild holders (marked with arrows) 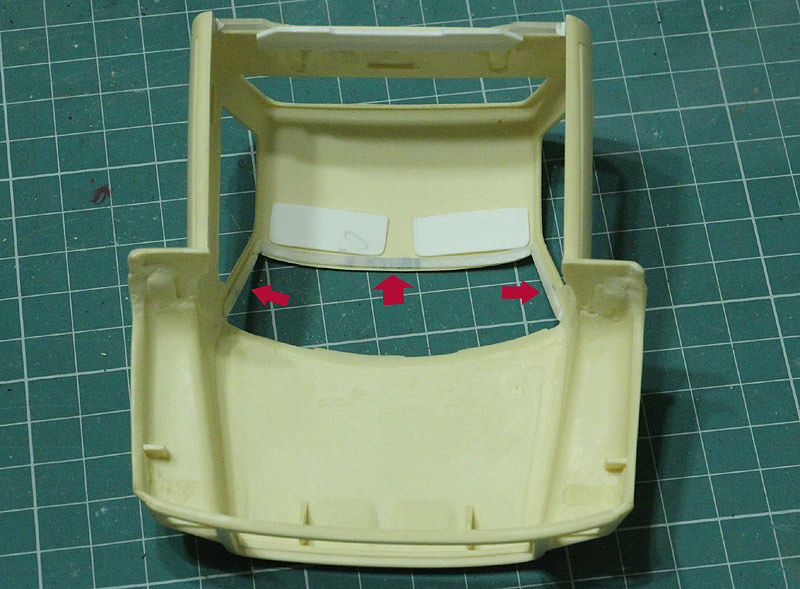 Some pattern parts to make power steering  Vu-A-la! 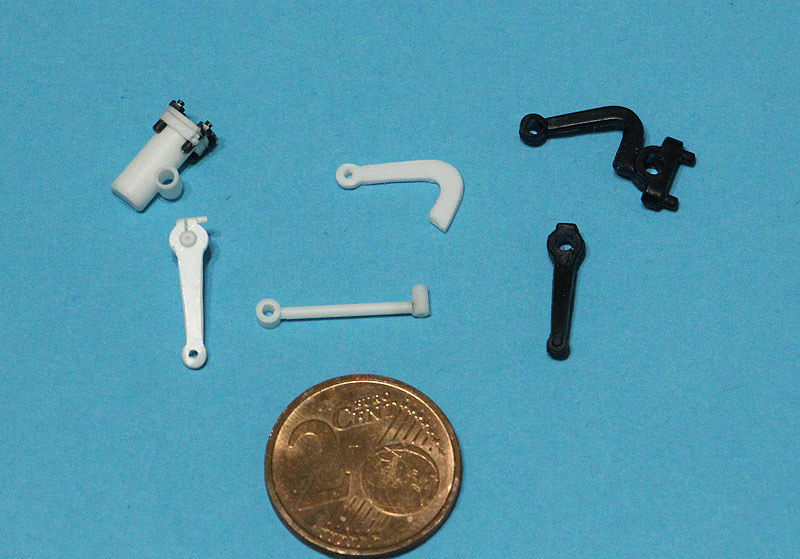 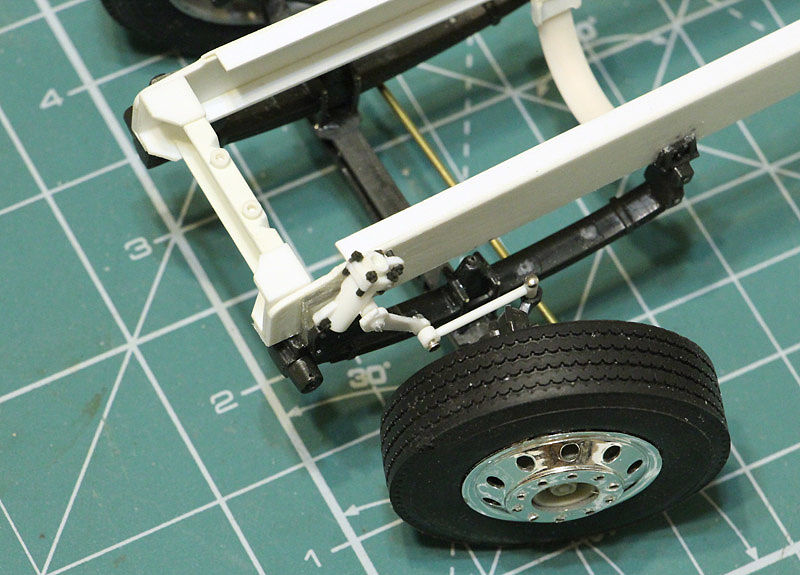 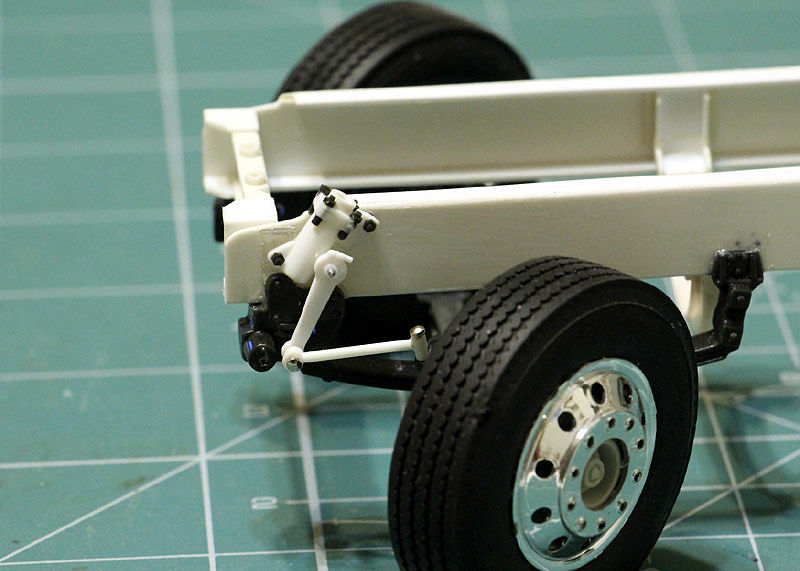 Late models of TopKicks has front mudgards: 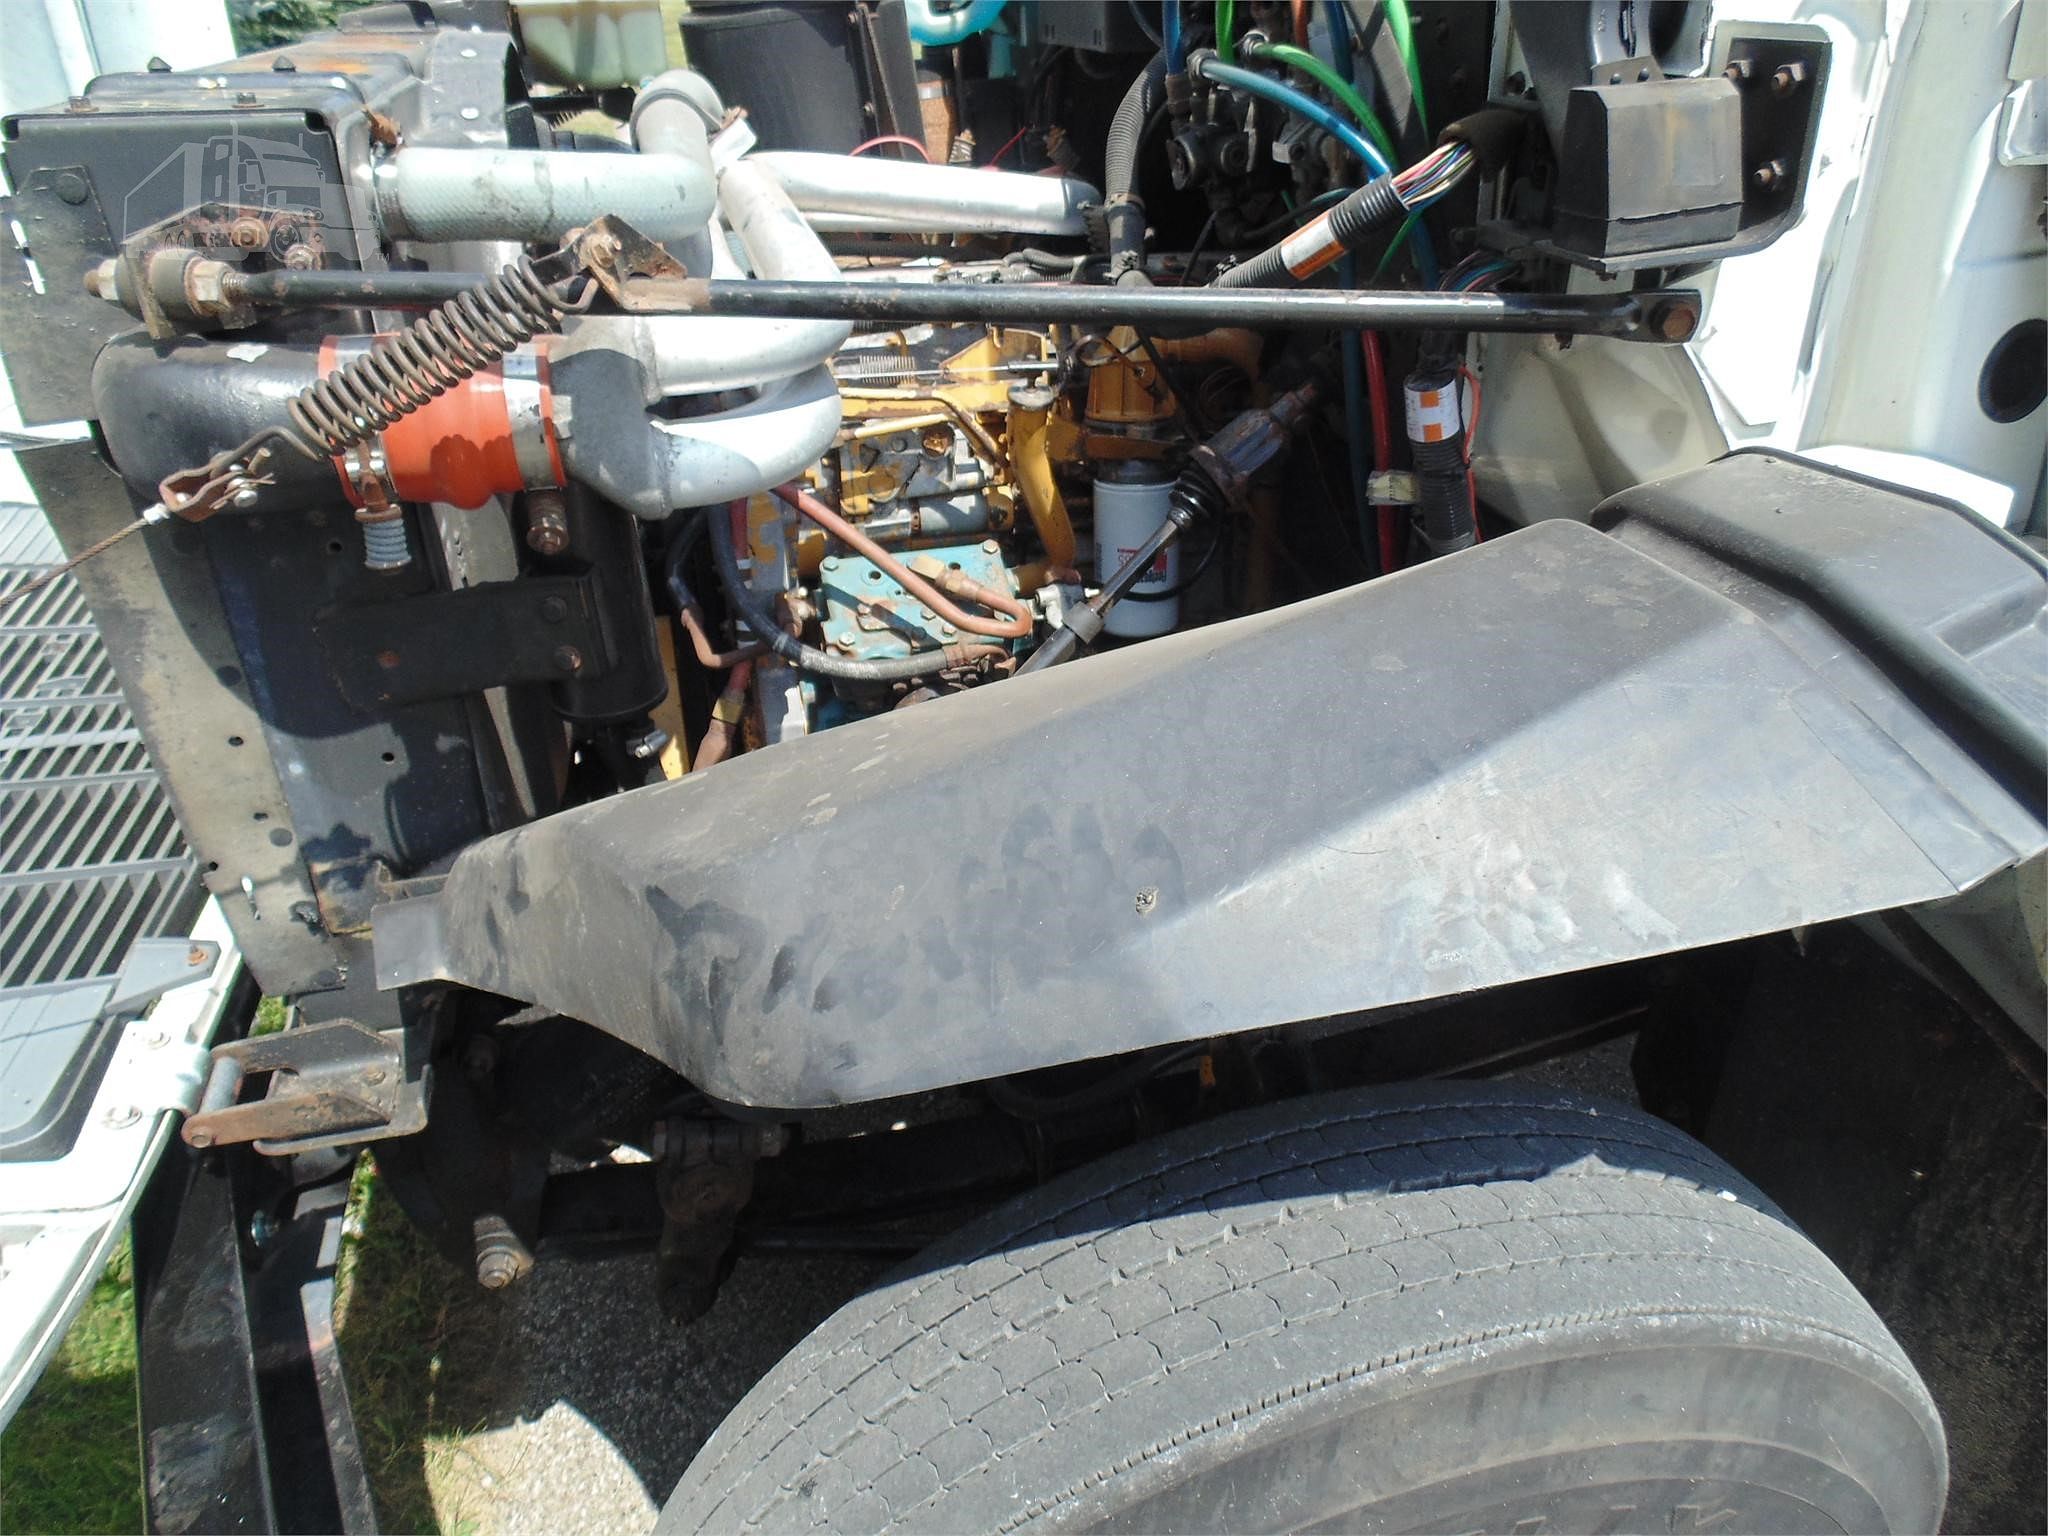 I desided to create one, but before - some origamy 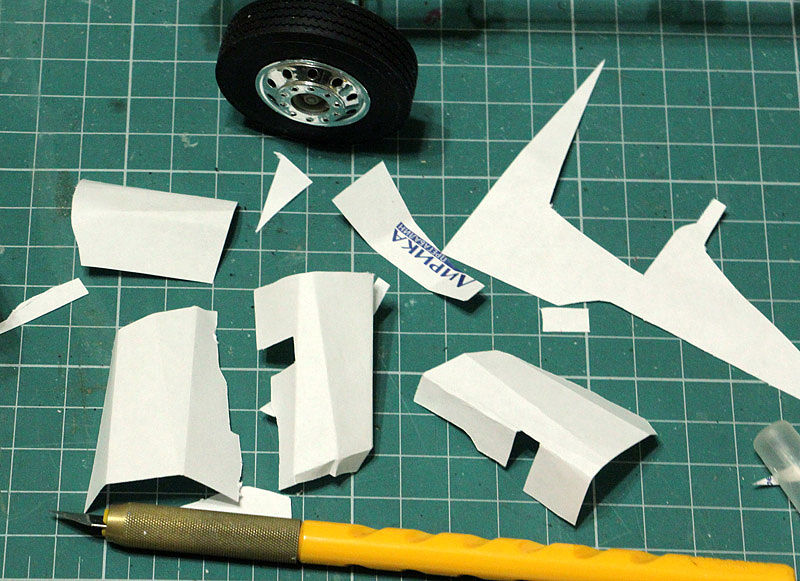 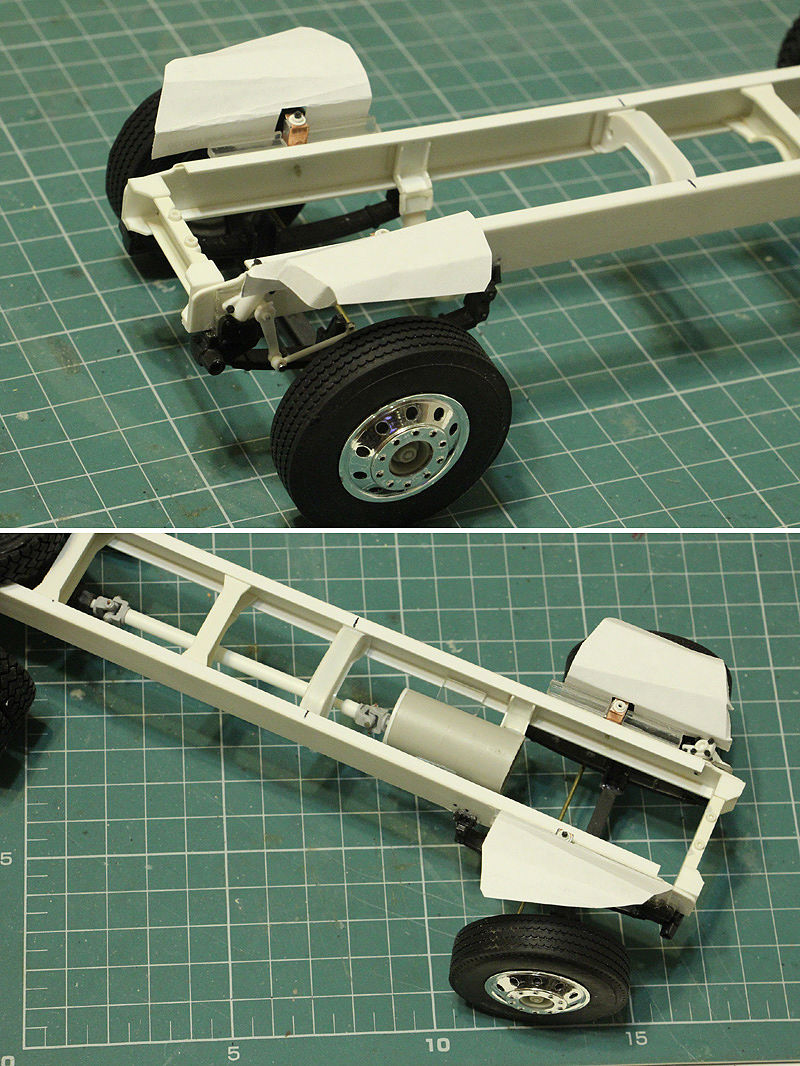 Then mudgards were solfered from sheet cooper 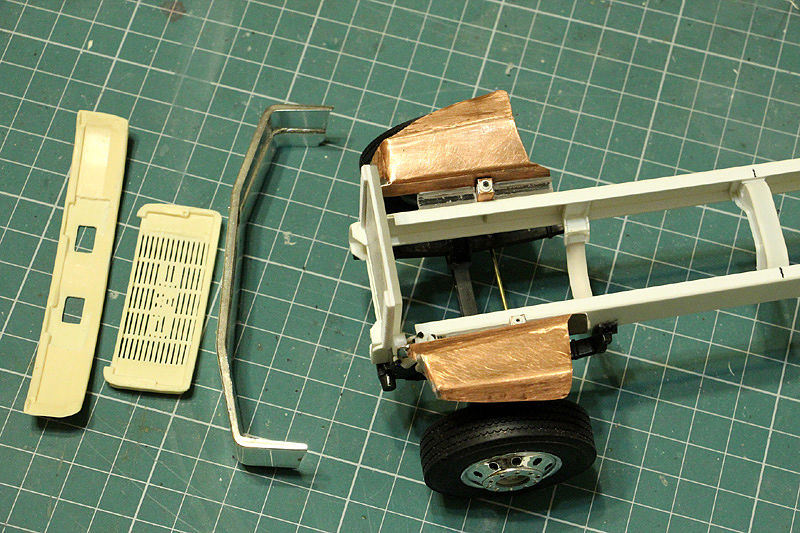 Delited some excess resin from bumper brackets side 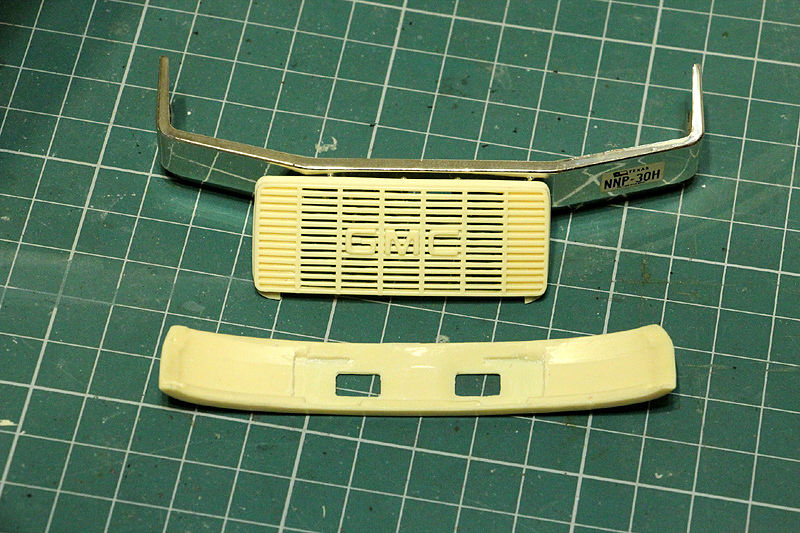 Rear cab bracket parts 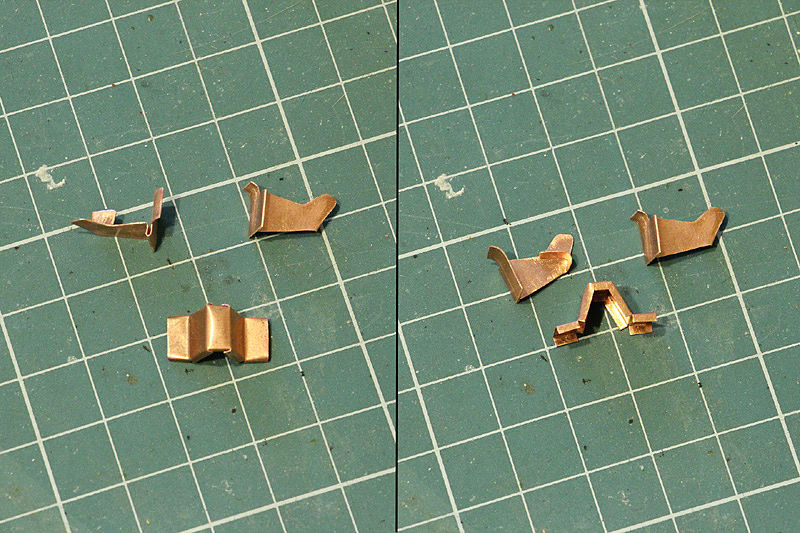 Soldered rear bracket plus bended plastic rod for front cab bracket 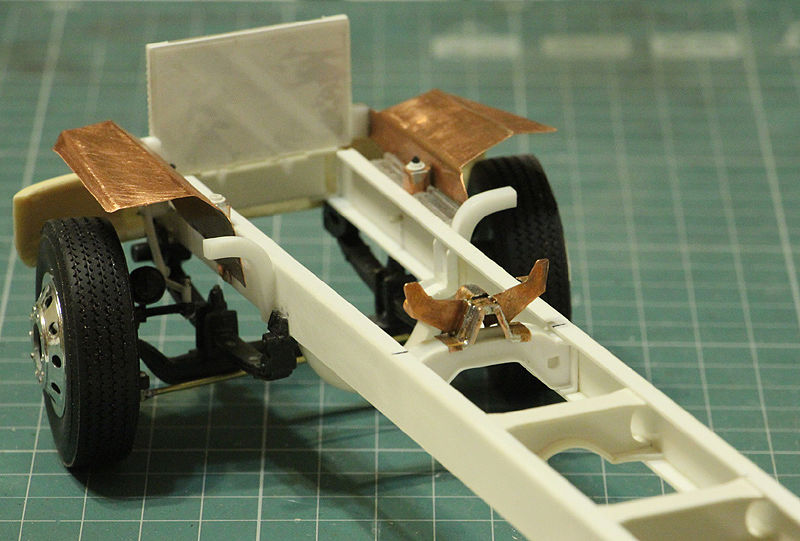  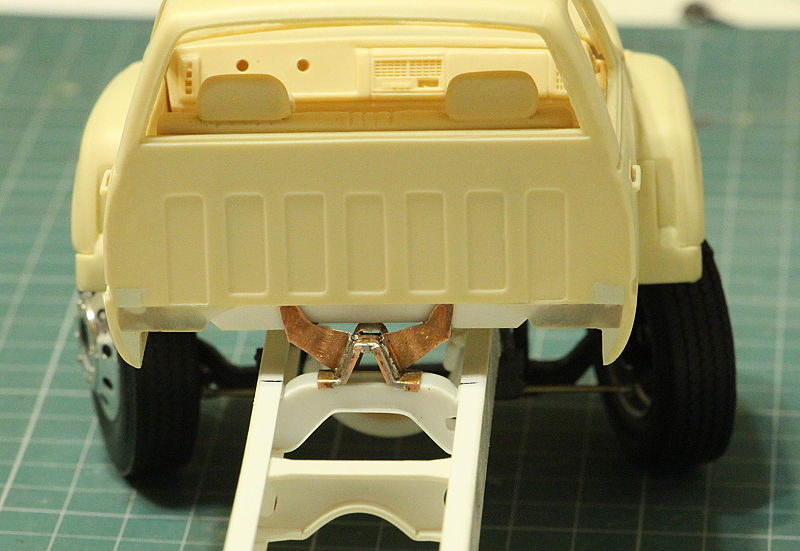 I satisfied now with cab position  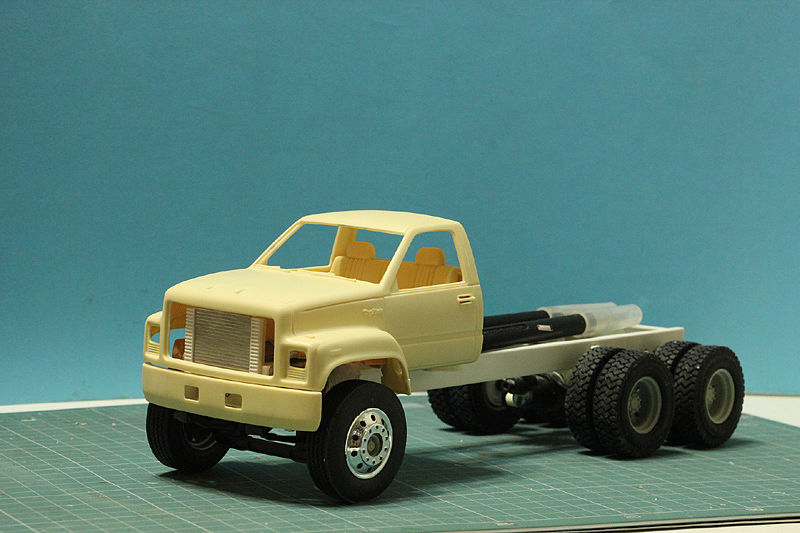 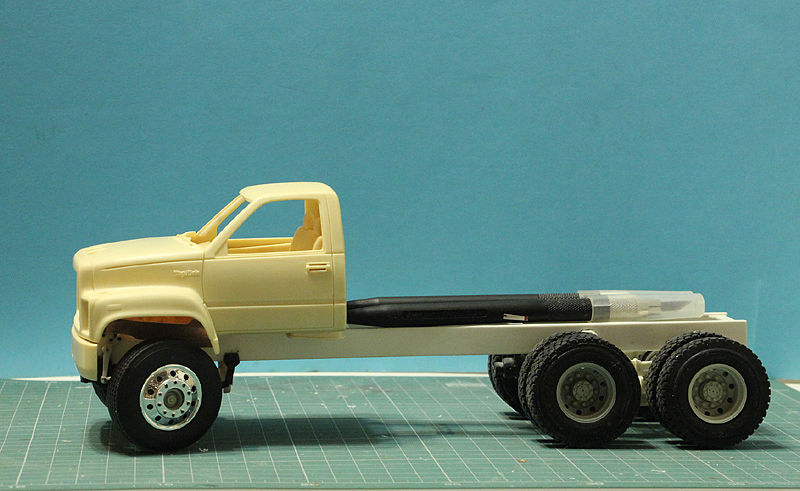 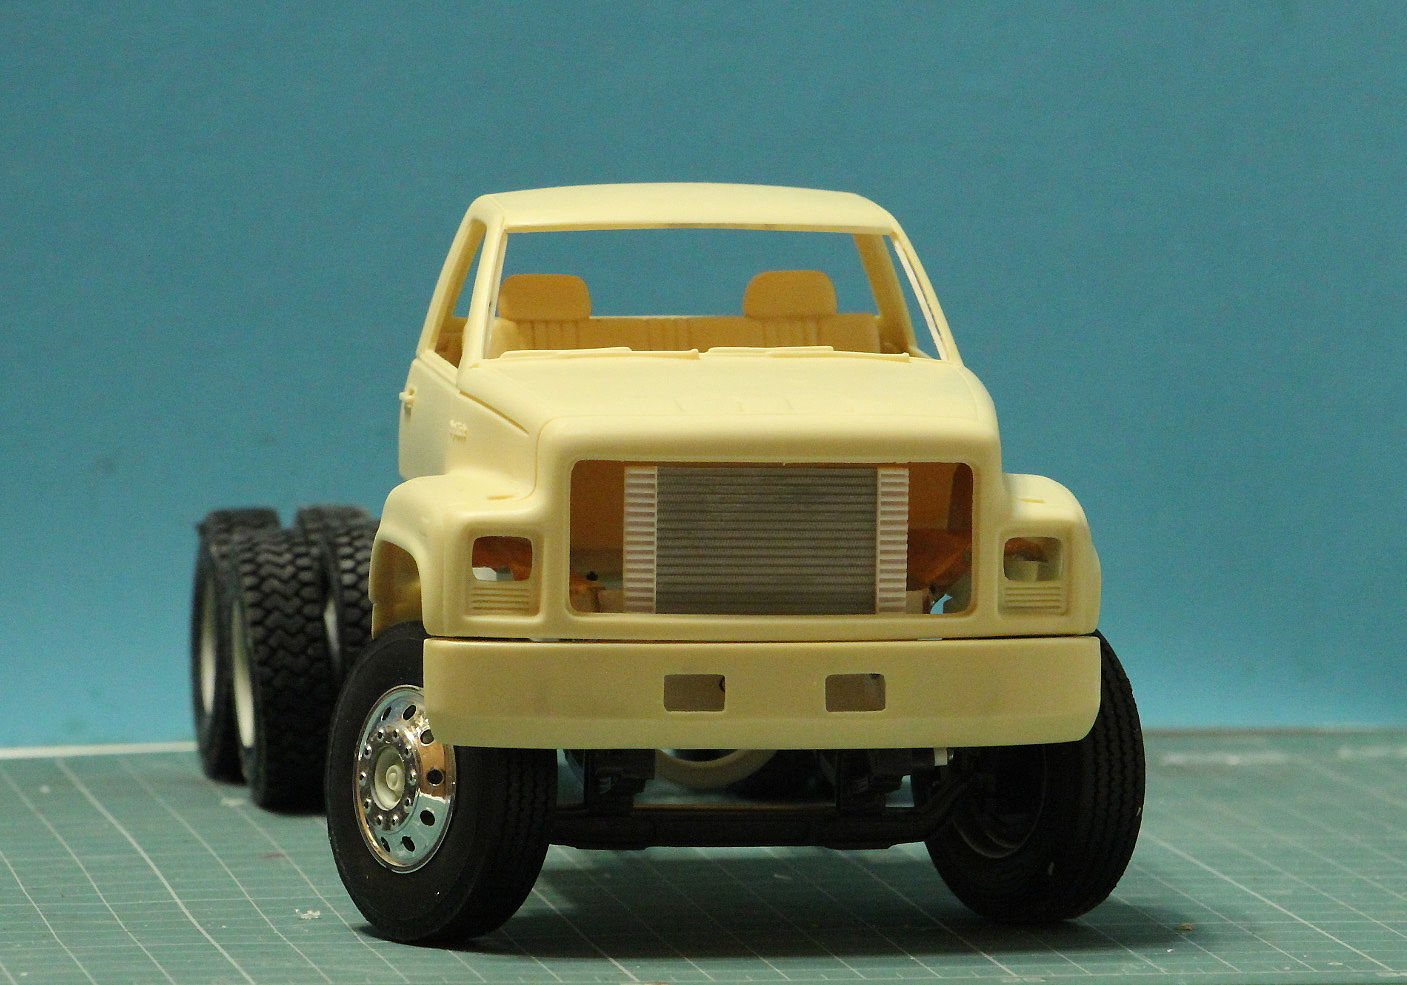 Time to make damp bed
__________________
"Precious and fragile things Needs special handling.."
|
|
|
|
|
|
12-20-2018, 02:30 PM
|
#7 | |
|
AF Moderator
 
Join Date: Sep 2002
Location: Fort Worth, Texas
Posts: 3,246
Thanks: 31
Thanked 314 Times in 241 Posts
|
Re: 90' GMC TopKick C7500-C8500
Wow. Lots of really cool stuff here. Tremendous scratchbuilding skills!
__________________
The client is not always right. - Enzo Ferrari ItalianHorses.net    
|
|
|
|
|
|
12-20-2018, 03:47 PM
|
#8 | |
|
AF Regular
Thread starter
Join Date: Feb 2009
Location: Moscow, Russia
Posts: 294
Thanks: 5
Thanked 14 Times in 14 Posts
|
Re: 90' GMC TopKick C7500-C8500
Thank you, Alex!
Your praise is the best prize.
__________________
"Precious and fragile things Needs special handling.."
|
|
|
|
|
|
12-25-2018, 12:51 PM
|
#9 | |
|
AF Regular
Thread starter
Join Date: Feb 2009
Location: Moscow, Russia
Posts: 294
Thanks: 5
Thanked 14 Times in 14 Posts
|
Re: 90' GMC TopKick C7500-C8500
Some dump bed work
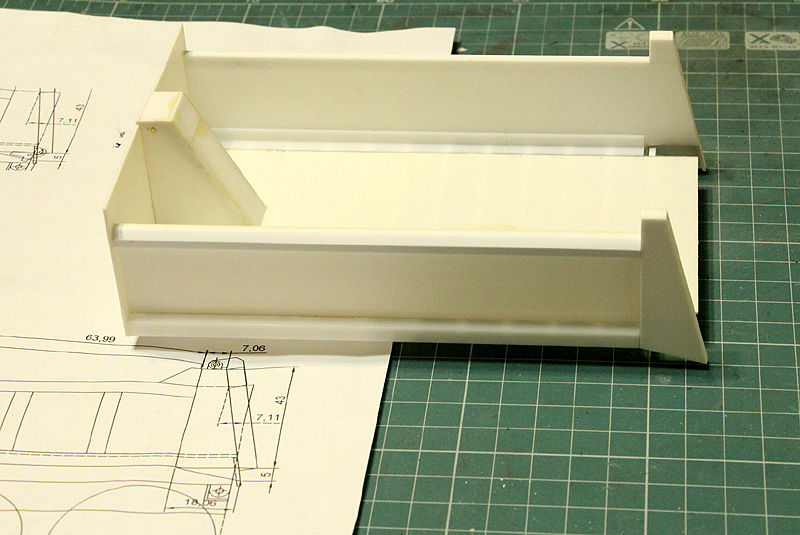
But first - paper mockup: 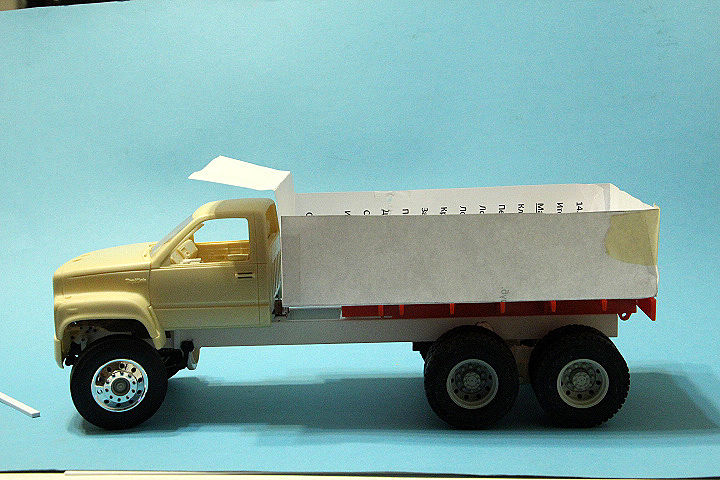 sloping end I liked more 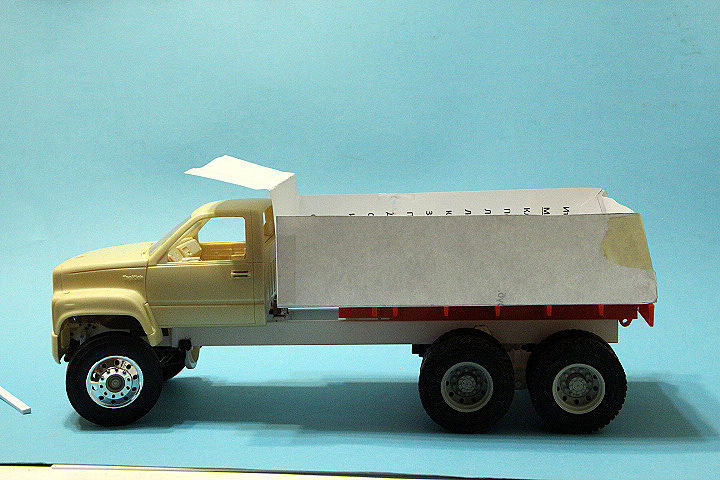 Skeleton 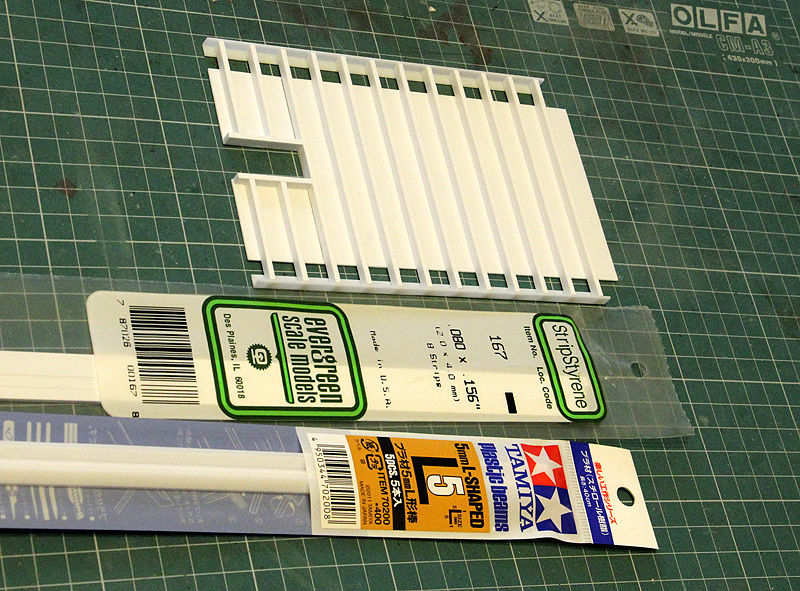 By the way, I note - hydraulic ram house on paper mockup turn out too small  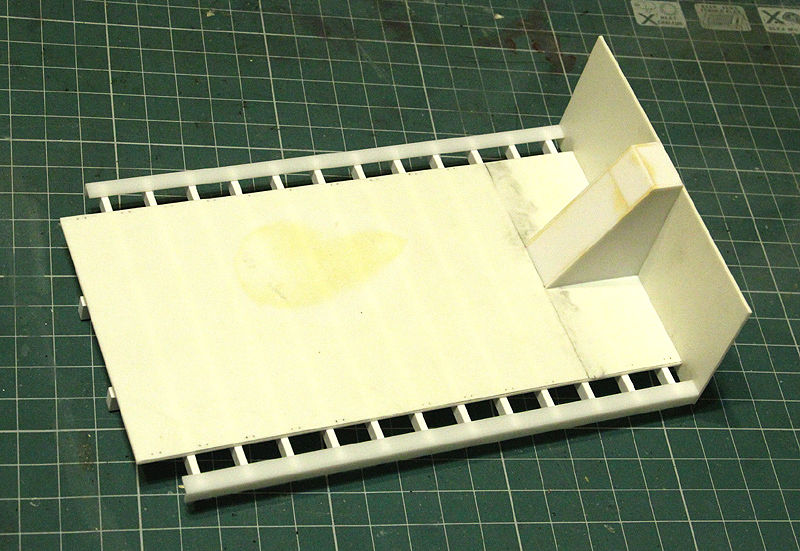 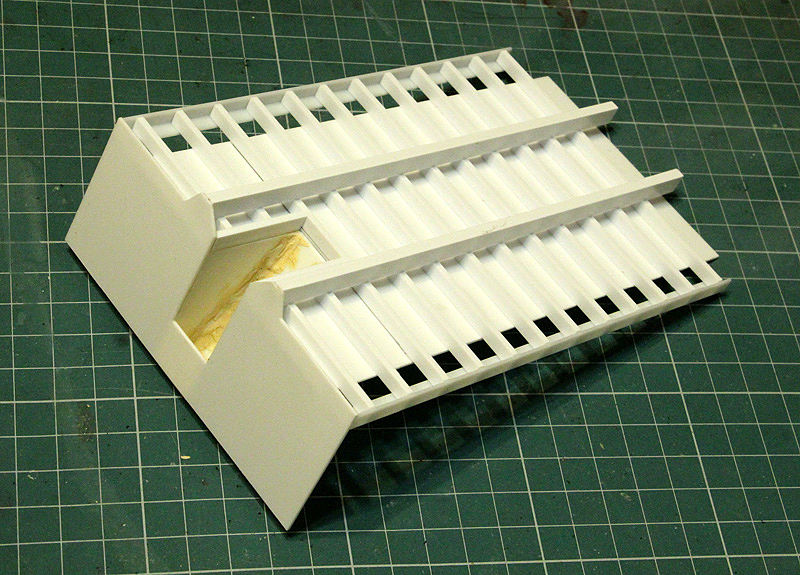
__________________
"Precious and fragile things Needs special handling.."
|
|
|
|
|
|
01-05-2019, 03:39 PM
|
#10 | |
|
AF Regular
Thread starter
Join Date: Feb 2009
Location: Moscow, Russia
Posts: 294
Thanks: 5
Thanked 14 Times in 14 Posts
|
Re: 90' GMC TopKick C7500-C8500
Thank you, Friends!
Kind a little "How To": Little triangles to connect crosmembers and subframe 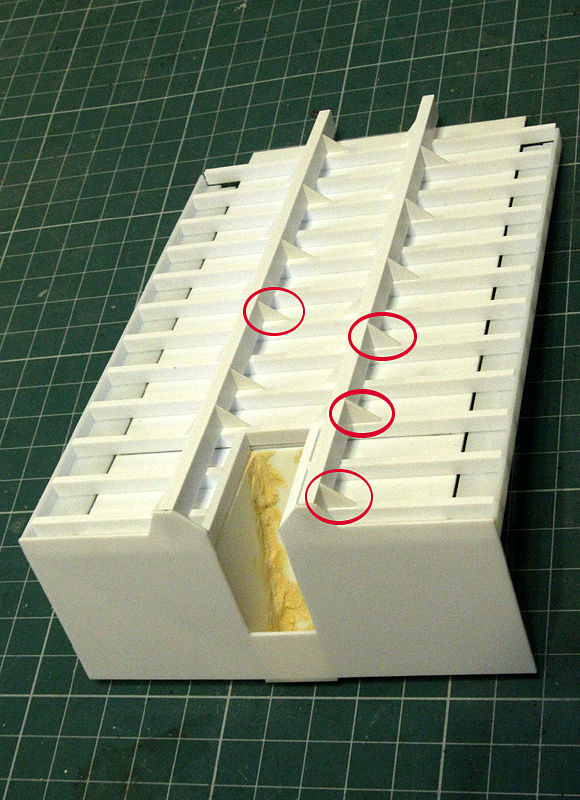 By the way, I often used right angles. For example red marked one to cover crossmembers, and green one acts as a guide for side walls 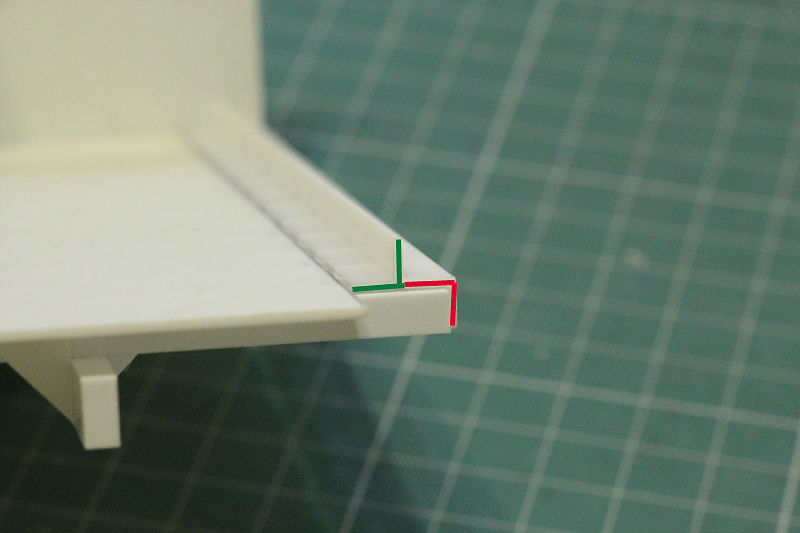 When I assembled the frame, I've forgot that dumpers don't have tail crossmember. Insted it has right angle. So I was have to tear off crossmember and cut out a piece of frame. 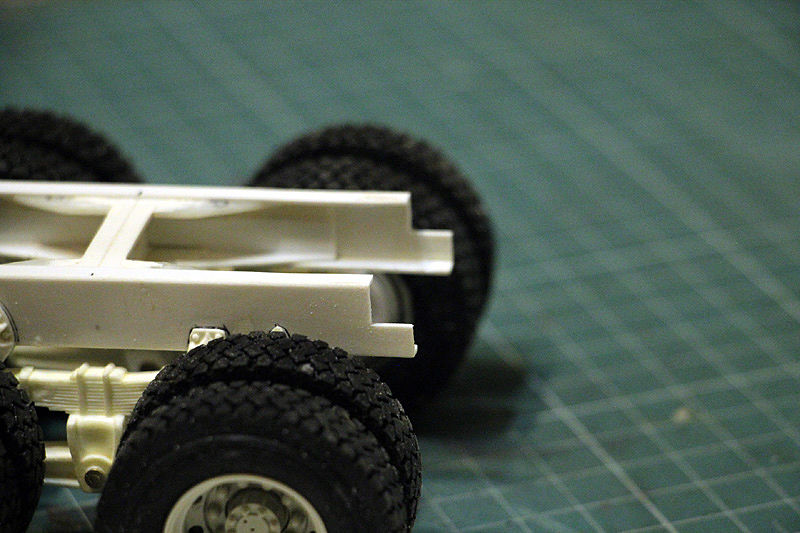 Here are profiles I used for dump hinge 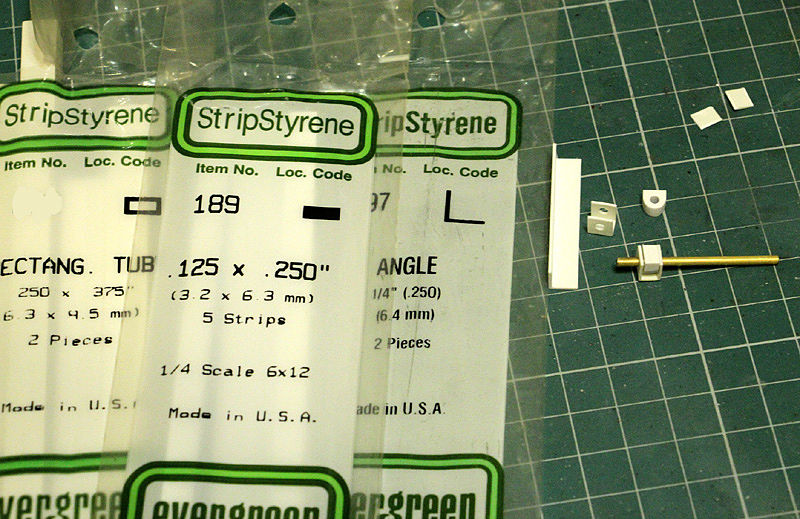 And here what it turned out 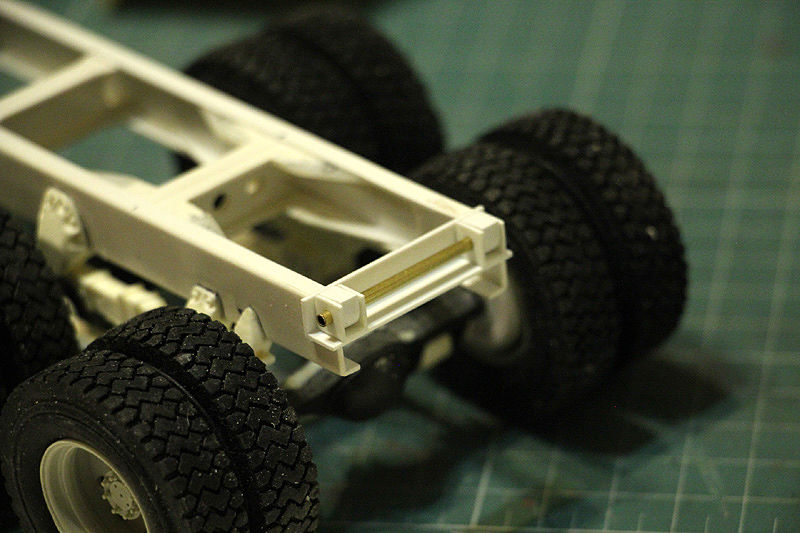 And finally: hydro reservoir and hinge set up for hydraulic ram 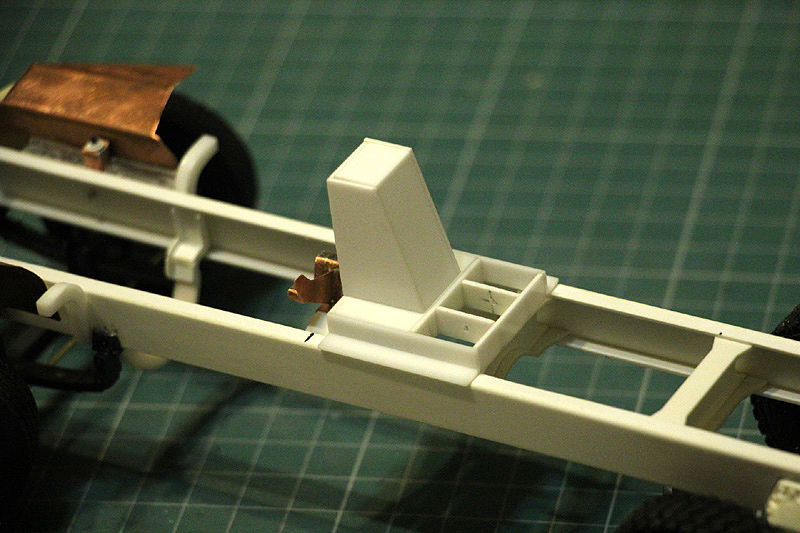
__________________
"Precious and fragile things Needs special handling.."
|
|
|
|
|
|
01-22-2019, 11:51 AM
|
#11 | |
|
AF Regular
Thread starter
Join Date: Feb 2009
Location: Moscow, Russia
Posts: 294
Thanks: 5
Thanked 14 Times in 14 Posts
|
Re: 90' GMC TopKick C7500-C8500
Side walls temporary glued
 I had two attempts to make tail gate ribs. First one turn out too narrow. 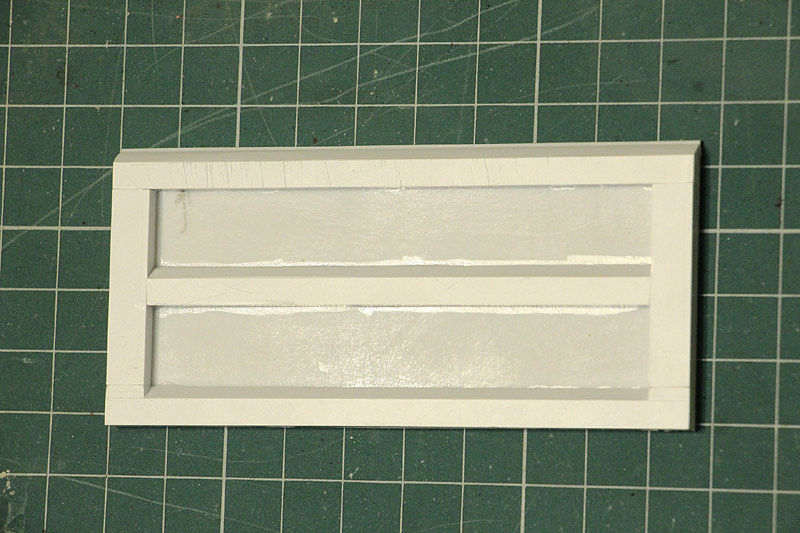 Tail gate hinge and lockers  Starts to look right. 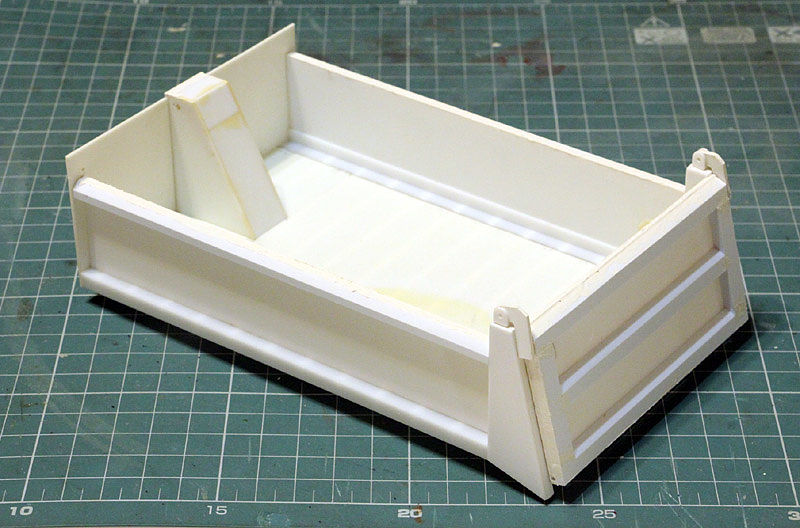 Thank you for interes
__________________
"Precious and fragile things Needs special handling.."
|
|
|
|
|
|
02-28-2019, 02:26 PM
|
#12 | |
|
AF Regular
Thread starter
Join Date: Feb 2009
Location: Moscow, Russia
Posts: 294
Thanks: 5
Thanked 14 Times in 14 Posts
|
Re: 90' GMC TopKick C7500-C8500
Hello again! Finally I've got tubes to make silencer and receivers
    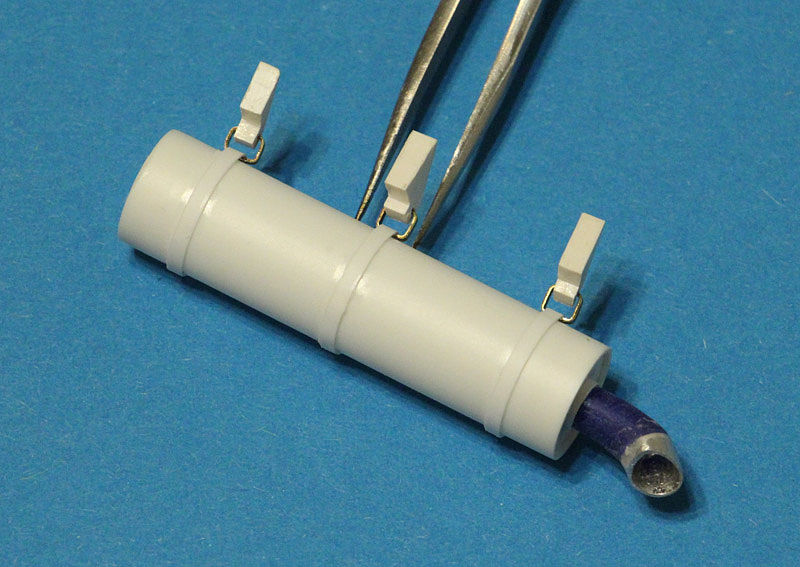 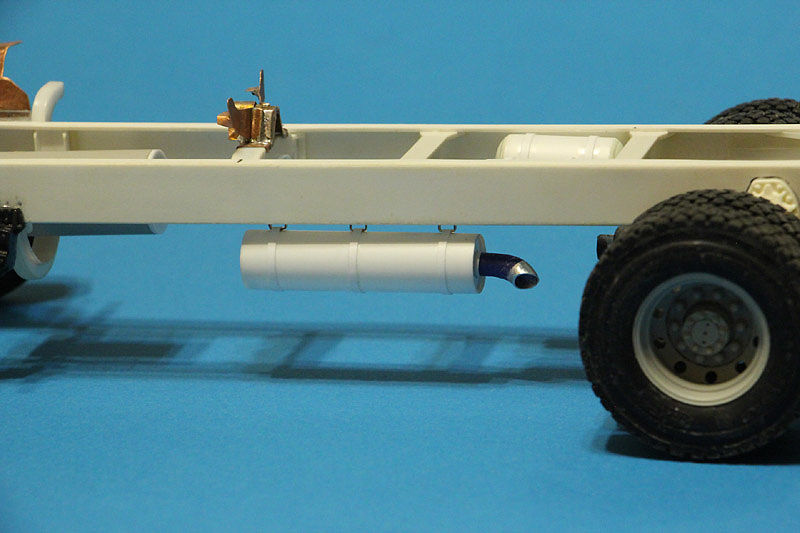 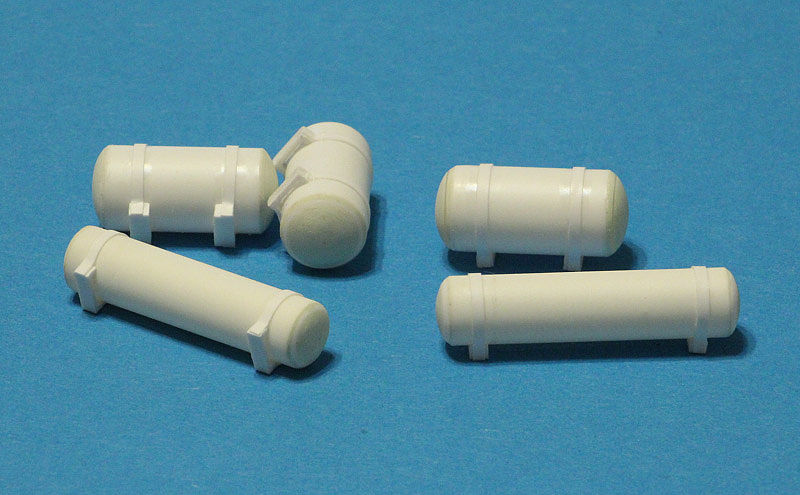 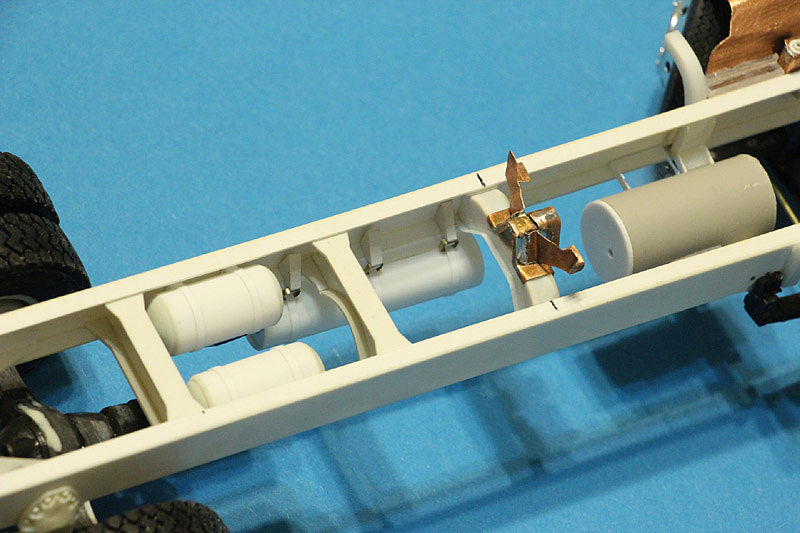  Also bought triangles to make bevels on horizontal ribs: outside and inside 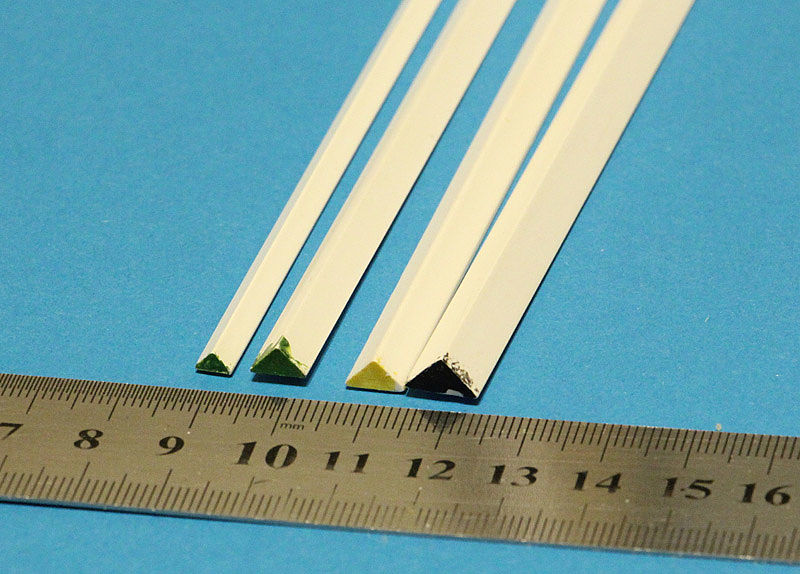 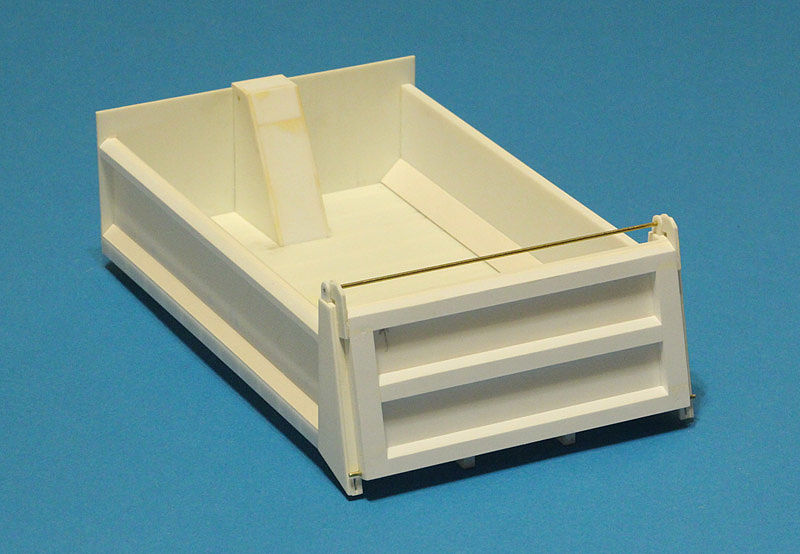 Finished vertical ribs and hinged the gates 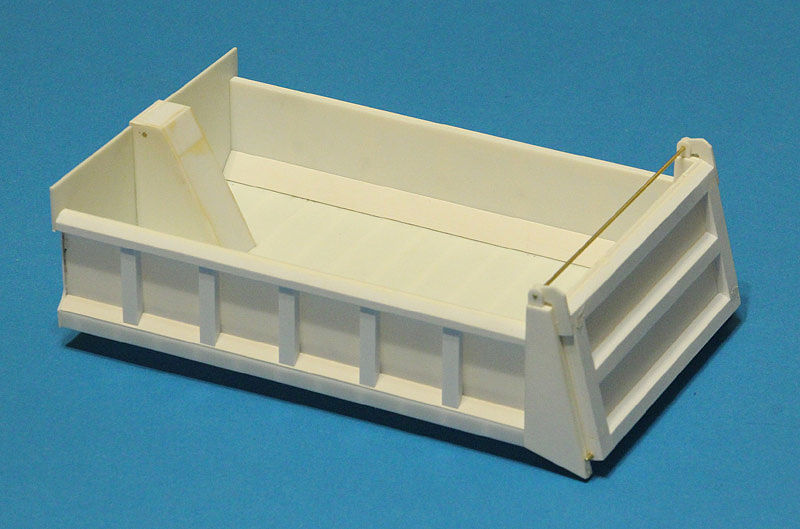 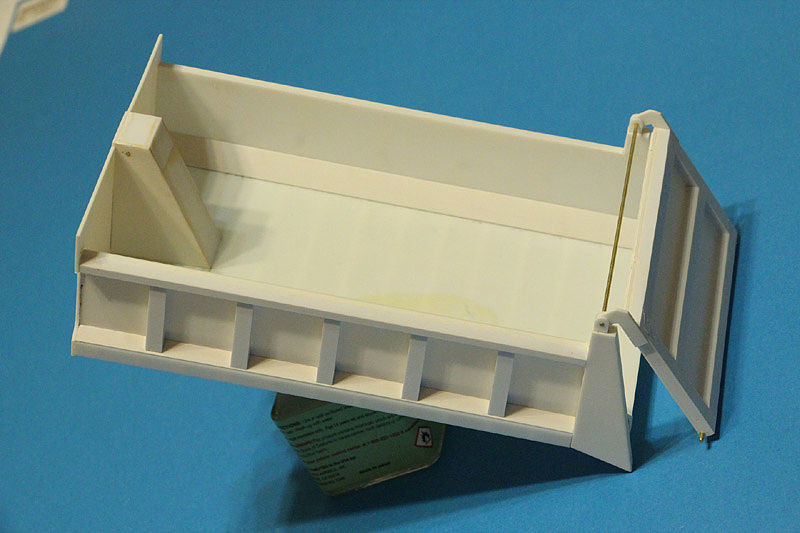 Have made over cab dump dome (I guess it's right term) 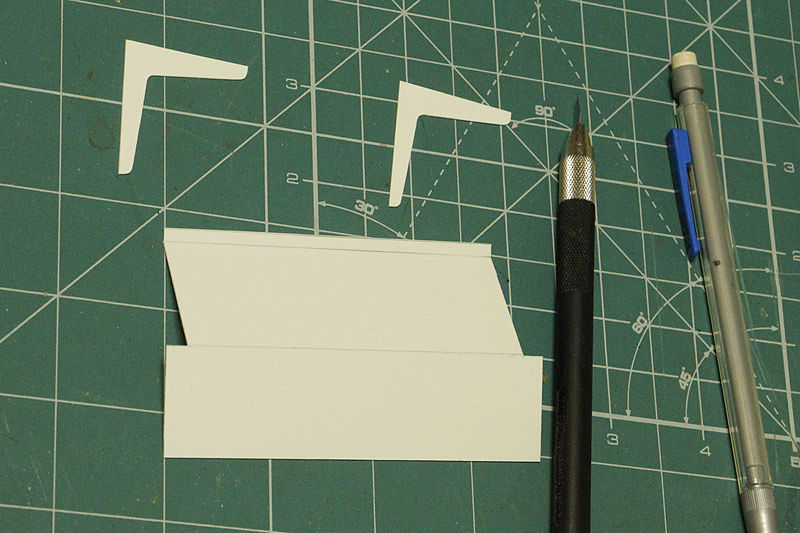 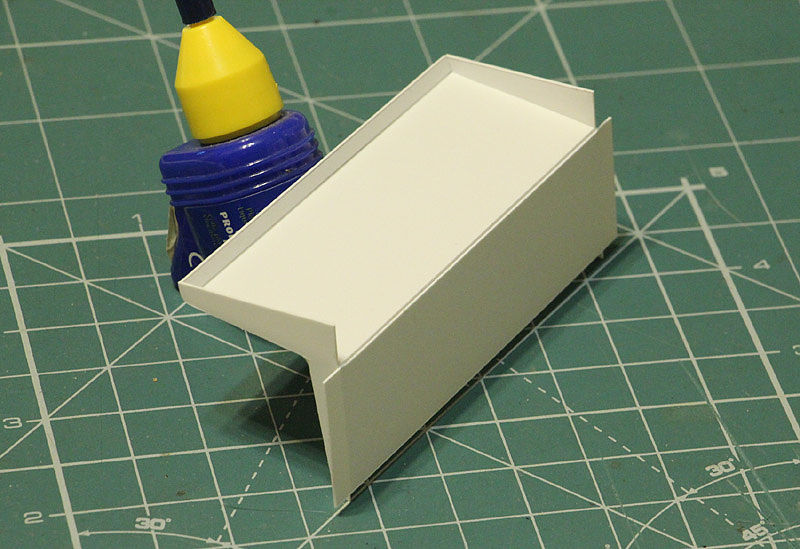 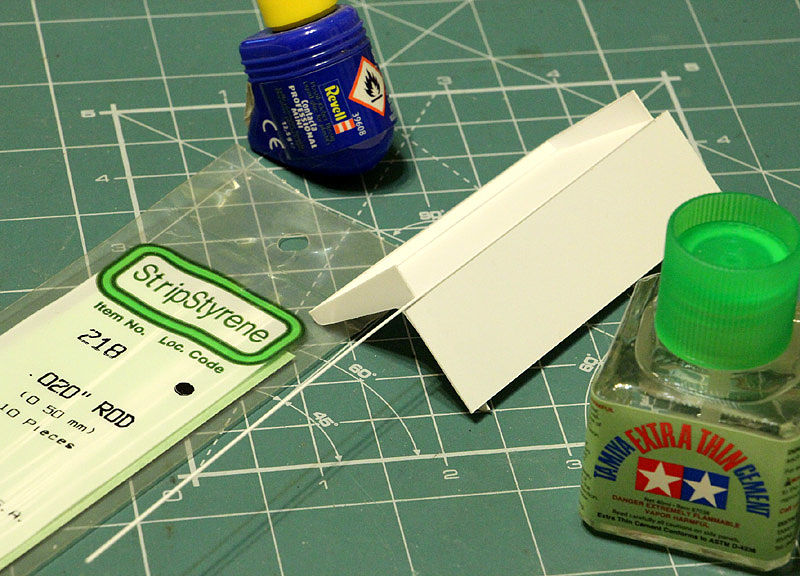 And worked a little over fuel tanks 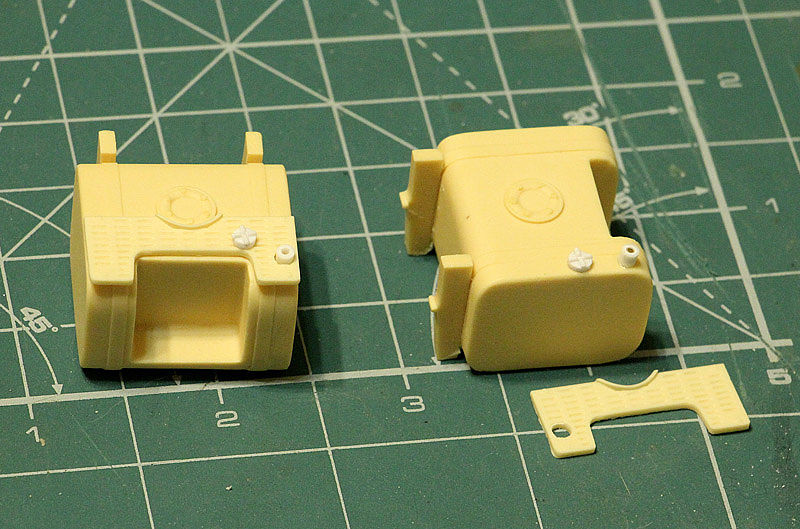
__________________
"Precious and fragile things Needs special handling.."
|
|
|
|
|
|
03-12-2019, 01:27 PM
|
#13 | |
|
AF Regular
Thread starter
Join Date: Feb 2009
Location: Moscow, Russia
Posts: 294
Thanks: 5
Thanked 14 Times in 14 Posts
|
Re: 90' GMC TopKick C7500-C8500
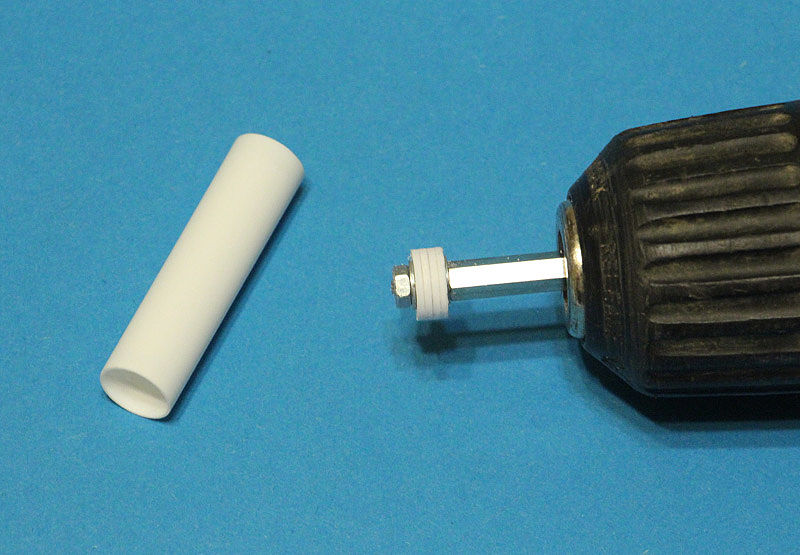
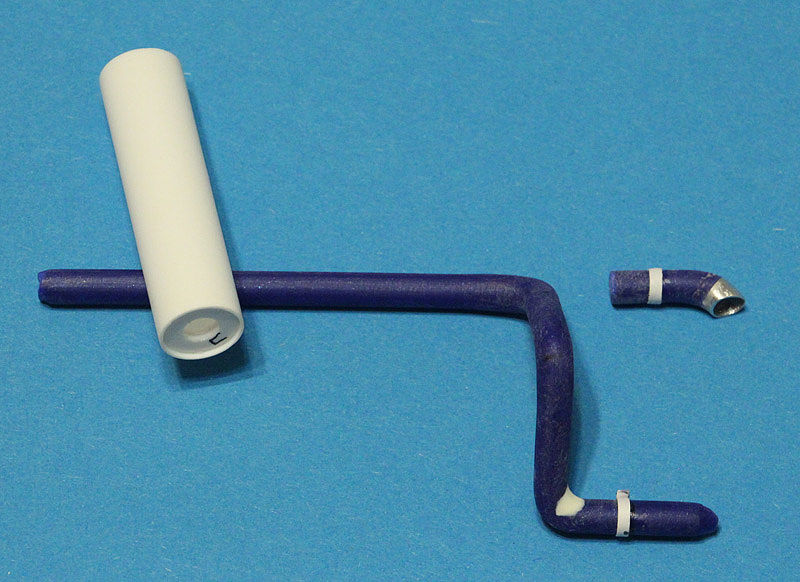
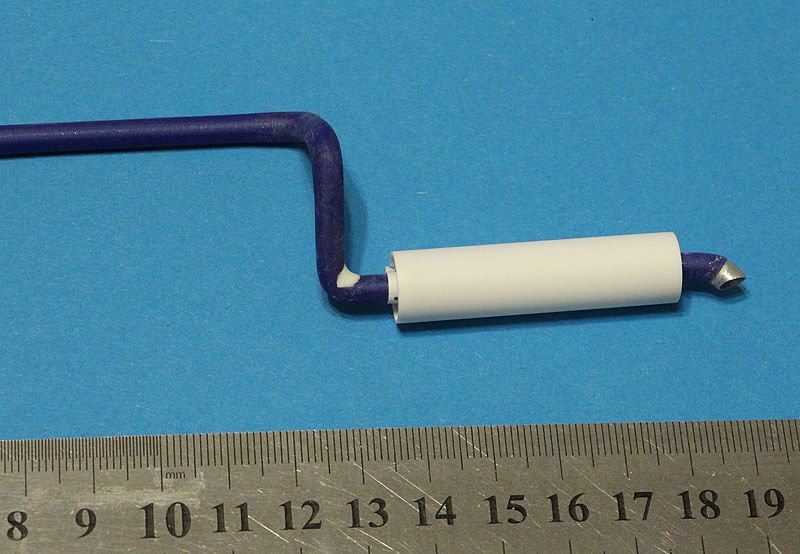
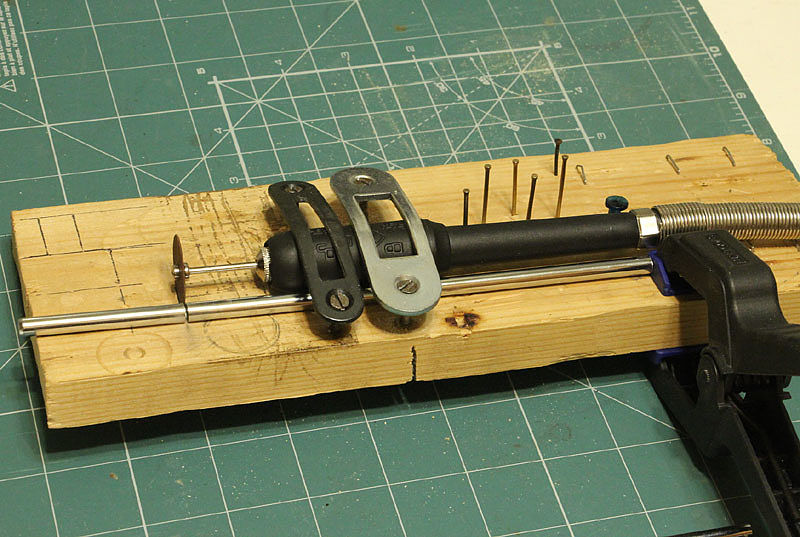
So, I have came to hydraulic ram. It made out of aerial, cut to size. My aerial was stainless. So it was cut by tool, like "Dremel". Here is a jig to cut.
 I will use plastic tube to enlarge outer part of ram 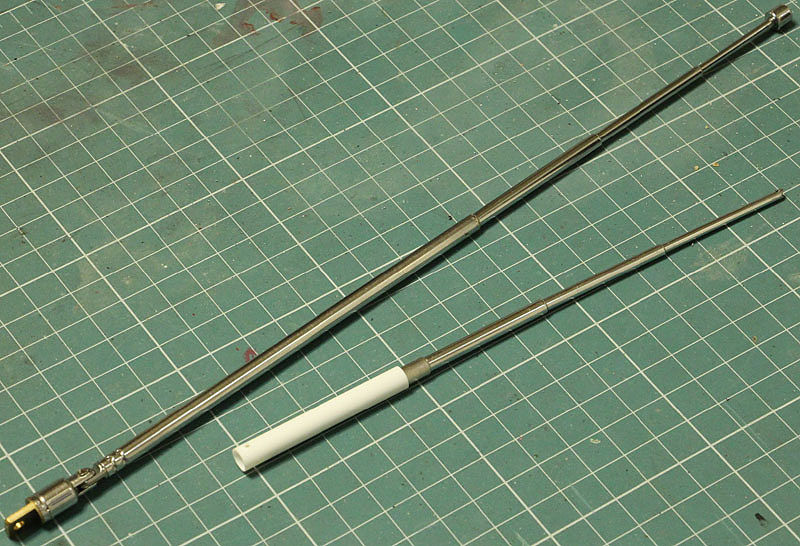 To drill new holes I used diamond boer 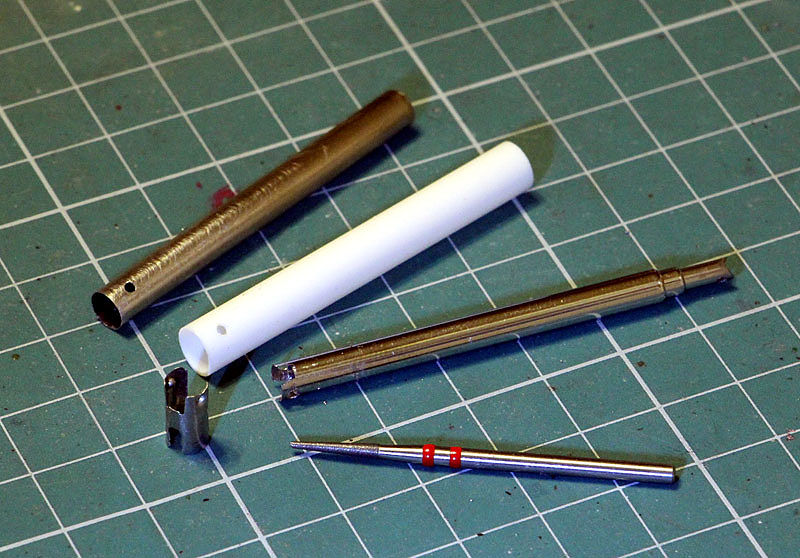 Here is how the truck looks now 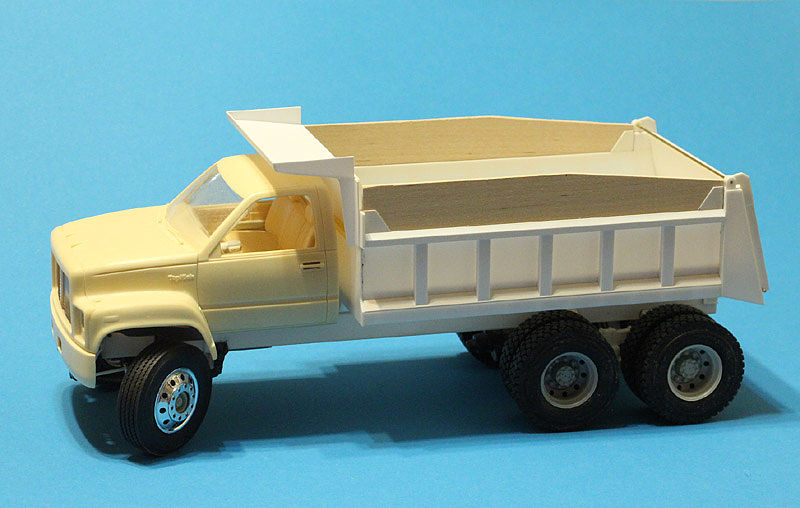 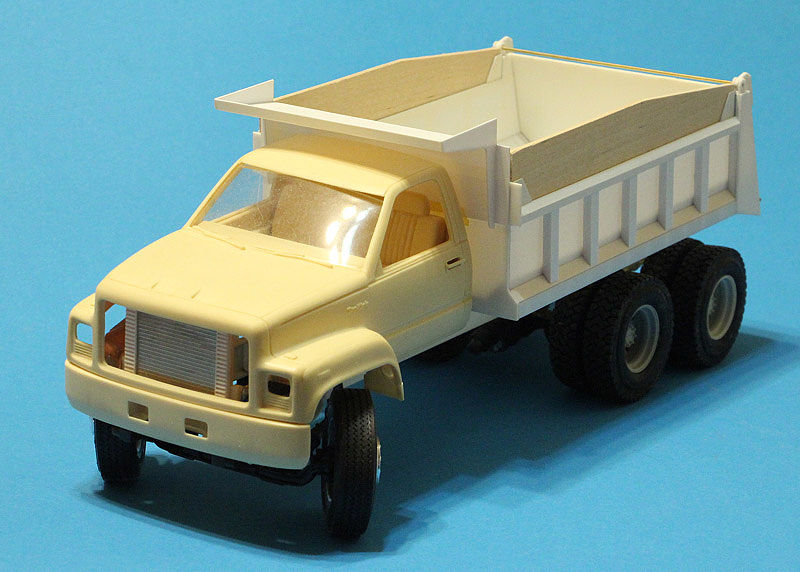 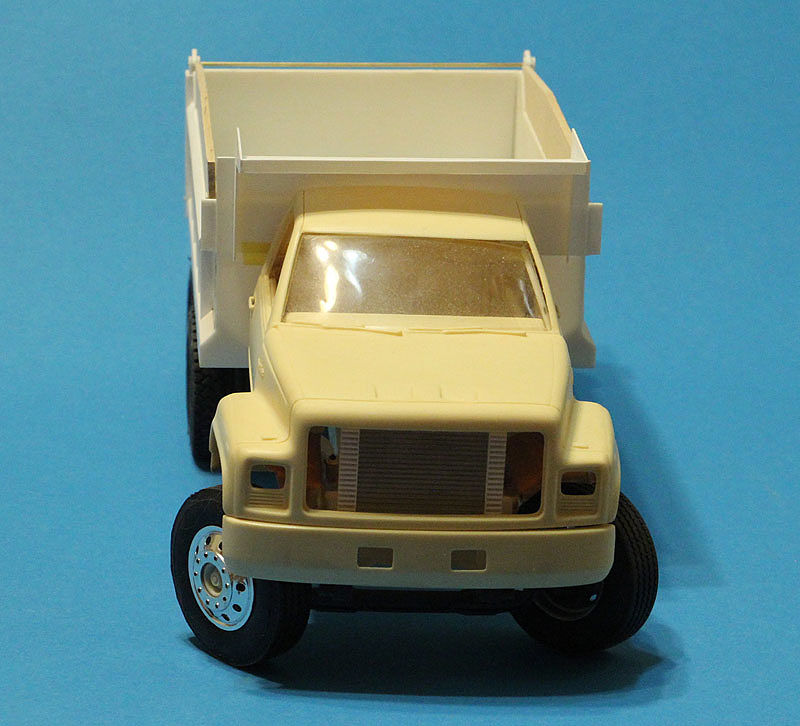 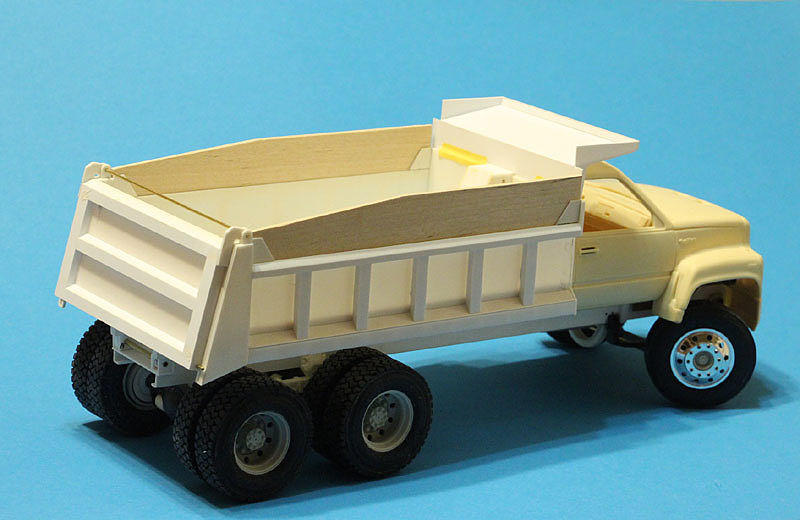 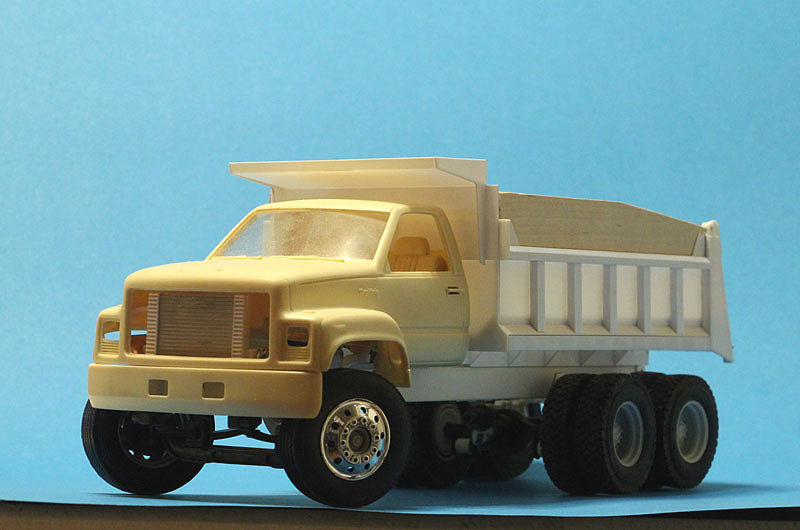 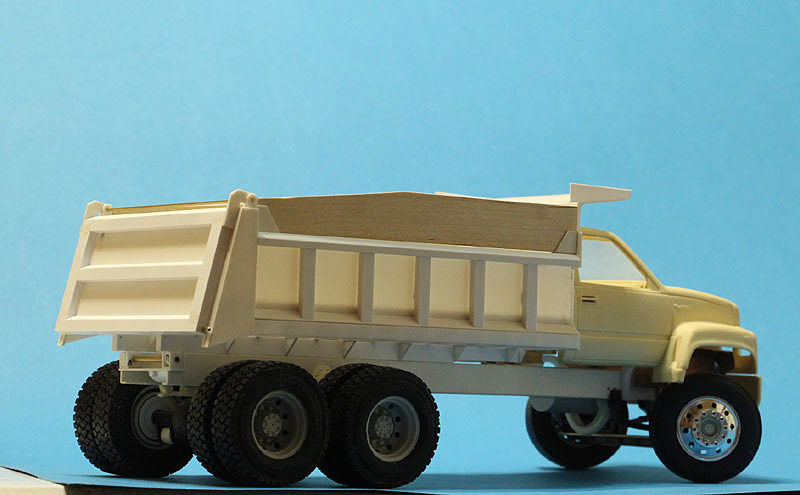 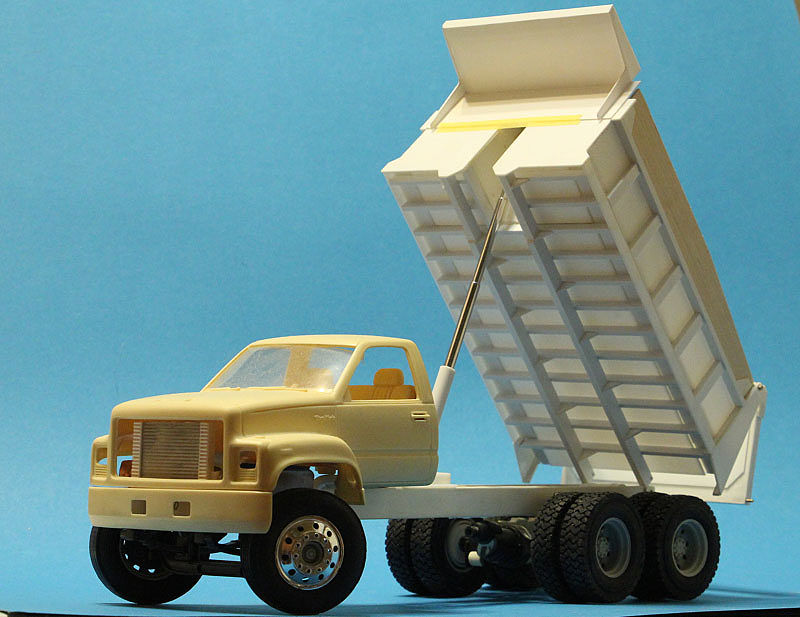 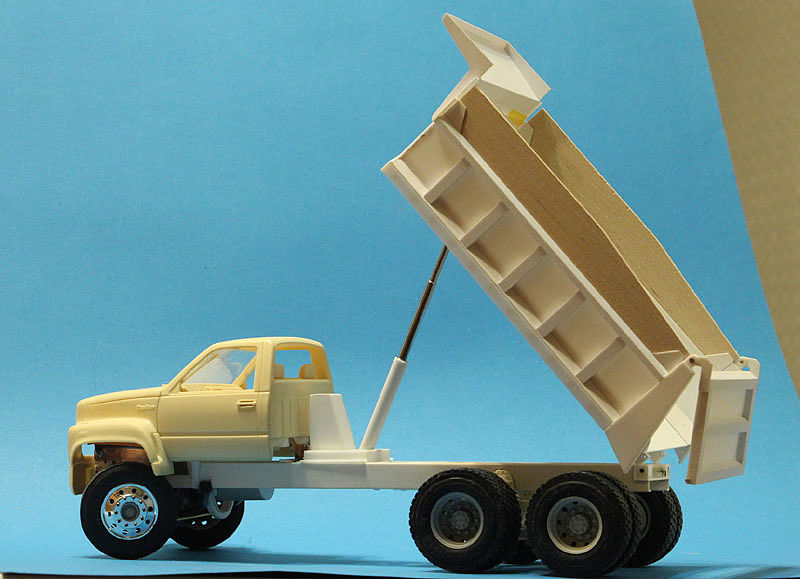 Here are king pins soldered for moving parts 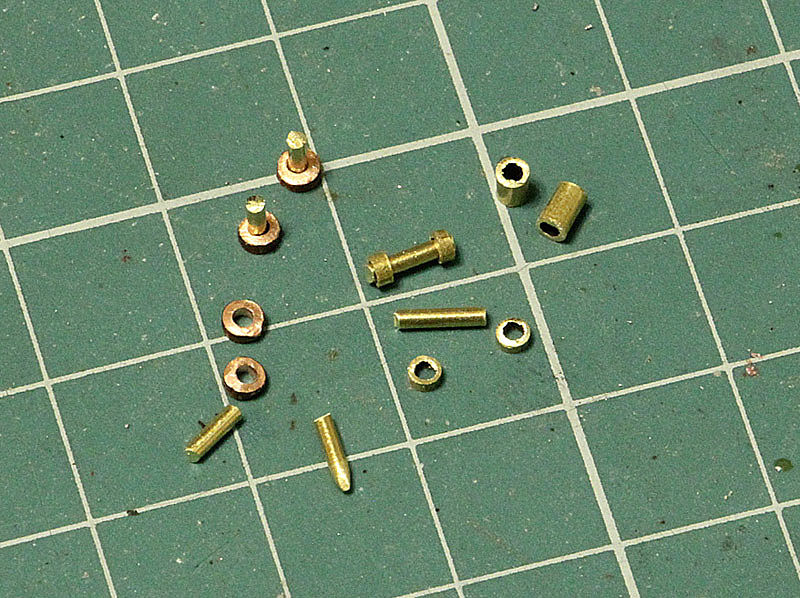 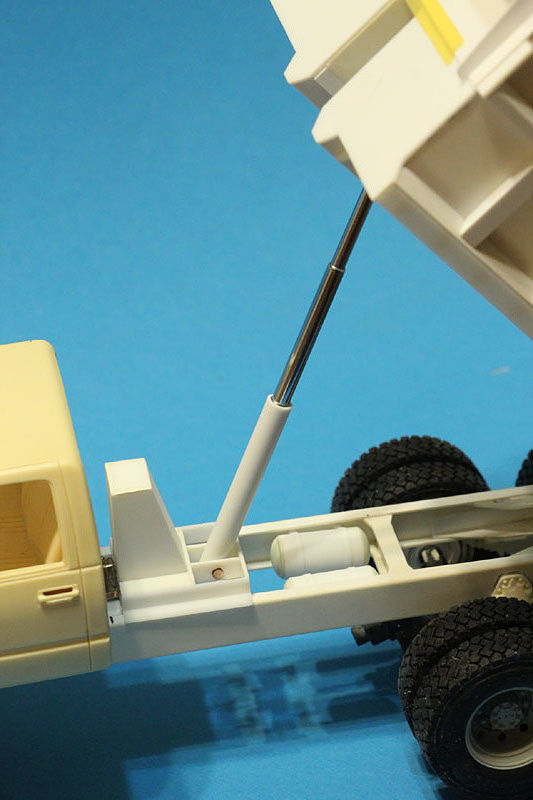  A load I made for gate lockers 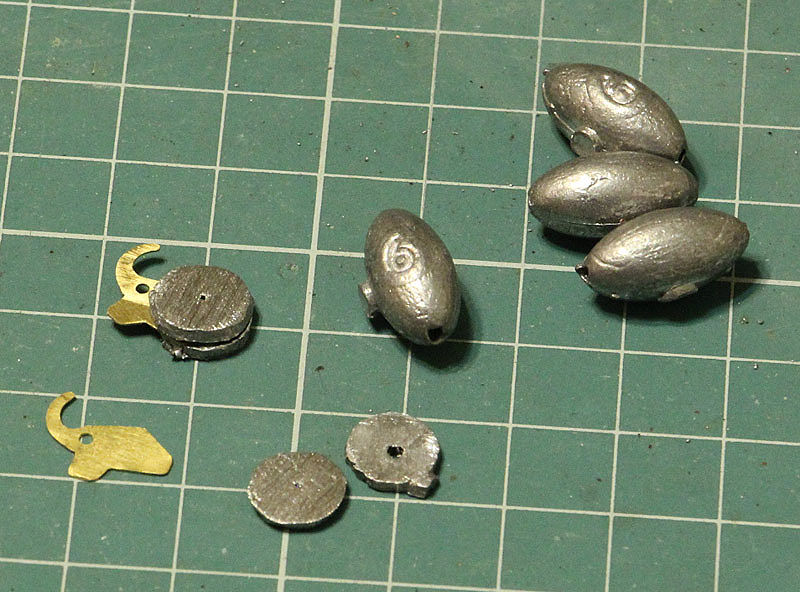
__________________
"Precious and fragile things Needs special handling.."
|
|
|
|
|
|
11-19-2019, 06:51 AM
|
#14 | |
|
AF Enthusiast

Join Date: Jan 2004
Location: Gellivare
Posts: 1,989
Thanks: 1
Thanked 22 Times in 22 Posts
|
Re: 90' GMC TopKick C7500-C8500
Awesome build! ou realy have som skils in scratch building!
__________________
Best Regards Anton |
|
|
|
|
|
12-12-2019, 11:03 AM
|
#15 | |
|
AF Regular
Thread starter
Join Date: Feb 2009
Location: Moscow, Russia
Posts: 294
Thanks: 5
Thanked 14 Times in 14 Posts
|
Re: 90' GMC TopKick C7500-C8500
A little more progress.
Side mirrors were made out of 1,5mm plastic and 0,5mm soldering wire  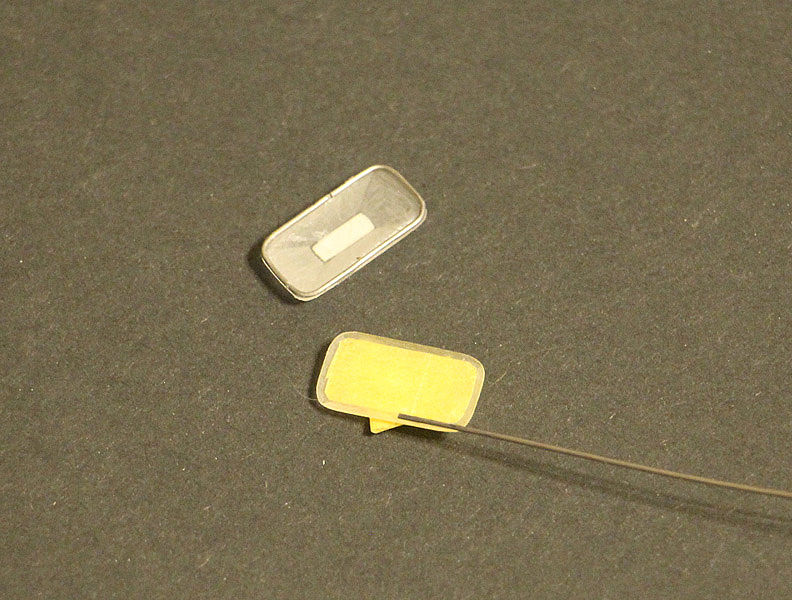 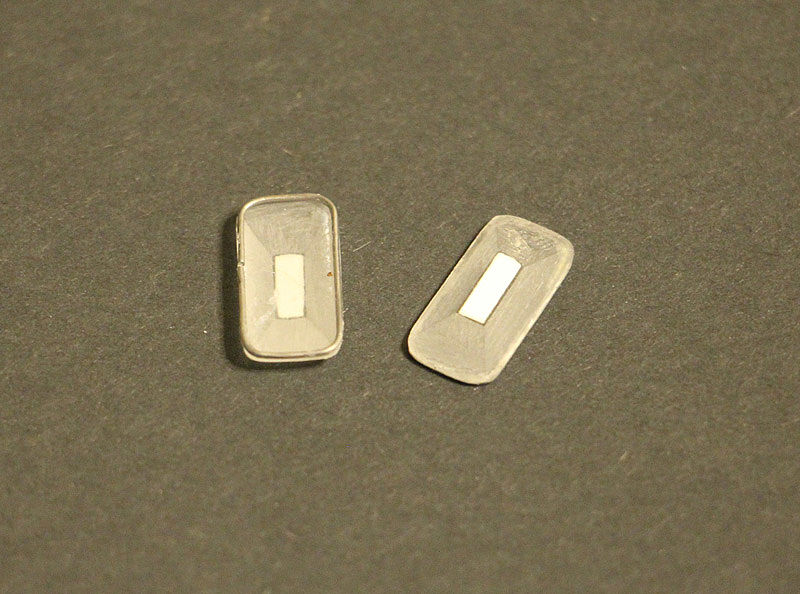 Mirror brackets are little complicated, then Big trucks have. PickUp doors have a slope at the top point. 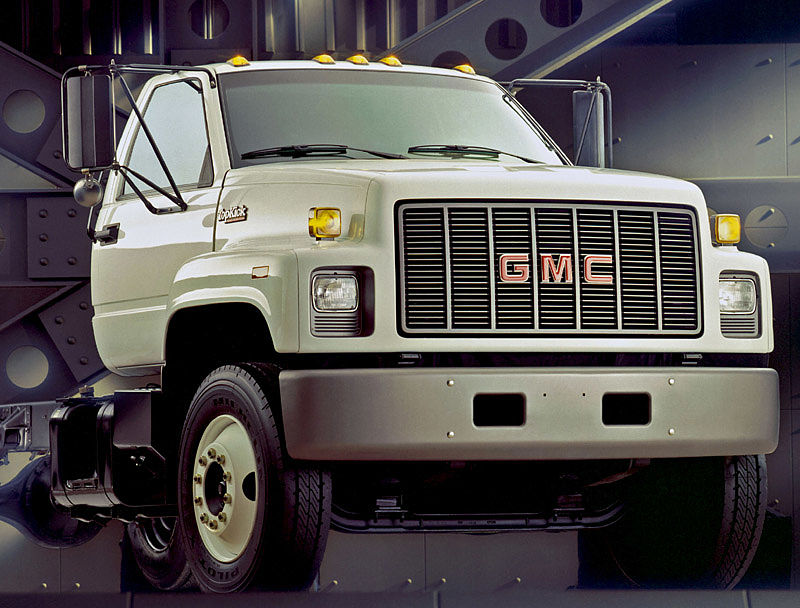 So I improved my old soldering device. 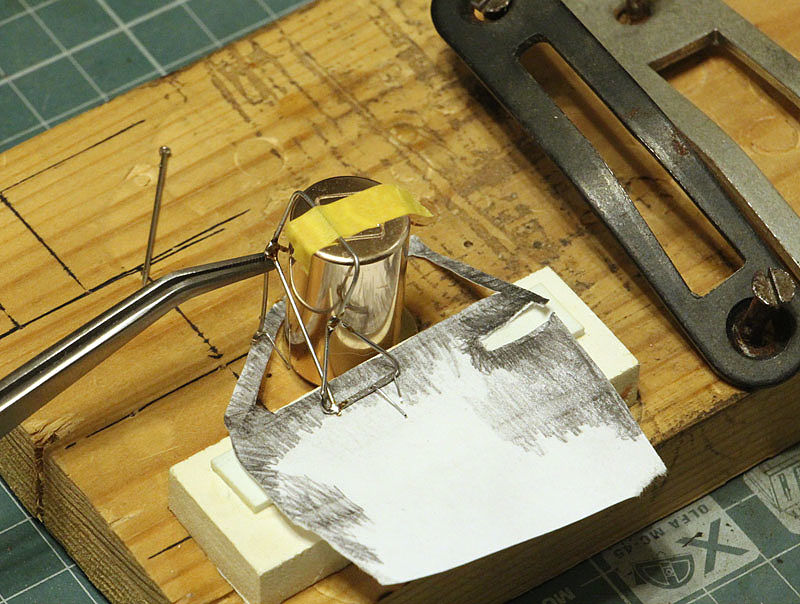 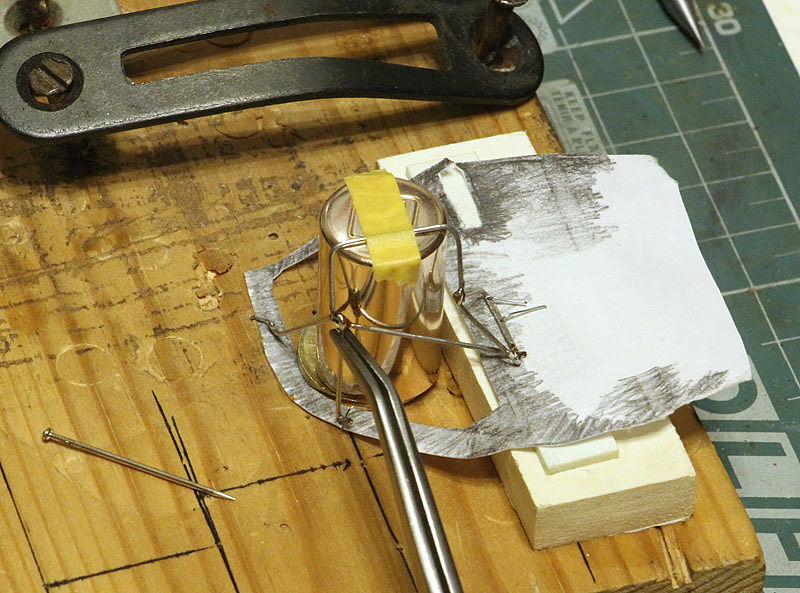 The wire was localy flatten and drilled for rivets. Here I broken one of my 0,4 drill bits. 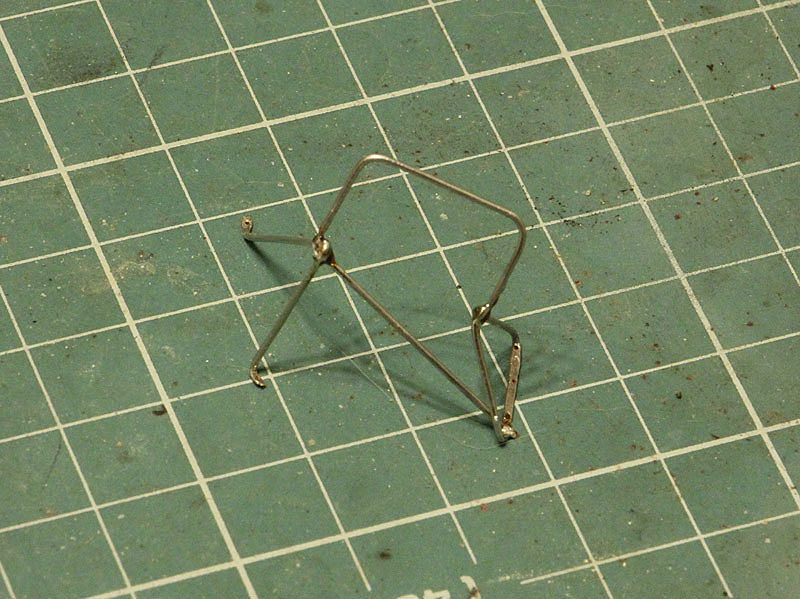 I have got Cab roof Marker Lights from Fireball Modelworks. Thank you Joseph! 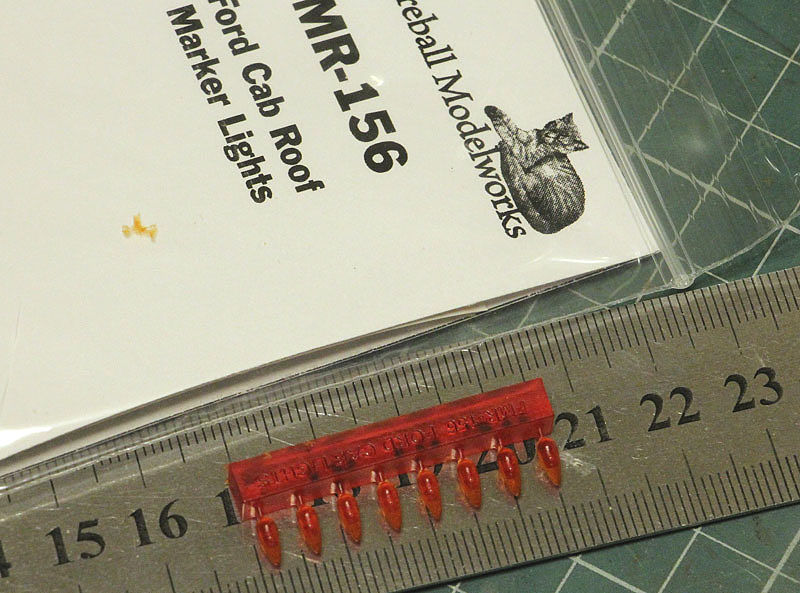 But as Joseph said: "they are smallewr then Silverado's one. Compare to photo 4. 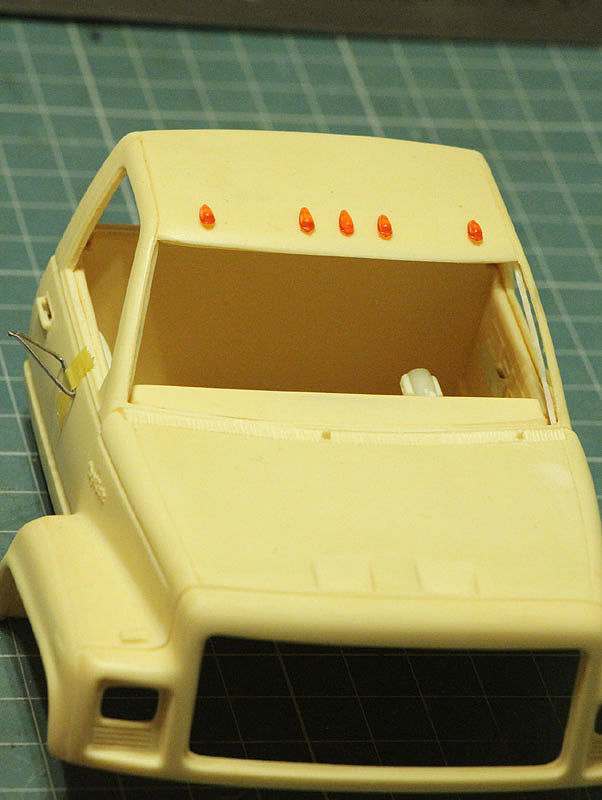 I plan to use rectangular black adhesive tape as a rubber for marker lights. Visually it should make them larger. Note, that wipers were cut off. Finally I made cab handles from square styrene 1х1мм & strip 1х0,3мм. 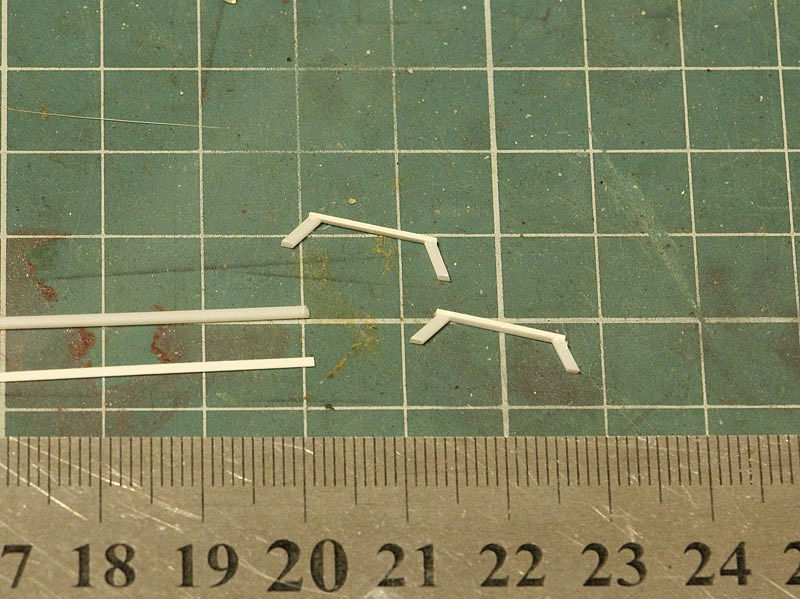 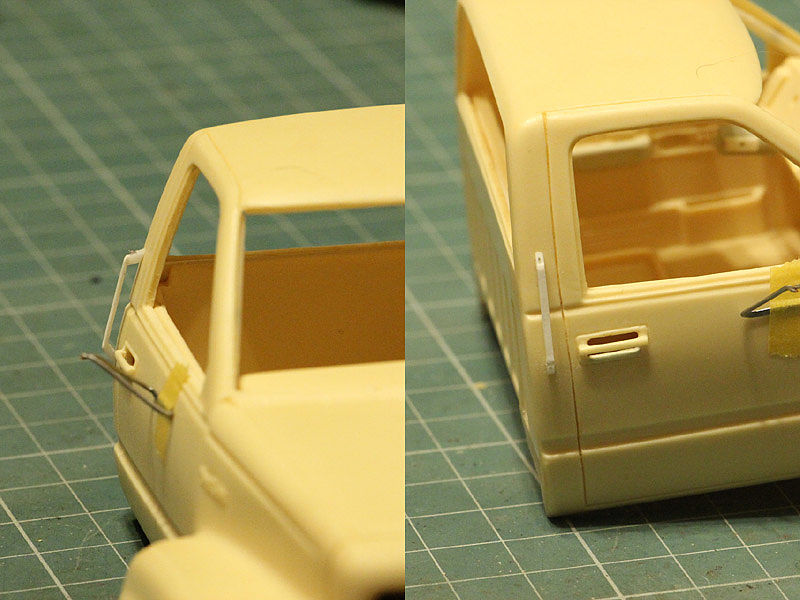
__________________
"Precious and fragile things Needs special handling.."
|
|
|
|
|
|
|
POST REPLY TO THIS THREAD |
 |
| Thread Tools | |
|
|

