|
|
|

|
|
| Search | Car Forums | Gallery | Articles | Helper | AF 350Z | IgorSushko.com | Corporate |
|
| Latest | 0 Rplys |
 11-15-2009, 01:08 AM
|
#91 | |
|
Authorized Vendor

Join Date: Oct 2005
Location: Vicenza - veneto de rassa
Posts: 3,909
Thanks: 6
Thanked 46 Times in 41 Posts
|
Re: Jordan 191
Sometime I say myself "Why I kill me with hard mods, and barely finish 1 model/years... sometimes I'll do something box stock and feel haapyness...)
Than I see someone other do much more, going deep in details and pulling the bar incredibly HI. A joy to see, motivating. PS/Edit: Must be first time I see dampers fitted with uniballs.......................................... .............................. speachless.................... I think it is time to get new life to the machining forum....
__________________
 gio gio
|
|

|

|
|
11-15-2009, 02:15 AM
|
#92 | |
|
AF Enthusiast

Join Date: Dec 2004
Location: Germany
Posts: 3,431
Thanks: 28
Thanked 79 Times in 73 Posts
|
Re: Jordan 191
Amazing job !!!!!!!!!!!!!!
__________________
Micha      
|
|
|
|
|
|
11-15-2009, 09:14 AM
|
#93 | |
|
Captain Over Engineer
 Join Date: Feb 2003
Location: New York, New York
Posts: 6,711
Thanks: 27
Thanked 29 Times in 23 Posts


|
Re: Jordan 191
Excellent work as usual. It amazes me how much detail you put into pieces that will not easily be seen. Yesterday we had a big model show and several guys and myself were commenting on your craftsmanship.
__________________
-Mike AF Director of Media / Photographer  mike.lawrence@automotiveforums.com | AutomotiveForums.com | Flickr Gallery |
|
|
|
|
|
11-15-2009, 12:14 PM
|
#94 | |
|
AF Enthusiast
Join Date: Apr 2007
Location: Pasadena, California
Posts: 827
Thanks: 2
Thanked 3 Times in 3 Posts
|
Re: Jordan 191
Ditto GIONC. Astonishing work! With such focus and attention to both detail and the big picture, you should be working on a real Formula 1 team.
(There will be four new teams next year. Why not apply? And include this WIP as part of your CV?) Ddms |
|
|
|
|
|
11-15-2009, 03:21 PM
|
#95 | |
|
AF Enthusiast
Join Date: May 2007
Location: Chicago, Illinois
Posts: 1,000
Thanks: 5
Thanked 29 Times in 26 Posts
|
Re: Jordan 191
Amazing. You are going to make super detailing the thing to do!!
Turning into a work of art. Tom Tanner/Scale Designs/Ferrari Expo-Strictly 43rd Revival model/photo contest-Chicago April 24th 2010 |
|
|
|
|
|
11-15-2009, 03:50 PM
|
#96 | |
|
AF Enthusiast

Join Date: Feb 2003
Location: F1...
Posts: 1,410
Thanks: 3
Thanked 3 Times in 3 Posts
|
Re: Jordan 191
I can't believe that you got the cowling so thin, brilliant stuff... I have to try that on my next build...
|
|
|
|
|
|
11-16-2009, 03:45 AM
|
#97 | ||
|
AF Regular

Join Date: Aug 2005
Location: Johannesburg
Posts: 171
Thanks: 3
Thanked 0 Times in 0 Posts
|
Re: Jordan 191
Quote:
Just wondering if you'd noticed (and apologies if you have this covered) but I see that the side panel below is fairly angled into the floor, without a step as in the Tamiya kit. In addition, the paint would be sprayed onto the CF as though it had been masked on the real panel, rather than as two separate components (which is how it looks on the original kit). Hope you don't mind me mentioning this, and please keep it coming. 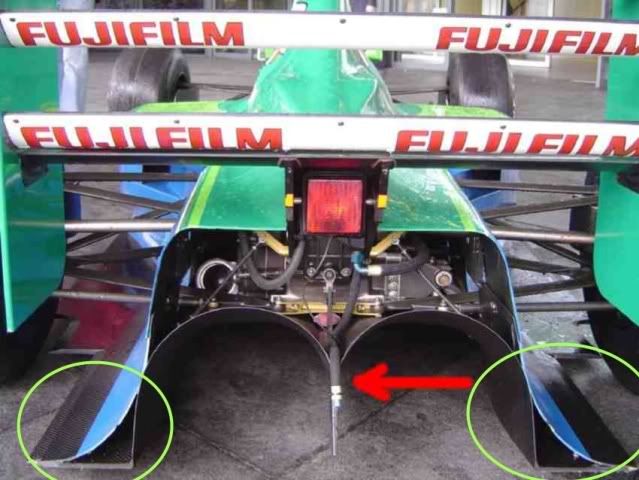 |
||
|
|
|
|
11-16-2009, 03:27 PM
|
#98 | |
|
AF Enthusiast
Thread starter
Join Date: Aug 2005
Location: where "sky grey" is a colour
Posts: 822
Thanks: 3
Thanked 32 Times in 29 Posts
|
Re: Jordan 191
@lotus123: Don't mind it at all...well spotted :-) I'm in the process of doing something about that actually. Glueing the bodywork panels to the floor as i described in the update was step one. I had hoped that some primer and sanding would do the rest but it looks like i will have to give it some putty too. It will not look 100% like on the real car. That would have meant to rebuild the panels completely and i couldn't be bothered to do that to be honest :-)
@GTmike.....thanks:-) I actually saw some pictures from that show right now, including your time attack car...when's that gonna progress!? @Didymus.....frankly, no thanks :-) The teams need engineers and mechanics and i'm neither of them. I work on street cars and wouldn't wanna be an engineer there either :-) |
|
|
|
|
|
11-18-2009, 08:11 AM
|
#99 | |
|
AF Regular

Join Date: Jul 2003
Location: Avon, Indiana
Posts: 164
Thanks: 0
Thanked 0 Times in 0 Posts
|
Re: Jordan 191
I love it Jay! I know I told you not to paint anything, but I guess it looks OK with some paint on there.
 The mock up looks fantastic, but as silly as it sounds my favorite part so far are the little aluminum sleeves in the gearbox for the pivots. Those look perfect! Like they were just pressed in. Keep it going! Clay
__________________
http://public.fotki.com/ClayK/ |
|
|
|
|
|
11-24-2009, 06:40 PM
|
#100 | |
|
AF Enthusiast
Thread starter
Join Date: Aug 2005
Location: where "sky grey" is a colour
Posts: 822
Thanks: 3
Thanked 32 Times in 29 Posts
|
Re: Jordan 191
Hi everyone. Its been some time again and here is a bit of an update.
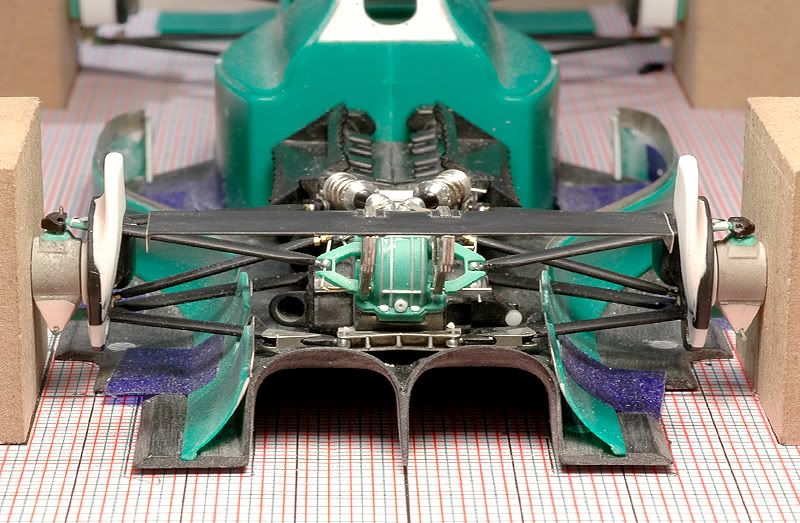
Im in the middle of the painting process which is as always time consuming and not really interesting to look at in pictures if you ask me, but here are some shots anyway. The first one is particularly impressive ..body in white primer on white background :-) 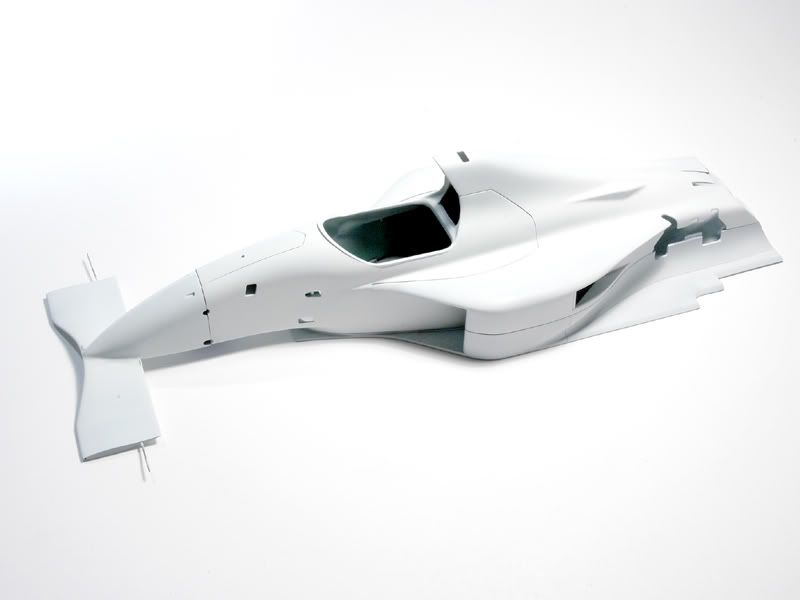 At that point the bodywork already had a layer of automotive primer/filler on and sanded, followed by a layer of 50% thinned grey ZERO primer with another session of sanding and this layer of white ZERO primer. I used the ZERO primers for the first time and Im quite pleased with them. They are no replacement for the urethane automotive stuff Ive been using for a while now. Thats thicker and better for smoothing out surface blemishes, but the ZERO stuff is very good as a final layer to show those last imperfections that require just a little sanding. Getting to tiny imperfections I realized something at that point though ( and Lotus123 rightly pointed it out :-). The lower bodywork panels were just not blending into the undertray well enough. I had hoped for the paint to fix most of that but it didnt look like that was gonna work ( with only paint and clearcoat still to come ). So I brought out the polyester putty again and went to work. It took me quite a bit of annoying puttying and sanding ( while I wanted to see some paint on the bloody thing ) but the result is an improvement. After going through the primers again in the reworked area the body was finally ready for paint. I used the ZERO Jordan set, spraying dark green first with the lower areas masked that were going to be blue in the next step. The paint wasnt thinned further and went on very well. Here its already complete: 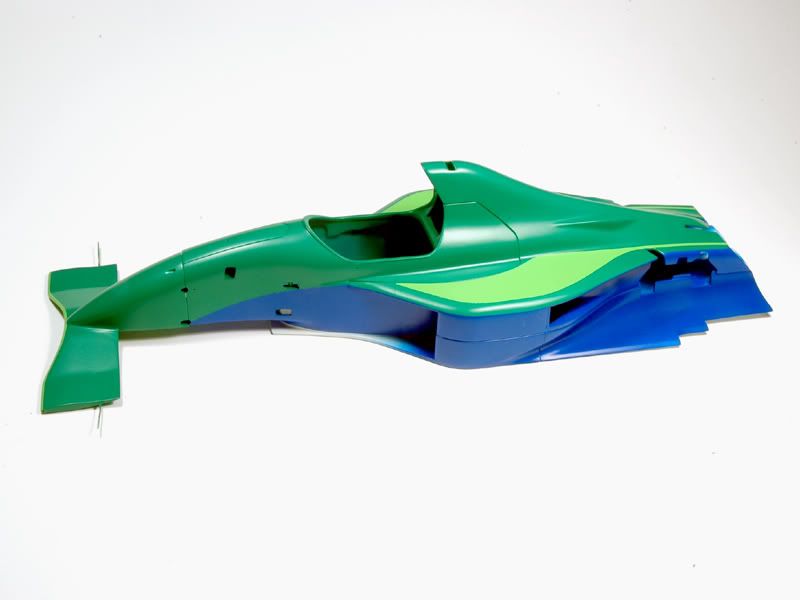 The blue is different in reality than it shows up in the pictures not so ultramarine. I do wonder which drug was involved when that paint scheme was signed off at Jordan :-) The dark green and blue are quite a mismatch imho. It gets better with the light green bits and the sponsor logos will surely do their part but still Another view from the rear: 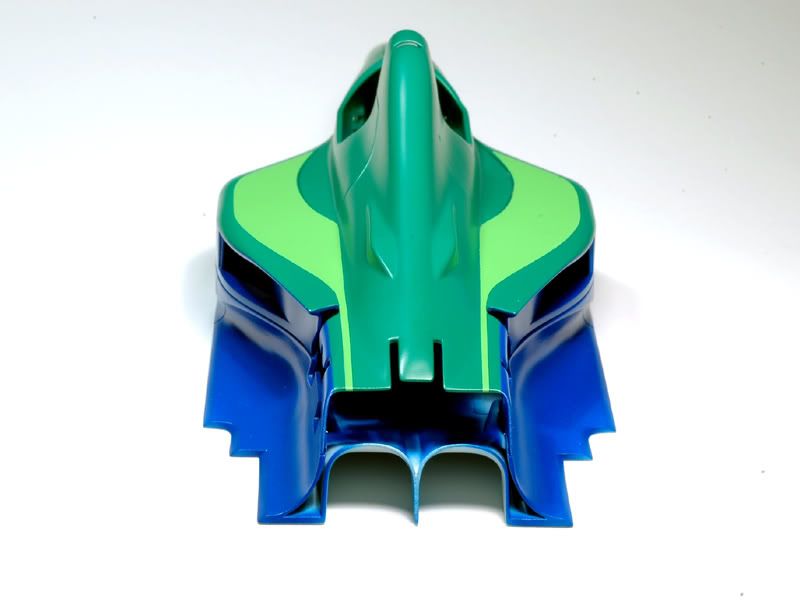 In the next detail shot you can better see how the panels are now smoothly connected to the floor ( compared to the unpainted picture ). Panel thickness is not as thin as should be, but thats how much I managed to do. 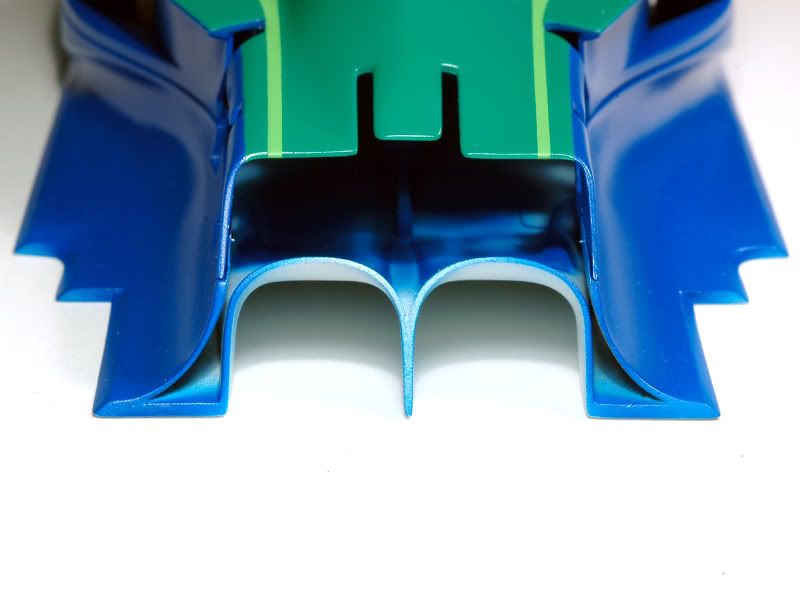 The question when painting this car for many builders is, what to do about the light green areas on the cowling and the strip on the front wing. Use the decals or paint!? Both Tamiya and Studio27 provide a straight strip which is a mess to get in place on the very curved front edge of the wing. Painting seems to be the better option. If you then use the decals for the cowling the colours most likely wont match though. Masking the light green areas isnt much fun either so I chose a different approach. I first masked and painted the front wing strip. 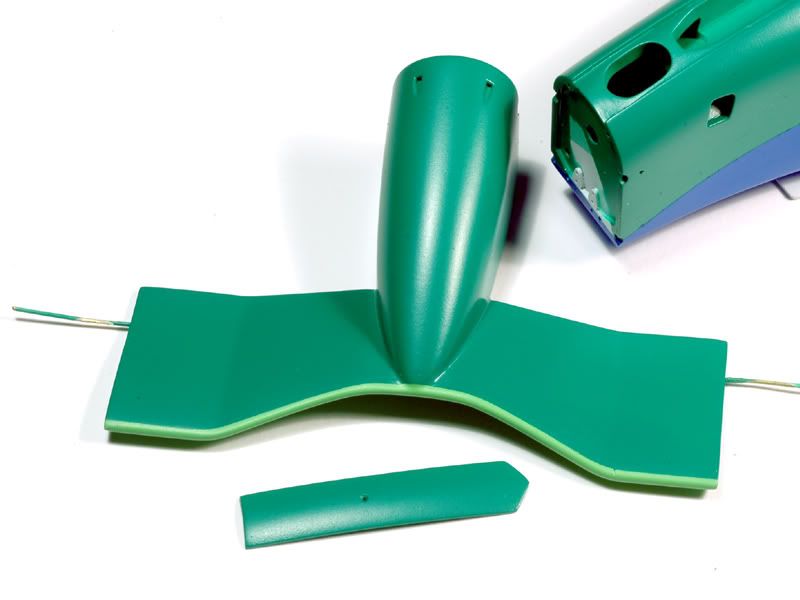 Then I cut out the light green Tamiya decals ( without the surrounding transparent strip ) and improved their shape according to reference pictures. ( The shape of the Studio 27 decals fit less ). Cutting out the decal with a knive will only get you so far. But the edges can be carefully smoothed out with sand paper at that point. Then I took the shaped decals and airbrushed them with the ZERO light green. After drying I applied them the normal way. They get a bit stiffer and wont work on very curvy surfaces but that wasnt the case here anyway. 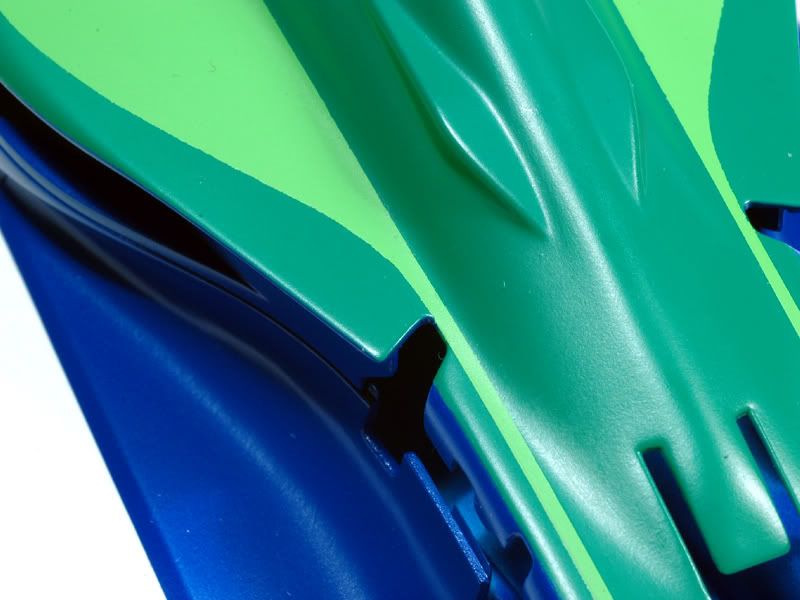 As a result I have matching light green areas on the front wing and cowling but there is a problem as you can see in the above detail picture. Just like the separation line where I masked between dark green and blue, the edges of the light green areas arent perfectly sharp. They are a bit rough just like on a 1:1 paintjob but there you never get so close that you notice. On a scale model ( and in close up pictures ) thats another thing :-) While a thin white line decal will hide that edge between green and blue the light green edge will stay. I will try to improve some of that. The unaltered decals would have had sharper edges but then the shape would have been wrong here and there. Its kind of a Catch 22 :-) So for now thats it. A lot of work, but not much to show for it at this stage. Next up Ill have to paint some areas black and then its time for CF decals. Time consuming work again, so the next update may take a bit as well :-) Cheers for looking! |
|
|
|
|
|
11-24-2009, 06:46 PM
|
#101 | |
|
Captain Over Engineer
Join Date: Feb 2003
Location: New York, New York
Posts: 6,711
Thanks: 27
Thanked 29 Times in 23 Posts
|
Re: Jordan 191
Hey, you said that pictures of paint is boring, but I just learned something! That decal technique is very ingenious trick. I know I will be able to use that down the road when I get to paint. Thanks for sharing!
__________________
-Mike AF Director of Media / Photographer mike.lawrence@automotiveforums.com | AutomotiveForums.com | Flickr Gallery |
|
|
|
|
|
11-24-2009, 11:09 PM
|
#102 | ||
|
AF Regular
Join Date: Aug 2005
Location: Johannesburg
Posts: 171
Thanks: 3
Thanked 0 Times in 0 Posts
|
Re: Jordan 191
Quote:
I think you will be able to create the effect of "thinner" panels by masking halfway across the panel edge when you paint the black(?) coat around the diffuser and floor. Edit: Sorry - on re-reading the second part of this post I think I'm doing this:  Last edited by lotus123; 11-26-2009 at 02:31 AM. |
||
|
|
|
|
11-25-2009, 05:27 PM
|
#103 | |
|
AF Enthusiast

Join Date: Oct 2008
Location: Auckland
Posts: 2,761
Thanks: 51
Thanked 136 Times in 134 Posts
|
Re: Jordan 191
Awesome Work, the colours look great, I cant wait to see it with the full livery!!
__________________
 It's Not wheather you Win or Lose, its how you look while you play the Game |
|
|
|
|
|
11-26-2009, 07:25 AM
|
#104 | |
|
AF Newbie
Join Date: Aug 2008
Location: Coram, New York
Posts: 30
Thanks: 1
Thanked 0 Times in 0 Posts
|
Re: Jordan 191
What amazing work!
 I have learned a lot from your build and look forward to the next post. Now, if I only had 1/4 of your modeling skills I would be a very happy man. |
|
|
|
|
|
12-14-2009, 01:23 AM
|
#105 | |
|
AF Newbie
Join Date: Dec 2009
Location: Edenvale
Posts: 1
Thanks: 0
Thanked 0 Times in 0 Posts
|
Re: Jordan 191
Hi guys, i'm an old modeller, but new to this site. Great work on the 191. I have the same kit which I will be starting soon, and will follow your build with interest. I am currently finishing a 1:20 tamiya Wolf WR1. I will post some completed pics one of these days.
|
|
|
|
|
|
 |
POST REPLY TO THIS THREAD |
 |
|
|