|
|
|

|
|
| Search | Car Forums | Gallery | Articles | Helper | AF 350Z | IgorSushko.com | Corporate |
|
| Latest | 0 Rplys |
|
|||||||
 |
 Show Printable Version | Show Printable Version |  Email this Page | Email this Page |  Subscribe to this Thread
|
|
|
Thread Tools |
 08-28-2006, 07:03 PM
|
#16 | |
|
AF Moderator
 
Join Date: Oct 2004
Location: Bellingham, Washington
Posts: 1,751
Thanks: 0
Thanked 73 Times in 73 Posts
|
Re: That's the end of my '93 Metro.....
you can take the intake off and just leave it in car. once you have it all unbolted it should just come off but there are some nuts underneath that aren't the easiest to get to. exhaust will come off of head once all bolts and nuts are off. pistons have to come out the top of the engine so head has to be off. once you have head redone the valves seal a lot tighter and rings seem to start letting oil by. you can just do head but don't be supprised if it starts using oil or smoking
|
|

|

|
|
08-28-2006, 08:29 PM
|
#17 | |
|
Geo Metro Lover

Join Date: May 2005
Location: Eastern Washington State, Washington
Posts: 1,622
Thanks: 0
Thanked 0 Times in 0 Posts
|
Re: That's the end of my '93 Metro.....
I know that now is the best time to replace the rings....
But - I am in way over my head right now.......let alone taking on the rings! From what I know, I would have to hone the inside of the cylinder walls. I have to remove the piston rod bearing on the bottom to free up the piston. Then I could screw up those bearings when I reassemble them. The slightest dirt will burn them out. Any one of those two things alone I could screw up beyond anyone's recognition! What if the cylinders are not round? I could make slightly leaky cylinder(s) totally unusable! If I screw up, bye bye engine..... DoctorBill
__________________
|
|
|
|
|
|
08-28-2006, 09:16 PM
|
#18 | |
|
AF Newbie
 Join Date: Dec 2004
Location: Fostoria, Ohio
Posts: 98
Thanks: 0
Thanked 0 Times in 0 Posts
|
Re: That's the end of my '93 Metro.....
Doc,
The head is not that bad a job. This is the 2nd one I've done. BTW, I'm 56. I got a decent used one from eBay for $95 including shipping. It had just been rebuilt before the car got scrapped. The head gasket kit with head bolts was about another $60. I put it all together last Friday (8-25-06) and it runs great. Started right up as soon as I got the new battery in it. The pastor at our church knows absolutely nothing about engines and mechanics. I told him that when I changed this head, he was going to help. He CLAIMED he was looking forward to it He did all the work following the directions I gave him. It took him about two hours to remove the old head and he managed to keep his religion intact! A couple of the intake and exhaust manifold bolts gave him some problems, but we overcame them together. So just relax and do the job one step at a time. There's no rush. Before you know it you'll be done! So anyway... here's the written directions: REPLACING HEAD ON 1.0 METRO ENGINE Remove spark plugs and unhook battery Loosen, but dont remove, 4 bolts on water pump pulley. 10 mm combination wrench Loosen, but dont remove, 4 bolts on crank. 10 mm deep well ¼ drive socket Use 17 mm socket to turn crank as needed Loosen the lower alternator bolt. 12mm combination wrench Loosen the upper alternator bolt. 12mm combination wrench Pull the alternator forward and remove the belt Remove the 4 water pump pulley bolts and remove the pulley. Remove the 4 crank pulley bolts and remove the pulley. Remove the 5 bolts and 1 nut from the timing belt cover 10mm combination wrench and remove the cover. or socket Set #1 cylinder to TDC, check timing marks. Loosen tensioner and remove timing belt. Remove 2 bolts from distributor and pull out distributor. 12mm socket Remove radiator hose from head. Remove bolts and nuts from exhaust manifold. Pull it forward and let it hang. 12mm Remove nuts and bolts from intake manifold and pull it back from the head. 12mm Socket ¼ drive Remove valve cover acorn nuts. 10mm combination or socket You will have to unscrew the valve cover rubber grommets since they have been squeezed around the threads. An awl and mallet worked for me to get each one started Gradually loosen head bolts about a quarter turn on each one until pressure is relieved from all 8 bolts. Follow the sequence in the Hanes manual. 14mm socket Remove the head By the way, I always enjoy your posts. The pictures are very informative. I also enjoy the display of our product on all your posts. I am a Millwright for General Dynamics in Lima, OH. The plant that builds the M1A1 Abrams Tank. |
|
|
|
|
|
08-28-2006, 11:20 PM
|
#19 | |
|
Geo Metro Lover
Join Date: May 2005
Location: Eastern Washington State, Washington
Posts: 1,622
Thanks: 0
Thanked 0 Times in 0 Posts
|
Re: That's the end of my '93 Metro.....
Hey Frets14! Thanks for the information! I'm sure it will help others also...
Yes - the Abrams Tank is something else! Paladin could have used one to flush out the bad guys. Couldn't pay me enough to be in one though.... Not with today's anti-tank missiles..... Well - By God, I dood it!  I got the damned thing off! You were right guys - no sweat! All the sweat was in my head. I took off the Exhaust Manifold and here is a pic of the compartment with the Gasket laid out. Below that is the gasket's other side. Looked OK.   Then came the Intake Manifold. Not as hard as I thought. For once I had the right tools. Came off swimmingly.... No pics. Then I removed the water hoses and electrical stuff. I took off the four cap nuts on the valve cover. Wouldn't come off until I realized that there were rubber grommets that had to be pried off. Do I need new ones? Then came the eight head bolts. I used a cheater pipe and loosened them 1,2,3,4,5,6,7,8 as in the Chilton Manual. The screamed as I loosened them! Scared the Hell out of me - thought they might break! Didn't though... Off came the head! Pictures of each cylinder valve set below. Number one is burned badly and cracked..... Jesus! Number 1 - 60 psi cylinder pressure test.  Number 2 - 95 psi cylinder pressure test.  Number 3 - 155 psi cylinder pressure test.  Wow - the valve on Cylinder One is cracked on the bottom right and off round on the left middle. These last photos were taken in the dark by flash. I finished just as it got too dark to see well. Tomorrow I'll take it into the Head Service people. Not NAPA. Why? That's all they do - probably more reliable..... I'm tired! Think I'll go to bed....... DoctorBill
__________________
|
|
|
|
|
|
08-28-2006, 11:30 PM
|
#20 | |
|
Geo Metro Lover
Join Date: May 2005
Location: Eastern Washington State, Washington
Posts: 1,622
Thanks: 0
Thanked 0 Times in 0 Posts
|
Re: That's the end of my '93 Metro.....
Now that I have the head off, can someone tell me about changing the rings
without removing the block? The insides of the cylinders were smeeoooth as a baby's butt! No scoring that I could see, But I suppose that's normal. What do I do, remove the oil pan, unscrew the piston rod bearing covers and push the pistons up out of the top? Is it difficult to lap the cylinder walls? Do you rent something to do that? Can you booger it up easily (I am good at that!) ? BTW - what will all the gaskets cost me just for the head job? What does a new set of Head Bolts cost? I forgot to set the cylinders to TDC piston #1 before I took off the head! Will it be difficult to reset the timing after the head Job and Piston Ring Job...? Am worried about that....! DoctorBill  BTW - Any Firefox, Mozilla or SeaMonkey users, try this! You'll be happy....! http://adblock.mozdev.org/
__________________
Last edited by DOCTORBILL; 08-29-2006 at 08:30 AM. |
|
|
|
|
|
08-29-2006, 09:17 AM
|
#21 | |
|
AF Regular
 Join Date: Jan 2005
Location: Mechanicsville, Virginia
Posts: 478
Thanks: 0
Thanked 0 Times in 0 Posts
|
Re: That's the end of my '93 Metro.....
DOCTORBILL;
While I haven't done my Metro, I've changed rings in other vehicles and recommend you get a ring expander to help do the job (it's just a fancy pair of pliers that help you spread out the rings so they will fit down over the piston, then when you relax them they go down into the grooves on the piston). Otherwise rings tend to be a bit brittle and if you don't apply pressure evenly to them they could break. Your description/sequence of how to change the rings looks good. You will need to get a cylinder hone, NAPA should have a selection. Honing or lapping the cylinder walls is not hard, you lubricate the walls with honing oil and move the hone up and down at a modest pace so that you get a crosshatched pattern on the cylinder walls which will allow the new rings to mate to the cylinder. With the crankshaft in the engine I would recommend rotating it to the bottom of its stroke for each cylinder so you will be less like to bang into the journals with the hone while you work on the individual cylinders. No big deal regarding not having the engine at TDC until you go to reassemble it and then you can simply spin the crank until the #1 cylinder comes to the top of it's stroke and go from there. You will want to pay attention to the end gap on the rings (that is the amount of space between the two cut surfaces on the ring when it is in place in the cylinder) you measure it with a feeler gauge and compare that against the spec, if you don't have enough then you adjust it by removing a small amount of material at a time until you get the correct spacing. Also some rings are designed to work in a certain orientation so check to make sure you install them according to the manufacturers directions. I would also recommend using some plastigauge to check your rod bearing tolerance when you install your new bearings and finally get yourself some motor assembly lube (historically I've use a product called lubriplate) and slather all the metal to metal surfaces with it when you do your final assembly this will help with your projects longevity as when you first start it up it will essentially be dry sinc eyou won't have had any oil circulating through the engine. http://www.napaonline.com/masterpage...=10&SubCatId=3 will give you an idea of what parts go for. Sometimes there are certain parts where the inexpensive one performs as well as the pricier one and sometimes it's well worth the difference to get the more expensive one and not have to replace it again. Hopefully others who have been down this path will chime in with their experiences regarding head gaskets/bolts etc. I see head gaskets are listed in a range of ~$60-100 but I have no idea what the differences might be. You are on the right track and can do this job just keep plugging away at it! |
|
|
|
|
|
08-29-2006, 09:47 AM
|
#22 | |
|
Geo Metro Lover
Join Date: May 2005
Location: Eastern Washington State, Washington
Posts: 1,622
Thanks: 0
Thanked 0 Times in 0 Posts
|
Re: That's the end of my '93 Metro.....
Thanks Idmetro..... nice explanation!
I can probably buy a ring expander and a ring compressor at Harbor Freight Tools for a reasonable price. The Chilton manual (p 3-34) says to use a "Ball Type" hone on the cylinder walls. I will, most likely, have to use whatever I can rent - what is available.... You mention the following, "...your rod bearing tolerance when you install your new bearings and ...." Are you saying I should replace the rod bearings on the piston rod ends that attach to the crank shaft?! Not sure I'm using the right jargon.... I hope not....That really makes me nervous..bearings. Cost also. You see, this job has gone from maybe $200 on up and up and up...... If all the Gaskets for this bugger are now going to cost more than the head job will cost, then rings, then rod bearings, then what else...!? I am now wondering what all this is going to total when I'm done... This is one reason I was reluctant to start - these damn vehicles cost an arm and a leg by the time you are finished - And I am doing the labor! And it may all be for nothing if I screw it up.... DoctorBill
__________________
Last edited by DOCTORBILL; 08-29-2006 at 10:47 AM. |
|
|
|
|
|
08-29-2006, 11:15 AM
|
#23 | |
|
AF Enthusiast
 Join Date: Jul 2003
Location: Detroit, Michigan
Posts: 1,307
Thanks: 0
Thanked 0 Times in 0 Posts
|
Re: That's the end of my '93 Metro.....
partsdinosaur.com
 He has awesome prices on his stuff. Be careful when honing. Try to keep the honing at 45-60 degrees in angle. If it's too shallow, it'll tear up the new rings pretty quick. If I were you, I'd get a rubber mallet and a small wood block. Makes removing/installing the pistons a TON easier. While you're at it, have about .010" shaved off the bottom of the head. It'll increase your compression to a still regular gas level, but give you a few extra hp, and help the fuel economy a bit. He has awesome prices on his stuff. Be careful when honing. Try to keep the honing at 45-60 degrees in angle. If it's too shallow, it'll tear up the new rings pretty quick. If I were you, I'd get a rubber mallet and a small wood block. Makes removing/installing the pistons a TON easier. While you're at it, have about .010" shaved off the bottom of the head. It'll increase your compression to a still regular gas level, but give you a few extra hp, and help the fuel economy a bit. |
|
|
|
|
|
08-29-2006, 11:17 AM
|
#24 | |
|
AF Regular
Join Date: Jan 2005
Location: Mechanicsville, Virginia
Posts: 478
Thanks: 0
Thanked 0 Times in 0 Posts
|
Re: That's the end of my '93 Metro.....
Glad the explanation was of use. I'm not necessarily saying you have to replace the rod bearings but I am advocating using the plastigauge to check them (I'd hate to have you reassemble a worn out one that might fail and make your work for naught). The plastigauge is just a little piece of plastic that you put on the crankshaft, place the bearing cap over the top, torque it to spec then remove the bearing cap and measure the width of the squished plastic to make sure your tolerance is within spec, if so remove the plastic replace the cap, retorque and away you go. If it turns out to be out of spec then you can make the decision to replace the bearing or not. A ring expander, ring compressor and possibly even a hone from harbor freight should work fine. I've used both ball type hones and ones with a set of stones (typically three) to do cylinder honing and had gotten good results from both. My rule of thumb is if I'm only going to use it once or twice then a tool from harbor freight fits the bill nicely, if it's a tool I'm going to use with more frequency than that then I pony up the dollars and buy a better grade because I know from painful experience that I'll recoup the money spent in time saved. My father-in-law ran by the rule that you should figure out what tool you need for the job and then buy the next bigger one as the job ALWAYS expanded once you got started; seems to have held true and when I actually keep it in mind I get a lot less frustrated. When you remove/replace/reuse the rod bearing caps/bearings and the pistons I would keep track of their orientation (which cylinder, which direction) so they will mate back up with minimal disturbance when you reassemble. I can certainly sympathize with the additional costs of the project over what was initially envisioned. Possibly it will make it somewhat easier to live with if you remind yourself that you are making the vehicle far more reliable than it was and you are essentially paying yourself (even if the payback period has now been extended). By taking your time you dramatically lower the risk of as you say "screwing it up" I too have learned my share of hard lessons and this is one place where it doesn't pay to hurry.
|
|
|
|
|
|
08-29-2006, 12:34 PM
|
#25 | |
|
AF Moderator
Join Date: Oct 2004
Location: Bellingham, Washington
Posts: 1,751
Thanks: 0
Thanked 73 Times in 73 Posts
|
Re: That's the end of my '93 Metro.....
i am afraid by the time you buy all the gaskets and rings and bearings and tools your going to have a lot more in it than you planned. i found out that its easier for me to replace the engine with a jdm and cheaper than to rebuild the motor in the car. thats why i have so many spare parts. i have about 5 core engines in the shop at the moment. most just had 1 dead cyl from a burned valve and i replaced them with jdm engine. i rebuilt a few when i first started on metros and they worked ok. it just took to long and cost about the same amount
|
|
|
|
|
|
08-29-2006, 05:25 PM
|
#26 | |
|
AF Newbie
Join Date: Dec 2004
Location: Fostoria, Ohio
Posts: 98
Thanks: 0
Thanked 0 Times in 0 Posts
|
Re: That's the end of my '93 Metro.....
Doc,
I know that a true Metro mechanic would advocate rebuilding the entire engine. I've heard it said that by just rebuilding the head the extra compression will cause oil to be forced past the rings. I installed a rebuilt head over a year ago. did nothing to the rings and couldn't be more satisfied with the performance. It is, after all, still a Metro. The head I replaced last weekend was done the same way. I swapped out the head, put it together and it purrs like a kitten. It certainly is your choice, but if you're anxious to get the car back on the road... I'd suggest just changing the head and start bypassing gas stations. Just my opinion and I don't claim to be an expert! The complete head gasket set with the bolts can usually be found on eBay for under $60. That's where I got mine. It was delivered in about 3 days. |
|
|
|
|
|
08-29-2006, 06:16 PM
|
#27 | |
|
Geo Metro Lover
Join Date: May 2005
Location: Eastern Washington State, Washington
Posts: 1,622
Thanks: 0
Thanked 0 Times in 0 Posts
|
Re: That's the end of my '93 Metro.....
Don't read this if you are impatient - I relate my experiences today!
I took the head into the "Cylinder Head Service" company in Spokane. No one was at the counter, so I sat the head on the counter and just then a grizzled shop fellow walked up and from maybe 20 feet away said, "Ah Ha! A Geo Metro Head !" He recognized it from 20 feet away! He was filthy to the bone, had a long scraggily beard, was toothless and skinny as a dried up corpse. The Boss was out.. This skin and thinny "mountain man" proceeded to tell me what needs to be done...... Said I had better do the rings as even a small piece of carbon lodged in the old rings could come out catch under the Exhaust Valve and stop it from fully closing. Then it would burn up in a week. My cylinder head and the top of all my pistons have huge, thick, hard flakes of carbon covering them and flaking off easily. I figured the way he talked, he knew more about engines than I know about Chemistry .probably has the equivalent of a PhD in engines. Then he told me about putting the pistons back in see farther below. $140 labor, $9.10 per Exhaust Valve (Intake Valves are not changed out), and then the cost of the Gaskets. Hopefully nothing else wrong . The Boss Guy showed up and said he'd get me the "Complete Gasket and seal Set" for $48 ! That set is $98 at Schucks! He uses part of the set and I get the Head, Exhaust and Intake Gaskets in the deal! Nice! Saved $50 bucks right out of the chute. Almost everyone I talk to (or where ever I read), says to definitely do the rings. So - the Majority Rules! Now - Motion Auto and Schucks both show 2 or 3 ring sets. "Which one?" they ask me..... Crap! I don't know! Any way to tell which set I need short of pulling the pistons out to see? Big difference in price! $50 versus $80.... Then - Standard or oversized? Merde! Duuuh So here I am with my head up my Butt not knowing what to say to them.... Also - I found a ring spreader at Motion for $5 (whew!). But they want $30 for a compressor that Harbor-Freight sells for $10. Then the Honing tool .I don't know if to rent or buy. Chilton says to use the "Ball Type." So I guess I'll go with that - if I can find one. Back to the grizzled, dirty, toothless shop guy. He said that when I tap the pistons back into the cylinder after installing the new rings, that I should go cut small pieces of heater hose and cut them lengthwise and fit them over the bearing surface of the place the piston rod bearings go. That way, when I tap the pistons back down, the piston rod can't accidentally strike the bearing surface and nick it (Disastrous!). I love talking to people who know their butts from a hole in the ground. You pick up fabulous information! So, tomorrow the Head will be done. $250 I suspect. (???) Can anyone tell me how many rings this beast will have on each piston? Should I replace the eight Head Bolts? The grizzled guy said why bother? DoctorBill PS - I'd bet that the "mountain Man" shop guy is no older than 40! Bet he has seen everything and done everything... One used up looking fellow! He seemed eager to talk...the boss was out to lunch! lol
__________________
|
|
|
|
|
|
08-29-2006, 06:44 PM
|
#28 | |
|
AF Moderator
Join Date: Oct 2004
Location: Bellingham, Washington
Posts: 1,751
Thanks: 0
Thanked 73 Times in 73 Posts
|
Re: That's the end of my '93 Metro.....
replace the bolts, they are a torque to stretch bolt and if even 1 fails you will be pulling it all back apart again. standard metro will have 3 rings, 2 compression rings and a oil ring. xfi only has 2 rings. unless you have engine bored you don't need oversize rings. check each cyl wall about 1/4" from top to check for a ridge. if there is one there you need to get a ridge reamer to remove it or have it bored out. ring spreader is nice to have but not absolutly needed, ring compressor is. might ask local parts stores, some rent tools. you will also need a decent quality torque wrench for the head bolts and rodswhen you put it together you want is clean and you can get it inside, especially crank surface. to clean the carbon out of the piston tops and ring grooves break one of the rings (used) in half and use it to clean. after cleaning grooves blow them out with air to make sure they are clean. also pay attention to ring gap spacing when installing pistons. it should say on package or in your book
|
|
|
|
|
|
08-29-2006, 07:41 PM
|
#29 | |
|
Geo Metro Lover
Join Date: May 2005
Location: Eastern Washington State, Washington
Posts: 1,622
Thanks: 0
Thanked 0 Times in 0 Posts
|
Re: That's the end of my '93 Metro.....
Thank you for the Ring Information! I will buy the Ring Compressor at Harbor-Freight.
I went to Schuck's Web Site for the rings.... Rings - Standard '93 Geo Metro 3 cylinder engine  here are the ones I am supposing I should buy, yes?  $50. If I count correctly from the picture there, that's 15 rings... What!? What is a limited Lifetime Warranty anyway? Like when you get a heart transplant and the surgeon says, "We guarantee the heart until you die..." NAPA's price - same order number and picture! $65.49 Yowie! Thanks NAPA.... Also this.....could I have bought the entire head - new for $226 at Schucks? 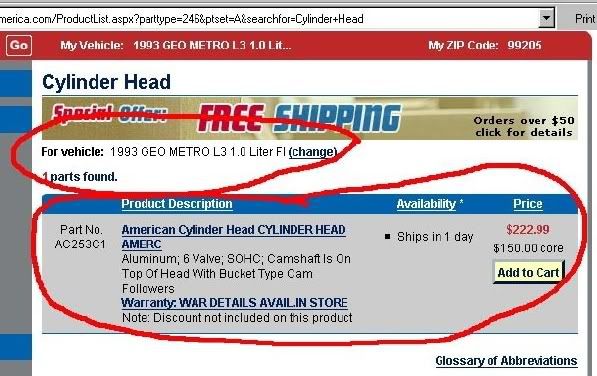 But then I wouldn't be getting all the gaskets also... DoctorBill
__________________
Last edited by DOCTORBILL; 08-30-2006 at 09:00 PM. |
|
|
|
|
|
08-30-2006, 09:31 AM
|
#30 | |
|
AF Enthusiast
Join Date: Jul 2003
Location: Detroit, Michigan
Posts: 1,307
Thanks: 0
Thanked 0 Times in 0 Posts
|
Re: That's the end of my '93 Metro.....
More than likely, yours is a 3 ring per piston set. Don't mind the pictures, they're just a generic picture the site puts up.
http://importperformanceparts.net/ Ring set there is $45, and i've had nothing but good luck with them. I've used their parts on al of my rebuilds. 3tech sells non-stretching reusable headbolts for $25 also! For $3 more a piece, you coulda got his stainless exhaust valves  . . If you've never installed rings, you're gonna have fun learning  . Soak the pistons in a pan of de-carb solution overnight before attempting to clean them. After an overnight soaking, you can clean them with a stiff bristle brush(not metal). Also, take a toothpick to clean out the oil holes behind the oil ring(looks like a mesh ring held in by 2 thin rings). Those oil passages are very important. Especially to an engine with new rings. By no means ever get the piston wet with water though. Might get water trapped in the wrist pin. And that'll rust in a BIG hurry. Clean the de-carb off with brake cleaner, and spray it down with wd-40 or some other type of oil coating while they sit. . Soak the pistons in a pan of de-carb solution overnight before attempting to clean them. After an overnight soaking, you can clean them with a stiff bristle brush(not metal). Also, take a toothpick to clean out the oil holes behind the oil ring(looks like a mesh ring held in by 2 thin rings). Those oil passages are very important. Especially to an engine with new rings. By no means ever get the piston wet with water though. Might get water trapped in the wrist pin. And that'll rust in a BIG hurry. Clean the de-carb off with brake cleaner, and spray it down with wd-40 or some other type of oil coating while they sit. And 1 tip putting in the oil ring... Be patient.. It's a very annoying one if you've never done it before. It's got a "mesh" type ring, held in by 2 very thin rings. One that goes around the bottom, and one around the top of it. Make sure the gap on that ring is at least 90* from the gap on the "mesh" like ring also. |
|
|
|
|
|
|
POST REPLY TO THIS THREAD |
 |
|
|


