|
|
|

|
|
| Search | Car Forums | Gallery | Articles | Helper | AF 350Z | IgorSushko.com | Corporate |
|
| Latest | 0 Rplys |
|
|||||||
| Tips and Maintenance Procedures Post helpful tips, maintenance guides and R&R procedures for all Buick models here. |
 |
 Show Printable Version | Show Printable Version |  Email this Page | Email this Page |  Subscribe to this Thread
|
|
|
Thread Tools |
 08-01-2008, 08:33 AM
|
#1 | |
|
AF Moderator
 Join Date: Jan 2005
Location: El Paso, Texas
Posts: 18,017
Thanks: 30
Thanked 53 Times in 41 Posts
|
Tensioner Assembly Removal for SII 3800 Engine and Bypass Elbows '99 and Up
This procedure may come in handy to remove the main serpentine drive belt tensioner assembly. Also, it is highly recommended to remove the tensioner to replace the pulley or install a new tensioner assembly which should come with the pulley. Further, tensioner removal is required when replacing lower intake manifold gaskets.
Note: Make sure engine is cool. Disconnect battery negative cable before starting work. 1) Sufficiently drain coolant. 2) Remove serpentine drive belt. Use a 15mm socket on the tensioner pulley bolt and turn counterclockwise to loosen belt. Note: For clearance to get to the tensioner pulley bolt on GM cars that have the coolant reservoir located on the right strut tower remove the coolant reservoir first. 3) Remove alternator. Use 15mm short and deep sockets on mounting bolts. 4) Remove heater hoses from tensioner fittings. <-- Or you can leave them connected if doing just a LIM job. 5) Remove tensioner retaining bolts. Total 3 bolts 15mm socket size. See pic. 6) Remove tensioner from engine. Note: While removing tensioner you will be removing the large 90 degree plastic elbow that connects to the lower intake manifold and at the same time the shorter 90 degree elbow to the water pump. You may have to pry or pull hard on the tensioner to get it off. 7) Installation is reverse. 8) Use new o-rings on the elbows. GM/Delco elbows will have the two o-rings. See pic. Inspect elbows for cracks or damage. Replace, if necessary. In most cases the ends of each elbow will break off during tensioner removal requiring replacement. See pic at this post. 9) Torque tensioner bolts to 37 ft-lbs. NOTE: Applicable to all '99 and up GM cars equipped with the L36 or L67 SII 3800 engine. Elbow to lower intake manifold (LIM) - GM Part # 24503423 Elbow to water pump - GM Part # 12565082 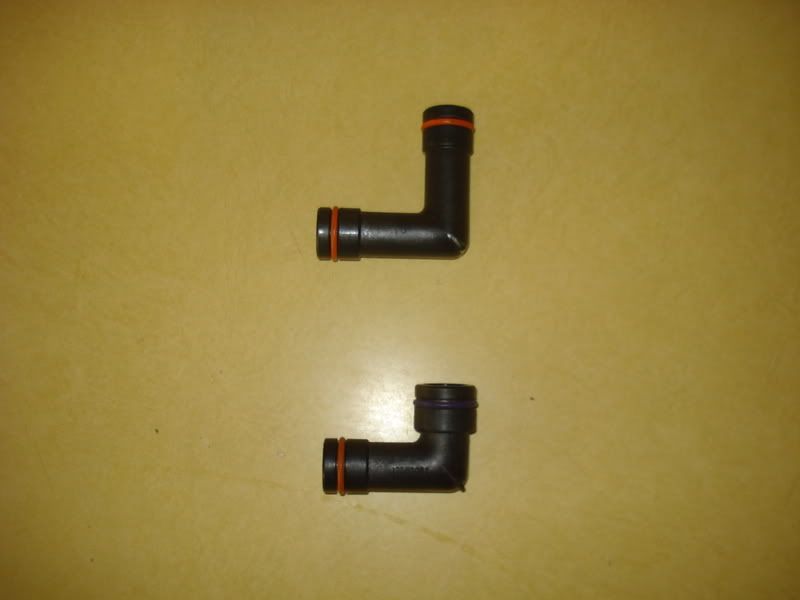 Tensioner bolt location. Total 3 shown by red arrow and circles. Use 15mm socket. 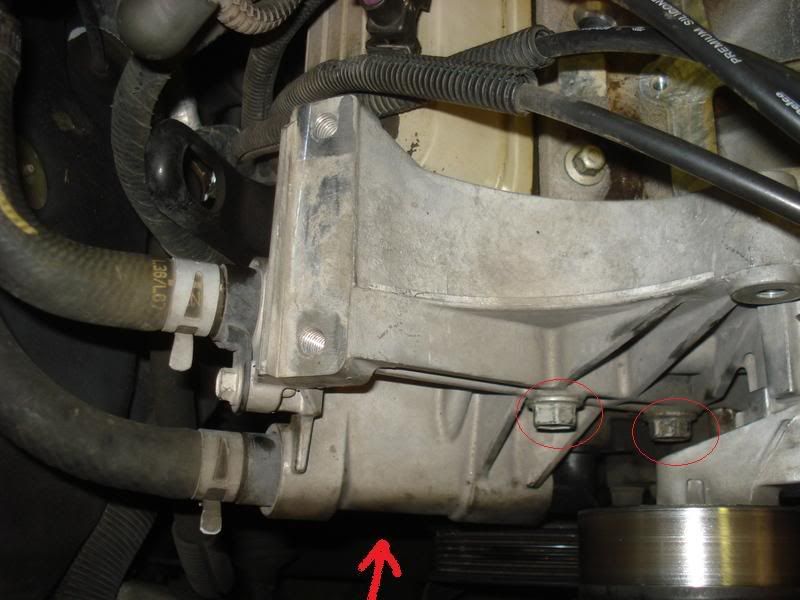
__________________
'08 Pontiac Grand Prix GXP (Dark Slate Metallic) - LS4 5.3L V8 '02 Oldsmobile Alero GL2 - LA1 3400 V6 '99 Buick Regal LS - L36 Series II 3800 V6 '03 Honda CR250R MX - 2 Stroke 250cc '97 Pontiac Grand Prix GTP - L67 Series II 3800 V6 Supercharged (Sold) Timeslip 08/12/06 AF Community Guidelines Last edited by BNaylor; 01-19-2009 at 10:05 AM. |
|

|

|
| The Following User Says Thank You to BNaylor For This Useful Post: |
porterico (10-28-2011)
|
|
09-07-2008, 01:26 PM
|
#2 | |
|
AF Moderator
Join Date: Jan 2005
Location: El Paso, Texas
Posts: 18,017
Thanks: 30
Thanked 53 Times in 41 Posts
|
Re: Tensioner Assembly Removal for SII 3800 Engine and Bypass Elbows
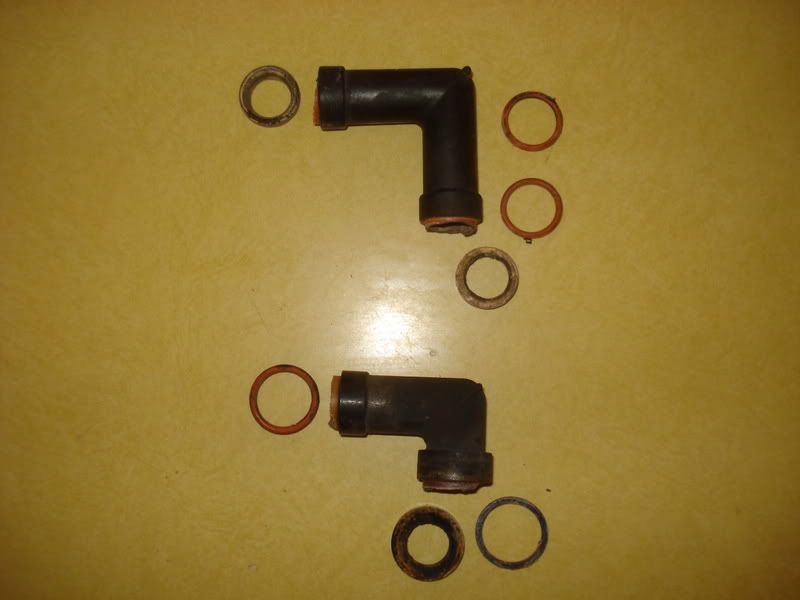
Pics of coolant bypass elbows after tensioner is removed. Not too fun picking out the broken plastic pieces out of the water pump and LIM outlet ports.
__________________
'08 Pontiac Grand Prix GXP (Dark Slate Metallic) - LS4 5.3L V8 '02 Oldsmobile Alero GL2 - LA1 3400 V6 '99 Buick Regal LS - L36 Series II 3800 V6 '03 Honda CR250R MX - 2 Stroke 250cc '97 Pontiac Grand Prix GTP - L67 Series II 3800 V6 Supercharged (Sold) Timeslip 08/12/06 AF Community Guidelines |
|
|
|
|
| The Following User Says Thank You to BNaylor For This Useful Post: |
porterico (10-28-2011)
|
|
01-01-2010, 04:19 PM
|
#3 | |
|
AF Enthusiast
Join Date: Sep 2004
Location: N.W., Washington
Posts: 764
Thanks: 0
Thanked 4 Times in 4 Posts
|
Re: Tensioner Assembly Removal for SII 3800 Engine and Bypass Elbows '99 and Up
Thanks BNaylor,
I love when people post pictures. Chris.
__________________
1998 Buick Park Avenue (best car GM ever made) Buick Lesabre 1997, 191,000 152,000 - Motor R.I.P. Used 111,000 Motor, All New Gaskets Used 102,000 Transmission - SOLD New Balance 662 Trek 8000 
|
|
|
|
|
|
01-15-2010, 07:38 PM
|
#4 | |
|
AF Newbie
Join Date: Jan 2010
Location: Zeeland, Michigan
Posts: 2
Thanks: 0
Thanked 0 Times in 0 Posts
|
WOW!!! Am I glad that I found this info. I have a 2001 Buick Lasabre, and the antifreeze has been slowly disappearing from the resevoir for five years, but it got a whole lot worse in just the last two weeks. The antifreeze would "pool up" under the removable engine plastic cover right at the front edge of the black intake cover where there is a metal "pocket". I also noticed antifreeze near the tensioner on a ledge, but couldn't figure out how the antifreeze could get from that area to the front "pocket". In hindsight, it must be some kind of airflow.
In any case, the problem was exactly what is shown earlier in this thread. The two 90 degree "pipes" came in a kit and cost less than $4.00. The big "stovepipe" had a bad end where it went into the main block. I am so pleased that this was an easy 2 hour fix. No heads to pull, WONDERFUL!!! The only part that was a bit frustrating was draining the antifreeze out. I had to use a long socket with a pipe taped to it to unscrew the drain plug and recover the antifreeze. I suppose it might be argued to change the antifreeze too, but I had gone through a gallon already, and the recovered amount looked clean. Many thanks to all, and I needed to leave that message here! |
|
|
|
|
|
01-16-2010, 10:16 AM
|
#5 | ||
|
AF Newbie
Join Date: Jan 2010
Location: Zeeland, Michigan
Posts: 2
Thanks: 0
Thanked 0 Times in 0 Posts
|
Re: Tensioner Assembly Removal for SII 3800 Engine and Bypass Elbows '99 and Up
Quote:
|
||
|
|
|
|
02-23-2011, 02:49 PM
|
#6 | |
|
AF Newbie
Join Date: Feb 2011
Location: Greenville, South Carolina
Posts: 12
Thanks: 2
Thanked 0 Times in 0 Posts
|
Thanks you so much for this infromation i needed it badly
ive been trying to figure this thing out for three days now i can finally save on anti freeze
__________________
Samples |
|
|
|
|
|
10-28-2011, 07:40 PM
|
#7 | |
|
AF Newbie
Join Date: Oct 2011
Location: Oakland, California
Posts: 3
Thanks: 2
Thanked 0 Times in 0 Posts
|
Re: Tensioner Assembly Removal for SII 3800 Engine and Bypass Elbows '99 and Up
Awesome information.
I had a bad radiator, replaced it... but was still losing coolant water pump went out... figured that was the problem... replaced it... but still losing coolant Problem started getting serious using 1 gallon of water / coolant every 20 miles or so... could not find the leak... Then it just started looking wet around this area in question, couple days later it was spraying out... on the verge of failure. It was really easy to take apart... the elbows are fairly melted into the tensioner assembly unfortunatley... it will take a bit of work to clean up the assembly, but yea... a few dollar fix makes this totally worth it. I will update to let yall know if this finally solves my cooling system issues once and for all... |
|
|
|
|
|
10-29-2011, 07:09 AM
|
#8 | |
|
AF Fanatic
Join Date: Jul 2011
Location: Worcester, Massachusetts
Posts: 5,017
Thanks: 70
Thanked 618 Times in 610 Posts
|
Re: Tensioner Assembly Removal for SII 3800 Engine and Bypass Elbows '99 and Up
I NEVER just replace the o-rings....I always replace the elbows and o-rings.....even though the lower one rarely leaks......on the opposite side of the engine, under the throttle body, that leak is usually the throttle body gasket.....
|
|
|
|
|
|
10-29-2011, 03:06 PM
|
#9 | |
|
AF Newbie
Join Date: Oct 2011
Location: Oakland, California
Posts: 3
Thanks: 2
Thanked 0 Times in 0 Posts
|
Re: Tensioner Assembly Removal for SII 3800 Engine and Bypass Elbows '99 and Up
is there any need to use some kind of sealant when installing the elbows?
|
|
|
|
|
|
11-14-2011, 11:42 AM
|
#10 | |
|
AF Moderator Elite
Join Date: Feb 2005
Location: Gilligan's Island, Florida
Posts: 5,762
Thanks: 83
Thanked 72 Times in 72 Posts
|
Re: Tensioner Assembly Removal for SII 3800 Engine and Bypass Elbows '99 and Up
NOTE: Do not use the DORMAN elbow kits, the O-rings are too small and will soon start leaking. Use only GM part numbers shown in the first post. BTW, when using the GM fittings/o-rings, there is no need to use any type of sealant, but it helps to spray the o-rings with silicone before installing.
__________________
Knowledge can be communicated, but not wisdom!    |
|
|
|
|
| The Following User Says Thank You to HotZ28 For This Useful Post: |
enslow (11-14-2011)
|
|
11-14-2011, 11:50 AM
|
#11 | |
|
AF Regular
Join Date: Aug 2010
Location: Coquitlam
Posts: 319
Thanks: 12
Thanked 33 Times in 31 Posts
|
Re: Tensioner Assembly Removal for SII 3800 Engine and Bypass Elbows '99 and Up
When I did my LIM gaskets, I followed advice elsewhere to use Help! elbows with a skim coat of RTV. I guess if they leak in the future, I'll have to replace them with GM, and spend some fun time removing RTV. If only I knew.....
|
|
|
|
|
|
11-14-2011, 02:08 PM
|
#12 | |
|
AF Newbie
Join Date: Oct 2011
Location: Oakland, California
Posts: 3
Thanks: 2
Thanked 0 Times in 0 Posts
|
Re: Tensioner Assembly Removal for SII 3800 Engine and Bypass Elbows '99 and Up
I replaced using the dorman kit which was like $4 at Oreilly, and didn't use sealant. I torqued the bolts to the specified torque and had no leaking at all. The car got totalled about a week after I replaced the elbows, so I won't be able to find out if they leak soon after install. Thanks again for the great thread.
|
|
|
|
|
|
11-14-2011, 10:26 PM
|
#13 | |
|
AF Moderator Elite
Join Date: Feb 2005
Location: Gilligan's Island, Florida
Posts: 5,762
Thanks: 83
Thanked 72 Times in 72 Posts
|
Re: Tensioner Assembly Removal for SII 3800 Engine and Bypass Elbows '99 and Up
The leak with the DORMAN fittings/O-rings will start with the weather change, expansion/contraction in cold weather.
__________________
Knowledge can be communicated, but not wisdom! |
|
|
|
|
|
08-22-2012, 11:17 PM
|
#14 | |
|
AF Newbie
Join Date: Aug 2012
Location: sc, Pennsylvania
Posts: 1
Thanks: 0
Thanked 0 Times in 0 Posts
|
Re: Tensioner Assembly Removal for SII 3800 Engine and Bypass Elbows '99 and Up
3800 Performance offers high performance aftermarket car parts and modifications for your 3800 Series II and 3800 Series III Pontiac and gives you the complete satisfaction.
3800 series engine parts |
|
|
|
|
|
08-24-2012, 09:04 AM
|
#15 | |
|
Buick Enthusiast

Join Date: Jun 2010
Location: Potomac Falls, Virginia
Posts: 280
Thanks: 56
Thanked 4 Times in 4 Posts
|
Re: Tensioner Assembly Removal for SII 3800 Engine and Bypass Elbows '99 and Up
Yes, very interesting topic!!
Last summer I had a BAD experience with the serpentine belt tensioner. It was getting very NOISY.. screeching actually. Was about to get the "pulley" replaced but put it off for two weeks. An appointment was made, however 1-1/2 days before the service visit, the tensioner bearing FAILED (froze up) and the belt came off. It was so frozen, I couldn't turn the pulley by hand at all. See photo below. Here is a photo of the FAILED bearing. The pulley is cocked sideways.  A replacement pulley bearing wasn't expensive at all, and you'd be surprised how much QUIETER the engine was with a new one. It was like a new engine! What also helped was a high-tech Goodyear Gator belt which runs quiet and resists cracking on the inside ridges. Below is the NEW tensioner bearing and belt installed. Again I couldn't believe how QUIET the engine idled after this fix!!!  Should have had that item replaced a LONG time ago.. or at least two weeks sooner. Notice the variable "block width" on the belt.. it's like low-noise tire technology. Lol In this case I recommend ditching the OE belt. -Ed Last edited by edwinn; 10-19-2013 at 06:25 AM. |
|
|
|
|
|
|
POST REPLY TO THIS THREAD |
 |
|
|


