

|
| Search | Car Forums | Gallery | Articles | Helper | AF 350Z | IgorSushko.com | Corporate |
|
| Latest | 0 Rplys |
|
|||||||
| WIP - Motorsports Post topics for any "Work In Process" motorsports vehicles in this sub-forum. |
 |
 Show Printable Version | Show Printable Version |  Email this Page | Email this Page |  Subscribe to this Thread
|
|
|
Thread Tools |
|
|
#631 | |
|
AF Enthusiast
Join Date: Aug 2005
Location: where "sky grey" is a colour
Posts: 822
Thanks: 3
Thanked 32 Times in 29 Posts
|
Re: 1/8 Porsche 935/78 'Moby Dick'
Love it!
It's always impressive to see how your builds come alive during painting of all those parts! |
|
|
|

|
|
|
#632 | |
|
AF Enthusiast
Thread starter
Join Date: Nov 2008
Location: Norwich
Posts: 649
Thanks: 21
Thanked 111 Times in 87 Posts
|
Re: 1/8 Porsche 935/78 'Moby Dick'
Hello again,
So, I've been spending a lot of time recently trying to finish off the various bits of pipework for the cooling circuits. With the intercooler plumbing sorted out last time, I returned to the head-cooling pipes (which I'd started some time ago). Access wasn't easy with the engine in place, so I used my normal technique of breaking the pipes into smaller sections, bending a wire core, and adding slices of styrene tube to suit: 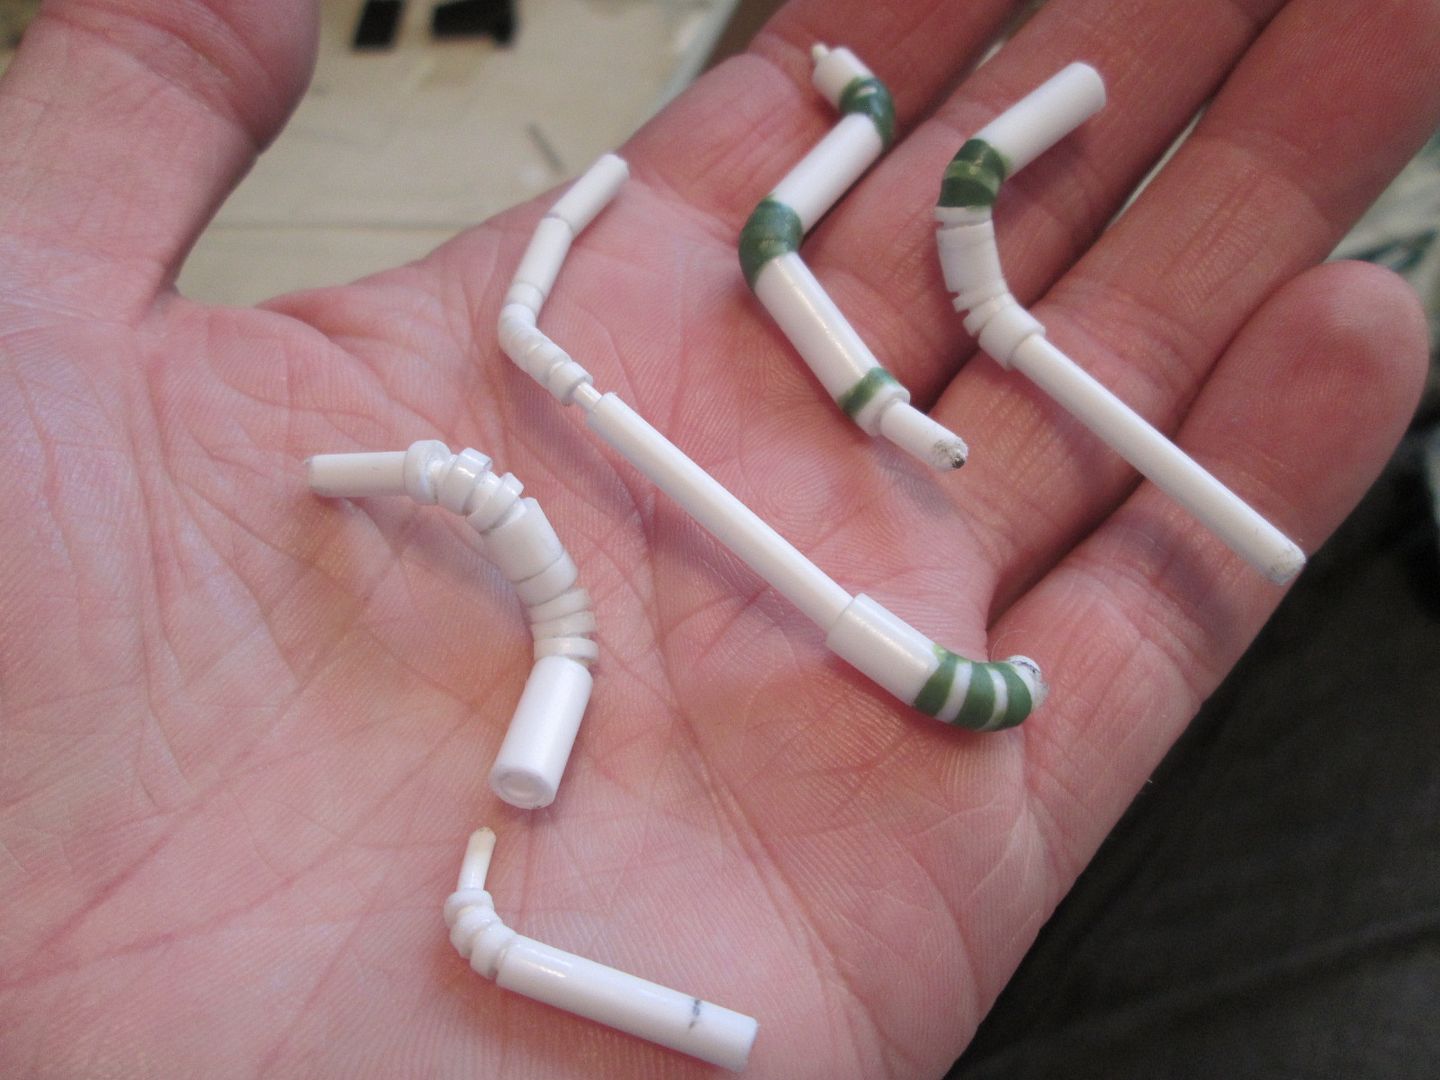 The main pipes running from the side radiators were trimmed to length after passing through the rear bulkhead, and the new pipes drop down to the top of the engine and the two lower water pumps. Here's the left-hand side: 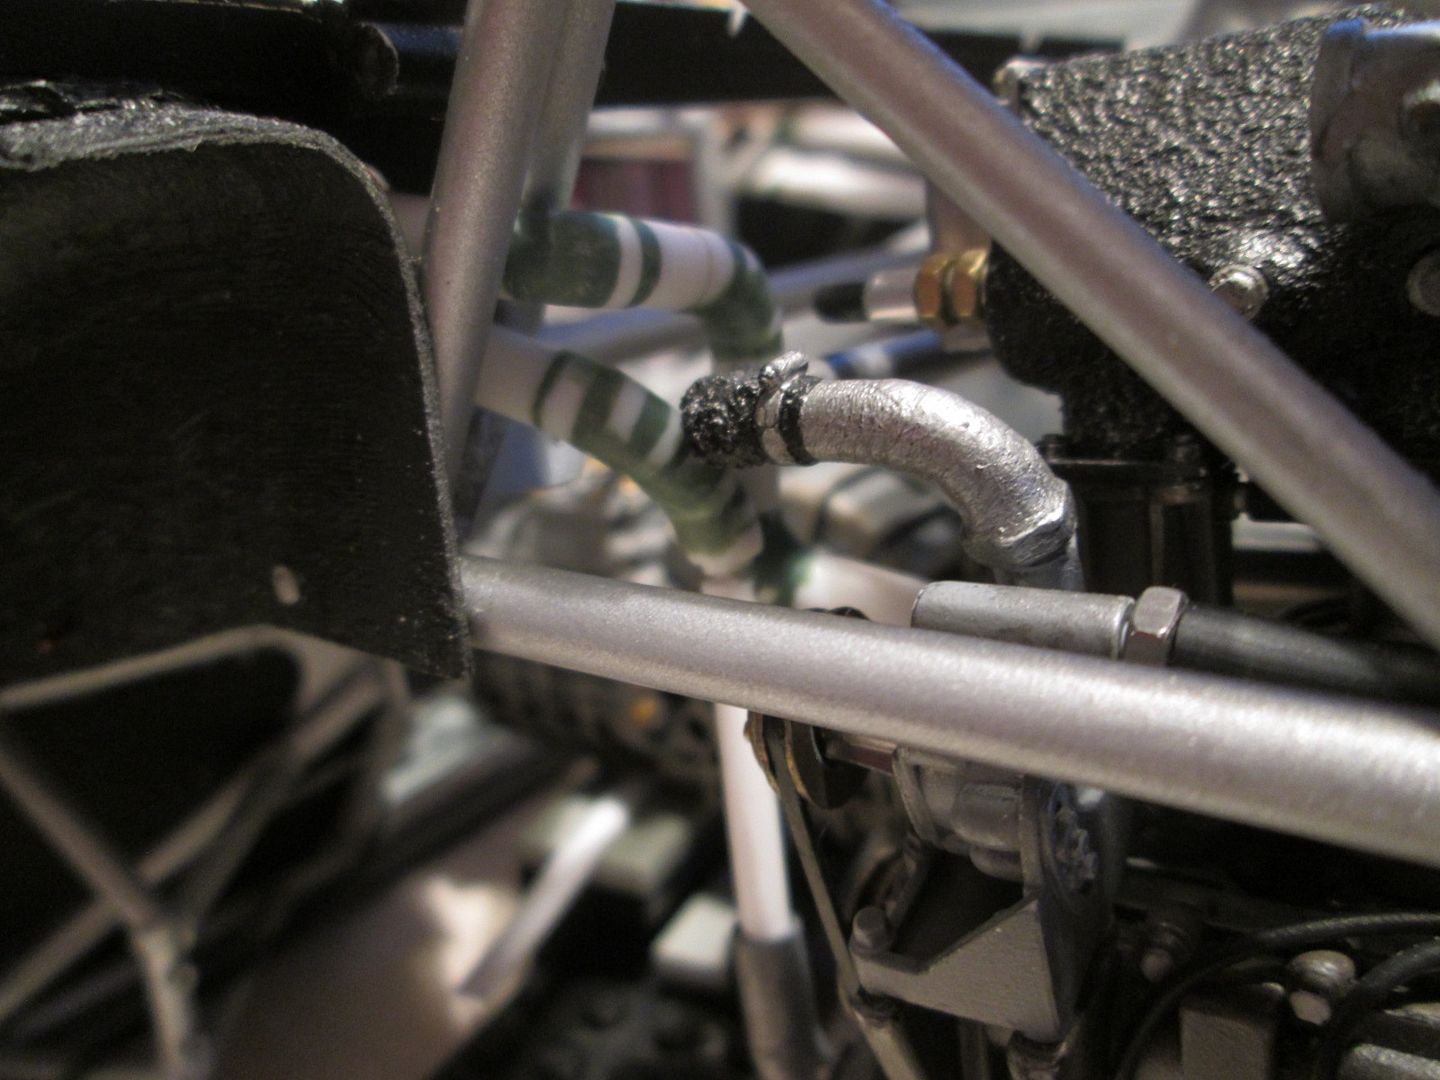 ...and here's the right: 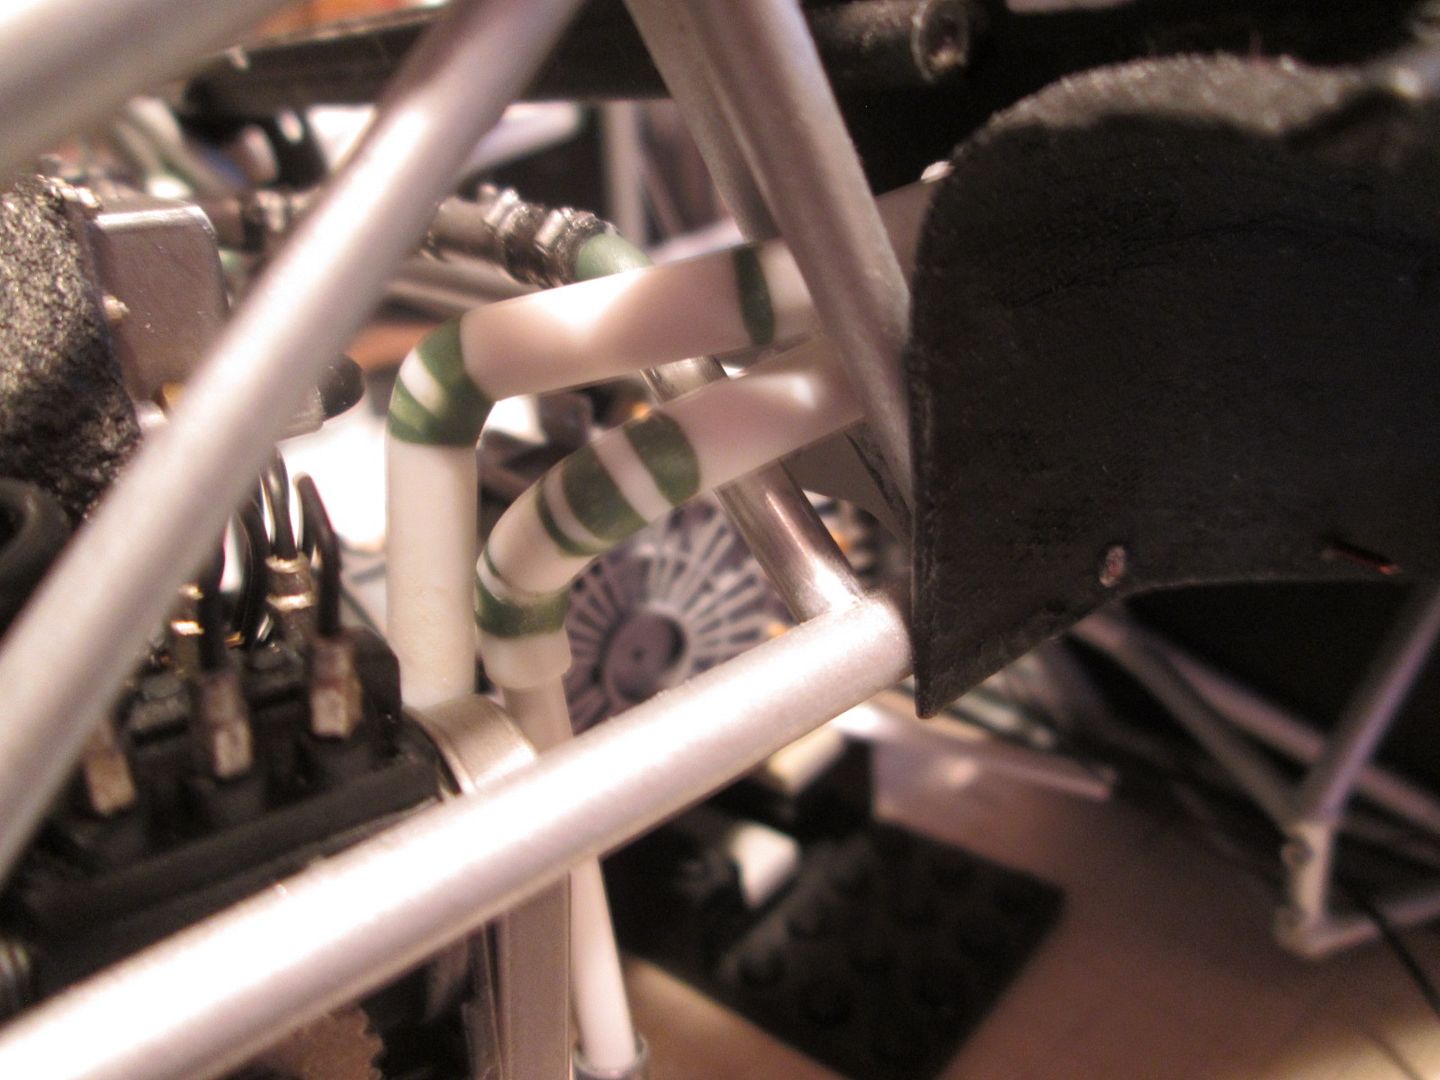 The final fitting of all this pipework is going to be a pain, I can feel it! I've made eight more hose sections from larger styrene tube, complete with hose-clip detailing, and these will slip over the pipes and hide all the joints, so there's a little room for misalignment. Also visible in this photo is the new pipe which connects the intercooler system to the chassis tube, and so to the cooler at the front of the car. There's something similar on the left-hand side, to the water pump, but it's hidden behind the chassis panelling. Both of these pipes can only be fixed in place once the engine / gearbox assembly is fitted, of course... Two more things tonight. I wanted to finalise the attachment points for the clutch and throttle cable, but was struggling with reference material. I found a couple of shots showing the clutch cable slotted into a web on the top of the gearbox, so that was the starting point. The throttle cable (or cables, as photos clearly showed a spare was pre-installed for racing) was a mystery, though. My first thought was to mount them to the underside of the water header tank, but (a) this didn't seem very Porsche-like and (b) from what I could see of the cables they're pulling from low down, not higher up. So, I added a simple bracket to the top of the new gearbox web for the clutch cable: 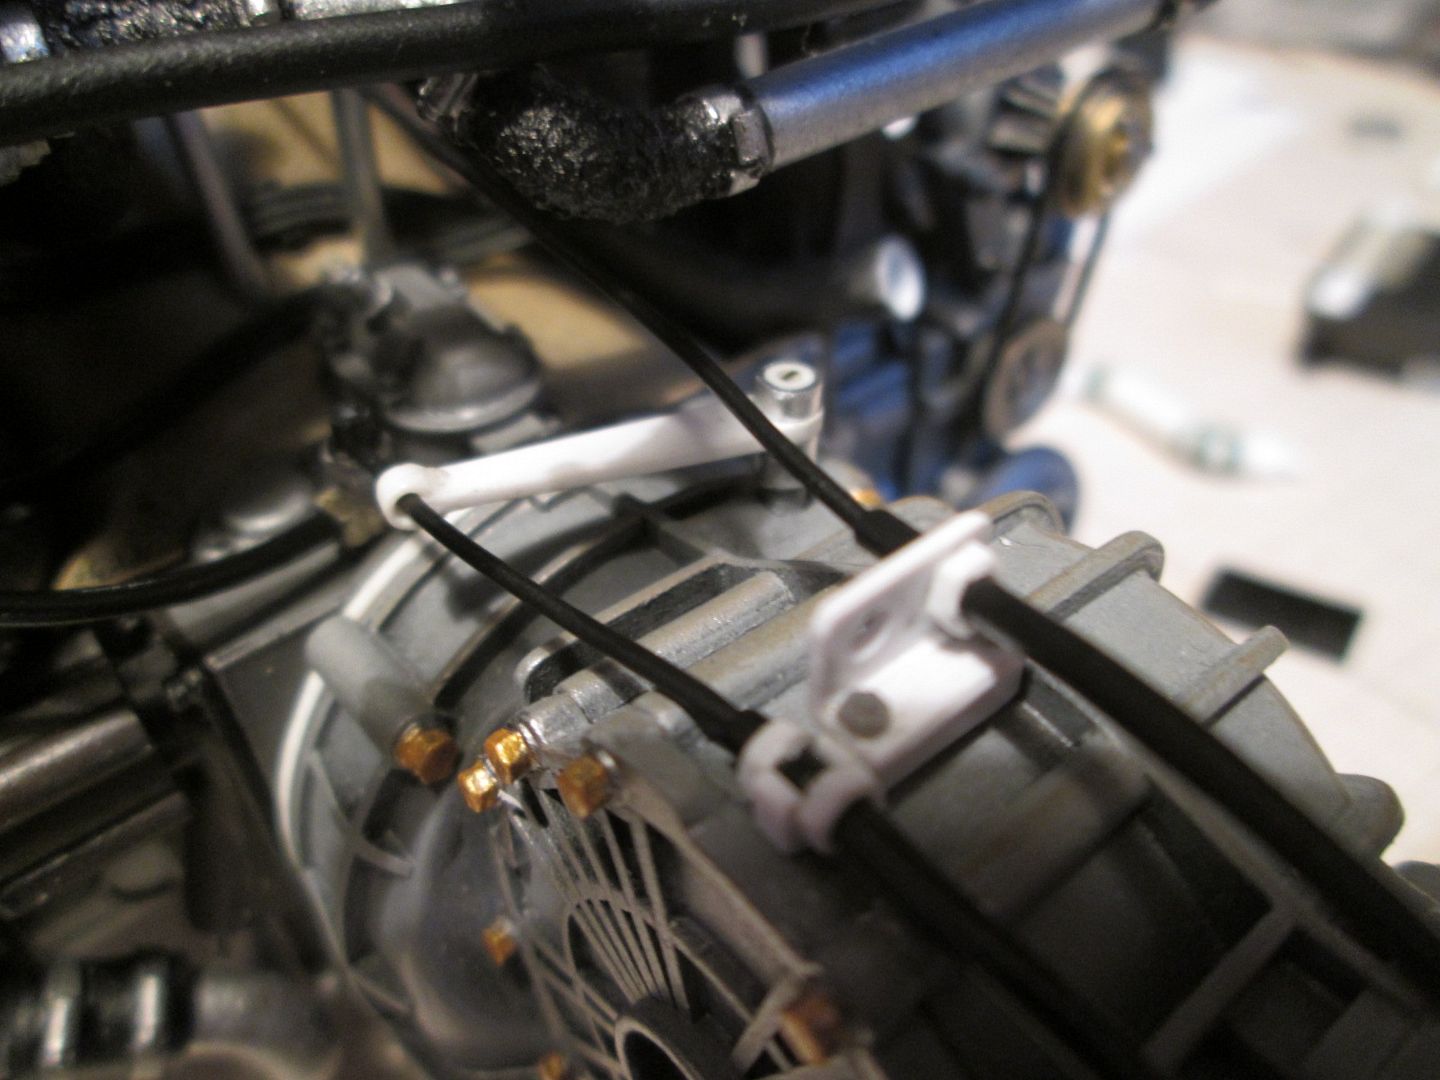 It's possible that the cables could be mounted off the top of the engine breather cover, but I have nothing to confirm this. My version is plausible, and that's good enough for me! In the background of the photo above you can also see the two pulleys and belt detailing for the intercooler water pump. Finally for tonight, I've started making the mounting plate which supports the front of the gearbox: 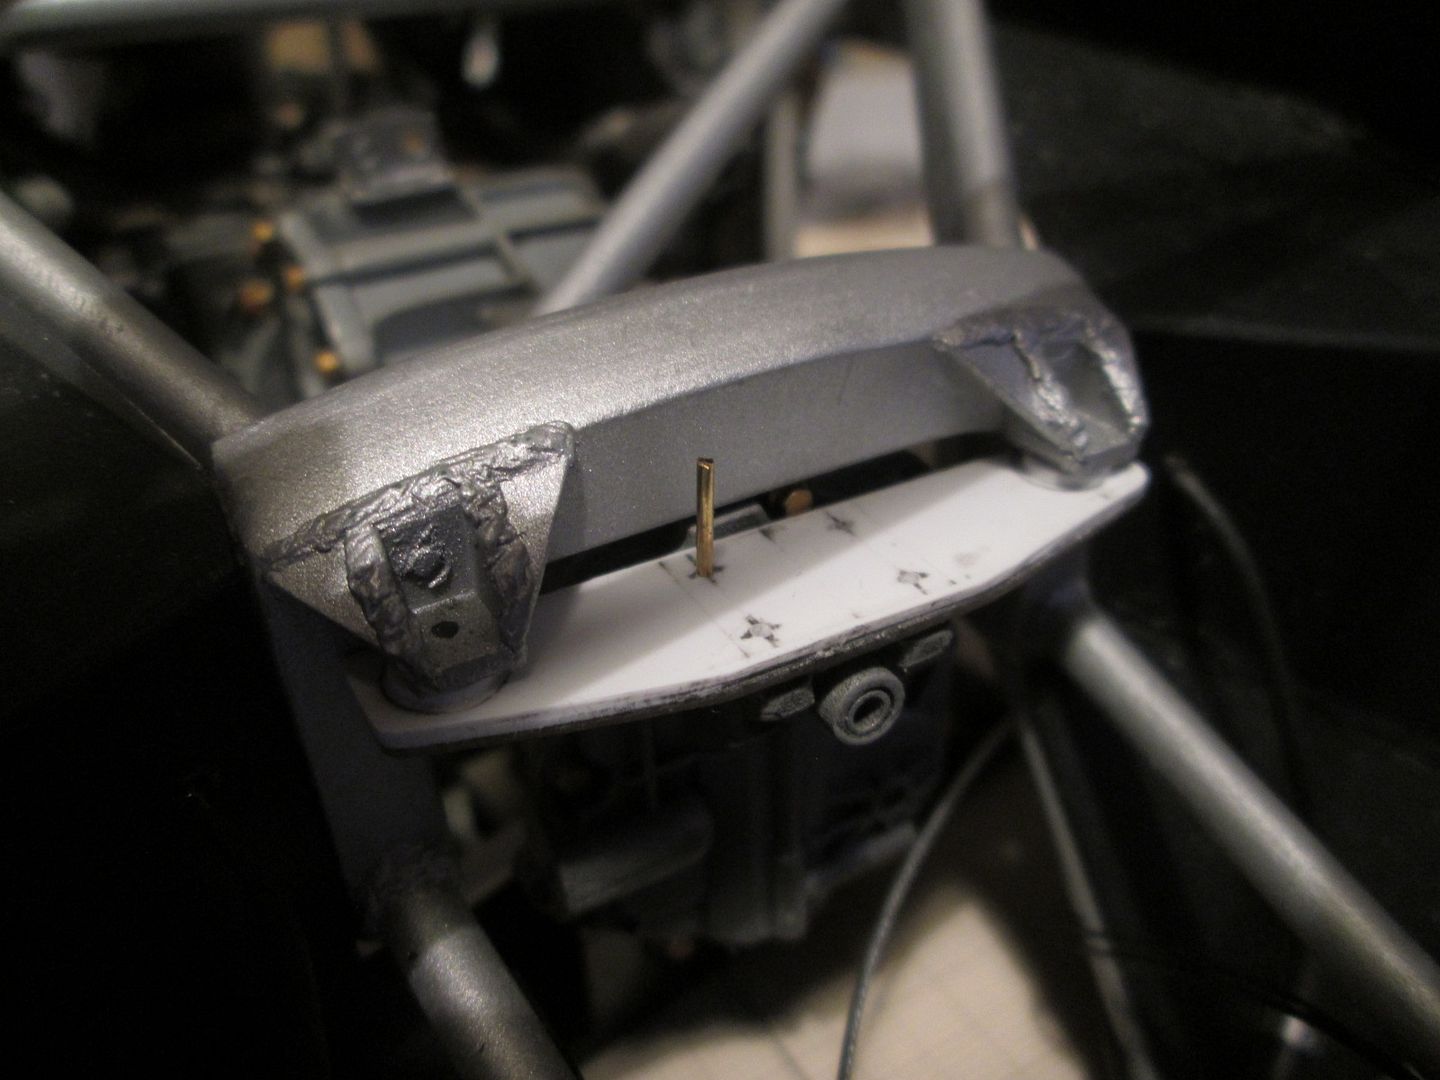 Although I used 0.75mm styrene for this, I added a lower layer of fibreglass sheet to give it some extra stiffness. It's been drilled and pinned to the front of the gearbox, as shown, and will eventually have some large bolt details added to connect it to the chassis brackets. The amount of pipework at the front of the engine is giving me major problems in how I can add some extra support to the engine / gearbox mounting. Everywhere I want to run a length of wire up to the chassis, there's a pipe in the way! I'll have to spend some time looking at the options, as I'd like to avoid having a permanent support under the engine. As usual, there's still plenty to do. The drivetrain won't be going in permanently any time soon, but there's still more detailing to be added in the back of the engine bay, plus wiring and plumbing to be brought through. I think there's still a few weeks work on all this before I consider moving my attention to a different part of the car... SB |
|
|
|

|
|
|
#633 | |
|
AF Enthusiast
Thread starter
Join Date: Nov 2008
Location: Norwich
Posts: 649
Thanks: 21
Thanked 111 Times in 87 Posts
|
Re: 1/8 Porsche 935/78 'Moby Dick'
Back again!
I've been planning to do another update for the last couple of weeks, but every time I've thought 'I'll just do a bit more' and have continued modelling, rather than posting! My trip to Le Mans last month brought the usual mixed feelings - part of me returns home with fresh enthusiasm having had a few days break from the modelling routine, but another part is frustrated that it's another year gone by and the project is still a long way from completion! Given that next year will be the 935-78's 40th birthday, I guess that's a good target to aim for. The recent Photobucket situation hasn't helped my mood, either. My current plan runs through to September, but I will not be paying the $400 to enable the 3rd party hosting. I suspect the same is true for 99% of those on this forum using PB, and it's a crying shame that so much stands to be lost. I don't plan to close my PB account, in the (slim) hope that common-sense will prevail, but I'm not going to upload all the photos somewhere else and re-link to the threads, either! I see from the small-print that we'll still get the 3rd party hosting facility until the end of 2018, but will PB be around that long after this...? Ah well, it was fun while it lasted. So, while I can still get photos on here, here's tonight's update. Since Le Mans I've been working on the rear body, trying to decide how to mount the various parts and to convince myself that it will all go together: 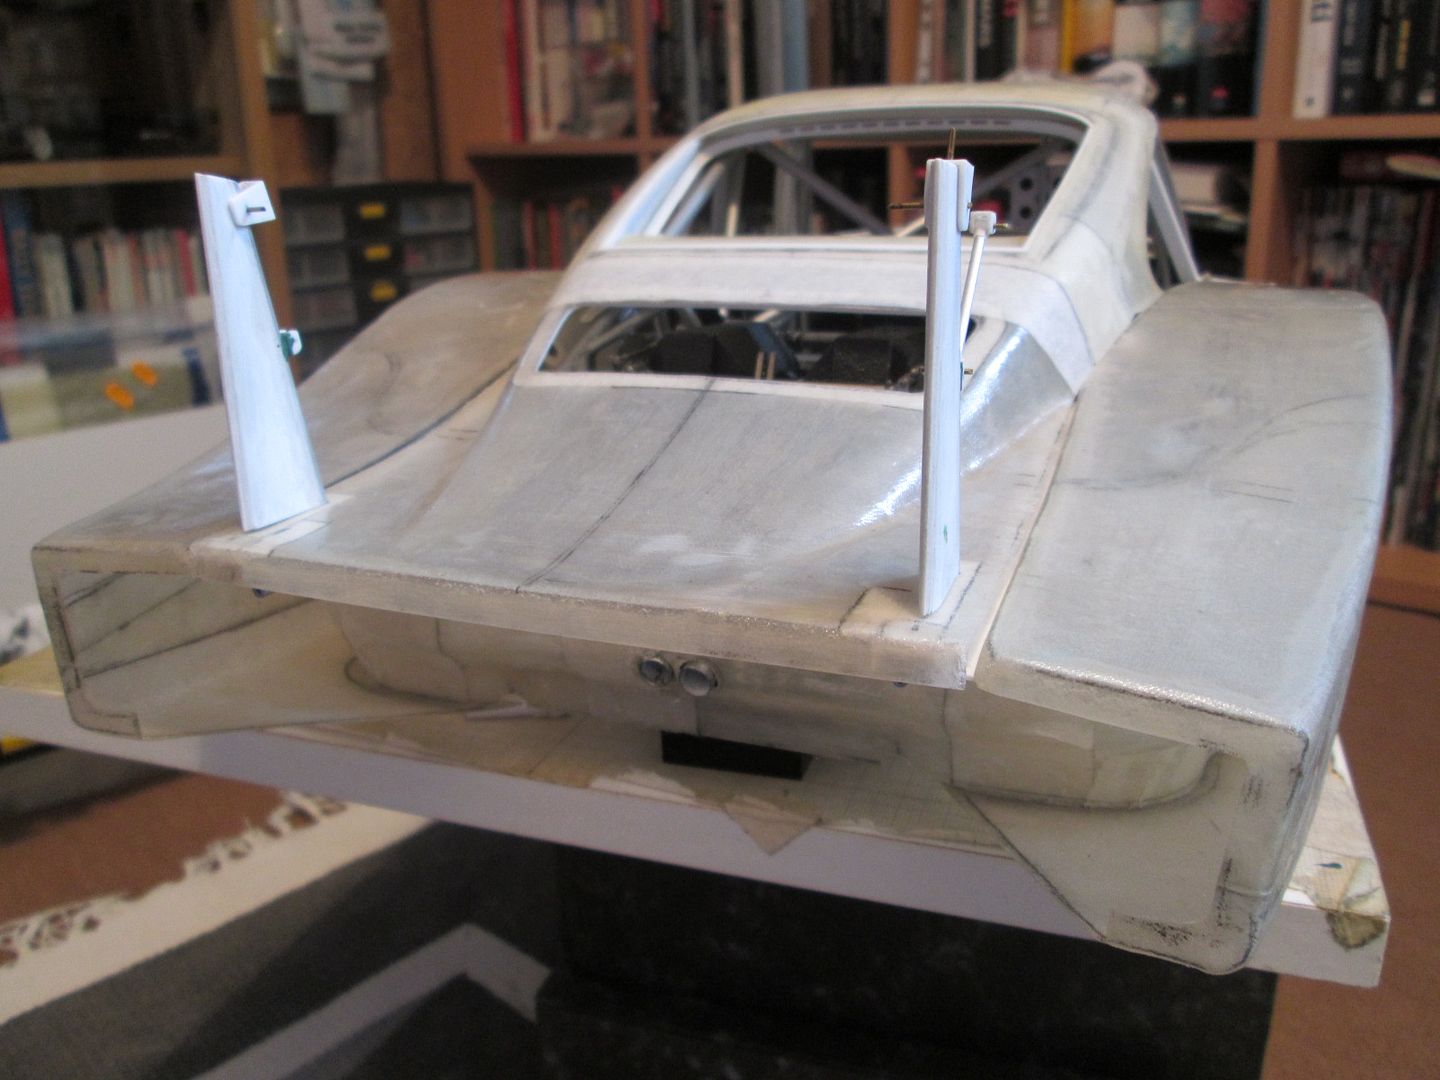 The fit of the engine cover to the back of the roof section needs a little adjustment, the outer wings / fenders want to sit at a slight angle, and the inner bumper section isn't fitting quite right. So, not much to do then! Until now the rear bumper has been left as a single piece, but I have had to split it into three sections in order to progress. Here's the right-hand section test-fitted into the wing / fender: 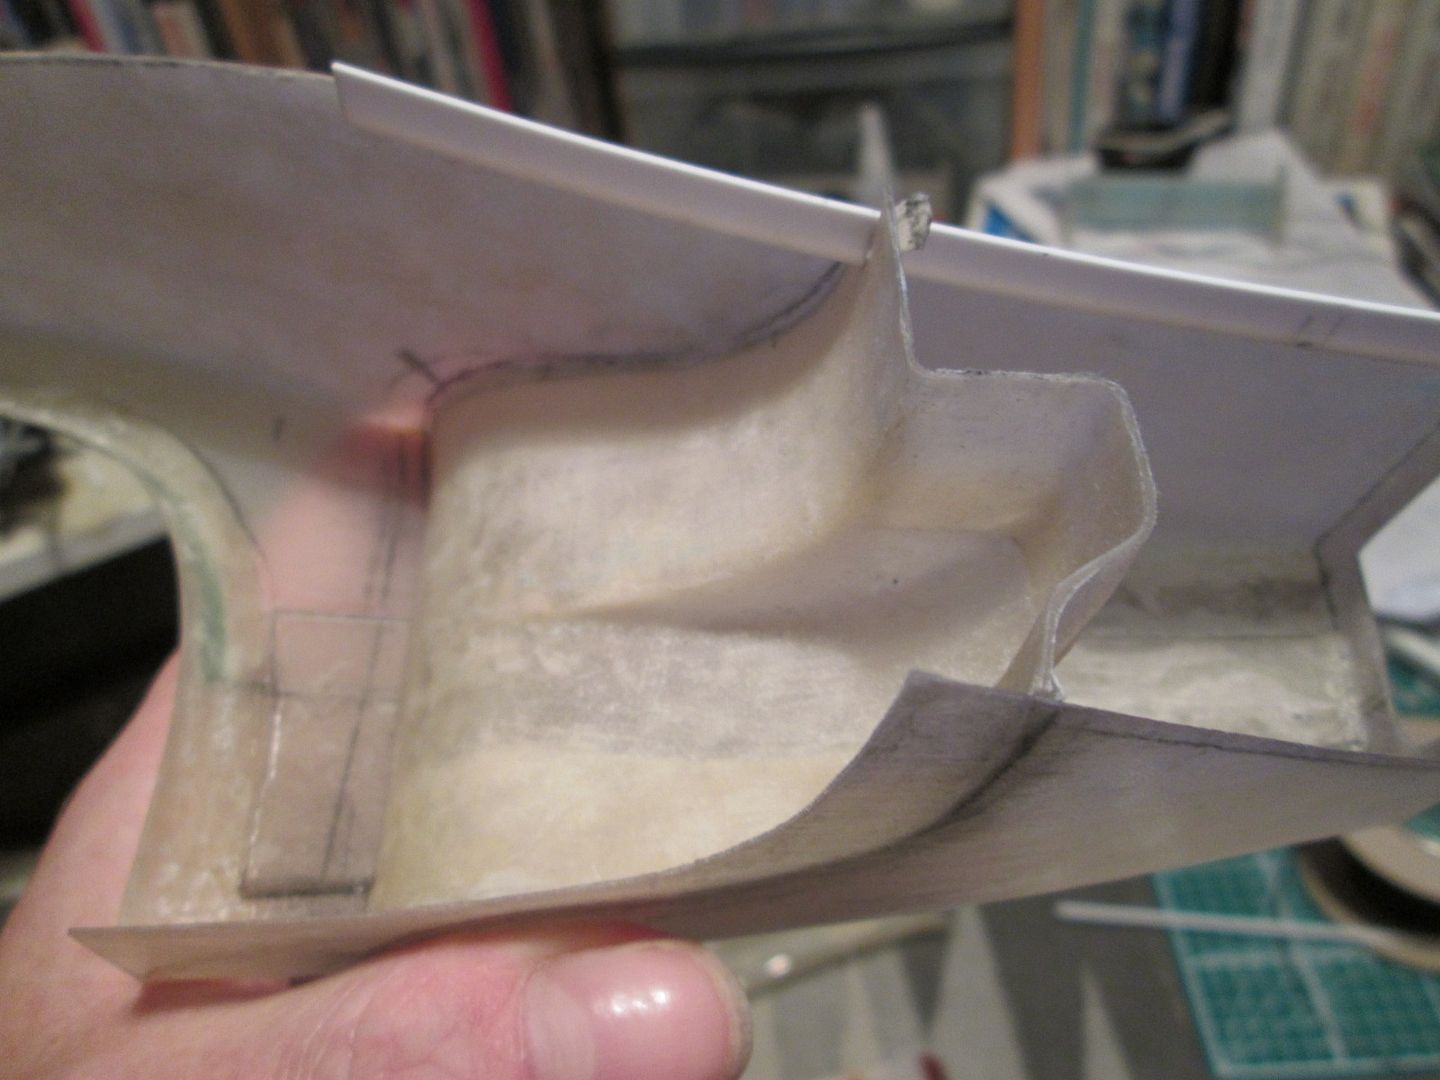 There's been plenty of filing, marking, test-fitting, more filing, etc, going on these last few weeks! It's been a very slow process, and the parts are still not finally glued together, but I'm optimistic that it will all work as planned. To tidy the inside of the rear wings before painting I added an inner skin from 0.5mm plasticard. As well as covering and reinforcing the joint between the upper and lower halves of the fibreglass mouldings, it also gives me a defined step to locate the bumper section against. There's also a C-shaped styrene plate on the back of each wing panel, too: 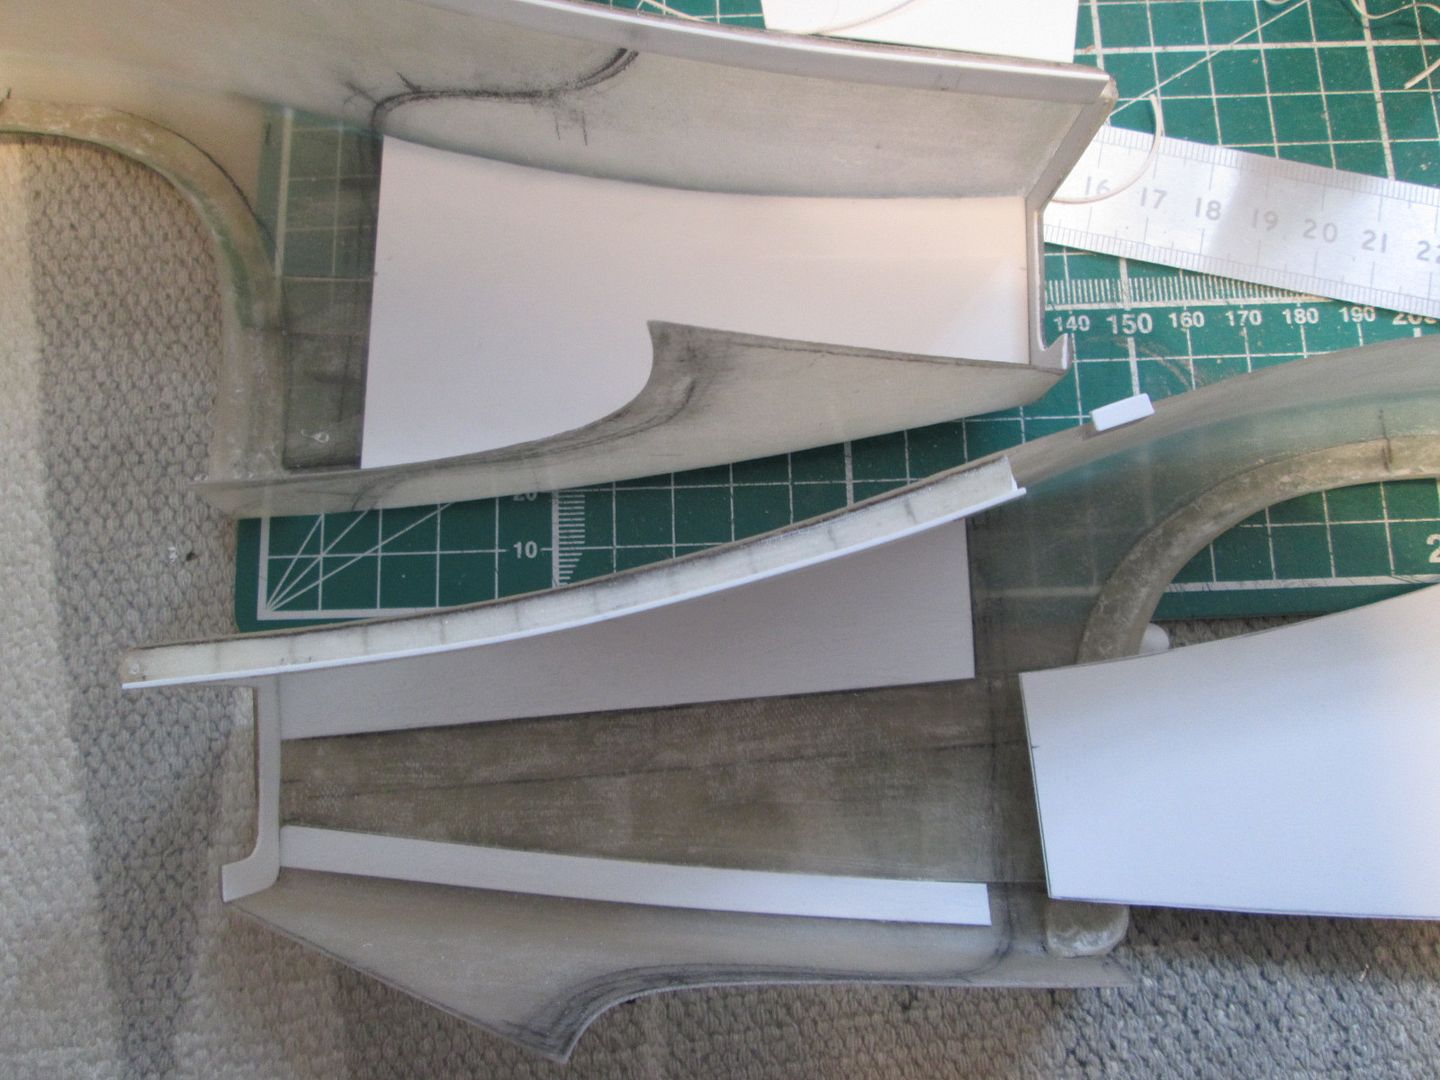 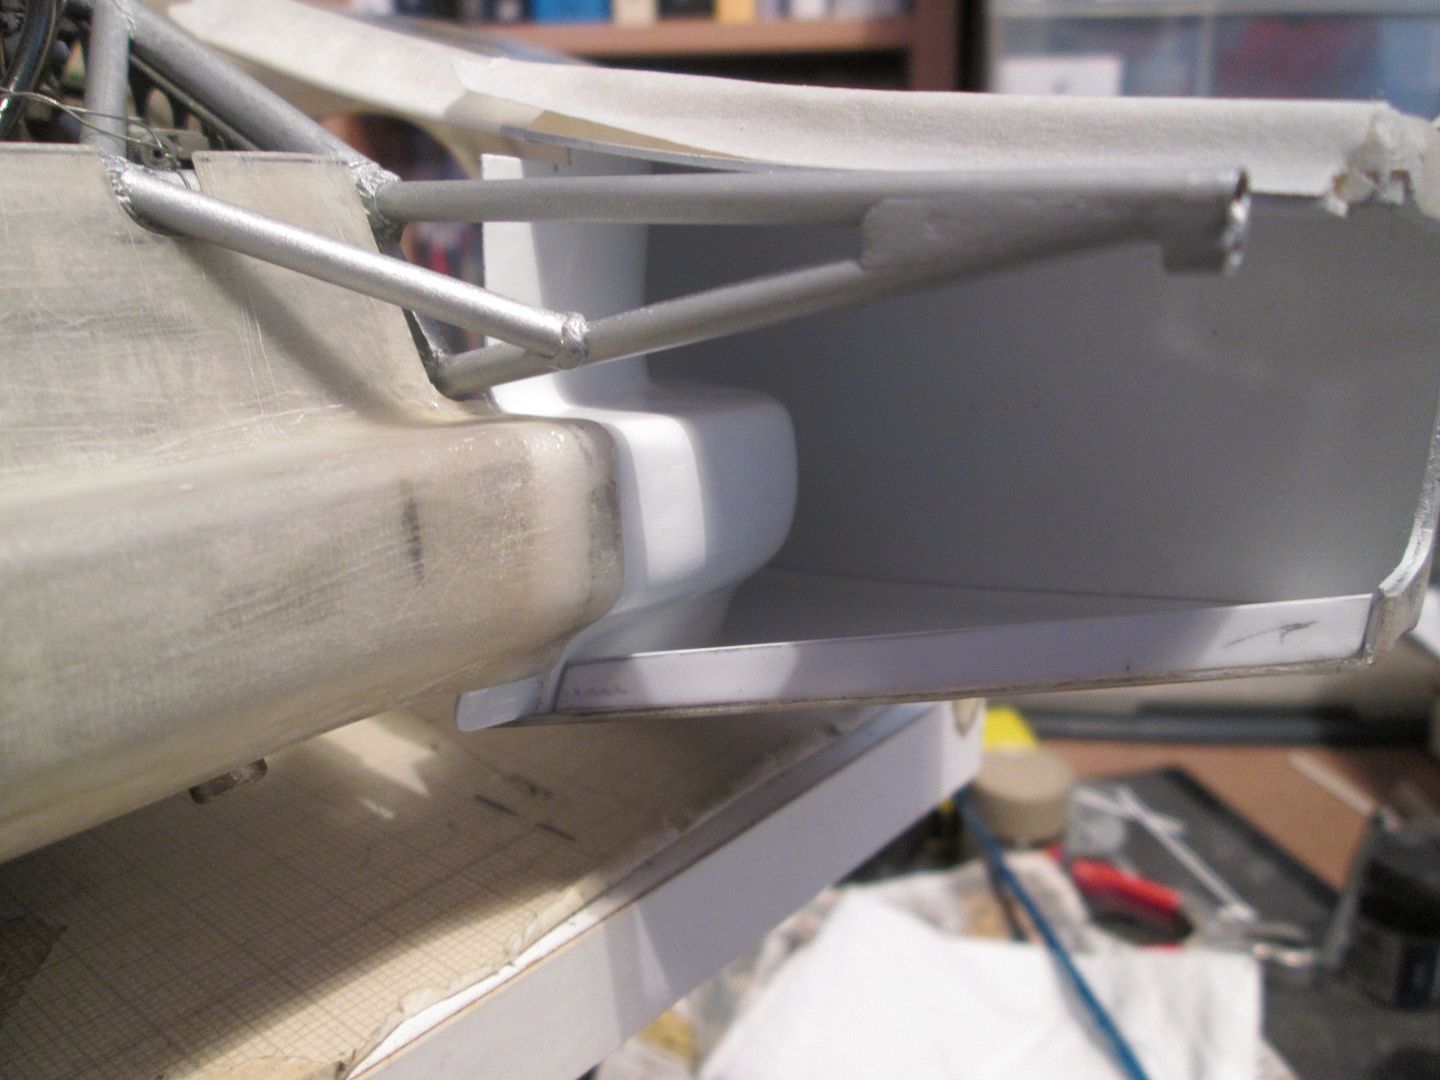 A length of styrene angle has been glued along the bottom edge to continue the flange detail, and to provide another locating point for the bumper panel. As the position of the bumper panels has slowly been refined, I've tidied up the shaping of the underside of the wings - but the final cuts will only be made once the inner panels have been glued in place. I've been spraying these panels as I've progressed, as I decided it would be a pain to spray them once assembled. This also meant I had to sort out the rear lights too, as they would also be awkward to get at. I don't know where the inspiration came from, but I had the idea of overlaying a painted lens over a fine mesh to create the appropriate look: 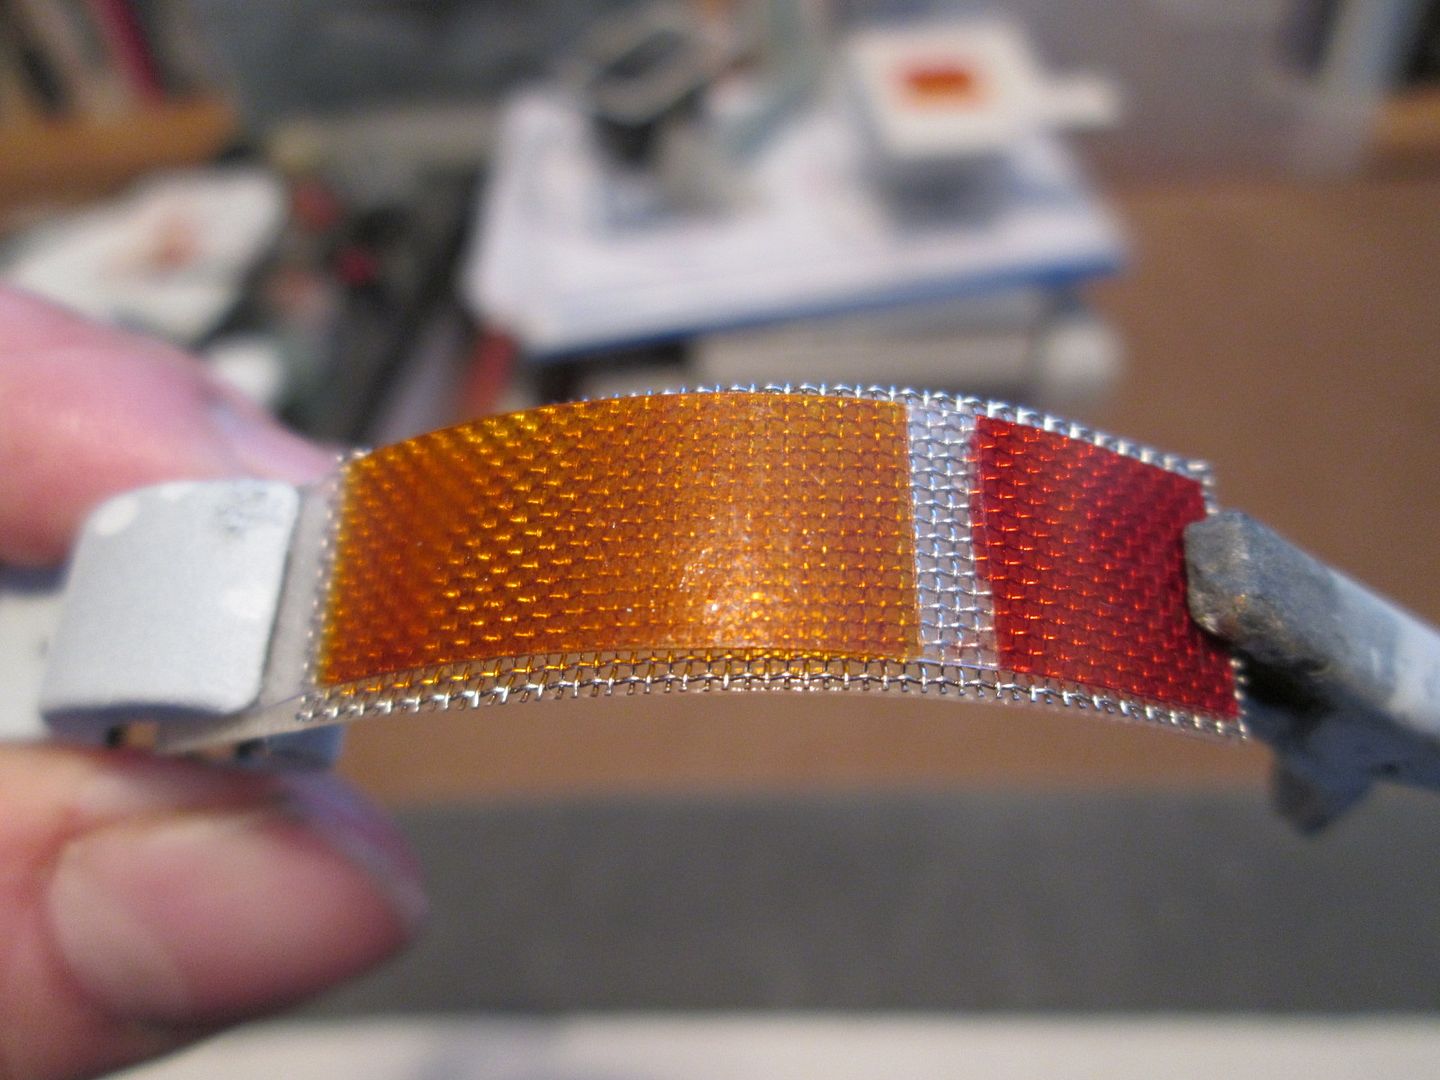 This was a test piece put together to prove the concept - it had to look right, but I also had to be sure I could actually glue the parts together (without affecting the materials). I ended up using two sections of curved fibreglass cut from the mk1 bumper panel as base-plates, then a strip of mesh, 0.75 x 0.75mm styrene strip around the edge, then the plastic lens over the top (painted with Tamiya X-26 Clear Orange and X-27 Clear Red). The overall effect changes depending on the light, but the mesh gives it that reflective sparkle and depth - the painted clear plastic on it's own would have looked flat and lifeless. I've also added three small screw details which will also be used to pin each light cluster in place: 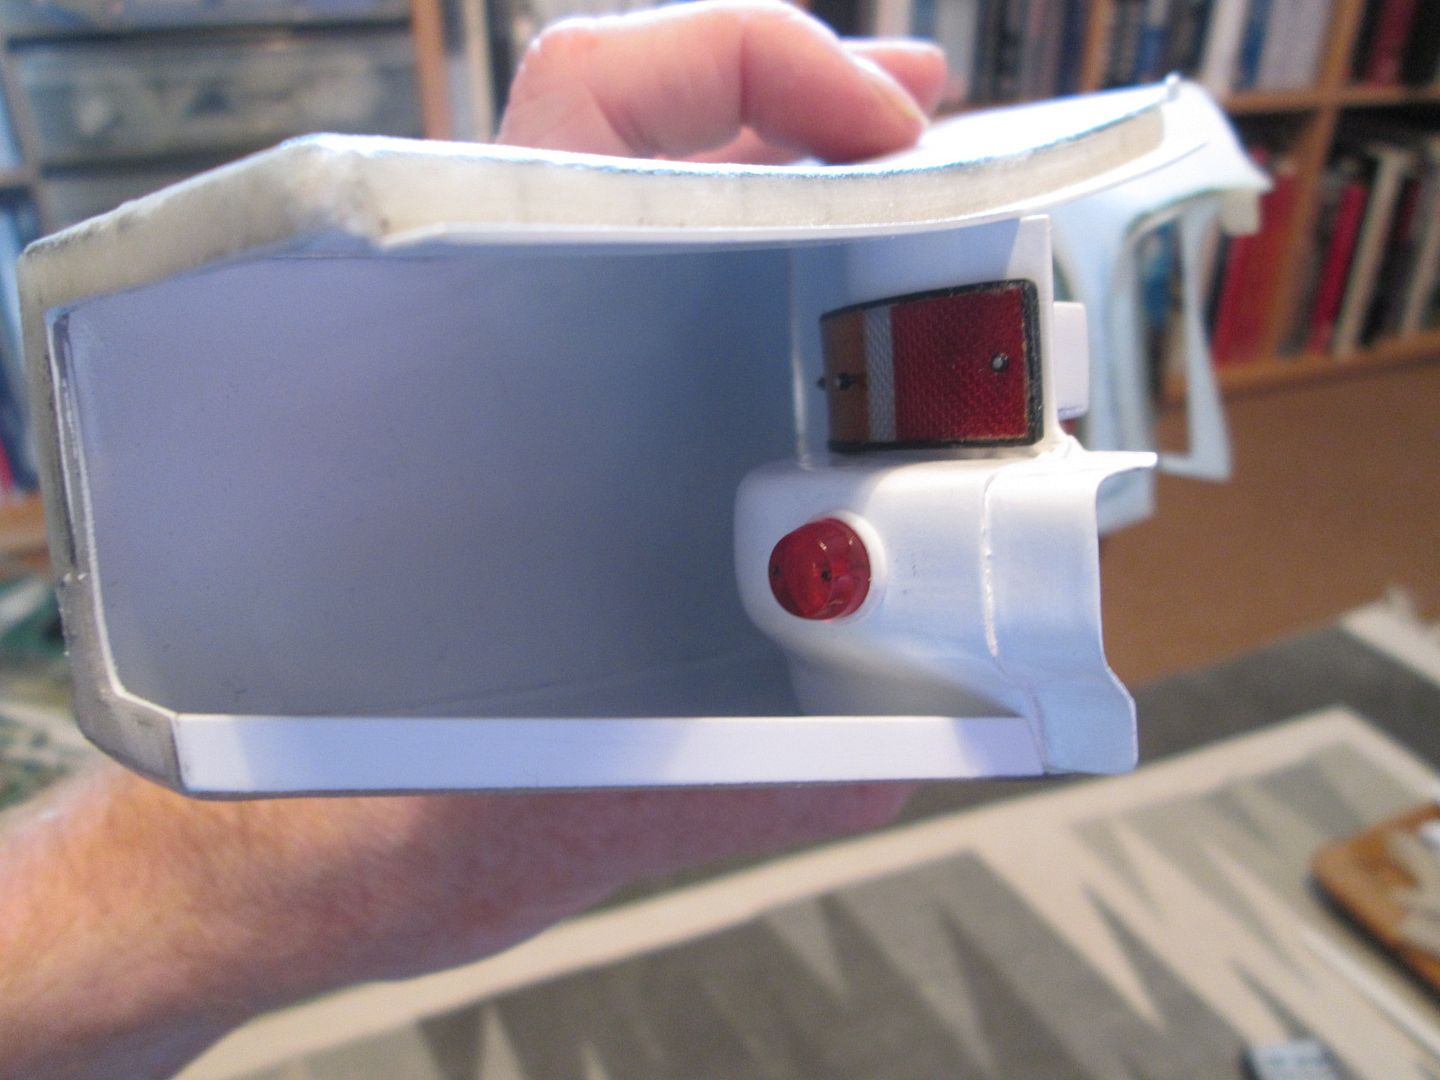 As usual, you won't see much of these once the car is assembled, but they're there! The single round light on the bumper was much simpler - a piece of clear rod shaped on the lathe, painted with Clear Red, and pinned in place with a white styrene collar to hide the join. The latest job is to start cutting and fitting the inner ducts for the two side-mounted radiators, ahead of the rear wheels. I made the fibreglass mouldings for these some time ago, but it's only now that I'm getting around to working with them! It's going to be a fiddly job - everything's at an angle, there's curved panels meeting other curved panels, and you can't get at anything with the rear wing in place. It's slowly coming together, though: 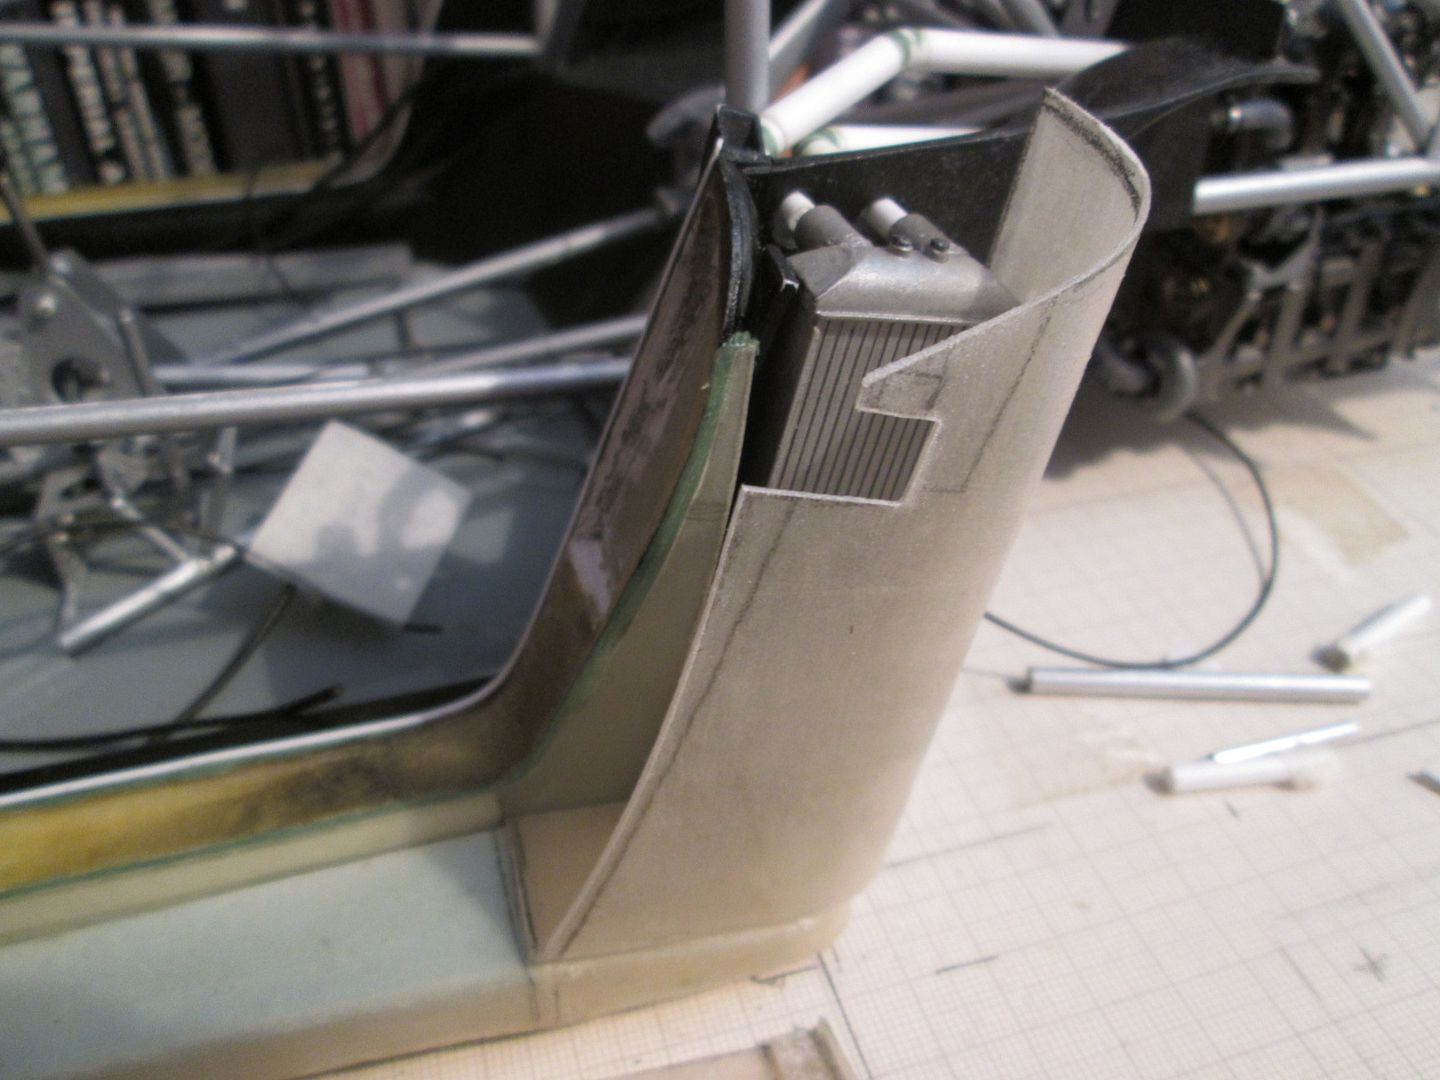 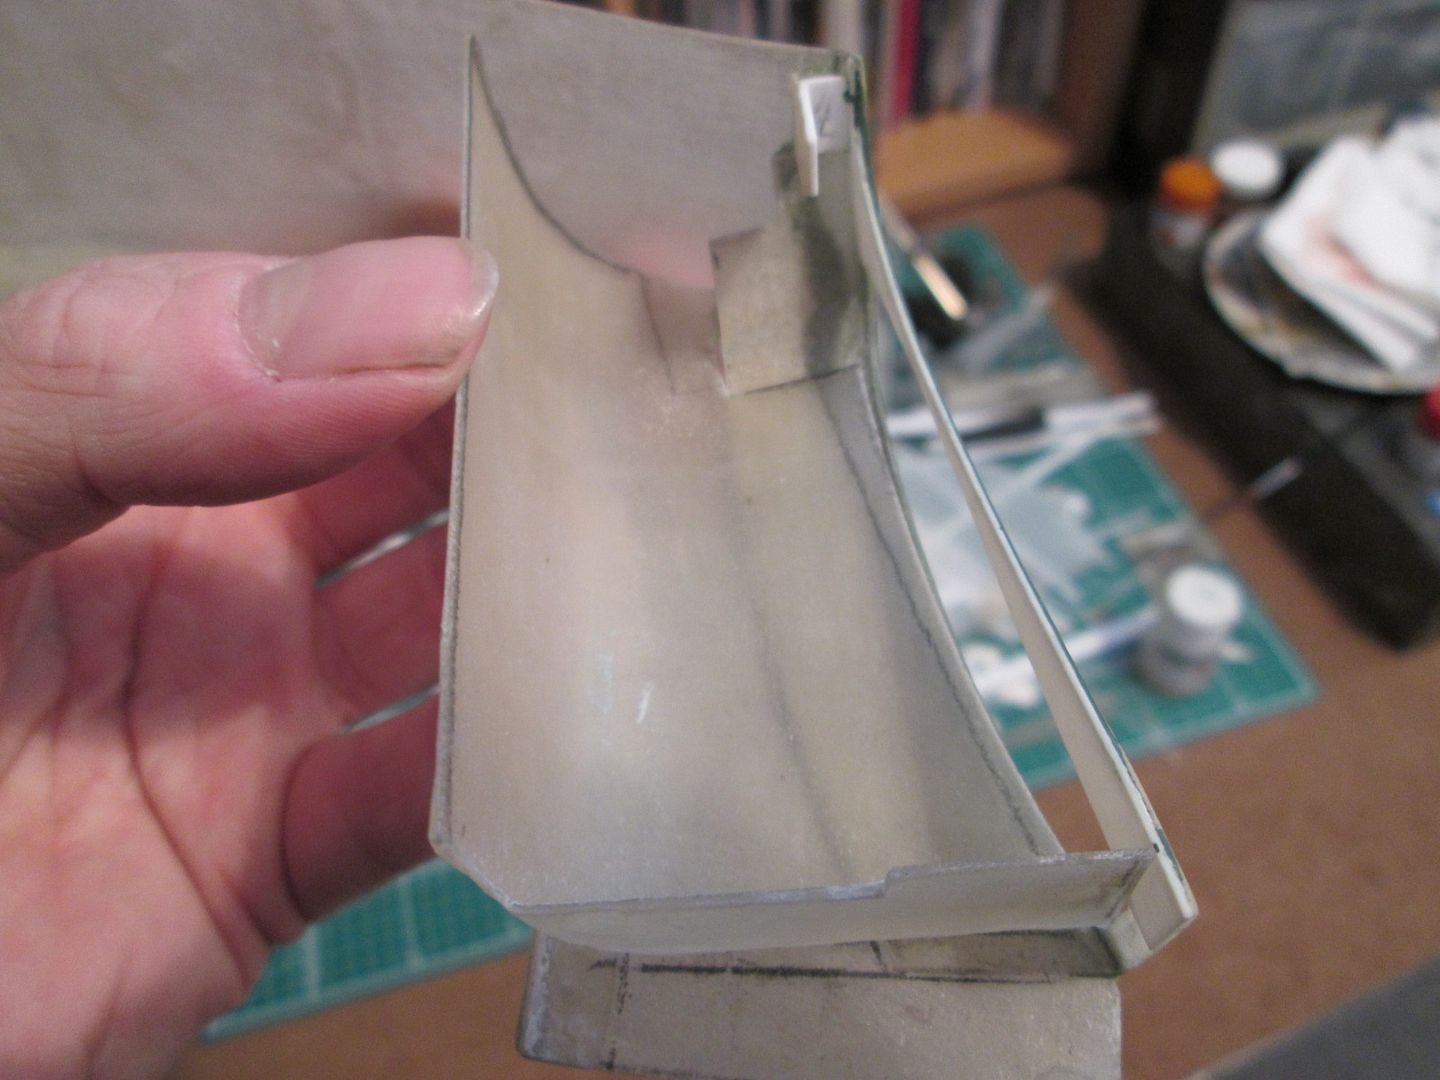 I might end up laying a couple of small pieces of wet fibreglass in here to smooth things over, particularly towards the top where the curve of the inlet panel edge meets the main duct. I need to test fit everything with the rear wheels in positon sometime soon, too, just in case they foul the back of the ducts...which would be very annoying. So, plenty going on. There's a few other bits and pieces I've done but not mentioned in detail - some brackets for attaching the centre bumper section, the backs of the rear lights, etc - but you'll probably see these next time. More soon! SB Last edited by ScratchBuilt; 07-17-2017 at 03:27 PM. Reason: Photos should work until the end of 2018 |
|
|
|

|
|
|
#634 | |
|
AF Enthusiast
Join Date: Sep 2011
Location: Redwood City, California
Posts: 651
Thanks: 0
Thanked 39 Times in 39 Posts
|
Re: 1/8 Porsche 935/78 'Moby Dick'
Everything is looking top notch as usual! Love the mesh\clear lens for the tail lights. How did you attach the lens to the mesh without ruining the look?
ianc |
|
|
|

|
|
|
#635 | |
|
AF Enthusiast
Join Date: Aug 2005
Location: where "sky grey" is a colour
Posts: 822
Thanks: 3
Thanked 32 Times in 29 Posts
|
Re: 1/8 Porsche 935/78 'Moby Dick'
Great work as always!
Thanks for the reminder about Photobucket. Haven't figured that out myself yet, but i will start saving this build report for reference! |
|
|
|

|
|
|
#636 | |
|
AF Enthusiast
Thread starter
Join Date: Nov 2008
Location: Norwich
Posts: 649
Thanks: 21
Thanked 111 Times in 87 Posts
|
Re: 1/8 Porsche 935/78 'Moby Dick'
Cheers, guys.
I used CA to glue the mesh to the fibreglass backing plate, then UHU Expanded Polystyrene glue for the clear lens. I did a couple of test pieces to make sure, with no problems. I didn't put any glue below the clear section, though, just in case. The effect of the tail lights is a bit lost once they're buried under the bodywork, but I felt it was worth the effort. Still not sure how I'll do the main headlights, but that's a problem for another time... SB |
|
|
|

|
|
|
#637 | |
|
AF Enthusiast
Join Date: Nov 2004
Location: San Diego, California
Posts: 833
Thanks: 2
Thanked 6 Times in 6 Posts
|
Re: 1/8 Porsche 935/78 'Moby Dick'
Awesome work, I've been waiting to see the body panels start giving this some shape. As always, very impressive.
__________________

|
|
|
|

|
|
|
#638 | |
|
AF Enthusiast
Join Date: Feb 2009
Location: Palm Desert, California
Posts: 610
Thanks: 108
Thanked 44 Times in 40 Posts
|
Re: 1/8 Porsche 935/78 'Moby Dick'
This is just becoming batshit insane. Incredible
|
|
|
|

|
|
|
#639 | |
|
AF Regular
Join Date: Nov 2007
Location: Thuringia/Germany
Posts: 485
Thanks: 1
Thanked 35 Times in 34 Posts
|
Re: 1/8 Porsche 935/78 'Moby Dick'
Outstanding, can't wait for the day, when the Martini stripes will be on it

__________________
my racing car modelling gallery |
|
|
|

|
|
|
#640 | |
|
AF Enthusiast
Thread starter
Join Date: Nov 2008
Location: Norwich
Posts: 649
Thanks: 21
Thanked 111 Times in 87 Posts
|
Re: 1/8 Porsche 935/78 'Moby Dick'
Hello again,
After sorting out the tail light lenses, the final headache with the rear wing panels was getting them to fit properly. This is still on-going, but the end is very much in sight. Here's an inside view of the wings: 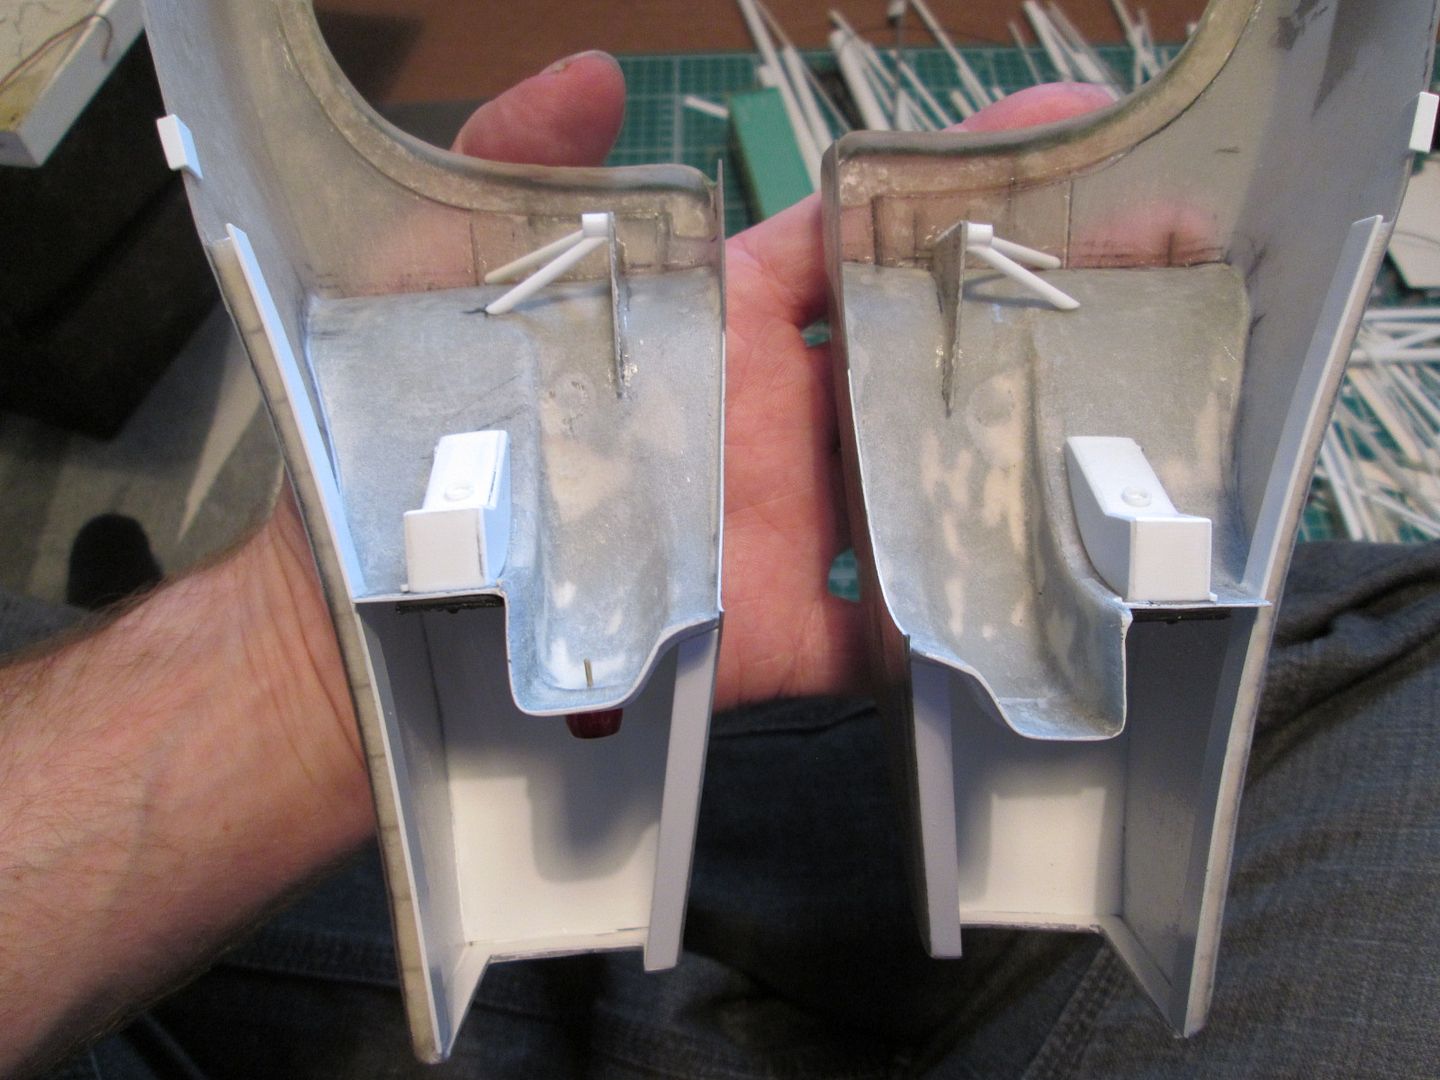 The backs of the tail lights are simple styrene and box-section constructions, and will have some wiring added later. Just behind each wheelarch I've fitted a couple of mounting plates with tubular stays - these are designed to sit somewhere close to the outrigger frames which are part of the chassis: 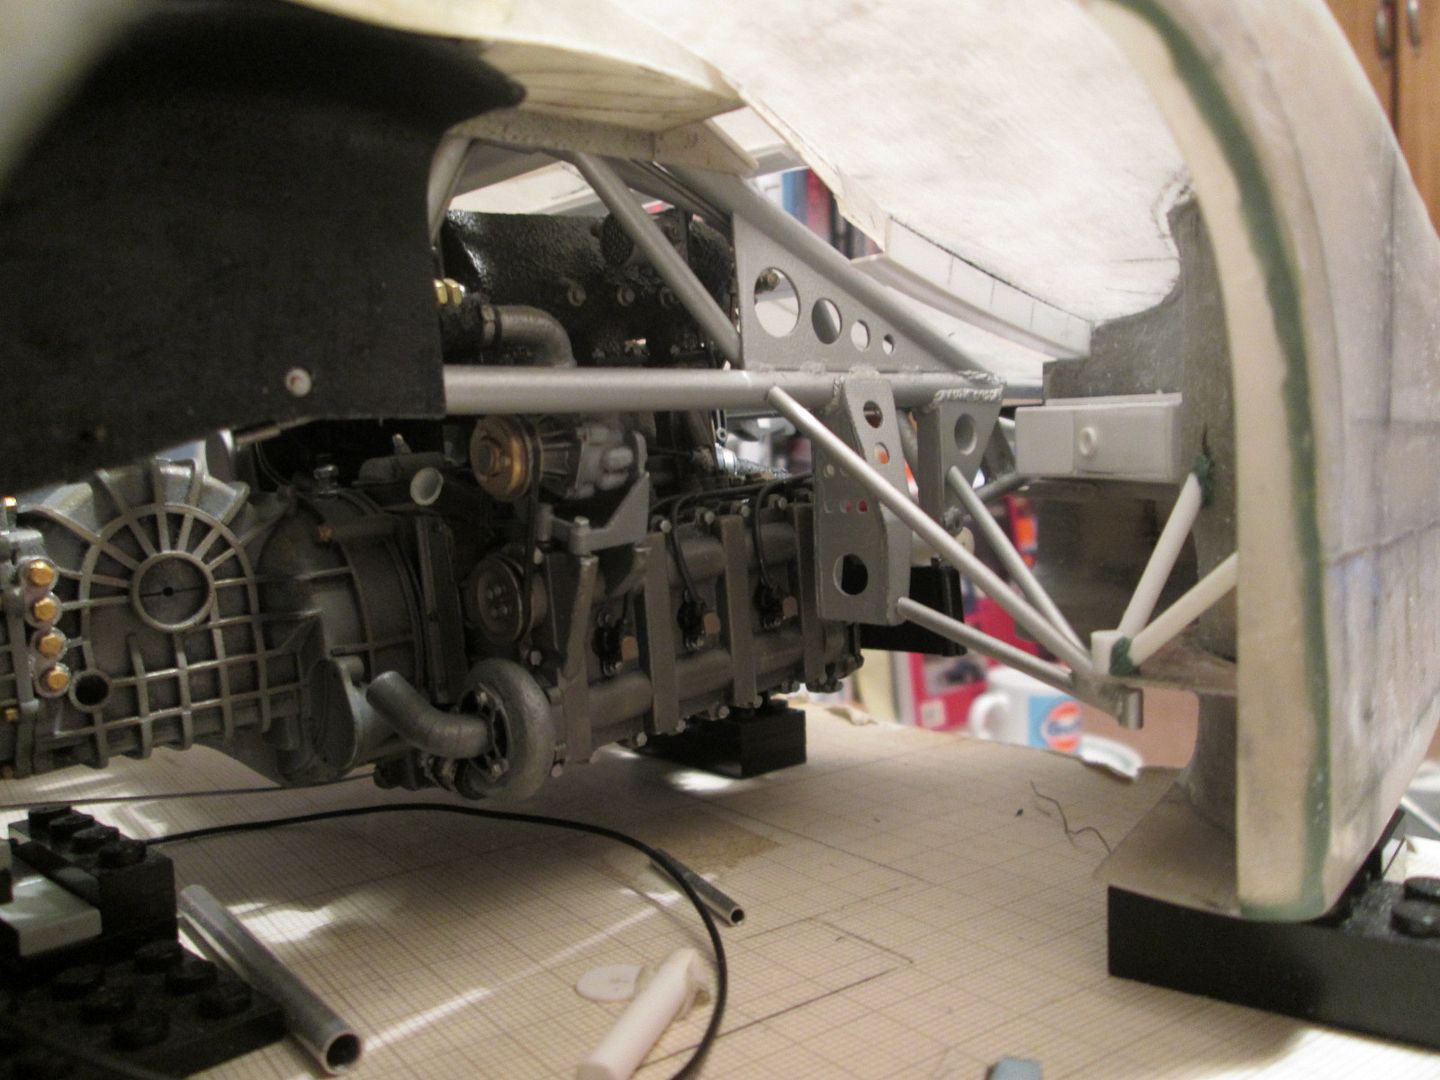 The chances of getting these two pairs of frames to line up exactly were pretty slim, but my plan was instead to use them to stabilise the wing panels rather than being the main mounting point. There is still room to adjust the positioning of everything, so these frames will be finished later. Next up, I added a couple of 0.75mm styrene plates to the inside edge of the two wing panels. This would allow me to improve the panel fit between the engine cover and the two wings, and it would also produce a nice crisp edge. Greenstuff and some filing and fettling brought everything into shape: 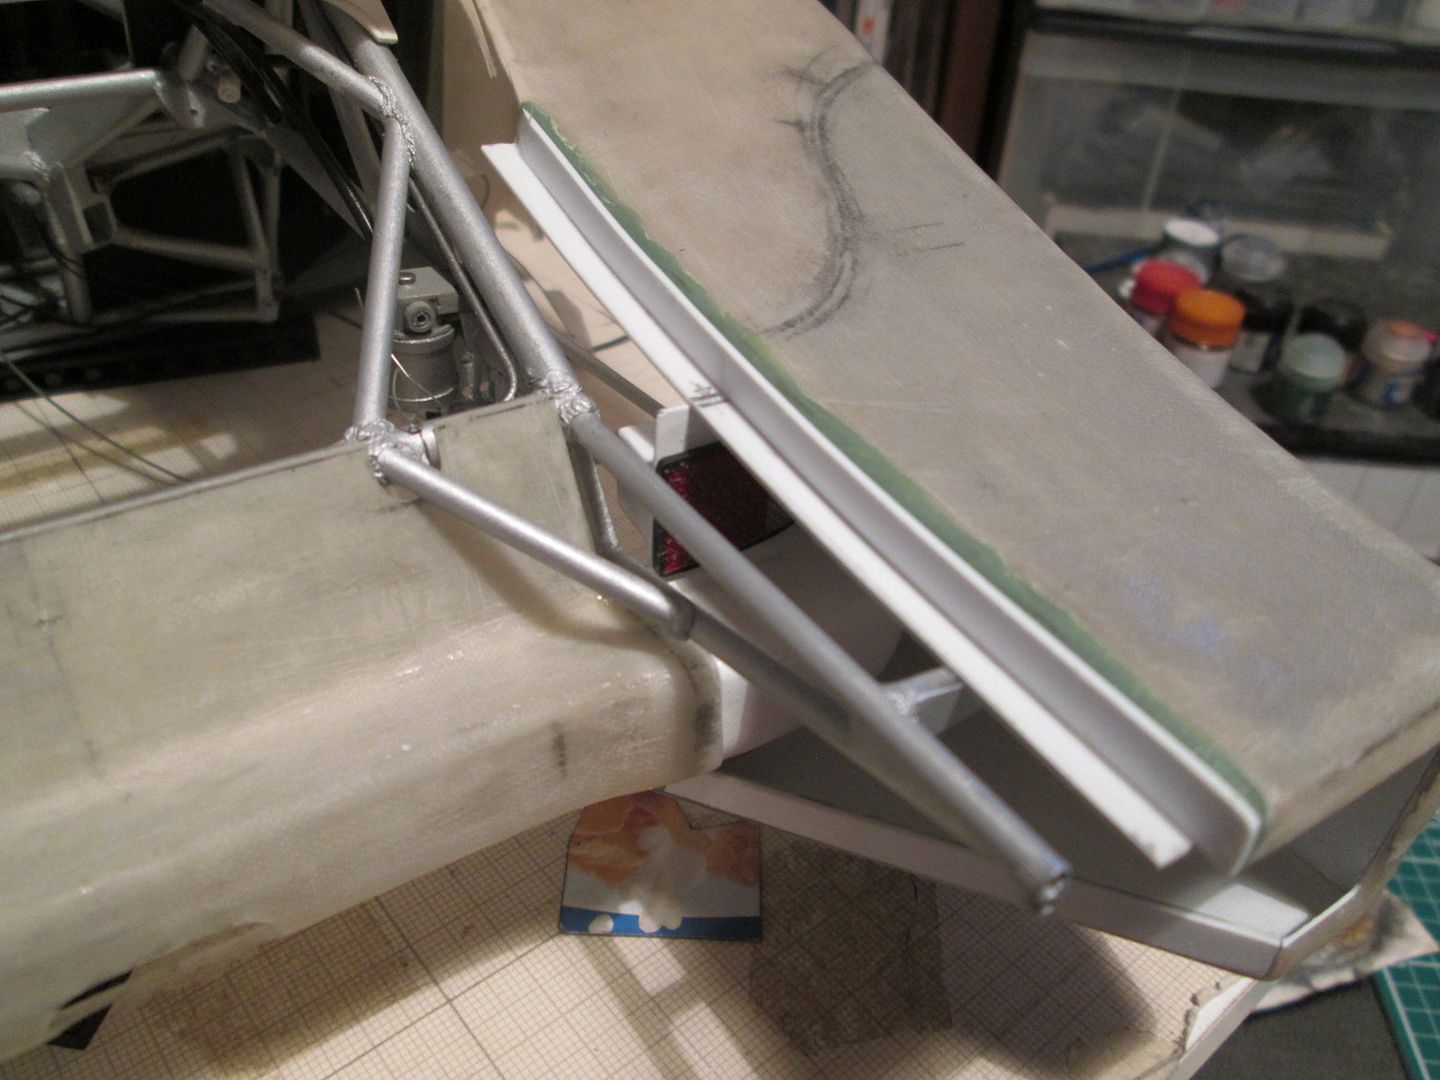 Finally for tonight, with all the adjustment and tweaking of the rear bodywork I found that the curve of the engine cover didn't quite match the curve of the rear wings. Not by much, but enough that it would create a noticeable step between the two panels. So, I had two choices: cut the panel and lift the outer edges slightly to improve the angle, or, to build up the top surface with styrene sheet and filler. I went for Plan A, and cut the panel: 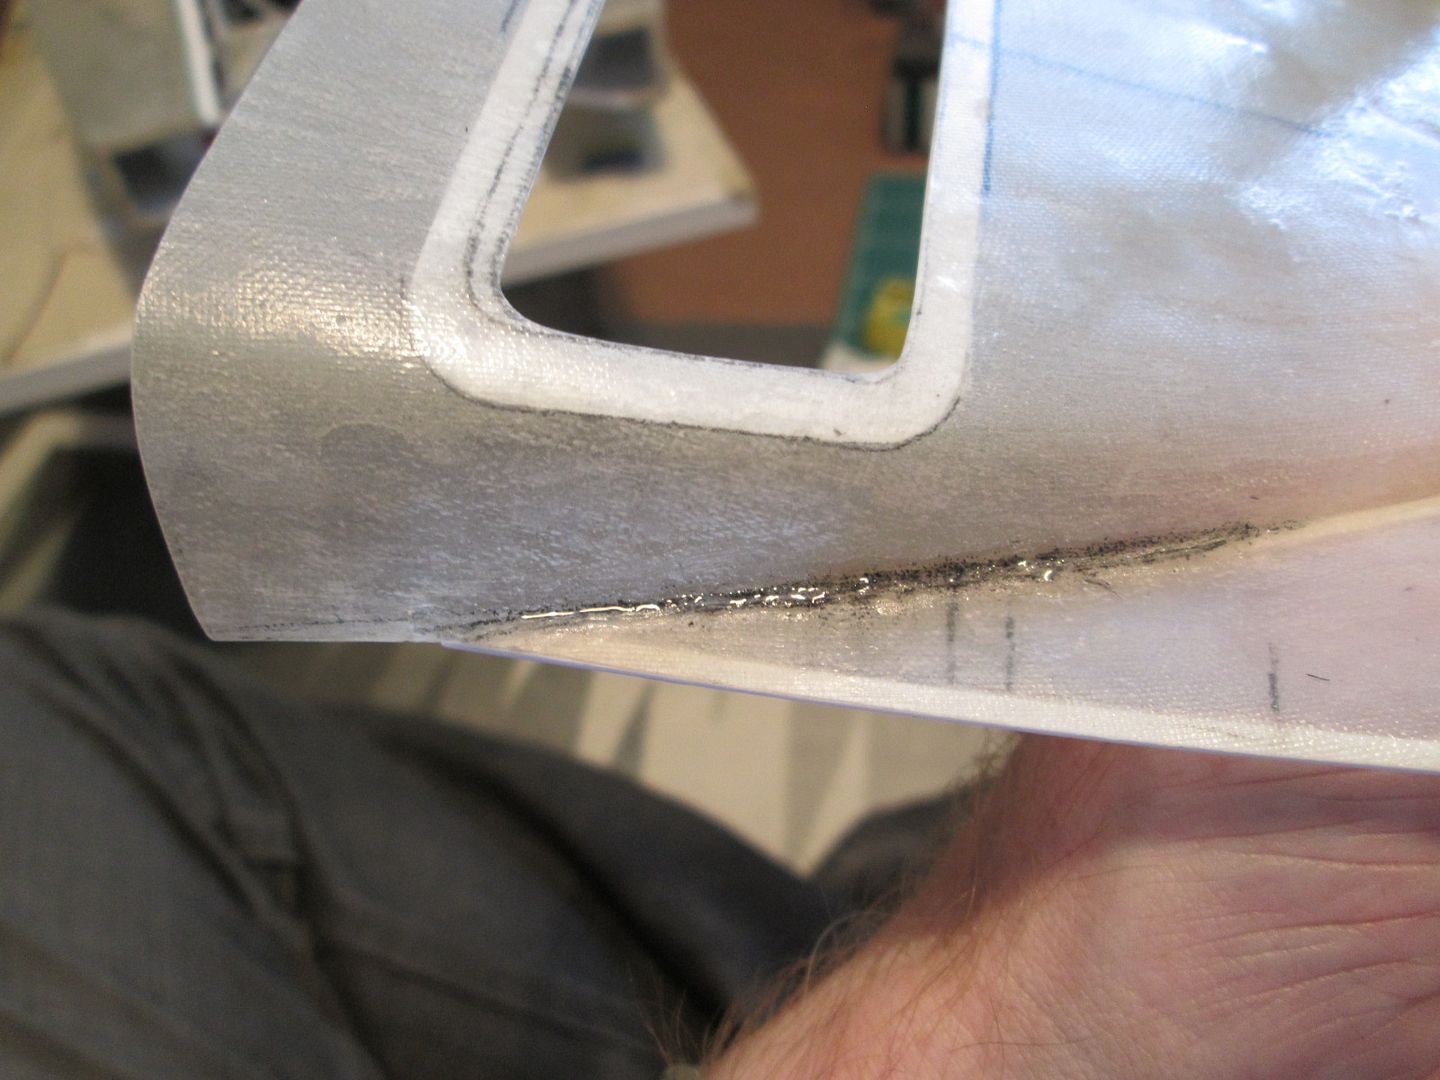 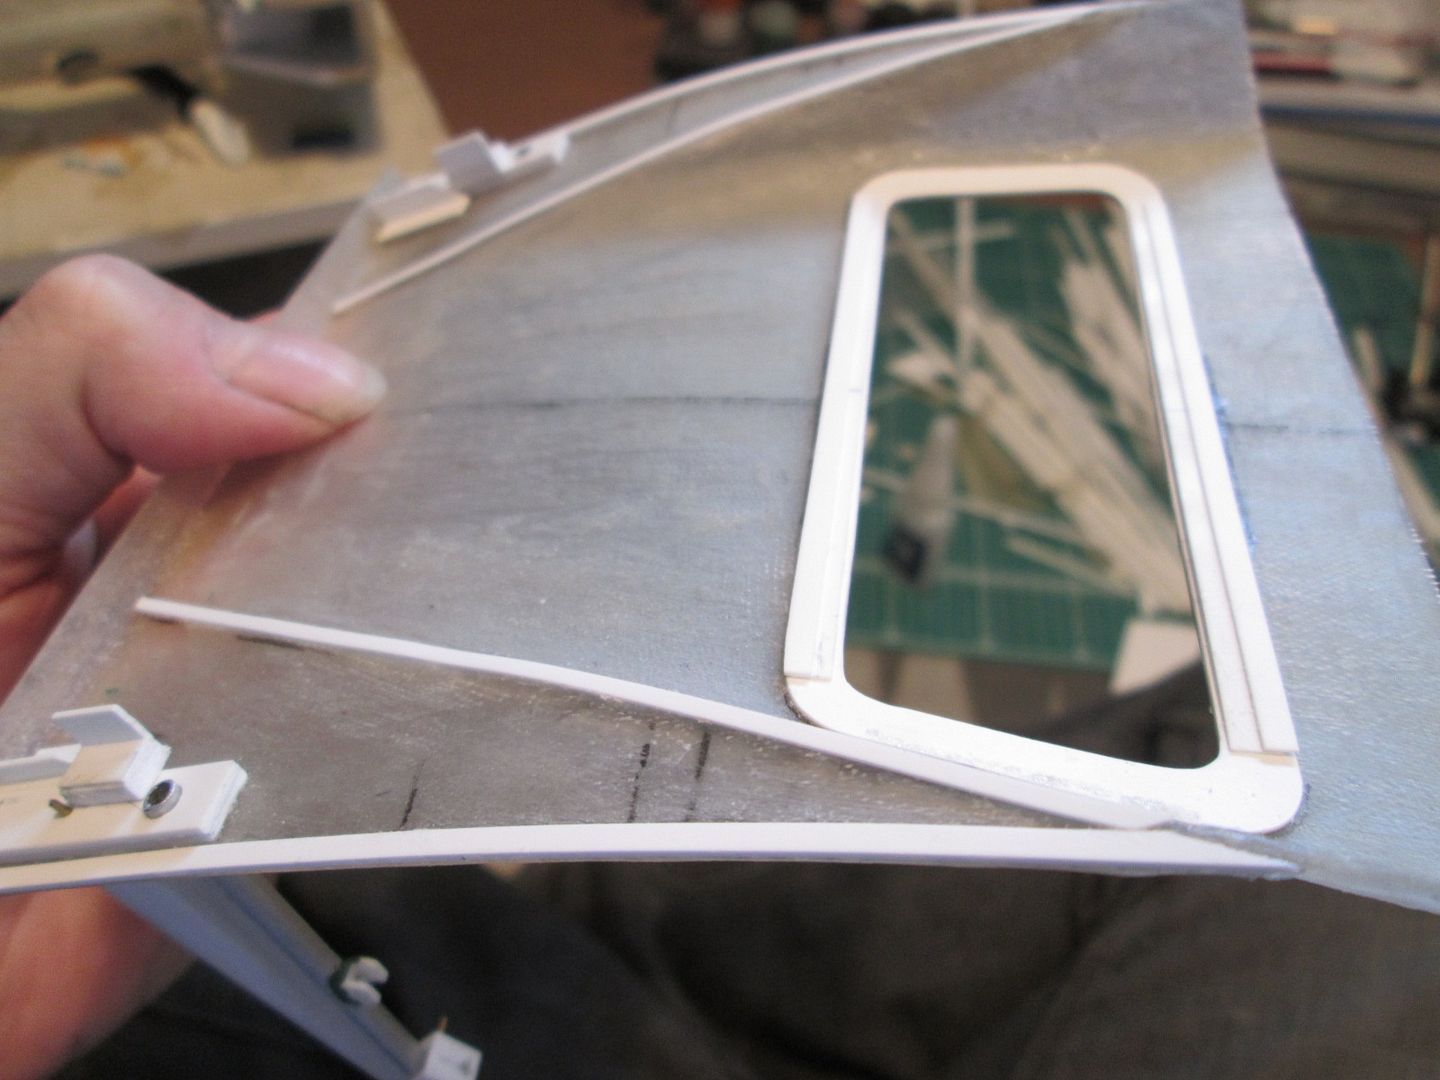 I ran lots of CA glue into the cut as a filler, then added the two thin strips on the back as reinforcement. Since taking the photo I've applied a little Plasto filler to the joint which will need sanding back. So, another week and I should have all the rear bodywork fitting properly. I still need to add a bunch of louvres to each rear wing, but that's a job I'm leaving aside for a while - the Martini stripes will pass over the louvres, so it's going to be a really fiddly job to either cut the slots first then mask and paint, or to paint first and cut afterwards. Either way, I'm not looking forward to it! I'll have the same challenge at the front, too. More next time, SB |
|
|
|

|
|
|
#641 | |
|
ItaloSvensk
Join Date: Mar 2009
Location: Marstrand
Posts: 3,383
Thanks: 1,077
Thanked 296 Times in 270 Posts
|
Re: 1/8 Porsche 935/78 'Moby Dick'
God how much I love your work man...
__________________
Paolo - LoveGT40 Modelworks website www.alsoldatino.com my YT channel : https://www.youtube.com/channel/UCIp..._as=subscriber FB: https://www.facebook.com/alsoldatino |
|
|
|

|
|
|
#642 | |
|
AF Enthusiast
Thread starter
Join Date: Nov 2008
Location: Norwich
Posts: 649
Thanks: 21
Thanked 111 Times in 87 Posts
|
Re: 1/8 Porsche 935/78 'Moby Dick'
That means a lot, my friend...thanks.
So, what's new? Last week was a holiday week for me, so it was a good opportunity to do something 'different' with the 935. I decided to spend some time getting the doors sorted out - this would mean designing some hinges, painting the inner sills, fitting the door support pillars and - just maybe - making a start on the side window-frames. I knew from the 908 that getting the doors to hinge correctly was not going to be easy. The two positives with the 935 were that the doors were opening conventionally sideways, and that the support for the hinges would (eventually) be solidly fixed in place. One major drawback with the Moby Dick is that the front bodywork is much wider than a regular 911, and the doors have an extra outer panel added to continue the aero down the sides - so the door is effectively twice as thick as normal. I did a bit of head-scratching to work out roughly where the pivot should be, and made a mark-1 hinge set-up: 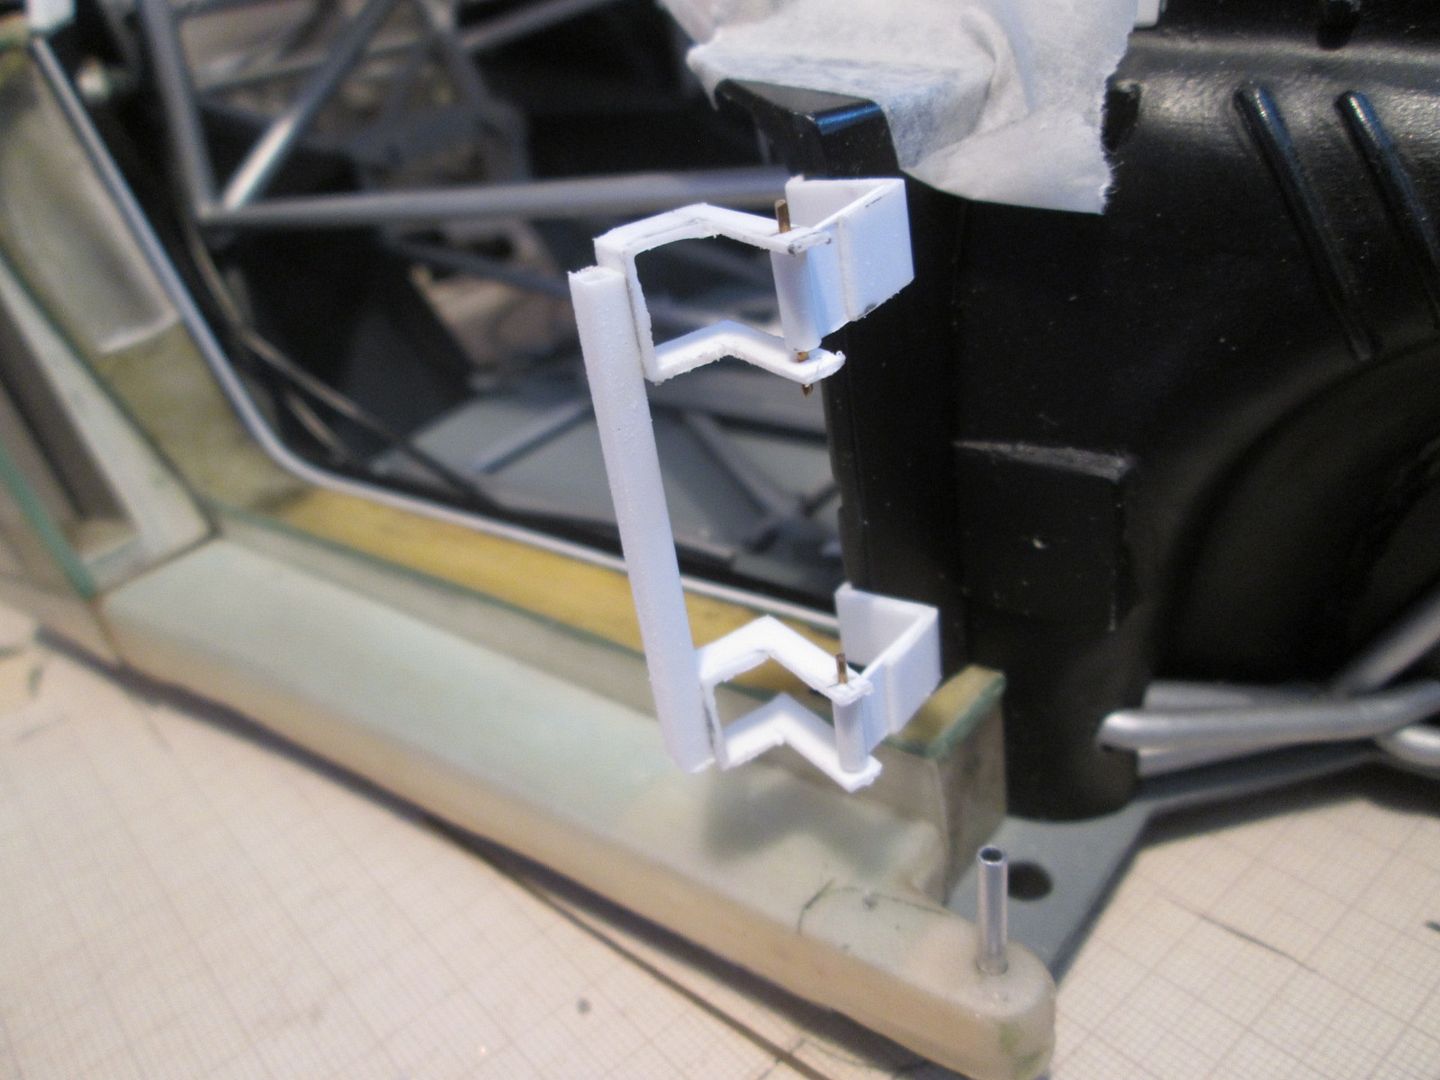 It's a bit crude, but at this stage I just wanted to get a feel for how things would be. The genuine hinges on the real car are a curvier design, but there was no way I could replicate these with enough strength to support the door. I suspect even my version will struggle under the weight eventually, but it's not going to de-rail the project. The mark-2 version was more refined, and the focus here was on trying to get more strength into the parts - I used a mix of angle and cut-down box-section to create a more robust connection to the door: 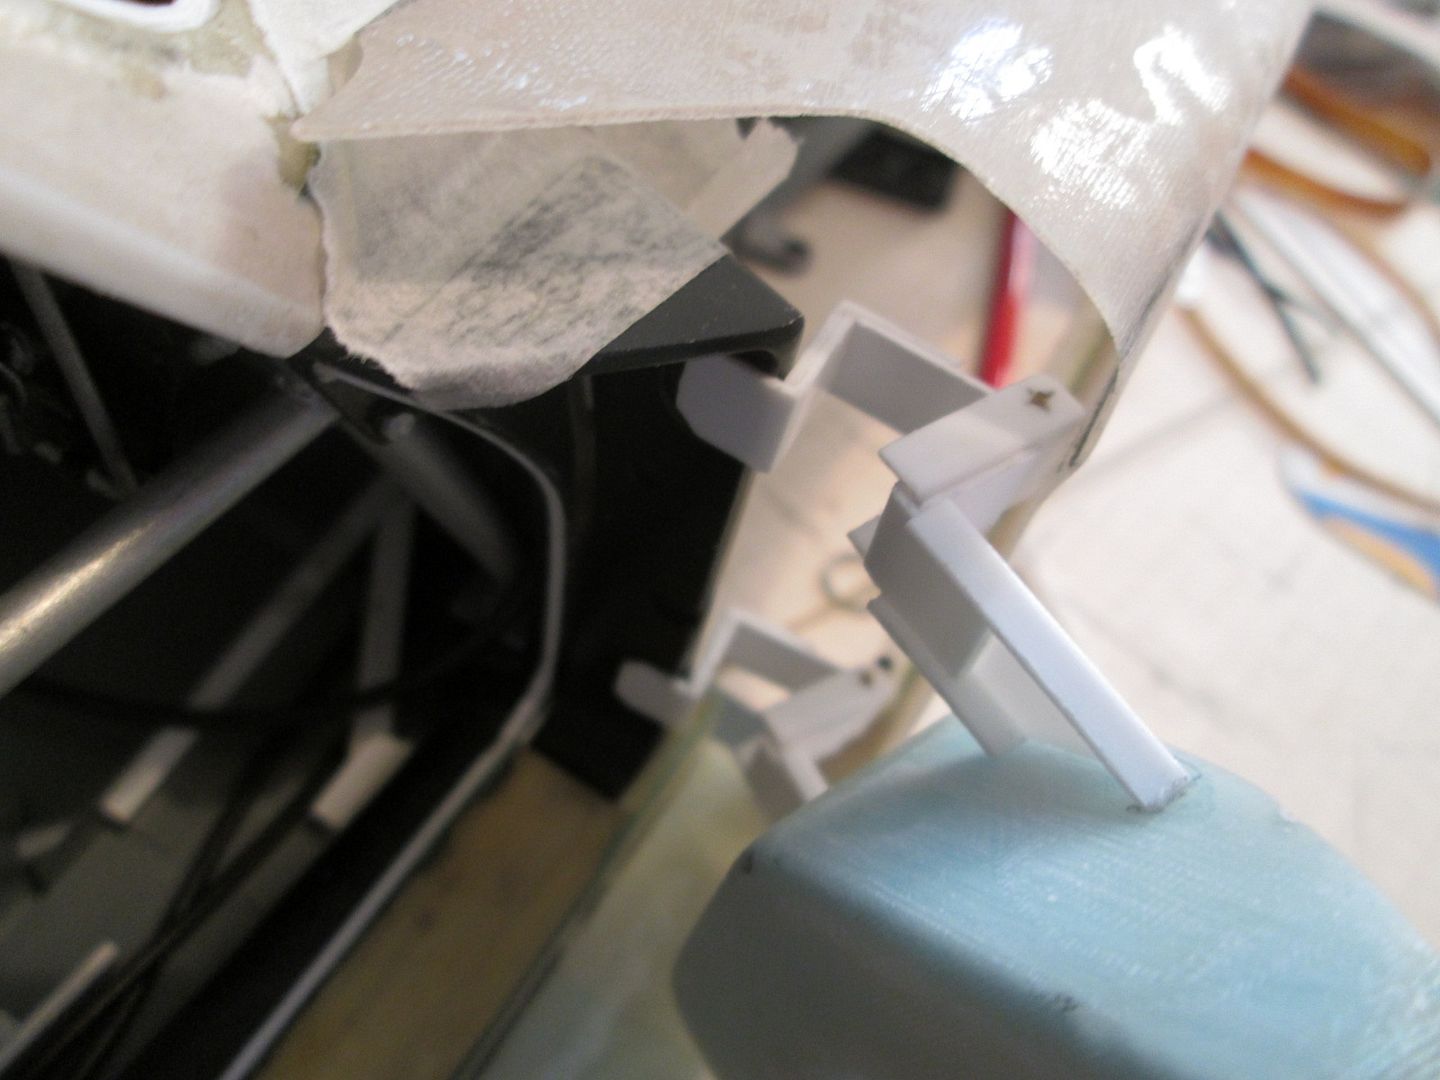 With the nose bodywork in place you can see that the pivot point is pushed right out to the edge - this should allow the doors to arc open without the aero panels fouling the nose. By this point I was happy that the hinges could be made to work, so the next step was to fix the supports in place at the front edge of the door-frame. However, before I could do this I had to spray the sill panels - much easier to do this now, than later. So, I masked everything up: 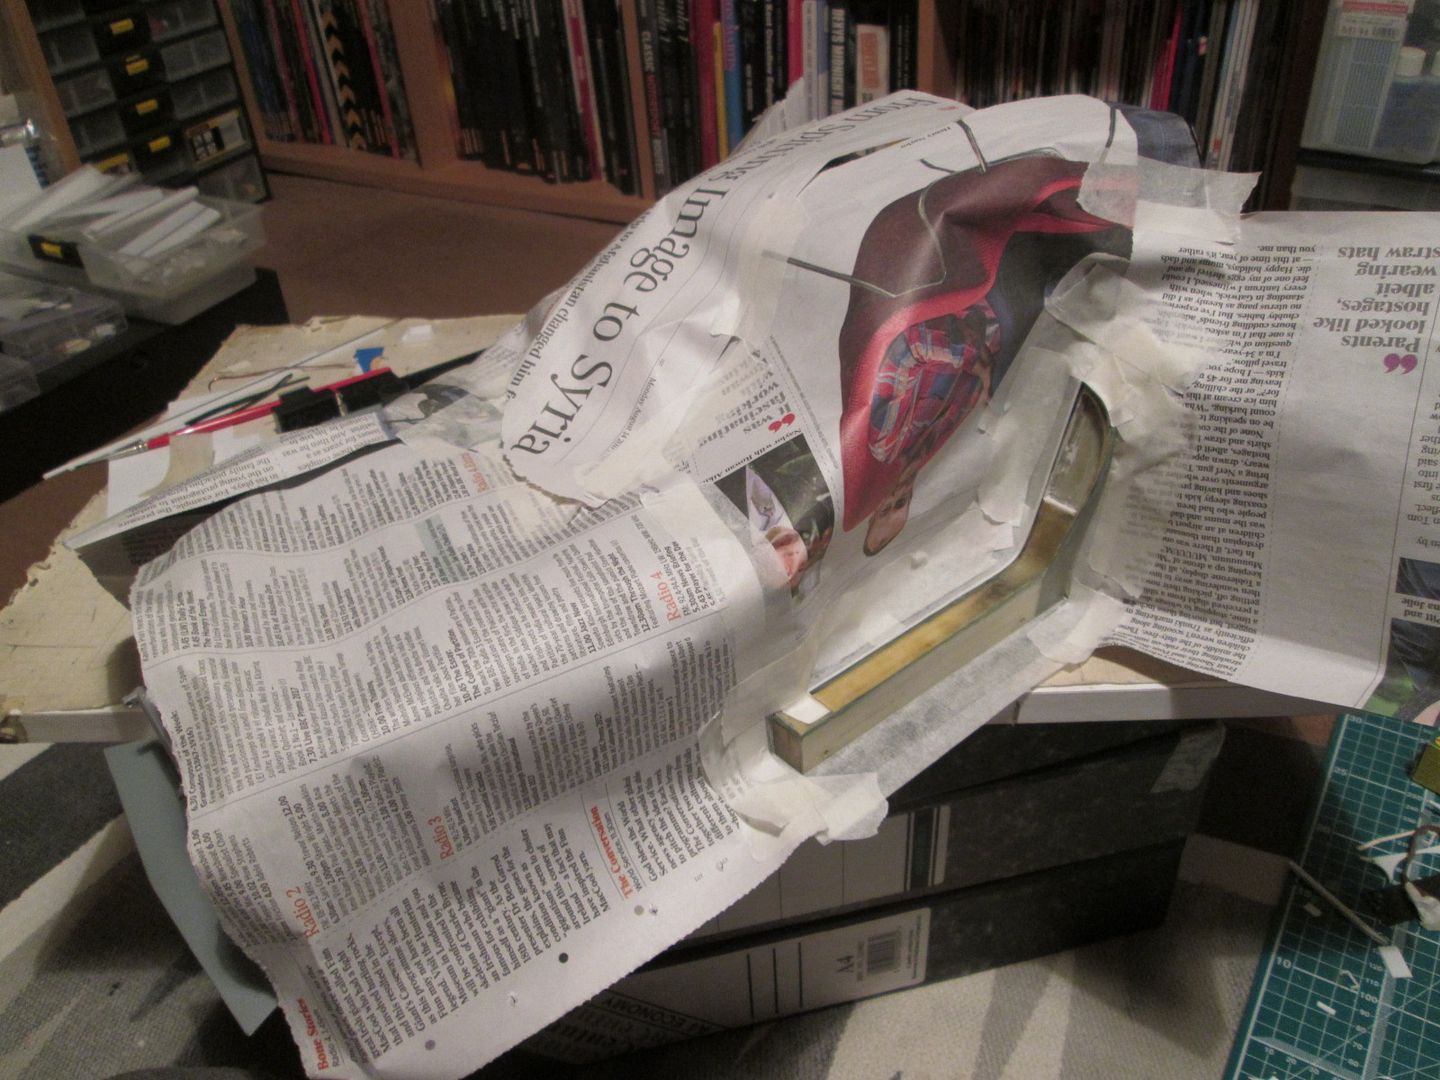 ...and after several coats of primer, then three air-brushed coats of Tamiya white: 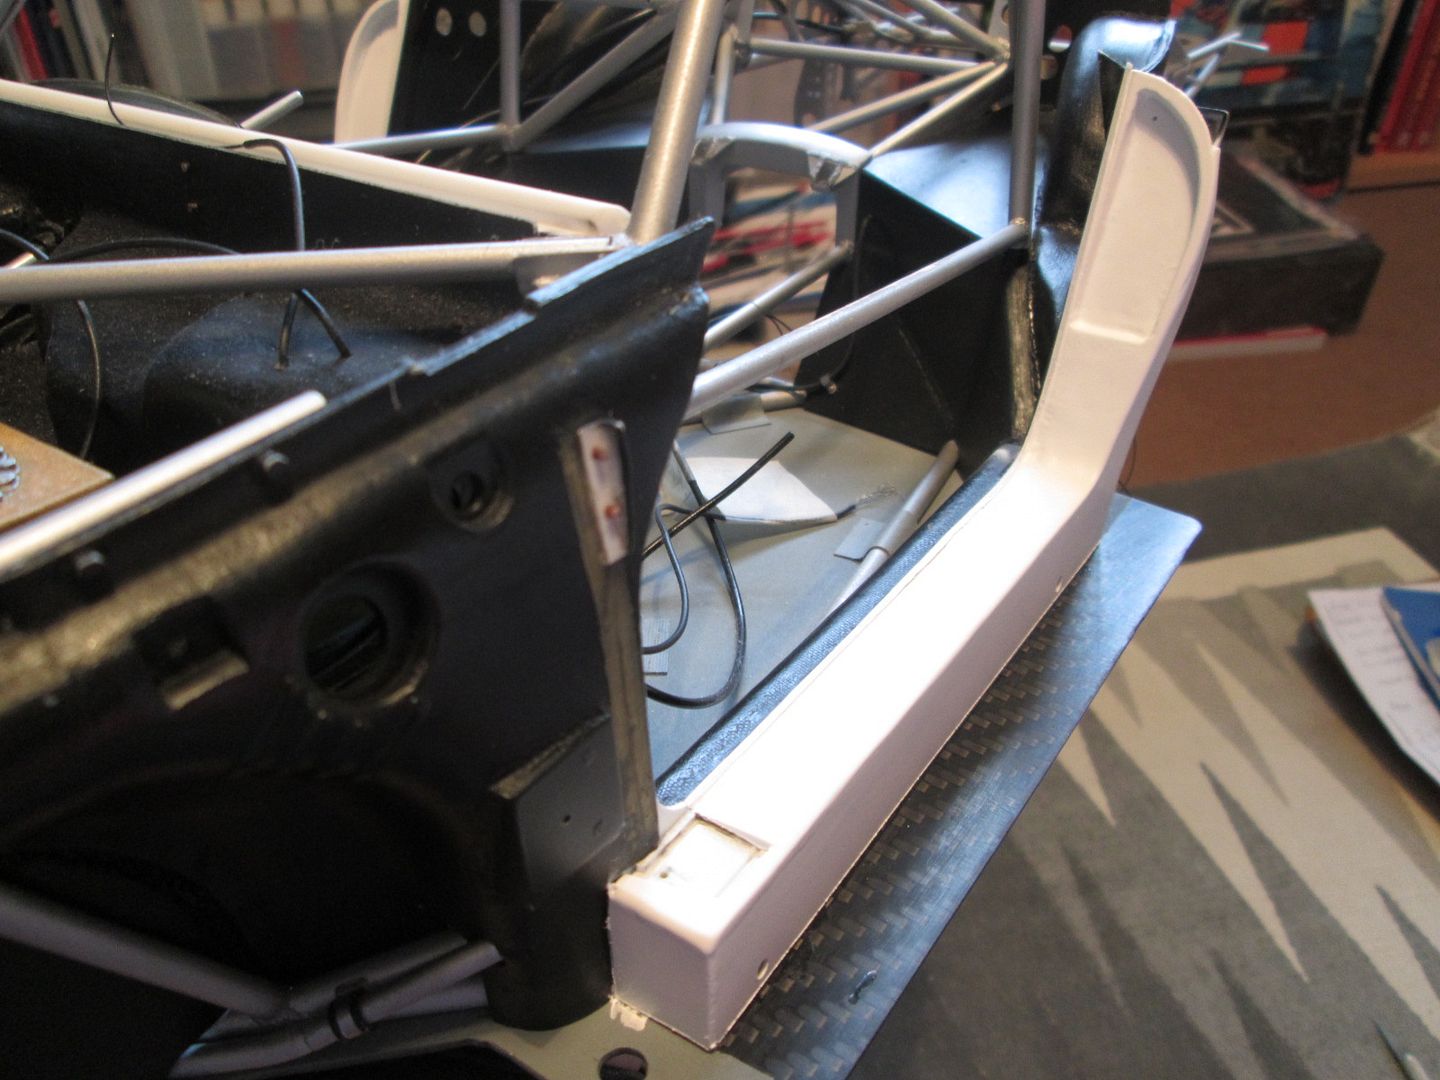 No overspray into the cockpit, so that's good. A little touching-up required around the front on the floor, but that's not a problem. I could now make the mark-3 hinges and fit the support pillars: 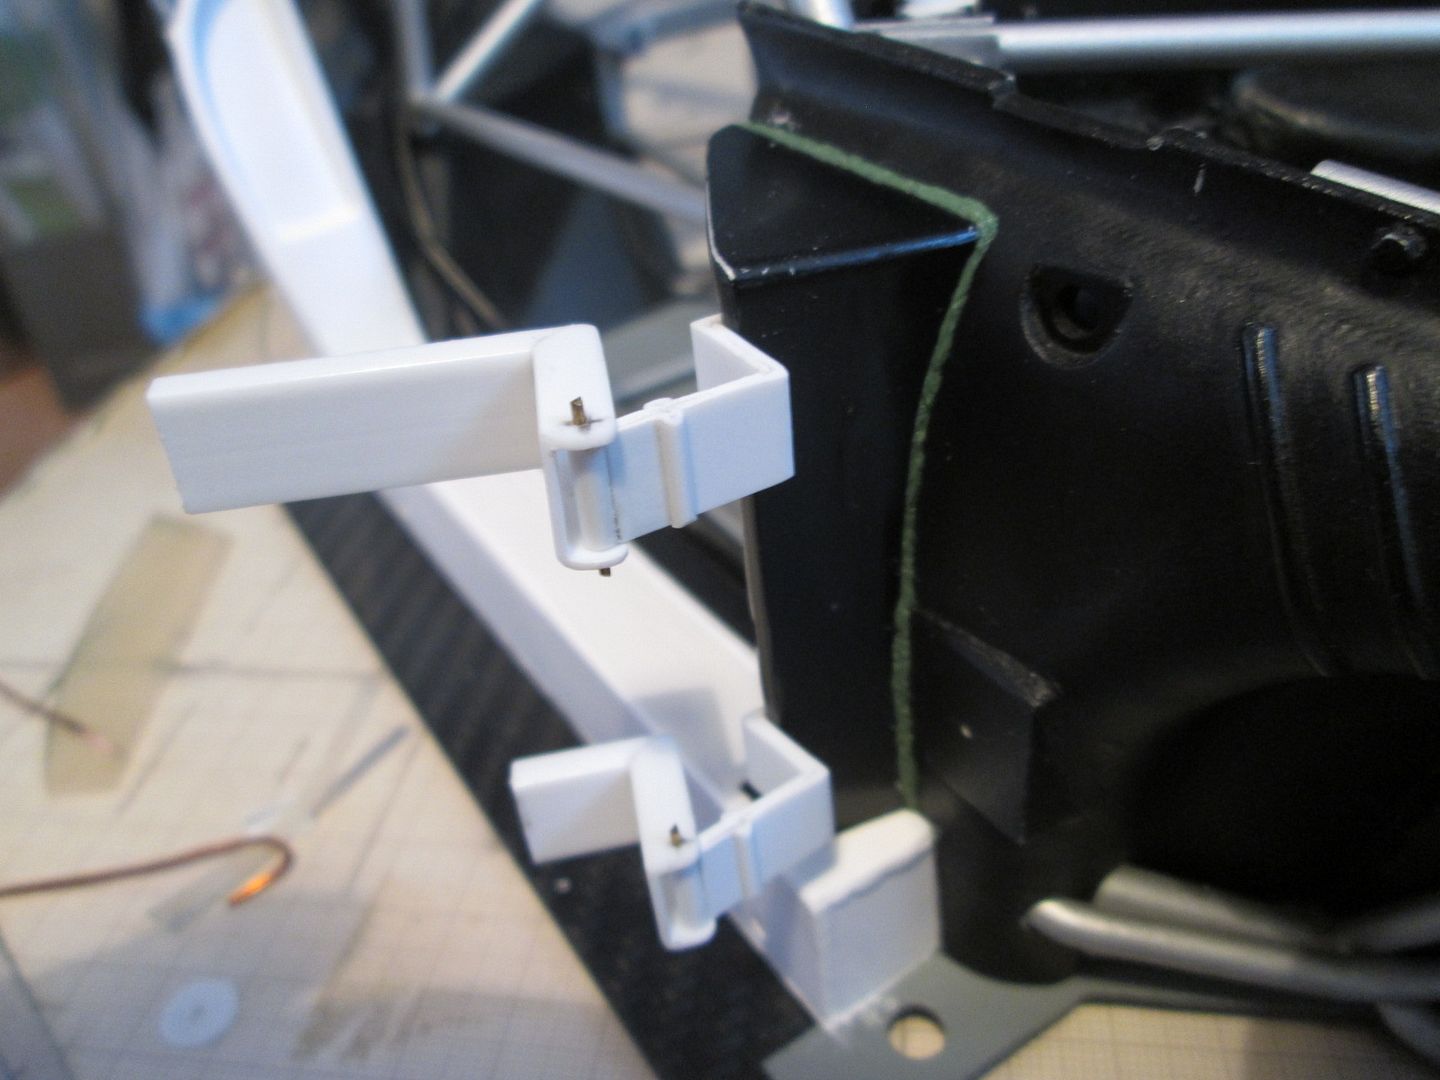 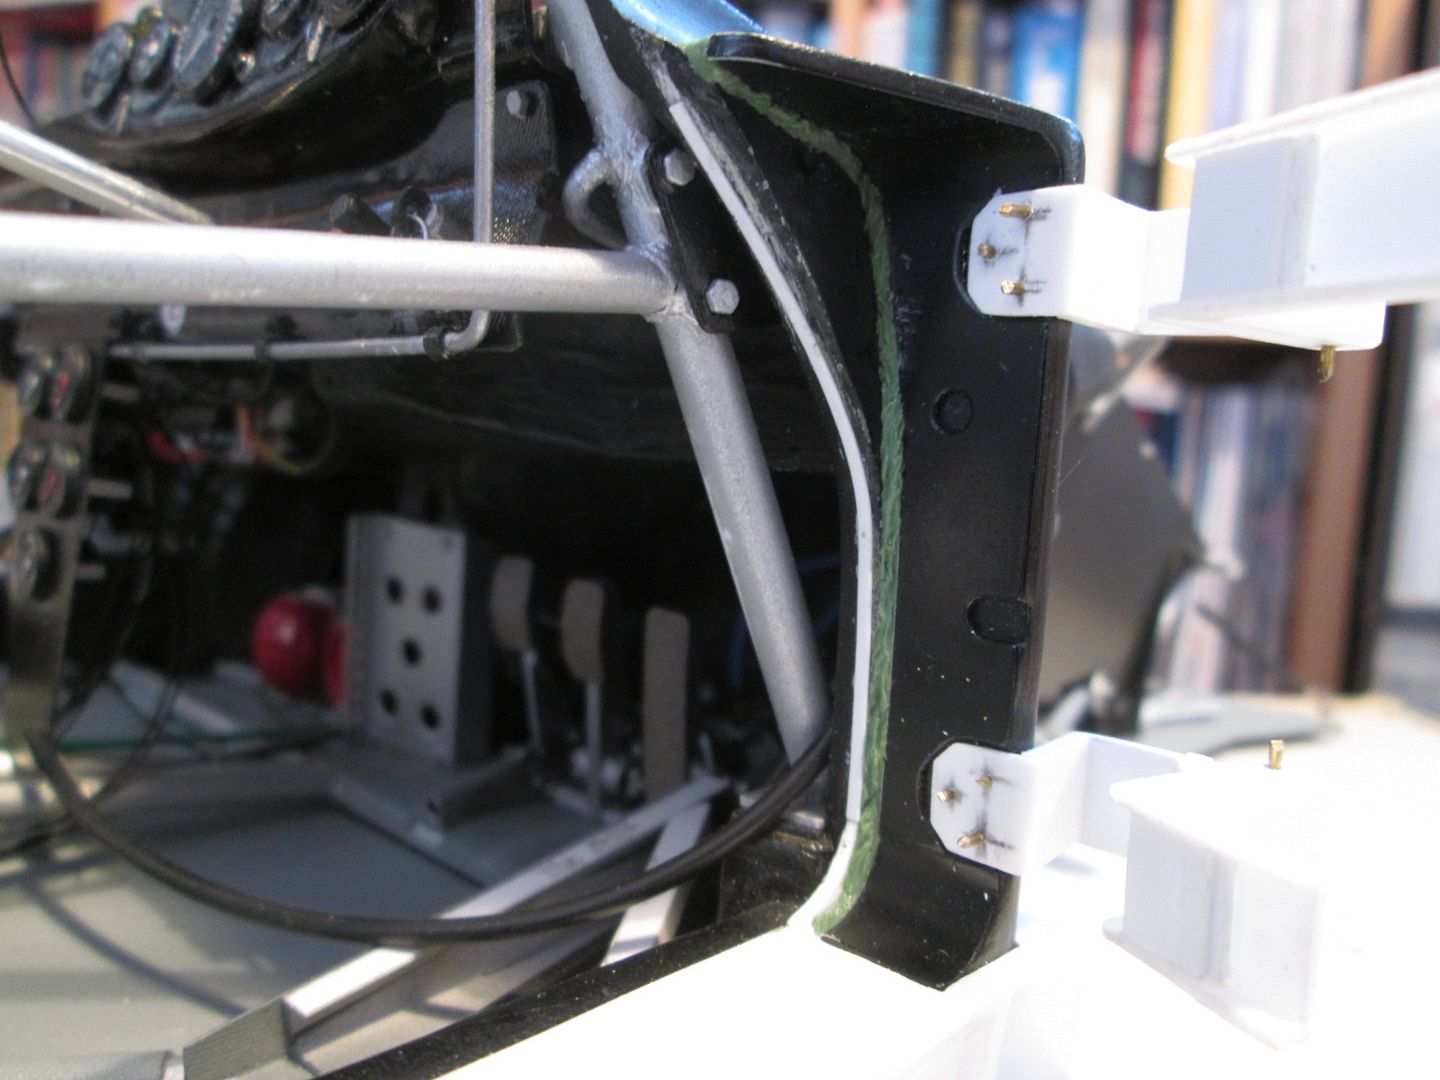 Each support pillar is pinned into the lower sill structure, and is glued to an internal bracket on the fibreglass wing panel. More CA glue was run into the joint, then packed out with Greenstuff. The mark-3 hinges have been drilled and temporarily pinned in place. There's still more to do on all these parts, but it's progressing nicely - I knew it would take time to find the right solution. The final job was to have a look at the window-frames on the door. I wasn't entirely sure how to approach these, but have started with sections of 1/8" box threaded onto a wire core: 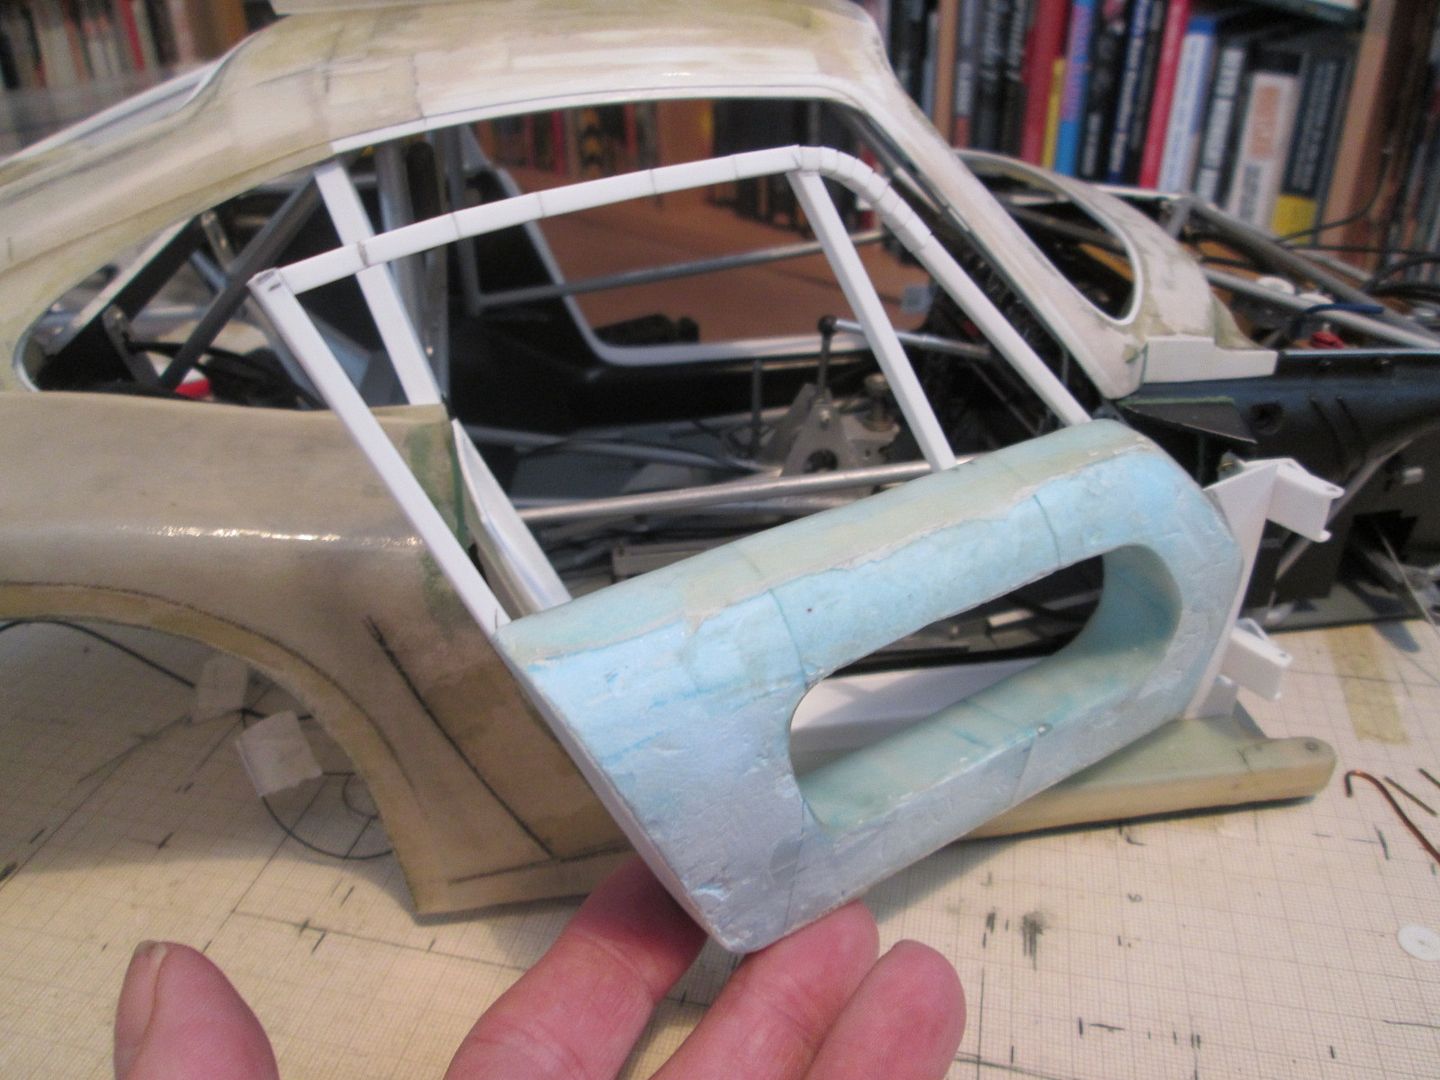 None of the pieces of 1/8" box are glued together yet, but there's potential for smoothing it all out, adding a thin outer skin if necessary, and generally just playing around with it until I get a good shape. The attachment to the inner door panel is temporary, and is one area which needs more attention - it needs a bit of juggling as the window-frames are currently attaching to the inside vertical face, where they should be attached more at the top. I'm blaming the lack of original drawings for this! I think it can all be made to work, though. That's it for tonight. Next time I hope to have a couple of trimmed door panels, some door handles, and maybe some sliding windows to show... SB |
|
|
|

|
|
|
#643 | |
|
AF Regular
Join Date: Mar 2005
Location: San Marcos, California
Posts: 331
Thanks: 52
Thanked 17 Times in 15 Posts
|
Re: 1/8 Porsche 935/78 'Moby Dick'
Just amazing work SB.
|
|
|
|

|
|
|
#644 | |
|
AF Newbie
Join Date: Jul 2009
Location: Wuerzburg
Posts: 32
Thanks: 4
Thanked 3 Times in 3 Posts
|
Re: 1/8 Porsche 935/78 'Moby Dick'
Great update again...your work is unbelievable!
|
|
|
|

|
|
|
#645 | |
|
AF Enthusiast
Thread starter
Join Date: Nov 2008
Location: Norwich
Posts: 649
Thanks: 21
Thanked 111 Times in 87 Posts
|
Re: 1/8 Porsche 935/78 'Moby Dick'
Hello again,
So, here's the problem with the first version of the window frames - the 1/8" box section had to attach to the inner face of the door in order to line up with the pillars and curve of the roof: 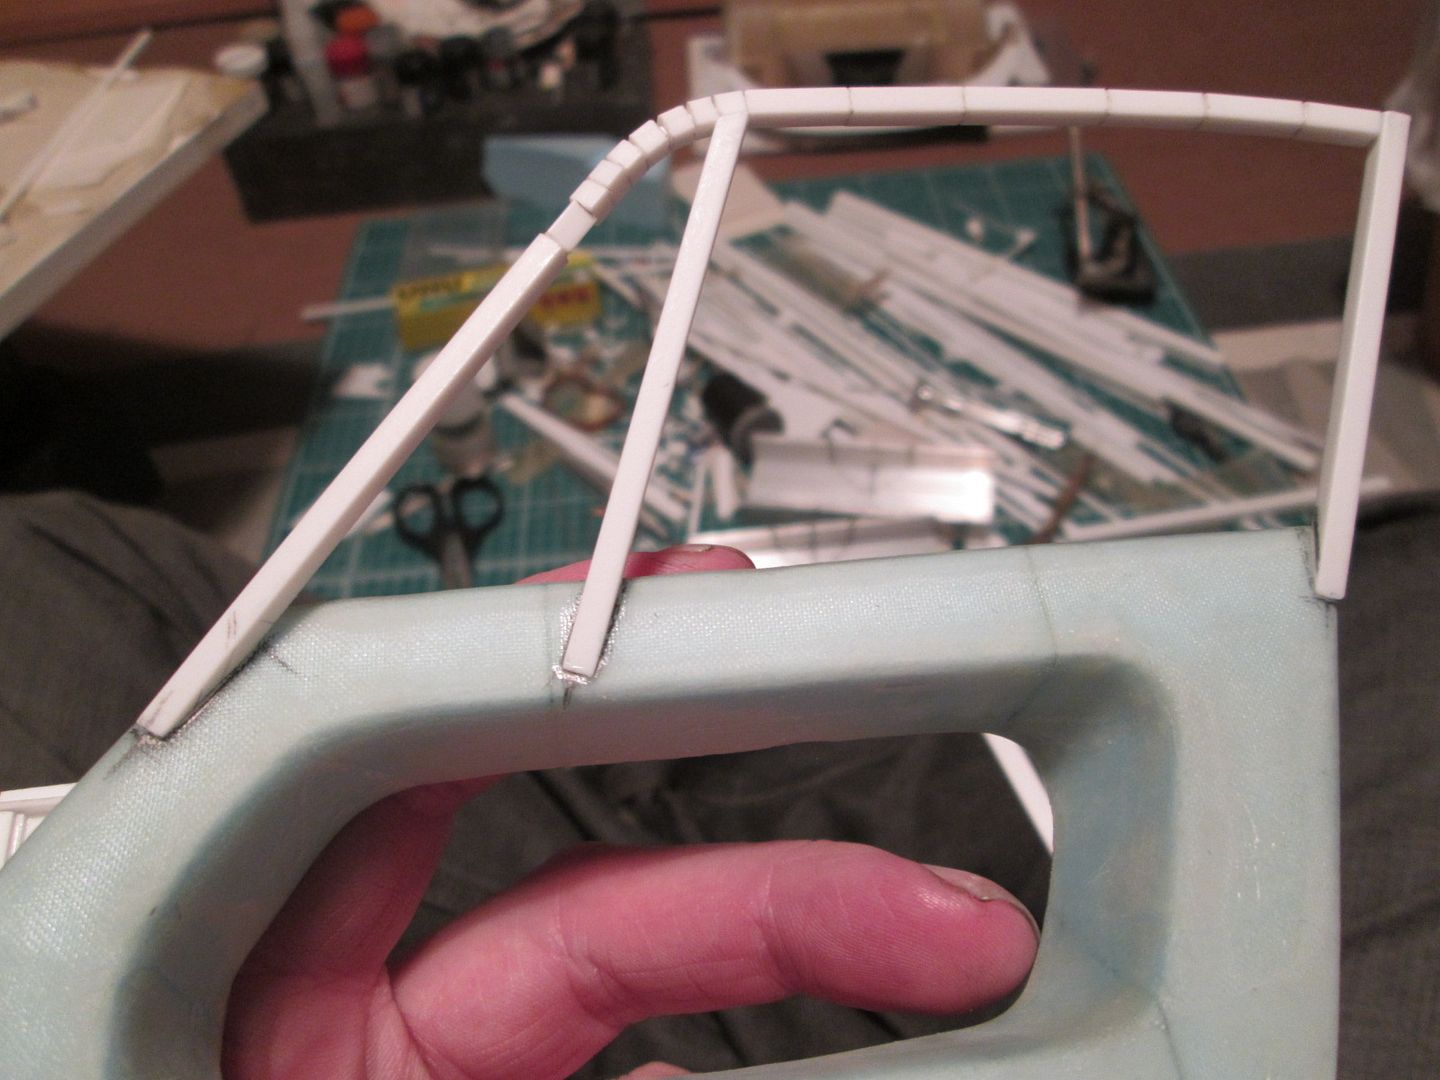 At this point I had two practical options. I could extend the door panel on the inside face by about 1/8" and attach the frame to the top of this section, or I could push the existing panel 1/8" further into the cockpit and space the outer door skin back to the correct position. Extending the door panel on the inside was not going to be fun - it would have required more pattern-making and fibreglass work, and I'd already spent a lot of time making the existing parts. Option B was the preferred choice - putting an 1/8" packer under the door skin offered a better chance of a good result! Given that the inner door panels were not now going to be altered, I could start adding some of the details required before painting. The 935-78 uses simple pull-cables to operate the door mechanism from the inside, and these disappear into two cut-outs at the back of each panel. I carved out the foam, lined the walls with styrene and made the two T-handles: 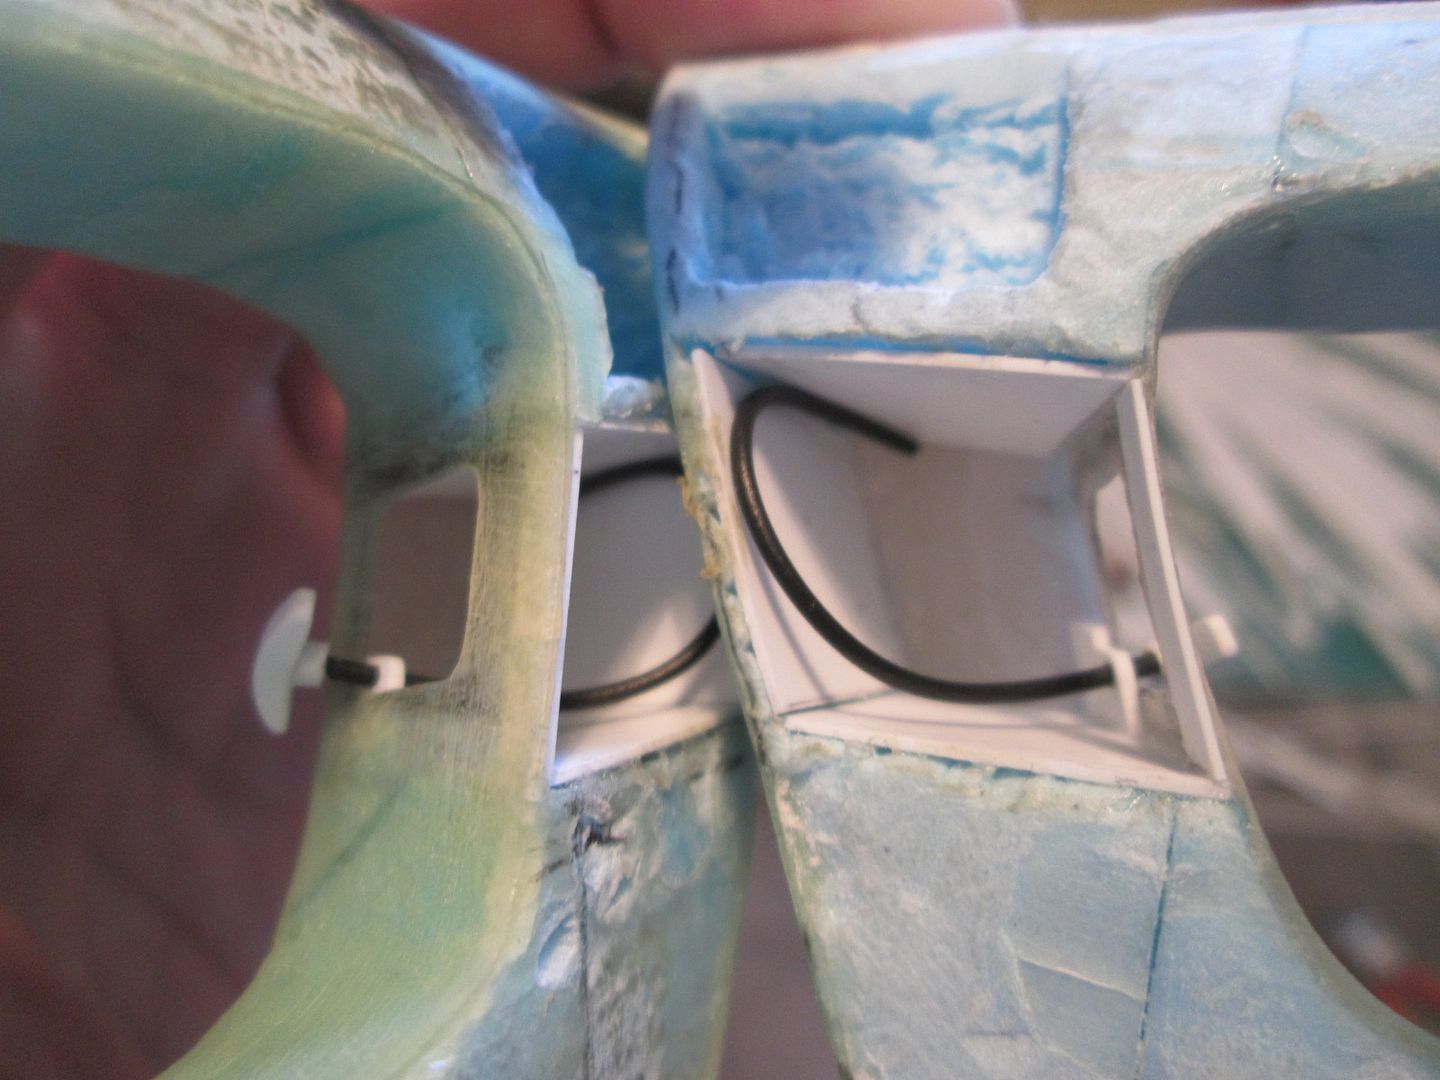 Next, the door strike-plates were made from three layers of styrene sheet, lots of filing, and some 'Wave' rivet heads: 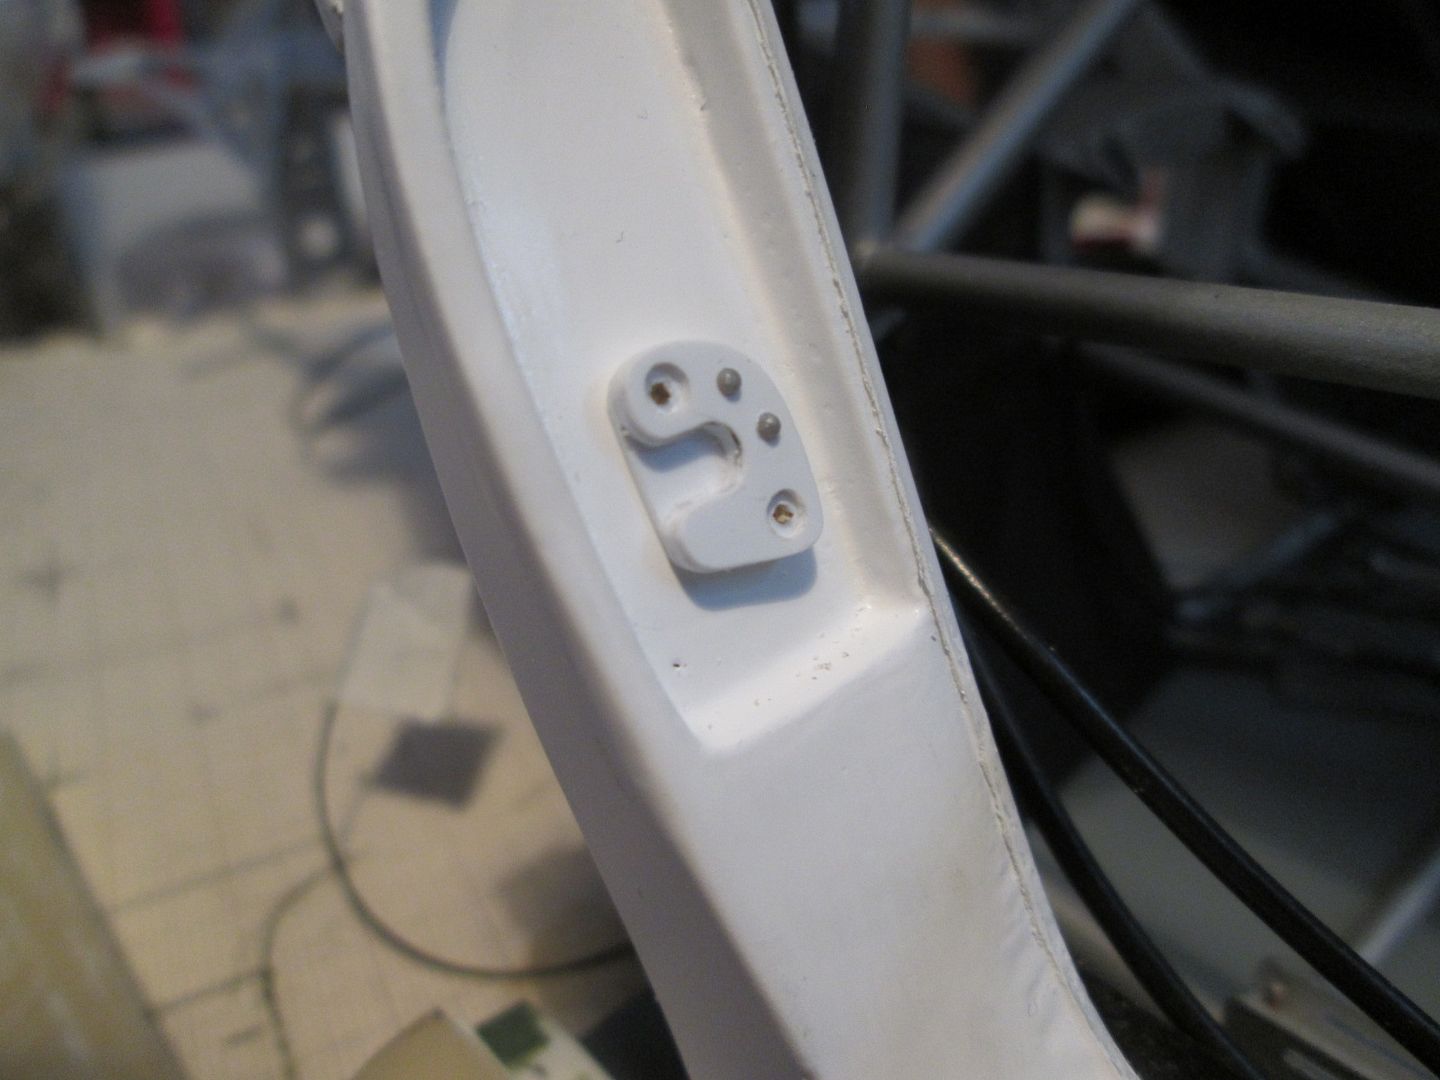 Pinned in place for now, but will be painted and glued in time. Before I could go much further with the doors I knew some painting was required. The recess in each panel would be difficult to spray once assembled, so I made some 'door card' panels from styrene and sprayed this section first: 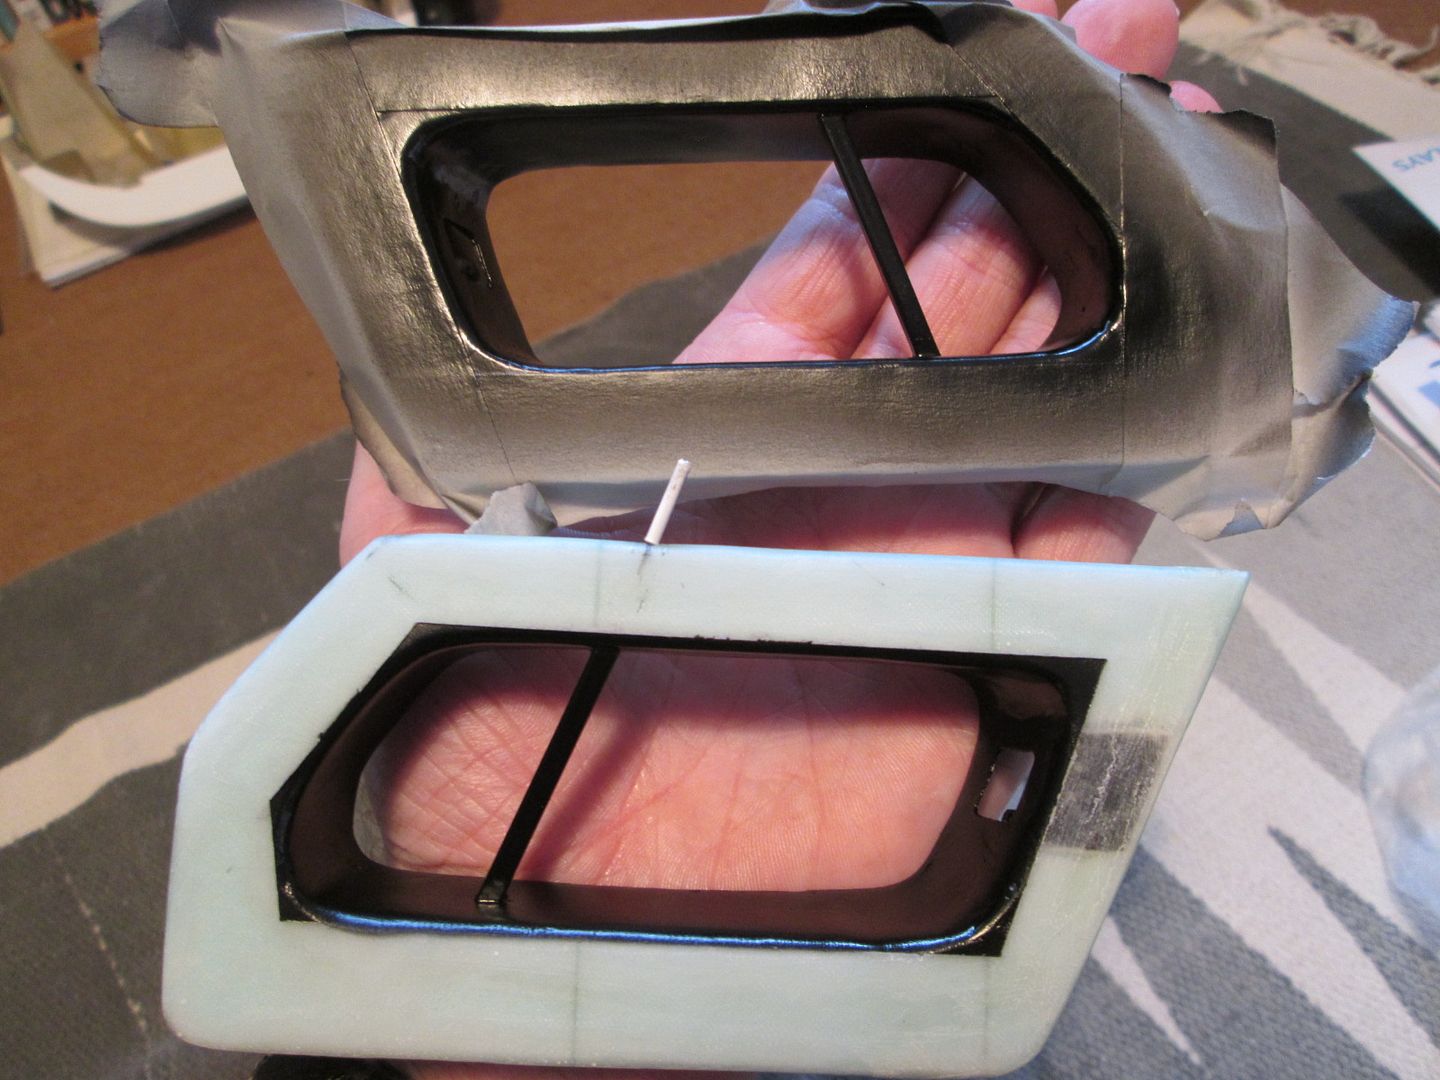 The lengths of 1/8" box section are pinned at the bottom, and the upper pin which will support the window frame goes right through into the top. The doorcards are not shown, but have since been glued in place. Rather than gluing the spacers for the outer door skin to the foam core, I re-used the two mark-one door panels as an inner skin. The next problem was realising that the door hinges were just not going to be strong enough. The ever-increasing weight of the doors was causing them to want to twist when opened, and I couldn't see a suitable solution. At this size and thickness I felt that re-making the hinges in fibreglass or thin aluminium sheet would not provide the required stiffness, and would cause other problems down the line - getting good glued joints with the ali, for example. I've (hopefully) solved the problem by adding a second section to the hinge which will be pinned and glued to the front face of the door support: 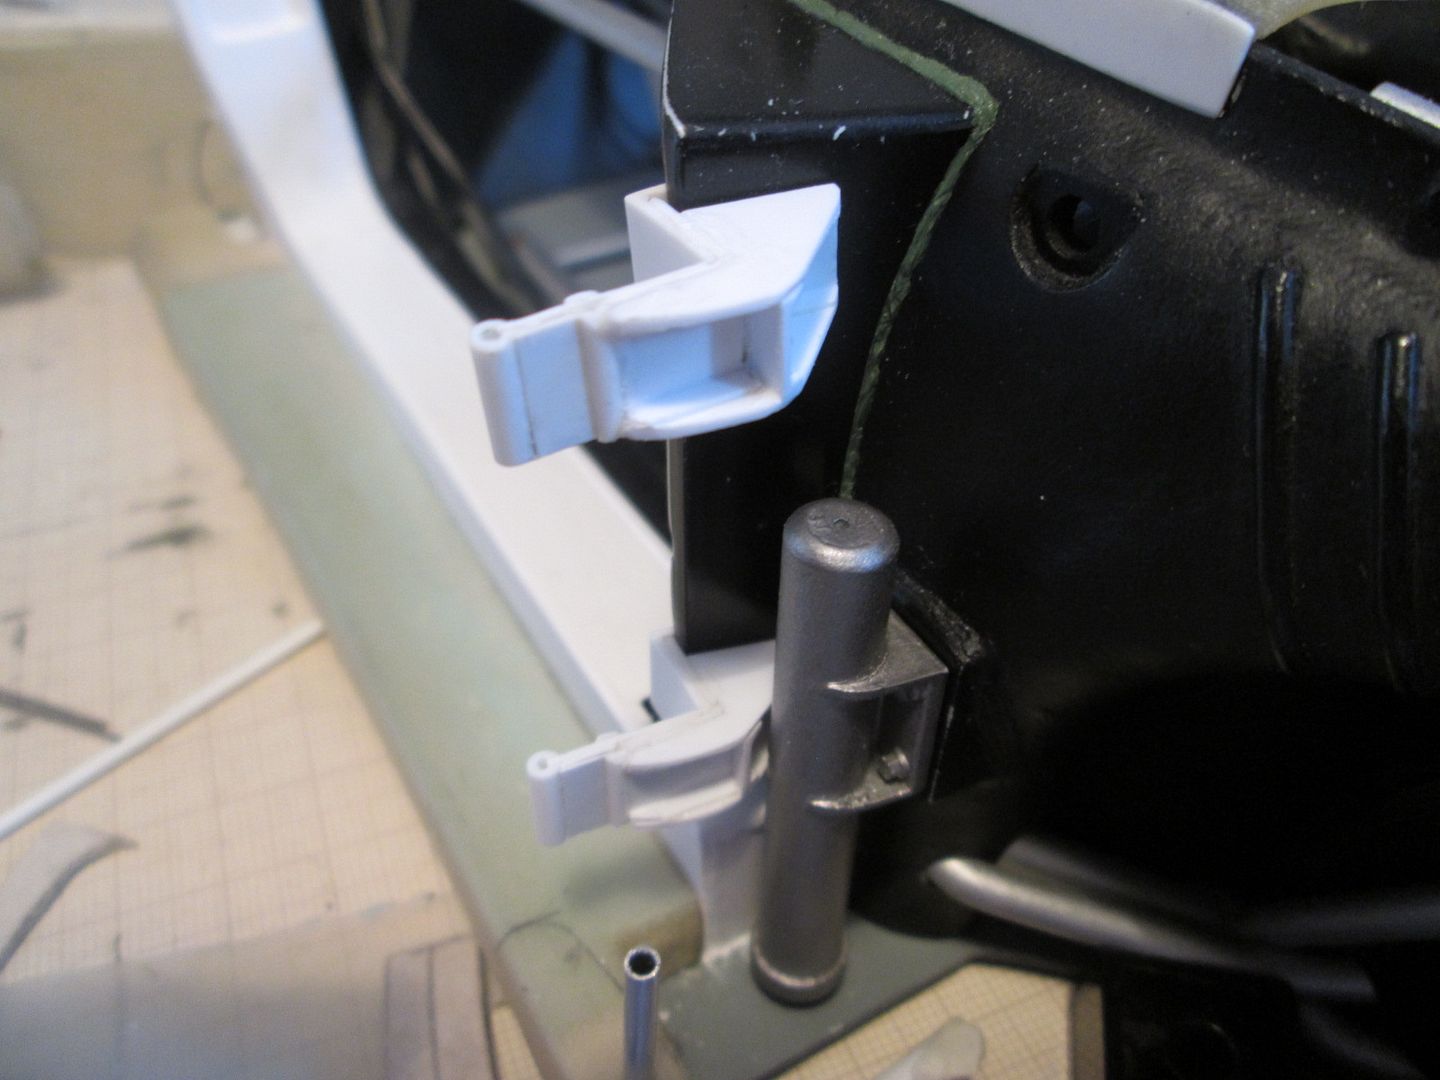 I know it's not 'original' to the 935, but I'm not sure there was much else I could have done. They'll look better once fitted and painted, and if they allow the doors to be opened properly I'll be happy. When the doors are closed the weight isn't a problem, and it'll spend most of it's life on the shelf with everything shut! So, here's the right-hand door before I start fitting the outer skin: 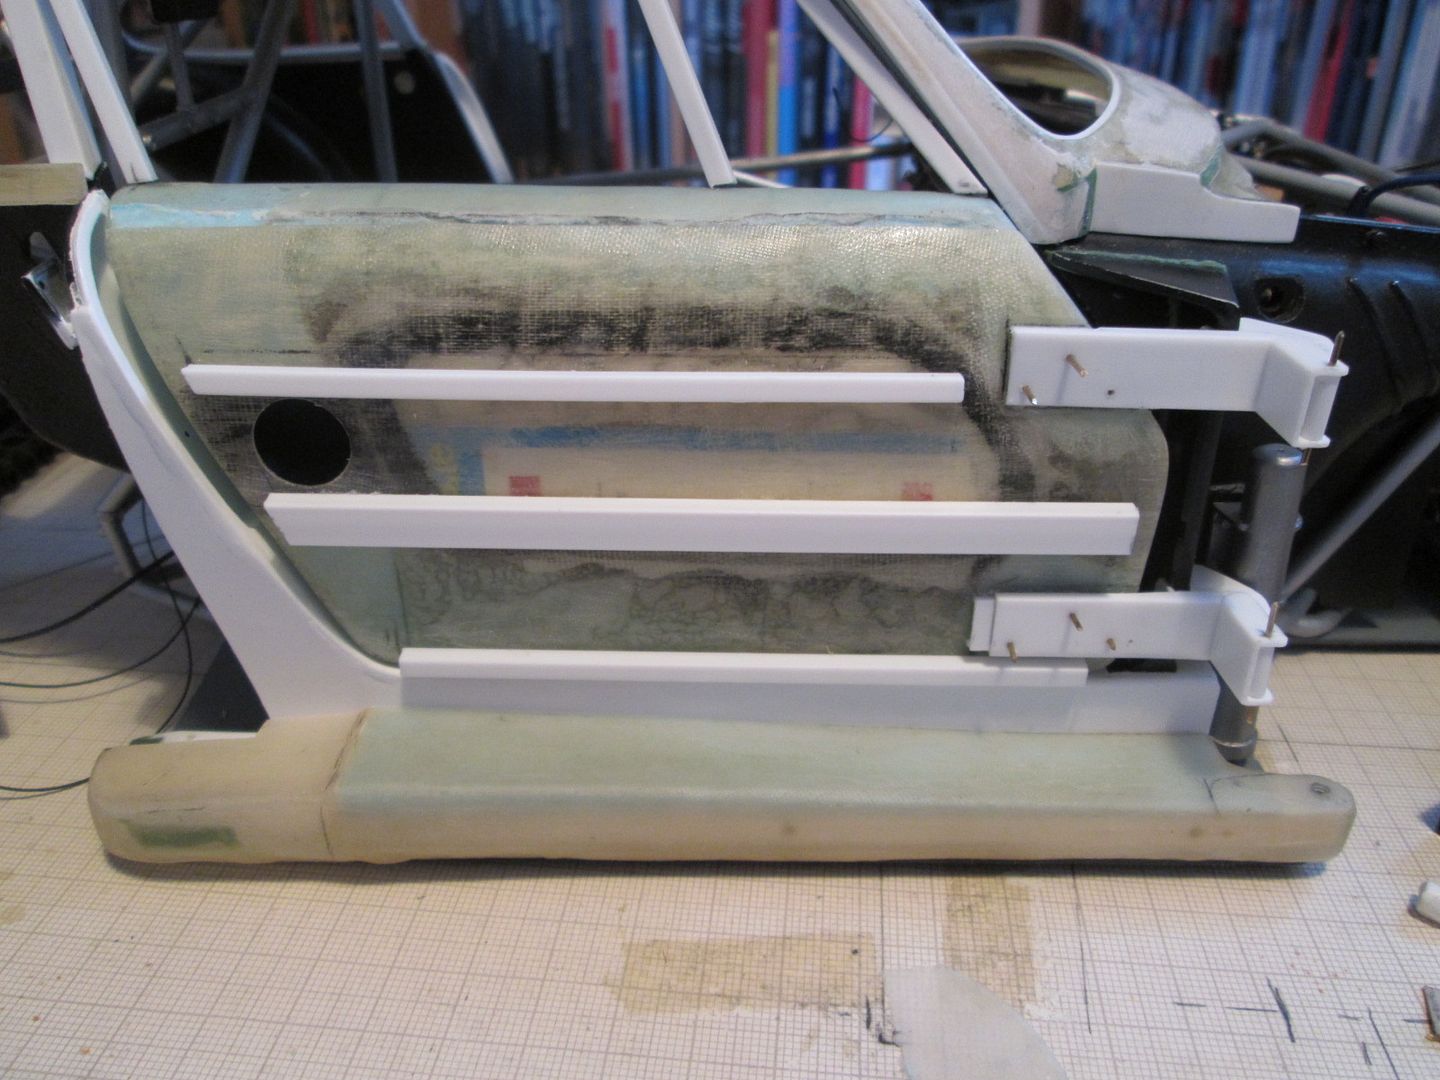 I had to re-make the door-side sections of the hinges as these were now mounting onto the sides rather than the front face; no problem - easy enough to do. The inner skin has been fitted and you can see the back of the cardboard used to pack out the styrene doorcards. The round hole will make it easier to fix the door pull-cables in place, before the outer skin is applied - as long as I remember! You can see where I've pushed the door further into the cockpit by looking at the back edge of the opening. The window frame now pins into the top edge of the door, so that's good. The three lengths of box section are the early stages of adding the spacer for the outer skin - the tricky bit here will be filling the gap around the edge, but I've got plans for that... Finally for tonight, a small detail but one that's worked out quite nicely: 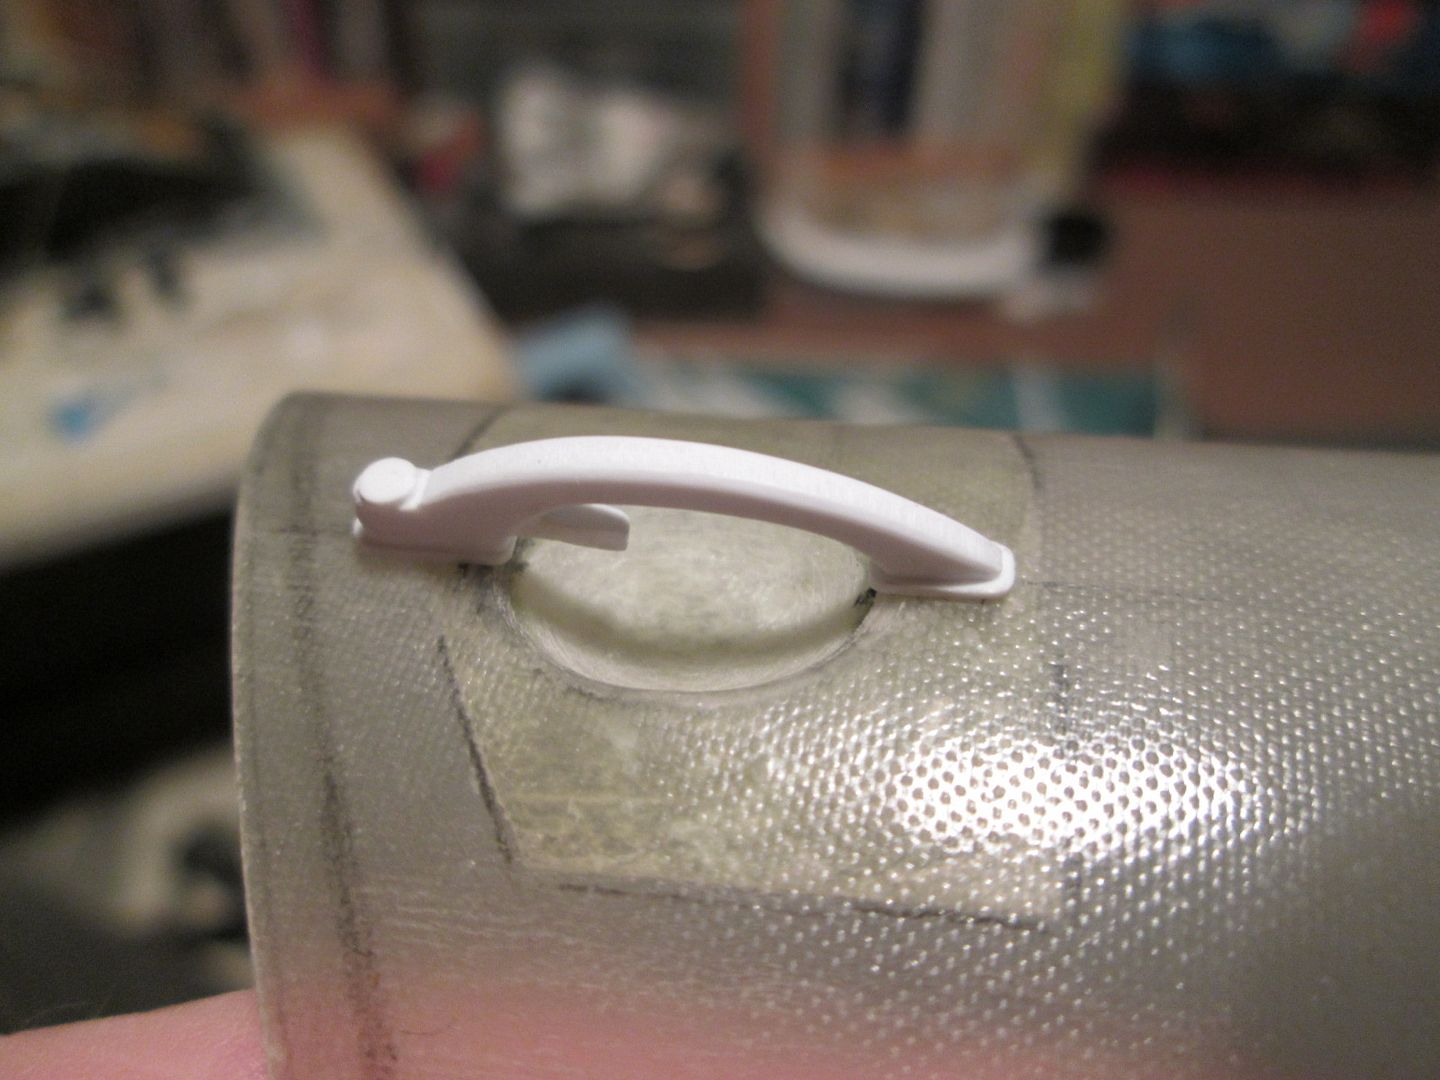 Time to add some door handles! I cut the hole in the outer skin, glued the small fibreglass recess piece in place, and the handle is pinned over the top. The main part of the handle was cut and filed from a piece of 4.8 x 2mm styrene strip, 0.5mm 'seals' added at each end, and the release latch fitted to the back. I'm very pleased with the result - even if this photo does suggest that the fibreglass door skin has the texture of golf-ball... Here's the whole lot all together - still work to do, but you can see what I'm aiming for: 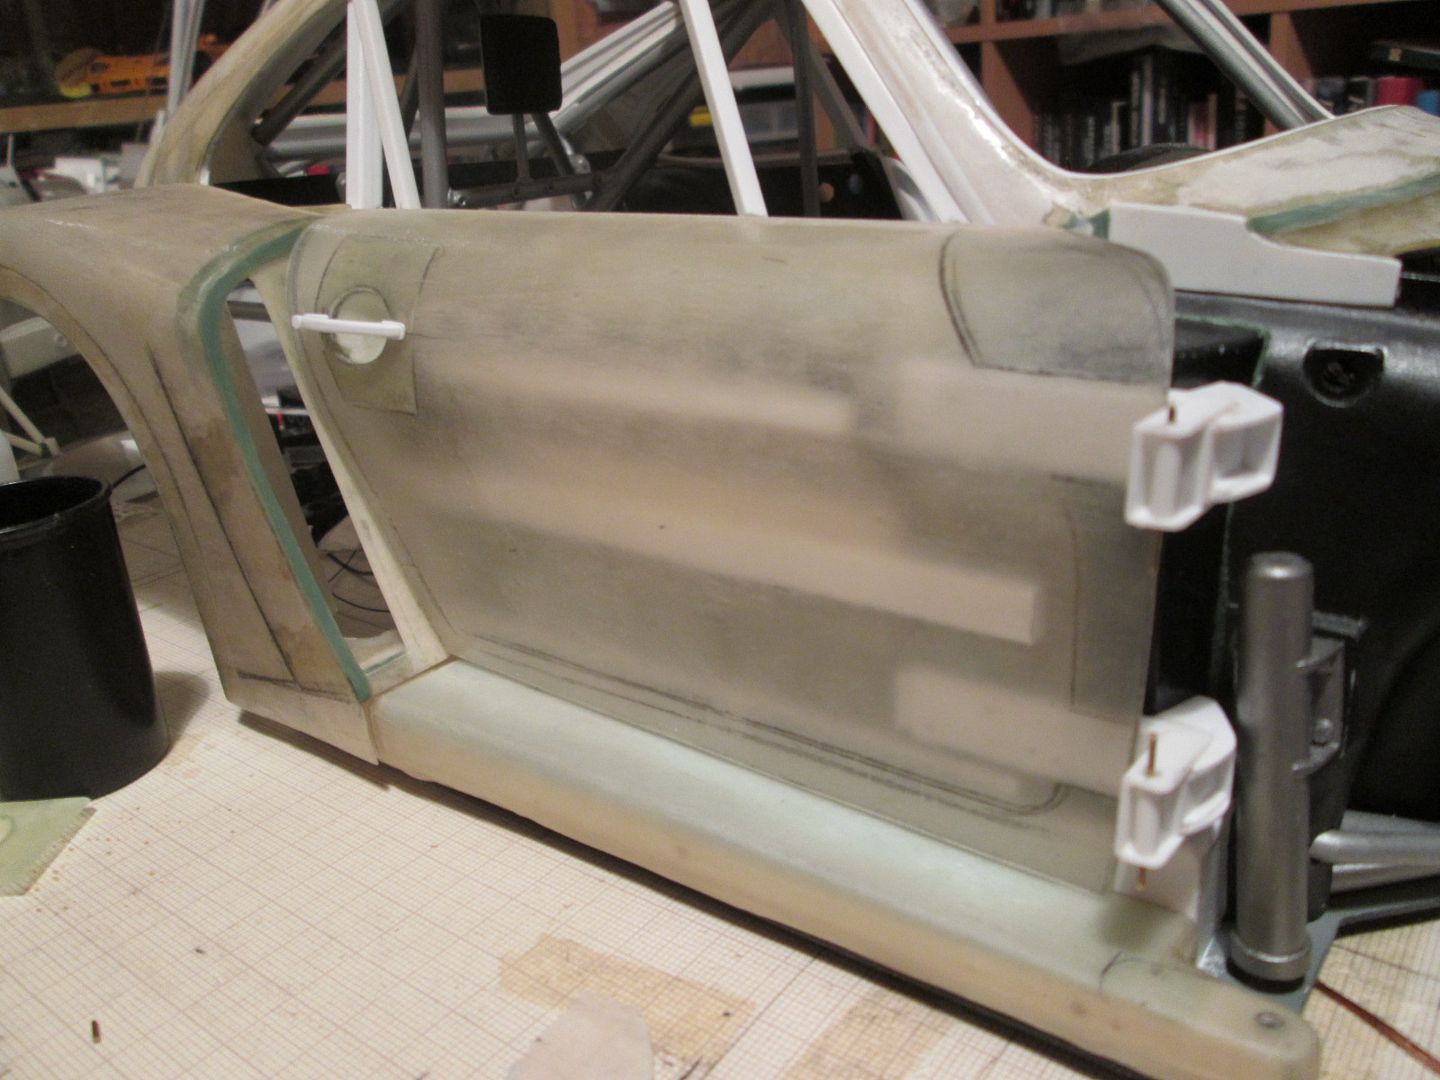 The only problem now is that I have to do a lot of this work again for the other side! Oh well, it'll keep me busy... As ever, have a good week. SB |
|
|
|

|
| ||||||||||||||||||||||||||||||||||||||
 |
POST REPLY TO THIS THREAD |
 |
|
|