

|
| Search | Car Forums | Gallery | Articles | Helper | AF 350Z | IgorSushko.com | Corporate |
|
| Latest | 0 Rplys |
|
|||||||
| WIP - Motorsports Post topics for any "Work In Process" motorsports vehicles in this sub-forum. |
 |
 Show Printable Version | Show Printable Version |  Email this Page | Email this Page |  Subscribe to this Thread
|
|
|
Thread Tools |
|
|
#601 | ||
|
AF Enthusiast
Join Date: Sep 2011
Location: Redwood City, California
Posts: 651
Thanks: 0
Thanked 39 Times in 39 Posts
|
Re: 1/8 Porsche 935/78 'Moby Dick'
Looking fantastic as usual...
Quote:
Don't know if you've seen this: http://www.automotiveforums.com/vbul...d.php?t=438245 ianc |
||
|
|

|
| The Following User Says Thank You to ianc911 For This Useful Post: |
ScratchBuilt (10-27-2016)
|
|
|
#602 | |
|
AF Enthusiast
Thread starter
Join Date: Nov 2008
Location: Norwich
Posts: 649
Thanks: 21
Thanked 111 Times in 87 Posts
|
Re: 1/8 Porsche 935/78 'Moby Dick'
Test pieces underway tonight, Ian! I had thought about trying to drape the fine fibreglass cloth over the tank, but was worried that I might find things not-quite-fitting anymore! I've got a couple of pieces of 1oz and 2.3oz cloth glued to a piece of 0.5mm styrene sheet, so it'll be interesting to see how they turn out - if I can get the colour right afterwards we might be onto a winner!
Now wondering if priming and base-coating the tank was a good idea... SB |
|
|
|

|
|
|
#603 | |
|
AF Enthusiast
Join Date: Sep 2011
Location: Redwood City, California
Posts: 651
Thanks: 0
Thanked 39 Times in 39 Posts
|
Re: 1/8 Porsche 935/78 'Moby Dick'
Looking forward to seeing what you come up with!
ianc |
|
|
|

|
|
|
#604 | |
|
AF Enthusiast
Thread starter
Join Date: Nov 2008
Location: Norwich
Posts: 649
Thanks: 21
Thanked 111 Times in 87 Posts
|
Re: 1/8 Porsche 935/78 'Moby Dick'
You know how sometimes you find yourself doing something you hadn't really expected to be doing? That's the story of the last few days!
Inspired / cajoled by ianc911, I glued a couple of pieces of fibreglass cloth to styrene, then added some colour to check the result: 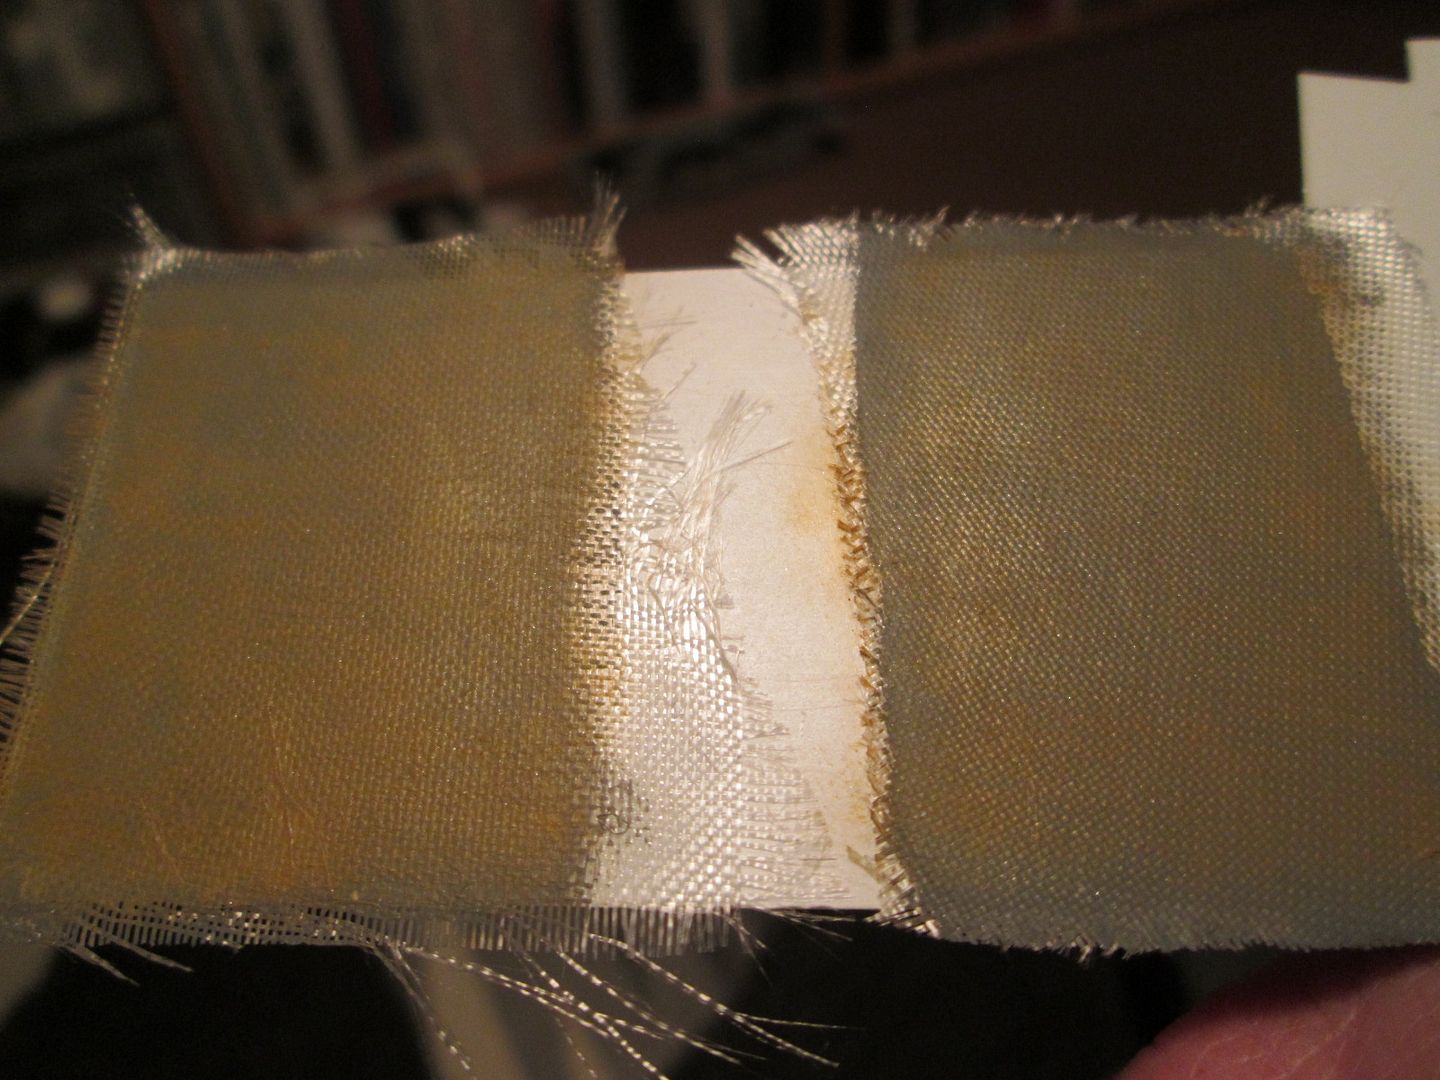 1oz cloth on left, 2.3oz on the right. The weave is still visible through both, and the single layer only adds about 0.1mm to the thickness. The styrene started to distort a little due to the amount of glue, but I didn't think this would be a problem with the solid fuel tanks. So, time to start covering. I started with the upper wedge from the main fuel tank - I reckoned that if anything went drastically wrong, this piece would be easiest to re-make. That's confidence for you... I used the heavier 2.3oz cloth; the lighter stuff is so easily snagged, distorted and generally messed up by handling that I needed the stability of the 2.3oz. Problem number two was the need to cut holes in the cloth to fit around the openings for the filler necks, etc. Fortunately I'd kept the pieces of styrene cut from the original panels used to make the tanks, so could use these as templates. I tried using a piece of masking tape to stabilise the cloth during cutting - it made it easier to cut the hole, but pulled the cloth to shreds when removed! So, cut the hole, give the tank a rub over with emery cloth to break up the layers of paint and primer, then add plenty of liquid-poly glue: 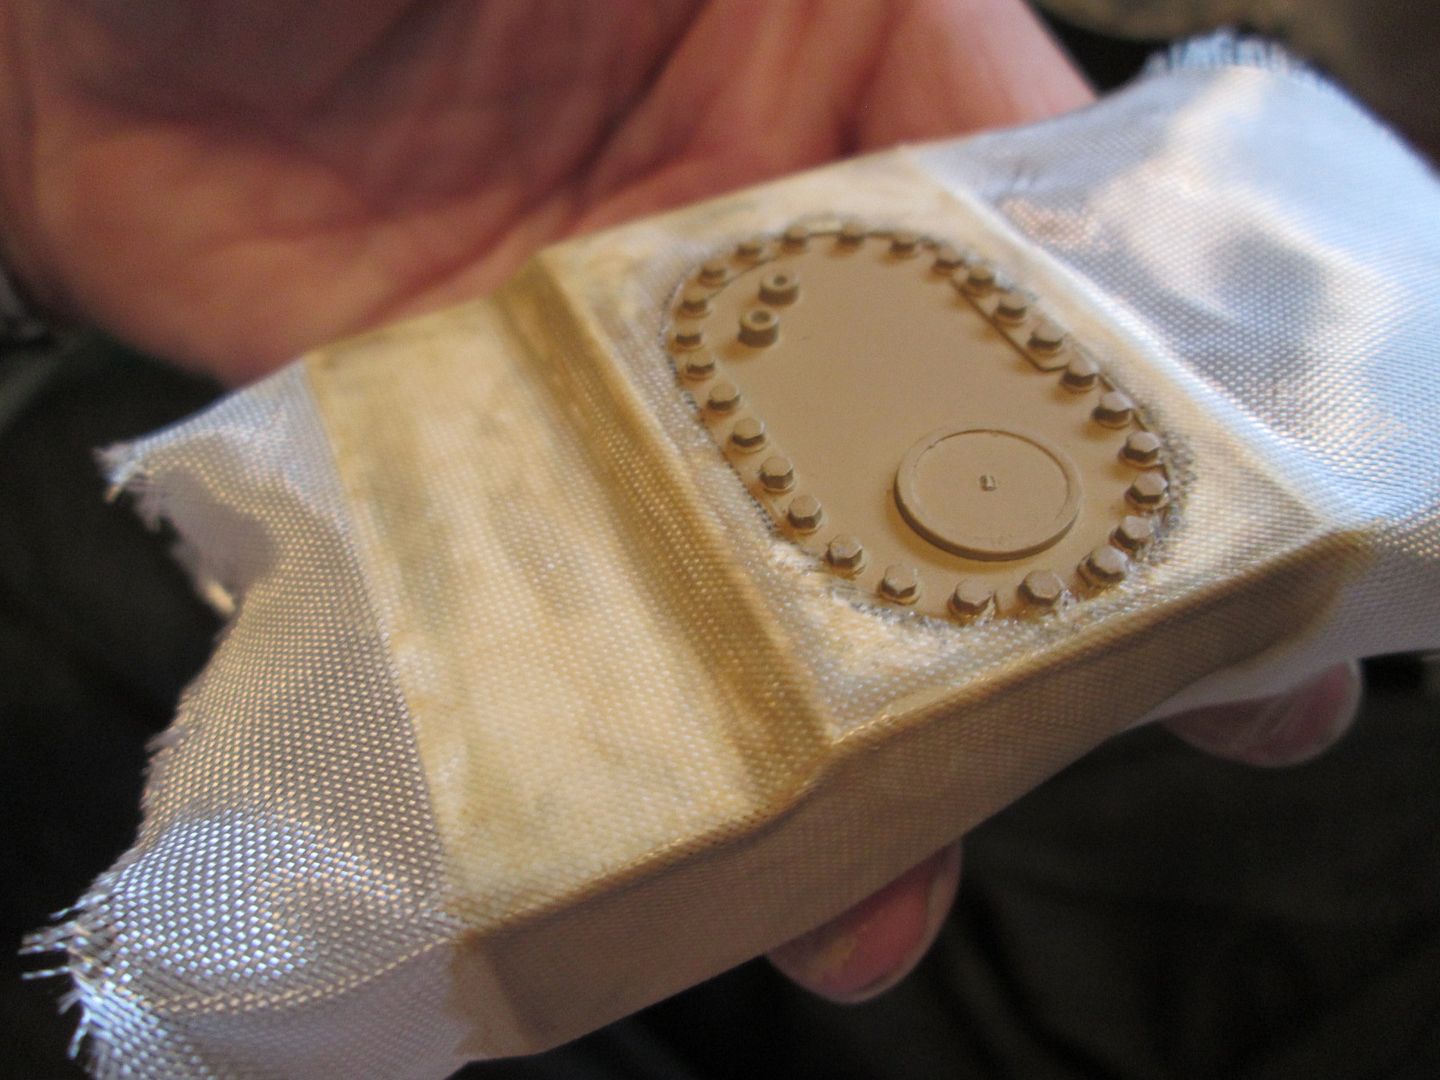 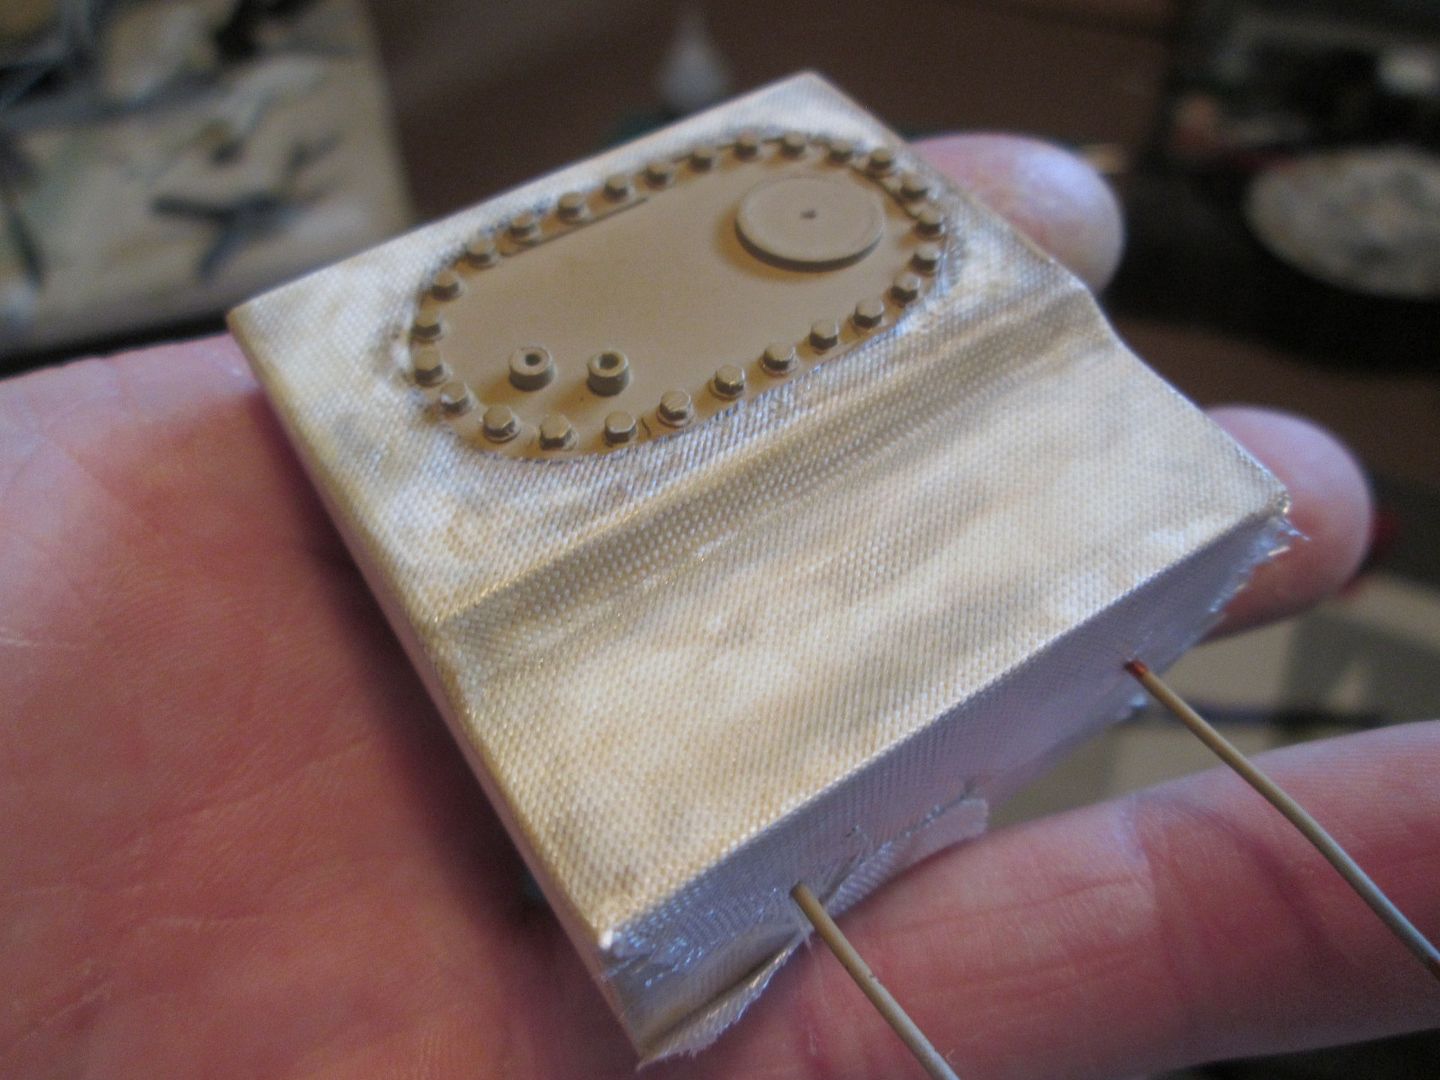 As per the tutorial, more glue was added after the cloth was in place. It was obvious very quickly that the technique was sound - if a little messy, as you can see from the state of my fingertips! After completing the wedge, I continued with the collector tank - a more complicated shape: 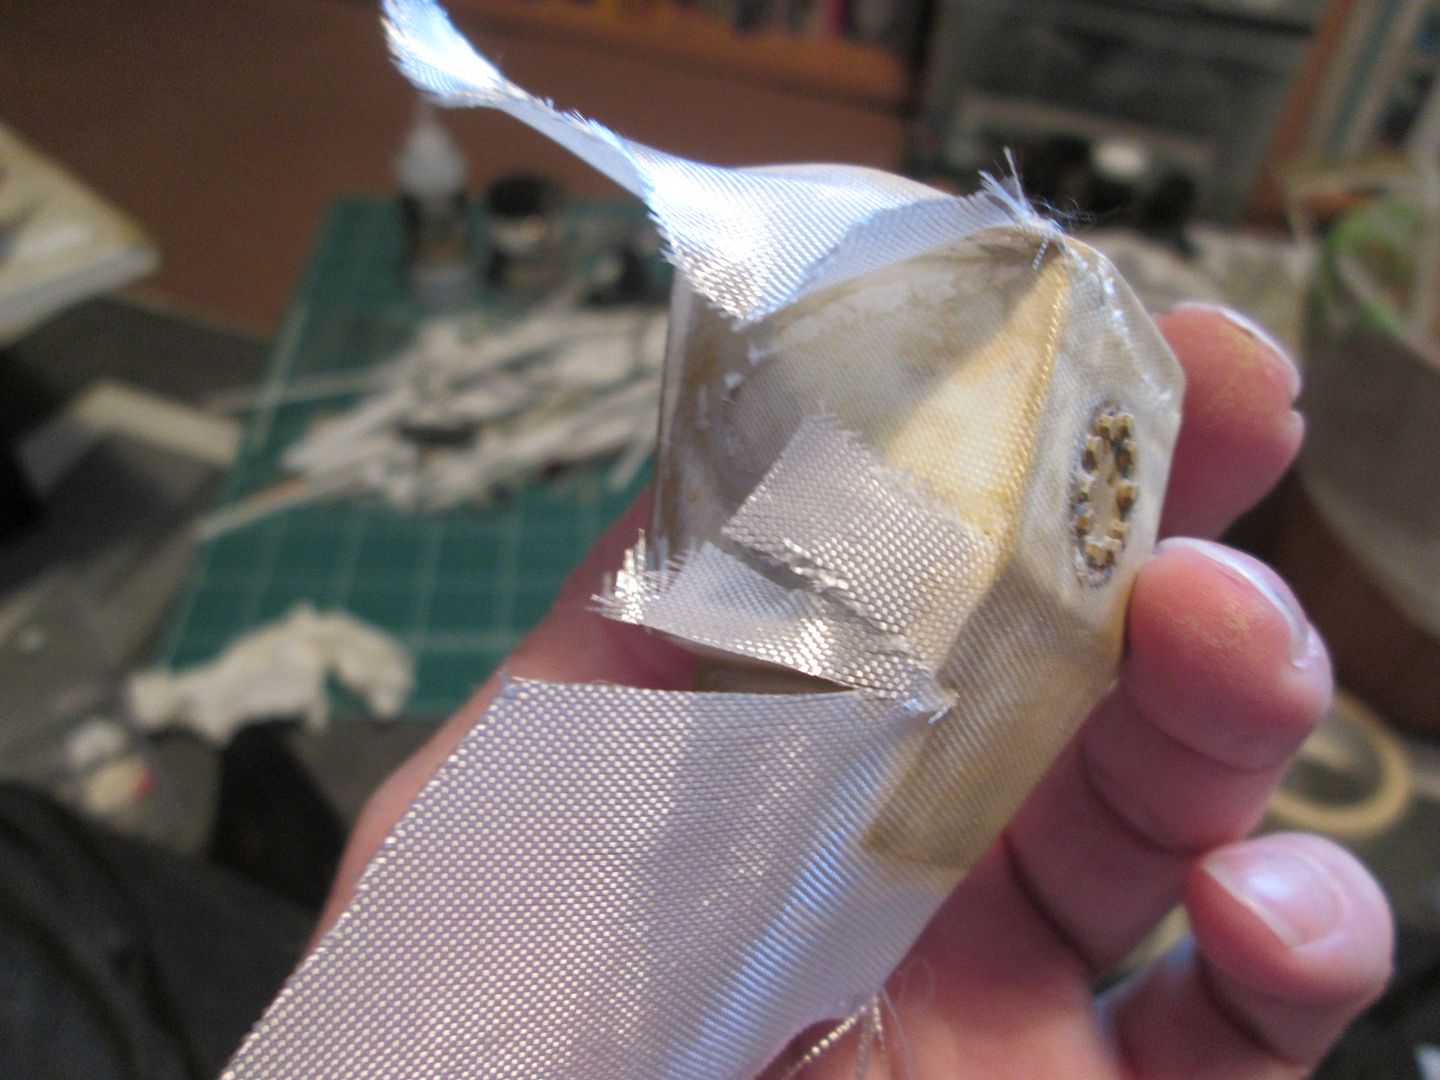 It wasn't necessary to completely cover each tank, as some sections would be hidden from view when the parts were fitted into the car. A few spots of CA glue were used to make sure things stayed stuck - particularly in places where two layers of cloth were overlapping. Finally, the main fuel tank: 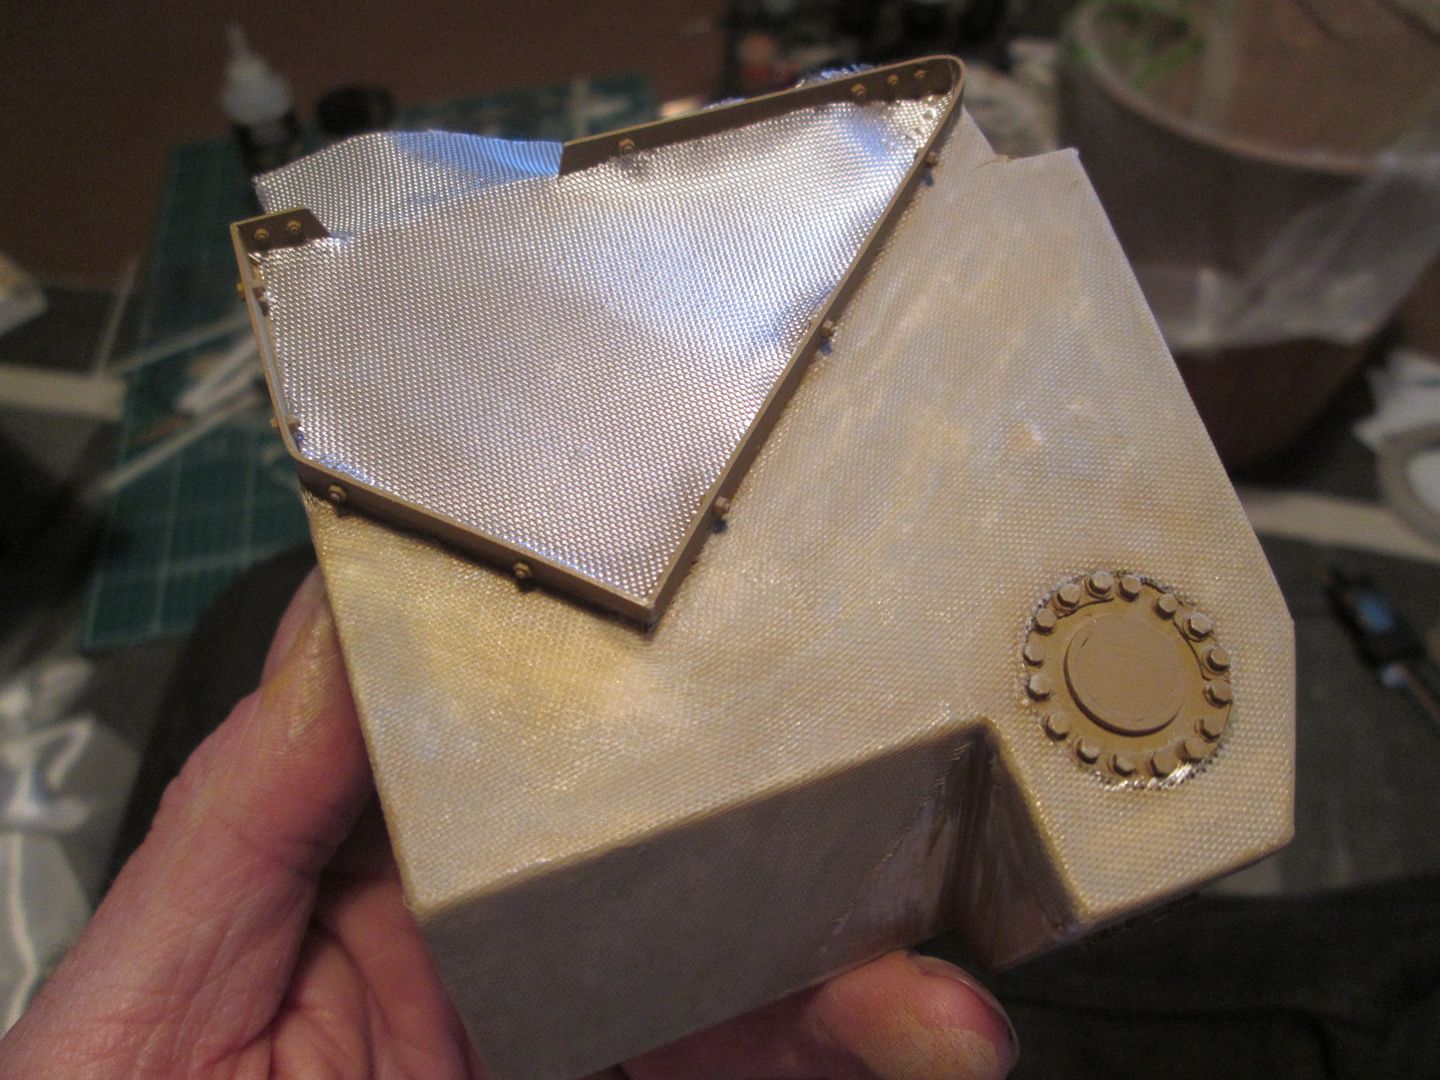 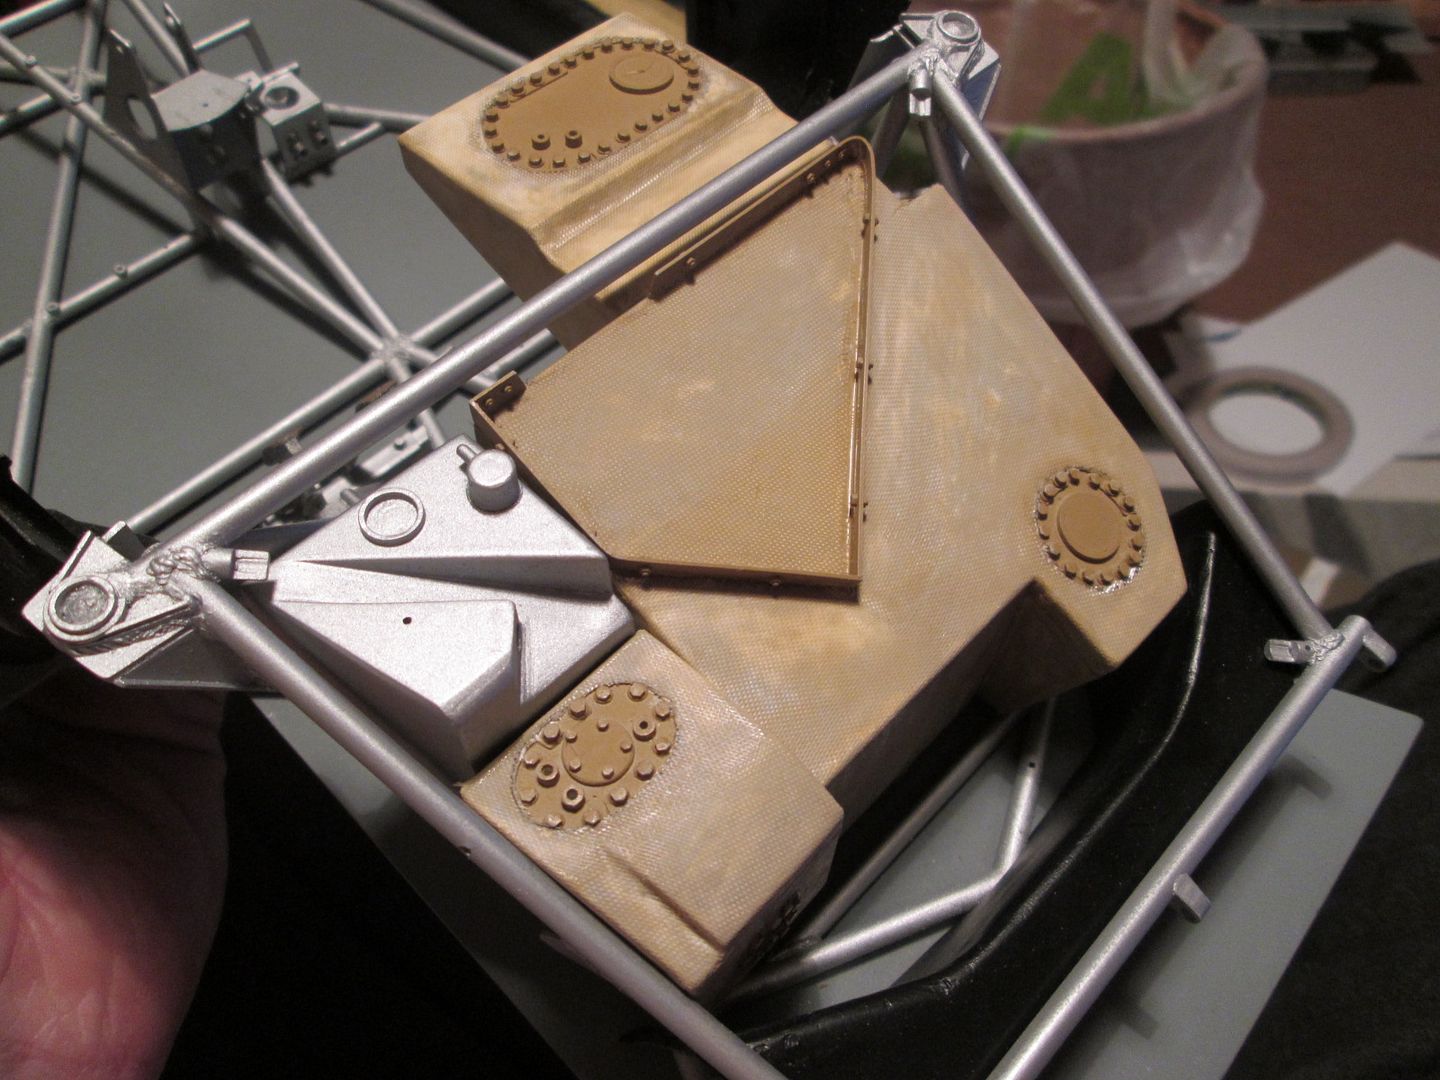 Remember how I was questioning whether it was a good idea to prime and paint the tank parts in the earlier post? Absolutely a good idea! The combination of bare styrene, grey primer and sand-yellow base-coat, mixed together with the liquid-poly glue makes for a great undercoat showing through the cloth. I then gave the parts a scrubbing-over with 'Snakebite Leather': 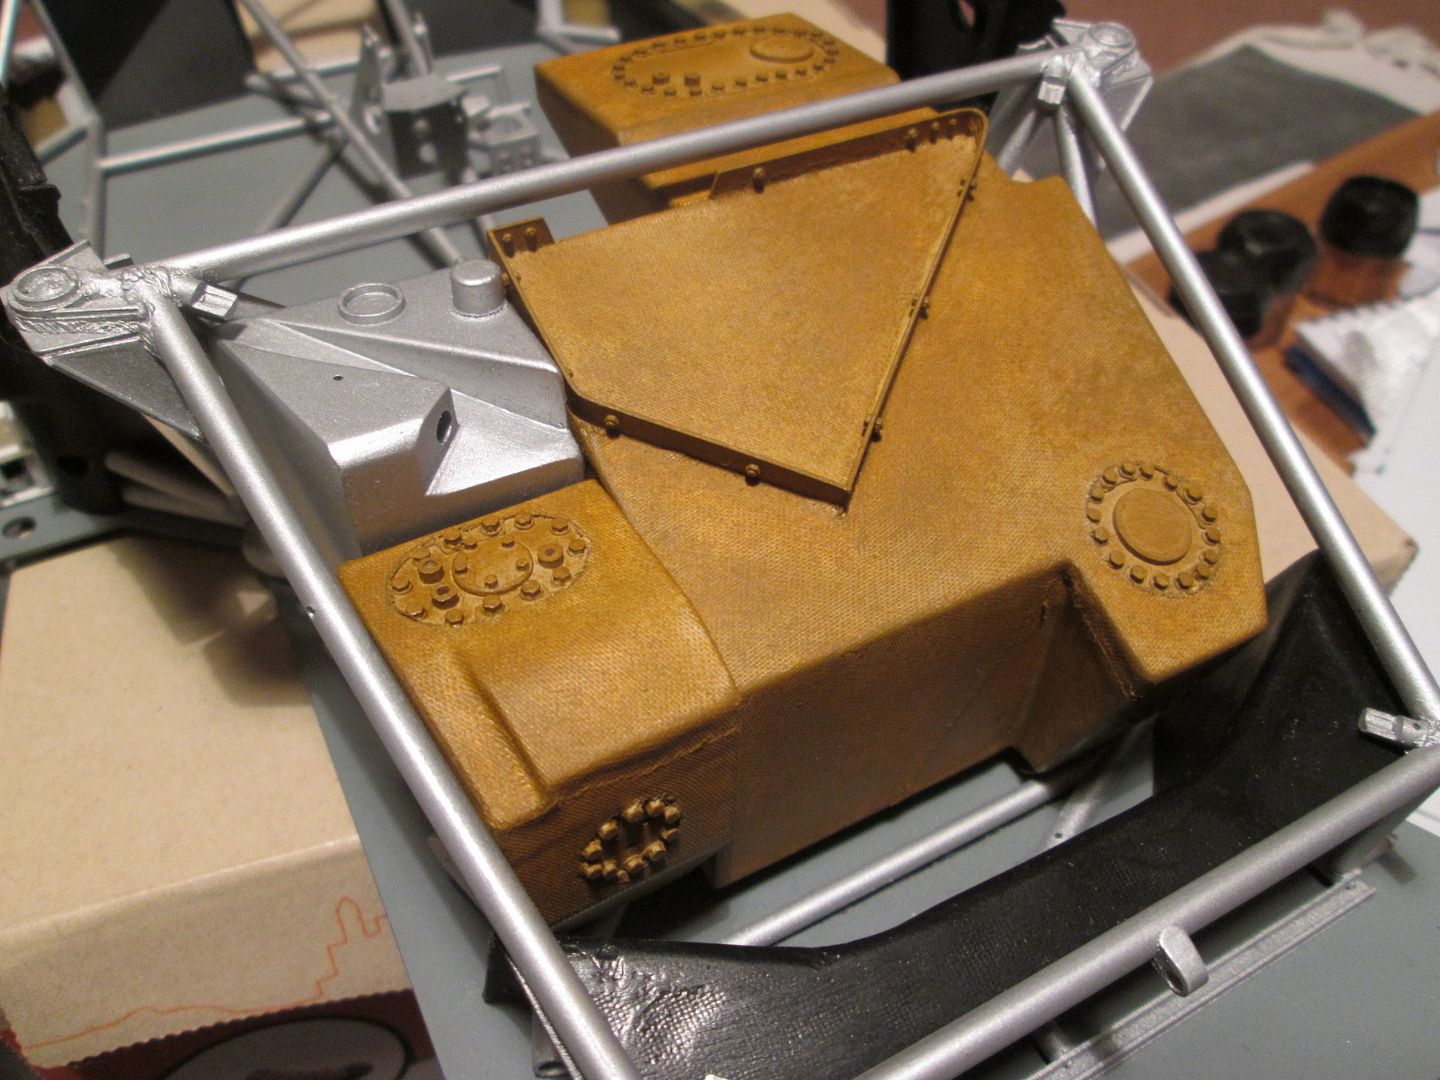 ...and then a little 'Vomit Brown' and 'Kommando Khaki' to tone things down a little: 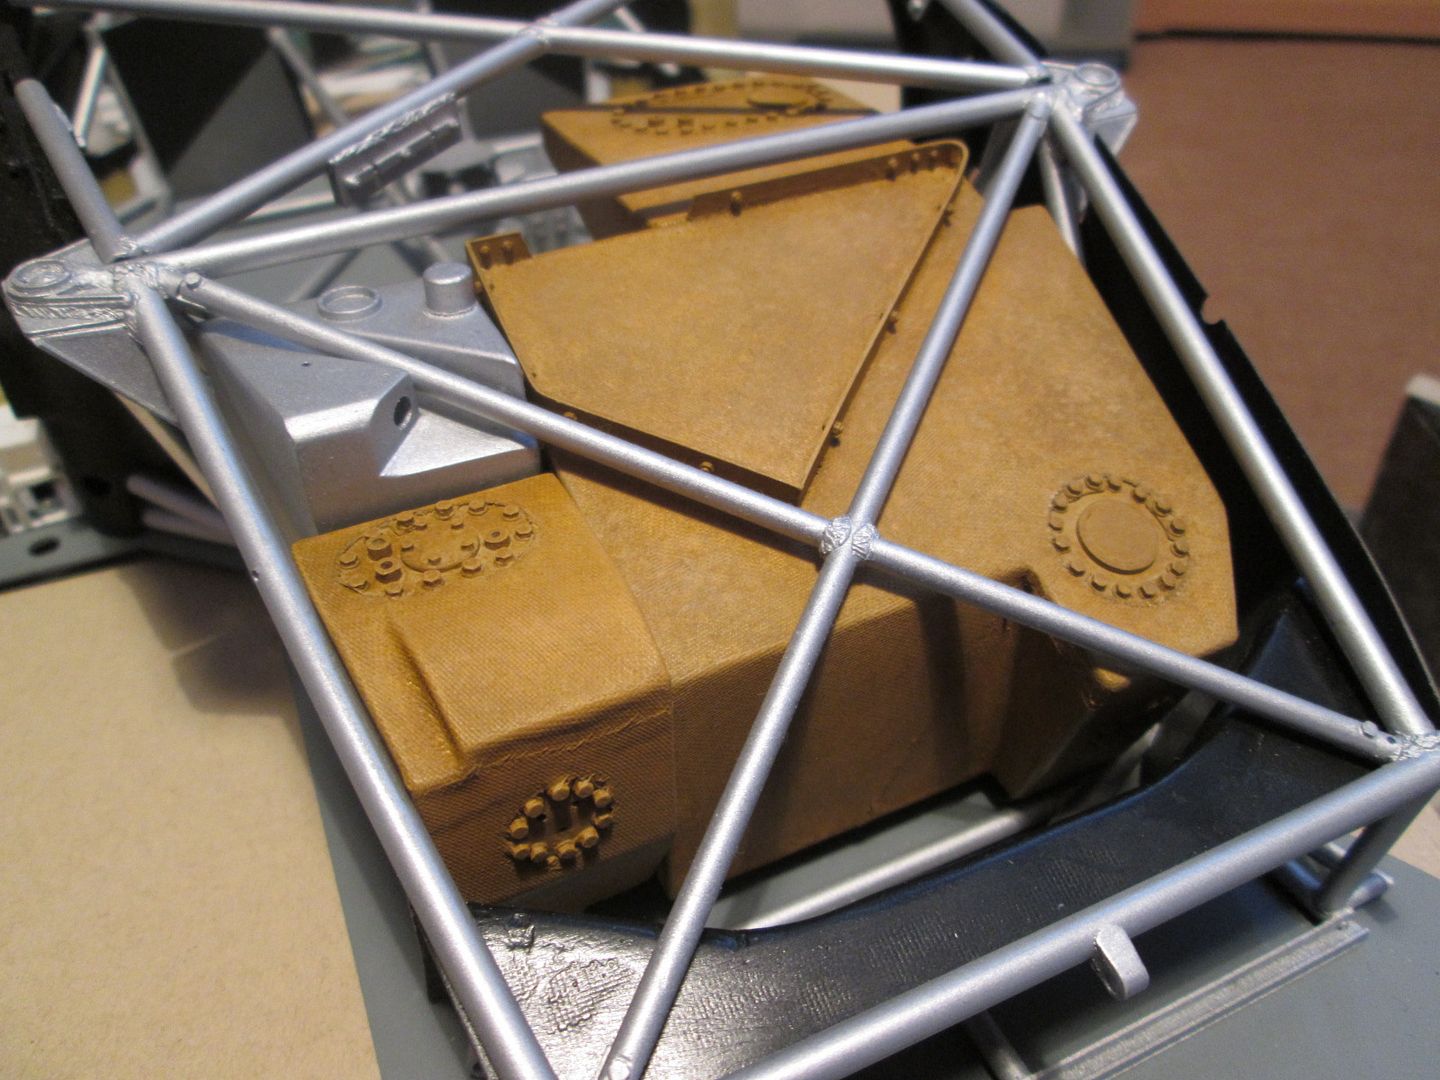 Not finished yet, but I'm really pleased with the result so far. I might try a thin wash to bring the weave out more - it's more noticeable in reality than in the photos. The openings need painting, the bolt detailing picking out, etc, plus I need to finish making the filler mechanisms, so there's plenty still to do. So, I hadn't expected to spend most of yesterday gluing fibreglass cloth to my fuel tank sections...but I'm glad I did. Cheers, Ianc! SB |
|
|
|

|
|
|
#605 | |
|
AF Enthusiast
Join Date: Sep 2011
Location: Redwood City, California
Posts: 651
Thanks: 0
Thanked 39 Times in 39 Posts
|
Re: 1/8 Porsche 935/78 'Moby Dick'
Glad it worked out for you; looks really good to me and gobs better than flat styrene. I like the color as well; I remember it took me a good bit of finagling to come up with the proper mix of Tamiya paints to simulate the ocher fiberglass color.
A new tool in your chest! ianc |
|
|
|

|
|
|
#606 | |
|
AF Enthusiast
Thread starter
Join Date: Nov 2008
Location: Norwich
Posts: 649
Thanks: 21
Thanked 111 Times in 87 Posts
|
Re: 1/8 Porsche 935/78 'Moby Dick'
Back again!
Work continues with getting everything ready for fitting the main bulkhead / firewall, and the roll-cage. The following photos are a little out of sequence but I wanted to get somewhere close to up-to-date for the start of my holiday. First up, here's a better view of how things are looking overall. All the front panelling has been painted, but the sides have also been glued in place since the photo was taken. This has also required the exit ducting for the rads to be fitted too: 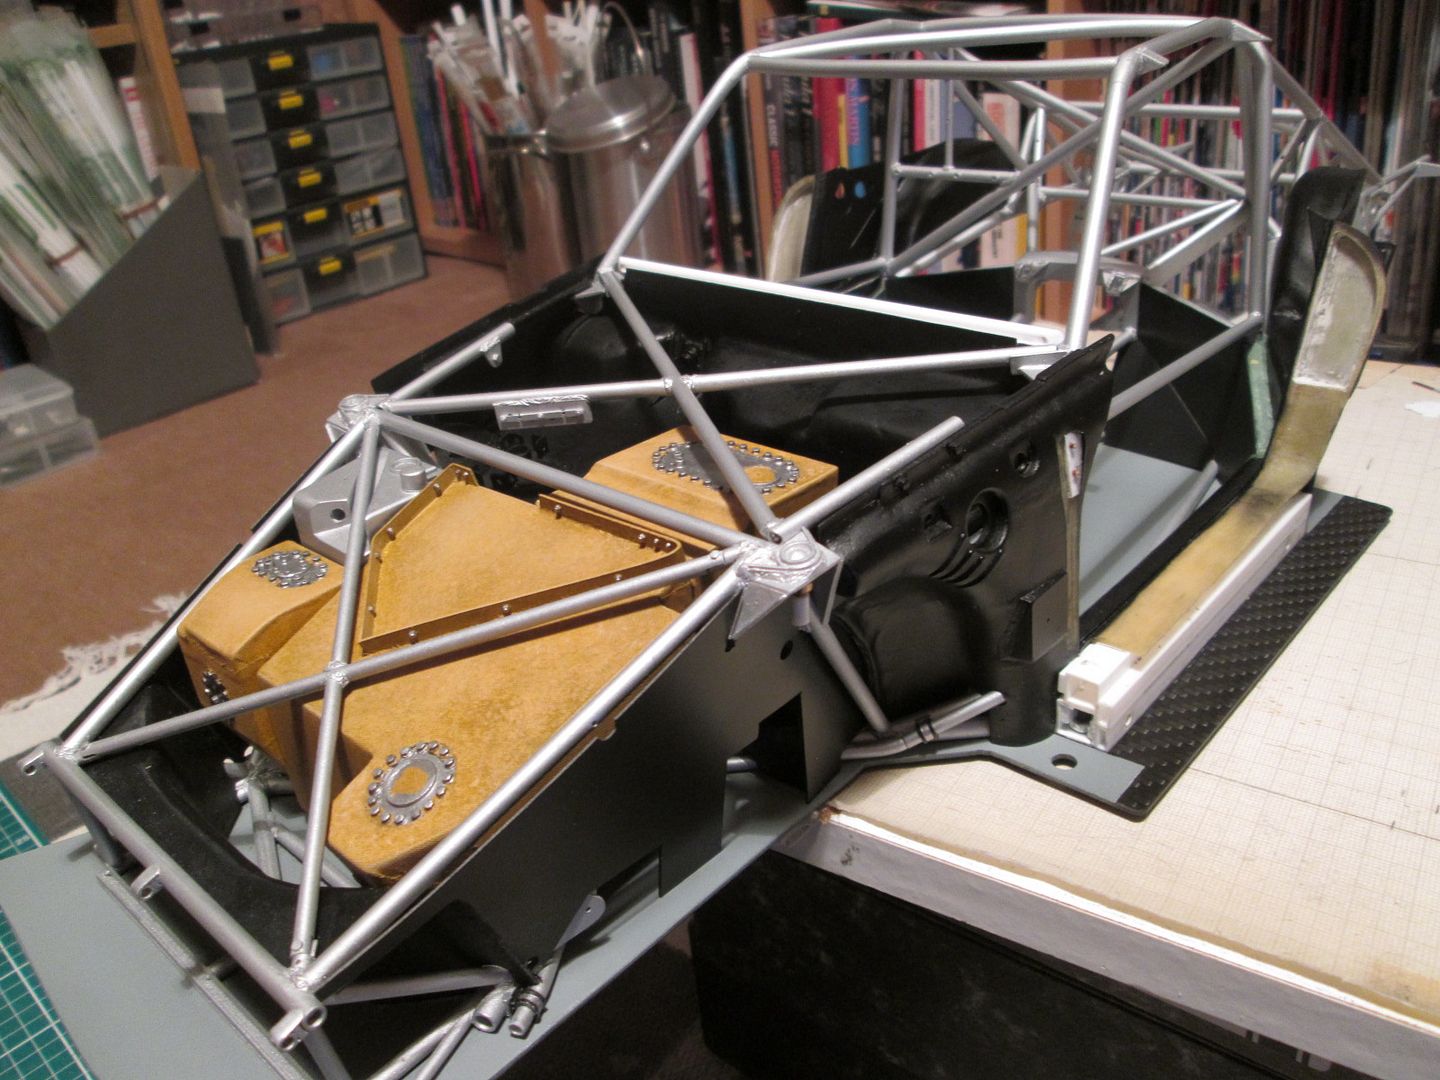 The interior panels forming the rear firewall have also been fitted, leaving small gaps in between. I used the Liquid Greenstuff to take care of the filling, but knew that some re-painting would be required. Initially I thought it would be necessary to mask-off the interior and get the airbrush out again, but some careful brushwork managed to get the job done. 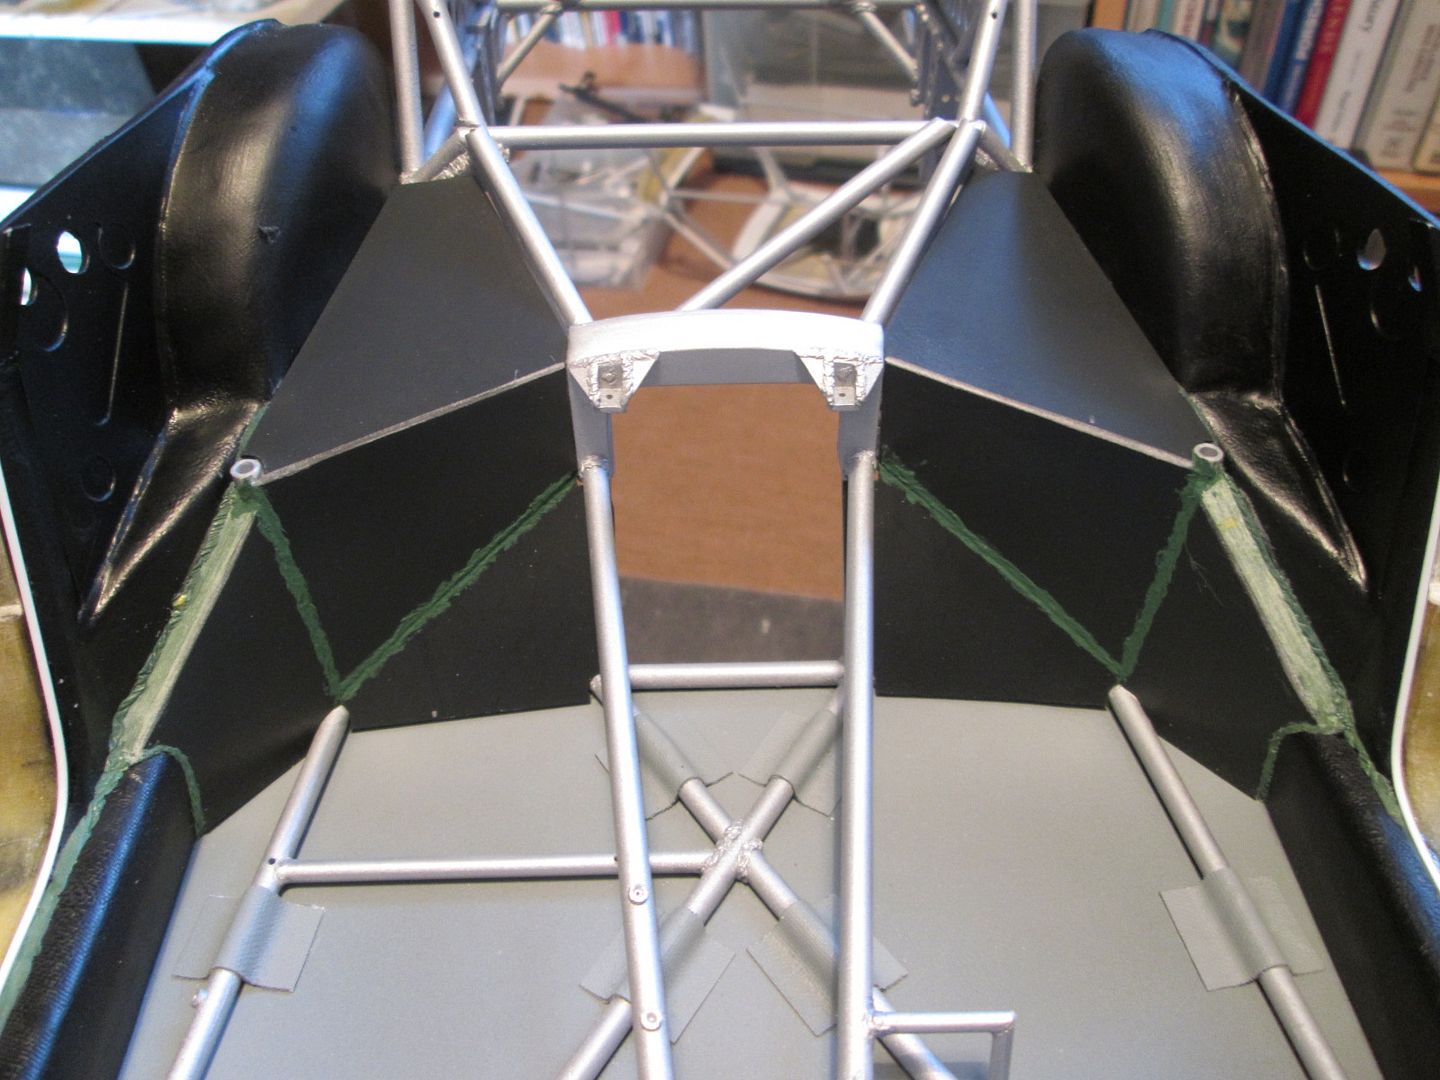 ...and after: 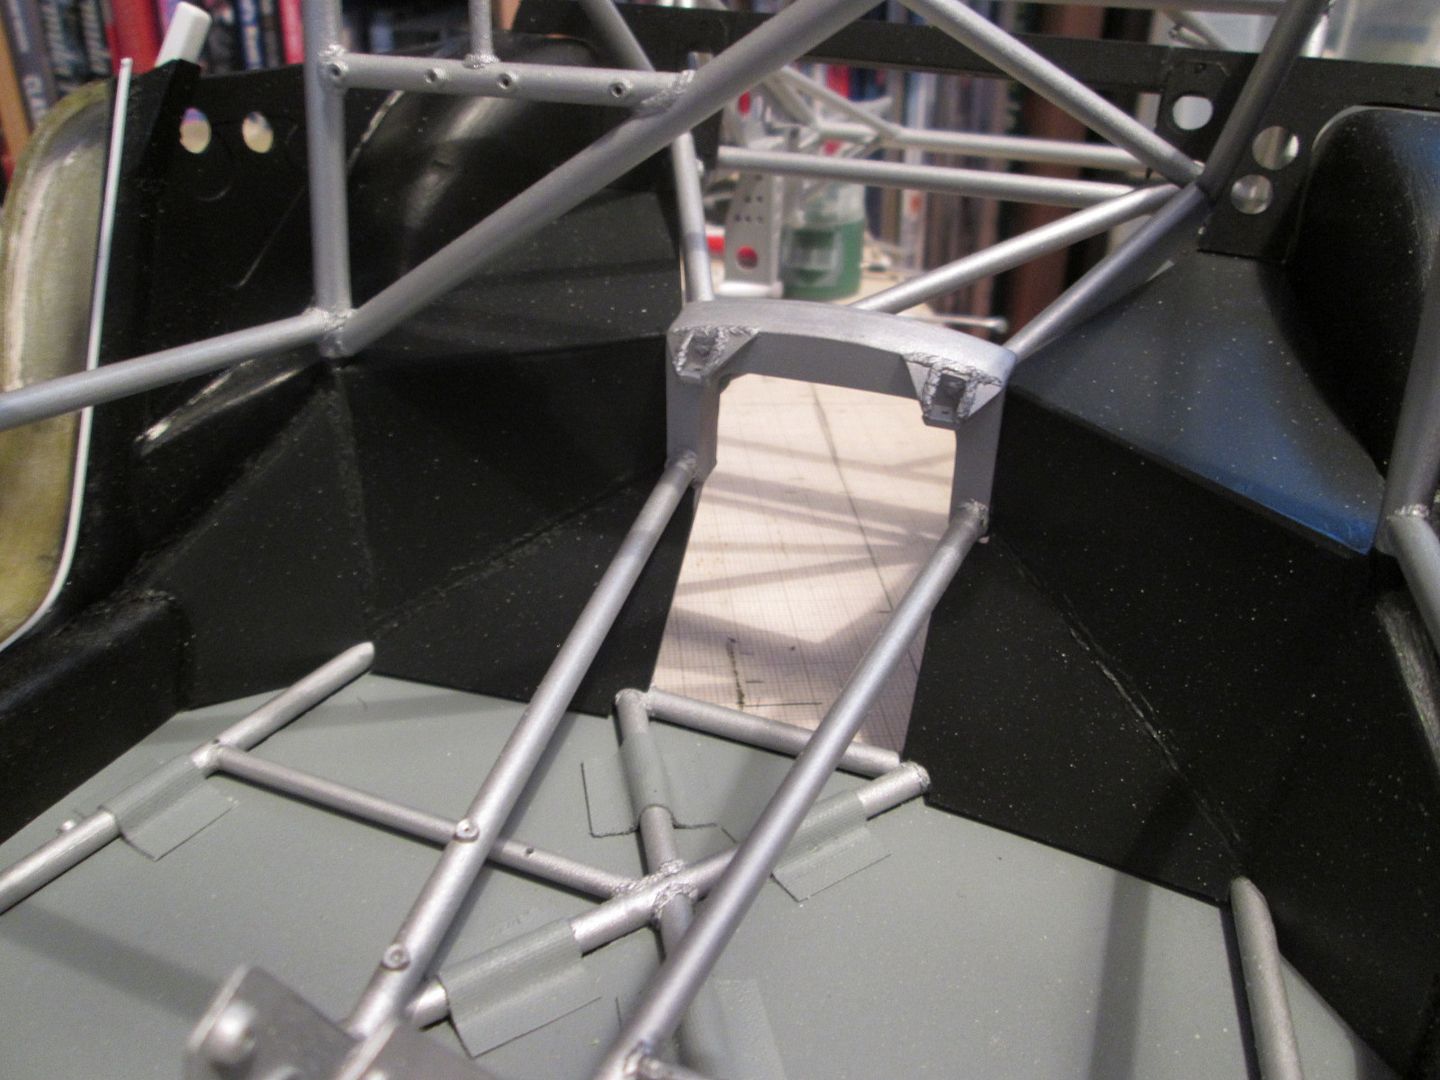 Please excuse the dust! In these last two photos you can also see where I've added a length of thin strip to the door opening each side - this will eventually extend all around the doorframe, and form the doorseal. It also gives me a neat divide between the black interior and the white exterior. Down in the footwell, I test-fitted the fire-bottles and pedals to make sure that the upper bulkhead could still be fitted afterwards: it can. I've done the final few bits of detail painting on the pedal assembly, so this is all ready to go in whenever I want. The fire-bottles need labelling before assembly - I've got some photos ready, and will be working on these during the next week or so. If I can persuade the aluminium parts of the mounting cradle to stay glued together, that would be even better! 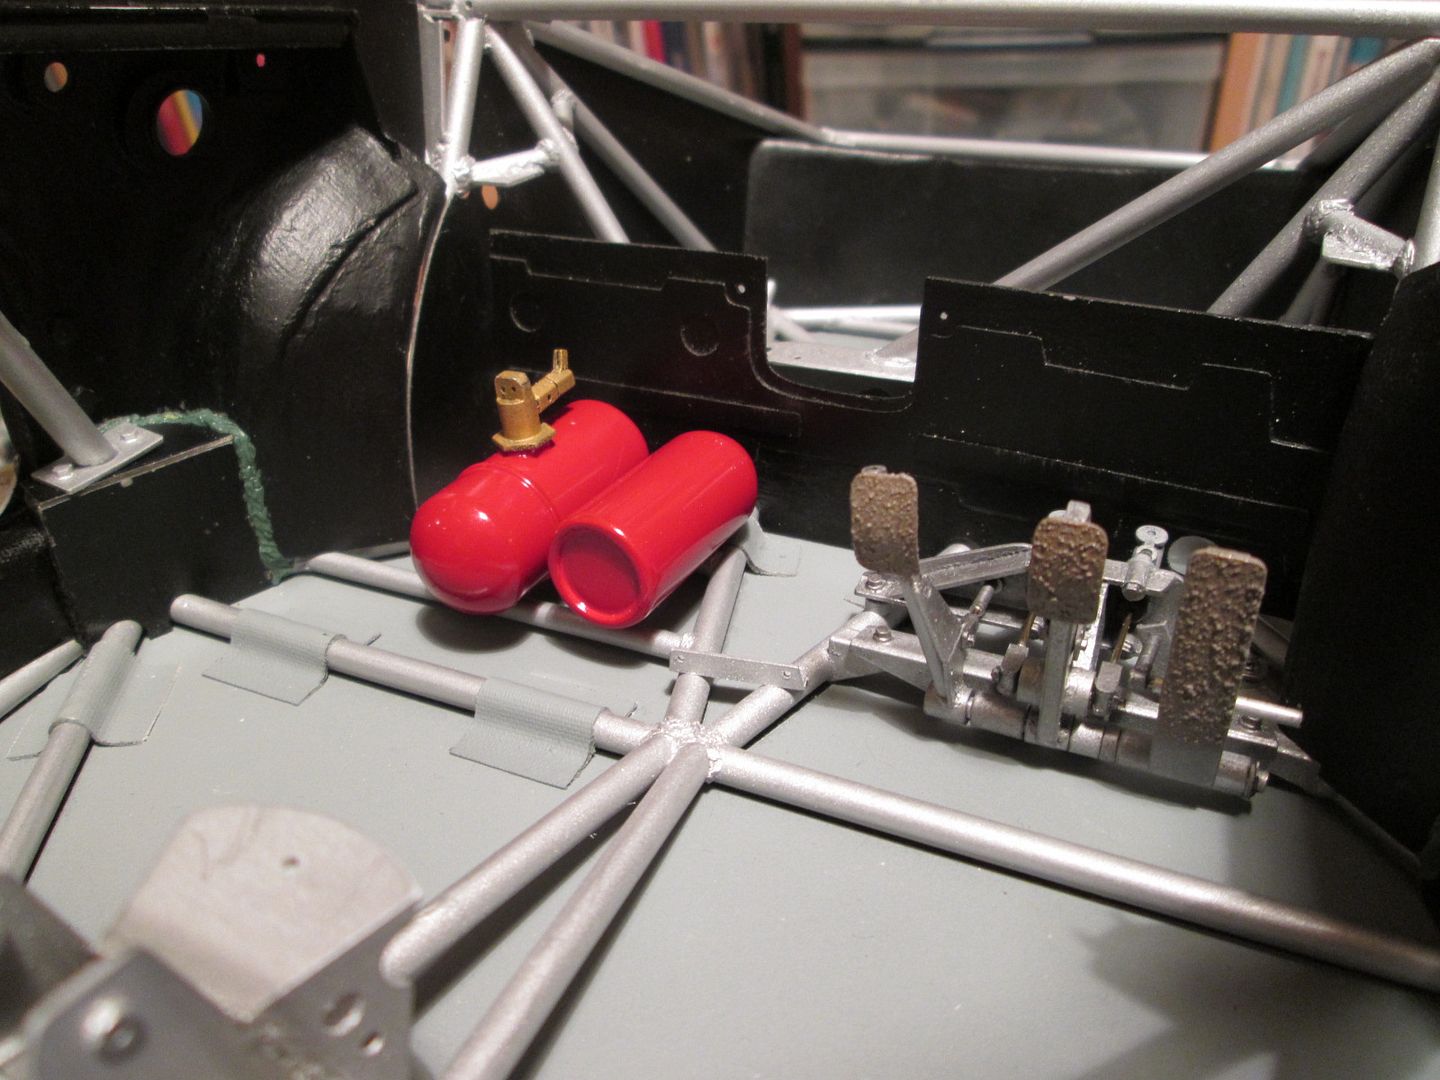 Over on the left-hand side you can see where I've added a seam of greenstuff around the mounting pedestal for the roll-cage. While this was going off I temporarily fitted the roof, etc, to make sure the front wheelarch panels were in the right place. Also in this shot there are a few of the sections of fibreglass strapping added over the bottom tubes in various places. Next, a small diversion. Each side of the roll-cage there is a small bracket which will bolt the tube-frame to the remains of the 911 shell - here's the left-hand side. They won't be structural on this car - they'll just disappear into the wheelarch panel interior: 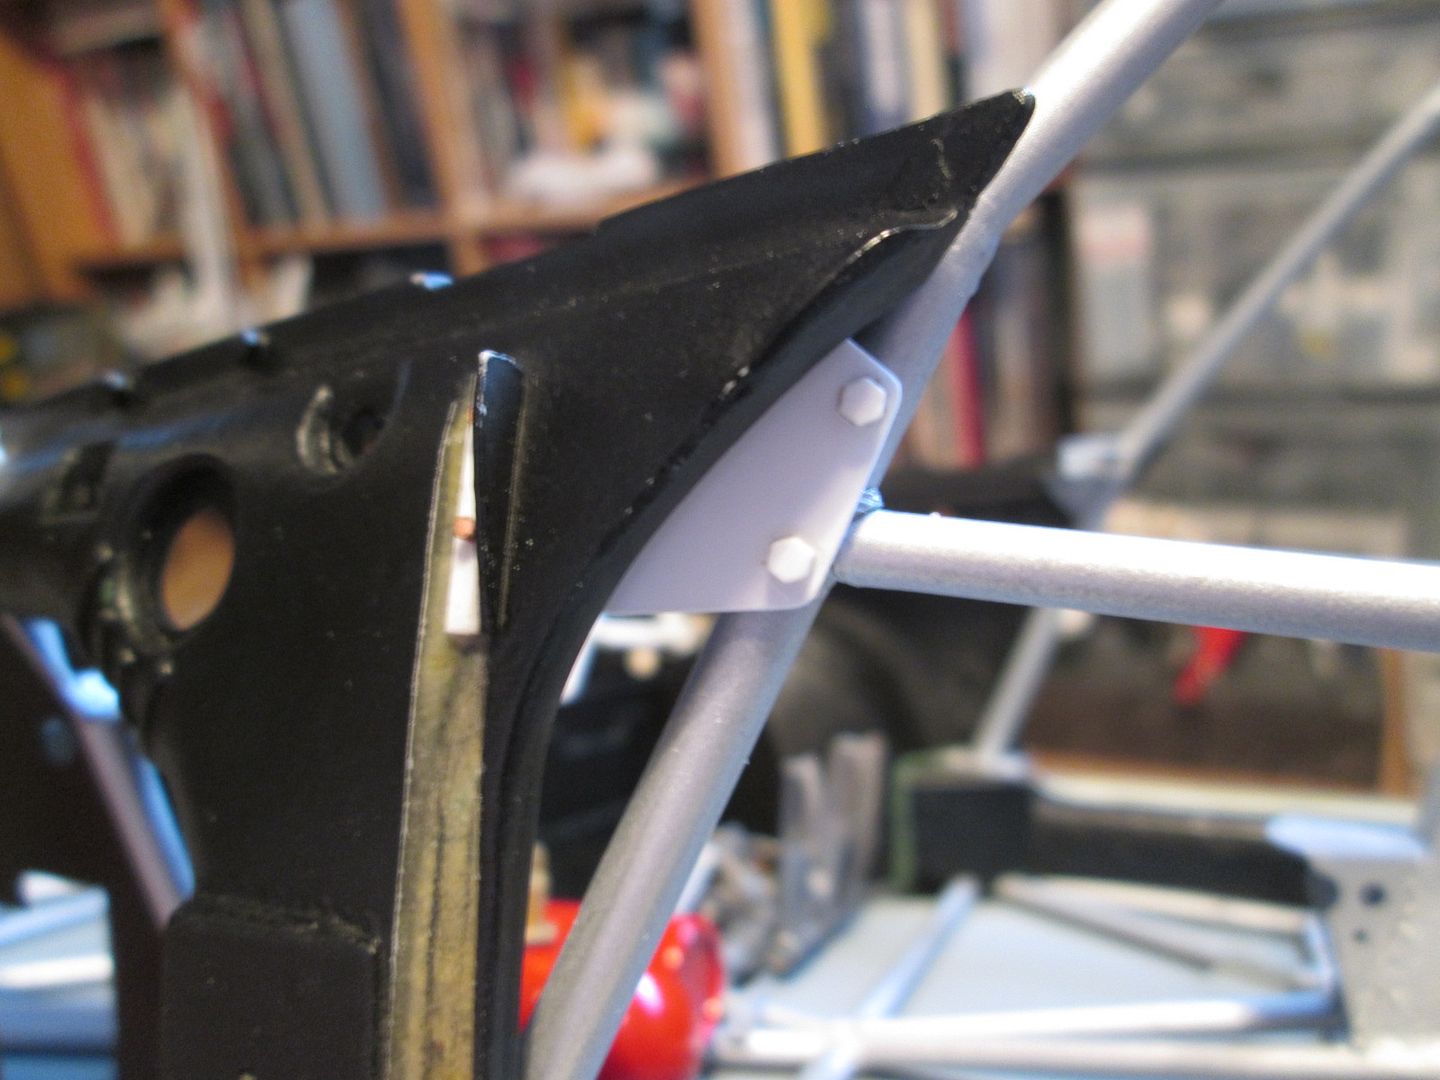 Finally, I decided it was time to start painting the gearbox. I double-checked the reference photos to make sure I hadn't missed something, added a couple of hex-plug details, drilled out a hole for one of the oil fittings, and added a coat of Tamiya grey primer: 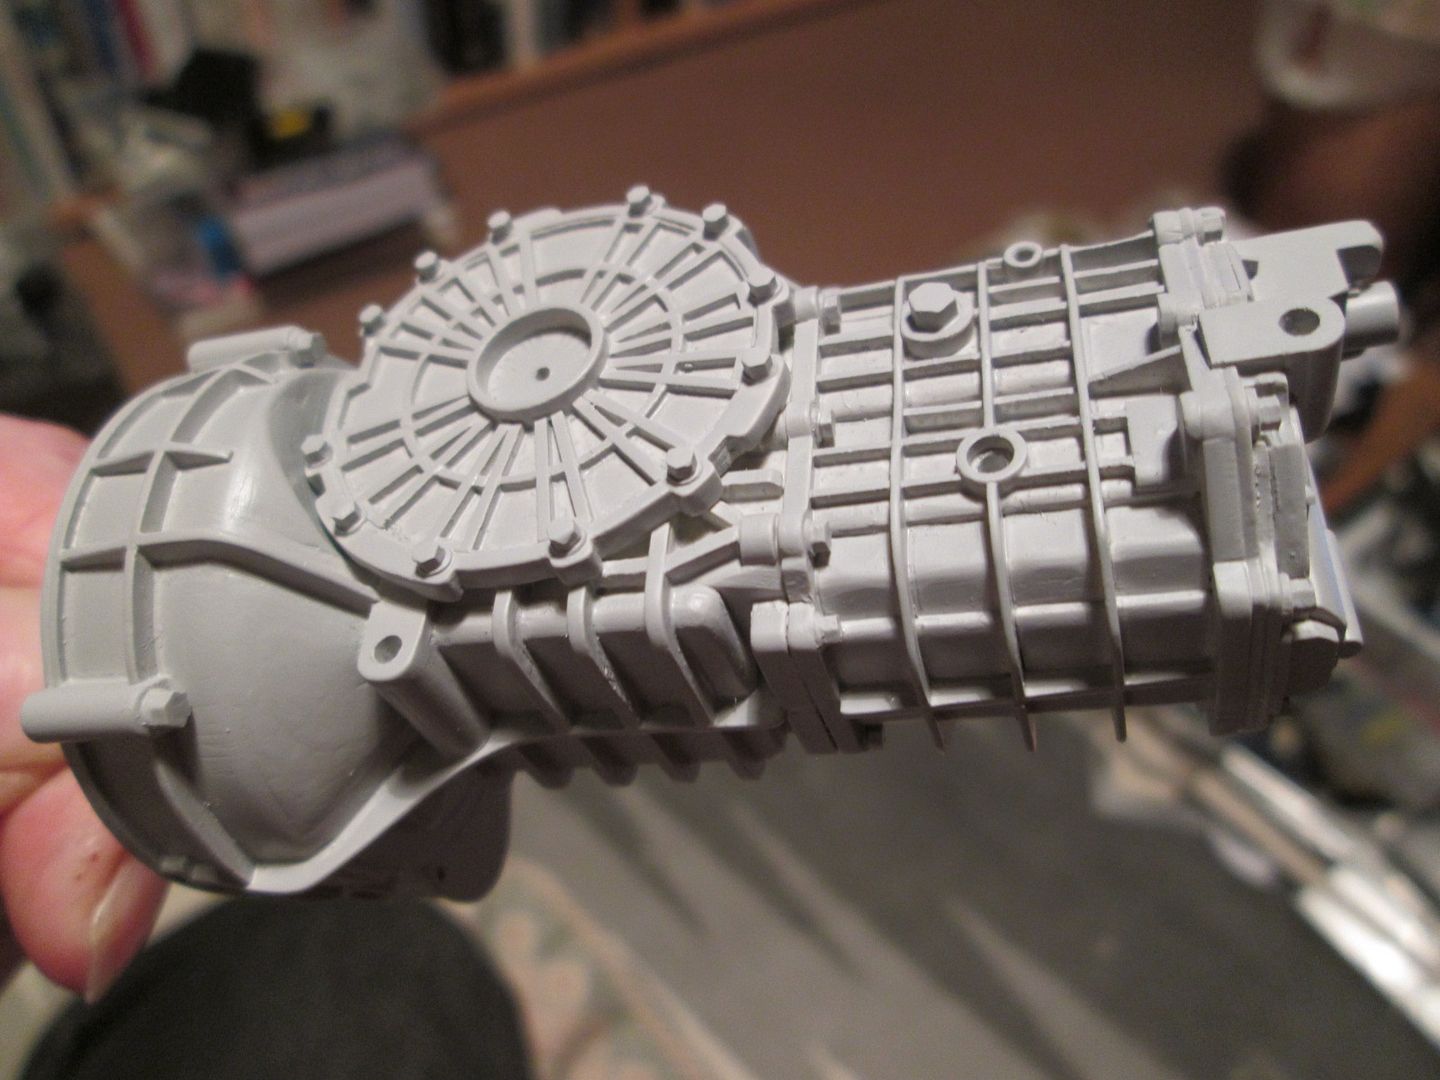 I'll give it a coat of flat black with the airbrush tomorrow, then gradually drybrush the final layers by hand, much the same as with the engine, etc. Two other things before I finish tonight. Earlier this afternoon I started laying up two versions of the cover panel which will close-off the hole in the cockpit ahead of the gearbox. While doing this, I've added a layer of cloth to the top of the roof - some of the filler was cracking, so I wanted to tie it all together and effectively start again. It'll need more filler and sanding, but it should work. You'll see both of these in the next update. More next time. SB |
|
|
|

|
|
|
#607 | |
|
AF Enthusiast
Join Date: Sep 2011
Location: Redwood City, California
Posts: 651
Thanks: 0
Thanked 39 Times in 39 Posts
|
Re: 1/8 Porsche 935/78 'Moby Dick'
Looks tasty; bet you can't wait to get the wiring started!
 ianc |
|
|
|

|
|
|
#608 | |
|
AF Enthusiast
Thread starter
Join Date: Nov 2008
Location: Norwich
Posts: 649
Thanks: 21
Thanked 111 Times in 87 Posts
|
Re: 1/8 Porsche 935/78 'Moby Dick'
Hi Ian,
I'm not sure that 'can't wait' is how I'd describe it! More like 'can't wait until it's over'. I probably said much the same thing when I was doing the 908-03: whether you have reference info or not, it's still difficult to get things looking 'right'. I'm planning to spend a good few hours poring over all my reference photos trying to piece together what goes where - I suspect the 917 wiring diagram in 'The Undercover Story' might also give me a few ideas. One benefit of the 935 compared to the 908 is that much of the wiring behind the dashboard will be hidden from view, so there's room for a little creative freedom. Mind you, there's still a lot of stuff running back towards the engine bay - fuel and brake lines, all the gauge feeds, extinguisher lines, etc - so the cockpit will start getting busy. Fortunately I managed to get my head around the oil, water and fuel systems some time ago, so at least some of the pipework and plumbing is (sort of) under control! We'll see how things work out... |
|
|
|

|
|
|
#609 | |
|
AF Enthusiast
Thread starter
Join Date: Nov 2008
Location: Norwich
Posts: 649
Thanks: 21
Thanked 111 Times in 87 Posts
|
Re: 1/8 Porsche 935/78 'Moby Dick'
Hello again,
So, have I had a productive two weeks? The answer has to be yes - I haven't reached the stage where I could fit the front bulkhead and firewall panels in place, but my work on understanding the wiring is definitely paying off. I started by spending most of an afternoon scrutinising the 917 wiring diagram in Wingrove's 'The Undercover Story', and trying to relate it to what I could see in the 935 reference photos. I ended up with a bunch of main components, a list of connections and wire colours, and the hope that I might actually be able to get this all looking vaguely accurate: 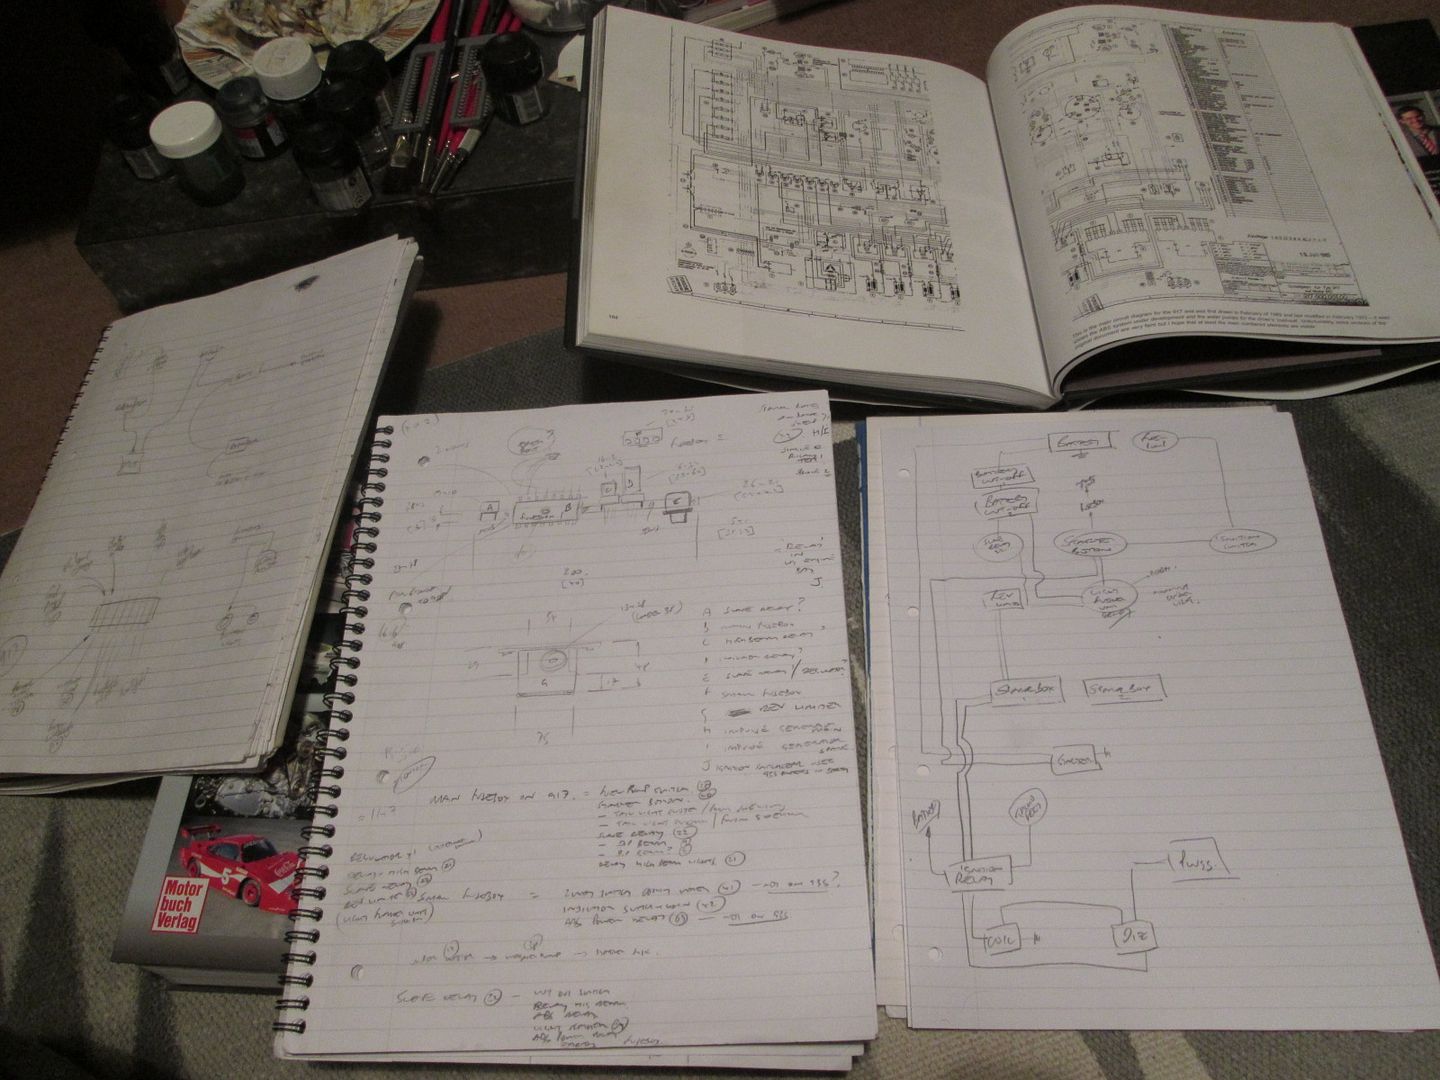 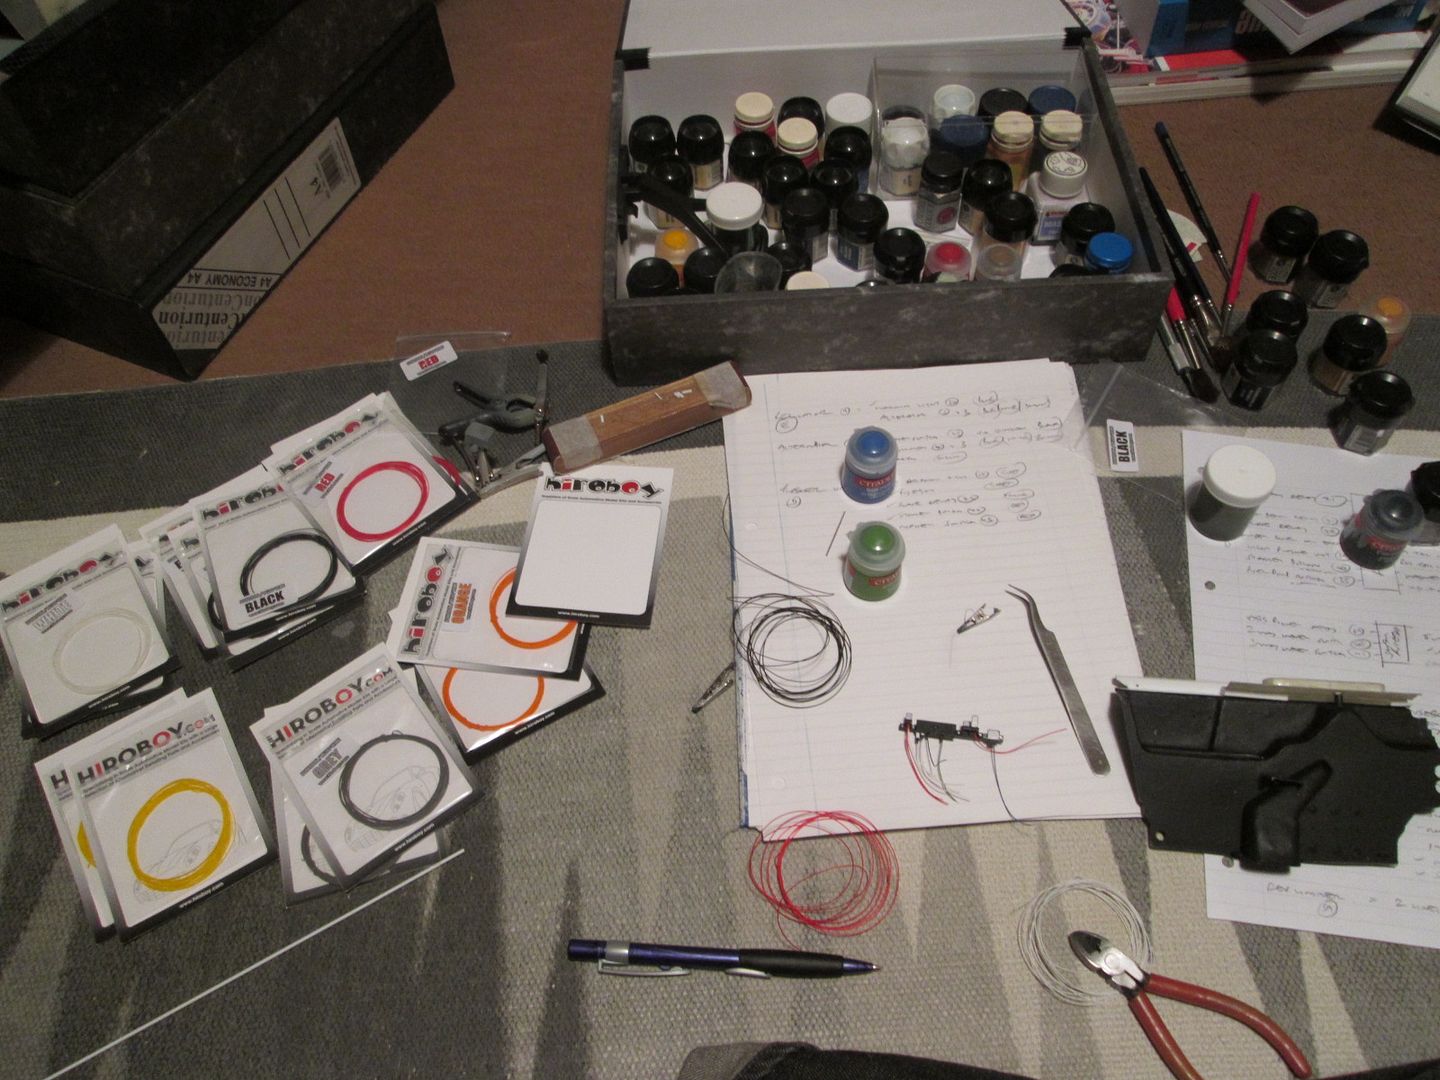 As well as using various grades of wire bought from the high-street, I'm using a lot of pre-coloured wire from Hiroboy - this was part of my prize from winning AFMOTY with the 908-03, so it's been sitting around for a few years waiting for the right time! The larger high-street wire is stripped out to act as sheathing, and the 0.4mm Hiroboy wire is used for the detailing. A lot of the wires connect to a couple of fuseboxes, so for these I've made some small spade terminals from 0.75 x 1.5mm strip: 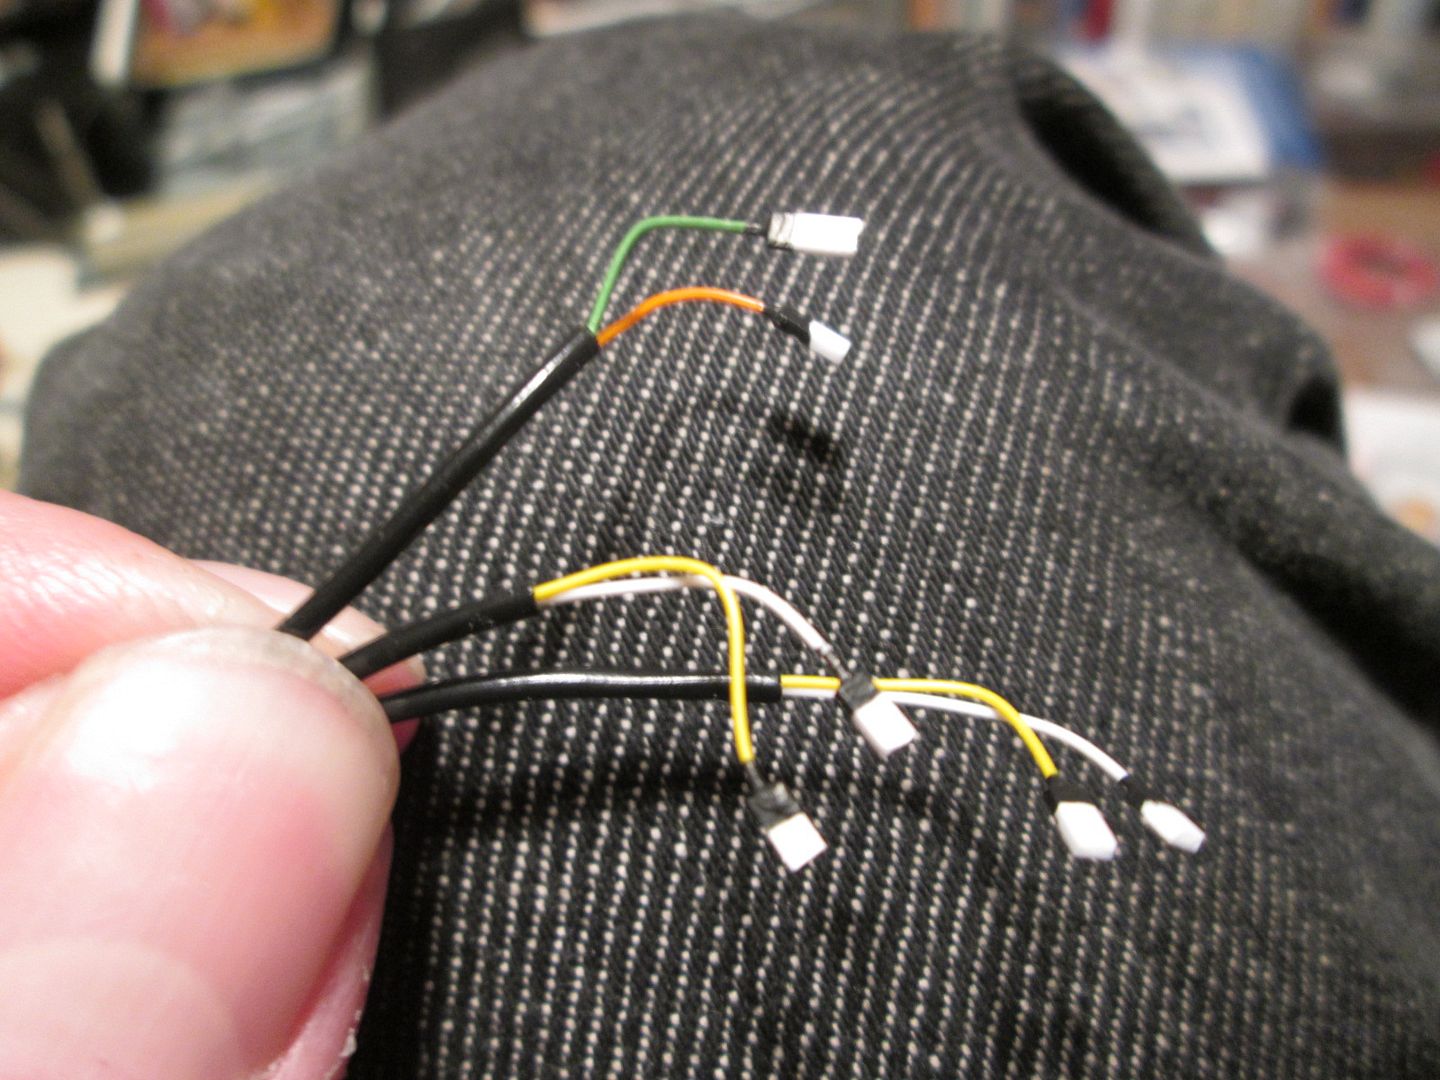 So far, it looks like this: 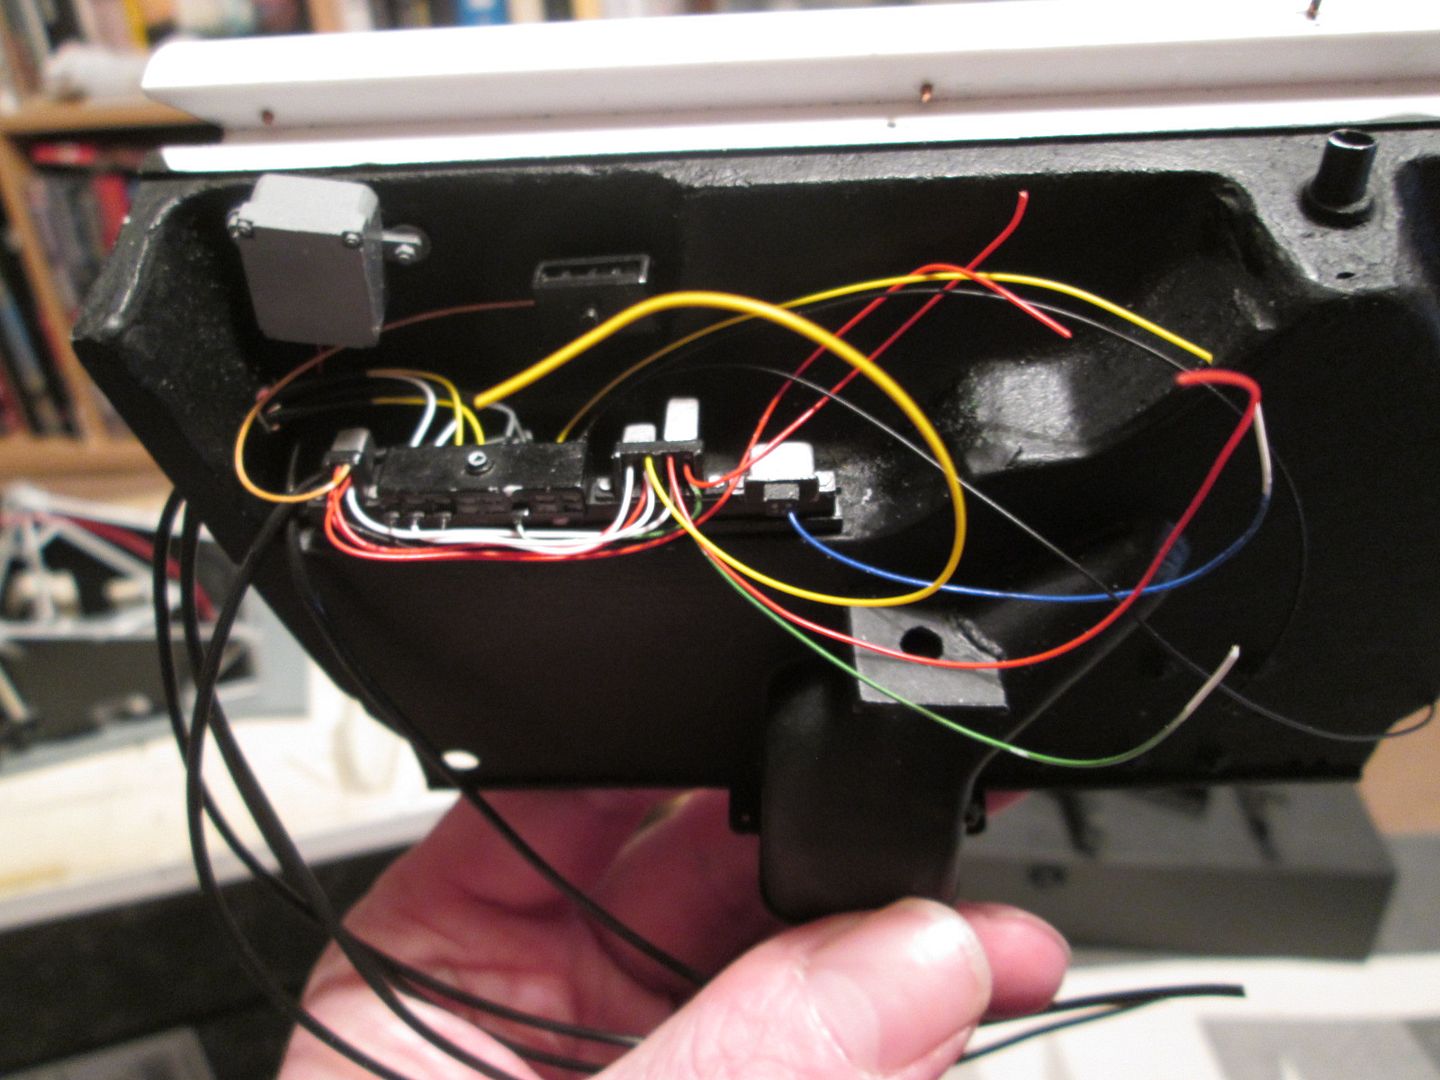 It's a bit of a mess, but I need to get this section sorted out before assembling the bulkhead panel and firewall. The larger black wires on the left will run forwards to the battery and nose lights or back into the engine bay, some of the loose wires on the right will disappear into the instrument pod, and a few more will connect to the switches and gauge on the lower part of the dashboard. It's a long way from being finished, but it's the sort of job that only works if I can hit it hard for several hours a day, over a few days. Now it's underway I can continue adding to it during the normal weekday evenings, without feeling that I'm not getting anywhere! While working on the wiring, I've also started on some the other components - switches, warning lights, battery cut-offs, etc. Here's the back of the gauges on the lower instrument panel - they'll be visible through the doorways so have to be properly detailed with wiring and sender lines: 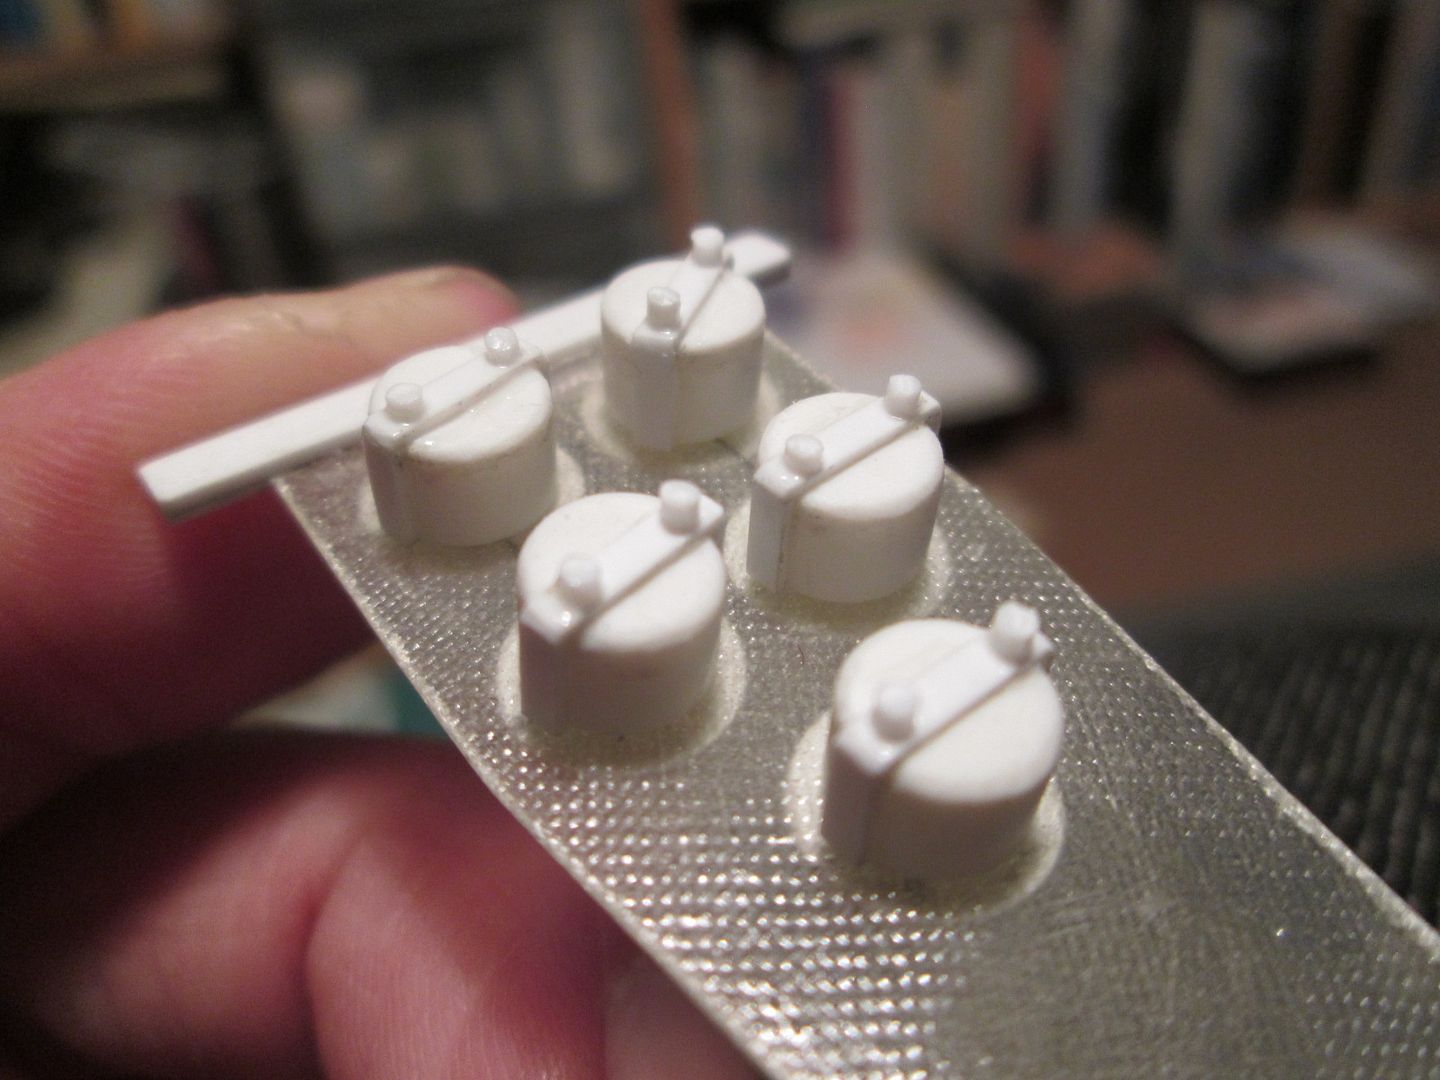 Another key job for the holiday was to sort out the decals on the two fire-bottles - until these are done, I can't assemble the bottles into the mountings. I couldn't find image scans of the correct Heinzmann labels online, so had to take photos of photos (don't ask!) and fiddle around with Photoshop. Here are the results: 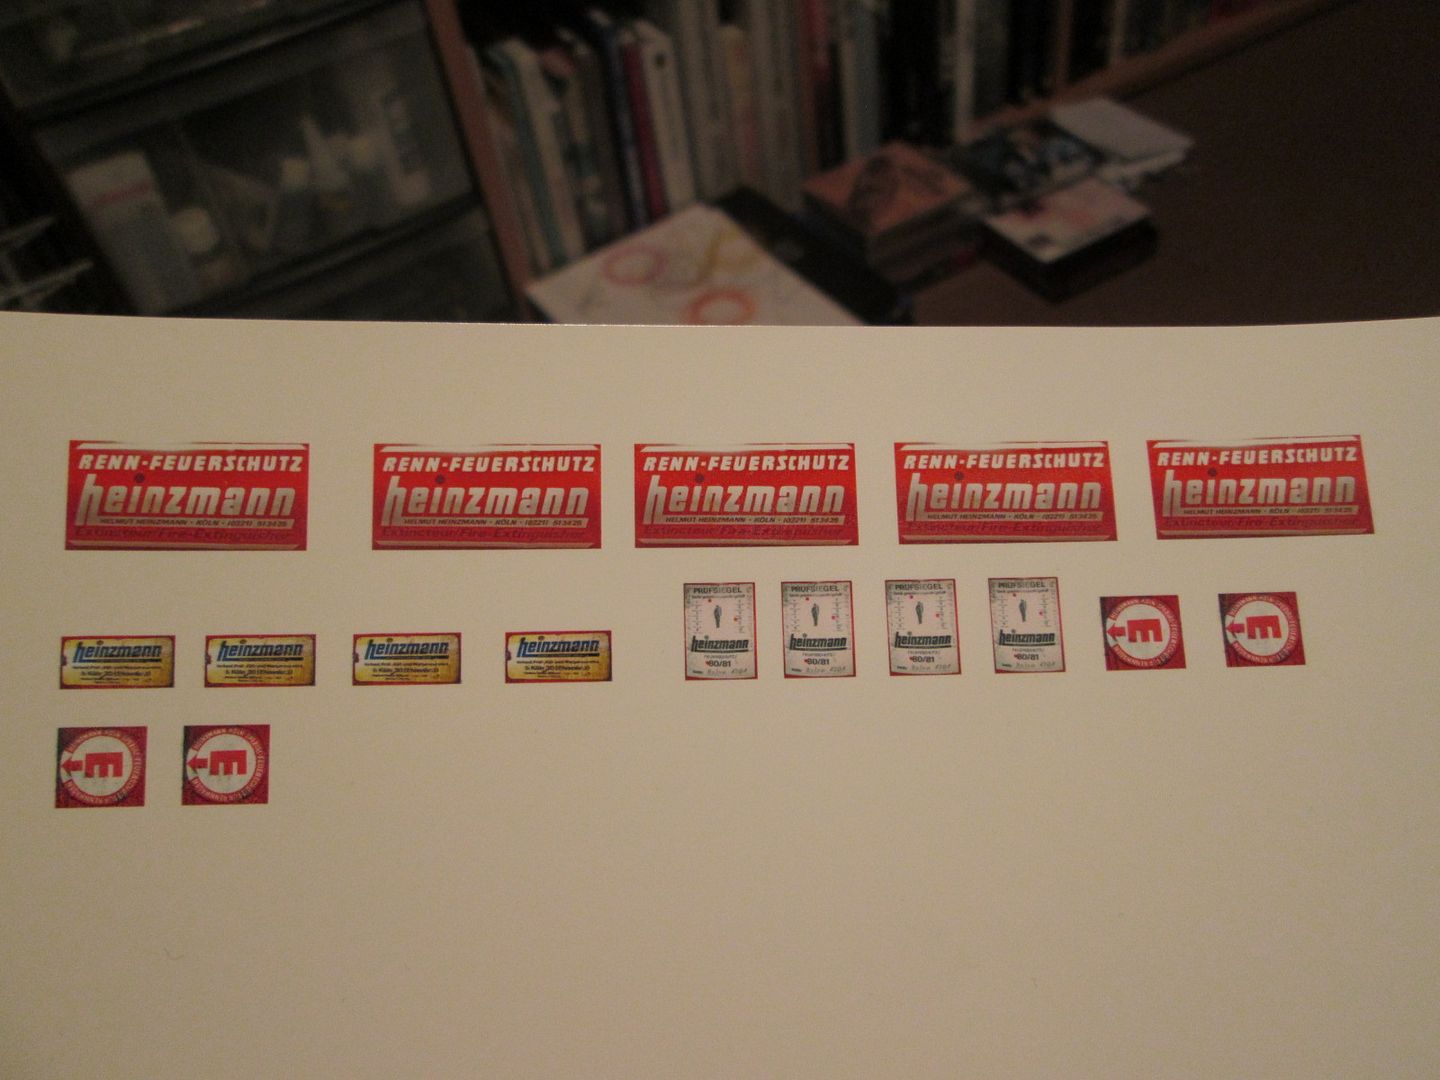 To give you an idea of scale, the main labels are about 27mm long. It's been five years since I did the 908 decals, but it all worked out okay - here's the two bottles: 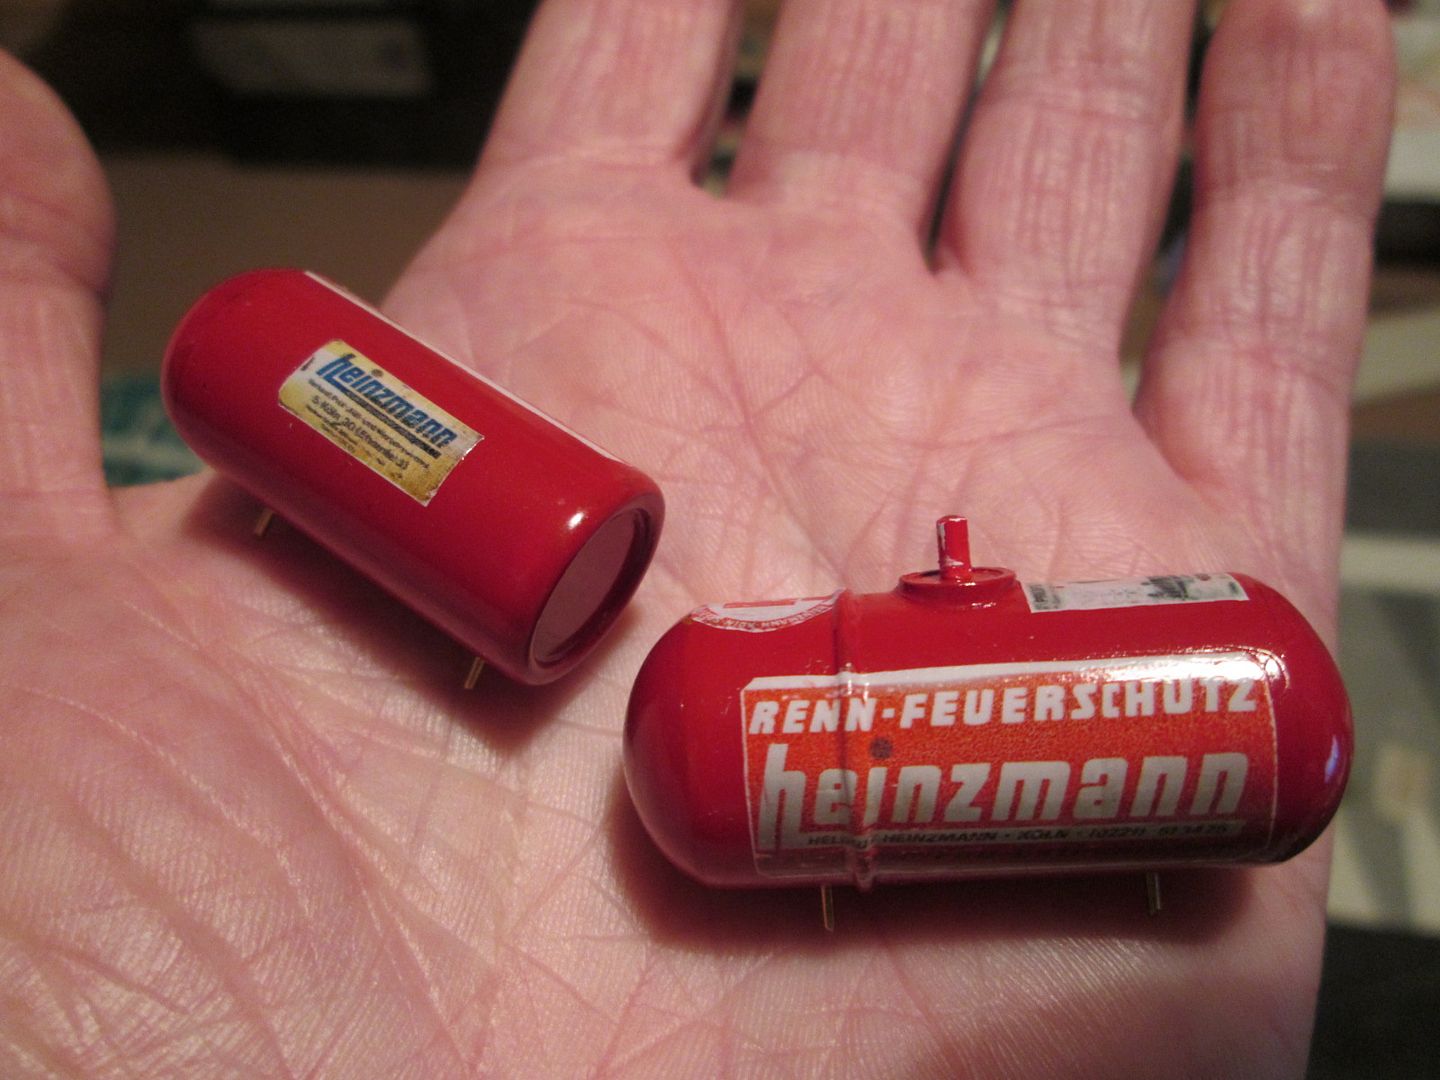 I was worried that the little ridge around the bottle might cause problems, but a good dose of MicroSet / MicroSol did the trick. A spray coat of gloss varnish afterwards has hopefully given them some long-term protection. Amongst all this I've been painting the gearbox, working through the layers of drybrushing: 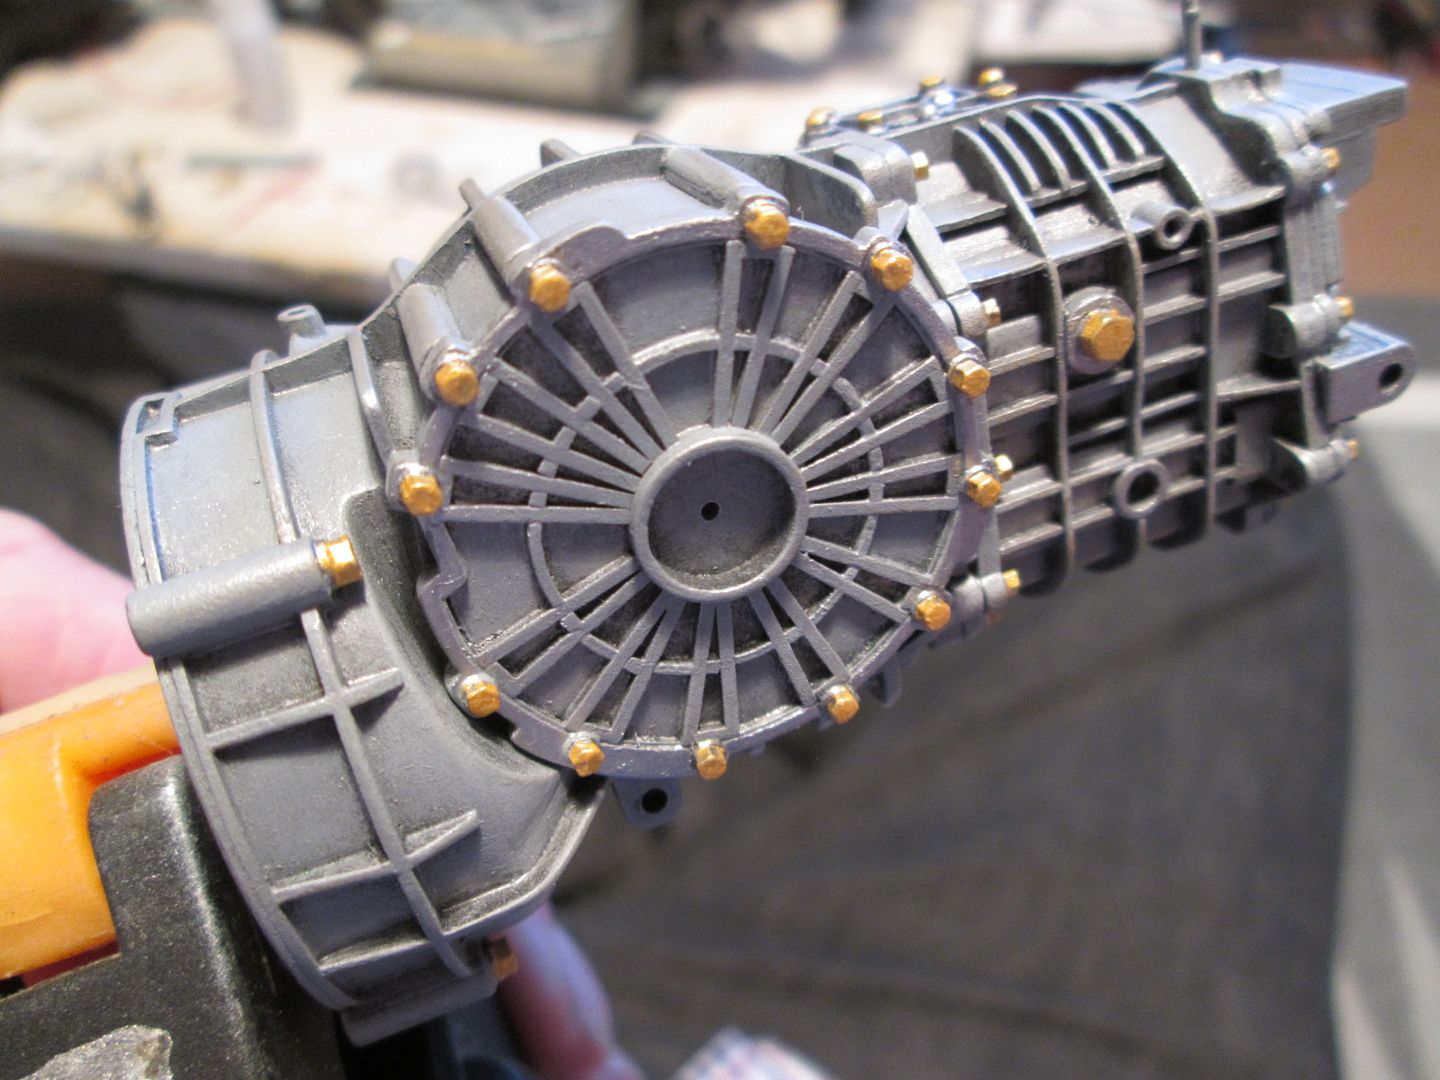 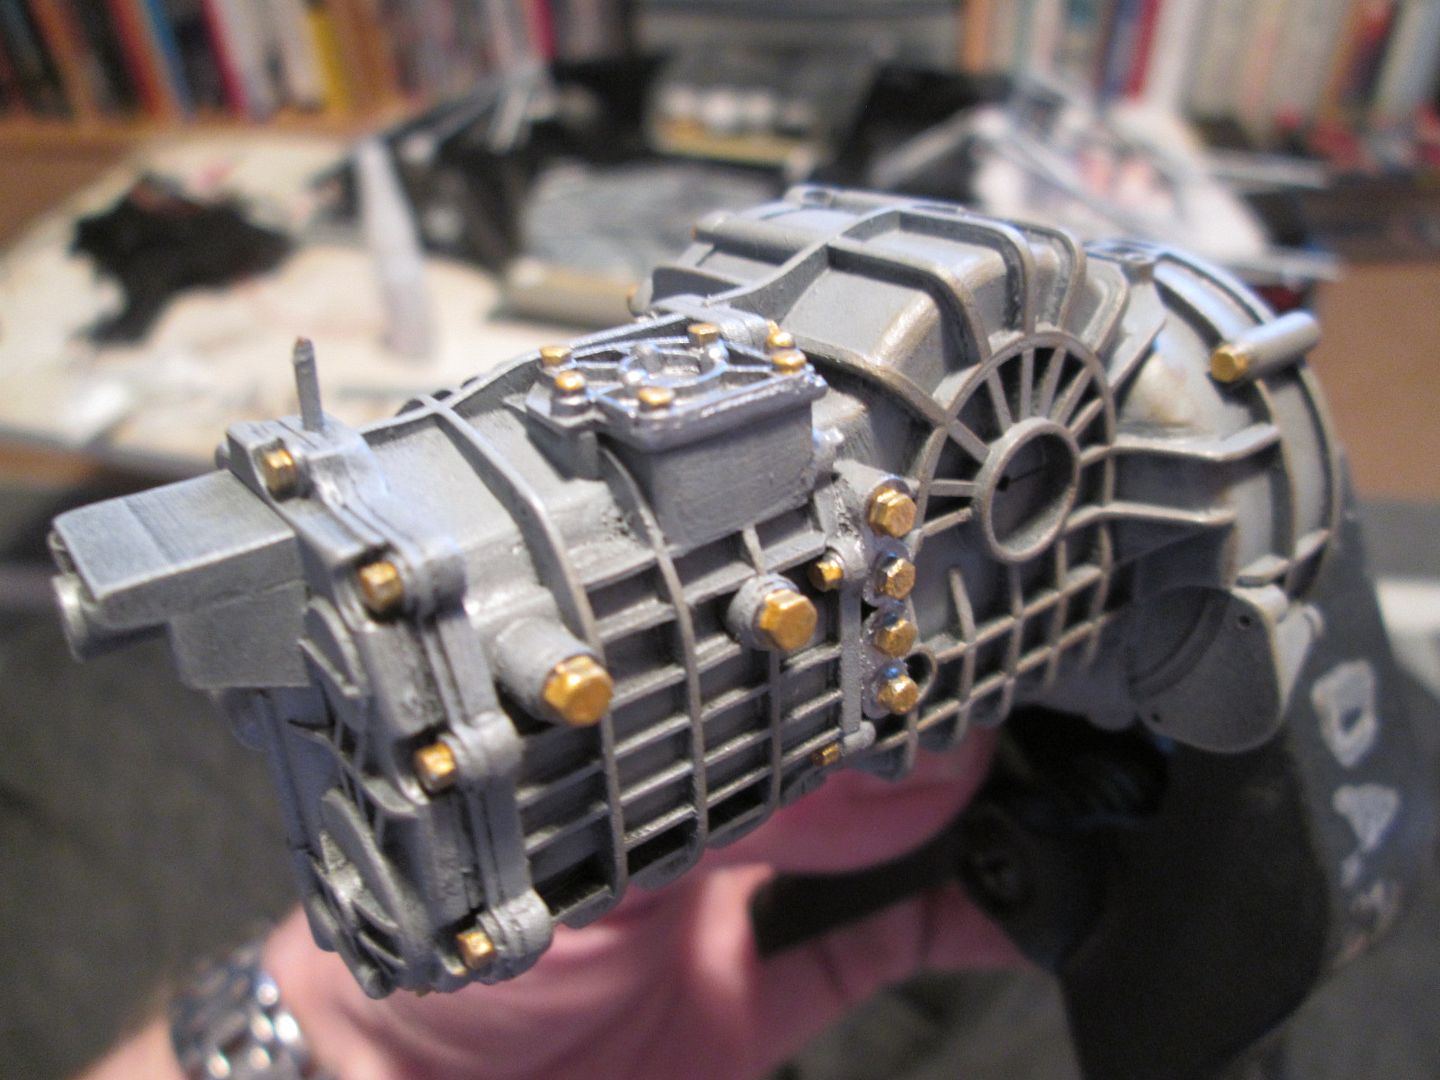 It looks better in reality than in the photos, I feel. There's a little tidying to be done around the hex detailing, and the clutch lever, starter motor, etc, all have to be added. Also in gearbox mode, here's the fibreglass cover panel I started making two weeks ago - trimmed up and in position: 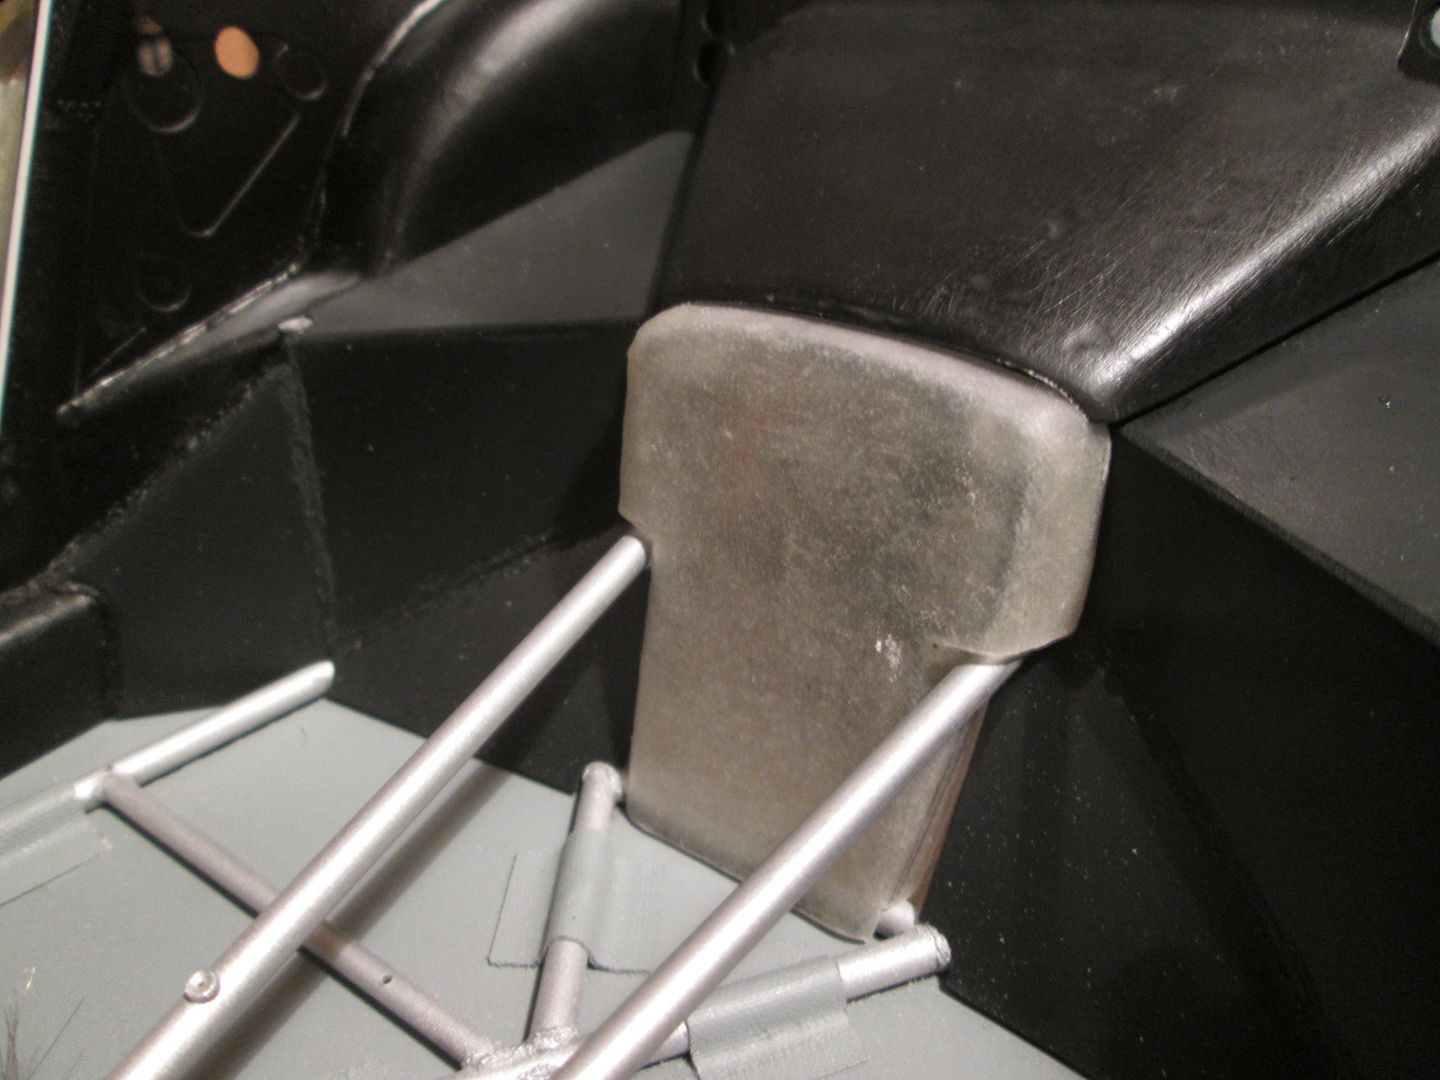 There won't be too much of the gearbox visible when it's all complete, but it will be too difficult to have these panels removable. One of the problems of having a roof on the car, I suppose! So, lots to be working on between now and Christmas. Can I get the cockpit wiring sorted out so that I can go into 2017 with an assembled firewall and bulkhead? That's the new plan. I'll also be finding suitable images to make decals for the battery, making a few more electrical system components (spark box for the rear parcel-shelf, etc), probably painting a few components, and generally moving around from one thing to another! As always, have a good week. SB |
|
|
|

|
|
|
#610 | |
|
AF Enthusiast
Join Date: Sep 2011
Location: Redwood City, California
Posts: 651
Thanks: 0
Thanked 39 Times in 39 Posts
|
Re: 1/8 Porsche 935/78 'Moby Dick'
Yay! Wiring!
Love it all...  ianc |
|
|
|

|
|
|
#611 | |
|
AF Enthusiast
Thread starter
Join Date: Nov 2008
Location: Norwich
Posts: 649
Thanks: 21
Thanked 111 Times in 87 Posts
|
Re: 1/8 Porsche 935/78 'Moby Dick'
I can't believe I haven't posted since the start of December! A late 'Happy New Year' to you all, of course.
Why the silence? Not for lack of progress, certainly. Although I made a good start on sorting out the under-dashboard wiring during my November holiday, I struggled to continue with it afterwards - rather than force things, I put it to one side. I still wanted to move towards being able to assemble the front bulkhead / firewall, but found various other things to divert me... First up, in mid-December I received a small package from Rijk in Holland - you might remember he made the suspension springs for the 908-03. He offered to make more for the 935, and I was happy to accept! So, I spent several evenings playing around with various combinations of springs, making locator collars, etc. Here are the rears: 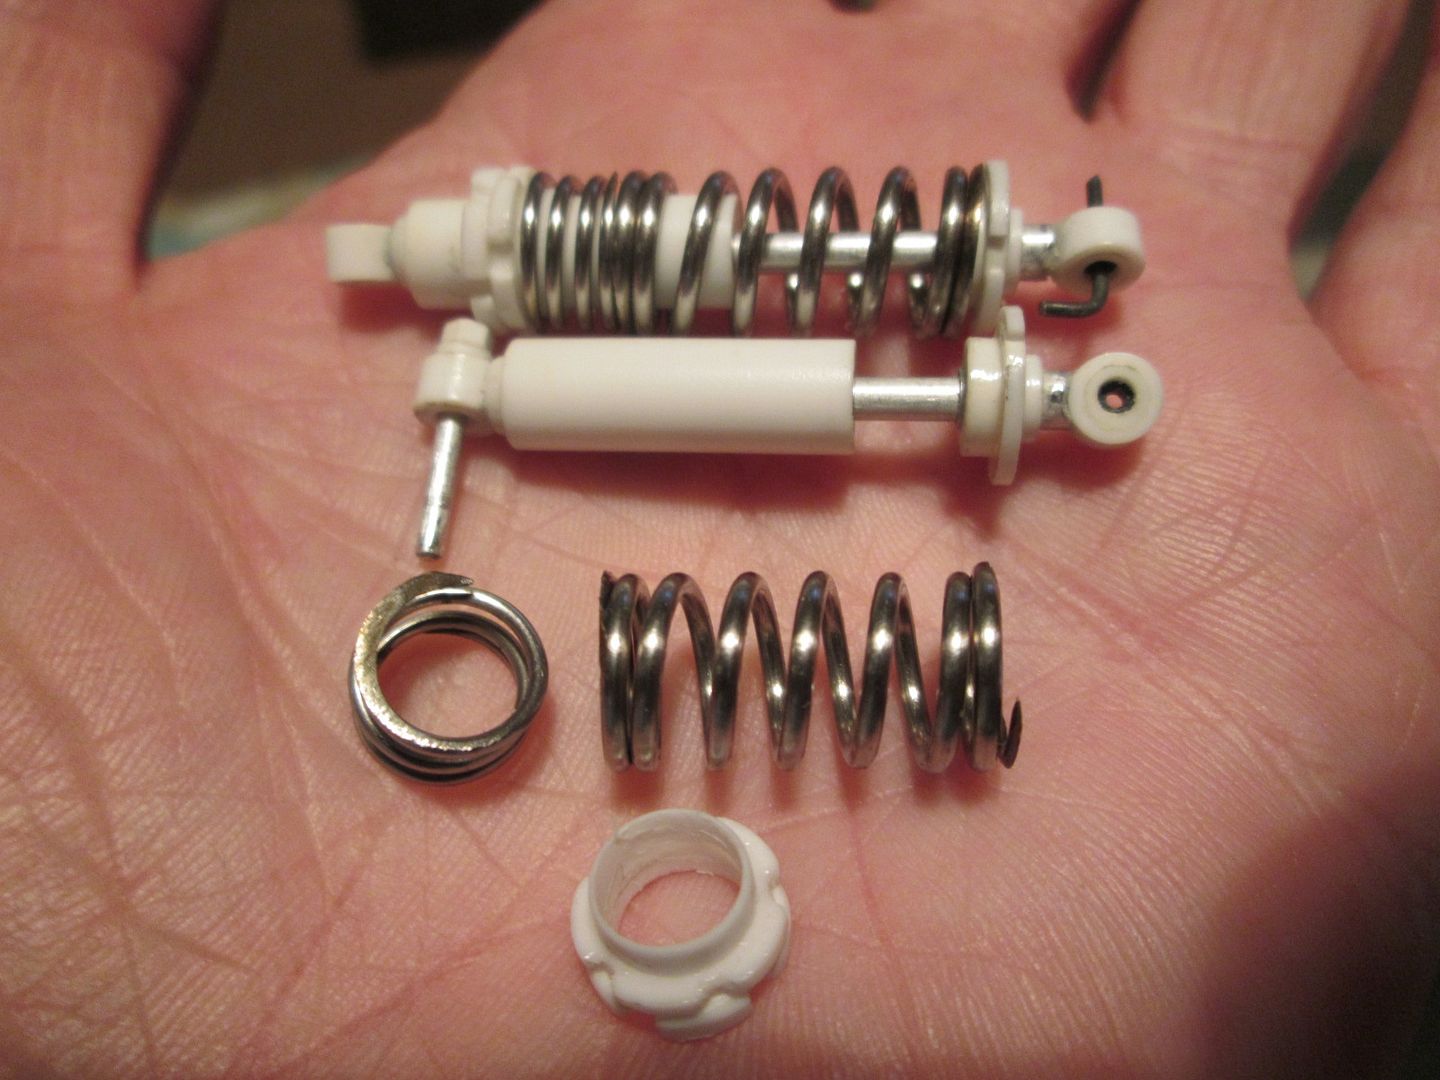 ...and one of the fronts: 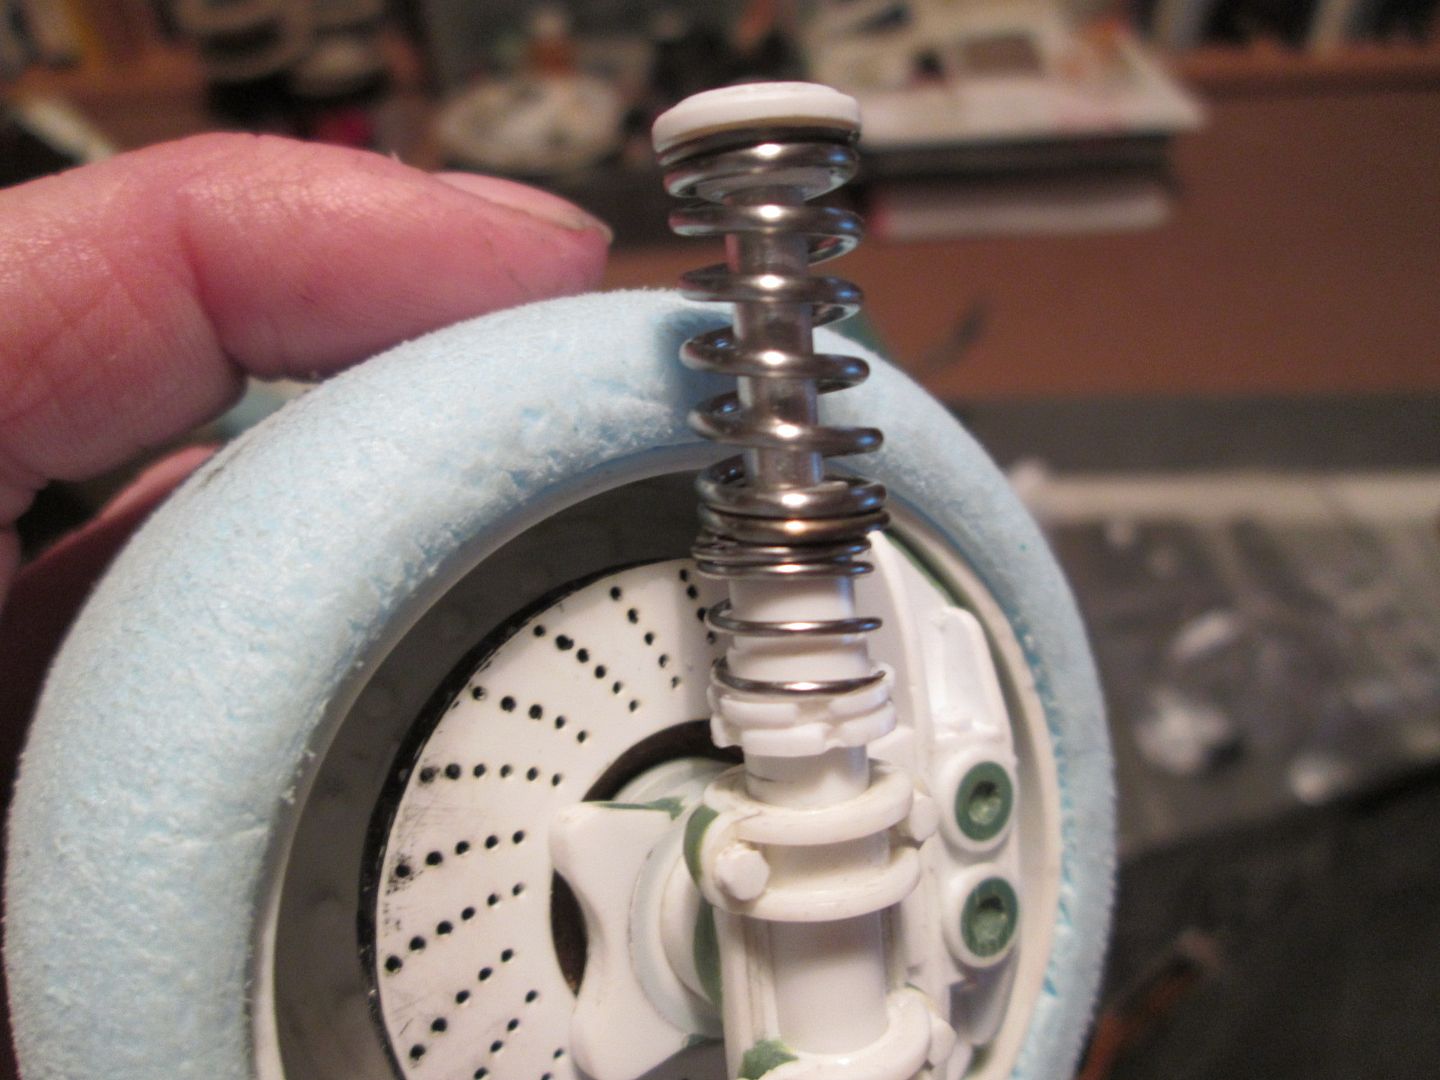 I asked Rijk if he could make the main springs and some smaller 'helper' springs - the originals appear to be a single variable-rate spring, but I couldn't see how this could be replicated in scale. I'm very happy with the results, and they look much better than anything I could have made - thanks, Rijk! Another job to be tackled before assembly was to paint some of the gauges and switches that would be fitted into the lower dashboard panel. I taped everything to a piece of card and set-to: 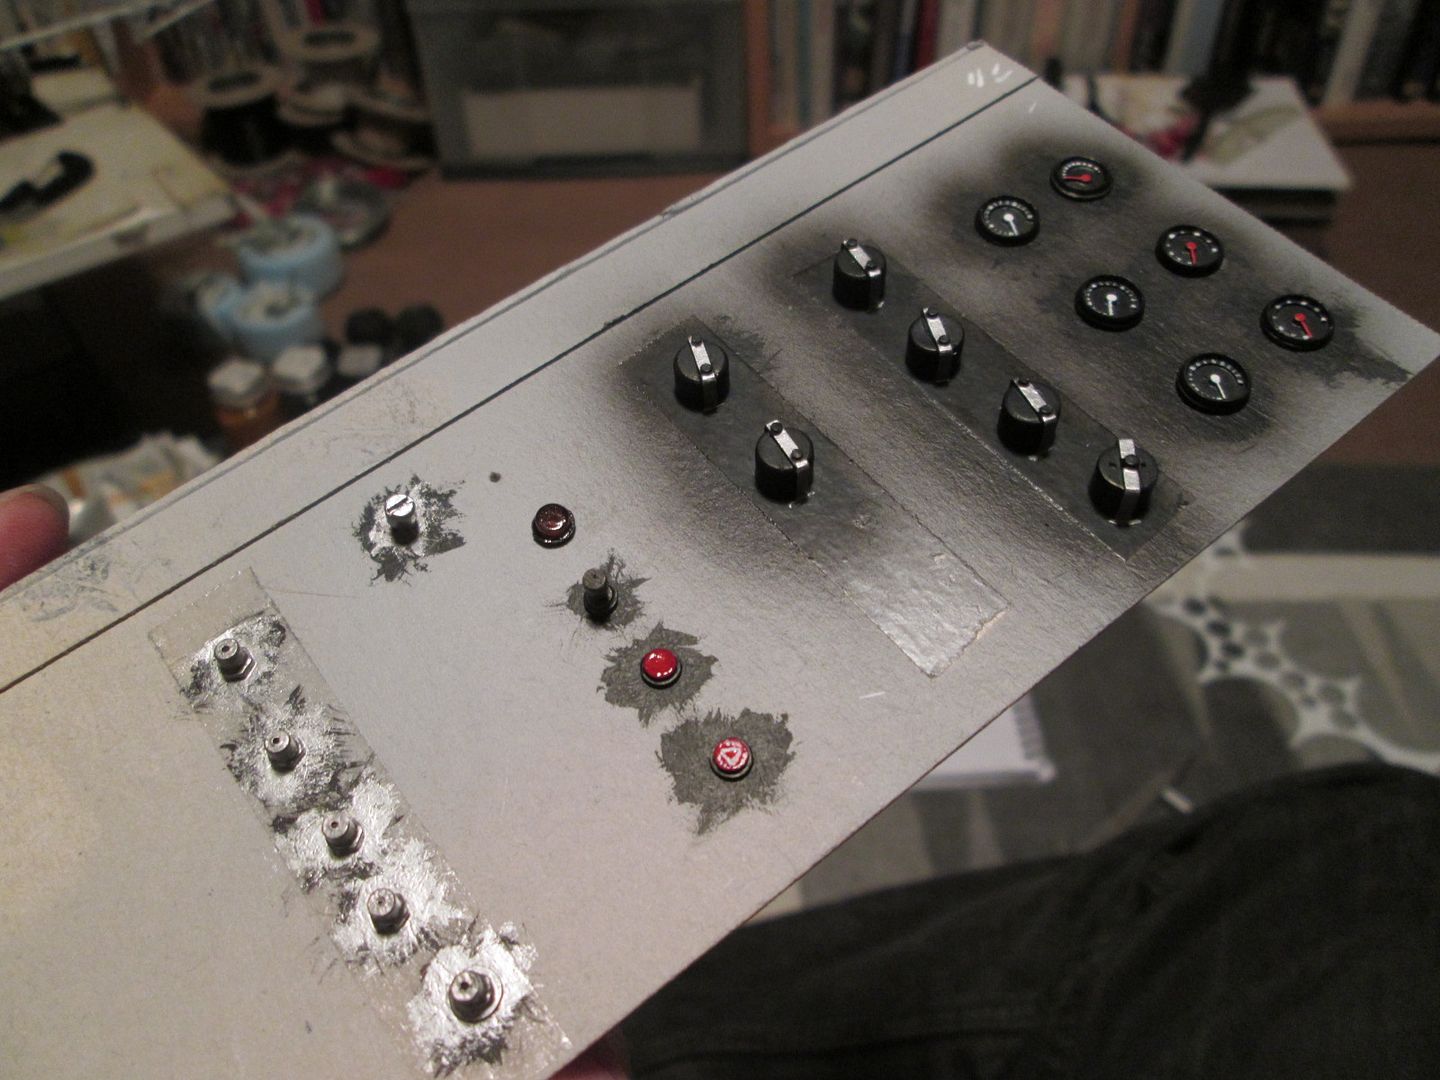 The gauges were filled with the 'liquid water' afterwards to create the effect of a glass face, and everything was glued in position. One thing I still need to do is to add the small ignition key detail to the switch... The next couple of photos were taken during the Christmas holiday period. I fitted the two fire bottles into the mounting cradle, and wanted to make the hard extinguisher lines that were routed around the cockpit and the engine bay. I used more of the 1.2mm plastic-coated wire, and started bending: 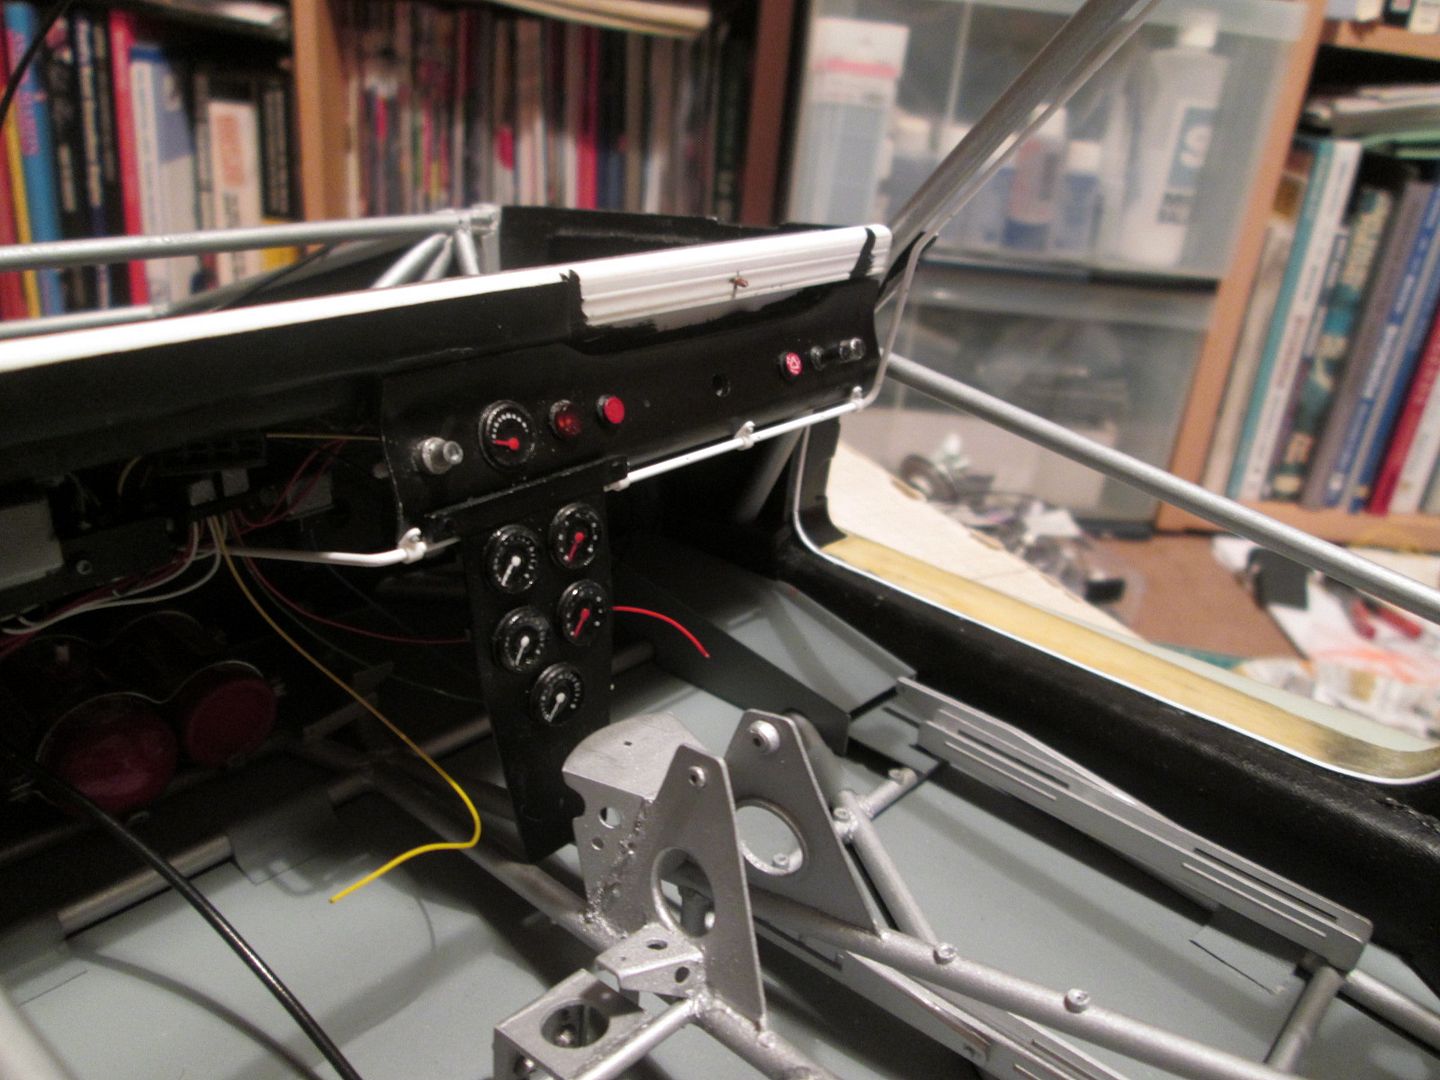 The bottle will connect to the hard-line with a short length of flexible hose under the bulkhead. It follows the bottom of the instrument panel then runs up the inside of the door pillar, along the roll-cage and behind the driver. And yes, those are some very small 1/8-scale P-clips I made to attach it... It's a similar story in the engine bay: 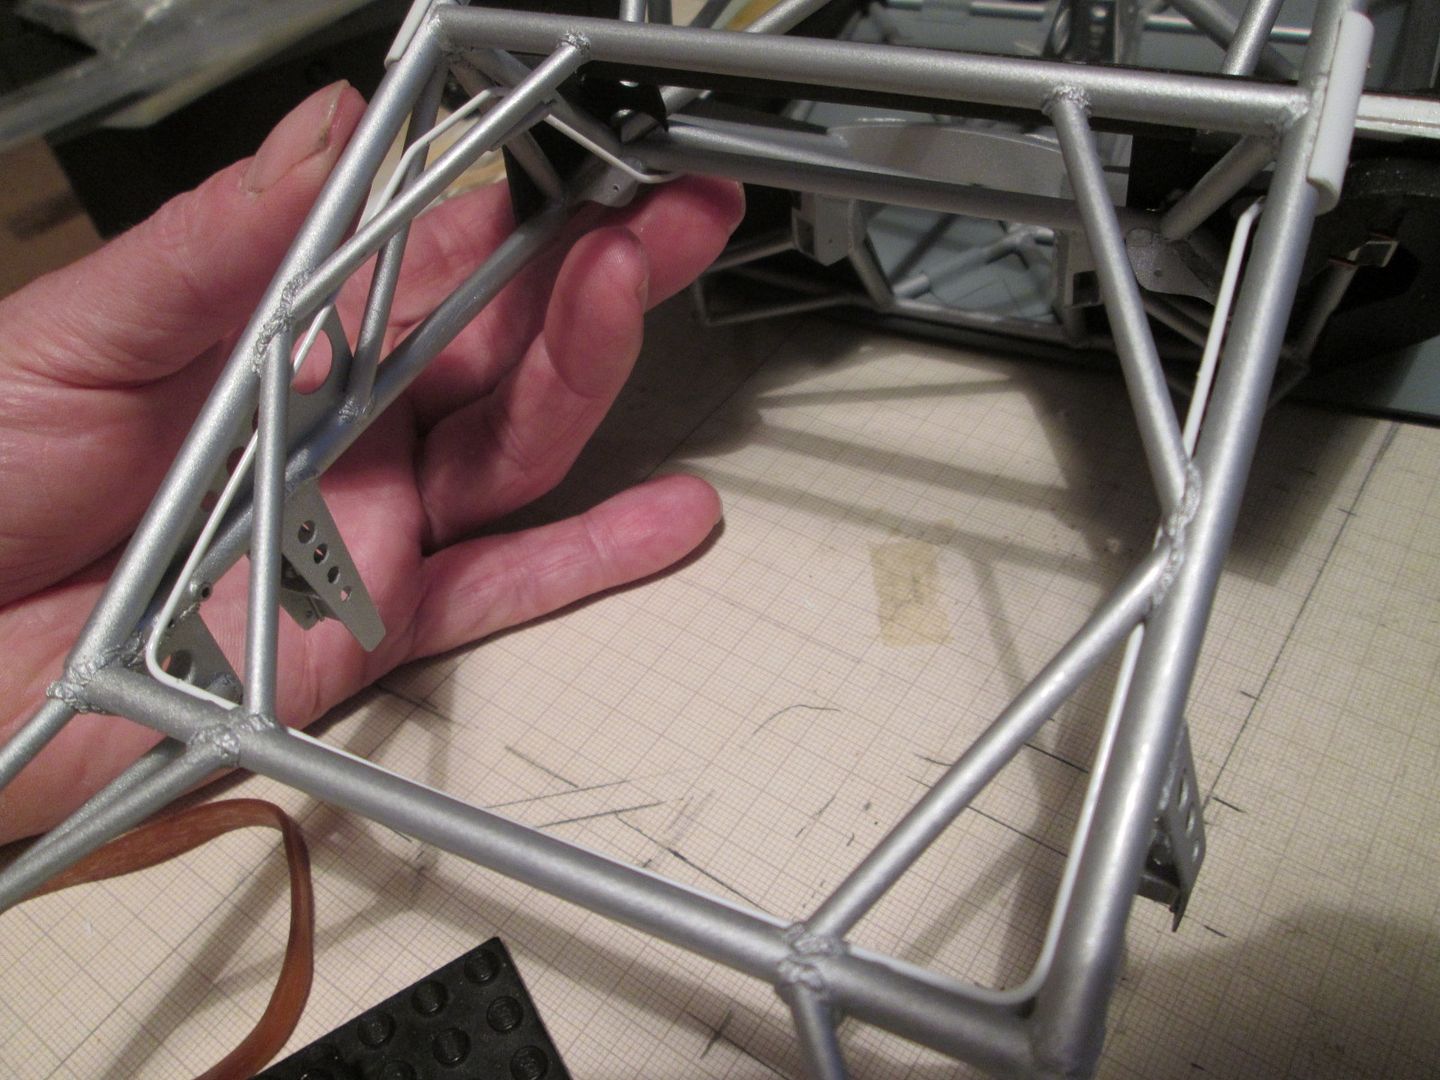 Moving on, the wiring under the bulkhead slowly fell into place - I couldn't avoid it, after all. I added some pieces of small-diameter heat-shrink for variety, and tried to route the cables so that it all looked appropriately busy (while still being based partly on the 917's wiring...) 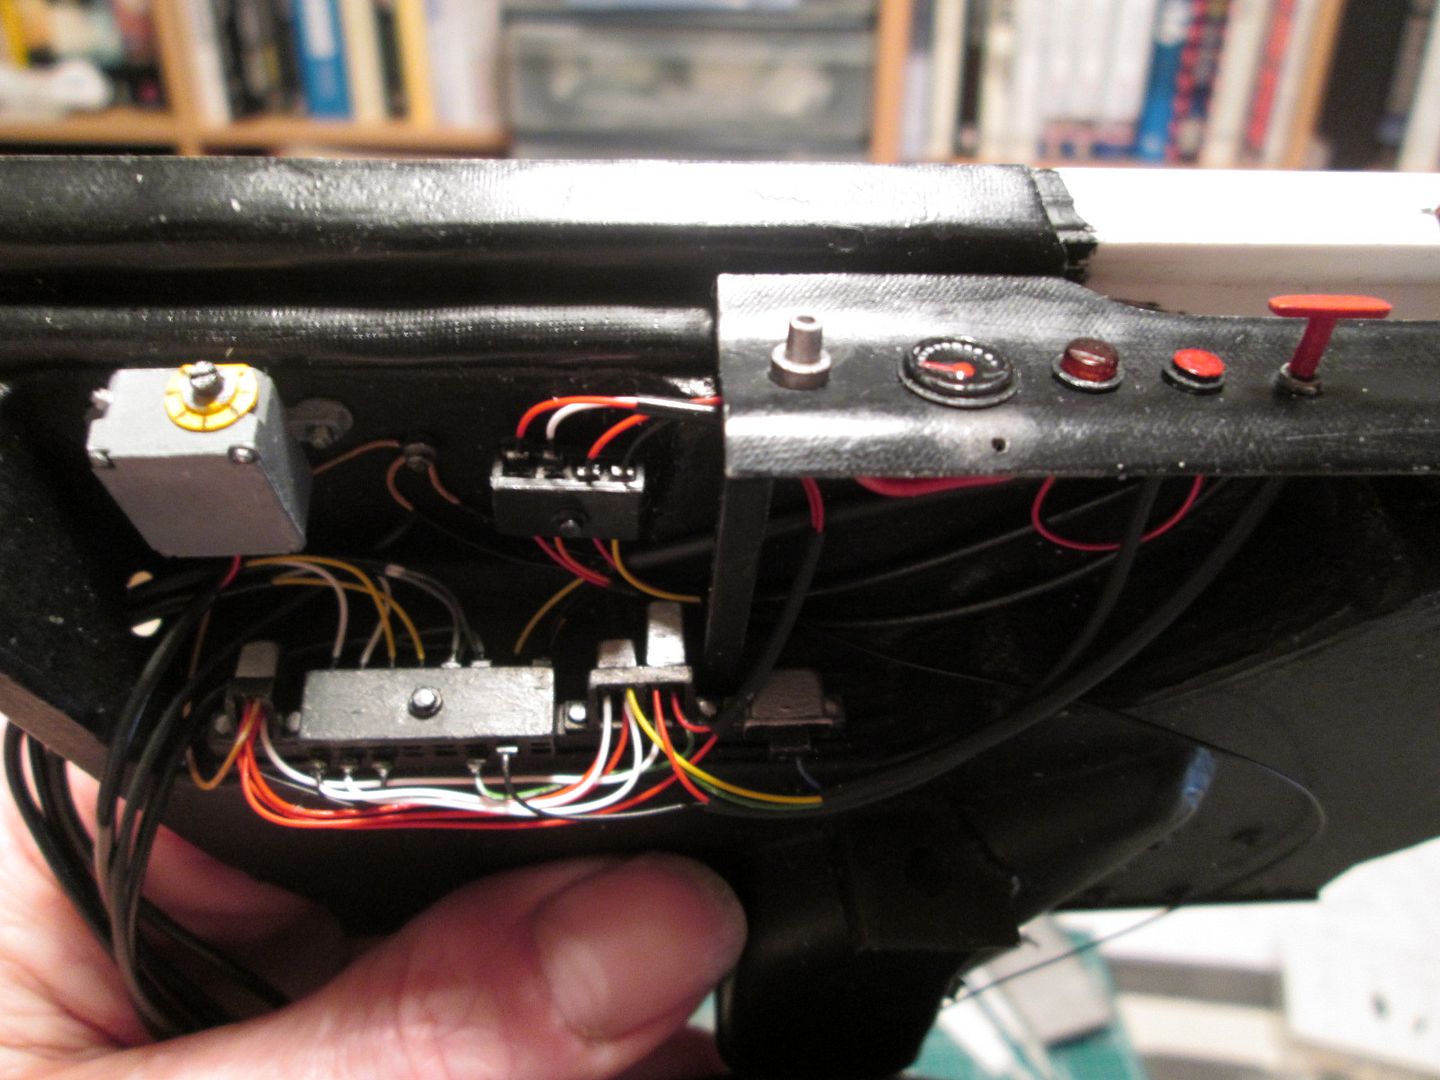 The red T-handle for the fire system is a recent addition, as is the control box on the left-hand side. Next, I fitted the firing mechanism for the larger of the two fire bottles - having checked to make sure the bulkhead panel would still fit: 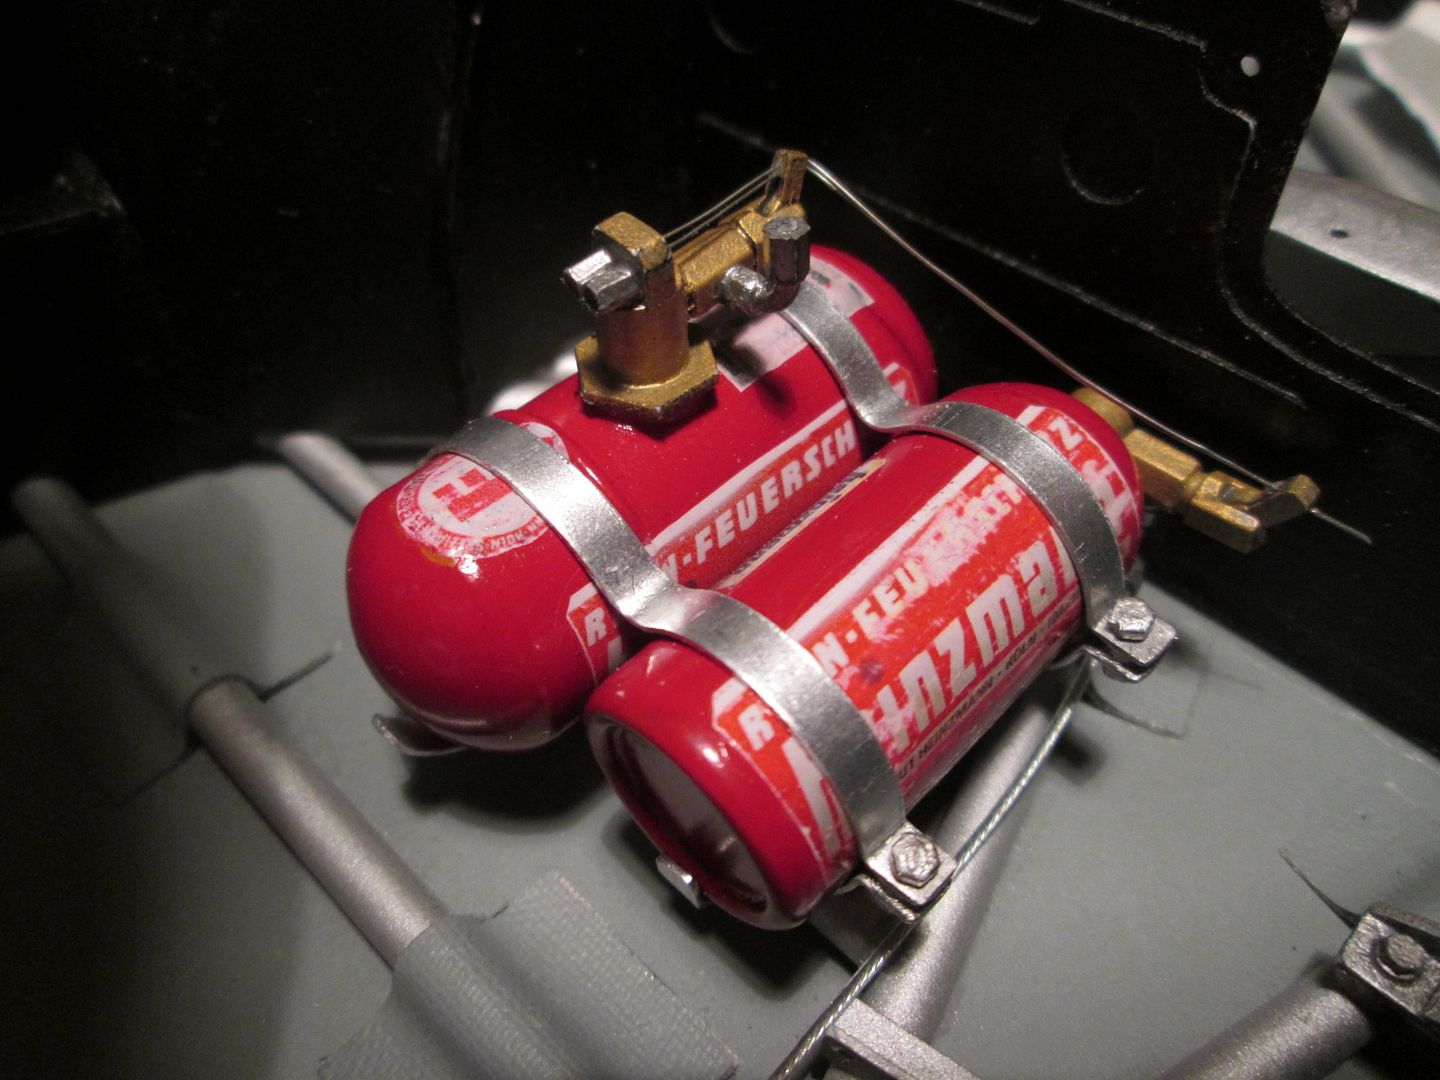 Some finishing touches for the pedal assembly: the blue hoses will connect to the two remote-mounted fluid reservoirs, and I've added two splitter-fittings to the master cylinder outlets. The right-hand cylinder will have two lines running to the front brakes, and the left-hand cylinder has a fitting to activate the brake lights, and a single line running to the rear brakes (there'll be a T-piece at the back of the cockpit): 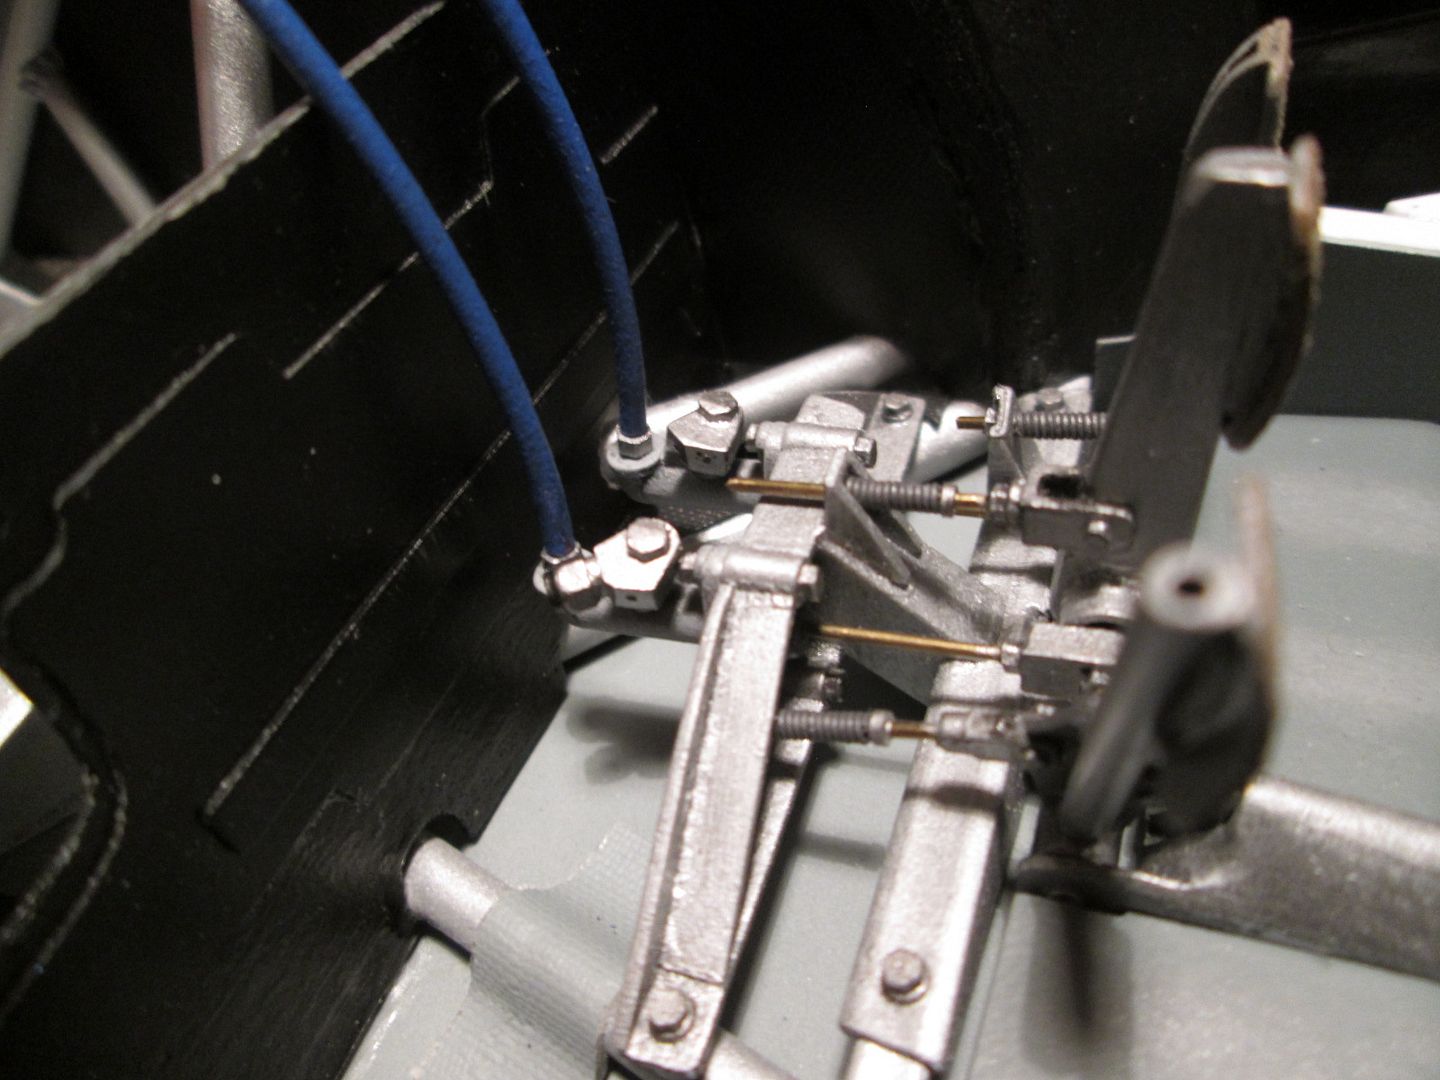 Finally for tonight, here's what it all looks like when viewed through the open doorway: 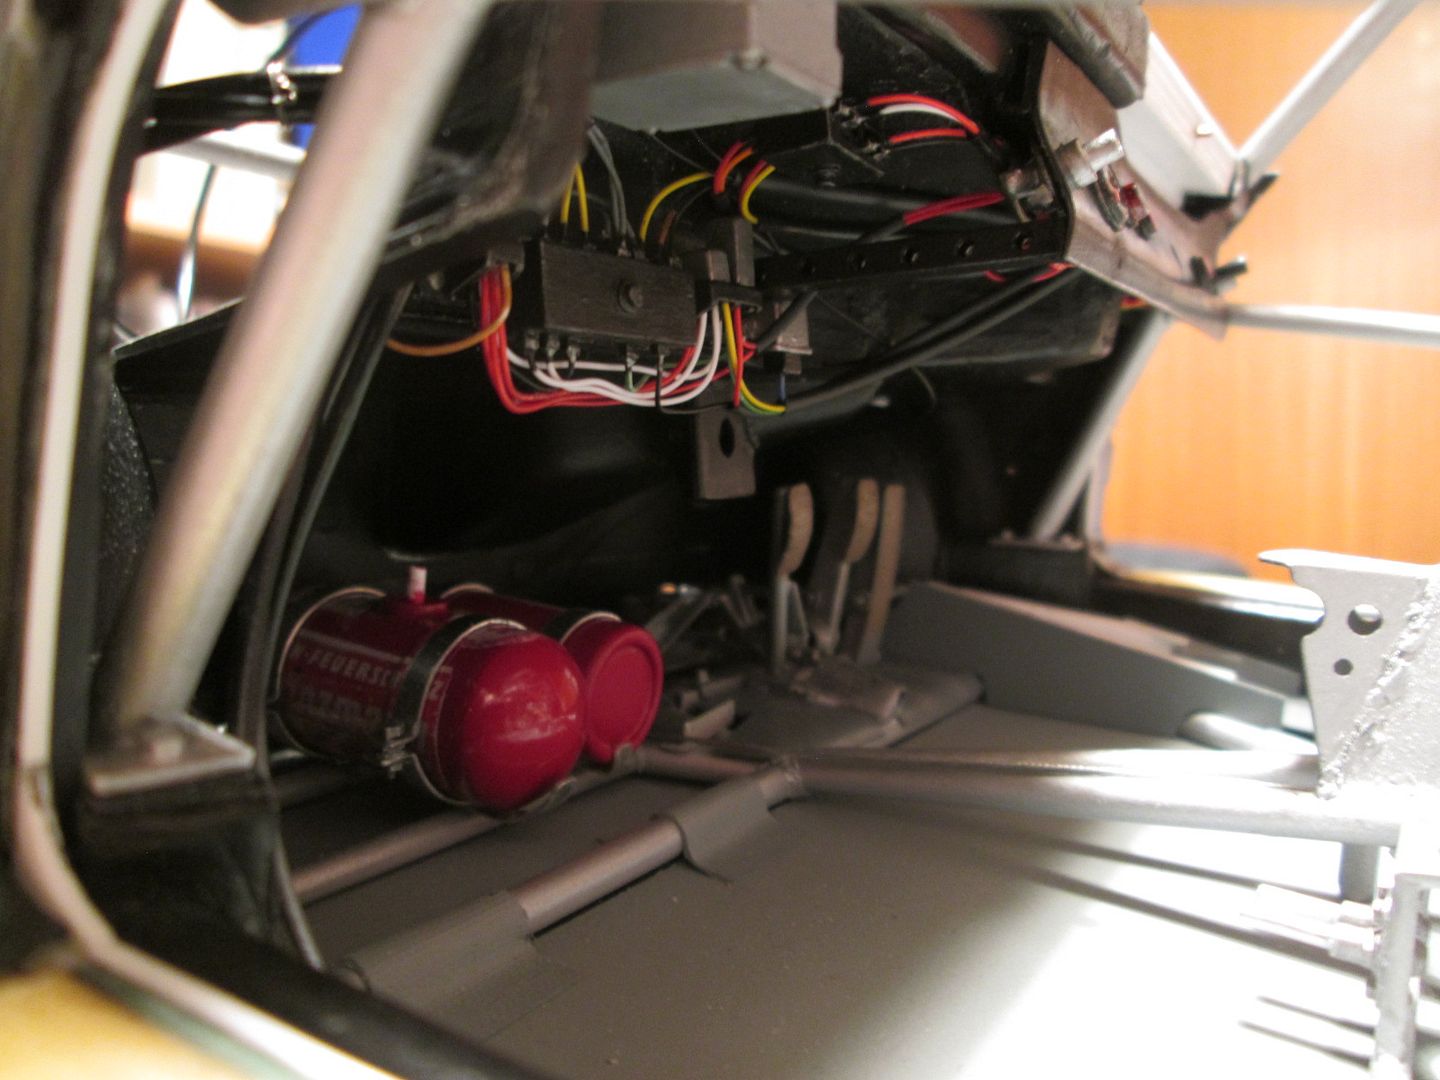 The fun part, of course, will be connecting the brake light line and fire-pulls once the whole lot is glued in place. No coffee that night, I think... I should also mention that in amongst all these jobs I fitted the main roll-cage, attached the rear bulkhead, fitted the front lower bulkhead (having threaded one of the water pipes through first), and have fixed the two supporting straps where the top part of the cage meets the engine bay. There's been plenty of greenstuff applied in various places to fill gaps, and it's all been painted-in to suit. Like I said - it's not a lack of progress, more a lack of decent photos! That's it for now. I'm running out of things to do before the front bulkhead goes in, so it shouldn't be too long before that major hurdle is cleared - this will allow all sorts of other parts to be fitted. I also want to make some small decals to label all the instruments (in German, of course...), so that's another little diversion. Have a good week, SB |
|
|
|

|
|
|
#612 | |
|
Sweet, sweet tiny Hondas.
          Join Date: Jul 2003
Location: Austin, Texas
Posts: 5,720
Thanks: 48
Thanked 89 Times in 65 Posts
|
Re: 1/8 Porsche 935/78 'Moby Dick'
As always, inspiring and beautiful. Love EVERY update!
__________________
It ain't cool 'till your wife hates it. Imagine a world without Alabama Recent builds: Rocket Bunny FR-S and stock BRZ Toyota bB Bro-style Civic K20 powered SiR converted EK WIP I build slowly and poorly. 
|
|
|
|

|
|
|
#613 | |
|
AF Enthusiast
Join Date: Aug 2005
Location: where "sky grey" is a colour
Posts: 822
Thanks: 3
Thanked 32 Times in 29 Posts
|
Re: 1/8 Porsche 935/78 'Moby Dick'
Yep, what else to say. Still a joy to follow!
|
|
|
|

|
|
|
#614 | |
|
AF Regular
Join Date: Jul 2007
Location: Waxahachie, Texas
Posts: 206
Thanks: 2
Thanked 19 Times in 19 Posts
|
Re: 1/8 Porsche 935/78 'Moby Dick'
The footwell and under dash are looking really good - it is amazing to watch this WIP, thank you for the updates.
Jordan |
|
|
|

|
|
|
#615 | |
|
AF Newbie
Join Date: Dec 2006
Location: Melbourne
Posts: 54
Thanks: 2
Thanked 0 Times in 0 Posts
|
Re: 1/8 Porsche 935/78 'Moby Dick'
You are such a treasure SB. Never short of inspirational. I always leave your posts jazzed up to go and do some modelling! Thank you for taking the time and effort to post your magical builds. I have had many years of enjoyment and education reading your exploits. I am always amazed at your dedication to spending years on a build to get everything just right.
Thank you. Dan |
|
|
|

|
| ||||||||||||||||||||||||||||||||||||||
 |
POST REPLY TO THIS THREAD |
 |
|
|