|
|
|

|
|
| Search | Car Forums | Gallery | Articles | Helper | AF 350Z | IgorSushko.com | Corporate |
|
| Latest | 0 Rplys |
|
|||||||
| WIP - Motorsports Post topics for any "Work In Process" motorsports vehicles in this sub-forum. |
 |
 Show Printable Version | Show Printable Version |  Email this Page | Email this Page |  Subscribe to this Thread
|
|
|
Thread Tools |
 05-13-2013, 02:01 PM
|
#226 | |
|
AF Enthusiast
Thread starter
Join Date: Nov 2008
Location: Norwich
Posts: 649
Thanks: 21
Thanked 111 Times in 87 Posts
|
Re: 1/8 Porsche 935/78 'Moby Dick'
Hi Ian,
For most of my hex-nut detailing I simply use small pieces of Plastruct hex rod cut by hand and filed flat where required - I bought six different sizes from Hiroboy a few years a go before I started the 908 (and fortunately still have plenty left, as I haven't seen it in stock there since!) The sizes range from 0.8mm through to 3.2mm hex (part numbers 90872 through 90877) and allow me to add the appropriate nuts where required. I'll often add small punched styrene discs underneath the nuts as washers, or to look like K-nuts. I also keep an eye out for proper small-sized nuts, and will use these mainly on the oil lines, fuel system, etc (again, as on the 908). I've got a small stock of M1.6, M2, M2.5 and M3 nuts (3.2mm to 5.5mm hex) so these extend the range I can handle. Sorry there hasn't been a normal update this weekend. Last week was particularly busy at work - I didn't leave the workshop until 10pm on Thursday as we were trying to get a car finished (Chevron Formula Atlantic), Friday we were testing all day and I didn't leave the circuit untill 7pm, Saturday was race-day with another 10pm finish, and Sunday was also race-day...finally finished at 7pm! So, not a lot of time for modelling... Hopefully I'll have some new developments to show you this Sunday - I'm still trying to work out the best way to make the brake disc bells, given that I don't necessarily want to machine them from solid (you know - that would be far too easy!), so that's something I want to get sorted during the next few evenings. SB |
|

|

|
|
05-25-2013, 06:34 AM
|
#227 | |
|
AF Enthusiast

Join Date: Oct 2004
Location: x
Posts: 1,135
Thanks: 17
Thanked 49 Times in 46 Posts
|
Re: 1/8 Porsche 935/78 'Moby Dick'
This build definitely deserves one of these:
 |
|
|
|
|
|
05-28-2013, 02:06 PM
|
#228 | |
|
AF Enthusiast
Thread starter
Join Date: Nov 2008
Location: Norwich
Posts: 649
Thanks: 21
Thanked 111 Times in 87 Posts
|
Re: 1/8 Porsche 935/78 'Moby Dick'
Hello again,
Lots of catching up to do tonight - I should have posted last Sunday, but ran out of time before the Nurburgring 24hr race started. I was going to post again last night, but had computer issues...so it's now or never! The problem is going to be remembering what's happened recently... So, starting with the disc bells. My first attempts at these weren't successful, but gave me some ideas which would work out later on. The two main problems were being able to create the slight chamfer to the outer edge, and to put ten holes around the perimeter. My first thought was to build up the centre of the bell with various sizes of styrene tube, then add greenstuff around the outside to create the chamfer (with a little machining afterwards, too). How to create ten evenly-spaced holes around the outside? How about inserting short lengths of tube into the centre boss, then filling around them with greenstuff? Hmmm...neither plan worked as well as I wanted:  Plan B was to create the whole lot from styrene, with minimal need for greenstuff. I still used different sizes of styrene tube to create the core, but left the innermost section long - this would give me something to hold in the lathe:  To increase the diameter, I wrapped bands of 0.5mm strip around the core:  Before adding the chamfer / taper to the outside edge, I marked and drilled the ten holes. I measured the circumference, marked this out on a strip of masking tape, split the length into the appropriate sections, and that was my drilling template:  After opening out the holes, each bell was spun in the lathe and the outside edge gently sanded off to suit - not much of a taper, from a little over 17mm diameter down to 16.5mm diameter, over 5.5mm length. I made a total of six bells - I could pick the best four to use on the car, or have a couple of spares in case of 'accidents'...  At this stage I could cut off the extra length of tube, then add an outer disc to tidy up the face - these were all drilled using a template (five holes for the locating pegs, five lightening holes):  I've started messing around with the drive pegs, too. I cut a set of 3mm lengths of 1.5mm diameter ali tube, chamfered the ends, then CA'd each of them to a short length of .75mm rod. The trick is going to be gluing them into the bell so that everything stays true and in-line...the holes are not exactly perpendicular to the base... Will continue this post after the break... SB |
|
|
|
|
|
05-28-2013, 02:42 PM
|
#229 | |
|
AF Enthusiast
Thread starter
Join Date: Nov 2008
Location: Norwich
Posts: 649
Thanks: 21
Thanked 111 Times in 87 Posts
|
Re: 1/8 Porsche 935/78 'Moby Dick'
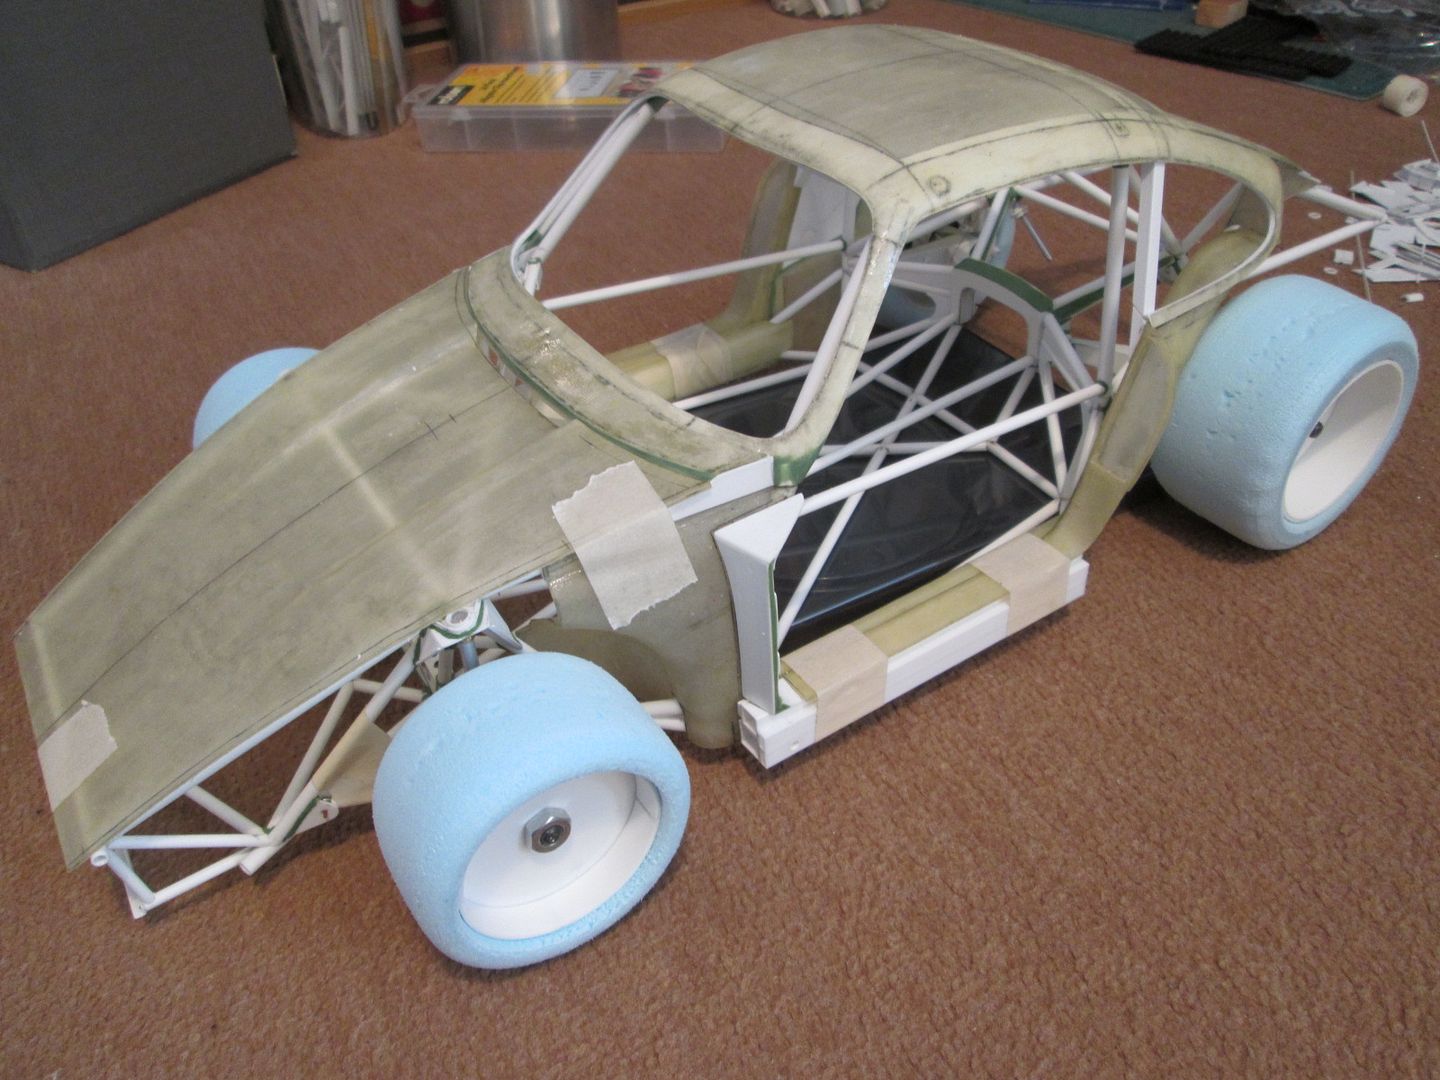
Okay, the next job was to make some dummy tyres. I know I'd said I wasn't going to make tyres too early, but it seemed daft not to get something on the car to make sure everything worked and fitted! To make sure I won't use these as the finished parts I wasn't too concerned about the accuracy of the profile or the smoothness of the finish - they just had to be the right size and fit on the rims.
So, I used the adjustable hole-cutter to make the two blanks for the rear tyres - they'll end up about 48mm wide, so will just squeeze out of the 50mm sheet. Unfortunately the hole-cutter won't go through in one pass, so there's a bit of fiddling around to keep the two cuts aligned!  The blanks were then mounted on a long 1/4" bolt and spun in the pillar drill, with a sanding block and emery cloth used to create the shape. With the outer profile complete, I could remove the centre using the adjustable cutter...end result as shown:  The front tyres are a little over 40mm wide, so before cutting and sanding them I milled the foam down to the appropriate width:  I used the same process to shape and cut the front tyres as for the fronts. Cutting the centres out was a little more...interesting...as the cutter was spinning away a little closer to my hand than I would have liked! No dramas though, and the foam is strong enough that you can hold it firmly without worrying about it crushing...  At this stage I returned to building the internals for the rear wheels. The black centre tube is spigoted into the two 0.5mm discs which fit snugly into the wheel rim. I've then started layering more discs onto this to build up the edges and create the ring of split-rim bolt detailing. The five spokes are short lengths of box-section, cut off to suit, and filed to match the centre - eventually these will be filled with greenstuff.    Now, you know what's coming next! I've got four rims, four tyres, suspension front and rear...and various bits of fibreglass fitted onto the chassis...   ...yeah, I think it's looking like a 935! The important thing here is that everything fits and nothing fouls the body - I was worried that the fronts would get too close to the fibreglass front wings, but the clearance should only improve as I start fixing the suspension in place. I can play around with the wheel offsets a little too, before finalising the geometry...then make the outer bodywork to suit. So, there's still plenty to do but the goal of having a complete rolling chassis is coming closer! Have a good week, SB |
|
|
|
|
|
05-28-2013, 03:42 PM
|
#230 | |
|
AF Newbie

Join Date: Sep 2011
Location: Bellbird
Posts: 46
Thanks: 0
Thanked 2 Times in 2 Posts
|
Re: 1/8 Porsche 935/78 'Moby Dick'
Jaw-droppingly brilliant work SB. So many techniques to admire and copy, a veritable minefield of information and skills. I thought your 908 was brilliant but this is a tour-de-force of you imagination. I'm in awe.
Regards Rick H |
|
|
|
|
|
05-28-2013, 05:05 PM
|
#231 | |
|
AF Enthusiast
Join Date: Sep 2011
Location: Redwood City, California
Posts: 651
Thanks: 0
Thanked 39 Times in 39 Posts
|
Re: 1/8 Porsche 935/78 'Moby Dick'
How cathartic it must have been to finally be able to do a mockup on the frame! I'd being itching for a little paint right now just to keep morale up!
ianc |
|
|
|
|
|
05-29-2013, 01:58 PM
|
#232 | |
|
AF Enthusiast
Thread starter
Join Date: Nov 2008
Location: Norwich
Posts: 649
Thanks: 21
Thanked 111 Times in 87 Posts
|
Re: 1/8 Porsche 935/78 'Moby Dick'
Hi Ian,
Yes, it's that moment when you start thinking 'this is going to work...' rather than 'I hope this is going to work...'! I'm forcing myself to keep to the plan of getting the rolling chassis sorted before starting the engine, gearbox, etc - otherwise I'll end up with a whole pile of bits in various states of completion. I have a feeling I'll be starting to make more bodywork moulds later in the summer - the temptation will be too great! It feels slower doing it this way, but I know there's a lot of hours gone into the discs, calipers, trailing arms, etc, that weren't necessarily there with the 908. Painting and final assembly is not going to be straight-forward, either - it's much easier when there isn't a roof in the way... SB |
|
|
|
|
|
05-30-2013, 04:38 AM
|
#233 | |
|
AF Regular
Join Date: Sep 2008
Location: cork
Posts: 118
Thanks: 11
Thanked 6 Times in 6 Posts
|
Re: 1/8 Porsche 935/78 'Moby Dick'
WOW.
What a master class in scratch building. Plenty of posts voicing apprication , but I have to say thanks also for sharing. If a modeler never tackled a total scratch build , there's some great WIP staged shots to "show you how to" scratch build a variety of parts and assemblies. Thanks for putting in the the time into the photgraphs and text...It's time consuming I'd imagine but very much appricated. |
|
|
|
|
|
05-30-2013, 07:30 PM
|
#234 | |
|
AF Enthusiast

Join Date: Oct 2008
Location: Auckland
Posts: 2,761
Thanks: 51
Thanked 136 Times in 134 Posts
|
Re: 1/8 Porsche 935/78 'Moby Dick'
Stunning!!! Now this is REALLY Building a model!!!
__________________
 It's Not wheather you Win or Lose, its how you look while you play the Game |
|
|
|
|
|
05-31-2013, 05:08 AM
|
#235 | |
|
AF Enthusiast

Join Date: Feb 2006
Location: Melbourne
Posts: 1,057
Thanks: 5
Thanked 26 Times in 26 Posts
|
Re: 1/8 Porsche 935/78 'Moby Dick'
Now that is just going too far, excellent work and those tyres......OMG
|
|
|
|
|
|
06-02-2013, 12:11 PM
|
#236 | |
|
AF Enthusiast
Thread starter
Join Date: Nov 2008
Location: Norwich
Posts: 649
Thanks: 21
Thanked 111 Times in 87 Posts
|
Re: 1/8 Porsche 935/78 'Moby Dick'
Evening all,
Not a big update tonight - more a case of tidying up before continuing with the next big step. First, here's the rear wheel centres after I've filled the spokes with greenstuff - they'll need filing and smoothing tomorrow once it's hardened. I also added the hex detailing to liven things up a bit - if they're supposed to be split-rims, they need bolting together, right? You can also see where I've drilled the five holes in the centre boss - these match up with the drive pegs on the disc bells.  Next, I made the remaining drive pegs - they're not glued in place yet, just in case...  Finally, the front wheel inners. These were similar in construction to the rears, only slightly smaller. The other significant difference is that they don't have the same offset as the rears - the centre boss is shorter. As a result, the five spokes are lengths of plain strip styrene, rather than cut-down box-section (to avoid fouling the brake calipers):  So, once I've filed the greenstuff on the rear spokes I'll be able to start thinking about gluing the wheel sections together and adding the next stage of detailing. I'm tempted to make a start on the moulds for the aerodynamic wheel covers, although this could be easier said than done! The calipers still need the pipework, etc, adding so that's also on the to-do list. Thanks for the recent comments - I realise that my methods are not necessarily appropriate for everyone, but there's always got to be an alternative way to do things! I think I've said this before - I'm trying to find new things to add to this build so that it stays interesting. All the best, SB |
|
|
|
|
|
06-03-2013, 02:43 PM
|
#237 | |
|
AF Regular

Join Date: Jun 2005
Location: london
Posts: 414
Thanks: 3
Thanked 22 Times in 20 Posts
|
Re: 1/8 Porsche 935/78 'Moby Dick'
Always interesting.
|
|
|
|
|
|
06-09-2013, 11:47 AM
|
#238 | ||
|
AF Enthusiast

Join Date: Mar 2003
Location: Nthern NSW
Posts: 799
Thanks: 48
Thanked 7 Times in 7 Posts

|
Re: 1/8 Porsche 935/78 'Moby Dick'
Quote:

__________________
Hello, I'm Greg. I'm an Aussie and a compulsive model starter... http://public.fotki.com/Greg5000/ Currant builds... 1:12 Datsun Z432R 1:12 Datsun OS-Giken |
||
|
|
|
| The Following User Says Thank You to stump For This Useful Post: |
ScratchBuilt (06-09-2013)
|
|
06-09-2013, 12:40 PM
|
#239 | |
|
AF Enthusiast
Thread starter
Join Date: Nov 2008
Location: Norwich
Posts: 649
Thanks: 21
Thanked 111 Times in 87 Posts
|
Re: 1/8 Porsche 935/78 'Moby Dick'
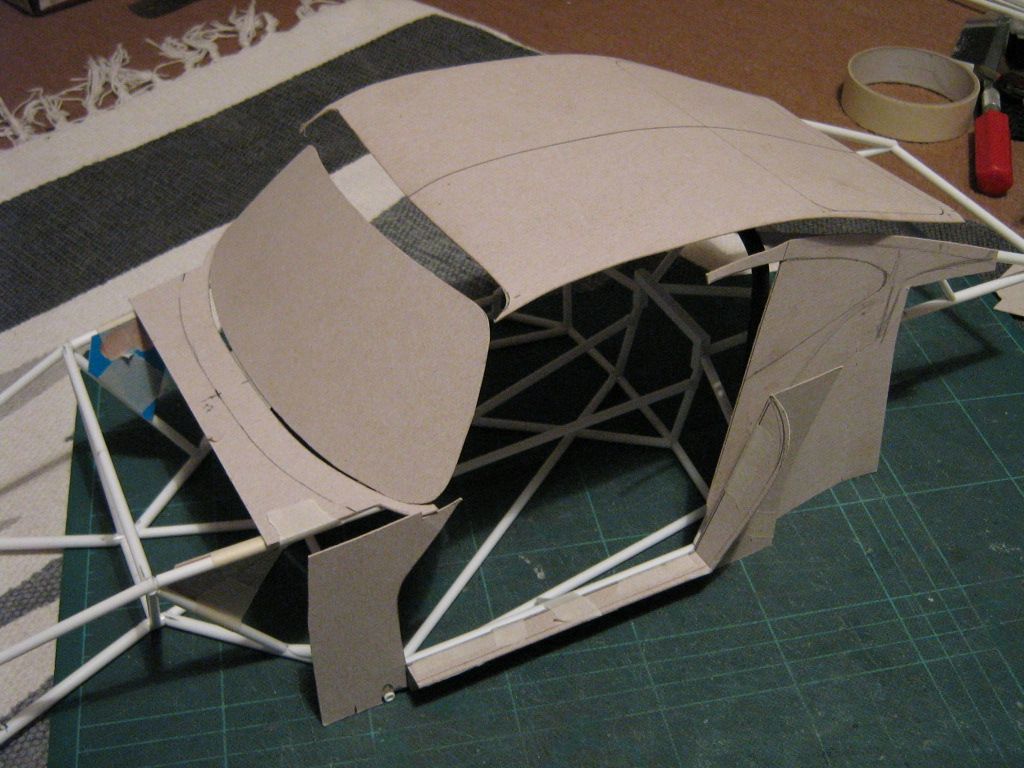
Nice one, Greg! Although the cardboard looks rough, it has been very useful for mocking-up certain areas of the build, and getting a feel for the overall shape - especially as I don't have official drawings to work with.
No time for a full post tonight - I've been listening to Le Mans Testing all day since 8am, had some of the BTCC on TV this afternoon in the background, and now getting ready for the GP in twenty minutes! However, I'll have photos and developments updated tomorrow. |
|
|
|
|
|
06-10-2013, 02:25 PM
|
#240 | |
|
AF Enthusiast
Thread starter
Join Date: Nov 2008
Location: Norwich
Posts: 649
Thanks: 21
Thanked 111 Times in 87 Posts
|
Re: 1/8 Porsche 935/78 'Moby Dick'
...and here it is.
First job for last week was to glue the wheel centres into the inner rims; once this was done I could start fitting several layers of 0.5mm strip to strengthen the join and to add some extra detail. When I'm ready I'll try running some of my liquid greenstuff into the grooves to smooth things out.   I then spent some time gluing the backing plates onto the disc bells - not totally straightforward as I had to match up each plate with the appropriate bell, and get the holes lined up correctly. Here's the two rears:  Another time-consuming job was to increase the thickness of the webs on the calipers. I'd felt for a while that they were a little on the thin side, so an extra layer of 0.5mm strip was glued in place and cut and filed to shape. Whilst filing the side webs I also added a slight chamfer to the top and bottom edges of the caliper - this will provide a little extra space when the connecting pipework is added. You might notice that I've also added bosses for the fittings and glued the mounting flanges in position:  Finally, the rear trailing arms have now had their reinforcing plates added on both sides of the hub carrier. I used 0.3mm sheet for these to make it easier to fit in place - it's not exactly structural. Sometime this week I'll add some greenstuff around the edges to finish it all off. The caliper mounts have also been fitted, so these can be 'welded' too.  That's it for tonight: up-to-date again. One thing I want to do this week is to finalise the front suspension geometry so I'm happy that nothing's going to foul. If I need to add thin spacers to the wheels, or tweak the measurements, I can. There's some greenstuffing to be done, and if I get really keen I can even start making some of the brake bleed screws, connections etc. We'll see... SB |
|
|
|
|
| ||||||||||||||||||||||||||||||||||||||
|
POST REPLY TO THIS THREAD |
 |
| Thread Tools | |
|
|