|
|
|

|
|
| Search | Car Forums | Gallery | Articles | Helper | AF 350Z | IgorSushko.com | Corporate |
|
| Latest | 0 Rplys |
|
|||||||
| WIP - Street Post topics for any "Works In Progress" street vehicles projects in this sub-forum. |
 |
 Show Printable Version | Show Printable Version |  Email this Page | Email this Page |  Subscribe to this Thread
|
|
|
Thread Tools |
 09-09-2015, 06:52 PM
|
#31 | |
|
AF Enthusiast
Thread starter
Join Date: Sep 2002
Posts: 1,385
Thanks: 0
Thanked 70 Times in 70 Posts
|
Re: Mazda MX-5s
So apart from pre-ordering three of Tamiya's new ND kits, I have made some progress on the NC. I applaud Fujimi's attempts at increasing the level of detail on this kit, and in fact the engine sits somewhere between full detail and the insert of recent Tamiya offerings. Quite a few of the under-bonnet parts are separate which at least allows for easier painting; the main issue are the fluid reservoirs at the front that that are molded in.
However..... The rear suspension setup is a nightmare. Fujimi includes real springs for working suspension. The springs are so strong they make assembly a pain, and when it is finally done the suspension will not move unless a reasonable amount of force is applied. In the end it was a case of test fit, test fit, glue, clamp, pray! I then clearly got complacent on the front end and managed to loose a spring to the Great Gods of Carpet. Of course without the spring the strut and wheel disappear in to the wheel-well, so I have glued a spacer in place at what I think will be the final ride height. Anyway, enough prattle, here are some photos. Final assembly now should not be too long. Body details then combine with these three sub-assemblies.      I have also started on the Garage Vary NB; fitment of the bodykit is a bit "approximate". I have in mind a race/track car with an all too obvious paint scheme. Photos to come. |
|

|

|
|
09-09-2015, 07:12 PM
|
#32 | |
|
AF Enthusiast

Join Date: Oct 2008
Location: Auckland
Posts: 2,761
Thanks: 51
Thanked 136 Times in 134 Posts
|
Re: Mazda MX-5s
Looking Good!
__________________
 It's Not wheather you Win or Lose, its how you look while you play the Game |
|
|
|
|
|
09-09-2015, 11:02 PM
|
#33 | |
|
AF Enthusiast
Thread starter
Join Date: Sep 2002
Posts: 1,385
Thanks: 0
Thanked 70 Times in 70 Posts
|
Re: Mazda MX-5s
Ah, so I have just proven once again that one should never say "Final assembly should not be too long"!!!
Fujimi say install front and rear light clusters before putting bumpers on. I always ignore this if I can, so that I can assemble the entire body before painting. Fronts were fine, but I had to trim excess plastic on the inside of the body (where bumper and body join) to allow rear lights to fit. Okay, but never fine taking a scalpel to a painted body! Then I had to do the same for the fuel cap. For some reason this is a separate part, and needed major surgery to clear the rear light clusters. Then, much worse, the fitting of the windscreen is appalling. There are two pieces, the clear screen and a part replicating the interior of the A-pillar/roll hoop that is painted semi-gloss black. Somehow you have to install the windscreen with no locator pins or surface, hold it there with magic I assume, while you glue the second part. I am sure the screen is still not in properly. The, the front scuttle where wipers go does not sit properly. Thankfully this can be rectified by some clamps! The last bit that I am really dreading is that the engine bay sub assembly has not positive locator pins to affix it to the chassis prior to putting the body. However, there are four pins on the body that will hopefully line up. The best thing wold be to actually glue the engine bay to the body, but then the engine will foul attempts to attach the chassis! Wish me luck. Bit annoyed at Fujimi right now. Up to this point I have enjoyed the kit and was really looking forward to the Mazdaspeed versions in the stash. At least I know the problems I will encounter! |
|
|
|
|
|
09-10-2015, 01:40 AM
|
#34 | |
|
AF Enthusiast
Thread starter
Join Date: Sep 2002
Posts: 1,385
Thanks: 0
Thanked 70 Times in 70 Posts
|
Re: Mazda MX-5s
Well, amazingly the NC now sits as something resembling a (mostly) finished model, not as small plastic pieces having been thrown at a brick wall and run over by the lawnmower. I have been making models for a long time and the only kit that gave me more grief when trying to attach body to chassis was the Level 3 Monogram Lotus Esprit Turbo I attempted when I was about 13.
Having got all sub assemblies together nicely and a body with a pleasing paint job, I then had to:
I was worried that the engine bay sub assembly would not locate on the four pins on the body during assemble - but oddly enough this worked fine!! Finally, once putting the bonnet on I found that the system that should allow the bonnet to shut securely did not work; all it did was made the bonnet sit high and not actually shut. So another piece had to be trimmed from the bonnet. I just need to finish some detail painting on the now-trimmed bonnet and modify the exhaust tips to fit around the trim panel on the rear bumper. Anyway, here are some photos. Might pull out the photobooth this weekend and do some good photos of the NA/NB/NC together. Thanks for watching.     |
|
|
|
|
|
04-06-2016, 01:48 AM
|
#35 | |
|
AF Enthusiast
Thread starter
Join Date: Sep 2002
Posts: 1,385
Thanks: 0
Thanked 70 Times in 70 Posts
|
Re: Mazda MX-5s
So... I have finally created a "completed" thread for the MX-5 kits. The thread can be found here: Completed Thread.
Please excuse some of these initial photos, as I was experimenting with a new macro lens for my camera. Hopefully I will get better! |
|
|
|
|
|
05-29-2016, 03:05 AM
|
#36 | |
|
AF Enthusiast
Thread starter
Join Date: Sep 2002
Posts: 1,385
Thanks: 0
Thanked 70 Times in 70 Posts
|
Re: Mazda MX-5s
Since last wip update on the MX-5s I have added a few to the collection; as you do. I have received the 3 ND's. Plans for these include a bright red with silver wheels (to match the NA, NB and NC above), even though a flat red is not a factory colour. Will also do one in "Soul Red" (have Tamiya's paint for this) with black BBS wheels; an attempt to match the Kuroi styling pack. I have also added an NB Mazdaspeed and 2 NB Lucky Star Itasha kits. Plans for these include a rally car and club-day track car.
I have also started the next project. This is based on Aoshima's NB kit with Garage Vary body kit. I am going to convert this to a race car, with livery inspired by the Le Mans winning 787B. Perhaps not the most original idea (Mazda themselves released an NA in this livery in the UK), but should look good on the shelf. I started with putting the body together. Aoshima helpfully removes the stock rear bumper, but the new bumper is not the neatest of fits. A little sanding and filler got it right though. The kit also includes a Mazdaspeed style half roll bar, temporarily fitted here.    I decided to create a full roll-cage. Started by designing and printing a brace for the rear. I think this looks okay, though clearly needs some filling and final prep before painting. Clears the roof okay.    I think I will do the rest of the roll-cage out of standard 2mm styrene rod. Having already built one of these, I know it will need a small reduction in ride height, but otherwise should be fairly straight forward from here. |
|
|
|
|
|
04-30-2018, 06:52 PM
|
#37 | |
|
AF Enthusiast
Thread starter
Join Date: Sep 2002
Posts: 1,385
Thanks: 0
Thanked 70 Times in 70 Posts
|
Re: Mazda MX-5s
While work on the 787B-inspired NB has stalled, I have been working on other projects including one of Tamiya's ND kits. This is an excellently engineered kit, with great fitment throughout. The rear "hubs" are located by ~7 rods from at least four other parts, all of which are glued to each other, and it all fits perfectly!
This model is again painted in Tamiya TS-49 Bright Red. I know this is not a Mazda factory colour, but it ties in with my MX-5 series. ND's could be optioned with silver wheels though. I also prefer the body coloured roll hoop over the windscreen, not the gloss black of the actual NDs. The chassis detailing is to my own preference, rather than the Tamiya instructions. I have some home-printed decals drying for the numberplates, then I can complete the final assembly. 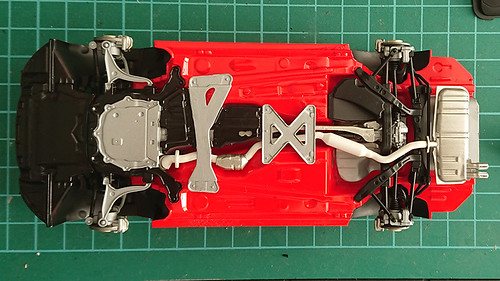 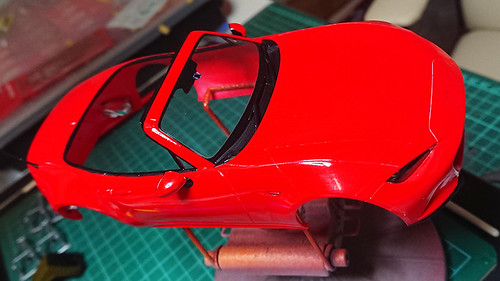 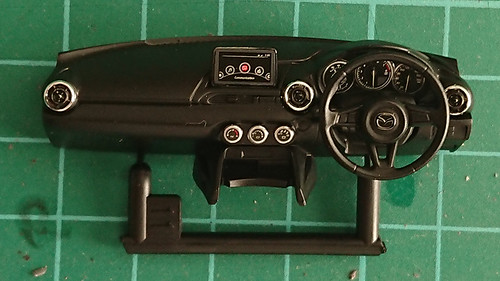 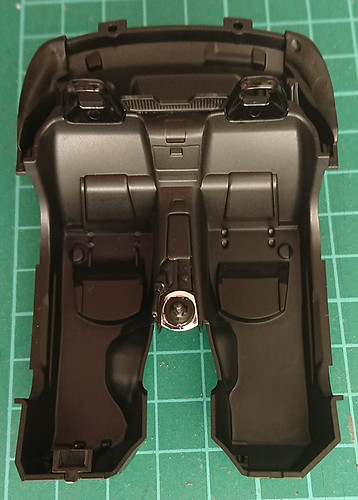 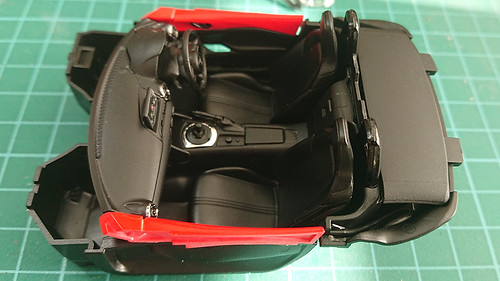 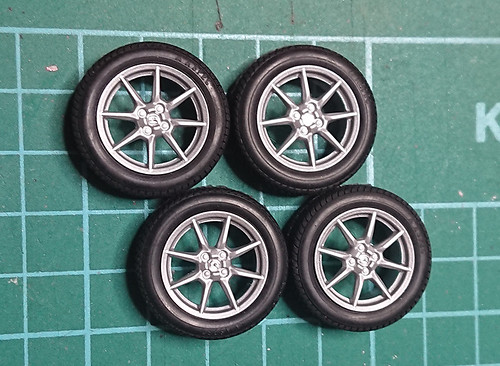 |
|
|
|
|
|
05-02-2018, 04:03 AM
|
#38 | |
|
AF Regular

Join Date: May 2010
Location: Balatonfured
Posts: 102
Thanks: 110
Thanked 8 Times in 8 Posts
|
Re: Mazda MX-5s
Good work, nice cars! I only miss the panel lines, I think they would be more realistic with that little effect.
__________________

|
|
|
|
|
|
09-25-2018, 01:59 AM
|
#39 | |
|
AF Enthusiast
Thread starter
Join Date: Sep 2002
Posts: 1,385
Thanks: 0
Thanked 70 Times in 70 Posts
|
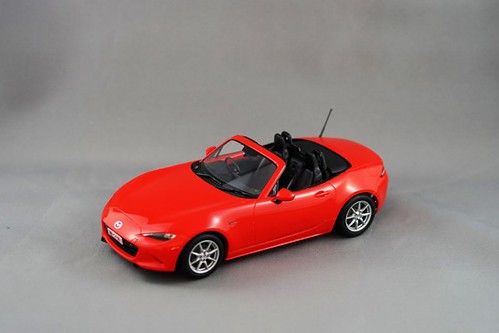
Re: Mazda MX-5s
The ND is "finished"; though taking photos I realised the centres of the exhaust tips have not been blackened. I also need to redo the numberplates as the ink ran during application. More photos in the Completed thread.
 |
|
|
|
|
|
09-25-2018, 11:05 AM
|
#40 | |
|
AF Moderator
 
Join Date: Sep 2002
Location: Fort Worth, Texas
Posts: 3,246
Thanks: 31
Thanked 314 Times in 241 Posts
|
Re: Mazda MX-5s
Very cool project.
__________________
The client is not always right. - Enzo Ferrari ItalianHorses.net    
|
|
|
|
|
|
09-25-2018, 07:11 PM
|
#41 | ||
|
AF Enthusiast
Thread starter
Join Date: Sep 2002
Posts: 1,385
Thanks: 0
Thanked 70 Times in 70 Posts
|
Re: Mazda MX-5s
Quote:
|
||
|
|
|
|
|
POST REPLY TO THIS THREAD |
 |
| Thread Tools | |
|
|


