|
|
|

|
|
| Search | Car Forums | Gallery | Articles | Helper | AF 350Z | IgorSushko.com | Corporate |
|
| Latest | 0 Rplys |
|
|||||||
| WIP - Motorsports Post topics for any "Work In Process" motorsports vehicles in this sub-forum. |
 |
 Show Printable Version | Show Printable Version |  Email this Page | Email this Page |  Subscribe to this Thread
|
|
|
Thread Tools |
 03-28-2016, 10:59 AM
|
#1 | |
|
AF Regular

Join Date: Nov 2007
Location: Thuringia/Germany
Posts: 485
Thanks: 1
Thanked 35 Times in 34 Posts
|
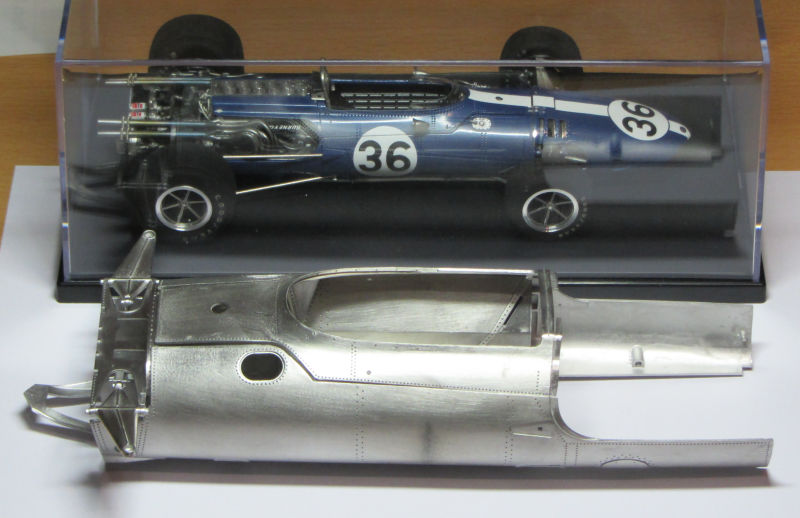
Eagle Weslake, MFH, 1/12
Hi
It's time for me to do a new WIP. I already built the MFH Eagle in 1/20 (http://www.marcosaupe.de/mod_Eagle_Weslake.html) but I could not resist when they released the 1/12 version a few weeks ago  A look in the box: 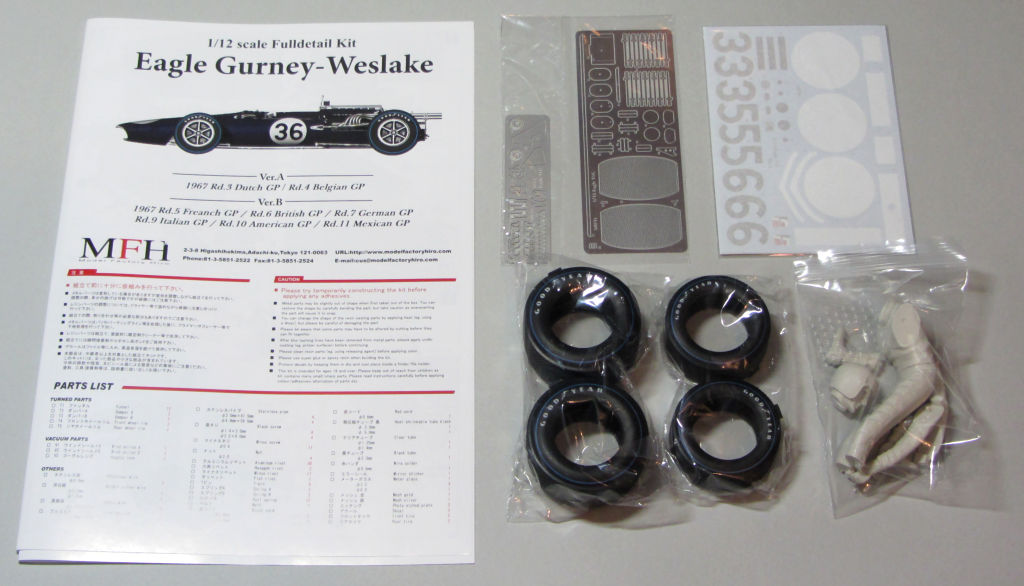 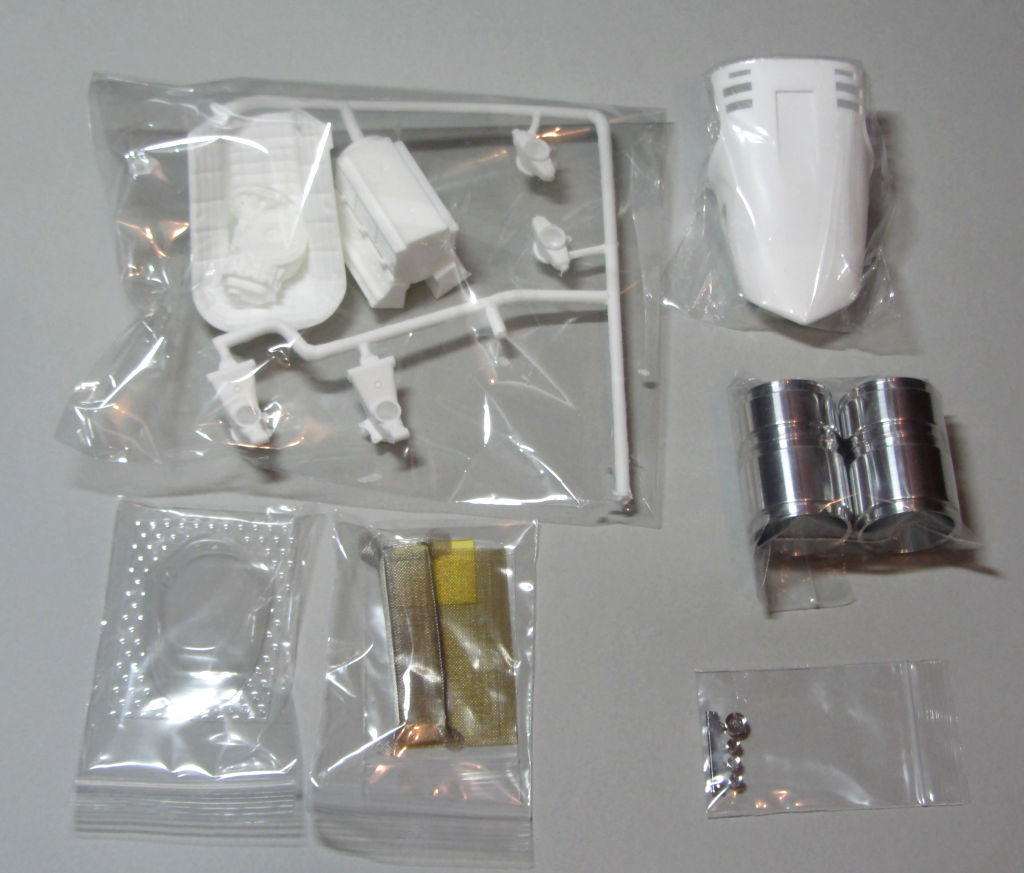 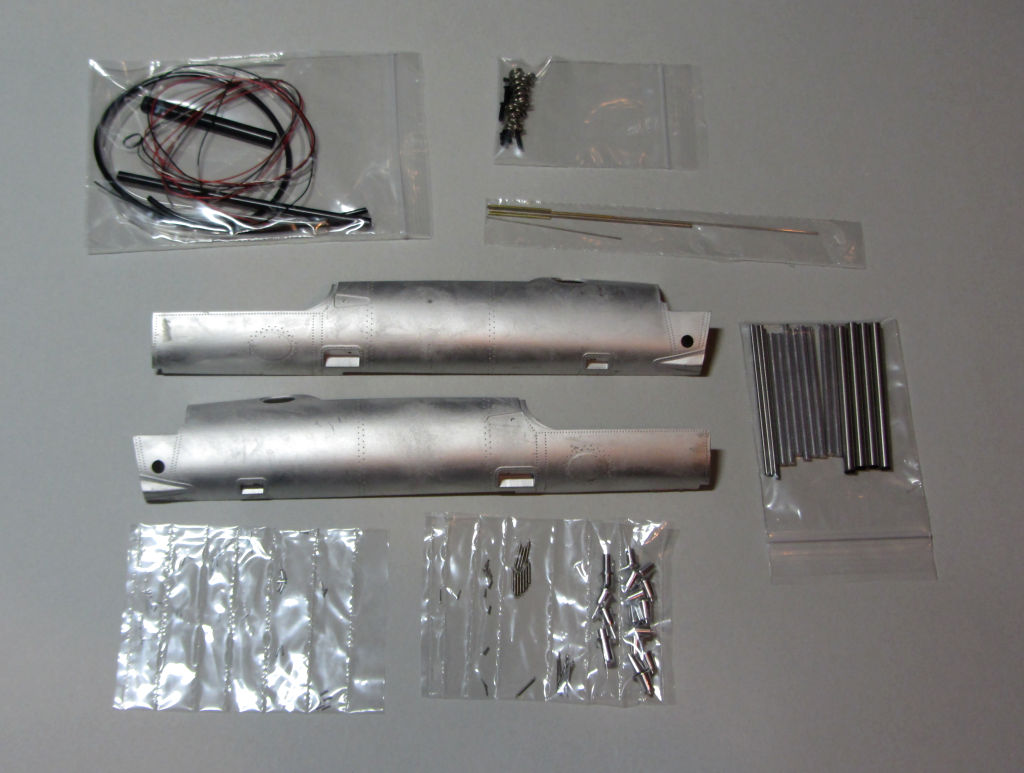 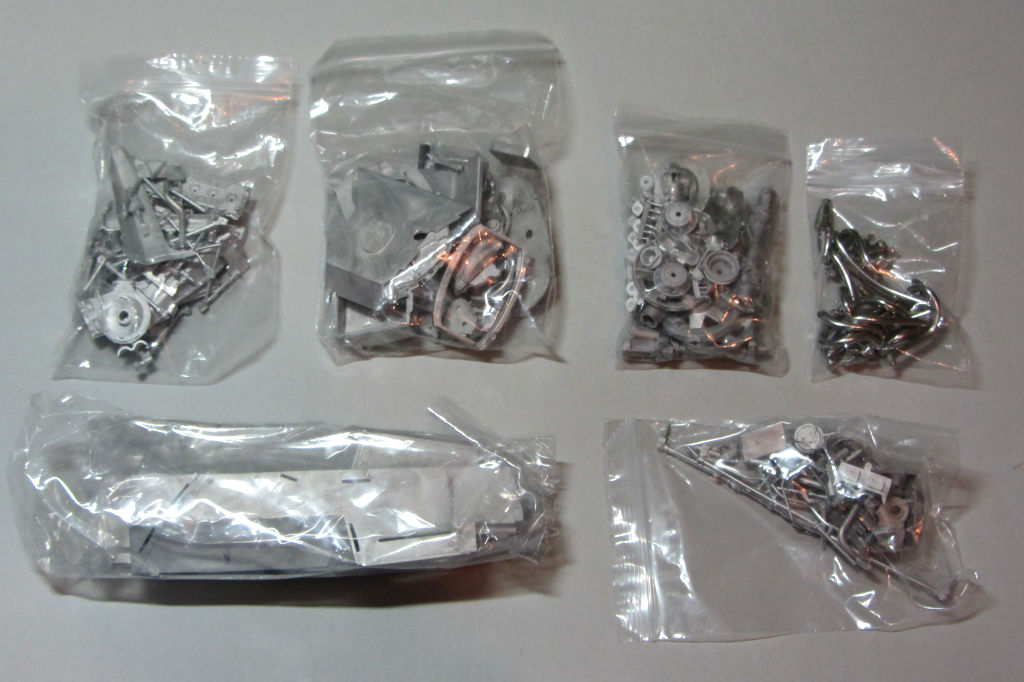 First step: sort the little metal parts in boxes. A few parts cannot be seen here since I have already started... 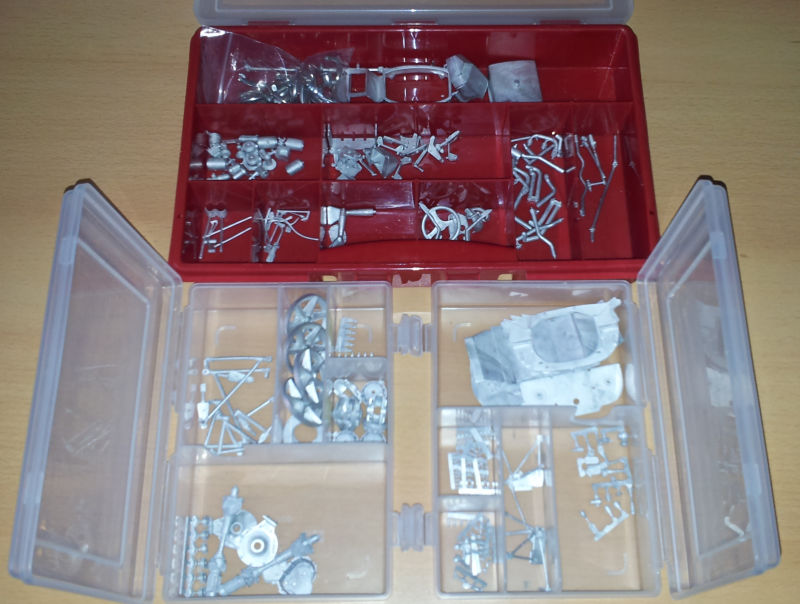 I started building with the nose. For the air intake on the sides, a metal part has to be glued in. I thinned the nose on the inside, so the front of the metal part is flush with the nose and you can see no seam after puttying with some instant glue 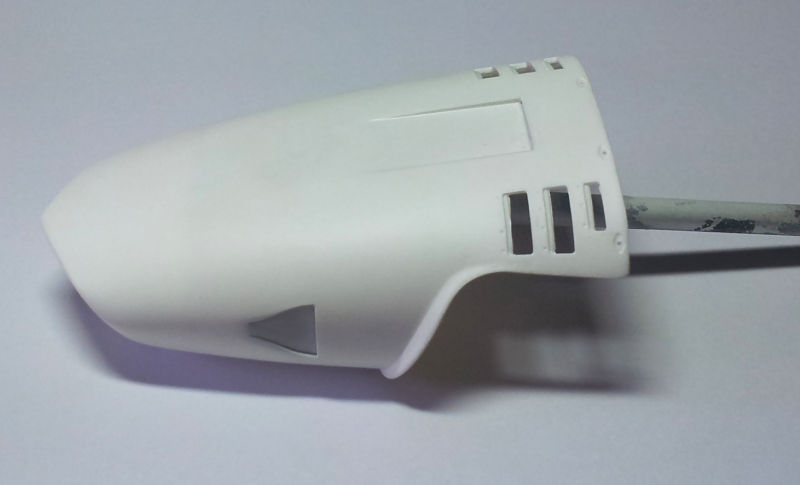 Here is a first view of the engine, I dryfitted some parts. The cam covers were painted black and I sanded the colour off the lettering. I don't prime those metal parts (except for the bodywork), since if some colour flakes off the edges it looks more real if you can see the metal, but no primer. The engine block is made from resin and painted with Alclad Aluminium + some Chrome, but you can hardly notice it's painted as the block is mostly covered by metal parts. As always with MFH kits, do not forget to drill out all the holes for holding pins; this will keep me busy for now... 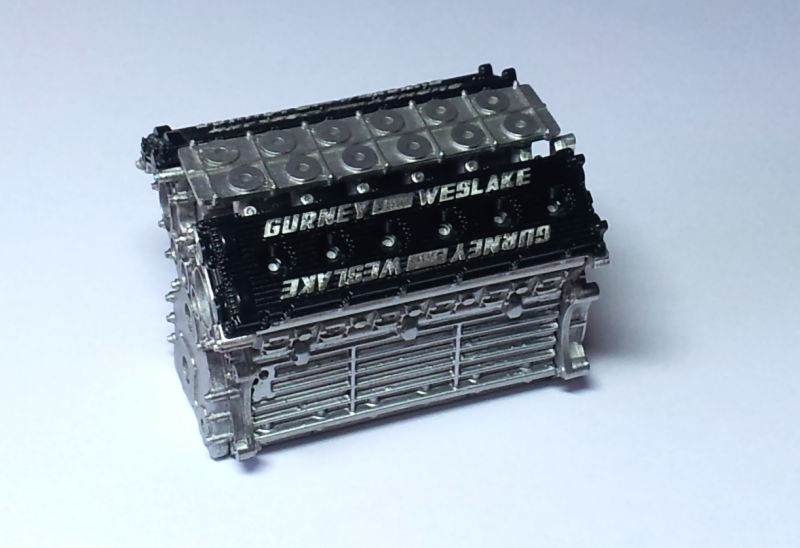
__________________
my racing car modelling gallery |
|

|

|
|
03-28-2016, 04:08 PM
|
#2 | |
|
AF Regular

Join Date: May 2007
Location: Andernos-les-Bains
Posts: 142
Thanks: 23
Thanked 5 Times in 5 Posts
|
Re: Eagle Weslake, MFH, 1/12
Hi,
Cooooool!! Great start!! I will follow it with interest! Pascal |
|
|
|
|
|
03-28-2016, 05:17 PM
|
#3 | |
|
AF Newbie
Join Date: Mar 2012
Location: Frisco, Texas
Posts: 51
Thanks: 5
Thanked 5 Times in 5 Posts
|
Re: Eagle Weslake, MFH, 1/12
Love it.
|
|
|
|
|
|
03-29-2016, 03:45 PM
|
#4 | |
|
AF Regular
Thread starter
Join Date: Nov 2007
Location: Thuringia/Germany
Posts: 485
Thanks: 1
Thanked 35 Times in 34 Posts
|
Re: Eagle Weslake, MFH, 1/12
I spent 2 hours building the fuel distributor, which consists of 32 parts including the pins to hold the fuel lines. Attaching those will also need some good nerves...
I already mentioned the lettering on the covers; I think it was better in 1/20 where it was made with an etched part, which left clean lettering after sanding off the colour. Here it's the metal of the cover, which is not fine enough to show the "3 Litres" in the middle clearly... 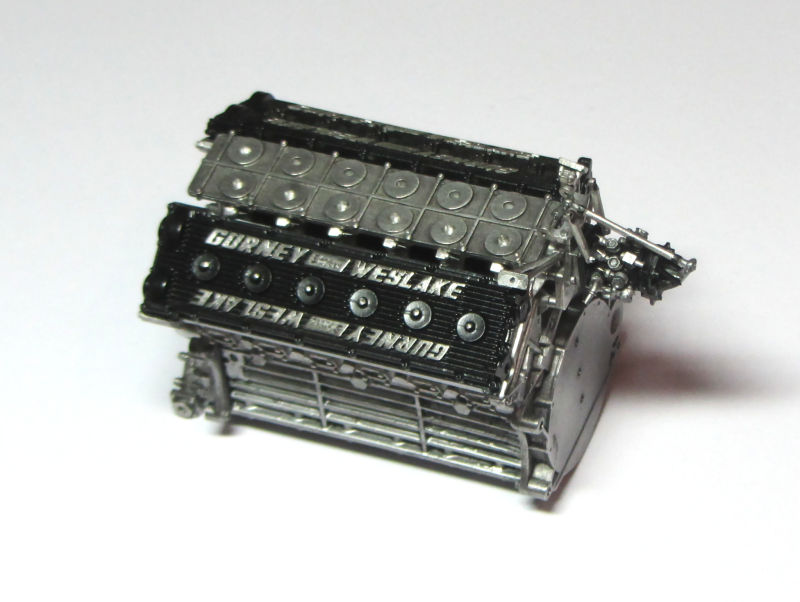
__________________
my racing car modelling gallery |
|
|
|
|
|
04-01-2016, 05:57 PM
|
#5 | |
|
AF Regular
Thread starter
Join Date: Nov 2007
Location: Thuringia/Germany
Posts: 485
Thanks: 1
Thanked 35 Times in 34 Posts
|
Re: Eagle Weslake, MFH, 1/12
Next step is the preparation of the chassis. The quality of the metal parts is not quite as good as those of the 1/20 kits I built. Sports with a rough surface, some places that have to be puttied, etc... but most of it is not visible anyway, as it will be hidden under paint or other parts like the seat, so not that big a problem with the Eagle. I tried some dry fitting - this is real important work, to get everything to fit together nicely, so you can later put the painted cowling on without damaging it. This will be tricky... It's also bit strange that the upper front suspension is one massive part. In the background the 1/20 kit, to compare sizes.
__________________
my racing car modelling gallery |
|
|
|
|
|
04-03-2016, 12:18 PM
|
#6 | |
|
AF Enthusiast

Join Date: Oct 2003
Location: Marietta, Georgia
Posts: 1,159
Thanks: 8
Thanked 32 Times in 29 Posts
|
Re: Eagle Weslake, MFH, 1/12
One of my all time favorite cars. Looking forward to seeing this one come together. The engine looks great so far.
__________________
Eric Cole Other Model Pictures Here: http://s5.photobucket.com/albums/y197/justdande/ |
|
|
|
|
|
04-10-2016, 10:38 AM
|
#7 | |
|
AF Regular
Thread starter
Join Date: Nov 2007
Location: Thuringia/Germany
Posts: 485
Thanks: 1
Thanked 35 Times in 34 Posts
|
Re: Eagle Weslake, MFH, 1/12
It's not that I didn't work on the kit in the last days, there was just not that much to see
 To continue with the previous step, I spent a few modeling evenings fitting the cowling parts; sanding, puttying, sanding, bending metal parts in place, to have them all fit together nicely at the end. The main part of the monocoque I had glued together for this, the other parts are just dryfitted, but they are all needed to make the parts fit with each other. Glueing the cowling in place will probably not work with light and careful handling alone, so I'll spend the next days with the paintjob, to give it enough time to dry properly. 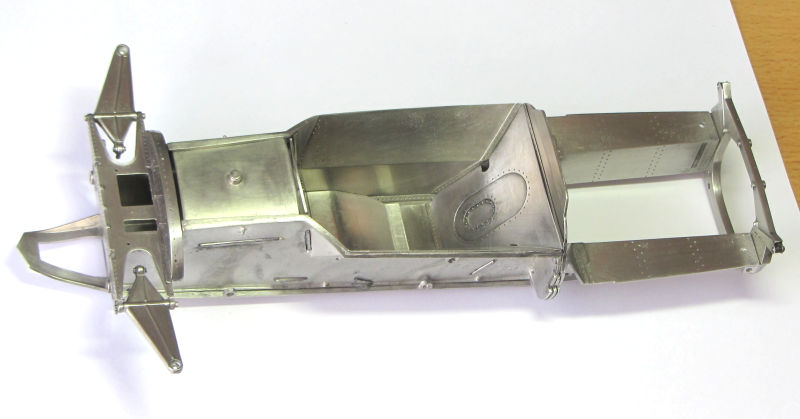 OK, I had to do at least some little thing to see some progress, so I glued on the intake trumpets and the ignition wire supports. 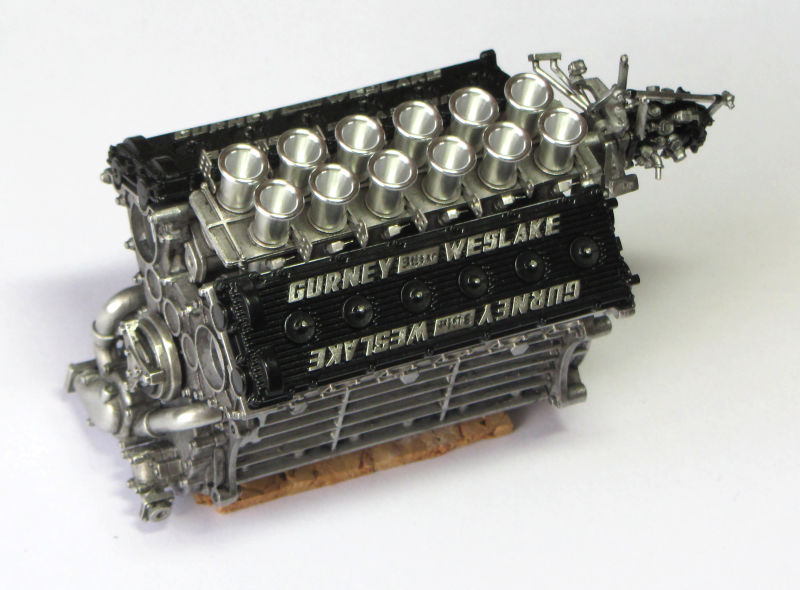 Does someone have a nice picture of the right side of the engine without cover? I'm looking for where the throttle linkage cable is supposed to connect to...
__________________
my racing car modelling gallery |
|
|
|
|
|
04-12-2016, 07:59 PM
|
#8 | |
|
AF Modelrater
 Join Date: Jul 2002
Location: Forks Township, Pennsylvania
Posts: 12,894
Thanks: 18
Thanked 63 Times in 56 Posts
|
Re: Eagle Weslake, MFH, 1/12
Engine looks fantastic - I look forward to seeing this build progress
__________________
|
|
|
|
|
|
04-16-2016, 08:24 AM
|
#9 | |
|
AF Regular
Thread starter
Join Date: Nov 2007
Location: Thuringia/Germany
Posts: 485
Thanks: 1
Thanked 35 Times in 34 Posts
|
Re: Eagle Weslake, MFH, 1/12
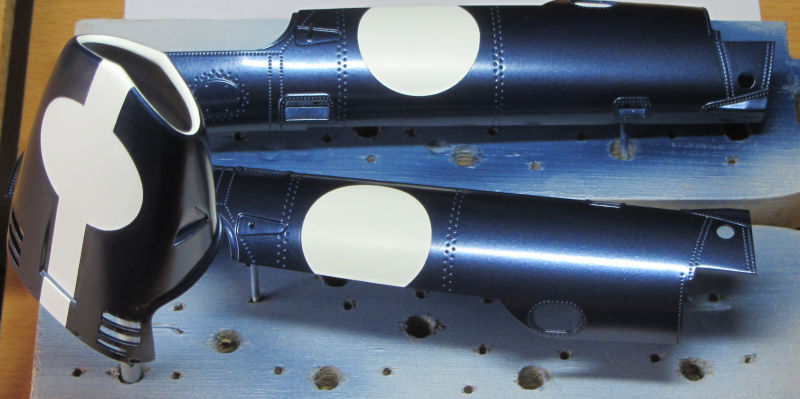
I decided to paint the white areas (i.e. mask them and paint the blue around), and here is the result: it went fairly well, I only have to redo the white stripe on the cockpit surround (which in theory was the easiest part) and then do some retouching, like the blue gap between stripe and number roundel on the nose which was to complicated for me to do in one go. The 1/20 kit did have all white decals included twice, the 1/12 does not, so I could not just mask the ring on the nose and use doubled up decals for the rest, which would have been my preferred option. Caution: I used Zero Paints Eagle blue, and the colour seems to be thinner than usual and not as opaque, so you have to airbrush several thin layers, which makes the paintjob with the masking a bit more difficult.
__________________
my racing car modelling gallery |
|
|
|
|
|
04-16-2016, 08:36 AM
|
#10 | ||
|
AF Newbie

Join Date: Jan 2011
Location: dumbledore
Posts: 60
Thanks: 2
Thanked 3 Times in 3 Posts
|
Re: Eagle Weslake, MFH, 1/12
Quote:
What's your opinion on the kit otherwise? Did you notice any difference in colour due to the different base materials? But anyway, with the Euro dropping like a rock vs the Yen at this time I've put all my MFH orders on hold  . . |
||
|
|
|
|
04-16-2016, 09:10 AM
|
#11 | |
|
AF Regular
Thread starter
Join Date: Nov 2007
Location: Thuringia/Germany
Posts: 485
Thanks: 1
Thanked 35 Times in 34 Posts
|
Re: Eagle Weslake, MFH, 1/12
The left sheet on your Pic is for the B Version of the Kit, the right sheet is for the A Version, which I have. So the sheet is complete for each version, but you don't get both sheets.
・K509 Ver.A : 1967 Rd.3 Dutch GP / Rd.4 Belgian GP ・K510 Ver.B : 1967 Rd.5 French GP / Rd.6 British GP / Rd.7 German GP / Rd.9 Italian GP / Rd.10 U.S. GP / Rd.11 Mexican GP However, with the 1/20 kit, the decal sheet had all white areas included twice, see the pic on this link: http://www.1999.co.jp/eng/image/10179131n/40/1# You have to put several layers of white primer on the metal parts anyway, if you want to paint the roundels, and after those layers, you will not see any difference in colour. Casting is a bit rougher than on the 1/20 MFH kits I have, but otherwise a fine kit.
__________________
my racing car modelling gallery |
|
|
|
|
|
04-16-2016, 09:32 PM
|
#12 | |
|
AF Regular
Join Date: Jan 2012
Location: douglas
Posts: 102
Thanks: 0
Thanked 16 Times in 16 Posts
|
Re: Eagle Weslake, MFH, 1/12
That blue looks nice though. Possibly the most realistic?
|
|
|
|
|
|
04-17-2016, 02:19 PM
|
#13 | |
|
AF Regular
Thread starter
Join Date: Nov 2007
Location: Thuringia/Germany
Posts: 485
Thanks: 1
Thanked 35 Times in 34 Posts
|
Re: Eagle Weslake, MFH, 1/12
The colour of the Zero Paints Eagle Blue seems to be spot on, but except for the properties of the colour I already mentioned, there is another massive problem: the colour seems to react with itself when you spray a new layer on top of dried colour. I refined the roundel on the nose and repaired the cockpit surround, when immediately after the colour started to dry it startet to grey out whereever I had sprayed. Adding another thin coat helped only at a few places. I had not had this happen with Zero Basecoats before. Now I have to think on how to repair those spots, or whether I either a) remove the paint from the affected parts and do them again in just one session or b) remove the paint from all parts and mix the colour myself...
Any ideas, anyone? 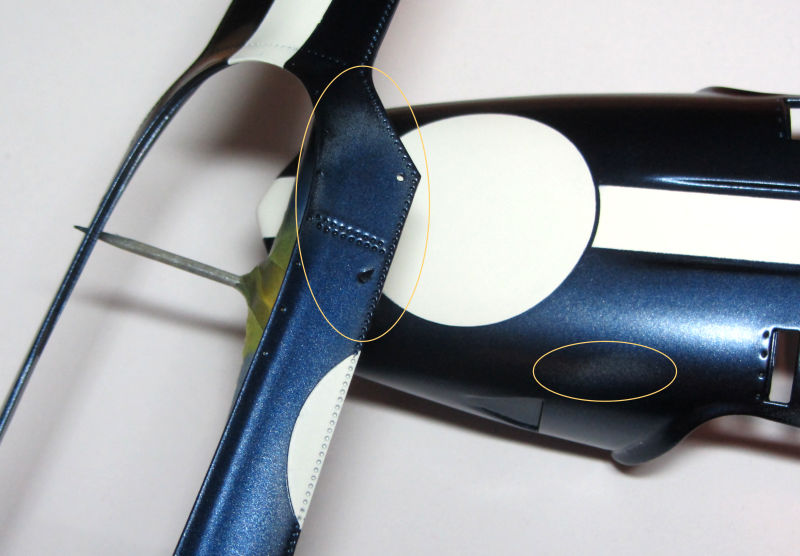
__________________
my racing car modelling gallery |
|
|
|
|
|
04-21-2016, 03:22 PM
|
#14 | |
|
AF Regular
Thread starter
Join Date: Nov 2007
Location: Thuringia/Germany
Posts: 485
Thanks: 1
Thanked 35 Times in 34 Posts
|
Re: Eagle Weslake, MFH, 1/12
To find the cause for the paint problem, I treated the 4 affected parts differently today, also using the warmer weather today to be sure the colder temps last week were not the problem: I stripped the engine cowlings, primed and painted again and it was good, while the greying got worse on cockpit and nose with each layer. The colour really does not like to be painted over itself... therefore I now also stripped nose and cockpit, which is depressing if you had been just a few mm² away from getting it done. To cheer myself up I will probably also do some work on the engine next...
__________________
my racing car modelling gallery |
|
|
|
|
|
04-21-2016, 09:58 PM
|
#15 | |
|
AF Enthusiast

Join Date: Sep 2002
Posts: 1,473
Thanks: 1
Thanked 25 Times in 23 Posts
|
Re: Eagle Weslake, MFH, 1/12
Re you sure that humidity has not been part of the problem?
|
|
|
|
|
|
|
POST REPLY TO THIS THREAD |
 |
|
|


