|
|
|

|
|
| Search | Car Forums | Gallery | Articles | Helper | AF 350Z | IgorSushko.com | Corporate |
|
| Latest | 0 Rplys |
|
|||||||
| WIP - Motorsports Post topics for any "Work In Process" motorsports vehicles in this sub-forum. |
 |
 Show Printable Version | Show Printable Version |  Email this Page | Email this Page |  Subscribe to this Thread
|
|
|
Thread Tools |
 04-21-2015, 02:09 PM
|
#1 | |
|
AF Enthusiast
Join Date: Aug 2005
Location: where "sky grey" is a colour
Posts: 822
Thanks: 3
Thanked 32 Times in 29 Posts
|
Audi R18 LeMans 2014 1:24
Hi everybody
Its been a long time since i posted anything in the way of build reports. Since becoming a father and moving to a new place I had a lot of other stuff to do and modeling time has been scarce. After setting up a new workspace it was finally time to get back to building though. To get back into the groove, instead of going straight back to the paused Leyton House, I decided to build something else first. My choice fell to the Studio27 Audi R18, last years LeMans winner. I decided to get this model last year when at the 24h race. Together with some modeling friends I visited Profil24, who are based in the town of LeMans and always have an open house on the Friday. It was an enjoyable visit and I ended up buying the 2011 Audi R18 ( at a bit of a discount :-) the winning car from the last race I had attended. Well, the 2014 Audi R18 won that weekend. I was happy about that, because it was the P1 car I liked the best for its looks.  So my plan was born, to build all the winning cars of the 24h races I attended. Including the 2010 winning R15 Plus, thats an all Audi affair so far. During our visit, Jean-Philippe of Profil24 had made it clear though, that he wouldnt be doing the 2014 Audi or the Porsche 919. Knowing, the Studio27 would be the only choice I got one, despite my dislike of their kits that has been growing over the years. I had a couple of their F1 kits back when they were the only choice but since then got rid of all but one and replaced them with infinitely better Hiros. Studio27 had and has a tendency to not get the shapes and proportions of their subjects right, which is just annoying, given their kit prices. On top of that i think the kits are often not well thought through in terms of parts breakdown and buildability and the quality of the parts is not impressive. Sounds harsh? Well, ill rant some more throughout this build :-) Since the F1 kits ten years ago Studio27 discovered CAD, but not in a Hiro kind of way. It means the mistakes are now symmetrical .mostly. You could see that even from the screenshots they posted prior to the release. In essence you get a kit that represents the real car all right from half a meter away, but fails close inspection in most respects. I already found the first mistake on the decal sheet as well, before even putting them on the body and the instructions are as pathetic as ever. So I was set for a quick curbside build. A kit that needs some serious sanding but wont lead to endless fiddling with tiny details ( as on the Leyton House ). So lets get to the parts. This is the main body on the undertray as they come in the box. 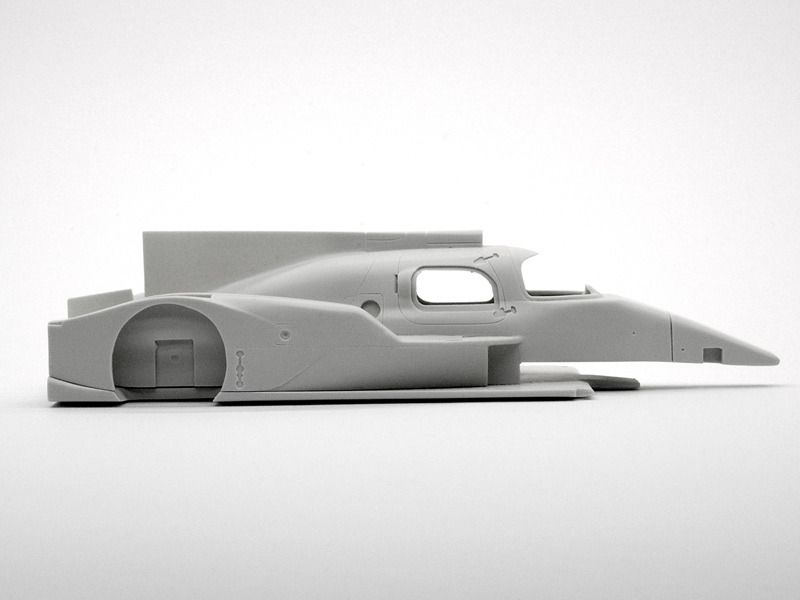 Some unpleasant mold lines and shallow shutlines that need to be cleaned and deepened. It seems their CAD modeler could learn a bit or two from the guys at MFH ( or they didnt give him enough time to do his job properly). The model was apparently printed in less than stellar resolution and finished by hand. Some details even seemed to be late add-ons made with putty. Just look at the distorted rear wheel arch. A properly printed CAD model doesnt come out like that This is the other side of the body with work started. 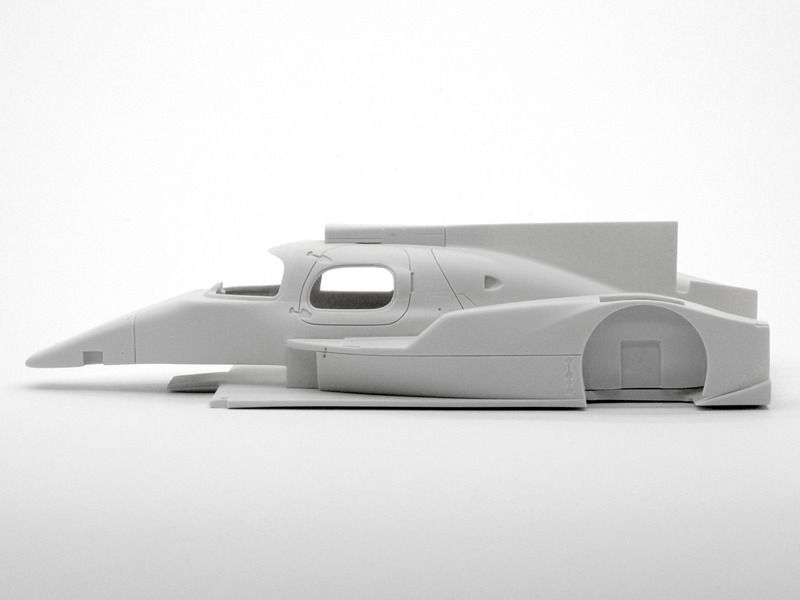 The wheel arch is now more like it should be and various shutlines have been engraved. I also opened the side windows to a more realistic level and improved their shape. Every single surface was sanded ( o.k Tamiya kit parts benefit from that as well ) but here they visibly needed treatment. Some shapes were wrong or details omitted. The rear fenders were too narrow and the leading edges had the wrong angle and the shape was too edgy. I filed and sanded those quite a bit but left the overall width alone. One detail I changed was the roof air intake. The kit provides a white metal part to glue to the roof.  The roof shape in that area was missing a very visible detail though. On the real one theres a massive aero dent around the intake.  I tried to carve that in the kit roof and added a resin copy of the kit intake. That was easier to hollow out and glue to the body than white metal. 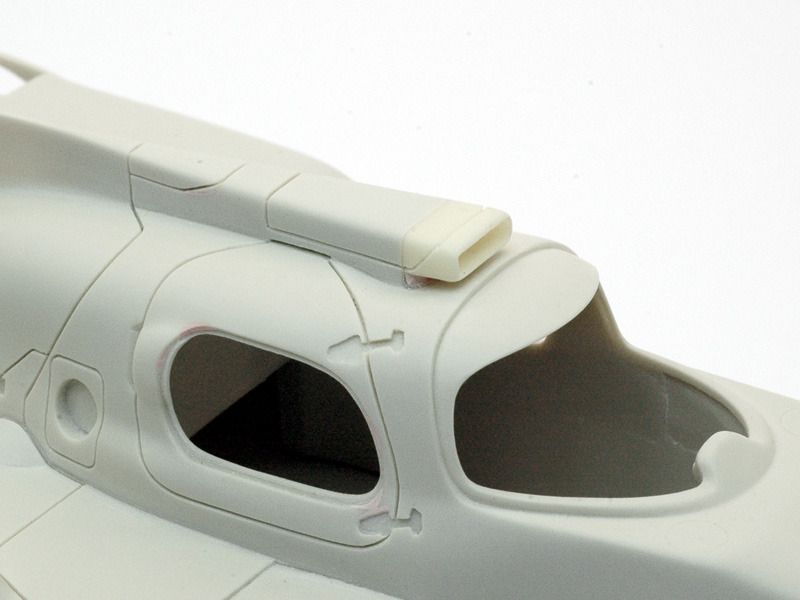 What helped the dent carving, was the material thickness of the main body part. Just look at the side window and compare it to the original thickness two pictures earlier. Any tank kit would be jealous of these walls :-) The really likeable thing about the kit is the resin. Its very good to work with. Its hard but still nice to sand and the grey colour shows the surface details very well. Much better than the common yellowish type I have, to make my parts. If only the parts werent made with so much of it Heres another view to highlight what I mean: 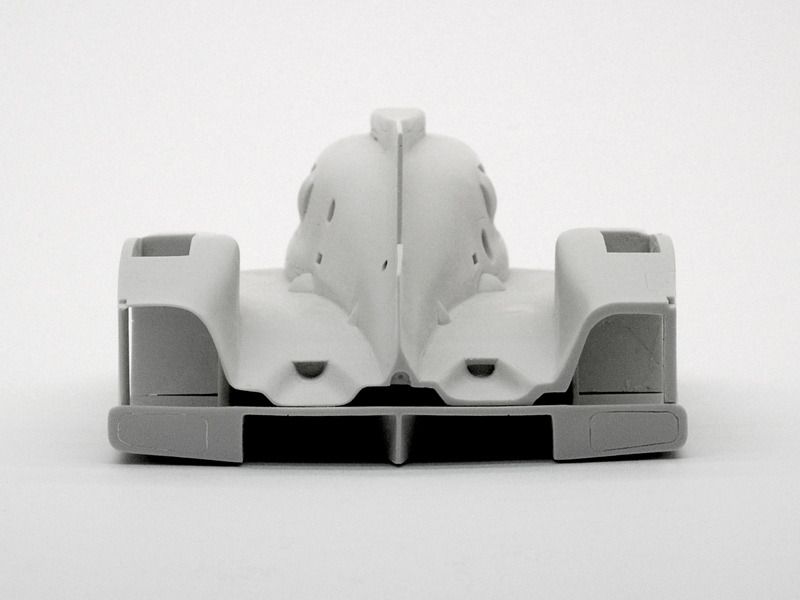 You can see where I started thinning the trailing edge of the bodywork. On the left is my version, on the right its still the untreated kit part. Still lots to do... So much for the start. My plan was, to get this one done by LeMans 2015, but progress will most likely be rather slow. Might get tight :-) |
|

|

|
|
04-21-2015, 03:11 PM
|
#2 | |
|
Blarg! Wort Wort Wort!
Join Date: Mar 2006
Location: Quezon City
Posts: 2,120
Thanks: 64
Thanked 101 Times in 100 Posts
|
Re: Audi R18 LeMans 2014 1:24
wow. no kidding with the "looks like a lot of work" there. looking forward to your improving the kit!
__________________
olly olly oxen free |
|
|
|
|
|
04-21-2015, 06:58 PM
|
#3 | |
|
AF Enthusiast
Join Date: Mar 2009
Location: Rio de Janeiro, Brazil
Posts: 1,209
Thanks: 6
Thanked 144 Times in 136 Posts
|
Re: Audi R18 LeMans 2014 1:24
Nice start!
__________________
https://www.instagram.com/denilsonvm_modelcars/ |
|
|
|
|
|
04-21-2015, 07:27 PM
|
#4 | |
|
AF Enthusiast

Join Date: Oct 2008
Location: Auckland
Posts: 2,761
Thanks: 51
Thanked 136 Times in 134 Posts
|
Re: Audi R18 LeMans 2014 1:24
Great work so far! Looking forward to seeing you wrestle this one over the line!
& Congrats on the family! Yes modeling time does significantly decrease with the arrival of little people!
__________________
 It's Not wheather you Win or Lose, its how you look while you play the Game |
|
|
|
|
|
04-22-2015, 06:19 PM
|
#5 | |
|
AF Newbie
Join Date: Jun 2010
Location: Tampa, Florida
Posts: 53
Thanks: 26
Thanked 8 Times in 8 Posts
|
Re: Audi R18 LeMans 2014 1:24
Jaykay - Very nice work thinning the body panel edges! Could you share your technique to get such a nice consistent edge? Thanks, Chuck
|
|
|
|
|
|
04-23-2015, 08:02 AM
|
#6 | ||
|
AF Enthusiast
Thread starter
Join Date: Aug 2005
Location: where "sky grey" is a colour
Posts: 822
Thanks: 3
Thanked 32 Times in 29 Posts
|
Re: Audi R18 LeMans 2014 1:24
Thanks everyone!
Quote:
I don't really have an elaborate technique. I start with the motor tool ( Dremel et al ) using various milling heads and flexible sanding discs where possible. Then i have a collection of fine files to do more delicate or hard to reach stuff. A lot is then done with 360 grit sandpaper wrapped around a rubber sanding pad. Finally i use a 1500grit micromesh pad ( not as fine as 1500grit sandpaper ). The thickness is only really visible at the edge and that can be measured with a caliper. I don't do that all the time though. It's not that difficult to keep an edge that looks steady when sanding. |
||
|
|
|
| The Following User Says Thank You to jaykay640 For This Useful Post: |
sprite46cfk (04-23-2015)
|
|
04-25-2015, 03:39 PM
|
#7 | |
|
'wannabe race driver'

Join Date: Aug 2008
Location: BAYERN
Posts: 258
Thanks: 81
Thanked 25 Times in 19 Posts
|
Re: Audi R18 LeMans 2014 1:24
Jaykay, FINALLY.......a new project of yours. Thats my kind of entertainment, great fun and motivation to look at. I like your style and meticulousness a lot, also your way of preparation and approach towards your subjects. I could follow hours and hours. Take your time, make this the best LMP1-miniature and a reference build. ....and, even more important, congrats and all the best wishes for your family and your new and challenging role as a father!!! Schön, wieder was von dir zu sehen / lesen!!! Alles Gute für dich und deine kleine Familie, Kinder sind unsere einzige Verbindung in die Zukunft, Glückwunsch! yours jochen
|
|
|
|
|
|
04-26-2015, 12:53 AM
|
#8 | |
|
AF Enthusiast

Join Date: Feb 2006
Location: Melbourne
Posts: 1,057
Thanks: 5
Thanked 26 Times in 26 Posts
|
Re: Audi R18 LeMans 2014 1:24
I am so looking forward to seeing more of this one, great start.
|
|
|
|
|
|
04-29-2015, 04:13 PM
|
#9 | |
|
AF Enthusiast
Thread starter
Join Date: Aug 2005
Location: where "sky grey" is a colour
Posts: 822
Thanks: 3
Thanked 32 Times in 29 Posts
|
Re: Audi R18 LeMans 2014 1:24
I have some more progress to show.
After thinning all the visible areas of the rear bodywork I had to fix the next problem. When seen from above, the trailing edge wasn’t straight as it should be and didn’t match the undertray/diffusor. 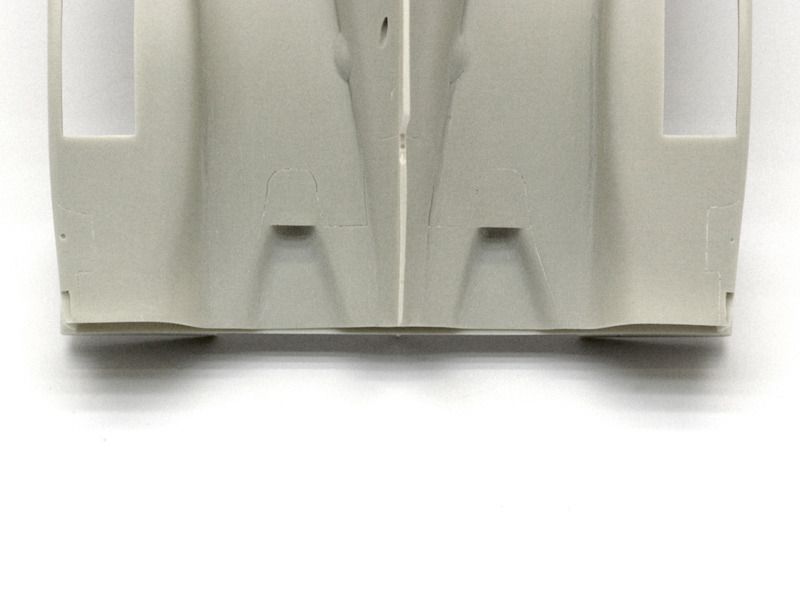 To change that, I put body + floor on my mill and machined the rear end to one level. After that I also thinned the diffusor deck and straightened and cleaned all the surfaces. This was followed by more shutline engraving ( and I still have more to do…). 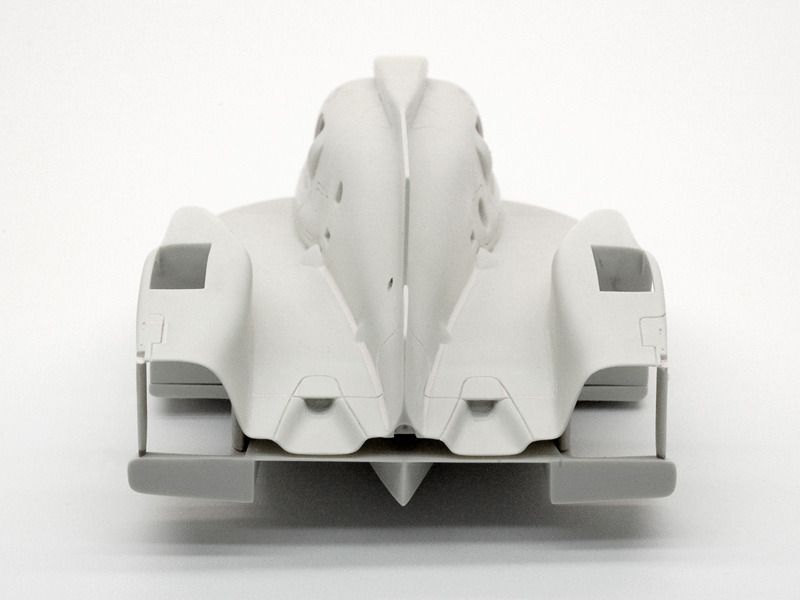 Yet another area that needed attention badly ( no, not that wobbly wheel arch again…) were the „cheese wedges“. Those are the triangular bits of the undertray behind the rear wheels. Studio27’s interpretations were not quite triangular: 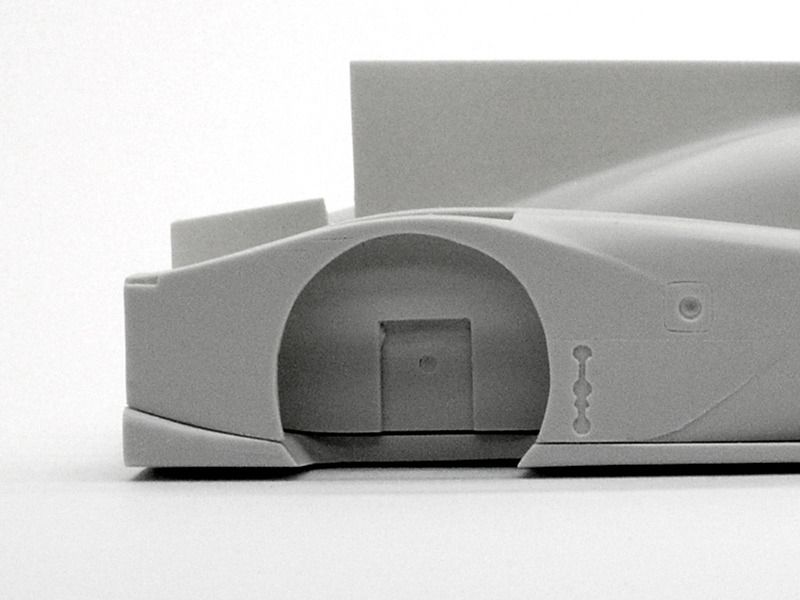 For comparison, here are the real ones ( slightly hidden by mechanic :-): 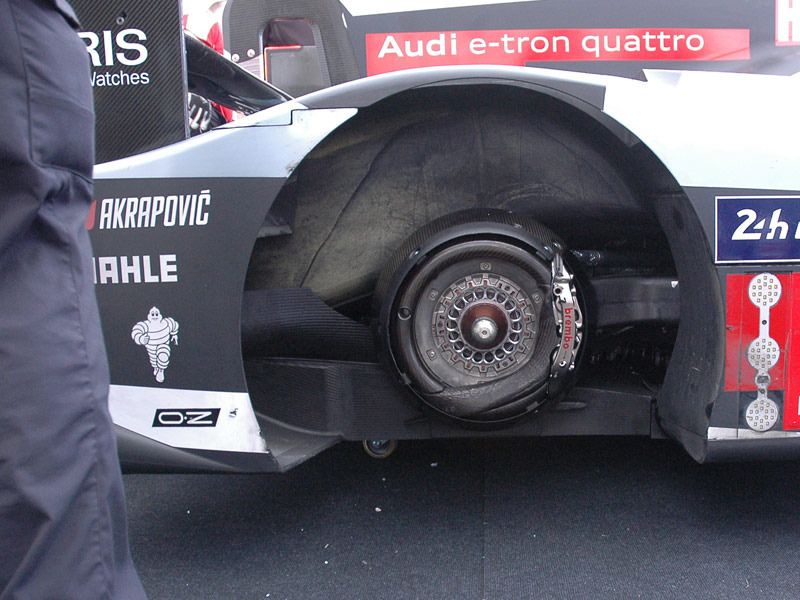 After turning them into actual wedges, I had to extend the bodywork: 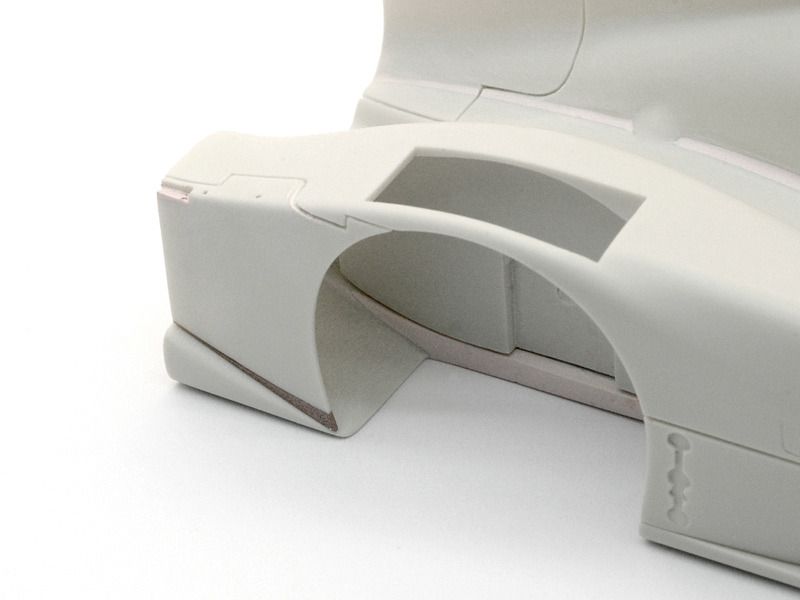 They are still not quite like the original parts. That’s because the parts separation on the real car is different to the kit. So far I don‘t want to change that though, to be honest. I hope I can cheat around it later on. |
|
|
|
|
|
04-30-2015, 11:58 AM
|
#10 | |
|
Blarg! Wort Wort Wort!
Join Date: Mar 2006
Location: Quezon City
Posts: 2,120
Thanks: 64
Thanked 101 Times in 100 Posts
|
Re: Audi R18 LeMans 2014 1:24
what did you use to extend the bodywork down to the wedges?
__________________
olly olly oxen free |
|
|
|
|
|
05-05-2015, 03:36 PM
|
#11 | ||
|
AF Enthusiast
Thread starter
Join Date: Aug 2005
Location: where "sky grey" is a colour
Posts: 822
Thanks: 3
Thanked 32 Times in 29 Posts
|
Re: Audi R18 LeMans 2014 1:24
Quote:
Heres also some more news from the carving and sanding department. After spending a lot of time, sanding and carving away at the main body and the rear end of the car, it was also time to do something about the front end. The fenders come as extra pieces. Heres the untreated right one. Lovely quality, eh!? :-) 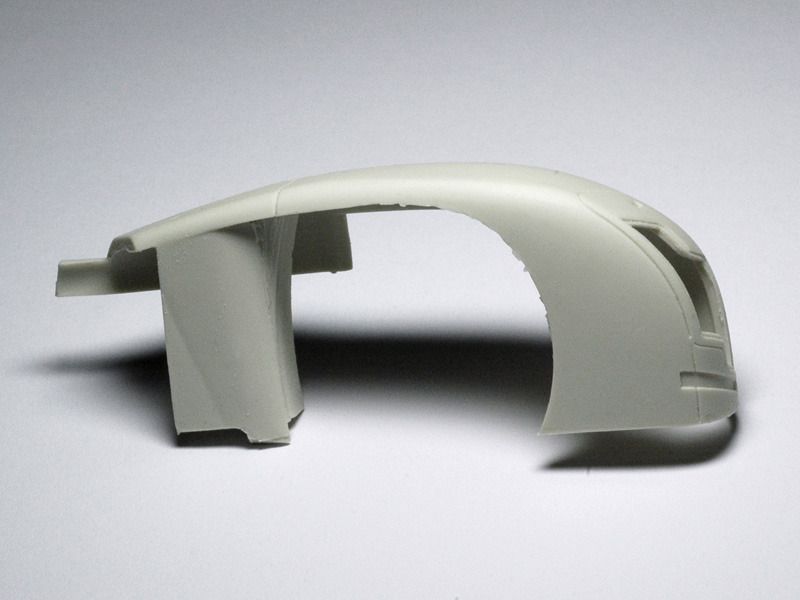 After a good deal of sanding heres the left one, with surfaces smoothed, edges cleaned and thinned and the shutlines engraved. 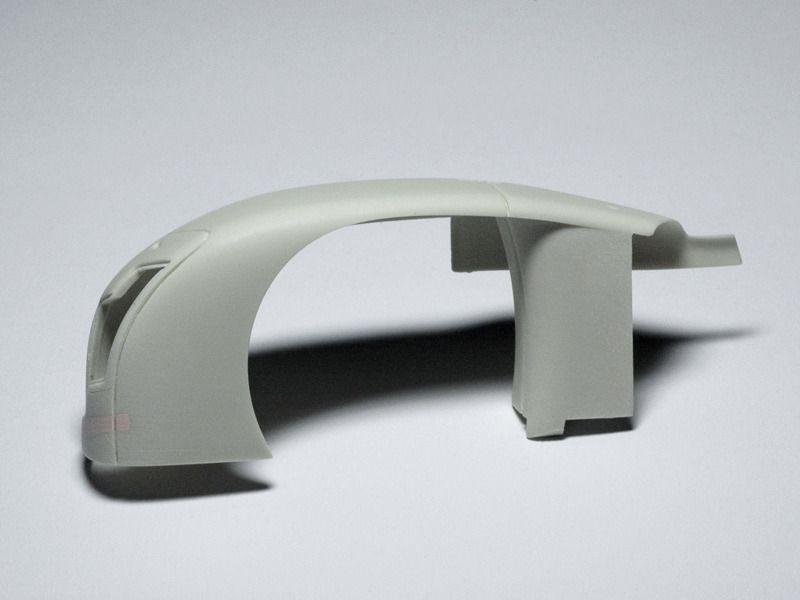 Again, the untreated part, in front view: 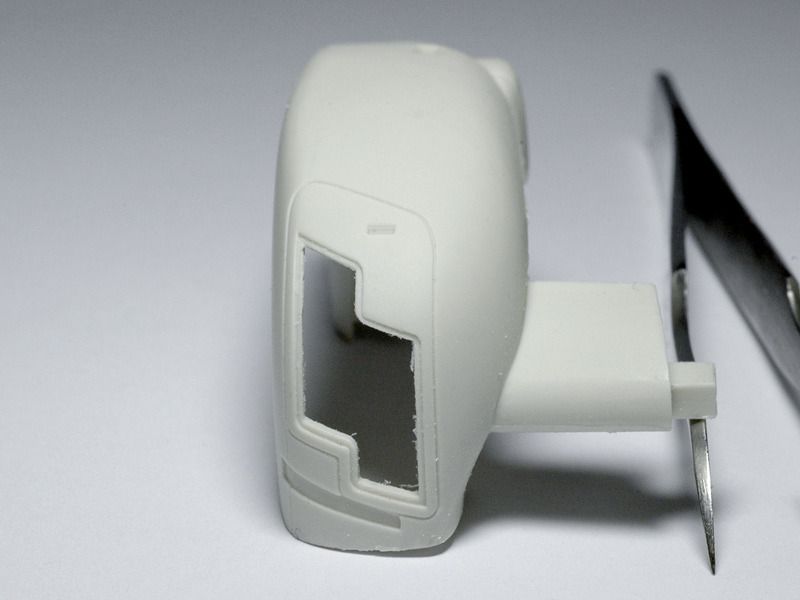 A real one for comparison: 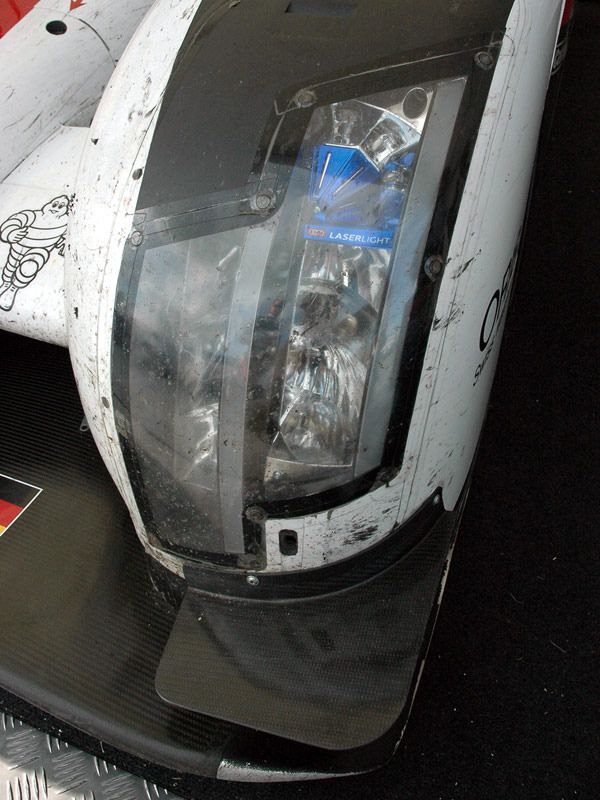 and the sanded left one again. 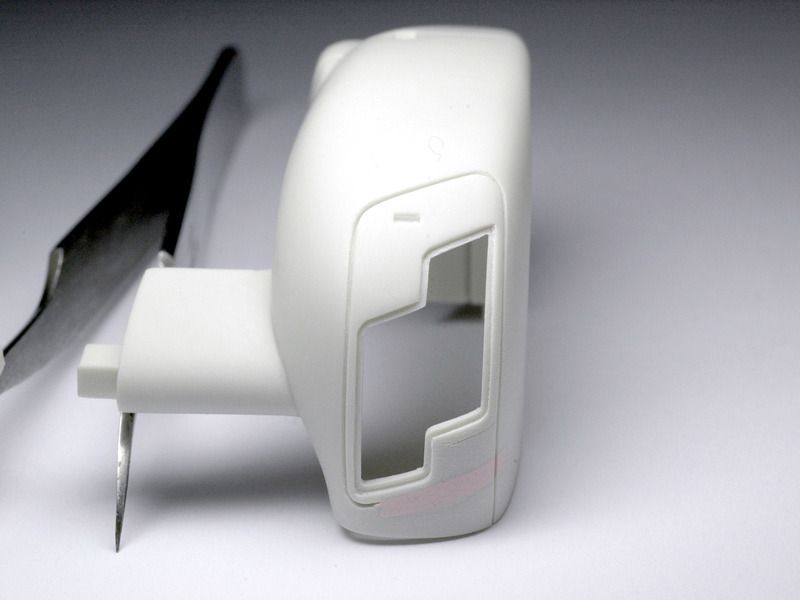 Below the headlight opening Studio27 made massive holes/recesses to place the ( etched ) front flip up spoiler tabs. I filled those, because as you can see from the real one, that would look quite wrong. For another laugh at material thickness, heres a shot of the right front fenders trailing edge as it comes in the box. Very aerodynamic . 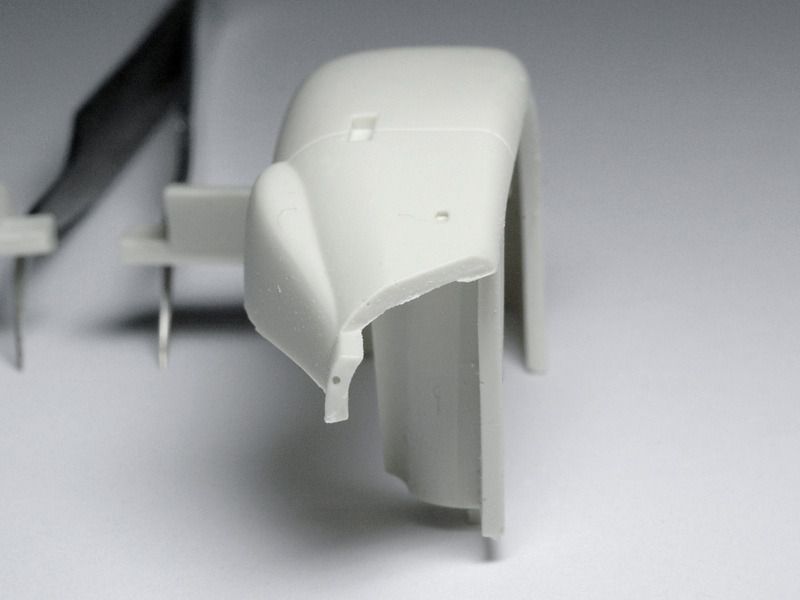 and here the left one, again after thinning and cleaning. 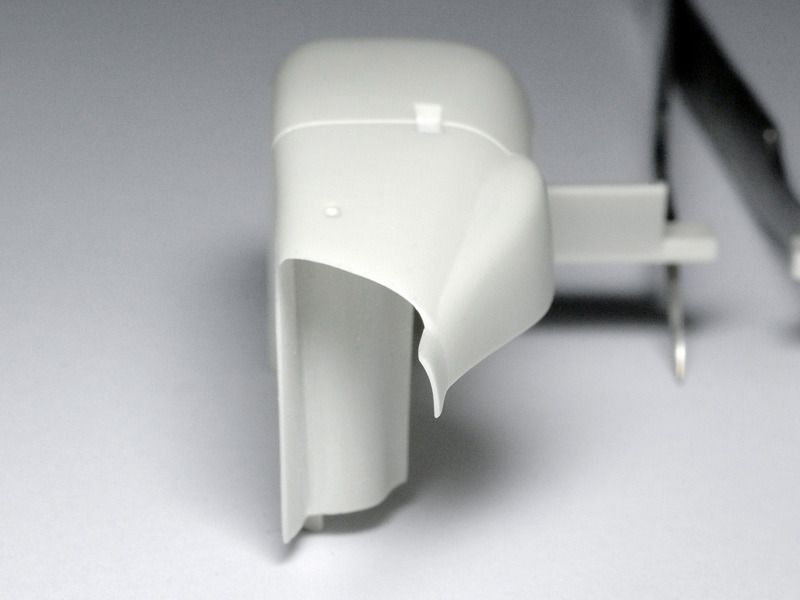 Still lots to do. More later :-) |
||
|
|
|
|
05-06-2015, 09:26 AM
|
#12 | |
|
Blarg! Wort Wort Wort!
Join Date: Mar 2006
Location: Quezon City
Posts: 2,120
Thanks: 64
Thanked 101 Times in 100 Posts
|
Re: Audi R18 LeMans 2014 1:24
thanks! wow, a ton more of work. but it's all turning out great

__________________
olly olly oxen free |
|
|
|
|
|
05-06-2015, 01:09 PM
|
#13 | |
|
ItaloSvensk

Join Date: Mar 2009
Location: Marstrand
Posts: 3,383
Thanks: 1,077
Thanked 296 Times in 270 Posts
|
Re: Audi R18 LeMans 2014 1:24
awesome work as usual Jay. the model has some problems but you manage it great.
__________________
Paolo - LoveGT40 Modelworks website www.alsoldatino.com my YT channel : https://www.youtube.com/channel/UCIp..._as=subscriber FB: https://www.facebook.com/alsoldatino |
|
|
|
|
|
05-14-2015, 06:12 AM
|
#14 | |
|
AF Enthusiast
Thread starter
Join Date: Aug 2005
Location: where "sky grey" is a colour
Posts: 822
Thanks: 3
Thanked 32 Times in 29 Posts
|
Re: Audi R18 LeMans 2014 1:24
To get on with the front end, it was time to attach the fenders to the body and undertray.
Studio27 ( in their defence, like many other resin kit manufacturers ) supply screws for that purpose ( and glue has to do the rest ). 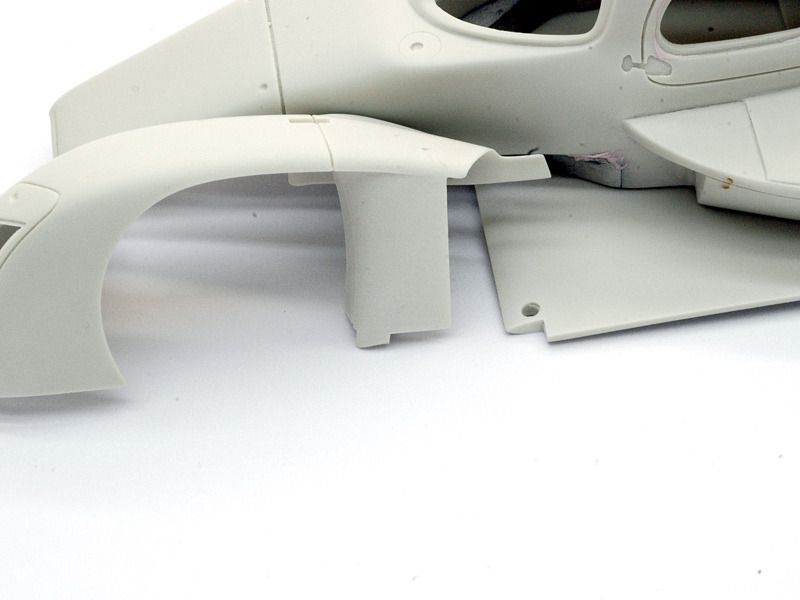 Thats a double no for me. As a general rule I wont have visible Phillips screw heads anywhere on my builds, not even on the underside. I dont build die-casts :-) More importantly, I needed a stable, but easily removable connection of the parts, as these would be put together and taken apart umpteen times during the course of the build. Screws would inevitably wear out the resin and it might eventually break. I just used straight pins to do that job. First I fixed the undertray to the main body and drilled some straight holes. Then I glued in bits of plastic rod and sanded them level with the bottom surface. I actually did that a while earlier, before starting to work on the rear end.  For the fenders I used metal pins, because they needed to be smaller in diameter. I temporarily fixed the parts to the main body and undertray with drops of CA glue. Where the fenders meet the nose part of the monocoque, I closed the open holes at the bottom with bits of Renshape, before drilling 0.8mm holes. Like that the connection is stronger and more precise. 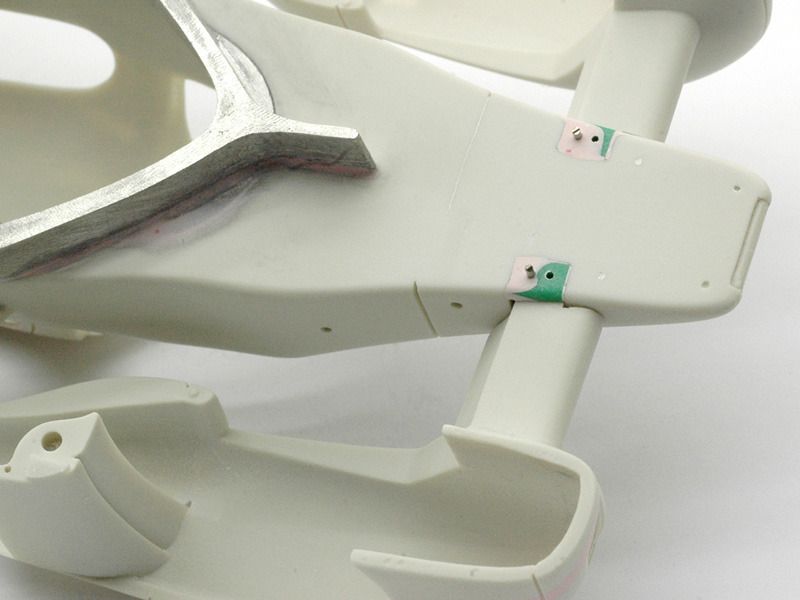 The metal pins can be pulled out with pliers and will eventually be shortened to not stick out anymore before the final installation. With the parts put together, you can see though, that Studio27s interpretation of how the fenders and undertray connect is rather crude and wont look right later on. 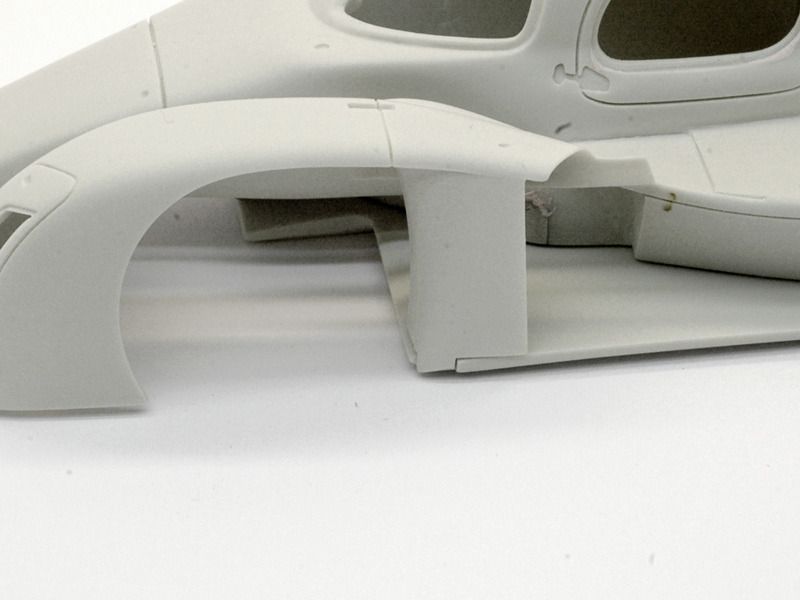 This is how that area looks on the real car:  So I modified the front edges of the undertray with slices of Renshape and putty. 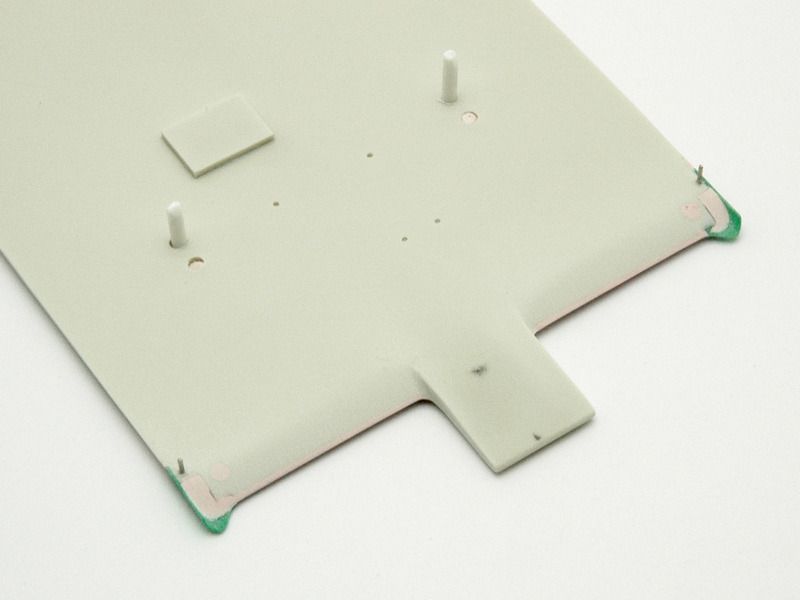 In the picture you can already see the metal pins on either side, that slide into the fenders. With their positions fixed I could also match them to the floor shape with putty. 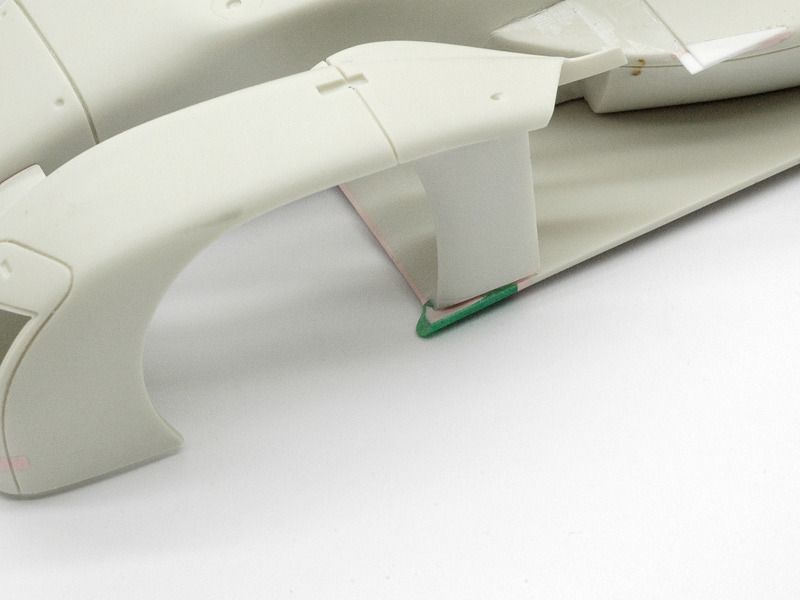 |
|
|
|
|
|
05-14-2015, 12:08 PM
|
#15 | |
|
Authorized Vendor

Join Date: Oct 2005
Location: Vicenza - veneto de rassa
Posts: 3,909
Thanks: 6
Thanked 46 Times in 41 Posts
|
Re: Audi R18 LeMans 2014 1:24
Mmmmmm, nice: sweet like an ice cream! Tuned! (impatiently awaiting)
__________________
 gio gio
|
|
|
|
|
|
|
POST REPLY TO THIS THREAD |
 |
|
|


