|
|
|

|
|
| Search | Car Forums | Gallery | Articles | Helper | AF 350Z | IgorSushko.com | Corporate |
|
| Latest | 0 Rplys |
|
|||||||
 |
 Show Printable Version | Show Printable Version |  Email this Page | Email this Page |  Subscribe to this Thread
|
|
|
Thread Tools |
 06-27-2005, 11:36 AM
|
#1 | |
|
Resident Chemist
 
Join Date: Feb 2004
Location: Rockville, Maryland
Posts: 8,586
Thanks: 105
Thanked 157 Times in 157 Posts

|
Camry FAQs/Information - SEARCH HERE AND FORUM BEFORE POSTING
SLUDGE PROBLEM
Note: To put the extent of this problem in perspective, out of the over 3.3 million Toyota engines that are installed in vehicles covered by Toyota's extended warranty, only about 7,000 of them have had serious failures. That is 0.2% or about two failures in 1,000 engines. Q: I have heard about some Camry engines having problems with sludge build-up. I was wondering if my car is likely to have that problem, and what I can do to prevent it. I have read that toyota claims it is just due to people not doing regular oil changes. If my year is affected by this problem, will doing these regular oil changes prevent it? Or is the problem almost inevitable? A: In February 02 Toyota finally acknowledged the condition, without taking real blame for any engineering problems, and started to correct the affected engines. They had some conditions that had to be met but their Special Policy Adjustment was a good start. They finally showed their true corporate stance on the unfortunate problem. They have broadened the scope of the coverage, within the years and models affected. In April 2002, Toyota said it has made a running production change to its widely used 3.0-liter V-6 engine that will improve circulation by enabling oil to drain faster into the sump - an apparent acknowledgement that engine design has been at least part of the problem. Second, Toyota said it will pay for sludge-related repairs for eight years from the date of purchase for all 1997-2002 Toyota and Lexus vehicles with the 3.0-liter IMZ-FE V-6 engine and all 1997-2001 Toyota vehicles with the now discontinued 5S-FE 2.2-liter four-cylinder engine. Toyota's new policy is a dramatic change from a so-called Special Policy Adjustment begun in February. Amid increasing criticism for refusing to deal with the problem, Toyota notified 3.3 million owners of the affected engines that sludge-related repairs would be covered for one year, as long as they proved the oil had been changed at least once in the previous year. It insisted then - as it does with the new policy - that owner negligence is the cause of the problem. In contrast to the February offer, Toyota's new policy: Has no mileage limitation. Covers owners who buy used vehicles. Reimburses drivers who already have paid for repairs Includes payments for tow trucks, rental cars and other incidental expenses resulting from engines that fill with sludge. For the uninitiated, here is an example of what sludge looks like in an engine: 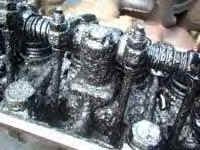 This seems affect mostly Avalon, Camry, Sienna, Highlander, Celica and most Lexus 300/RX series models with the model years after 1997 thru 2001/2002. Apparently, Toyota made a change in the engine design that actually contributed to the problem. My biggest question is do I qualify? Here are the guidelines Toyota is using to establish the engines that are prone to having the sludge (gel) condition: 2.2 L I4 Camry Produced 8/96 - 7/01 Celica Produced 8/96 - 4/99 Corolla Produced 1998 Solara Produced 6/98 - 5/01 3.0 L V6 Camry Produced 8/96 - 7/02 Avalon Produced 7/96 - 5/02 Highlander Produced 11/00 - 7/02 Lexus ES300 Produced 8/98 - 7/02 Lexus RX300 Produced 1/98 - 7/02 Sienna Produced 7/97 - 5/02 Solara Produced 6/98 - 5/02 If you look at the vehicle identification label on the left door or left door post you can find the date of manufacture. It normally is one of the first things you can see on the upper left of the label (example 7/98 means it was made July, 1998). The actual cause of the problem is an inability of the engine's crankcase ventilation system (PCV) to move the normal gases from the engine (fuel from blow-by, and water from combustion). When these gases stay longer in an hot engine it allows deposits to form on the metal parts of the engine. When enough deposits are present "Sludge" is formed. Another contributor may be reduction of the size of cooling passages to the cylinder heads in those engines in order to increase combustion temperatures for more of a complete burn to reduce exhaust emissions. Excessive heat makes oil more susceptible to sludge. Cylinder-head temperatures as high as 260 degrees have been measured in those engines - 30 degrees higher than in earlier models. The problem is magnified by short driving distances so that the engine oil never gets really hot, infrequent oil changes, or mechanical malfunctions. Using synthetic-based oil will also help minimize sludge formation since synthetic lubes are much less prone to oxidation than dino oils. Changing the oil more frequently will also help minimize sludge. There are alot of opinions on how often to change oil, but 3K miles for dino oil and 5K for synthetic oils are conservative and should be fine for most any engine (YMMV). WHAT IS SLUDGE? There are different "types" of sludge, they are of different appearance ranging from light brown to opaque black, they range from semi-liquid to solid, and they can be formed by different chemical reactions. Since any sludge is formed primarily from the engine oil, the oil itself appears to be at fault. Actually the oil is the victim of mechanical and chemical attack. The formation of sludge is a very complex interaction of components which include mechanical and thermal stress and multitude of chemical reactions. Although there are thousands of documented engine failures in the field, not a single research chemist has to date succeeded to create a "synthetic" sludge under controlled laboratory conditions. The real life conditions are therefore so complex as to be virtually impossible to duplicate in laboratory, yet hundreds of engines all over the world fail daily due to sludge formation. While some engine types are more prone to sludge formation, the fact is that only very small proportion of the "affected" engines actually fail in service. Sludge in gasoline engines is usually a black emulsion of water and other combustion by-products, and oil formed primarily during low-temperature engine operation. Sludge is typically soft, but can polymerize to very hard substance. It plugs oil lines and screens, and accelerates wear of engine parts. Sludge deposits can be controlled with a dispersant additive that keeps the sludge constituents finely suspended in the oil. "Black Sludge" is defined as thick to solid material with low water content, of dark color, light oil insolubles, and typically found in rocker cover, cylinder head, timing chain cover, oil sump, oil pump screen, and oil rings in variable quantities. Sludge in diesel engines, is soot combined with other combustion by-products which can thicken the oil to gel like sludge. This sludge is typically soft, but can also polymerize to very hard substance. It plugs oil filters, oil lines and screens, and accelerates wear of engine parts. FURTHER DISCUSSIONS http://www.automotiveforums.com/vbul...d.php?t=191631 http://townhall-talk.edmunds.com/direct/view/.ef0adfa/0 http://yotarepair.com/Sludge_Zone.html http://www.autosafety.org/getcat.php?cid=28 http://www.synlube.com/sludge.htm More discussion on sludge formation: http://yotarepair.com/sludge%20article.html How to prevent sludge: http://yotarepair.com/How_to_prevent_sludge.html What can I do since I have sludge? http://yotarepair.com/Engine_replace.html
__________________
Forum Guidelines:http://www.automotiveforums.com/vbulletin/guidelines.html "What we've got here is a failure to communicate" Last edited by Brian R.; 07-04-2006 at 10:43 PM. |
|

|
|
06-27-2005, 11:54 AM
|
#2 | |
|
Resident Chemist
Join Date: Feb 2004
Location: Rockville, Maryland
Posts: 8,586
Thanks: 105
Thanked 157 Times in 157 Posts
|
Re: Camry FAQs and Information
ACIS MOD FOR TOYOTA V6
Q: What is the ACIS mod? What engines does it apply to? How do you do it? A: This mod is meant for the 3VZ-FE engine, but may apply to 1MZ engines too. Basically, the ACIS is a valve powered by an actuator operating by vacuum pressure that closes when engine revs past 3900 rpm to give better high end power. When it's open, it theoretically gives more low end torque, but the 3VZ-FE engine is already very torquey. Furthermore, when the valve is open, the air is very turbulent and may actually limit airflow. So by making the ACIS close early, it will allow the engine to produce a smoother powercurve delivering peak power sooner. More power under 3900rpms and 50%+ TPS. It may be even more noticeable if you did some intake porting. Link for How To: http://www.automotiveforums.com/vbul...d.php?t=399112 After several trials, I noticed that only the plug on top of the throttle body that's closest to the driver seat provides enough vacuum to shut the ACIS at 1200-1500rpms. The lower vacuum plug shuts ACIS at 3500rpms. Thanks sanengo! Here's further clarification from Toysrme: Better pics than copying my old setup is me correcting someone else's attempt. What we are doing, is plugging the ACIS Actuator into the E-vacuum port on the throttle body. This way, instead of the nasty ECU programming controlling the ACIS valve (>4000rpm, >/= 50% TPS, the car must be moving). It will open any time the throttle plate is open, and at any rpm. They should snap shut around 1250-1500rpm. You can get small plastic T's at Wall-mart fish section. About 50 cents for a two pack.  This will improve the power around the 2000-4000rpm band.
__________________
Forum Guidelines:http://www.automotiveforums.com/vbulletin/guidelines.html "What we've got here is a failure to communicate" Last edited by Brian R.; 07-13-2005 at 09:08 PM. |
|
|
|
|
06-27-2005, 12:16 PM
|
#3 | |
|
Resident Chemist
Join Date: Feb 2004
Location: Rockville, Maryland
Posts: 8,586
Thanks: 105
Thanked 157 Times in 157 Posts
|
Re: Camry FAQs and Information
Historical Background for Camry:
http://encyclopedia.thefreedictionary.com/Toyota+Camry 1997 New Car Features: http://oregonstate.edu/~tongt/camry/99/97_NCF.pdf 1998 New Car Features: http://oregonstate.edu/~tongt/camry/99/98_NCF.pdf 1999 New Car Features: http://oregonstate.edu/~tongt/camry/99/99_NCF.pdf 2000 New Car Features: http://oregonstate.edu/~tongt/camry/99/00_NCF.pdf 2001 New Car Features: http://oregonstate.edu/~tongt/camry/99/01_NCF.pdf ENGINE HISTORY AND SPECS http://www.geocities.com/MotorCity/P...neEngines.html http://www.babcox.com/editorial/ar/ar400108.htm Thanks to ToyotaNation for the following information. CAMRY GENERATIONS Q: What are the years for the difference Camry Generations? A: Gen1 = 83-86 Gen2 = 87-91 Gen3 = 92-96 Gen4 = 97-01 Gen5 = 02-06 LARGER OIL FILTER Q: What larger capacity oil filters can I use on my Camry? A: For 3VZ-FE (Gen 3) / 1MZ-FE (Gen 3,4) / 3MZ-FE (Gen 5) Camry V6 engines: Part # for Toyota OEM filter: 90915-YZZD3 Filter is off 4Runner and Land Cruiser, it's slightly longer with (arguably) better filtration. Price should be the same as any Camry V6 oil filter. For 5S-FE (Gen3, 4) Camry 4-cylinder engines: Oil filter from Rav4: 90915-YZZA1 If the capacity of the lubrication system is increased substantially (such as adding a remote filter or multiple filters, etc), you must increase the fill of lubricant to match that of the additional capacity. LOWERING SPRINGS Q: What lowering springs are available for my Camry? A: Gen2: Intrax (all except All-Trac: #75.1.002) Gen3: Apex Dropzone Eibach Pro-Kit (4-cyl: #8226.240, V6: #8226.140) H&R Sport Intrax (4-cyl: #75.1.003, V6: #75.1.004) Votgland Sprint Gen4: Eibach Pro-Kit (4/6-cyl: #8249.140) Gen5: Eibach Pro-Kit Tein S-Tech (#SKL20-AUB00) PERFORMANCE STRUTS Q: What performance struts are available for my Camry? A: Gen2: Tokico HP (inserts only) - (Front: #HZ3117 / Rear: #HZ3118) Gen3: Koni Special [Reds] (inserts only) (Front: #86-2484 / Rear: #86-2485) KYB GR-2 (full replacements) (Front: #334131,334132 / Rear: #334133,334134) Tokico HP (full replacements) (Front: #HB3179,HB3180 / Rear: #HB3181,HB3182) Tokico HP (inserts only) (Front: #HZ3138 / Rear: #HZ3139A) Gen4: TRD (rebadged Bilstein) Tokico HP (full replacements) (Front: #HB3184,HB3185 / Rear: #HB3181,HB3182) LIGHT BULB TYPES Q: What light bulb are in my Camry? A: Gen3: Low Beam - 9006 High Beam - 9005 Front Turn Signals - 1156 Rear Turn Signals - 1156 Brake Lights - 1157 Parking Lights - 194 Gen4: High & low beam - 9003 Front turn signal - 1157A Rear turn signal - 3156 Parking light - 1157A Tail light - 904/3157 Stop light - 3157 High mount stop light - 921 License plate - 2825 Back up light - 921 Front sidemarker - 1157A Rear sidemarker - 194 Glove box - 37 Dome light - DE3175 Step/Courtesy light - DE3021 Trunk/Cargo area - 194 Instrument-general - 74/194 BOLT PATTERN AND STOCK WHEEL OFFSET Q: What is the bolt pattern and stock wheel offset? A: Gen2: Bolt pattern: 5 x 100 Offset: +38mm Gen3: Bolt pattern: 5 x 114.3 Offset: +38mm Gen4: Bolt pattern: 5 x 114.3 Offset: +38mm Gen5: Bolt pattern: 5 x 114.3 Offset: +50mm LEXUS YEAR OE SIZE BOLT LUG/NUT CENTER BORE ET ES 250 90-91 15 X 6 5X100 12mmX1.5 54.1 35-45mm ES 300 92-97 15 X 6 5X114.3 12mmX1.5 60.1 35-45mm GS 300 93-on 16 X 7.5 5X114.3 12mmX1.5 60.1 35-45mm GS 400 98 16X7.5 5X114.3 12mmX1.5 60.1 35-45mm GS 430 01-on 17 x 7 5X114.3 12mmX1.5 60.1 20mm IS 300 2000-on 17 x 7 5X114.3 12mmX1.5 60.1 35-45mm LS 400 90-94 16 X 7 5X114.3 12mmX1.5 60.1 35-45mm LS 400 95-on 16 X 7 5X114.3 12mmX1.5 60.1 20mm LS 430 2000-on 16 X 7 5X114.3 12mmX1.5 60.1 20mm SC 300 92-96 16 X 6.5 5X114.3 12mmX1.5 60.1 35-45mm SC 400 91-on 16 X 7 5X114.3 12mmX1.5 60.1 35-45mm SC 430 8 2002-on 18x8.5 5x114.3 12mmX1.5 60.1 35-45mm LX 450 96-97 16 X 8 6X139.7 12mmX1.5 108 20mm LX 470 97-on 16 x 8 5x150 - 110 35-45mm RX300 98- 16x7 5x114.3 12mmX1.5 60.1 20mm TOYOTA YEAR OE SIZE BOLT LUG/NUT CENTER BORE ET AVALON 95-97 15 X 6 5X114.3 12mmX1.5 60.1 35-45mm CAMRY 83-91 13 X 5 5X100 12mmX1.5 54.1 35-45mm CAMRY 92-on 14 X 6 5X114.3 12mmX1.5 60.1 35-45mm CAMRY SOLARA 99-on 16 X 6 5X114.3 12mmX1.5 60.1 35-45mm CELICA 76-85 14 X 6 4X114.3 12mmX1.5 60.1 20mm CELICA 86-91 13 X 5.5 4X100 12mmX1.5 54.1 35-45mm CELICA 86-96 14 X 6 5X100 12mmX1.5 54.1 35-45mm CELICA 90-96 15 X 6 5X100 12mmX1.5 54.1 35-45mm CELICA 2000-on 15 X 6 5X100 12mmX1.5 54.1 35-45mm COROLLA 88-96 13 X 5 4X100 12mmX1.5 54.1 35-45mm COROLLA 88-97 14 X 5.5 4X100 12mmX1.5 54.1 35-45mm CRESSIDA 85-88 15 X 6 4X114.3 12mmX1.5 60.1 20mm CRESSIDA 89-92 15 X 6 5X114.3 12mmX1.5 60.1 35-45mm ECHO 00-on 13 X 4.5 4X100 12mmX1.5 54.1 35-45mm MR-2 85-89 14 X 6 4X100 12mmX1.5 54.1 35-45mm MR-2 90-92 14 X 6 5X114.3 12mmX1.5 60.1 35-45mm MR-2 92-95 15 X 7 5X114.3 12mmX1.5 60.1 35-45mm MR-2 SPYDER 00-on - 4X100 12mmX1.5 54.1 35-45mm PASEO 92-96 14 X 5.5 4X100 12mmX1.5 54.1 35-45mm PRIUS 01-on 4X100 12mmX1.5 54.1 35-45mm SUPRA 79-82 14 X 6 4X114.3 12mmX1.5 60.1 20mm SUPRA 93-96 16 X 8 5X114.3 12mmX1.5 60.1 35-45mm SUPRA 93-96 17 X 8,F 5X114.3 12mmX1.5 60.1 35-45mm SUPRA 93-96 17 X 9,5,R 5X114.3 12mmX1.5 60.1 35-45mm SUPRA L 83-85 15 X 6 4X114.3 12mmX1.5 60.1 20mm SUPRA,TURBO 86-93 16 X 7 5X114.3 12mmX1.5 60.1 35-45mm TERCEL 83-97 13 X 4.5 4X100 12mmX1.5 54.1 35-45mm PICKUP 2WD 80-95 14 X 6 5X114.3 12mmX1.5 - 0mm/20mm PICKUP 4WD, 4 RUNNER 80-95 15 X 7 6X139.7 12mmX1.5 - 0mm/20mm 4-RUNNER 96-97 16 X 7 6X139.7 12mmX1.5 - 20mm 4WD PICKUP 86-95 15 X 6 6X139.7 12mmX1.5 - 0mm/20mm HIGHLANDER 01-on 5X114.3 12mmX1.5 60.1 20mm LANDCRUISER 69-92 15 X 6 6X139.7 12mmX1.5 - 0mm/20mm LANDCRUISER 93-97 16 X 8 6X139.7 12mmX1.5 - 20mm LANDCRUISER 98-on 16 X 8 5X150 14mmX1.5 110 35-45mm PREVIA 90-94 14 X 6 5X114.3 12mmX1.5 60.1 35-45mm PREVIA 91-96 15 X 6 5X114.3 12mmX1.5 60.1 35-45mm RAV4 96-97 16 X 7 5X114.3 12mmX1.5 67.1 35-45mm RAV4 00-on 16 X 7 5X114.3 12mmX1.5 67.1 - SEQUOIA 01-on 16 X 7 6X139.7 12mmX1.5 108 20mm SIENNA 97- 15 X 6 5X114.3 12mmX1.5 60.1 35-45mm T-100 93-96 15 X 6 6X139.7 12mmX1.5 108 20mm TACOMA 2WD 95-97 14 X 5.5 5X114.3 12mmX1.5 67.1 20mm/35-45mm TACOMA 4WD 95-97 15 X 7 6X139.7 12mmX1.5 108 20mm TUNDRA 99-on 16 X 7 6X139.7 12mmX1.5 108 20mm VAN WAGON 2WD 84-90 14 X 5.5 4X114.3 12mmX1.5 - 20mm Read more: http://www.clublexus.com/forums/rx-f...#ixzz2fppUmTLK
__________________
Forum Guidelines:http://www.automotiveforums.com/vbulletin/guidelines.html "What we've got here is a failure to communicate" Last edited by Brian R.; 09-24-2013 at 01:10 PM. |
|
|
|
|
06-27-2005, 12:33 PM
|
#4 | |
|
Resident Chemist
Join Date: Feb 2004
Location: Rockville, Maryland
Posts: 8,586
Thanks: 105
Thanked 157 Times in 157 Posts
|
Re: Camry FAQs and Information
STARTER CLICKS ONCE BUT DOES NOT TURN ENGINE
Q: Often my starter will just click and not turn over the engine. It will do this for a long time, but eventually it will act normally. Is this a common problem with Camrys? How can I fix it? A: Yes, it is a common problem with Toyota starters. Many times, the problem is sticking starter solenoid contacts. See the following links for descriptions on how to replace them. This is a really cheap and easy fix on a Camry and should be the first thing you try after you check all the cable connections and the battery quality. Some Toyota (NipponDenso now called Denso) starter-repair reference sites: http://www.4crawler.com/4x4/CheapTricks/Starter.shtml http://yotarepair.com/startercontacts.html http://www.4x4wire.com/toyota/maintenance/starter/ http://www.yotatech.com/~corey/tech/...r/haveblue.htm http://www.sleeoffroad.com/technical...er_rebuild.htm http://www.startercontacts.com/install.htm http://www.colorado4x4.net/tech/star..._contacts.html http://www.barneymc.com/toy_root/techneek/starter.htm http://www.toyotanation.com/forum/sh...312&forumid=10 Starter contact kits (8mm ID hole): Ace Electric # S-5263 (only two contacts) Ace Electric # S-5264 (only two contacts) Metro # 66-82104 (only two contacts) (www.metroautoinc.com ,Pomona,California) Toyota # 28226-72010/80 (battery side)(also1KZTE-2LT-1KZT) Toyota # 28226-72080 (8808-9108) Toyota # 28226-16130 (9108-9308) Toyota # 28226-55050 (9308-9511) Toyota # 28226-70040 (9308-9511) Toyota # 28226-72040 (motor side if needed) Toyota # 28226-72010 (8808-9511) Toyota # 28226-74070 (9108-9511) For others besides 22R series: Toyota # 28226-54220 (motor side) (2LTE, 3L..LN13# IKZTE, 2L#, KZN130,LN108,112,85..4FC) Toyota # 28226-54250 (Diesel Surf 2.4TD, contains a new end cover and gasket) Toyota # 28226-54320 (battery side) (2LTE, 3L..LN13# IKZTE, 2L#, KZN130, LN108,112,85..4FC,3B-1HZ-BJ73-HZJ7#-1KZT-KZJ70) Toyota # 28226-17030 (battery side) (1H#-HDJ80-HZJ80) Toyota # 28226-56250 (battery side) (3B-1HZ-1PZ-PZJ7#) Starter contacts only (8mm ID hole): Ace Electric # S-5231 Ace Electric # S-5293 (crescent moon shape) Ace Electric # S-5295 (crescent moon shape) Metro # 66-82106 (www.metroautoinc.com ,Pomona,California) Tons more at: http://www.metroautoinc.com/PDF%20Fi...%20Contact.pdf Toyota # 28226-70040 Wilson’s Electric # 45-29-652 Starter brushes: AC Delco # D762 GP Sorensen # 255048 Standard # JX-117 Whether your starter uses two rectangular types or one rectangular and one crescent you can substitute with two squares or one square and one crescent so any of the above part #'s for those kits will be the right ones, or about half of the auto electric shops in your local yellow pages would sell aftermarket contacts for only $5 each or the pair. Thanks to SidneyCanada for the above information STARTER CLICKS CONTINUOUSLY BUT DOES NOT TURN ENGINE Q: What if the starter clicks not once, but very fast and does not turn the engine over? A:The problem you're having is not the solenoid contacts as described above. With bad solenoid contacts, there is only one click (the starter relay), not many. Your problem is insufficient current/voltage getting to the starter. Most likely cause is a bad battery. Before you buy one, check the battery terminals - make sure they are on tight and they are clean. Check the connections on the other end of the battery cables for tightness and cleanliness also. If all looks good, replace the battery. If the battery cable connections are bad, loosen them from the battery and clean them with baking soda/water slurry until they are bright metal, then reconnect them and tighten them snug. Coat them with petroleum jelly to prevent them from corrosion. It it's possible something has been left on, like your headlights or dome light etc. and the battery may be drained/discharged, try charging it first or bring it in to have it tested before you buy a new one. CHANGING SERPENTINE ACCESSORY BELT Q: How do you change a 2002 4cyl. Camry serpentine belt? What needs to be loosened? A: First thing is to draw a diagram of the pulleys and how the belt is routed. for some reason toyota decided that they didnt need to put a sticker with this info under the hood... Next, right behind the alternator, their is an aluminum type plate that is conected to the tensioner pulley. it has what looks like a nut welded to a plate, i think it is 14mm. put a socket wrench on that and use some power and push it down (it takes quite a bit so if your operating solo use a pipe on the end of the wrench for leverage while you take the belt off with the other hand). This will loosen the belt enough to get it off the alternator pulley. Switch out the belt, and reverse the process to get it back on. You can see the tensioner if you look straight now the side of the engine, it looks like a little shock absorber, and is attached to both the pulley and that plate. BLOWER MOTOR FOR HEATER OR A/C DOES NOT WORK ON ALL SPEEDS Q: My blower motor doesn't work for the bottom three speeds. What is the problem - is it the motor or what? A: It is most likely a bad connection or bad resistor on the resistor block that controls the current to the motor. See the discussion in the following links: http://www.automotiveforums.com/vbul...d.php?t=252829 http://www.4crawler.com/4x4/CheapTricks/Blower.shtml
__________________
Forum Guidelines:http://www.automotiveforums.com/vbulletin/guidelines.html "What we've got here is a failure to communicate" Last edited by Brian R.; 03-12-2014 at 01:31 PM. |
|
|
|
|
06-27-2005, 12:43 PM
|
#5 | |
|
Resident Chemist
Join Date: Feb 2004
Location: Rockville, Maryland
Posts: 8,586
Thanks: 105
Thanked 157 Times in 157 Posts
|
Re: Camry FAQs and Information
Thanks to yotarepair.com for alternative instuctional drawings:
TIMING BELT REPLACEMENT INSTRUCTIONS Q: My engine stopper running suddenly on the highway and now it won't start. Any guesses as to what the problem is? How do I replace my timing belt? What should I replace while I'm in there to save time in the future? A: It sounds like you may have broken your timing belt. If you can see the cam shafts by looking through the oil filler hole in the head cover, then you can use these as an indicator. If the cams don't turn when the engine is cranked, your timing belt is broken. You may have to remove the valve cover. You can also tell if your timing belt has broken by removing the distributer cap and seeing if the rotor moves when you crank the engine. If the rotor doesn't move, then you broke the timing belt. Here are links to instructions for replacing the timing belt in various Camry engines: 1C-LTC, 2C-LTC, 2S-ELC, 3S-FE, 5S-FE, 2VZ-FE, 3VZ-FE, 1MZ-FE http://www.autozone.com/servlet/UiBr...3d8013e607.jsp 3S-FE http://yotarepair.com/3S-FEtimingbelt.html 5S-FE (also http://yotarepair.com/5S-FEtimingbelt.html ) http://i16.photobucket.com/albums/b8...elt/5SFE19.jpg http://i16.photobucket.com/albums/b8...elt/5SFE20.jpg http://i16.photobucket.com/albums/b8...elt/5SFE21.jpg http://i16.photobucket.com/albums/b8...elt/5SFE22.jpg http://i16.photobucket.com/albums/b8...elt/5SFE23.jpg http://i16.photobucket.com/albums/b8...elt/5SFE24.jpg http://i16.photobucket.com/albums/b8...elt/5SFE25.jpg http://i16.photobucket.com/albums/b8...elt/5SFE26.jpg http://i16.photobucket.com/albums/b8...elt/5SFE27.jpg http://i16.photobucket.com/albums/b8...elt/5SFE28.jpg http://i16.photobucket.com/albums/b8...elt/5SFE29.jpg 1MZ-FE (also http://yotarepair.com/1FZ-ME_timingbelt.html ) http://i16.photobucket.com/albums/b8...lt/1MZFE16.jpg http://i16.photobucket.com/albums/b8...lt/1MZFE17.jpg http://i16.photobucket.com/albums/b8...lt/1MZFE18.jpg http://i16.photobucket.com/albums/b8...lt/1MZFE19.jpg http://i16.photobucket.com/albums/b8...lt/1MZFE20.jpg http://i16.photobucket.com/albums/b8...lt/1MZFE21.jpg http://i16.photobucket.com/albums/b8...lt/1MZFE22.jpg http://i16.photobucket.com/albums/b8...lt/1MZFE23.jpg http://i16.photobucket.com/albums/b8...lt/1MZFE24.jpg http://i16.photobucket.com/albums/b8...lt/1MZFE25.jpg http://i16.photobucket.com/albums/b8...lt/1MZFE26.jpg Additional Comments on Replacing Timing Belts Other than the timing belt whether or not you need more parts depends on if there are any fluid leaks inside the timing cover, the water pump may need to be replaced and there may be oil seals such as the front crankshaft seal or the camshaft seals that may be leaking and need to be replaced. If you do it yourself, make sure you understand how to set #1 piston at TDC on compression stroke. Also, be prepared to stop and put everything back together if you find you cannot remove the crank pulley bolt. I think this is the hardest part from a strength point of view. Air gun is best way. Really long cheater bar with tool to hold the crank is also good. Also, be careful and gentle with the new timing belt. Handle it as if it were a piece of gold foil. Don't bend it sharply, contaminate it with anything, or turn it inside out. Don't scratch the sensor part of the crankshaft timing pulley. Don't use the timing belt tension to tighten the mounting bolt of the camshaft timing pulley. If there is noticeable wear or cracks on the belt face, check to see if there are nicks on the side of the idler pulley lock. If there is wear or damage on only one side of the belt, check the belt guide and alignment of each pulley. If there is noticable wear on the belt teeth, check the timing cover for damage, correct gasket installation, and for foreign material on the pulley teeth. Check to make sure the idler pulley turns smoothly. If not, replace. Clean all the pulleys and keep them clean. If you have to turn the crankshaft, always turn it clockwise. Make sure you have all the gaskets you need. Clean the gasket surfaces to shiny metal everywhere before you replace the gaskets. Replace the timing cover gaskets if they are at all questionable. Make note of all the electical connections you disconnect when you disconnect them. Make sure they are all connected when you are done (DOH!). Consider replacing the water pump simultaneously. It will be accessible when you are replacing the belt. Also, check the accessory drive belts and replace them if they are old. Torque everything. INTERFERENCE ENGINES Q: What is an interference engine and is my Toyota engine an interference engine? Why should I care? A: An interference engine is one in which the valves and pistons can touch if the cams and crank are not kept in correct timing by the timing belt or chain. Most (not all) Toyota passenger car engines are free-running (non-interference engines). This means that if your timing belt breaks, then all that will happen is your engine will not run anymore until the belt is replaced. In an interference engine, piston-to-valve contact will cause very serious damage to the engine if the timing belt breaks. To see if your engine is an interference engine or not, look it up in the following brochure: http://www.gates.com/downloads/downl...older=brochure An asterisk opposite your engine means it is an interference engine.
__________________
Forum Guidelines:http://www.automotiveforums.com/vbulletin/guidelines.html "What we've got here is a failure to communicate" Last edited by Brian R.; 09-20-2007 at 08:26 PM. |
|
|
|
| The Following 2 Users Say Thank You to Brian R. For This Useful Post: |
MasonVilla99 (04-23-2019)
|
|
06-27-2005, 03:30 PM
|
#6 | |
|
Resident Chemist
Join Date: Feb 2004
Location: Rockville, Maryland
Posts: 8,586
Thanks: 105
Thanked 157 Times in 157 Posts
|
Re: Camry FAQs and Information
SERVICE PUBLICATIONS
Q: Where can I purchase Toyota Service and Repair Manuals for my Camry? A: Printed copies of all Toyota, Scion, and Lexus service support information can be purchased directly from the Toyota Materials Distribution Center or MDC. The MDC stocks printed versions of most Toyota service information products, including legacy model information that is not available on this site. Note: Certain inventory items are produced in limited quantities and may not be reprinted or reissued once initial inventory is depleted. MDC telephone operators accept Visa and MasterCard credit card orders, Monday through Friday, 8 AM to 5 PM Pacific Time. To place orders call 1-800-622-2033 VARIOUS USED MANUALS - mostly older http://www.autobooksonline.com/ TRANSMISSION REPAIR MANUALS Q: Where can I purchase transmission repair manuals? A: http://www.autorepairmanuals.biz/sit...83/page/267592 RENT ONLINE ACCESS TO MANUALS HERE: http://www.eautorepair.net/ http://www.alldata.com/products/diy/index.html
__________________
Forum Guidelines:http://www.automotiveforums.com/vbulletin/guidelines.html "What we've got here is a failure to communicate" Last edited by Brian R.; 07-19-2005 at 02:57 PM. |
|
|
|
|
06-27-2005, 06:40 PM
|
#7 | |
|
Resident Chemist
Join Date: Feb 2004
Location: Rockville, Maryland
Posts: 8,586
Thanks: 105
Thanked 157 Times in 157 Posts
|
Re: Camry FAQs and Information
PROGRAMMING TRANSPONDER IGNITION KEYS
Thanks to Sparky at talkaboutautos.com Q: How do I program a transponder ignition key for my Toyota/Lexus vehicle? A: 98-01 CAMRY's: The programming sequence for adding another key (Toyota key part number 89785-26020) to the Camry, according to the ILCO key company catalog, and a Toyota maintenance manual I have seen, is as follows: Simultaneously depress and release the brake and accelerator pedals 1 time (one instruction kind of hints that you should hold the pedals down while you insert the master key, the next step). Insert the master key in the ignition, but do not turn it. Within 15 seconds press & release the accelerator pedal 5 times. Then within 20 seconds press & release the brake pedal 6 times. Within 10 seconds remove the master key, and insert the new key. Within 10 seconds press & release the accelerator 1 time. The security light will stay off after 60 to 80 seconds indicating the re-programming was successful. Remove the new key, and depress & release the brake pedal 1 time. 02 TO EARLY-03 CAMRY's: The programming sequence for adding another key (Toyota key part number 89785-26020) to the Camry, according to the key company catalog is as follows: Make sure all windows and doors are closed, and insert the master key in the ignition. Cycle the ignition key ON/OFF 5 times and leave the key in the lock. Open/Close the driver side door 6 times. Remove the original key and insert the new duplicate key, BUT DO NOT TURN THE KEY ON. The theft light will stay off after 60 to 80 seconds indicating the re-programming was successful. Do not laugh while executing this sequence. MID-03 TO 2004 CAMRY's: Currently there is no (easily available) programming sequence that the customer can use. A new key is used (Toyota key part number 89785-60160) that has a small letter "o" stamped on the brass part of the key up near the handle. Apparently, only the dealer can program in a new transponder code into the ECM via the OBD (On Board Diagnostic) computer. ACE hardware and others, sell the non-"o" key for much less than $75, but you have to program the ECM in the car yourself. Camelback Toyota charges $150 to supply & program a key for a Mid-03 Camry. Larry Miller Toyota sells the key for $75 and programs it for free. Bell Road Toyota sells the key for $75, but it's not clear if they charge for programming. If the ECM is truly programmed through the OBD, then I think it is only a matter of time before somebody like Pep Boys or Autozone will do it too! According to the ILCO catalog, all of the key numbers programmed into a 98 to Early-03 ECM (other than the number of the key you are using) can be deleted by using the following sequence: Simultaneously depress & release the brake and accelerator pedals 1 time. Insert a working key into the ignition but do not turn it. Within 15 seconds depress & release the accelerator pedal 6 times. Within 20 seconds depress & release the break pedal 7 times. The security light will flash indicating that all key numbers, other than the one being used, have been deleted from the ECM memory. Within 10 seconds remove the key from the ignition switch. This is now the only key that will work. Brian Edit: Here's a link to the ILCO catalog: http://www.kaba-ilco.com/key_systems...16-E-0205].pdf An alternative to reprogramming the ECM when you have no programed master key: Stefan: "I called the parts department at local dealership I usually get parts from (I own a custom body&paint/collision shop) and they told me, that there is a way to get TOYOTA CORP. to actually replace the ECM free of charge, all I have to pay for is two keys @ $41 list price and the labor to swap out the ECM. The car has to have original ECM it came from the factory with, simple as that! I called TOYOTA Corp, they asked a few questions and ran a VIN# in their sytem and said my car falls under that category for a FREE ECM!! WOOT!. They said it will take 3-5 business days to mail/ship the ECM to the dealership of my choice, once it gets there, dealership will call me to bring/tow the car in and all I have to pay is for the labor to swap out ECM AND the cost for 2 new keys!, I will update you on the outcome of this situation." Stefan INFORMATION ON TRANSPONDER KEYS AND PROGRAMMING THE ECM WHEN THERE ARE NO PROGRAMMED KEYS AVAILABLE (yes, apparently it is possible): http://www.locksmithcharley.com/transponder.html Locksmith Charley has the following instructions posted: These procedures are modified from those published in other forums after several experiences with cars not programming up in an efficient manner. This procedure was developed with the kind assistance of Randy Mize who provides technical support for ILCOs SDD machine. I also received valuable input on this subject from Mike Labar. Of primary importance is determining if you have a key that is enrolled in the cars computer as a master key or a valet key. The procedure for making this determination is: 1. Positively locate the security or anti-theft light. This light should blink when there is no key in the ignition or if an unrecognized key is placed into the ignition. 2. Insert the key you have into the ignition DO NOT TURN ON. There are 3 possible things that may occur: (a) Security light continues to blink = unrecognized key. (b) Security light goes off IMMEDIATELY = MASTER key (c) Security light remains illuminated for 1-3 seconds before going out = VALET key If you have only a VALET key or an unrecognized key then the ECM will have to be reprogrammed or flashed before you are able to add any more keys to the vehicle. The ECM reprogramming (flashing) service can be provided to you by LOCKSMITH CHARLEY (1-602-230-8888 or 1-800-313-5397) at the shop at 2308 E. Indian School Road, Phoenix AZ 85016. If you are not local to the Phoenix area you can ship the ECM to us and we can flash it and send it back to you the same day we receive it. Once you have determined that you have an enrolled MASTER key you may proceed to either: (a) delete all other keys from the cars computer (b) add an additional MASTER key to the cars computer. (c) add an additional VALET key to the cars computer. PROCEDURES FOR PROGRAMMING A - Delete all keys other than present master key 1. Make sure all windows are rolled up and all doors are shut. 2. From outside the car LOCK the car door with the key. 3. From outside the car UNLOCK the car door with the key. 4. Enter vehicle and close the door. 5. Start the cars engine. 6. Turn engine off and remove key. 7. Place master key in the ignition lock. (DO NOT TURN ON.) 8. Within 15 seconds press and release the gas pedal 6 times. 9. Within 20 seconds, forcefully press and release the brake pedal 7 times. The Security light will blink. 10. Within 10 seconds, remove the master key. All other keys should be deleted from the cars computer. B - add an additional MASTER key to the cars computer 1. Make sure all windows are rolled up and all doors are shut. 2. From outside the car LOCK the car door with the key. 3. From outside the car UNLOCK the car door with the key. 4. Enter vehicle and close the door. 5. Start the cars engine. 6. Turn engine off and remove key. 7. Place master key in the ignition lock. (DO NOT TURN ON.) 8. Press and release the gas pedal 5 times. 9. Forcefully press and release the brake pedal 6 times. 10. Remove key 11. Place new key in the ignition lock. (DO NOT TURN ON.) 12. Press and release the gas pedal 1 time. 13. Wait (about 1 minute) for security light to stop blinking. 14. Remove new key from the ignition lock. 15. Press brake pedal 1 time to close programming cycle. 16. Wait 15 seconds for programming cycle to end 17. Insert new key into ignition lock and start the vehicle. C - add an additional VALET key to the cars computer 1. Make sure all windows are rolled up and all doors are shut. 2. From outside the car LOCK the car door with the key. 3. From outside the car UNLOCK the car door with the key. 4. Enter vehicle and close the door. 5. Start the cars engine. 6. Turn engine off and remove key. 7. Place master key in the ignition lock. (DO NOT TURN ON.) 8. Press and release the gas pedal 5 times. 9. Forcefully press and release the brake pedal 6 times. 10. Remove key 11. Place new key in the ignition lock. (DO NOT TURN ON.) 12. Press and release the gas pedal 1 time. 13. Wait (about 1 minute) for security light to stop blinking. 14. Remove new key from the ignition lock. 15. Press brake pedal 1 time to close programming cycle. 16. Wait 15 seconds for programming cycle to end 17. Insert new key into ignition lock and start the vehicle. This information is presented to you as a public service of: LOCKSMITH CHARLEY 2308 E. Indian School Rd. Phoenix AZ 85016 (602) 230-8888 / 1-800-313-5397 Here is a discussion of the various types of keys: http://www.clublexus.com/forums/showthread.php?t=176485
__________________
Forum Guidelines:http://www.automotiveforums.com/vbulletin/guidelines.html "What we've got here is a failure to communicate" Last edited by Brian R.; 08-29-2005 at 11:03 PM. |
|
|
|
|
06-27-2005, 06:56 PM
|
#8 | |
|
Resident Chemist
Join Date: Feb 2004
Location: Rockville, Maryland
Posts: 8,586
Thanks: 105
Thanked 157 Times in 157 Posts
|
Re: Camry FAQs and Information
MAINTENANCE SCHEDULE
Q: How can I find out what maintenance is recommended for my Camry at 60k (or whenever)? A: Fill out the form on the following site: http://www.edmunds.com/car-maintenance/guide-page.html
__________________
Forum Guidelines:http://www.automotiveforums.com/vbulletin/guidelines.html "What we've got here is a failure to communicate" Last edited by Brian R.; 04-20-2011 at 01:40 PM. |
|
|
|
|
06-27-2005, 07:01 PM
|
#9 | |
|
Resident Chemist
Join Date: Feb 2004
Location: Rockville, Maryland
Posts: 8,586
Thanks: 105
Thanked 157 Times in 157 Posts
|
Re: Camry FAQs and Information
OIL AND OIL-CHANGE INTERVAL, AND OIL FILTER BRAND RECOMMENDATIONS
Q: What is the best motor oil to use in my car and how often should I change it? What is the best brand of oil filter? A: These questions have more answers and opinions than there are grains of sand on a beach. Read opinions at the following site and become one of the opinionated on these subjects: http://theoildrop.server101.com/cgi/ultimatebb.cgi As a general rule, if you want longer oil-change intervals and don't mind paying more for your oil, use an oil with a synthetic base stock such as Mobil 1, Castrol Syntec, etc. Use the oil viscosity that is recommended in your owner's manual. OIL ANALYSIS AND OIL CHANGE INTERVAL To determine the optimum oil change frequency for your vehicle requires that you perform several oil analysis during one oil change interval. For example, if your vehicle has 15,000 miles on it and the manufacturer recommends 7500 mile oil changes for normal service and 5000 miles for severe, perform an analysis at 18,750 miles, 20,000 miles, and 22,500 miles (if the first or second test shows a need for an oil change then stop there). Do not exceed the manufacturer's normal service interval even if the analysis shows no need for an oil change at 7500 miles. The oil change industry desperately desires that you NOT perform such an analysis. The almost certain result for most drivers will be that even at 7500 miles the oil will still be fine. Even after your vehicle is out of warranty it is a good idea to continue to follow the manufacturer's schedule for maintenance. There are frequently special campaigns (not recalls) to fix latent defects after the warranty has expired. Lately we've seen these on some Toyota V6 engines and some Saturn engines. You want the manufacturer to have no excuse to deny coverage. Also you can sometimes get a manufacturer to share the cost of an expensive repair when something fails after the warranty has expired, but this is at their pleasure and it is best to have solid proof that you have followed the maintenance schedules. Big oil users like bus companies and truck fleets use oil analysis to extend the life of their engines without unnecessary oil changes. The reasons are clear. These big engines can use 3-4 gallons of oil and unnecessary changes are expensive in both time and materials. In some cases they change the filters and put in additives to replace the acid neutralizers and anti-wear agents. A good analogy is swimming pool maintenance. You clean the filters, you remove the debris, you add stabilizers and disinfectants, but you rarely empty the whole pool and refill it. Two places to get your oil analyzed are: Lubricon Lubricant Consultants, Inc 350 E. Churchman Ave. Beech Grove, IN 46107 (317) 783-2968 Cleveland Technical Center 18419 Euclid Avenue Cleveland, OH 44112-1016 (800) 726-5400 API CERTIFICATION, PHOSPHOROUS & ZDDP Never use a non-API certified synthetic oil (there are many of these on the market). The problem with the non-API certified synthetics is that they contain too much phosphorus (in the form of the additive ZDDP (Zinc Dialkyl Dithiophosphates)). The API has limited the amount of phosphorus because phosphorus shortens the life of the catalytic converter. These oils are fine for snowmobiles, motorcycles, and older cars that don't have a catalytic converter, and the extra ZDDP does provide additional wear protection. Unfortunately, the marketers of some the non-certified oils do not explicitly and honestly state the reason for the lack of API certification. You can check the status of API certification on the API web site. Be certain to go not just by the manufacturer name but by the actual product as well. This is because a manufacturer often have both certified and non-certified products. Suffice it to say that Mobil 1, Royal Purple, Castrol, & Havoline all make synthetic oils that are API certified and that can be purchased at auto parts stores and other retail outlets. AMSOIL has one product line, XL-7500 that is API certified, but it's other lines contain too much ZDDP to be certified and should not be used in vehicles with catalytic converters. MOTOR OIL MYTHS AND FACTS http://www.nordicgroup.us/oil.htm OIL CHANGE PROCEDURE AND RECOMMENDATIONS http://www.automotiveforums.com/vbul...41#post3157041 OIL FILTER STUDIES Q: What oil filters are the best? A: Here are studies performed on various brands of filters. Make your own judgement: http://www.frankhunt.com/FRANK/corve...lterstudy.html http://www.frankhunt.com/FRANK/corve...ilfilters.html http://www.scuderiaciriani.com/rx7/oil_filter_study/ http://www.oilfilterstudy.com/ OIL ADDITIVES Q: What about the various oil additives? A: Here's a discussion on the subject: http://www.offroaders.com/tech/snake-oil.htm In general, lubricating oil contain additive packages that have been certified to provide a minimum level of protection as specified by the specification they meet (SF or whatever). Adding an additive to the oil is something you should do sparingly. For a discussion of additive packages, see: http://www.dirtroadmagazine.com/oil.htm
__________________
Forum Guidelines:http://www.automotiveforums.com/vbulletin/guidelines.html "What we've got here is a failure to communicate" Last edited by Brian R.; 01-07-2007 at 05:07 PM. |
|
|
|
|
06-27-2005, 07:08 PM
|
#10 | |
|
Resident Chemist
Join Date: Feb 2004
Location: Rockville, Maryland
Posts: 8,586
Thanks: 105
Thanked 157 Times in 157 Posts
|
Re: Camry FAQs and Information
WHAT LUBRICANT TO USE
Q: What lubricants should I use in my '96 Camry differential, transmission, engine, etc? A: Look up your vehicle on the AMSOIL website and look down the list for the lubricant they recommend: https://www.amsoil.com/scripts/runis...msoiloaf:index
__________________
Forum Guidelines:http://www.automotiveforums.com/vbulletin/guidelines.html "What we've got here is a failure to communicate" |
|
|
|
|
06-27-2005, 07:26 PM
|
#11 | |
|
Resident Chemist
Join Date: Feb 2004
Location: Rockville, Maryland
Posts: 8,586
Thanks: 105
Thanked 157 Times in 157 Posts
|
Re: Camry FAQs and Information
Thanks to sanengo and Toysrme for the following ideas:
Want more horsepower? Not enough money for a Turbo? (If you have enough money and time to hook up a turbo in a 5S-FE, see: http://www.automotiveforums.com/vbul...5&postcount=50 ) and http://www.toyotanation.com/forum/sh...d.php?t=236305 Q: How do I increase the power of my Camry? A: Custom weld a wider Y-pipe for V6. Brospeed (Bosal) used to sell a header bolt on kit for V6, but it has now been discontinued. (2.5" recomended and a device to lean out fuel) Performance headers (Not emissions safe) Hi-flow cat with wider downpipe: 2.5" should be enough for i4, 3" for V6 Exhaust: For those with i4 engines, swapping to the V6 muffler does help if you have other exhaust mods. For V6 owners, custom mufflers don't do much. In general, anything after the CAT won't do much. Installing a performance air filter or cold air intake (CAI) is not a very wise investment for power, but if every bit helps, and you enjoy a more throaty sound, go for it. Get recommendations from others with your engine. Some intakes actually cost you power, but sound louder. [Brian edit]Make sure there is some give to the CAI system. Some CAIs bolt directly to the engine and to the body at each end. When the engine moves, the end bolted to the body has no give and may tear the bolts out of the body where attached. TRD, AEM, and AMSOIL sell excellent and reusable oil-impregnated air filters. The AEM and TRD filters are the same and are cotton-fiber based. The AMSOIL filter is multi-layer foam.[/edit] CLEAN YOUR ENGINE TO REGAIN LOST POWER! Carb cleaner, GM top engine cleaner, or SeaFoam to start with. GET RID OF ENGINE CARBON! Believe it or not, spraying a small stream of water through the brake booster vacuum line of your engine can clear away carbon deposites VERY efficiently. (Just don't hydrolock your engine, if the engine is choking too much push on the butterfly valve on your TB) For any vane-flap Toyota vehicle. 22RE's, 3S's, VZ blocks... And most other AFM vehicles. This is a vane-flap air-flow meter. You slice the silicon glue off the top, and pry the black plastic top off Exposing the innards. 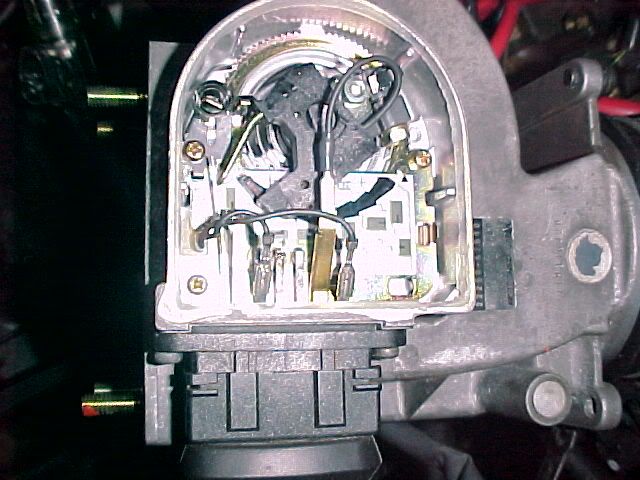 An AFM. It is not a MAF... They measure the VOLUME of airflow, by a flap, held closed by spring tension. On top of the flap is a small arm, which rotates along what essentially is a pointometer. The ECU sends an exact voltage to the AFM, and reads the flap. It also reads a small air temperature sensor in the AFM housing. From this -> an AFM can accurately meter the MASS of airflow. (the important part!) 1) Reset the ecu - pull the EFI fuse for one nanosecond and replace it 2) Cut glue 3) Pry UP plastic top 4) PAINT THE STARTING COG 5) Rotote cog clockwise 3 clicks, 5 clicks, 7 clicks seem to be where people like. As soon as you get over the shock factor, most of the gain is 5-7 clicks. 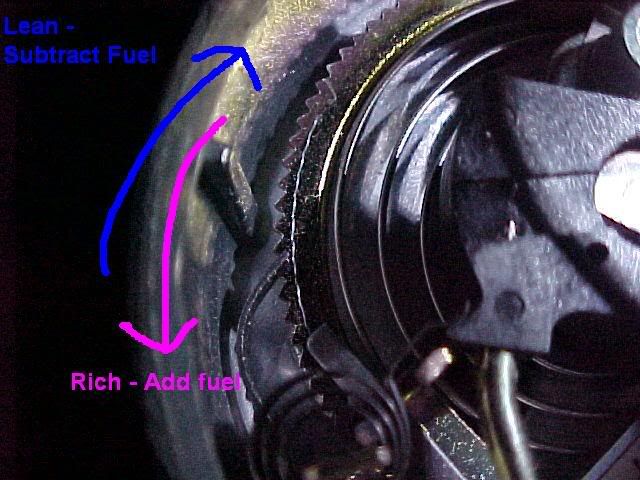 You'll gain mid rpm range power. You'll also gain top rpm range power under a high load (i.e. top gear-top speed runs). Don't be surprised if you rev back to back in park and it's a tad slower from less fuel -> it will be noticeably faster on the street when there is a load on the engine. Grind down your ACIS valve and clear away carbon deposits to smooth out this turbulent area. Porting the upper intake manifold doesn't really do jack. I've always told people to take the throttlebody off and knife edge the 1/2" flat surface behind it, but it doesn't make any impact on anything near stock. The upper intake air chamber splits the intake into a top and bottom section. The split is after the throttlebody, and very un-aerodynamic. LOW-COST LOW-RESISTANCE INTAKE THAT WORKS (Thanks to Toysrme for this discussion) Here's how to build the only intake that *actually* does something constructive: Get on ebay & buy a 2.75" to 3" silicon coupler, and an AFM Adapter WITH a cone filter. That should set you back $25-30. Go to... Anywhere Lowes/Home Depot/Auto parts store. Buy a plastic 5/8" barb, 2' of 5/8" hose, and something like Automotive Goop. 1) Drill/grind a 5/8" hole in the top, or bottom of the AFM housing on the flat spot, AFTER everything & just BEFORE the hose flange as shown in the following picture 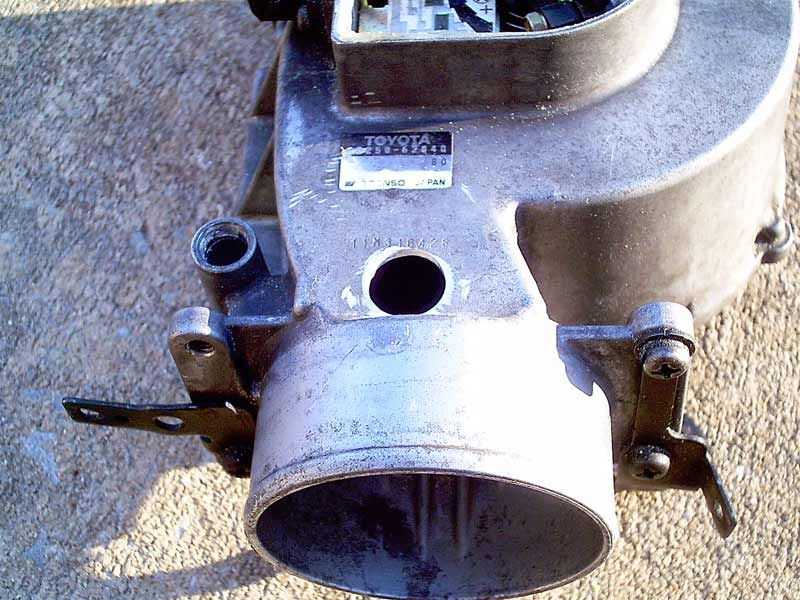 2) Cut the barb in half, leaving the flange on one side intact (Mine was a 5/8" to 3/4" barb) 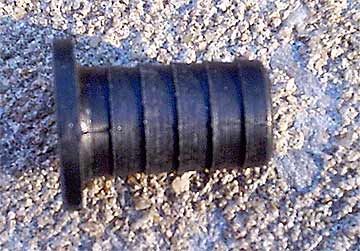 3) Push the hose barb in the hole from the inside out. That way it catches on the flange & gives you some surface area. Check the fit of the bard in the hole and then Goop/Epoxy/whatever the hose barb in place. 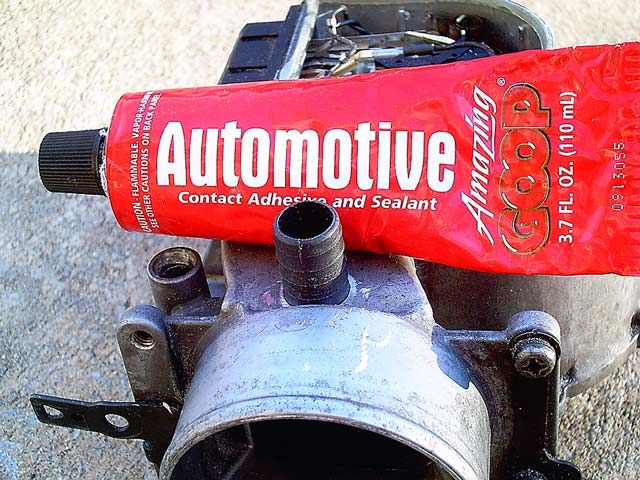 4) Bolt the AFM adapter to the AFM, & clamp the filter on 5) Clamp the silicon coupler to the AFM 6) Rotate the entire intake clockwise about 45-60* on the throttlebody when you install it 7) Install the 5/8" hose VERY GENTLY 8) Reconnect the AFM 9) Pull the EFI fuse, and count to One - Brandon-kicks-a-lot-of-ass. Then replace it. This accomplishes moving the AFM as close to the throttle plate as possible. This increases the resolution of data that the ECU see's to the maximum it ever will, and increase throttle response across the board. It also gives the best transition, shortest, and smallest amount of intake restrictions currently possible. It's the only way you're *actually* going to gain power with an intake, unless the intake includes a n2o fogger, or a turbo at some point. Not to mention it's... A very aggressive sound. Especially after modding the ACIS closed. Remember to take off the wire clip on the AFM to get the harness off... Otherwise you'll rip half the PCB out when you tug the cable. 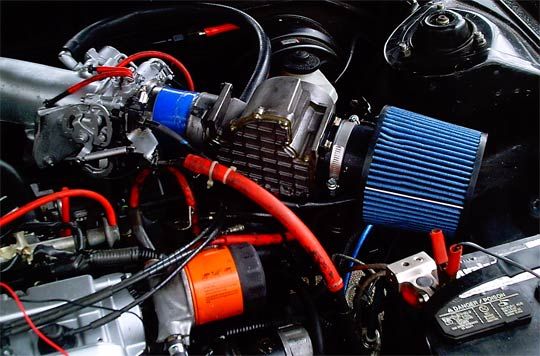  (I had some 2.75" couplers on hand so I used that. But you want to use a 2.75" to 3" coupler. You can also adjust the AFM cog. See previous discussion on that. CAMRY PERFORMANCE PARTS 1) http://www.doaracingengines.com/4cylcamshafts.html 2) http://www.mr2.com/Performance.html 4) http://www.procarparts.com/ 5) http://www.rippmods.com/ 6) http://store.summitracing.com 7) http://www.securityrace.com 8) http://www.cscracing.com/se.htm
__________________
Forum Guidelines:http://www.automotiveforums.com/vbulletin/guidelines.html "What we've got here is a failure to communicate" Last edited by Brian R.; 03-11-2008 at 05:44 PM. |
|
|
|
|
06-27-2005, 08:55 PM
|
#12 | |
|
Resident Chemist
Join Date: Feb 2004
Location: Rockville, Maryland
Posts: 8,586
Thanks: 105
Thanked 157 Times in 157 Posts
|
Re: Camry FAQs and Information
BODY KIT RECOMMENDATIONS
Q: Anyone have any recomendations for body kits for my Camry? A: Try these sites for starters: http://www.visracing.com/catalog/adv...keywords=camry http://www.extremedimensions.com/
__________________
Forum Guidelines:http://www.automotiveforums.com/vbulletin/guidelines.html "What we've got here is a failure to communicate" |
|
|
|
|
06-27-2005, 09:01 PM
|
#13 | |
|
Resident Chemist
Join Date: Feb 2004
Location: Rockville, Maryland
Posts: 8,586
Thanks: 105
Thanked 157 Times in 157 Posts
|
Re: Camry FAQs and Information
BRAKE LININGS
Q: What are the best brake linings for my Camry? Are there any things I should watch out for in changing them? A: The Toyota OEM linings are very good and I recommend them for most uses - I use them exclusively. They are quiet, have good life, and don't trash the rotor/drum. Ceramic linings have been recommended to me, but I haven't tried them. Cheap asbestos linings generally sound like Cooter's Hell when you are stopping and should be used only if you and anyone riding in your car are deaf. You should refinish the rotors if there are any grooves worn in the rotors or if there is any side-to-side wobble (runout). Drums always have to be refinished. Also, be careful not to inhale brake dust from the old pads. Don't blow the dust with your lungs or compressed air to clean the brake parts. Clean the old backing plate, rotor, caliper, etc. with a spray brake cleaner. Use a drip pan to catch the run-off. Always use new springs for the drum brakes. Use high temperature brake grease on all pivot points in drum braking systems. Don't get any liquid on the brake linings or they will be garbage. Don't even touch the linings with your fingers. Watch for wetness around the wheel cylinders, particularly inside behind the dust shields. The cylinders have to be honed or replaced if they leak at all. Flush your brake system periodically to get rid of water and contaminents. These lower the boiling point of the brake fluid and can cause brake failure or pitting of the wheel cylinders. Back off the star wheels on the bottom of the drum mechanism to allow the brake linings to clear the ridge created by drug wear. Use two screwdrivers or other bladed tools that fit in the oval opening covered by the rubber boot. Last but not least, after you change your linings, drive your car like your grandmother for a week or two. This finish cures the brake lining material and will give you a much longer brake life. PULSATING BRAKE PEDAL Q:I 've noticed this problem for quite a while. The brake pedal shakes (vibrates) when braking at or above 50 mph. It happens every time i go down a long slope or on highway. The streering wheel shakes a little bit too. It does not happen below 40 mph. I change the brake pads (front) this March and it did not fix the problem. So what can be the problem? Thanks A: Your brake rotor runout is excessive. basically they're warped Q: Then what work needs to be done? Replace the rotors or resurface them? A: You are correct; resurface them if there is enough meat left on them (wherever you take them to be cut will check the thickness first) or replace them with new ones. If there is plenty of pad left, just sand the pads lightly so they will seat better to the new rotor surface. BRAKE LIGHT ON DASH COMING ON INTERMITTENTLY Q: Okay so as I'm driving down the road sometimes my emergency brake light comes on and then after a little while it goes off. Also when I push the button to make sure that it's not engaged the light still doesn't go off. Is there something that I can check, or is there something that may have gotten crossed? A: You are most likely low on brake fluid in the master cylinder. After checking and refilling the master cylinder, inspect the thickness of the front brake pads and the thickness of the pads or shoes in the rear. When the fluid level drops that far, it usually indicates there has been considerable wear on them and it might be time for replacement of the pads and/or shoes. (Mike Gerber) Here's an article on rotor problems: http://www.performanceoiltechnology....ingsystems.htm How brakes work: http://auto.howstuffworks.com/brake.htm How disc brakes work: http://auto.howstuffworks.com/disc-brake.htm How drum brakes work: http://auto.howstuffworks.com/drum-brake.htm How anti-lock brakes work: http://auto.howstuffworks.com/anti-lock-brake.htm Here are general discussions on the topic: http://www.babcox.com/editorial/ic/ic20316.htm http://www.asbestos-institute.ca/saf...section5d.html http://www.mightyautoparts.com/pdf/articles/tt68.pdf http://www.asashop.org/autoinc/nov2002/mech.cfm
__________________
Forum Guidelines:http://www.automotiveforums.com/vbulletin/guidelines.html "What we've got here is a failure to communicate" Last edited by Brian R.; 11-24-2007 at 12:13 AM. |
|
|
|
|
06-27-2005, 10:02 PM
|
#14 | |
|
Resident Chemist
Join Date: Feb 2004
Location: Rockville, Maryland
Posts: 8,586
Thanks: 105
Thanked 157 Times in 157 Posts
|
Re: Camry FAQs and Information
TIRE SIZE COMPENSATION CALCULATOR
Q: Please tell me how to calculate the speedometer error if I go to different than stock tire diameters. A: Here is a calculator just for that purpose: http://www.miata.net/garage/tirecalc.html
__________________
Forum Guidelines:http://www.automotiveforums.com/vbulletin/guidelines.html "What we've got here is a failure to communicate" |
|
|
|
|
06-27-2005, 10:31 PM
|
#15 | |
|
Resident Chemist
Join Date: Feb 2004
Location: Rockville, Maryland
Posts: 8,586
Thanks: 105
Thanked 157 Times in 157 Posts
|
Re: Camry FAQs and Information
REPROGRAMMING REMOTE ENTRY
http://www.automotiveforums.com/vbul...5&page=1&pp=15 http://www.automotiveforums.com/vbul...ad.php?t=73219 http://www.automotiveforums.com/vbul...d.php?t=383114 http://www.automotiveforums.com/vbul...d.php?t=367962 http://www.automotiveforums.com/vbul...d.php?t=348186 http://www.automotiveforums.com/vbul...d.php?t=360771 http://www.automotiveforums.com/vbul...d.php?t=172063 http://www.automotiveforums.com/vbul...8&postcount=12 http://www.automotiveforums.com/vbul...d.php?t=126305 Toyota security systems in general: http://toyotasecurity.buypartsonline.biz/
__________________
Forum Guidelines:http://www.automotiveforums.com/vbulletin/guidelines.html "What we've got here is a failure to communicate" Last edited by Brian R.; 03-27-2007 at 04:09 PM. |
|
|
|
|
|
POST REPLY TO THIS THREAD |
 |
| Thread Tools | |
|
|

