|
|
|

|
|
| Search | Car Forums | Gallery | Articles | Helper | AF 350Z | IgorSushko.com | Corporate |
|
| Latest | 0 Rplys |
|
|||||||
| How-to | Technical Info A wealth of information at your disposal. |
 |
 Show Printable Version | Show Printable Version |  Email this Page | Email this Page |  Subscribe to this Thread
|
|
|
Thread Tools |
 01-13-2008, 11:56 PM
|
#1 | |
|
AF Enthusiast

Join Date: Mar 2005
Location: bowling green, Kentucky
Posts: 600
Thanks: 2
Thanked 1 Time in 1 Post
|
How to find Top Dead Center and set your distributor and rotor when it has been out
Heres a how-to that will help you align your timing (distributor, rotor, No. 1 cyl. at Top Dead Center (TDC) on a 1997.
This will be most helpful when: 1) your distributor has been out its housing and it wasnt marked properly for re-installation 2) you cranked your engine while the distributor was out 3) you think your distributor may have jumped a tooth *Top Dead Center refers to when your No. #1 piston in the firing order is at the top of its compression stroke when the piston is furthest from the crankshaft. http://en.wikipedia.org/wiki/Four-stroke_cycle STEP 1: Disconnect negative battery cable. **This is not just a precaution. If this is not done, you might actually crank and start your engine manually when turning the crankshaft ---- very dangerous. 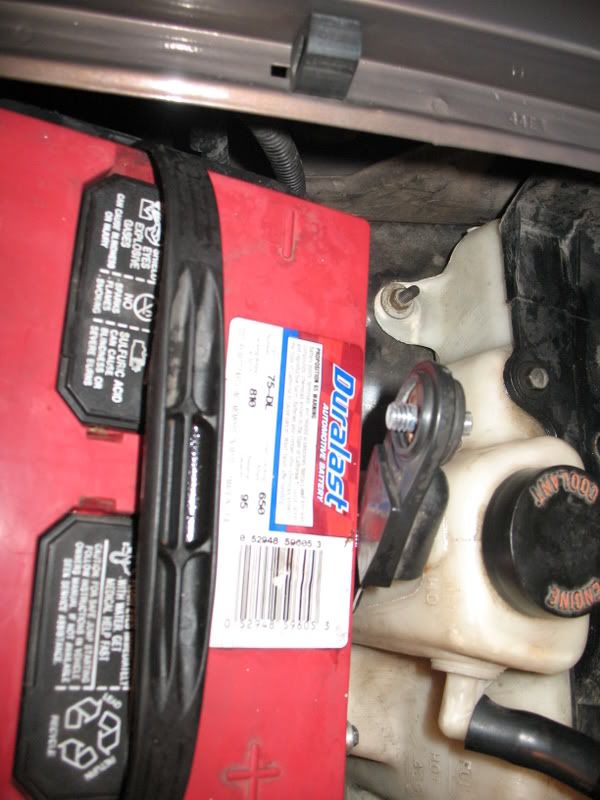 For extra precaution, disconnect the ignition coil. 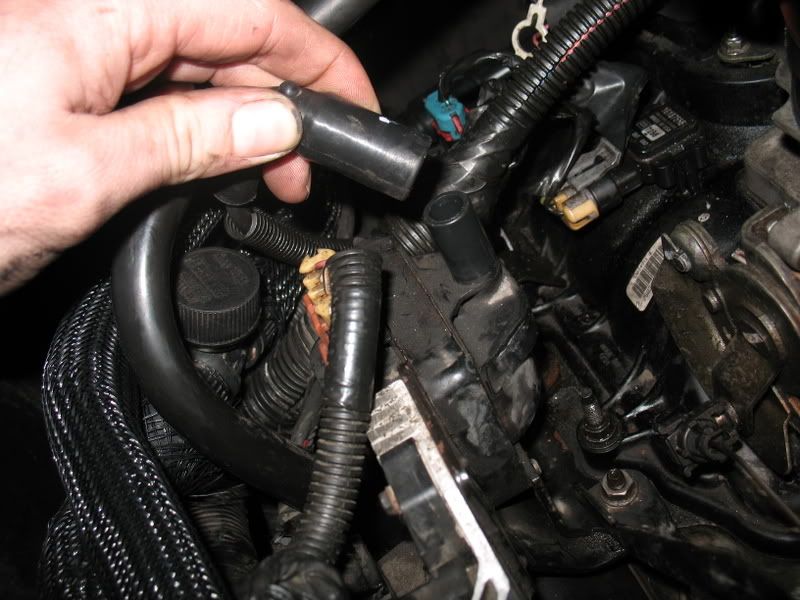 STEP 2: In my case, I thought my distributor had jumped a tooth after replacing my lower intake manifold gasket (turns out it did, due to a loose hold-down bolt). I was determined to pull the distributor without taking off the air-intake and the whole top of the engine to access it. It is possible. I was able to pull out and re-install my distributor with this special socket I made without removing all the stuff on top. As you can see in the pictures below, there is not much clearance between the distributor housing and the hold-down bolt. To loosen and tighten the hold-down bolt, I made my own shortened socket by sanding down a sacrificial 10mm socket. See the pictures below. 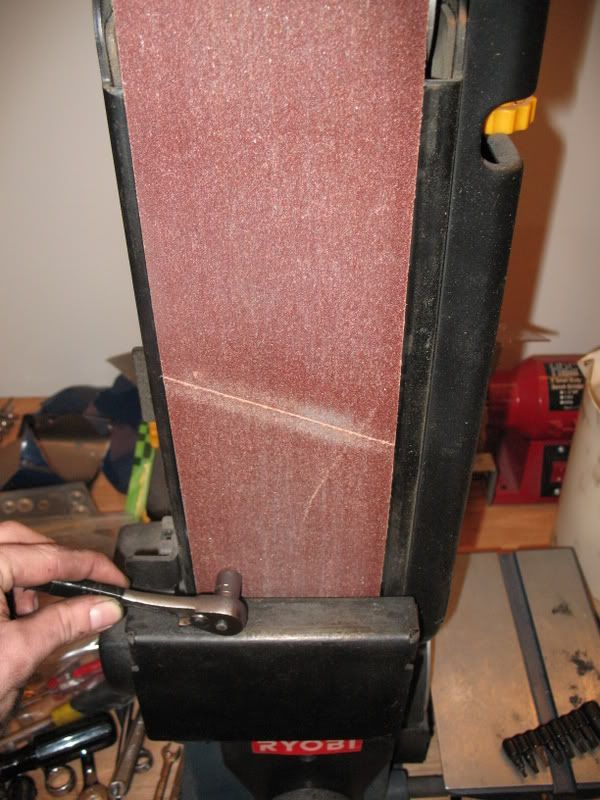 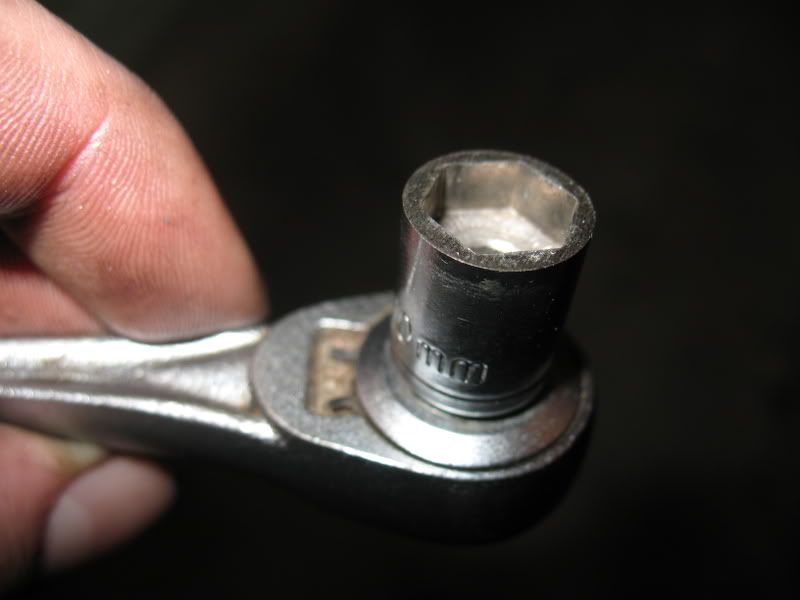 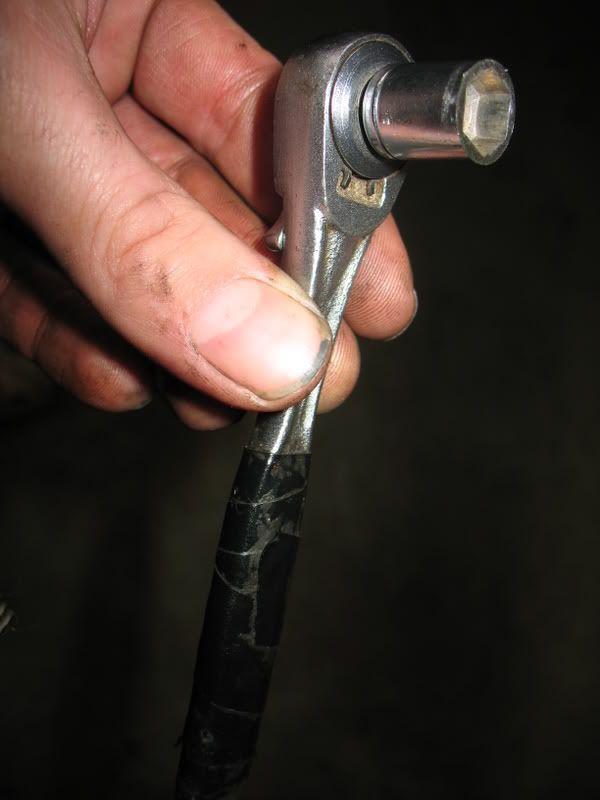 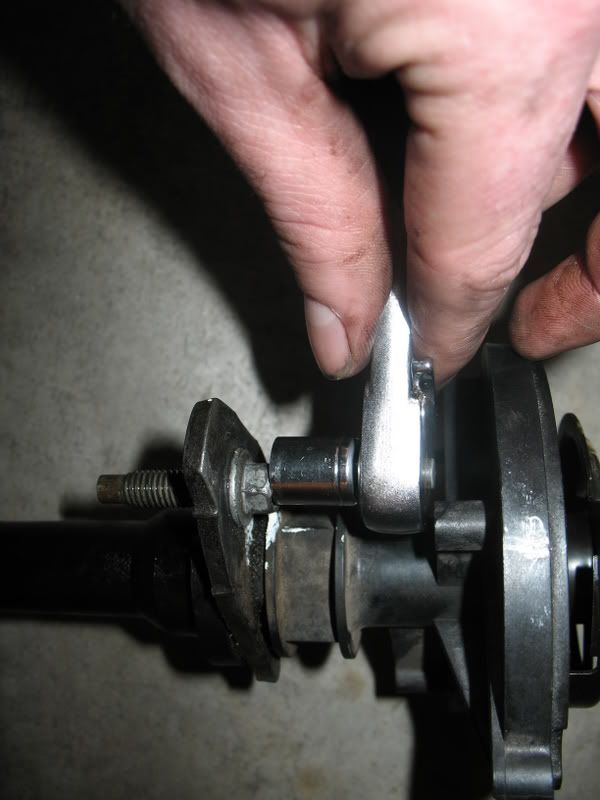 STEP 3: Now on to setting TDC ... Looson wheel lugs on front drivers-side wheel. Jack up the left front of the truck. Remove wheel lugs and tire. 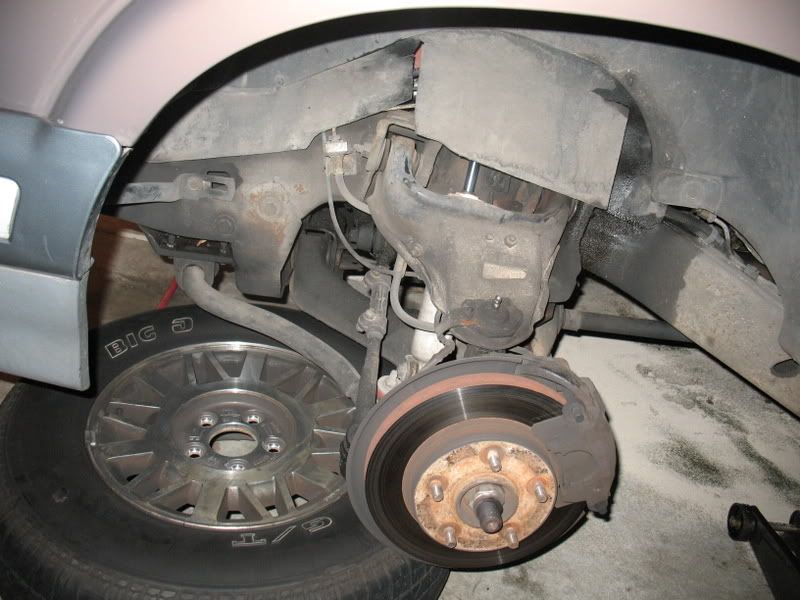 STEP 4: Remove your #1 sparkplug (drivers side front-most plug). If your air intake is still on (like mine was), this is best done from the front wheel-well. Wobble extensions are extremely helpful here.  STEP 5: Now, get under your truck and look at the harmonic balancer behind the crankshaft pulley. You should see two white marks. Both of these need to line up on at about 4:00 oclock on the balancer which lines up with on the plastic, and another one on top of the balancer at about 1:00 oclock which lines up with a notch (see pictures). Put a ratchet and socket on the crankshaft pulley and rotate the crankshaft to make them line up. Now, the marks can be lined up and still be 180degrees off which means -- your truck still wont go. Everything has to be lined up on the compression stroke. To do this, youll need to put your finger or thumb into the open No. #1 cylinder spark-plug hole while turning the crankshaft (an assistant can help but I was able to do this easily by myself). When you feel air coming out of the cylinder, that means it is on the compression stroke. At that point, you know you are on the compression stroke begin to watch the marks and align them slowly. 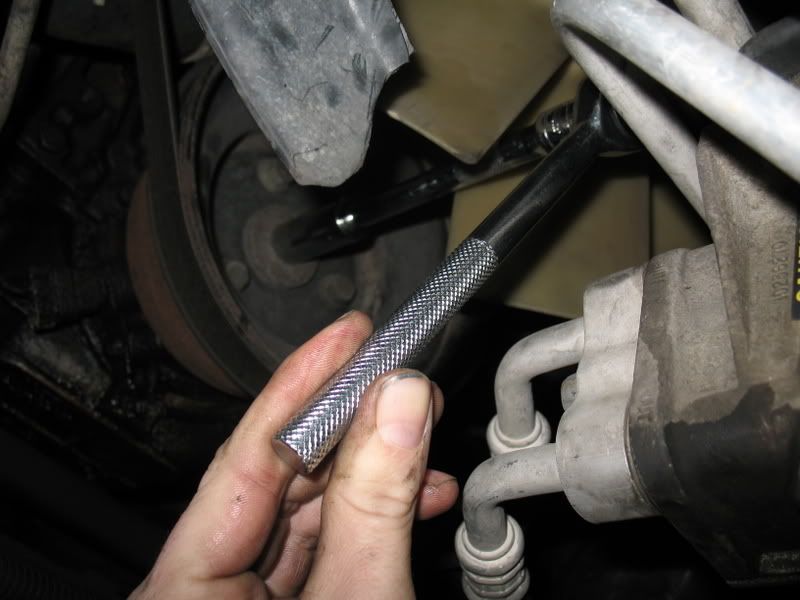 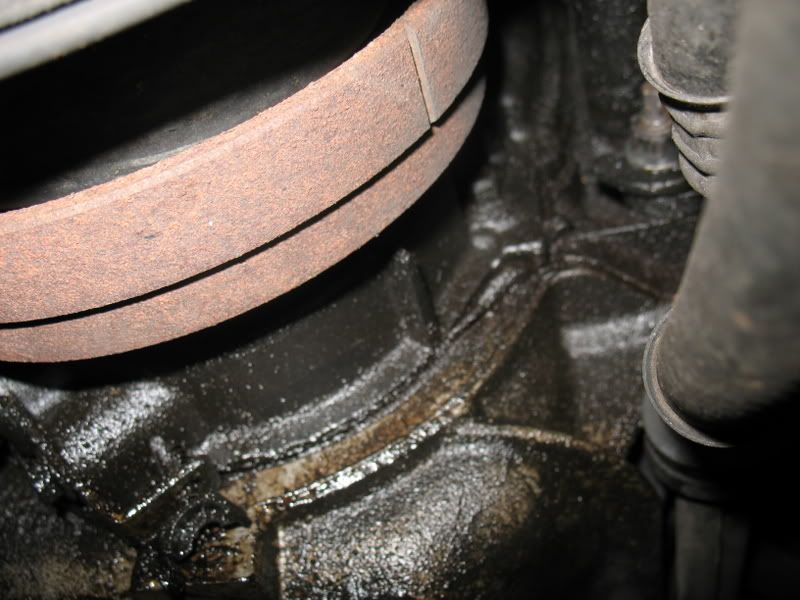 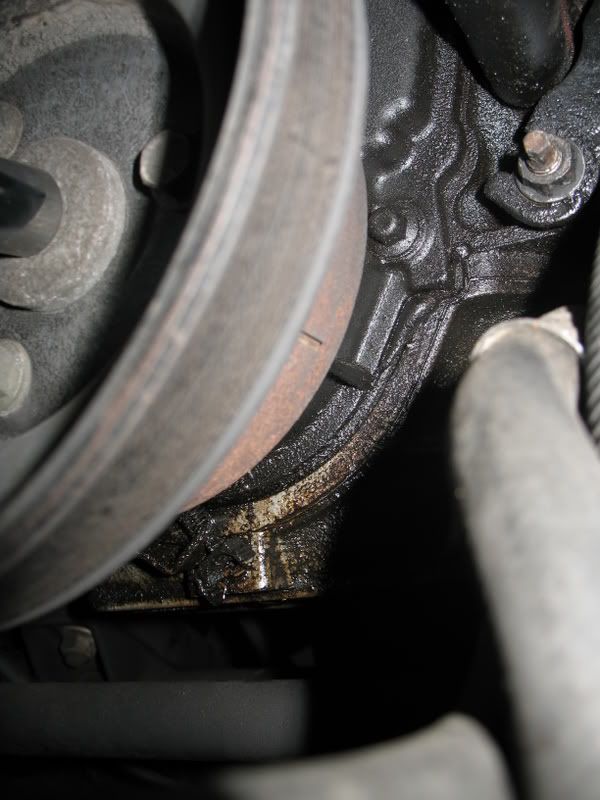 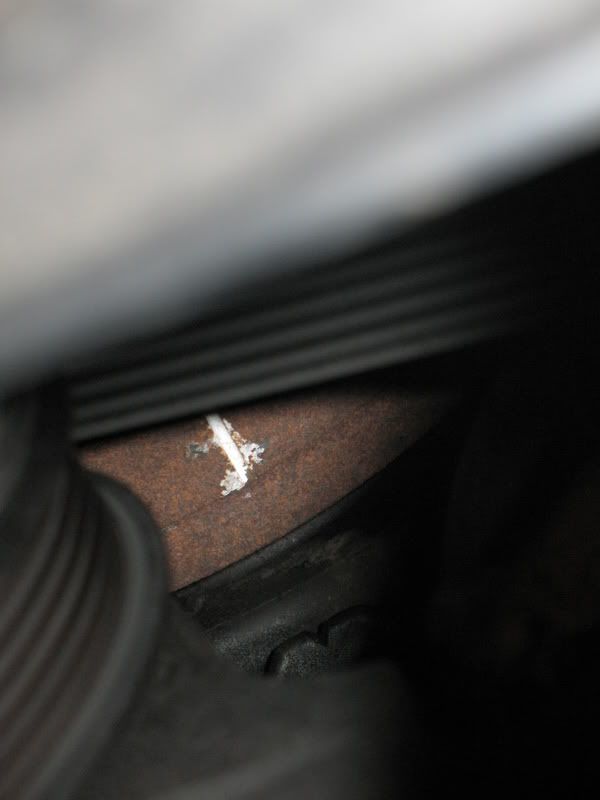 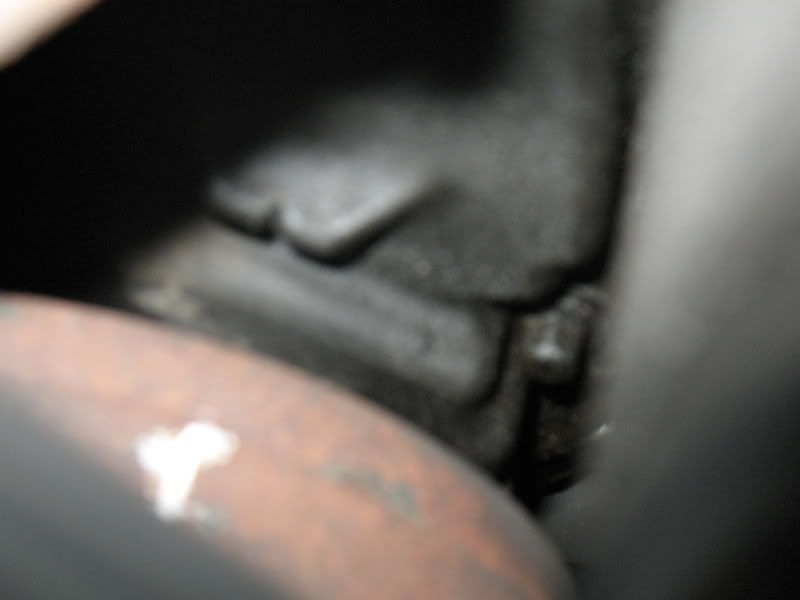 STEP 6: You are now at TDC. Time to line up the distributor shaft and rotor. Heres the distributor 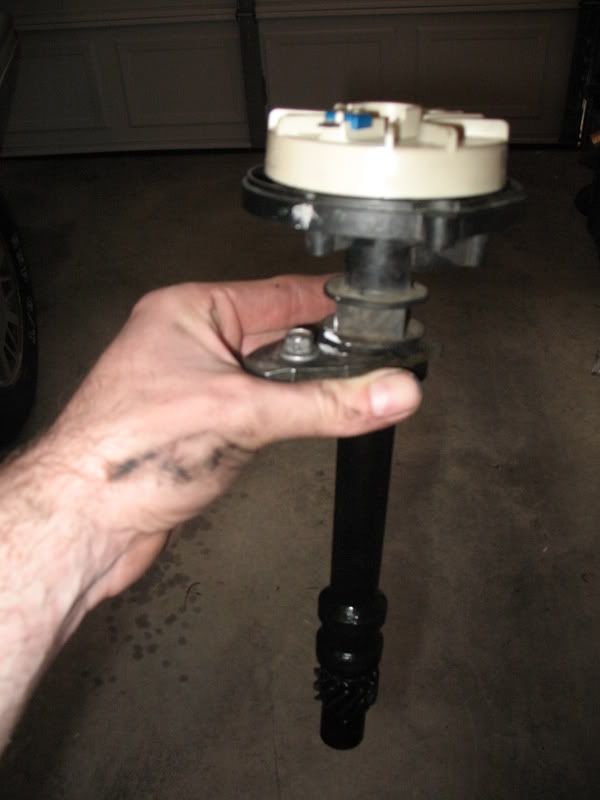 Two small Torx screws hold the rotor to the distributor. This picture was taken on reassembly.  The rotor only fits on one way. Its not possible to attach the rotor 180degrees off. Heres an underside picture of the rotor. Note the dimples next to the screw holes. They are displaced one is closer to the screw-hole than the other. This is why its only possible to attach the rotor to the distributor in one way. 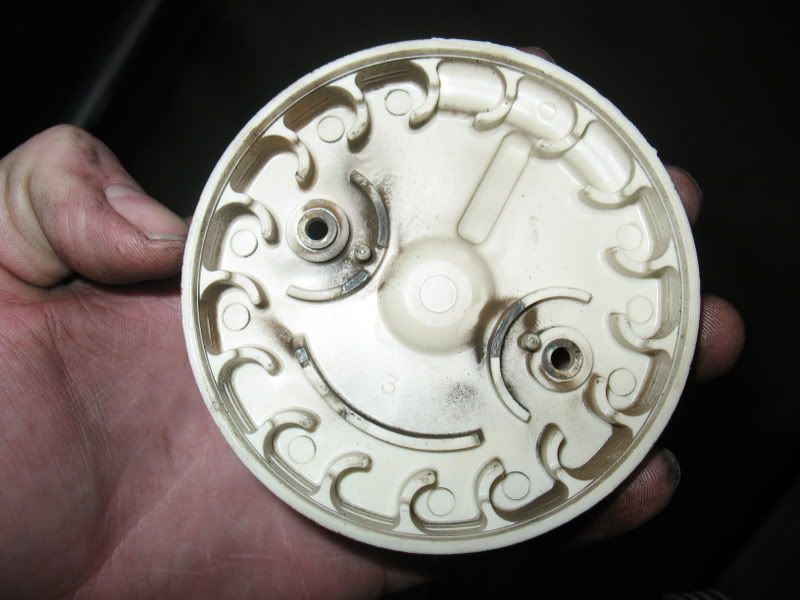 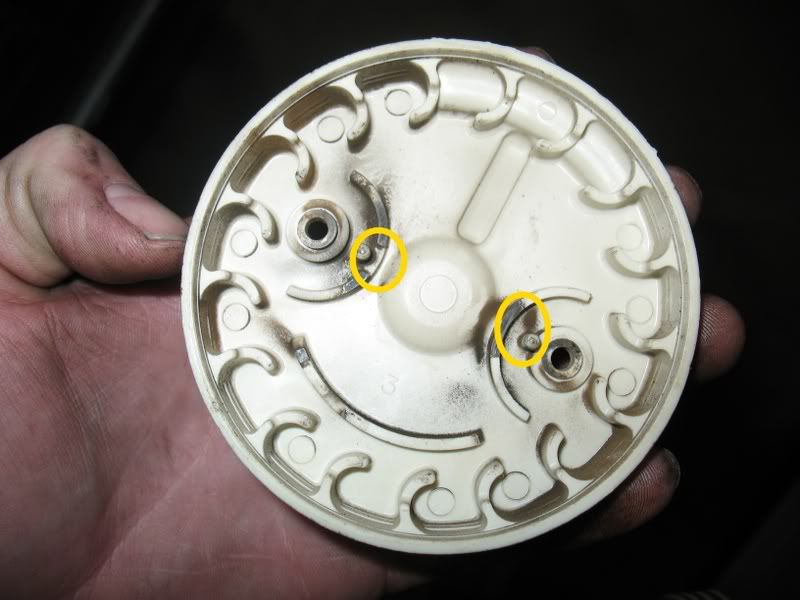 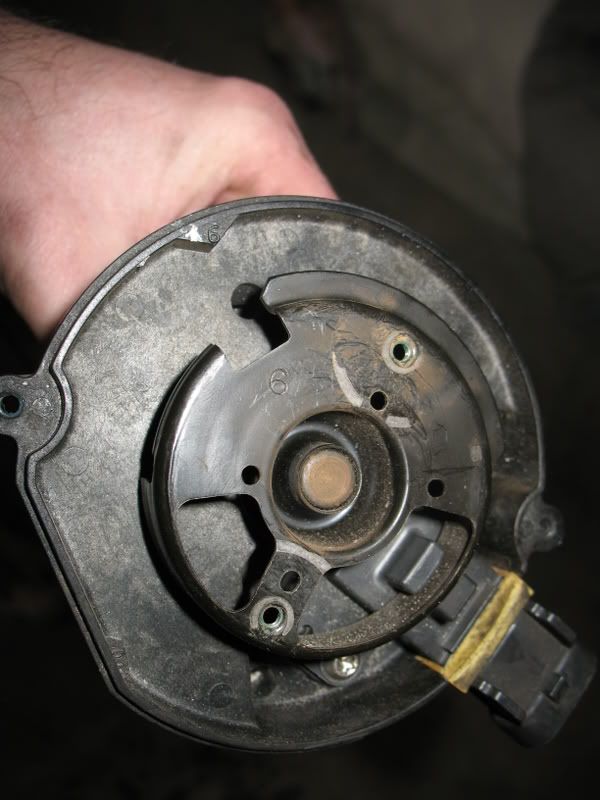 Step 7: Now attach the rotor to the distributor and rotate to the number 6 which is embossed on the plastic distributor housing (there is a number 8 as well for eight-cylinders us 4.3 guys want the 6 of course). 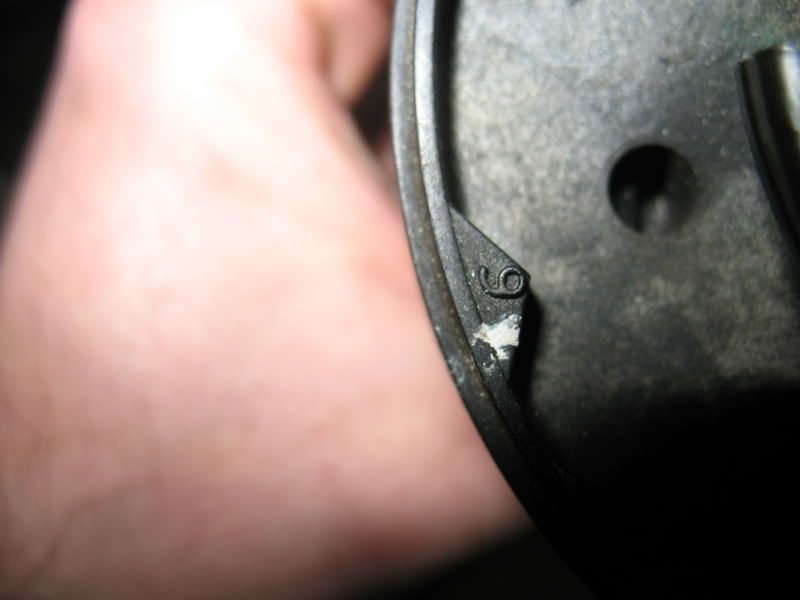  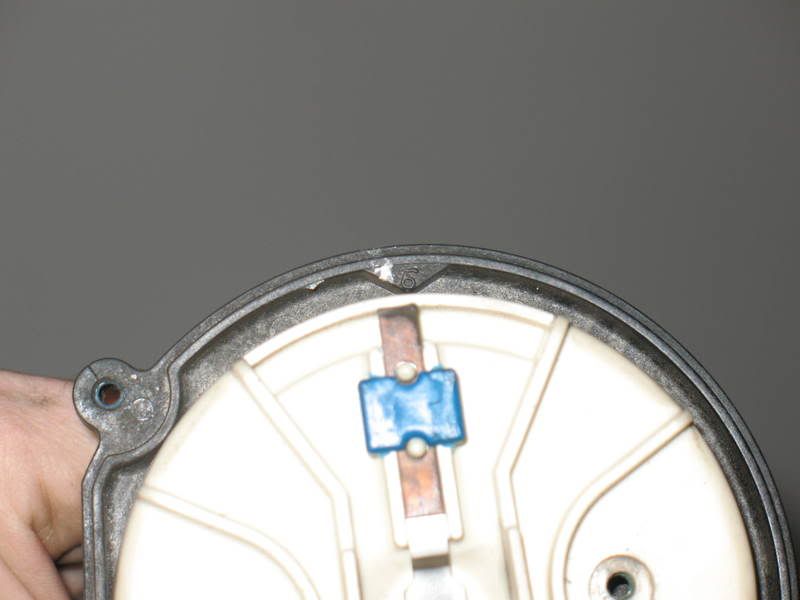 Heres the 8 dont align with this though 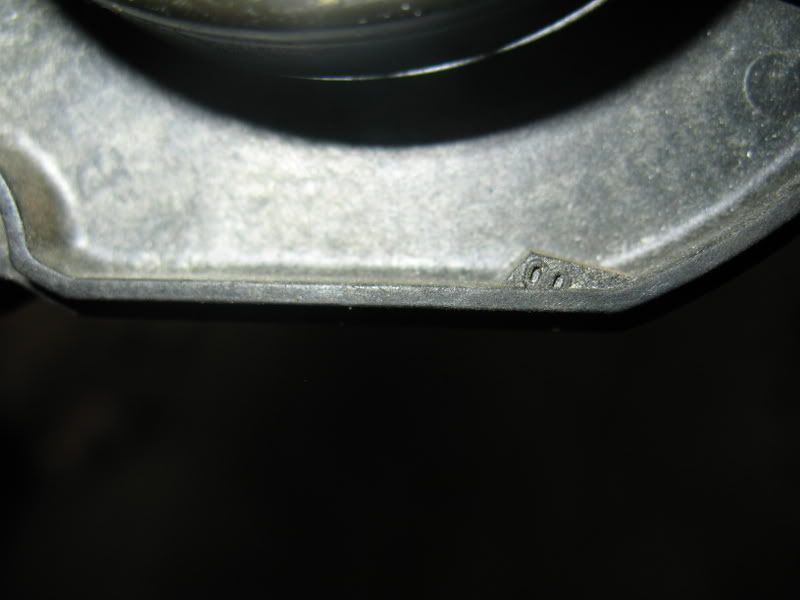 STEP 8: Now you are at TDC, your rotor is attached to your distributor properly. Now, the trick is to slide the distributor back in (use a gasket if you have one) so that the hold-down bolt lines up and the rotor stays lined up with the number 6 embossed on the plastic distributor housing. If you dont get it the first time, youre probably off by just a few teeth pull the distributor out and try again. Heres a picture of everything lined up. 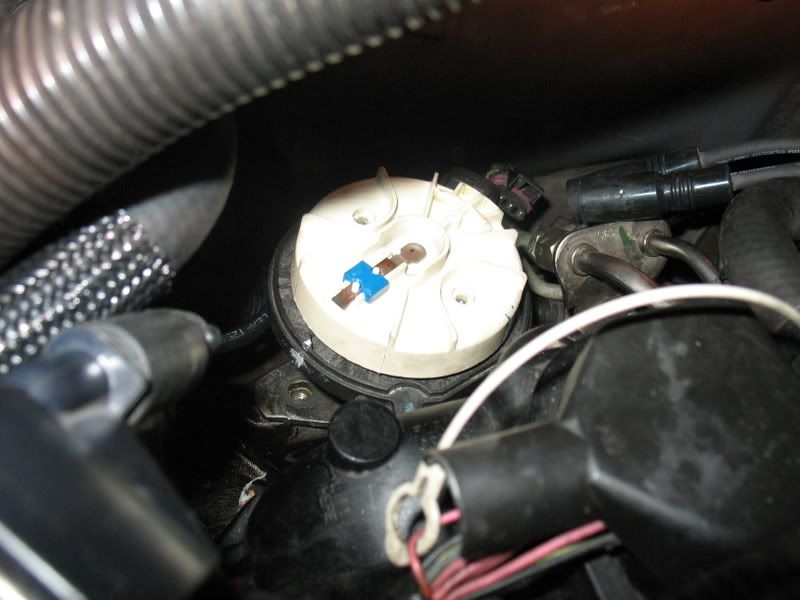 STEP 9: Re-install hold-down bolt 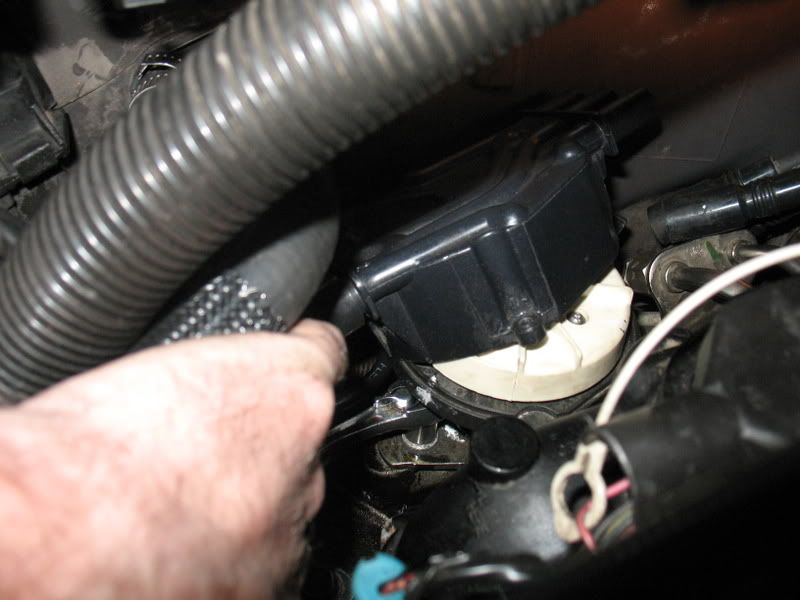 And distributor cap 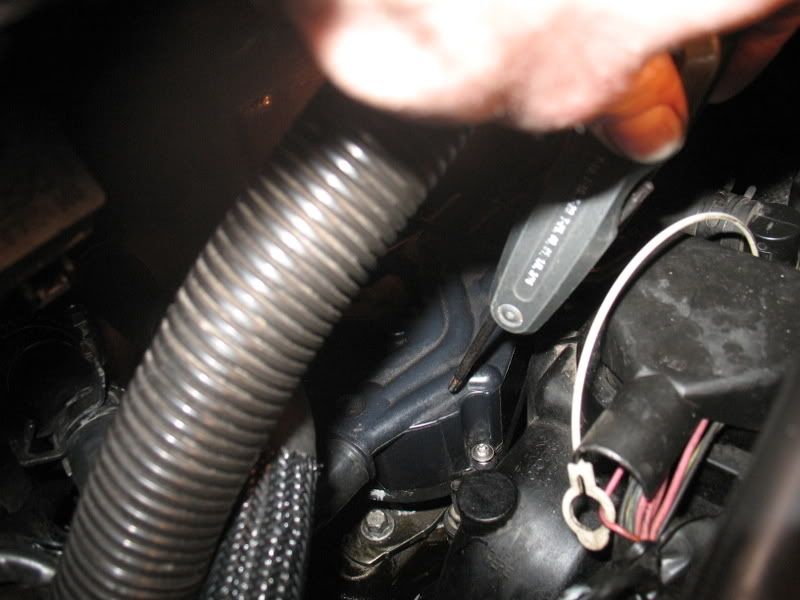 STEP 10: Now re-connect ignition wires. Note the order on the cap (3, 1, 5 front-to-back). 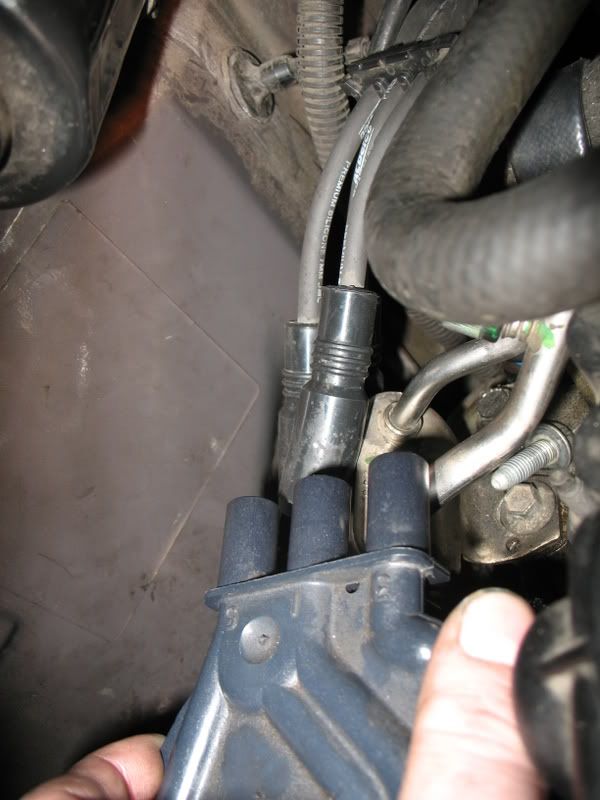 Reconnect the harness electrical connection on the distributor. Re-connect coil as well. STEP 11: Re-connect spark-plug and wire. When I reconnected the spark plug, my socket got stuck on the tightened spark plug. I had to use a pair of channel locks to grab it and pull it out. 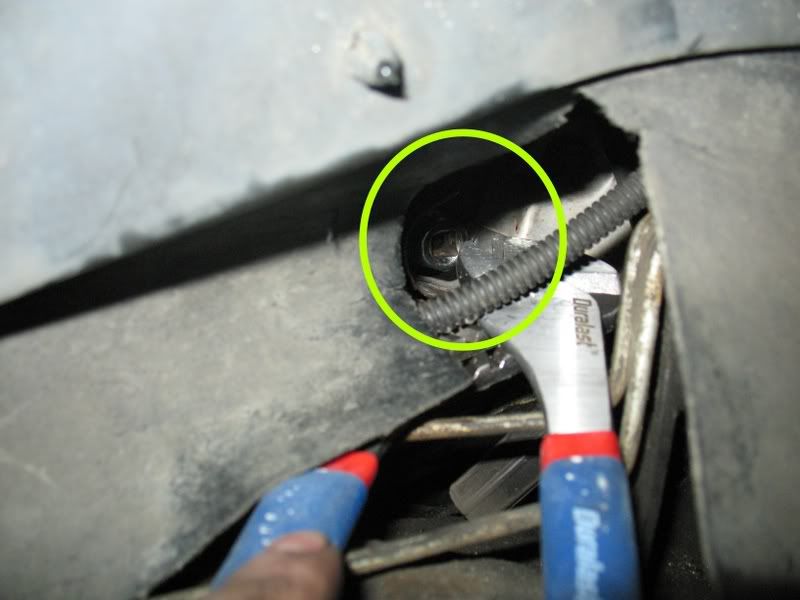 Next time Ill use a longer socket that extends farther than the exhaust manifold heat sheild like this one on the left. 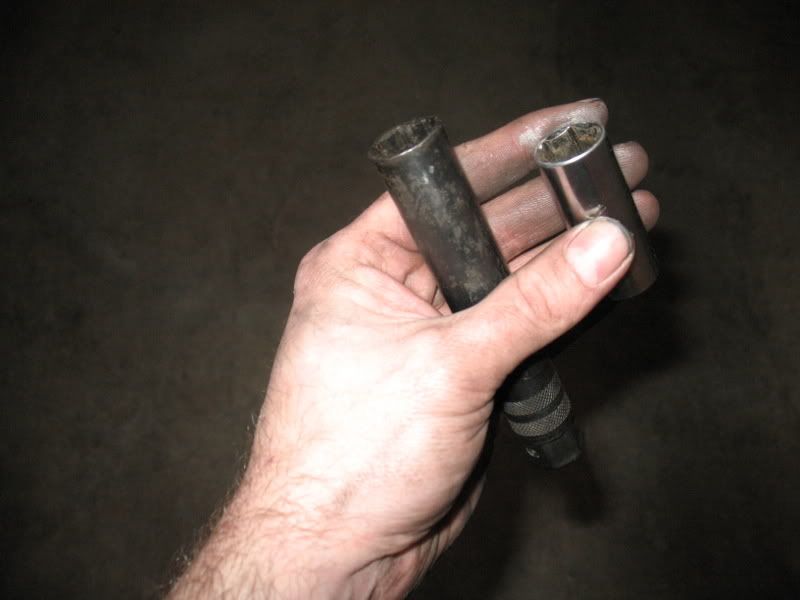 STEP 12: Put your tire back on. Re-connect your negative battery cable and youre good to go. |
|

|

|
|
01-14-2008, 06:42 AM
|
#2 | |
|
AF Enthusiast
 
Join Date: Feb 2005
Location: Burbank, Illinois
Posts: 571
Thanks: 0
Thanked 0 Times in 0 Posts
|
Re: How to find Top Dead Center and set your distributor and rotor when it has been out
Excellent, Write up drdd... (Life Saving for some)
This should end up in the DIY Section... Dino
__________________
1998 BLAZER LS Vin-W 4Dr 2wd 2004 Cavalier LS 4Dr 2.2 Ecotec "Good Part's ain't Cheap--Cheap Parts ain't Good" |
|
|
|
|
|
01-14-2008, 10:06 AM
|
#3 | |
|
GM S-Series Mod
 
Join Date: Aug 2005
Location: Westminster, Maryland
Posts: 2,650
Thanks: 0
Thanked 1 Time in 1 Post
|
Re: How to find Top Dead Center and set your distributor and rotor when it has been out
moving to FAQ section
__________________
2000 Chevy Blazer ZR2 Performance Mods: Numerous Suspension Mods: Some, but not enough Exterior Mods: Just Right 1987 Buick Turbo T Dark Red Low 11 sec sleeper  .030 4.1 block, PT6262E, & other odds and ends.... My Cardomain |
|
|
|
|
|
05-08-2008, 10:17 AM
|
#4 | |
|
AF Newbie

Join Date: May 2008
Location: Billings, Montana
Posts: 5
Thanks: 0
Thanked 0 Times in 0 Posts
|
Re: How to find Top Dead Center and set your distributor and rotor when it has been out
Great write up..
Thanks for taking the time to do it... You & this thread just saved me a TON of $$$$$$$$$$$ I almost gave up hope on the Jimmy until I "Stummbled" on to this site!!! Again Thankyou..  |
|
|
|
|
|
10-29-2008, 02:55 PM
|
#5 | |
|
AF Newbie
Join Date: Oct 2008
Location: bountiful, Utah
Posts: 2
Thanks: 0
Thanked 0 Times in 0 Posts
|
WOW, i can't tell you how much i appreciate this how -to!! You saved me a ton of hours and money! Tried it and got it the first try with your instruction...2 big thumbs way up!
 |
|
|
|
|
|
04-24-2010, 10:39 PM
|
#6 | |
|
AF Newbie
Join Date: Apr 2010
Location: Rochester, Indiana
Posts: 1
Thanks: 0
Thanked 0 Times in 0 Posts
|
I just wanted to say thanks for the step by step and pics about the 4.3l dist. and timing. I have been working on my 02 chevy silverado 1500 for about a week trying to get it start after someone pulled the motor out and did not mark the dist. location after i rebuilt it and put it back in. Then i went to start it and nothing could not figure it out my book did not explain nothing about the #6 or #8 location on the dist. once i put it on the 6 cranked it over and it fired right up. So thanks again to see it help out so much. Thanks aging Tony Rogers Rochester Indiana
|
|
|
|
|
|
04-26-2010, 01:08 AM
|
#7 | |
|
AF Regular
Join Date: Mar 2010
Location: atlanta, Georgia
Posts: 247
Thanks: 1
Thanked 8 Times in 8 Posts
|
Re: How to find Top Dead Center and set your distributor and rotor when it has been o
glad the forum could help! it has def helped me. the guys on here are great!
__________________
2001 Chevy Blazer 4.3L 5 speed manual Alpine deck, Type R 12in. sub. 145k miles 1997 Pontiac Sunfire 2.2L automatic trans 146k miles |
|
|
|
|
|
09-19-2010, 01:42 PM
|
#8 | |
|
AF Newbie
Join Date: Feb 2007
Location: Shawnee, Oklahoma
Posts: 4
Thanks: 0
Thanked 0 Times in 0 Posts
|
Re: How to find Top Dead Center and set your distributor and rotor when it has been out
looks like this info will fix my '96. just curious why you have to pull the distributor all the way out? why not just lift it out of the cam gear, index it, and drop it back in? thanks for the info!
|
|
|
|
|
|
09-19-2010, 09:58 PM
|
#9 | ||
|
AF Newbie
Join Date: Sep 2010
Location: Laguna Beach, California
Posts: 5
Thanks: 0
Thanked 0 Times in 0 Posts
|
Quote:
Notes: With the cap off as it should be when sinking in the dist., the mark (6 pointer) is clearly evident when approaching the dist. on the passenger side (RH). Also, we need not be concerned of the exact rotative position of the distributor because of the simple fact that it does not rotate (while it is clamped, anyway). Note that the odd bank ign. wires are NOT in consecutive order although the even (RH) side is. (2,4,6,coil. & 3,1,5 for the LH bank) Vortec engines are nice servicing in my opinion. Unlike so many car makers, for the most part the design does include some provisions, with less pompous in opposing fact that will always apply which warrants that the vehicle actually might have to be worked on someday. What an excellent post this is. Better than the premium content you have to pay money for. GREAT photography too. The poster is an asset to the site, irrefutably, if that is an example of his posts! Best to all! - Pete VEH: '10 -C6
__________________
Better to PREVENT a problem than solving one >>--> 
|
||
|
|
|
|
09-12-2011, 01:40 AM
|
#10 | |
|
AF Newbie
Join Date: Jun 2008
Location: san jose, California
Posts: 1
Thanks: 0
Thanked 0 Times in 0 Posts
|
Re: How to find Top Dead Center and set your distributor and rotor when it has been out
Hello All,
Does this procedure work on 1991 4.3l S10 Pickup? Thanks! Ed |
|
|
|
|
|
09-12-2011, 04:33 PM
|
#11 | ||
|
Advisor/Moderator

Join Date: Nov 2005
Location: Belleville, Michigan
Posts: 5,184
Thanks: 6
Thanked 103 Times in 95 Posts
|
Re: How to find Top Dead Center and set your distributor and rotor when it has been out
Quote:
1991 only has one timing mark on the damper. No need to remove the #1 plug on either engine, (The piston will push air out of the spark plug hole on both strokes when approaching TDC). When the TDC timing mark on the damper lines up with the index on the timing cover, #1 piston is at TDC. There are two ways to determine if you are at TDC of the compression stroke, (not exhaust stroke) on the 4.3L engine: One is to remove the driver side rocker arm cover and check that both valves for #1 cylinder are closed. The second is much easier and done by using a timing light after the distributor is installed. The rotor and distributor are different on the 1991, (no "6" or "8" on distributor housing). On your 1991, when the distributor is fully seated, the rotor must point to the #1 plug wire in the cap. Connect a timing light, disconnect the EST wire, and crank the engine. If the timing mark is visible while cranking, adjust the timing to spec and tighten the distributor hold down bolt. If the mark is not visible, the distributor was installed on the exhaust stroke and must be removed, the shaft rotated 180 degrees, and reinstalled, then check and adjust timing.
__________________
You have to know how it works, to figure out why it doesn't. |
||
|
|
|
|
04-22-2012, 11:52 AM
|
#12 | |
|
AF Newbie
Join Date: Apr 2012
Location: lebanon, Pennsylvania
Posts: 1
Thanks: 0
Thanked 0 Times in 0 Posts
|
Re: How to find Top Dead Center and set your distributor and rotor when it has been out
thanks... workin' on my 97 s-10 i just bought a few months back for $700 w/ over 200k miles on it, and ran into just this problem... very helpful, though i wish the pictures were still available to aid even further in the trouble shooting... just a minor issue though, as the step by step was very clear and concise... thanks again.
|
|
|
|
|
|
|
POST REPLY TO THIS THREAD |
 |
|
|


