|
|
|

|
|
| Search | Car Forums | Gallery | Articles | Helper | AF 350Z | IgorSushko.com | Corporate |
|
| Latest | 0 Rplys |
|
|||||||
| WIP - Motorsports Post topics for any "Work In Process" motorsports vehicles in this sub-forum. |
 |
 Show Printable Version | Show Printable Version |  Email this Page | Email this Page |  Subscribe to this Thread
|
|
|
Thread Tools |
 09-12-2013, 01:13 PM
|
#1 | |
|
AF Newbie
Join Date: Aug 2013
Location: Ottawa
Posts: 65
Thanks: 9
Thanked 4 Times in 4 Posts
|
Ika Musume Ferrari (Super GT 2011)
Hello,
This is my first post here on AutomotiveForums. I'm starting a new project, which is 1/24 scale Ika Musume Ferrari by Fujimi. The car is based on Ferrari 430 GTC, and it ran in Super GT GT300 class in 2011 and 2012 seasons.   I picked a 2011 livery because IMO it's better looking. The catch with this kit is that the kit is based on Ferrari Challenge F430, while the real car is GTC. This means there are some modifications (some fairly major) to do. This is going to be my first time doing anything outside of just building by instructions, so I'm going to need some help! I also picked up the detail kit for this model from Hobby Design, but because of the modifications, I'll be only using some of them Anyway, I'll be posting my progress here, as well as on my blogger (Link). I'm hoping to get some advices on here, because I already know there are many things that will be challenging for me. I'm not an experienced (or fast) modeller, so please leave lots of comments :-) I haven't started building yet, but here are couple more pictures for you to enjoy!  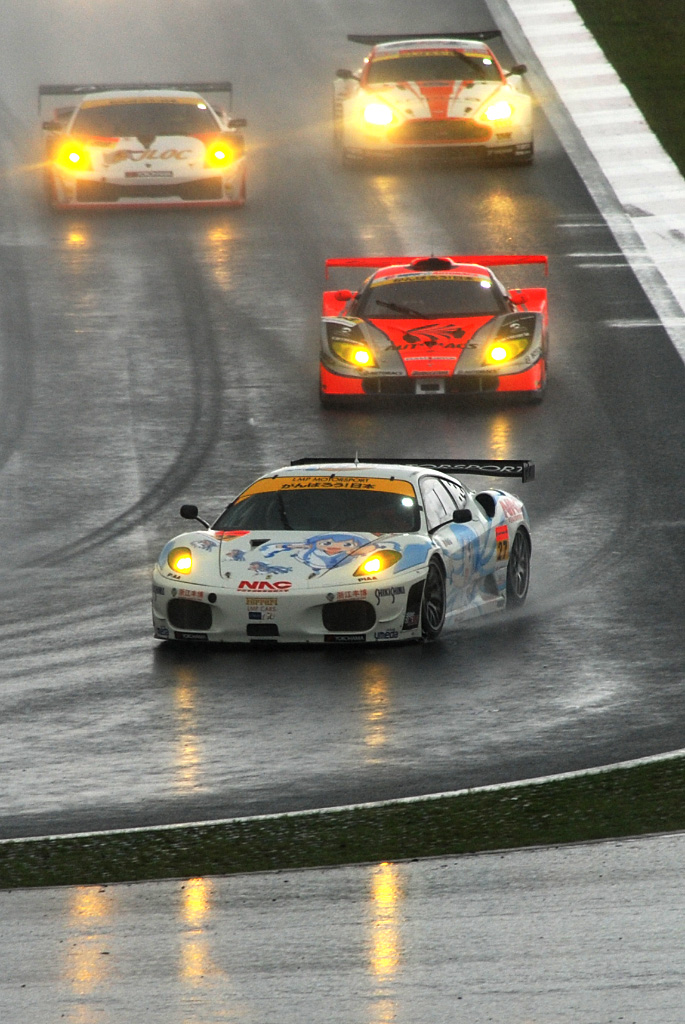 |
|

|

|
|
09-12-2013, 02:27 PM
|
#2 | |
|
AF Enthusiast

Join Date: Oct 2012
Location: Doornenburg , Netherlands
Posts: 502
Thanks: 80
Thanked 74 Times in 74 Posts
|
Re: Ika Musume Ferrari (Super GT 2011)
I will follow this ons.
I build the 2012 version. http://www.automotiveforums.com/vbul....php?t=1091269
__________________
my English is not perfect but hopefully be readable |
|
|
|
|
|
09-12-2013, 11:31 PM
|
#3 | |
|
AF Newbie
Thread starter
Join Date: Aug 2013
Location: Ottawa
Posts: 65
Thanks: 9
Thanked 4 Times in 4 Posts
|
Re: Ika Musume Ferrari (Super GT 2011)
Just a quick update, just to show that I am actually working on this and not just a wish list:
Today, I worked on adding the air vents to the hood of the car:  These vents are not represented in the kit, so I needed to create them. Doing any sort of modifications to a kit is new, so I was really nervous, but I think it turned out okay without resulting in a total disaster. Using a knife, I cut out the outlines (Using a knife may not have been the best way. Whilst making these, I broke the tip of two blades  ) ) Then added the vents:  I need to finish up with putty, but I will leave it for another time. Let the glue cure, and do some final sanding before applying the putty. ----- On a completely unrelated issue, I would like to ask for an advice on two things: 1. The tires that come with the kit is treaded: (See attached picture IMG_0576.jpg), but I would like to have slick tires. Does anyone know a good way to convert into slick tires (some rubber compound?) 2. The brake discs that is represented in the kit/detail up kit looks like the attached picture IMG_074.jpg. But the real life brake discs look like this:  Should I just use the kit? I think the kit discs are very common discs for race cars too (or am I wrong?) |
|
|
|
|
|
09-12-2013, 11:36 PM
|
#4 | ||
|
AF Newbie
Thread starter
Join Date: Aug 2013
Location: Ottawa
Posts: 65
Thanks: 9
Thanked 4 Times in 4 Posts
|
Re: Ika Musume Ferrari (Super GT 2011)
Quote:
Nice job on the 2012 version! I may ask you for some tips later on, since they are basically the same kit. I also thought of doing a Z4 GT3 (but with Hatsune Miku livery also from SuperGT). I may get to that some day |
||
|
|
|
|
09-16-2013, 10:32 PM
|
#5 | |
|
AF Newbie
Thread starter
Join Date: Aug 2013
Location: Ottawa
Posts: 65
Thanks: 9
Thanked 4 Times in 4 Posts
|
Re: Ika Musume Ferrari (Super GT 2011)
Time for some updates!
1. Brakes Using the detail up parts, I built the brake discs (whilst making these, I cut myself with the knife. I learnt thus that it really sucks not having a thumb when modelling. Good thing it was on my left hand  The calipers are painted gold. In the real car it has a red Brembo logo on it, but unfortunately I don't have the decals for them, so leaving them blank  The tires are finished (for now... I may decide to do something with the tires to make them racing slick tires... open to any suggestions) 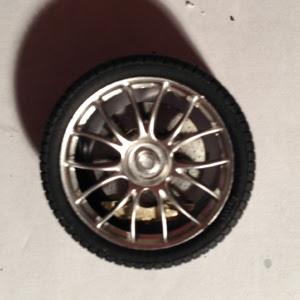 2. Body Modifications Building the wide-body modification: GTC car has wider body than the Challenge (the kit). So widen the body by 1mm on either side:  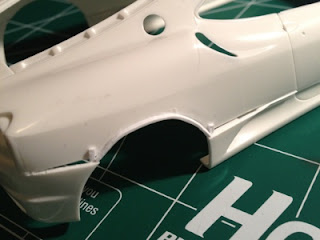 Next, the front air intake. The GTC intake is bigger than the Challenge.    Applying the putty (which I learned that I should not have used the basic putty, but use the epoxy putty or polyester):   The body will be primed and will be sanded as necessary 3. Chassis In the GTC, the front has a overhanging lip that is absent in the Challenge. The rear diffuser is gone in GTC (See picture below). So recreate these by replacing the front and rear with the new pieces:  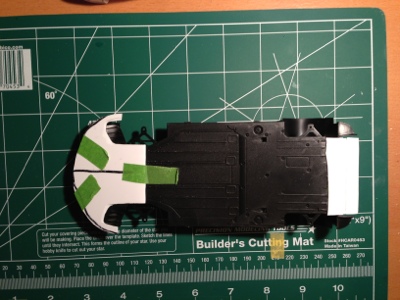 That's it for now! Stay tuned for more updates later~ |
|
|
|
|
|
09-17-2013, 06:31 AM
|
#6 | |
|
ItaloSvensk

Join Date: Mar 2009
Location: Marstrand
Posts: 3,383
Thanks: 1,077
Thanked 296 Times in 270 Posts
|
Re: Ika Musume Ferrari (Super GT 2011)
suspect the wheel used by the racing version are different than challenger ones provided into fujimi kit.
__________________
Paolo - LoveGT40 Modelworks website www.alsoldatino.com my YT channel : https://www.youtube.com/channel/UCIp..._as=subscriber FB: https://www.facebook.com/alsoldatino |
|
|
|
|
|
09-25-2013, 09:00 PM
|
#7 | |
|
AF Newbie
Thread starter
Join Date: Aug 2013
Location: Ottawa
Posts: 65
Thanks: 9
Thanked 4 Times in 4 Posts
|
Re: Ika Musume Ferrari (Super GT 2011)
So finally I have some updates.
I have been in the cycle of priming the body, checking for flaws, fixing the flaws, prime again, finding my fix did not completely fix the flaws, attempt to fix again, etc etc... In the end, I think I have the result I am satisfied with.   Some other things I worked on in parallel is to reshape the NACA duct on the hood.  The left is the first attempt. I didn't really like the shape, so I fixed it, and I think it looks better. I also partially filled the hole where the hooks go, since it is way too deep for the PE parts I will be using for the hooks. Another part I worked on is the side vent on the front bumper. The reference pic is below:  I scratch-built the vents, and added the flare at the bottom. It does not perfectly resemble the real thing, but it is close enough.  So, as usual, I am looking for an advise: I am hoping to get to paint the body soon, but should I add the small aero-wings such as the one in the reference picture above, or should I attach them after I paint the body? I will be using the spray can, if that makes any difference. Any advise would be very helpful! Thanks for reading  |
|
|
|
|
|
09-26-2013, 12:40 AM
|
#8 | |
|
AF Enthusiast
Join Date: Oct 2012
Location: Doornenburg , Netherlands
Posts: 502
Thanks: 80
Thanked 74 Times in 74 Posts
|
Re: Ika Musume Ferrari (Super GT 2011)
This car is getting nice. Personally i attached those wings after i spray painted the body. The change of getting too much paint in that area is great.
__________________
my English is not perfect but hopefully be readable |
|
|
|
|
|
09-30-2013, 01:49 PM
|
#9 | |
|
AF Newbie
Thread starter
Join Date: Aug 2013
Location: Ottawa
Posts: 65
Thanks: 9
Thanked 4 Times in 4 Posts
|
Re: Ika Musume Ferrari (Super GT 2011)
The progress is at the moment halted.
I primed the body gray, and without thinking, I started painting the body white. The result is that I don't get the white I was hoping for. I already painted like four coats, thinking the more coats you do, the whiter the body will get. Apparently I'm wrong. I'm still left with a somewhat grayish white. So I ended up going back to the store to get a white primer. I will sand down the body and restart from applying the primer. It'll add on a few extra days but I think it will end up looking better I have started on the interior but I'll post an update a little bit later Stay tuned... |
|
|
|
|
|
09-30-2013, 02:55 PM
|
#10 | |
|
AF Regular
Join Date: Apr 2005
Location: Hamilton
Posts: 324
Thanks: 6
Thanked 45 Times in 40 Posts
|
Re: Ika Musume Ferrari (Super GT 2011)
Nice start. The mods you are doing look really good for your first attempt at them. For the vents you cut, next time, get a fine drill and drill the corners, then drill some more holes along the edge to connect the dots, then take your knife and break the small remaining bits of plastic between the holes. Then just sand and file. Will save you a lot of blade tips. For the paint, try to strip the old paint first, since it hasn't been on the car long it shouldn't take long remove it. Personally I like to use Castrol Super Clean, think its just called Super Clean now, can get it here in Canada at Walmart. Big jug of it is like 10 bucks and last for a REALLY long time. I just cleaned out my container of it after stripping my current restoration build and it was probably in the big 4L ice cream container I use as the bath for about the last 1 1/2 years. Others use brake cleaner or alcohol, but I prefer the CSC route. Use a coat of grey primer to find your flaws, then sand it out, coat it in white primer then paint, should hide your grey under primer and give you the white you're looking for.
David |
|
|
|
|
|
09-30-2013, 03:07 PM
|
#11 | |
|
AF Enthusiast

Join Date: Aug 2012
Location: Canada
Posts: 546
Thanks: 121
Thanked 45 Times in 40 Posts
|
Re: Ika Musume Ferrari (Super GT 2011)
to brighten a white paint job, I like to either use white primer, or even have used silver before too, with good result, but of course unless you strip the current paintwork, you won't want to be building up to many layers
looks good, looking forward to seeing more progress, bravo! |
|
|
|
|
|
10-02-2013, 10:47 PM
|
#12 | |
|
AF Newbie
Thread starter
Join Date: Aug 2013
Location: Ottawa
Posts: 65
Thanks: 9
Thanked 4 Times in 4 Posts
|
Re: Ika Musume Ferrari (Super GT 2011)
Thanks for everyone for their kind words and encouragement, as well as very useful advises!
Today I'm updating the interior (Not yet finished). First, a couple of reference pictures: 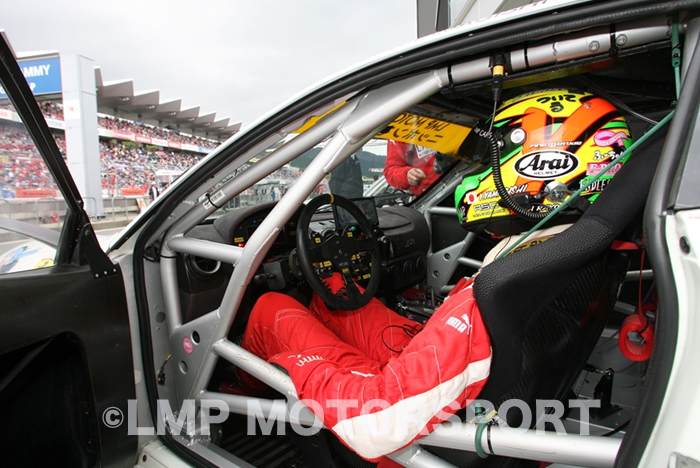 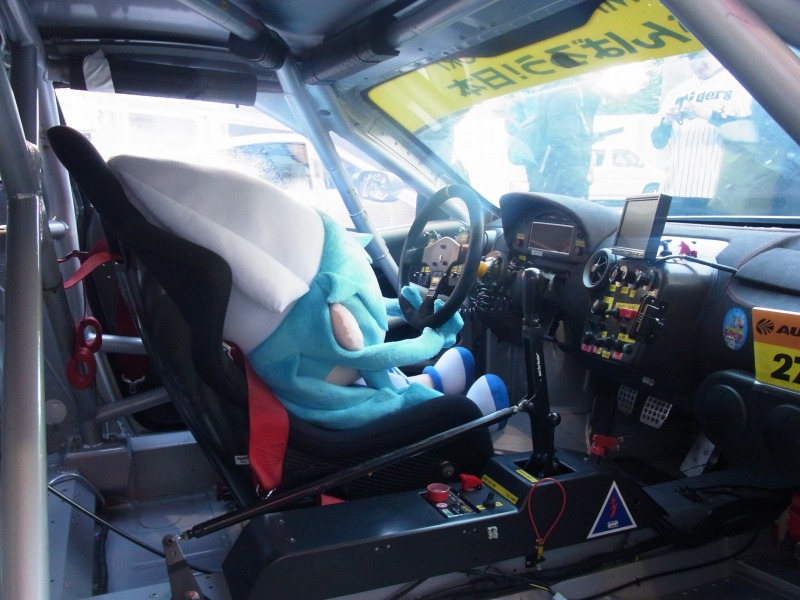  As well as the F430 GT Krohn Racing WIP post by sam01contact (http://www.automotiveforums.com/vbul...t=ferrari+f430) Ok. So interior was quite a bit different from the challenge, so there were a lot of work that was needed, a lot more than what I first anticipated. 1. Centre Console This had to be scratchbuilt because this doesn't exist in challenge (challenge uses paddle shifters).  Work in progress:   2. Main Dash The main difference here is the centre panel. In the challenge version, there are three vents and small control panel underneath. The GTC has one vent and large control panel with many dials. This is also scratch built and painted the yellow/red stickers  In the reference pictures, you can also see a monitor mounted in centre. I'm not sure what this is used for (my first guess was a replacement for rear view mirror, but maybe it's for something else, I don't know). I made this also from plastic sheet. The steering wheel is also different, and I can't use the kit. Mainly, the steering column had to be made from scratch.  3. Other things The GTC has three pedals. The challenge only has two (the kit only comes with two). So I had to use both the kit and the PE parts to make three pedals. The sizes differ slightly from how it should be, but since it'll be mostly hidden under the dash, I decided not to worry about it too much as long as there are three.  I noticed that the roll bar is different from the one used in the GTC (Also see sam01contact's pictures on page 2). I don't think there is much I can do about it, but I may want to put in a little bit more work (like adding padding etc), so it's work in progress  4: Progress so far  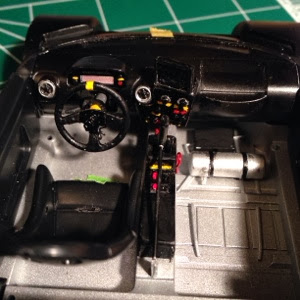 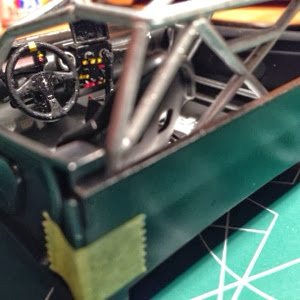 I think the interior is nearly done. A couple items of to do list is:
That's it for today. I hope to continue to make (slow but steady) progress on this. |
|
|
|
|
|
10-07-2013, 09:38 AM
|
#13 | |
|
AF Newbie
Thread starter
Join Date: Aug 2013
Location: Ottawa
Posts: 65
Thanks: 9
Thanked 4 Times in 4 Posts
|
Re: Ika Musume Ferrari (Super GT 2011)
It's finally time to add some liveries to the body!
 This is probably the most exciting part of the build, since you really get to see what the car will look like in the end. Since this is my first race car build, I'm not used to putting on so many decals on the body, and some of them are really big, so I really had to be careful and not to rip them. So, I started working from the front of the car, and after putting a few decals on, I used the Mark Fit to set them. 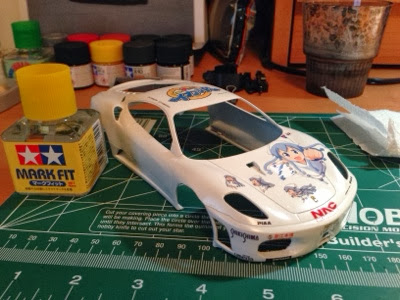 I think one of the most challenging part about the whole process was the work on the hood, where I had to slice the decal to fit around the air vent. I had to be super careful, and I think in the end, I achieved what I wanted  It took me almost an entire day to put all of them on the body. It was a cold day so I sat by the fire and put them on. Anyway, at the end of the day, I finally have a Ika Musume Ferrari emerge    There are still so many things to do. Hopefully soon I will complete the cockpit. The chassis needs some work done, and the engine bay needs a lot of modifications! Stay tuned... |
|
|
|
|
|
10-07-2013, 01:10 PM
|
#14 | |
|
AF Enthusiast
Join Date: Oct 2012
Location: Doornenburg , Netherlands
Posts: 502
Thanks: 80
Thanked 74 Times in 74 Posts
|
Re: Ika Musume Ferrari (Super GT 2011)
Looks great!
__________________
my English is not perfect but hopefully be readable |
|
|
|
|
|
10-07-2013, 07:02 PM
|
#15 | |
|
AF Enthusiast

Join Date: Oct 2008
Location: Auckland
Posts: 2,761
Thanks: 51
Thanked 136 Times in 134 Posts
|
Re: Ika Musume Ferrari (Super GT 2011)
Looking great!
__________________
 It's Not wheather you Win or Lose, its how you look while you play the Game |
|
|
|
|
|
|
POST REPLY TO THIS THREAD |
| Tags |
| ferrari , ika , itasha , musume , supergt |
 |
| Thread Tools | |
|
|


