|
|
|

|
|
| Search | Car Forums | Gallery | Articles | Helper | AF 350Z | IgorSushko.com | Corporate |
|
| Latest | 0 Rplys |
|
|||||||
| WIP - Motorsports Post topics for any "Work In Process" motorsports vehicles in this sub-forum. |
 |
 Show Printable Version | Show Printable Version |  Email this Page | Email this Page |  Subscribe to this Thread
|
|
|
Thread Tools |
 12-02-2012, 11:56 AM
|
#151 | |
|
AF Enthusiast
Thread starter
Join Date: Nov 2008
Location: Norwich
Posts: 649
Thanks: 21
Thanked 111 Times in 87 Posts
|
Re: 1/8 Porsche 935/78 'Moby Dick'
Evening all,
First task this week was to add some greenstuff around the base of the windscreen pillars to tidy everything up (and add a little extra reinforcement):  I left his to harden for 24 hours, then attacked it with the fine emery cloth and files:   It's slowly starting to look better - and it allows me to drop the entire roof section into place without having to interlock various sections around this front area. I've also added some greenstuff to the outer door mountings, which you'll see in some of the following photos. The next job was to return to the lower sill filler panels - I'd made a start on these some time ago, but I've now re-cut them in thicker 0.8mm stryene rather than the original 0.5mm. A couple of lengths of 2.5mm strip on the inside face will locate the panel into the side of the main sill structure: 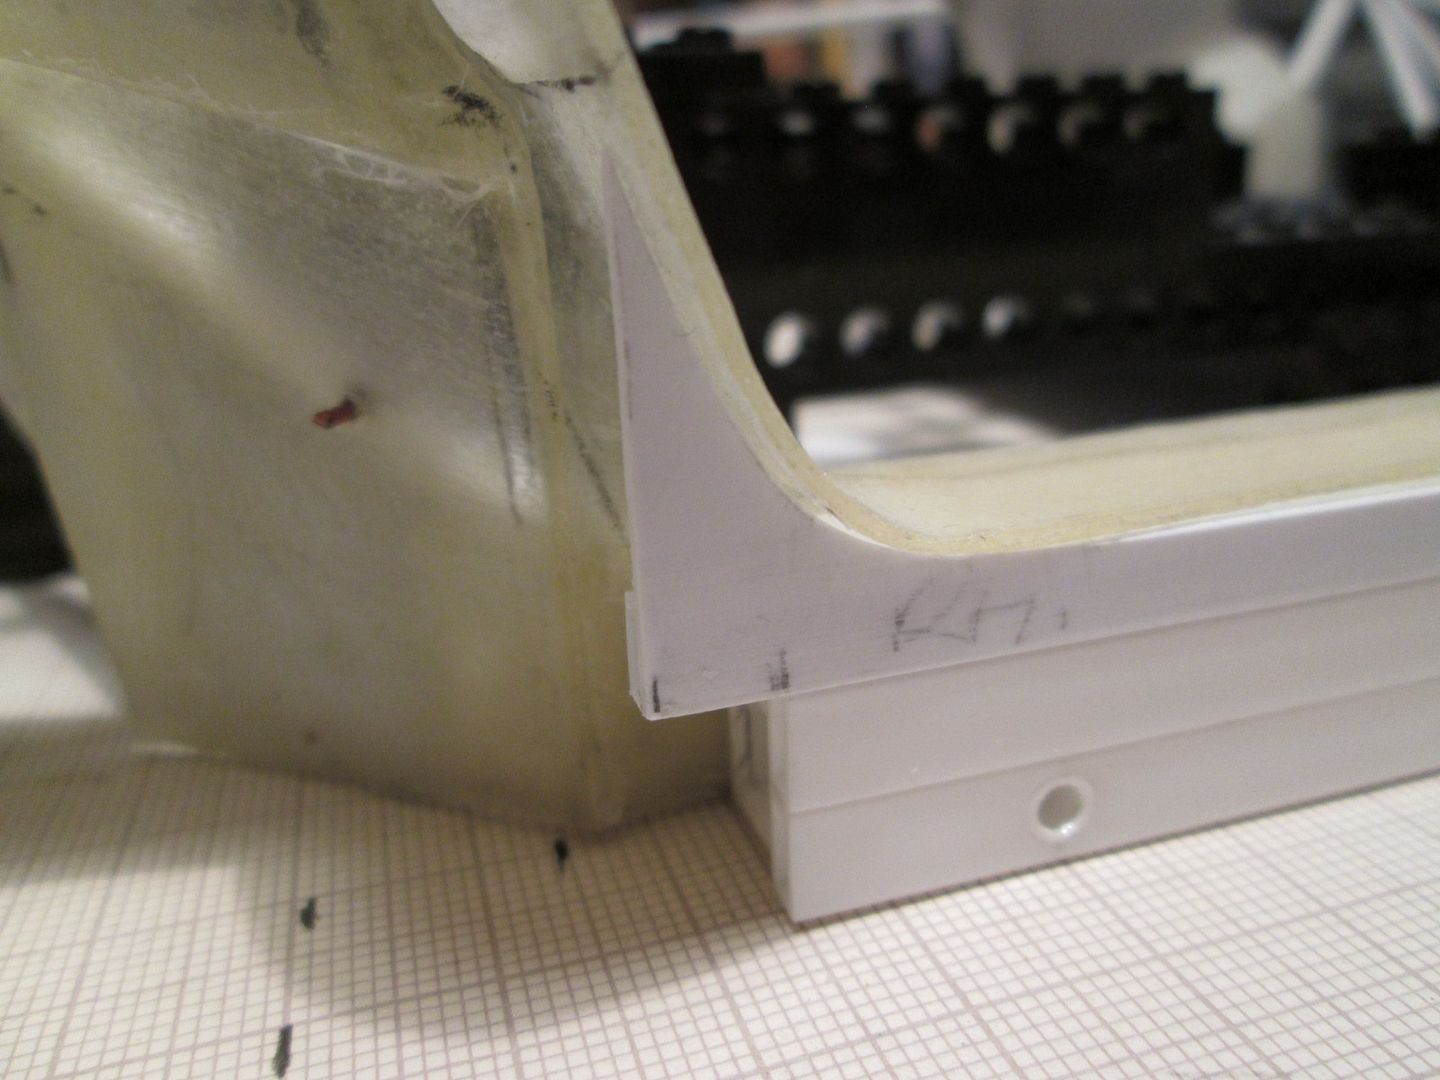 I'll add some small brackets to the inside of the top corners to give the fibreglass some extra support. The overall shape is not quite 'factory spec', but there's a couple of radiators to hang behind the doors - I might need to use the lower corners of these sill panels to provide fixing points, etc. Having done all the work around the windscreen and front wings recently, I wanted to check the front bulkhead section still fitted properly. The strip-work around the edge of the doorframe clashed, so I've cut a couple of small notches in the bulkhead sides to clear - other than that, it all seems okay: 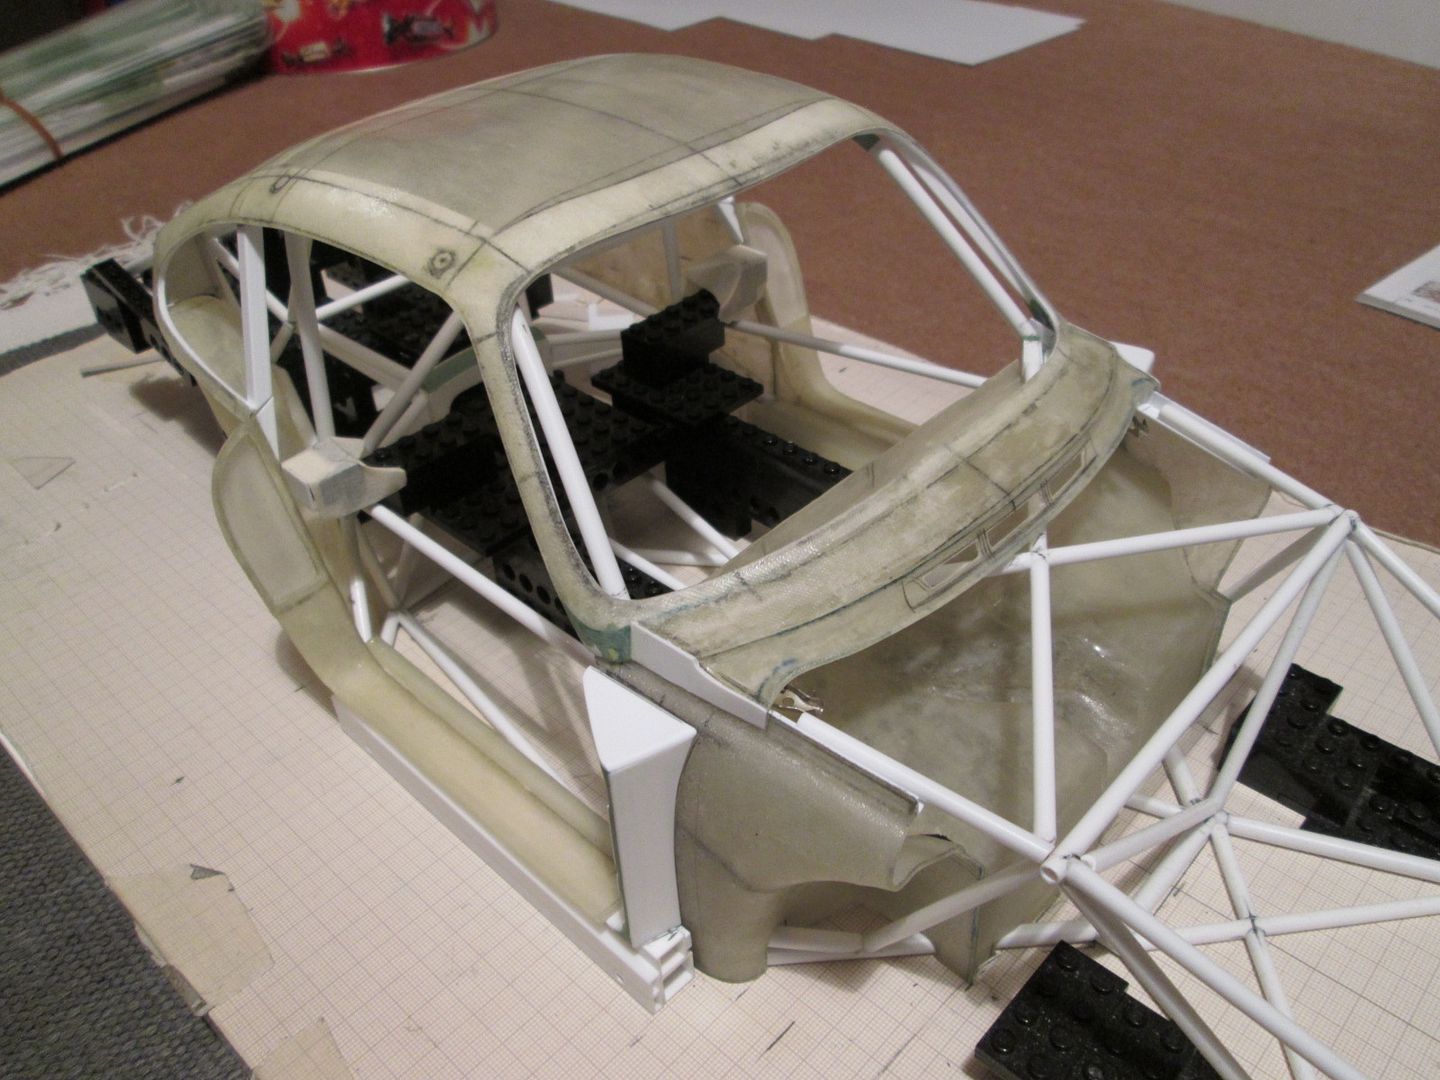  To be honest, I might not use this particular bulkhead panel: although the shape is quite 'busy' it's not really my finest piece of fibreglass work. It's very thick in places (over 2mm!) and still has some flex - ideally I'd like it stiffer and thinner! Other than trimming it to fit I haven't really done much to it since it came off the mould, so it wouldn't be a waste of effort if I re-made it next year. The front wings are still independent parts, so they shouldn't be affected by a new bulkhead. Maybe I need to re-think how to mould this piece - the lay-up is not easy on the current pattern... To finish, I've made a start on some of the detail panels to fit inside the rear wings: 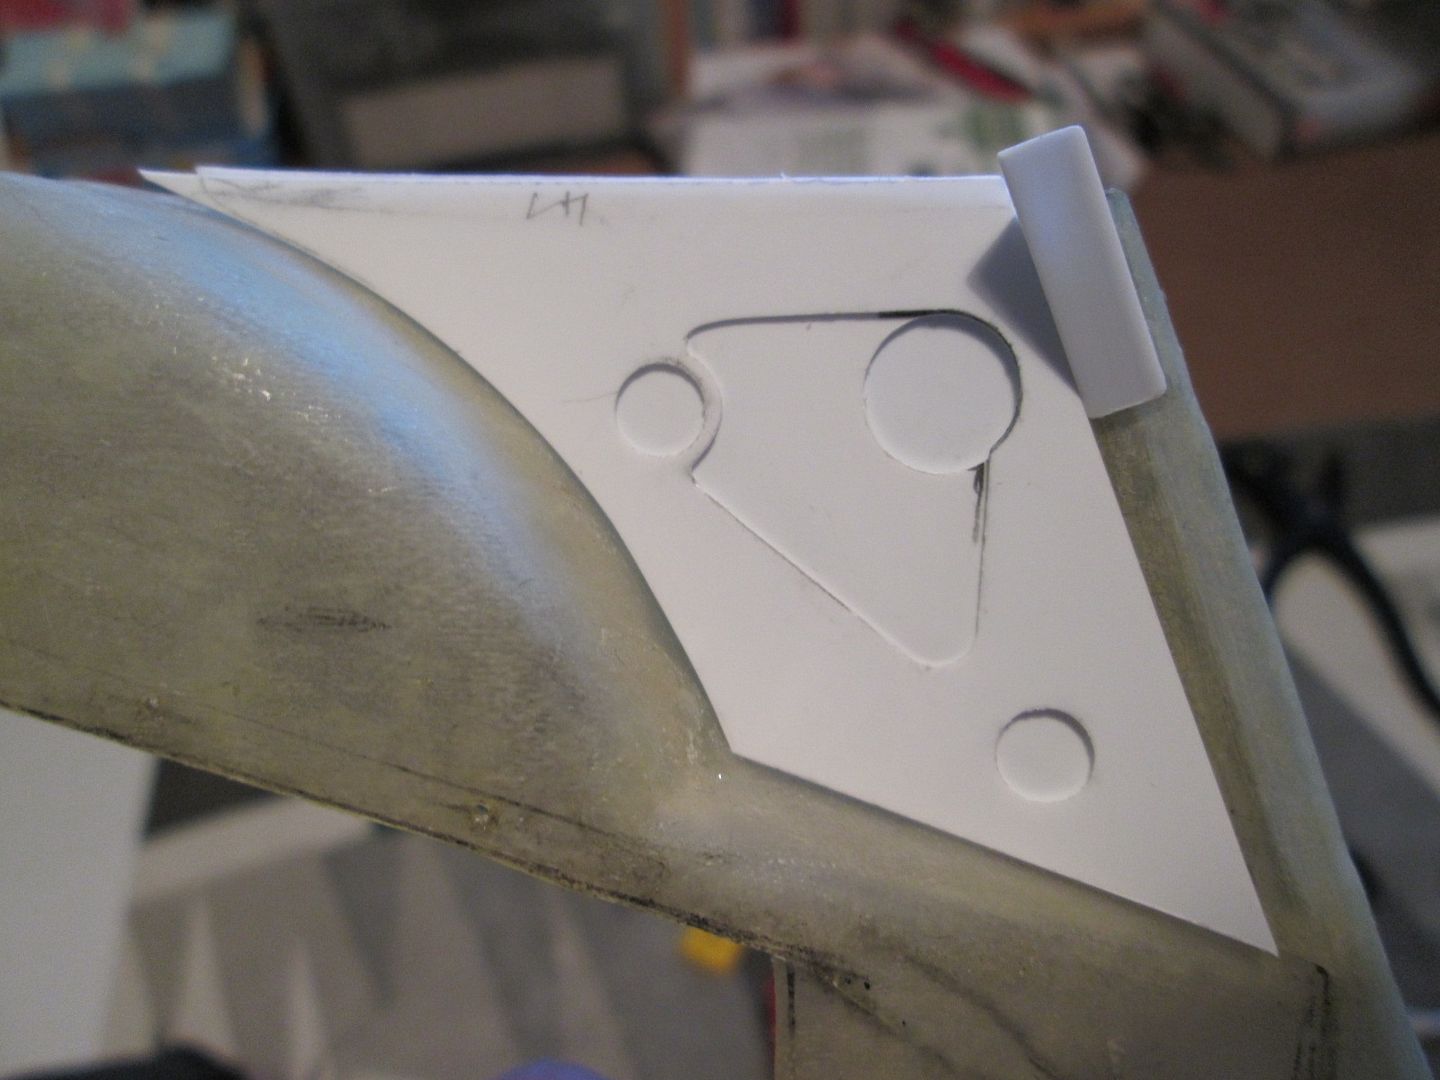 The pressed detail on the original steel bodyshell would be very difficult to reproduce in fibreglass on this scale, so layering thin sheets of styrene allows me to get the right effect. Here I've got a base layer of 0.25mm, then a middle 0.4mm, and a top 0.25mm to finish off. I'll leave the top edge untrimmed for now, just in case I need to adjust the fit of the roof. This panelling will also allow me to reinforce the joint between the two fibreglass wing and sill sections, and the bases of the B-pillars. The pipework for the radiators passes through the top of these panels, so at some point I'll have to punch holes in them - but that's not going to happen for a while! I'll continue with these for the near future and see what happens next... Before I go, John: thanks for your comment there. What I've been doing in 2012 has been a change for me - although it's not the same as adding hex-nuts, drilling out brake discs or putting together a convincing-looking wiring layout, so far it's been an exercise in detailing on a larger scale! This year's work is the foundation for whether this project succeeds or not, and I've really had to think hard about how I put this car together. I guess I'll know the answer in 2014 (or 2015)! Until then, I'll keep posting... See you all next week, SB |
|

|

|
|
12-02-2012, 01:51 PM
|
#152 | |
|
AF Regular
Join Date: Feb 2009
Location: Lelystad
Posts: 137
Thanks: 0
Thanked 2 Times in 2 Posts
|
Re: 1/8 Porsche 935/78 'Moby Dick'
What an amazing build. I keep a close look and can't wait till the next update. In the future I'm planning a superdetail build of this "Moby Dick" in 1/24 (Tamiya) your WIP is very helpfull. Keep up this excellent build.
Eric |
|
|
|
|
|
12-02-2012, 01:55 PM
|
#153 | ||
|
AF Enthusiast

Join Date: Jul 2005
Location: London
Posts: 899
Thanks: 3
Thanked 11 Times in 10 Posts
|
Re: 1/8 Porsche 935/78 'Moby Dick'
Quote:
 It's looking fantastic already...if it were me, I'd leave it at this stage of construction, paint her up and just add hubs and suspension. It's almost a shame to cover up all that lovely construction work! |
||
|
|
|
|
12-02-2012, 03:32 PM
|
#154 | |
|
AF Regular

Join Date: Nov 2008
Location: AC
Posts: 118
Thanks: 30
Thanked 21 Times in 11 Posts
|
Re: 1/8 Porsche 935/78 'Moby Dick'
I agree to that, it looks great that way, but i think a lot of it the details can be seen at least.
 |
|
|
|
|
|
12-02-2012, 03:49 PM
|
#155 | |
|
AF Enthusiast
Thread starter
Join Date: Nov 2008
Location: Norwich
Posts: 649
Thanks: 21
Thanked 111 Times in 87 Posts
|
Re: 1/8 Porsche 935/78 'Moby Dick'
Thanks Cinqster - I almost captioned that photo as 'gratuitous bodyshell shot' when I put the post up! Actually, a lot of the detailing will still be visible when the model is complete - the bonnet and engine cover will come off, but also the whole nose and tail sections. Throw in some opening doors and it should be possible to see all the good stuff! The only things that will be hidden will be the engine and gearbox - but I'm sure I can use a mirrored display base to get around this.
One of the reasons why I want to postpone any further fibreglass moulding until the Spring is that I know what will happen: as soon as I make the nose and tail sections, I'll be doing a dry-run fit of it all and seeing the finished car! I want to keep that as a reward for after I've broken the back of the engine, gearbox and suspension work... |
|
|
|
|
|
12-09-2012, 10:32 AM
|
#156 | |
|
AF Enthusiast
Thread starter
Join Date: Nov 2008
Location: Norwich
Posts: 649
Thanks: 21
Thanked 111 Times in 87 Posts
|
Re: 1/8 Porsche 935/78 'Moby Dick'
Hello again,
No major developments this week, just a few 'odds and ends'-type jobs to keep things moving along. The layered panels I was working on last time have been glued in place, and I've added some extra reinforcement to the joint between the two fibreglass sections - first, a layer of 0.8mm styrene to level everything up: 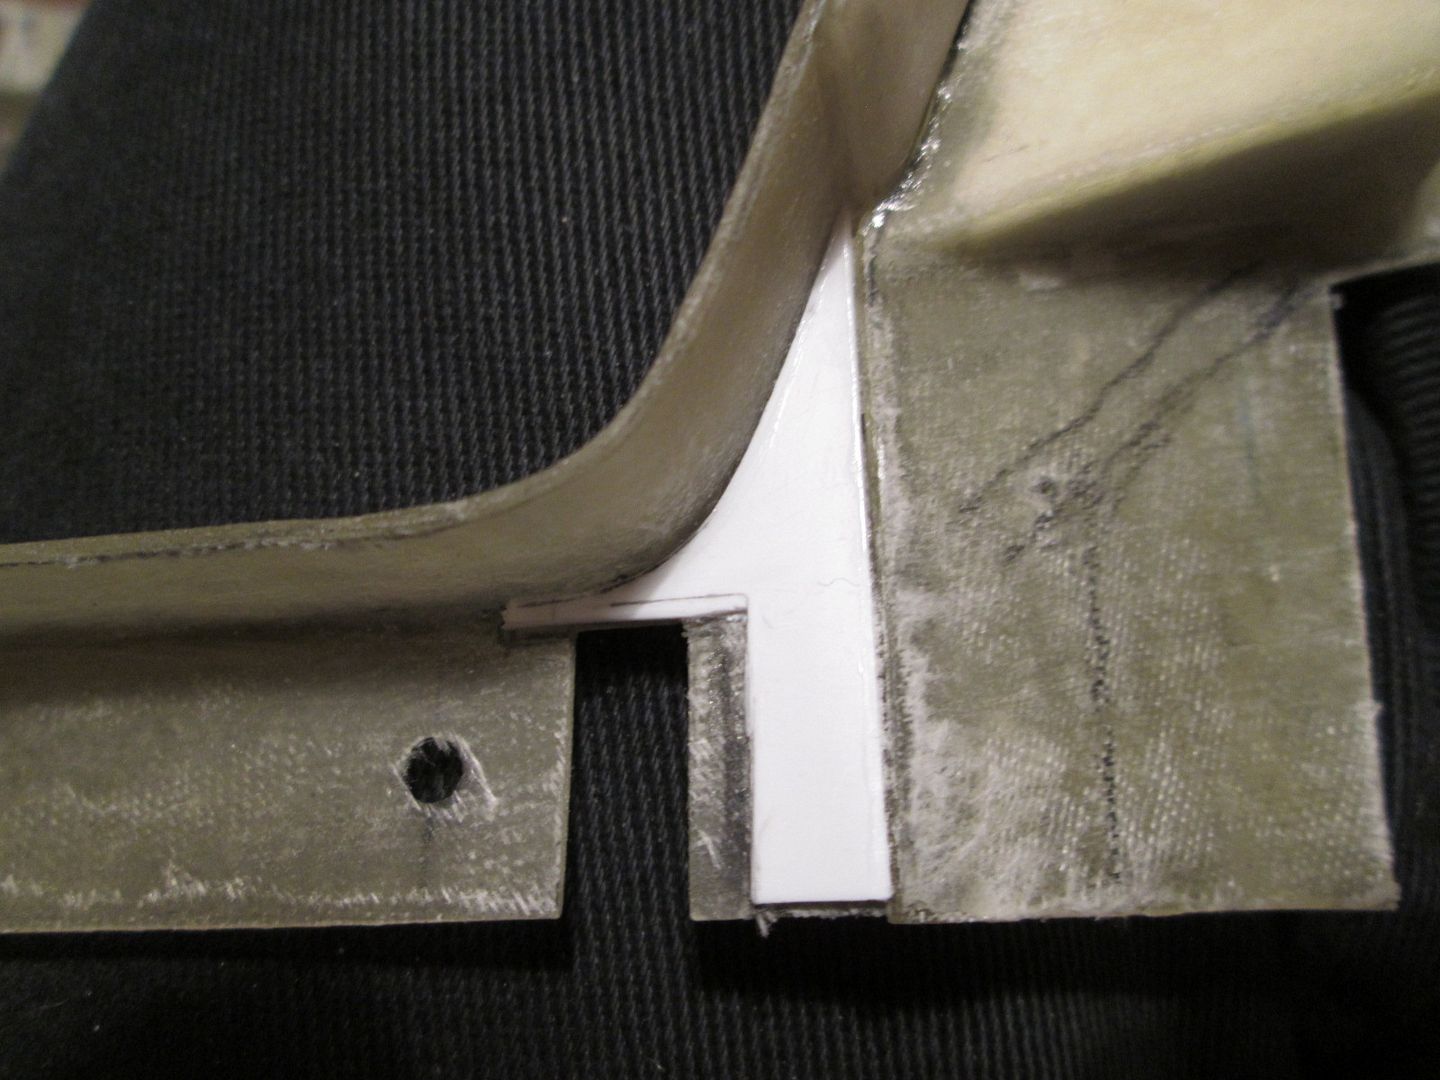 ...and then a 0.4mm patch to strengthen the joint: 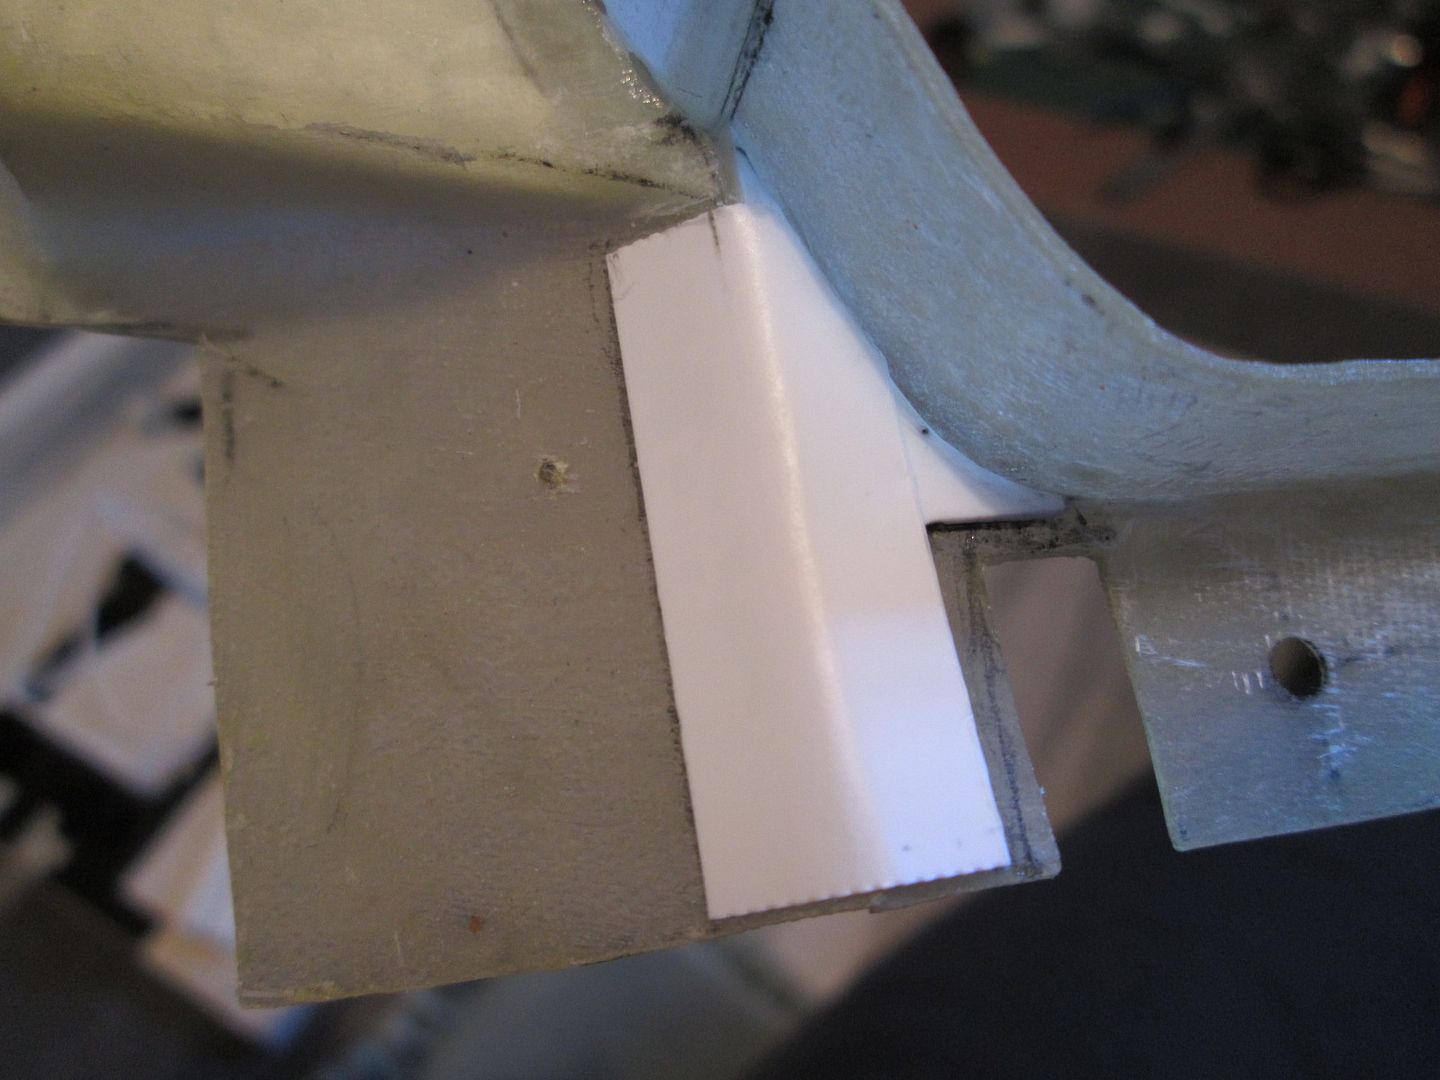 These panels are still a long way from being finished - there's more trimming to be done when I start adding the suspension pick-ups, etc. For now, it's all about making sure the panels survive the build-process in one piece, rather than trying to fall apart! I've been adding some more greenstuff here and there, too, such as this thin seam around the joint between the base of the windscreen and the back edge of the bonnet: 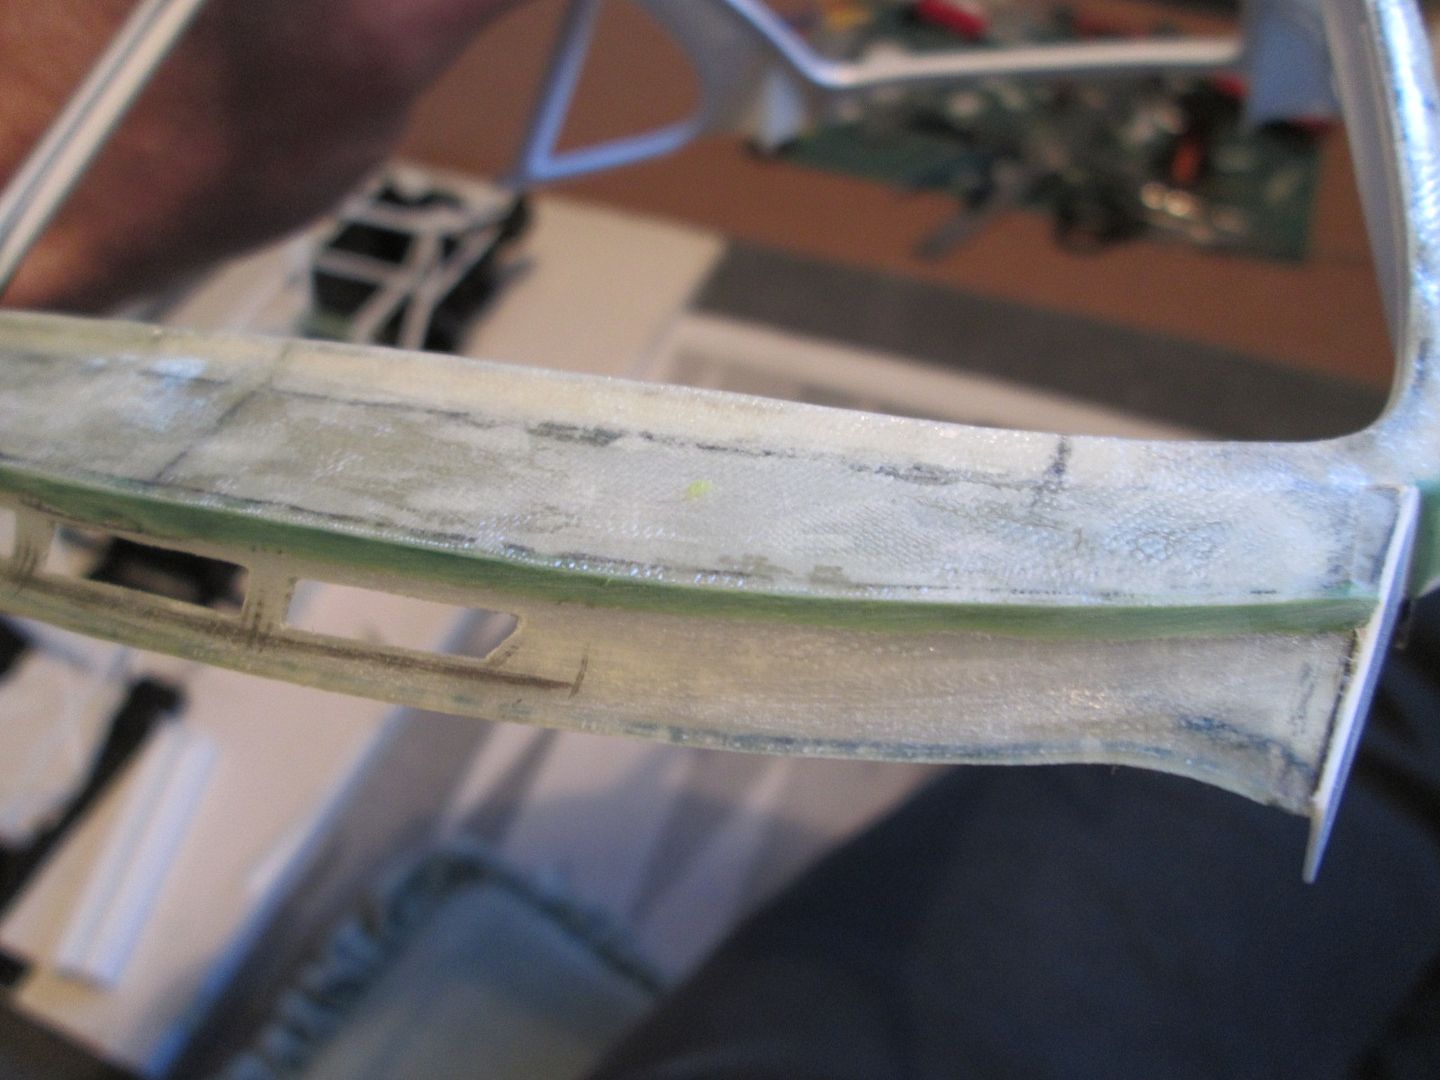 A more time-consuming job was making a pair of detail panels to fit inside the rear C-pillars. It would have been much easier to cut them from thicker sheet, rather than the 0.25mm I used, but as they would be glued onto a curved surface I wanted the maximum flexibilty.  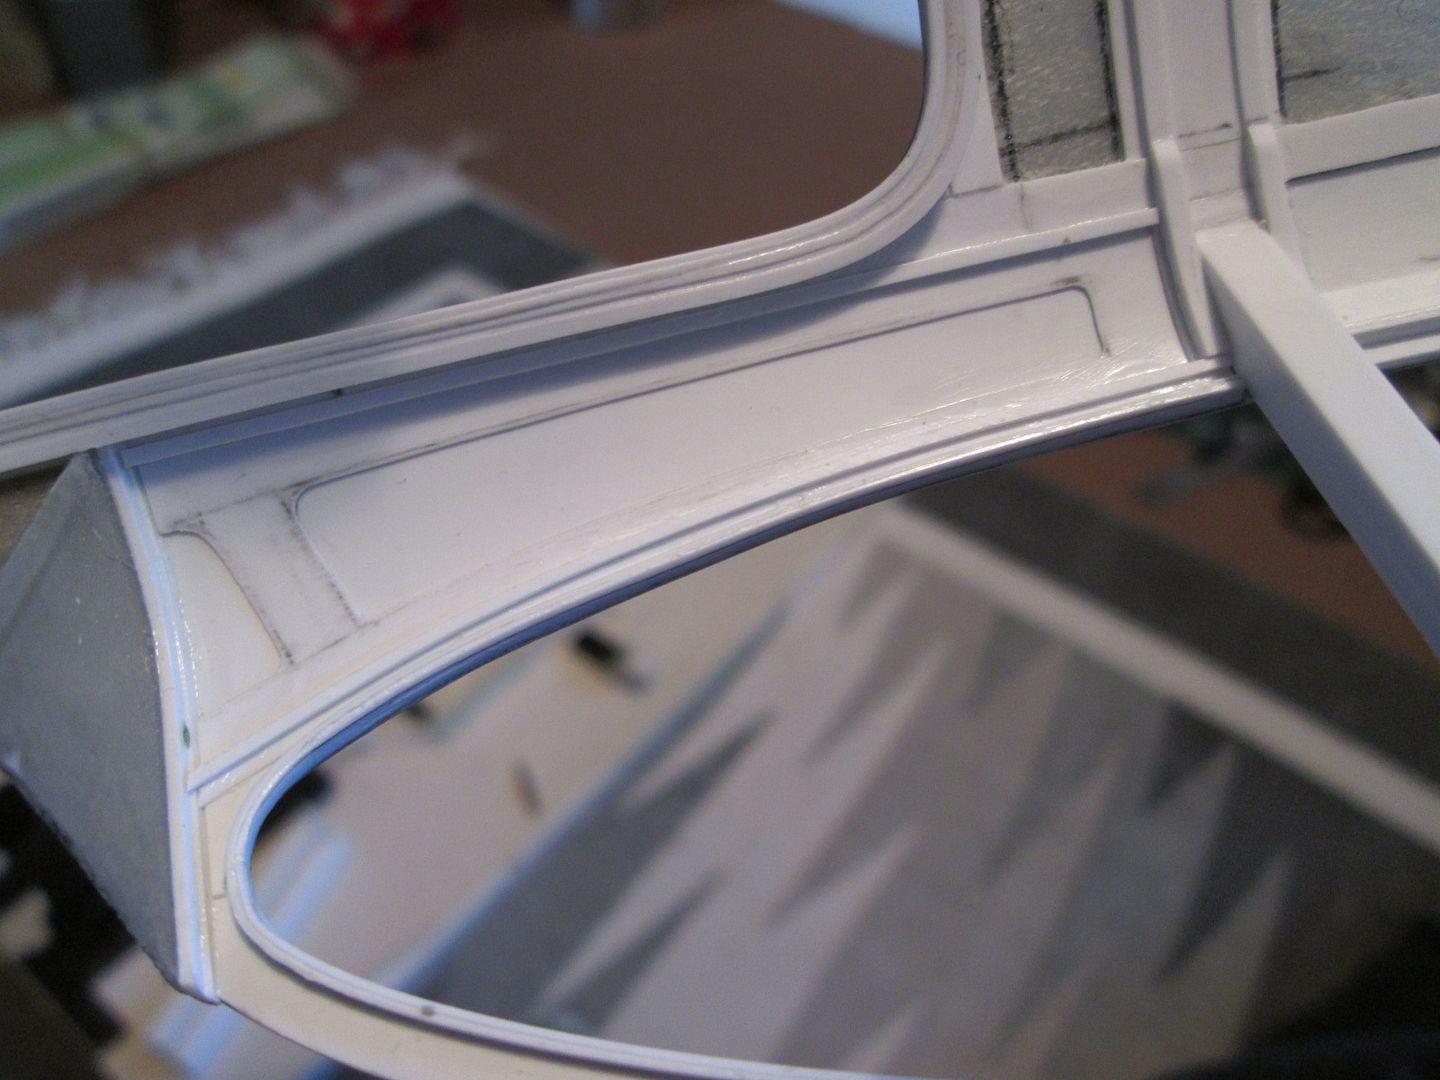 Perhaps the most significant job this week took the least amount of time. I'm getting to the point where I'm ready to start on the suspension, and before then I want to plan what I'm doing with the wheels (as that will affect what I can do with the discs, hubs, etc). On the 908 I used heavily modified RC-car wheels as the starting point - on the 935 I intend to do the whole lot from scratch using my method of layering styrene strip inside a mould to create the rims, then adding the hub and external detail. So, I need to know what diameters I can work with - and by drilling a series of holes with a wood-working hole-cutter, I can see what's possible: 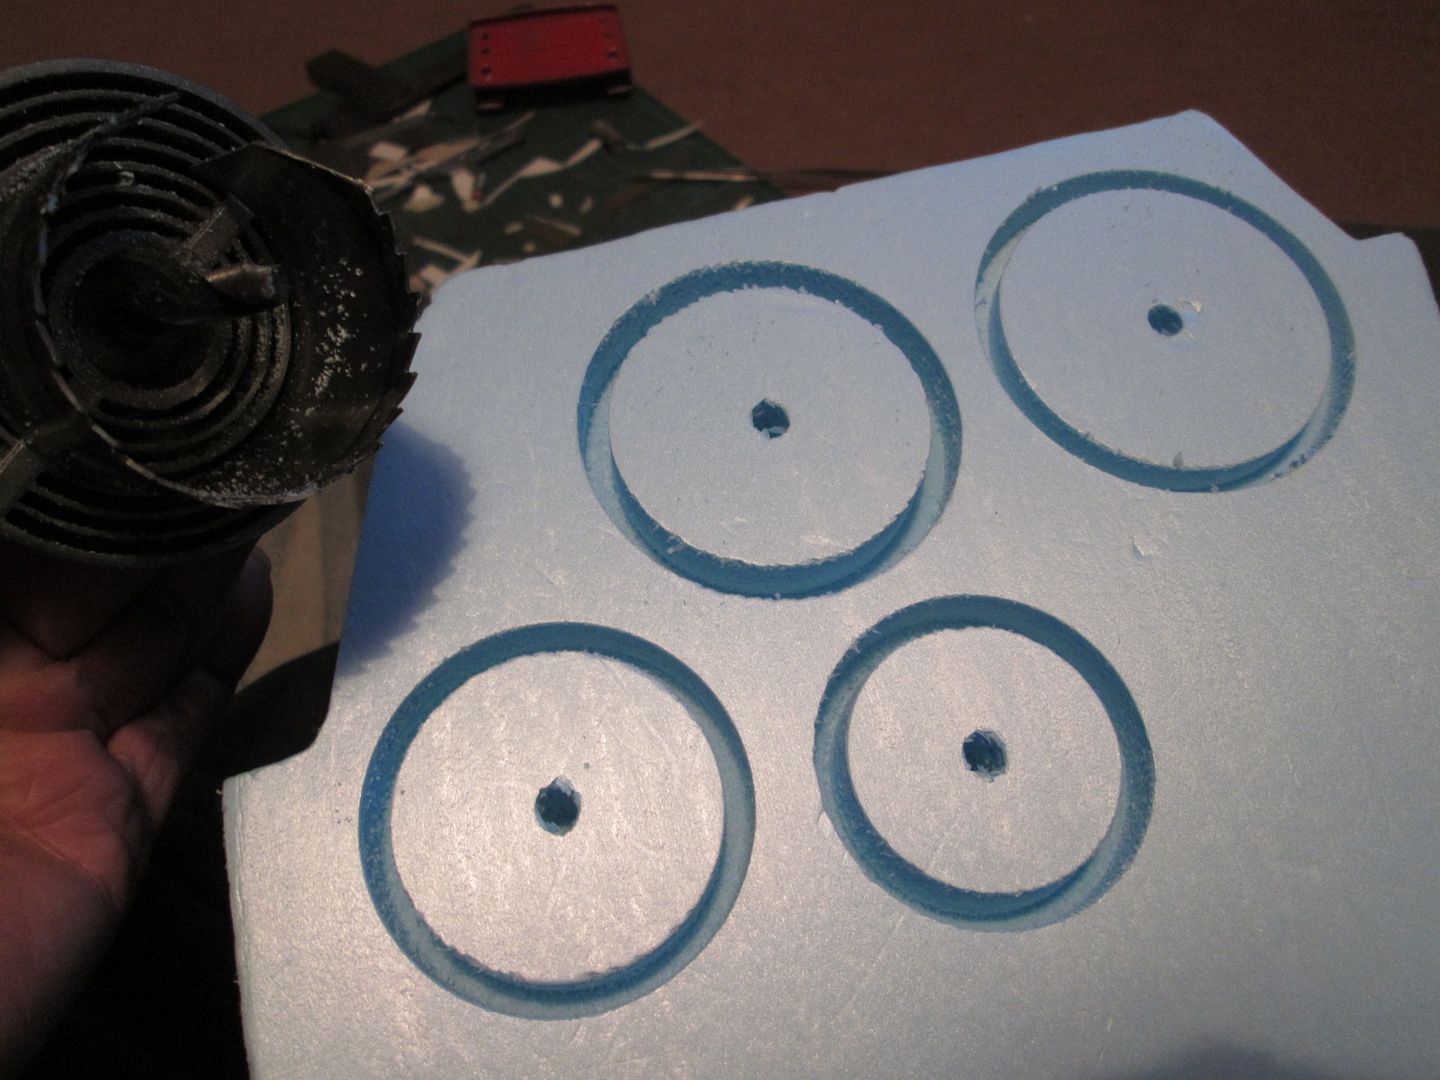 Ideally I could simply measure the diameter of the different hole-cutters, but - no! They're not exactly circular, and by the time they're wobbling around in my bench drill, the hole is somewhat larger than the cutter. These four are the likely sizes, ranging from about 48mm to 65mm, but I haven't started to do any calculations yet. In theory I could use a larger cutter and sleeve down to get the required diameter for the wheel, but I can see this causing problems when I then try to make the foam tyre... So, working out the wheel sizes will be one of the jobs for the next few days - next weekend I can maybe prepare the foam blocks to be used as the moulds, and then over the Christmas holidays I can make a start on the rims themselves. All the best, SB |
|
|
|
|
|
12-09-2012, 11:10 AM
|
#157 | |
|
AF Regular

Join Date: Jun 2005
Location: london
Posts: 414
Thanks: 3
Thanked 22 Times in 20 Posts
|
Re: 1/8 Porsche 935/78 'Moby Dick'
looking great, your detail is very good.
|
|
|
|
|
|
12-09-2012, 01:29 PM
|
#158 | |
|
AF Newbie
Join Date: Jul 2010
Location: Antwerp
Posts: 24
Thanks: 0
Thanked 0 Times in 0 Posts
|
Re: 1/8 Porsche 935/78 'Moby Dick'
Another great update of your works SB. I like the way you explain every step you take in this building proces.
Concerning the wheels, I was wondering if there are no closed hole cutter saws ? Maybe a little bit easier to work with ? I'm sure you will find the right size and method in the end. Mark |
|
|
|
|
|
12-09-2012, 02:05 PM
|
#159 | |
|
AF Enthusiast
Thread starter
Join Date: Nov 2008
Location: Norwich
Posts: 649
Thanks: 21
Thanked 111 Times in 87 Posts
|
Re: 1/8 Porsche 935/78 'Moby Dick'
Good point Mark - thanks! I bought this particular set of hole-saws when I was building my first 1/8 project in 2001, and I've never really bothered to look for anything better - they only get used once per build, after all.
However, a quick search online has given me some ideas - I've seen two particular sets of closed hole-saws which would be a big improvement over the old ones (allowing me to cut right through from one side), plus there are some adjustable cutters out there too. Hmm...I'd better start working out what size the wheels should be! |
|
|
|
|
|
12-09-2012, 04:31 PM
|
#160 | |
|
Captain Over Engineer
 Join Date: Feb 2003
Location: New York, New York
Posts: 6,711
Thanks: 27
Thanked 29 Times in 23 Posts


|
Re: 1/8 Porsche 935/78 'Moby Dick'
Great work as usual, SB! Your accuracy and level of detail is a real work of art.
__________________
-Mike AF Director of Media / Photographer  mike.lawrence@automotiveforums.com | AutomotiveForums.com | Flickr Gallery |
|
|
|
|
|
12-23-2012, 02:09 PM
|
#161 | |
|
AF Enthusiast
Thread starter
Join Date: Nov 2008
Location: Norwich
Posts: 649
Thanks: 21
Thanked 111 Times in 87 Posts
|
Re: 1/8 Porsche 935/78 'Moby Dick'
Thanks Mike - much appreciated.
...Hello everyone, Lots to write about tonight - the no-post last weekend was not due to lack of progress! Firstly, the new tools arrived - another set of hole-saws (closed, this time) and an adjustable cutter: 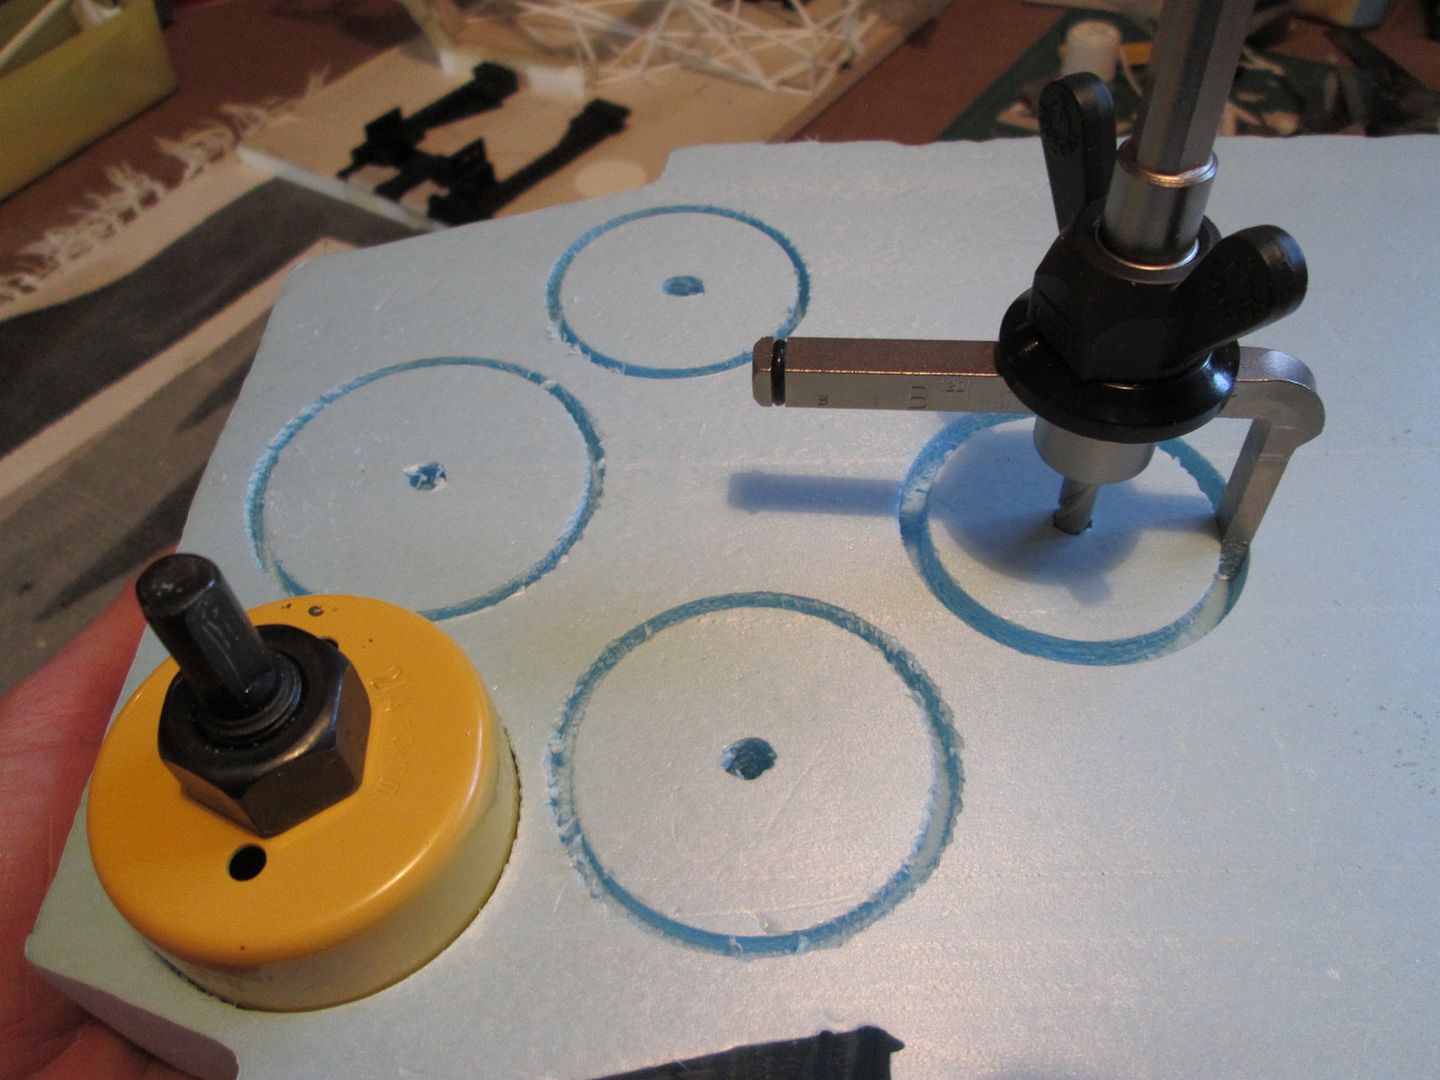 The hole-saws give me seven more sizes to play with - and the design means they will drill through the 50mm foam from one side (although I'll have to stop part-way through to remove the centre core, then continue). The adjustable cutter makes holes from 40mm diameter through to 120mm, so really it's the only tool I should need. I drilled a selection of test-holes to get an idea of the actual sizes produced - the new yellow cutters produced holes 1mm larger in diameter than their nominal size, so that's better than the old ones. I've done some measurements and scalings for the rims, and it looks like a couple of these will do what I require. Regarding the rims, I was happily thinking I would be making another set of the regular 5-spoke design as used on many of the 70's racing Porsches, when I realised that these were not necessarily correct. The 935-78 ran at Le Mans with cooling hub-caps fitted, so you don't actually see what type of rim is behind them; however, at Silverstone the car ran at least part of the time with the front rims uncovered...  ...which reveals a split-rim similar to those used on many of the standard 935's (BBS, right?). So, would Porsche have used a combination of 5-spoke and split-rims depending on whether or not they wanted to use the hub-caps, or would the split-rim be the standard-fit? Logically, I'm assuming they used the BBS full-time, so this is what I'll be making... Before getting the rear suspension underway I spent an evening making some cardboard test-panels for the rear bulkhead. In time this will all be re-made using fibreglass, but I wanted to get a feel for how it looked - it's a bit rough, but the concept works:  Next up, the rear trailing arms. I used tracings over the original drawings to get the basic layout, then set-to with the styrene to make a prototype: 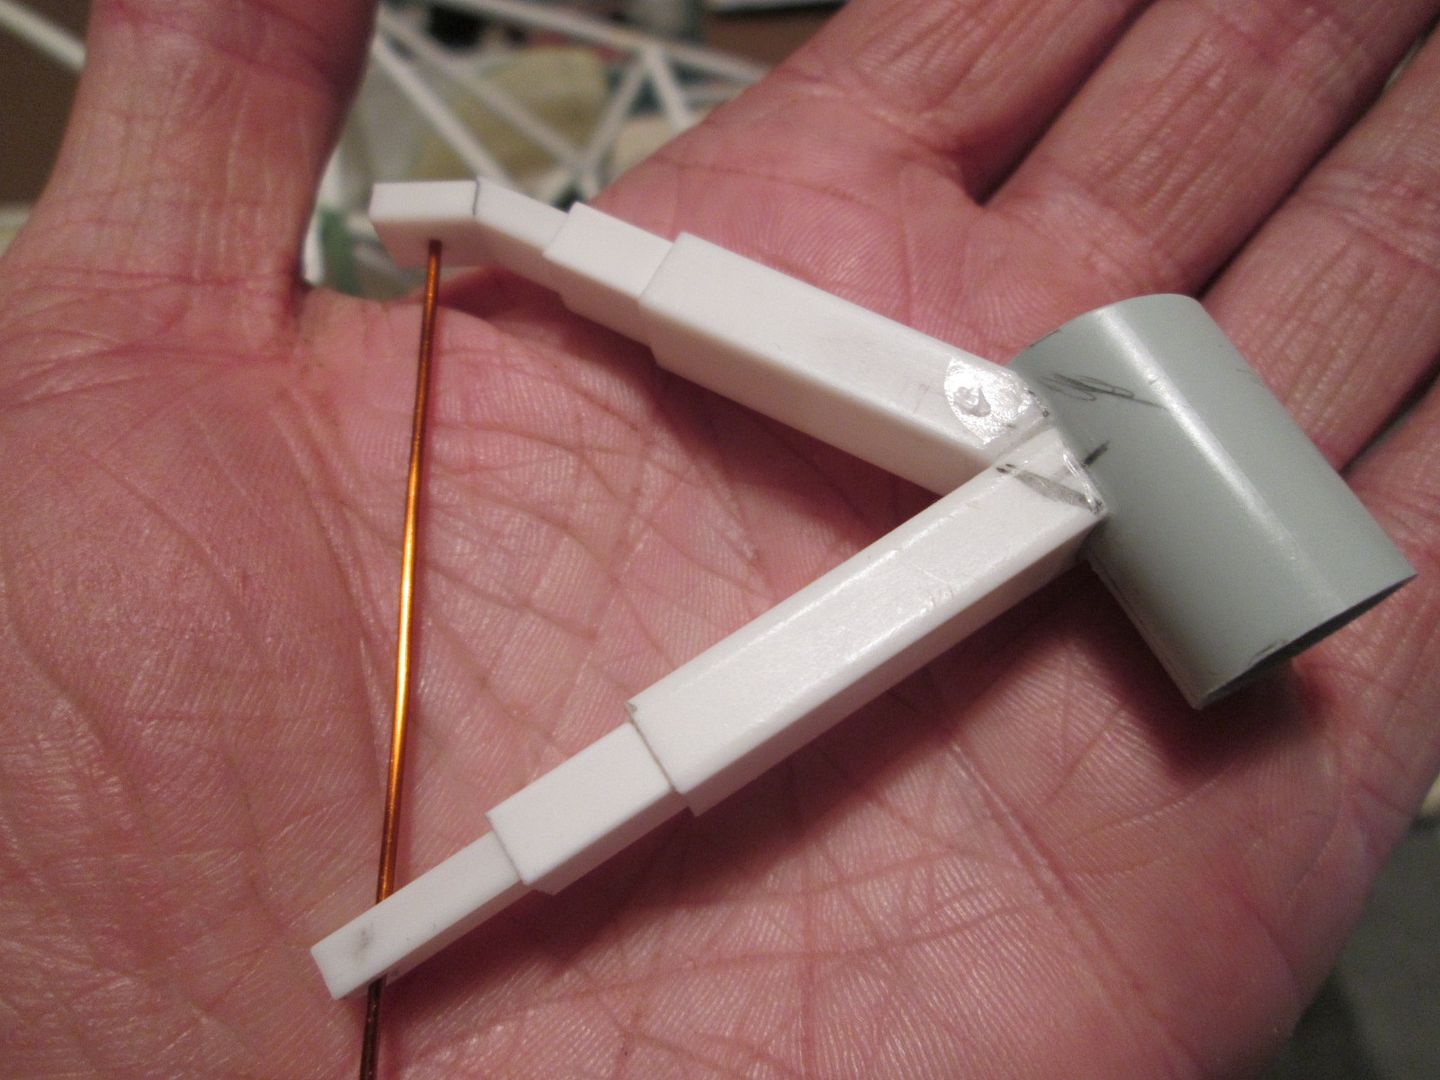 I modified the positioning and angle of the forward pivots to suit, and made another Lego fixture to hold everything in place whilst I was working:  This keeps the hub tube at ride-height with zero toe-in and zero castor, which will make life much simpler. One of the trailing arms should have an adjustable front pick-up, but in the interest of strength over accuracy I'm making them as one-piece (as on the Carrera RSR Turbo). So, now to start on the actual parts. The core to each trailing arm is made from 1/8" x 1/4" box, double-pinned at each end to the hub-tube and the pick-up:  Keeping these joints strong is critical - it's not like the chassis where I can simply run lengths of brass or ali tube inside the framework. These pins are a natural tight fit inside the styrene anyway, so when everything is glued together it should be strong enough. Here's the basic arm on the chassis:  To get the final shape I'll be covering the core structure with a mixture of panelling and greenstuff: 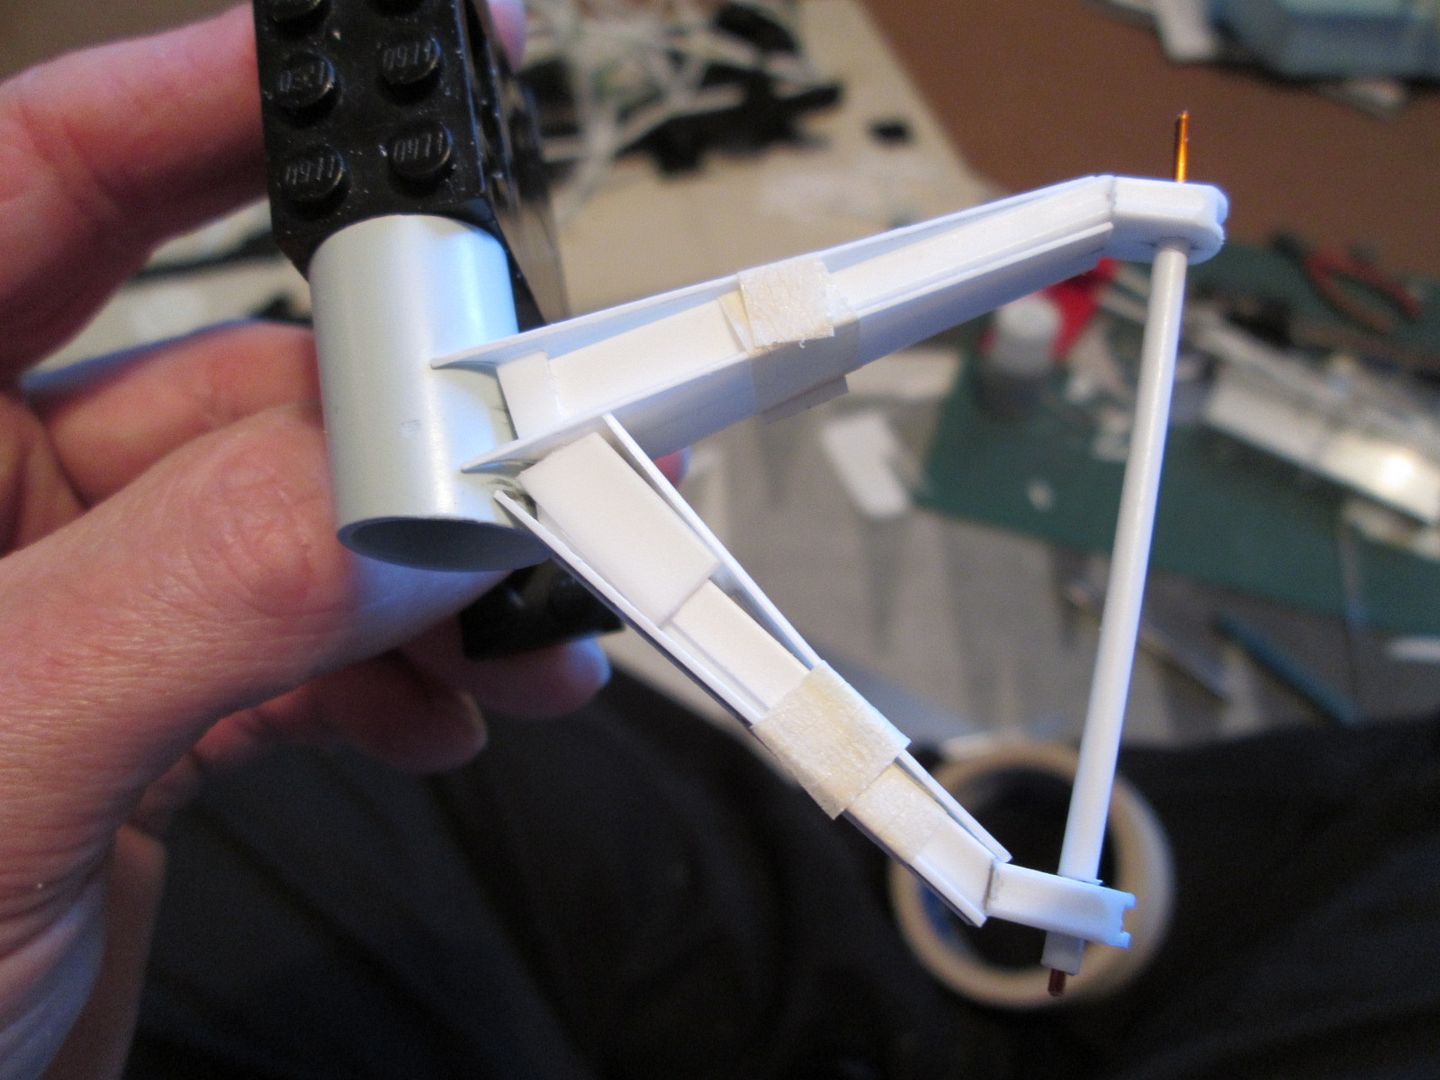 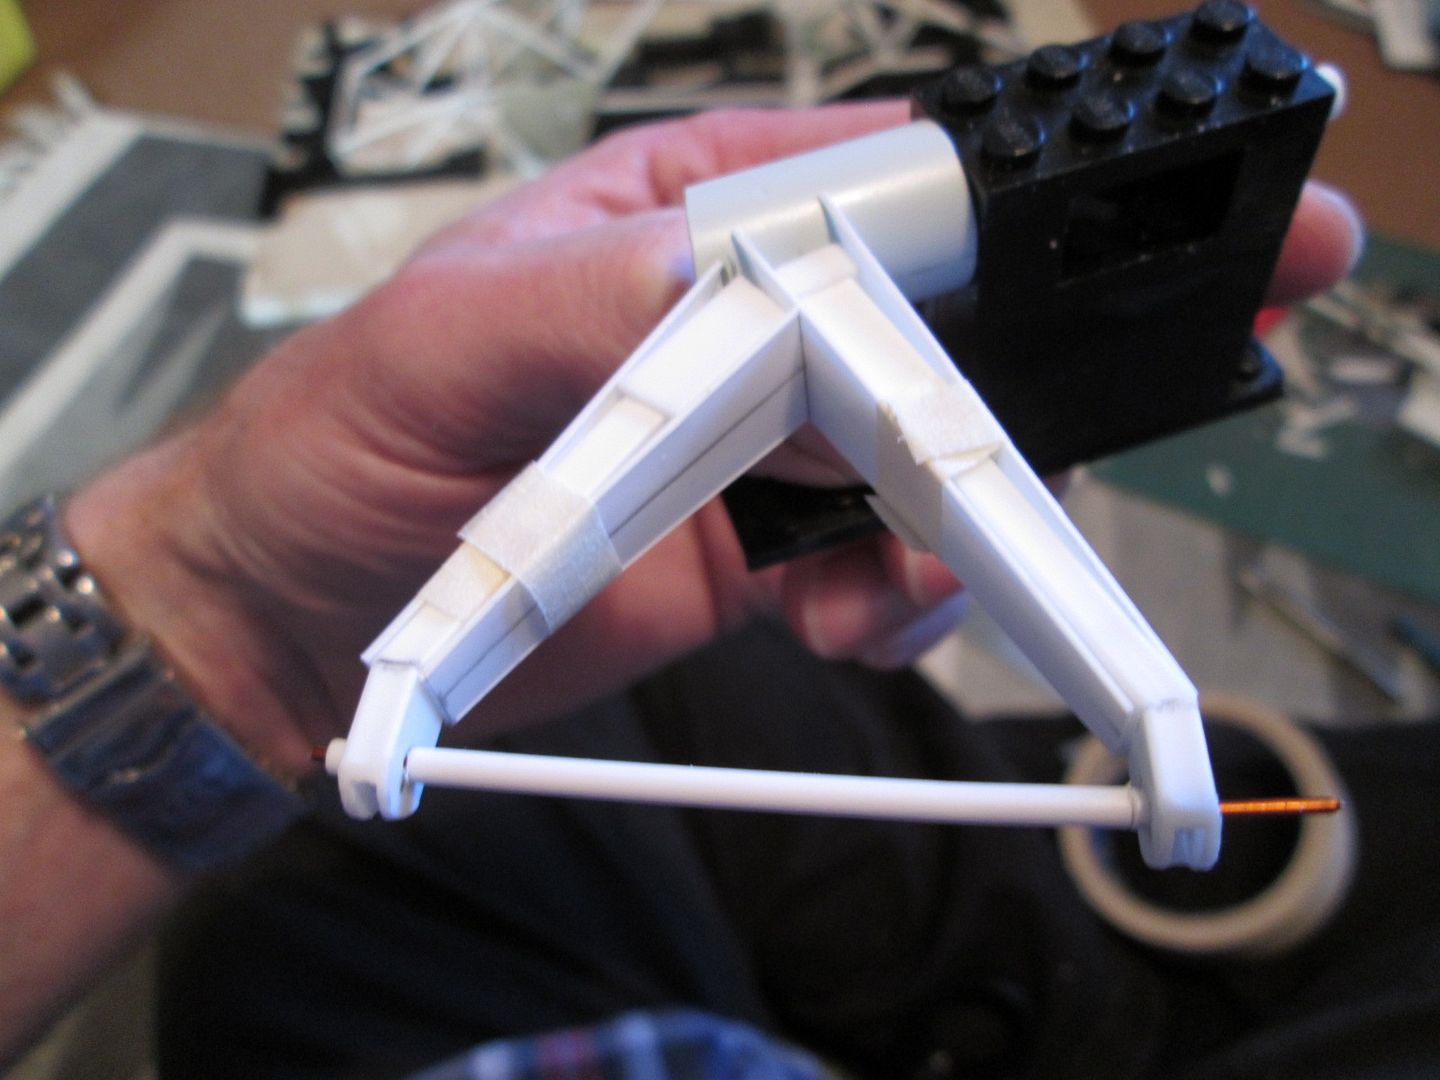 None of this is actually glued together yet - I wanted to keep the first arm in kit-form until I knew it would work, then use it as the pattern for the other side. Since taking these shots earlier today I've been busy making the second set of components, so one of tomorrow's jobs will be to start assembly. Then I can start playing around with the mountings to the chassis - hopefully a straight-forward job. The extra work to add the damper mountings, caliper lugs, etc, will follow in time - the plan for now is simply to get the axles in the right place. So, that's what I've been busy with for the last couple of weeks. I'll probably get one more 2012 update posted next weekend - maybe with some front suspension and wheel components to show... Whatever you're all doing in the next few days, have a good time! All the best, SB |
|
|
|
|
|
12-23-2012, 05:20 PM
|
#162 | |
|
AF Enthusiast
Join Date: May 2009
Location: Tucson, Arizona
Posts: 1,469
Thanks: 12
Thanked 126 Times in 120 Posts
|
Re: 1/8 Porsche 935/78 'Moby Dick'
unbelievable work SB -
please take some time and have a merry Christmas John |
|
|
|
|
|
12-23-2012, 05:54 PM
|
#163 | |
|
Captain Over Engineer
Join Date: Feb 2003
Location: New York, New York
Posts: 6,711
Thanks: 27
Thanked 29 Times in 23 Posts
|
Re: 1/8 Porsche 935/78 'Moby Dick'
Inspirational work, SB.
__________________
-Mike AF Director of Media / Photographer mike.lawrence@automotiveforums.com | AutomotiveForums.com | Flickr Gallery |
|
|
|
|
|
12-23-2012, 08:22 PM
|
#164 | |
|
AF Newbie
Join Date: May 2012
Location: Quakertown, Pennsylvania
Posts: 4
Thanks: 0
Thanked 1 Time in 1 Post
|
Re: 1/8 Porsche 935/78 'Moby Dick'
The spoked wheels were more common to 956 and 962. The 935 commonly used bbs E50 and similar variants, so you are correct in making those.
Nice job. |
|
|
|
|
| The Following User Says Thank You to ritzblitz For This Useful Post: |
ScratchBuilt (12-31-2012)
|
|
12-31-2012, 08:55 AM
|
#165 | |
|
AF Enthusiast
Thread starter
Join Date: Nov 2008
Location: Norwich
Posts: 649
Thanks: 21
Thanked 111 Times in 87 Posts
|
Re: 1/8 Porsche 935/78 'Moby Dick'
Okay - so the plan to start on the front suspension layout didn't work out. I've spent time modelling most days since I finished for Christmas, but getting the rear suspension mounted has taken a lot longer than I thought - and it's still in progress.
The second swing-arm core was made and glued together, then I was ready to get the four mounting brackets (1/4" x 3/8" box) attached to the back of the chassis. Despite my best efforts to file and fettle them to suit beforehand, I still ended up with a few gaps here and there - not a major problem, as we will see. Here's the starting point:   Next step was to reinforce the mountings with plates and gussets - and this was the time-consuming part:  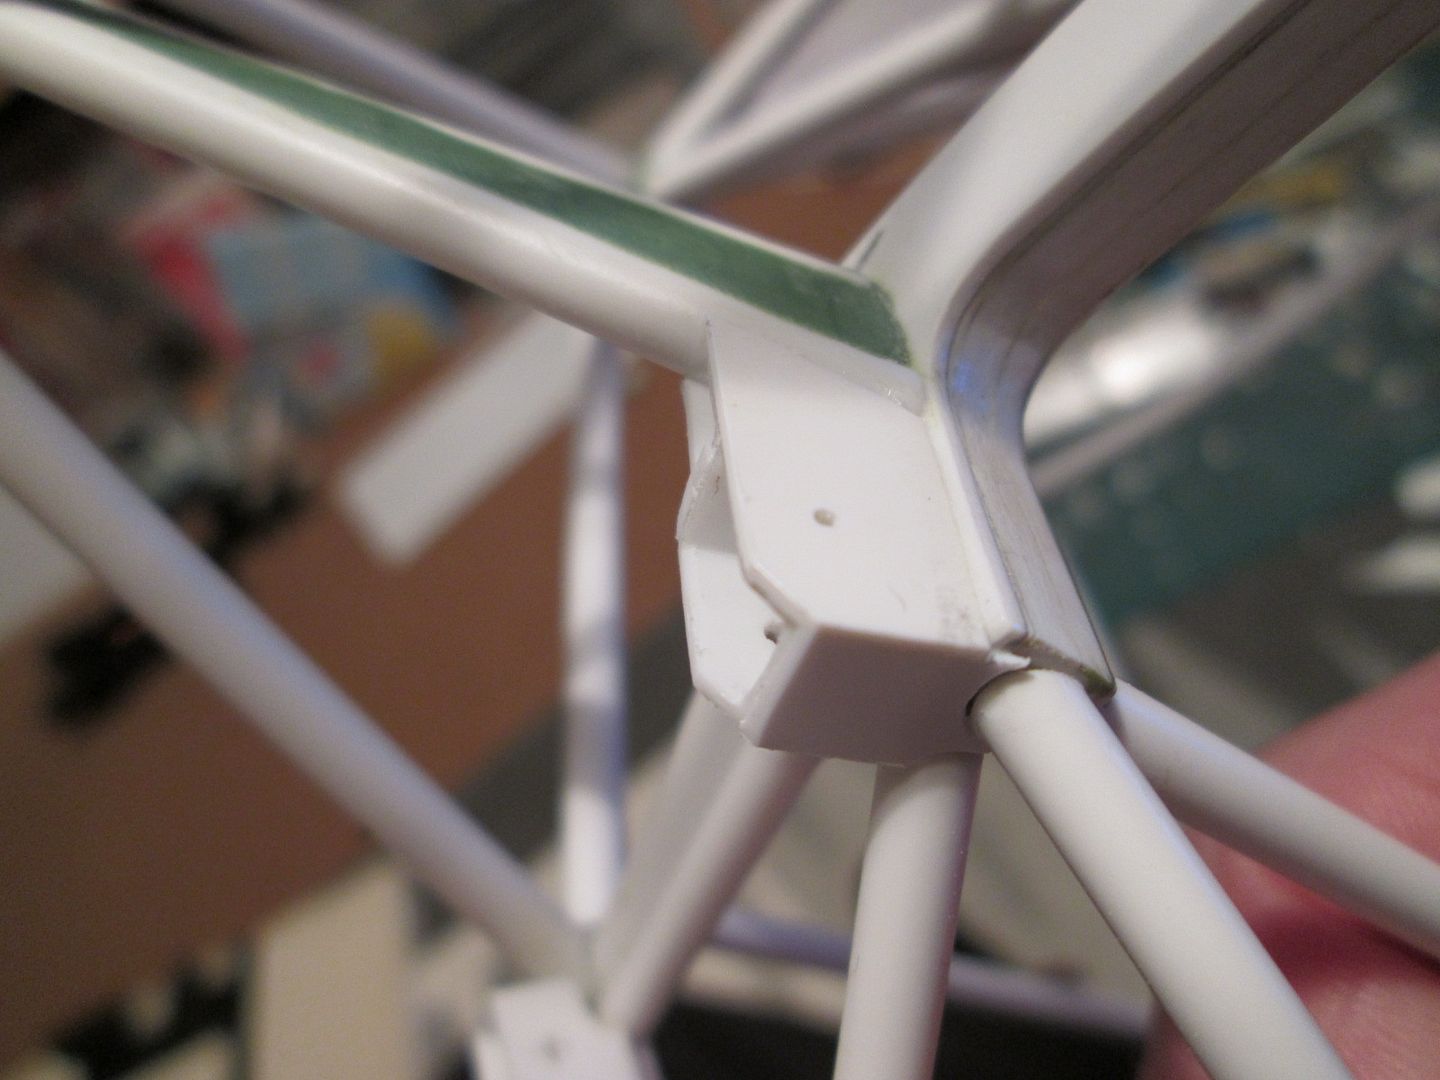 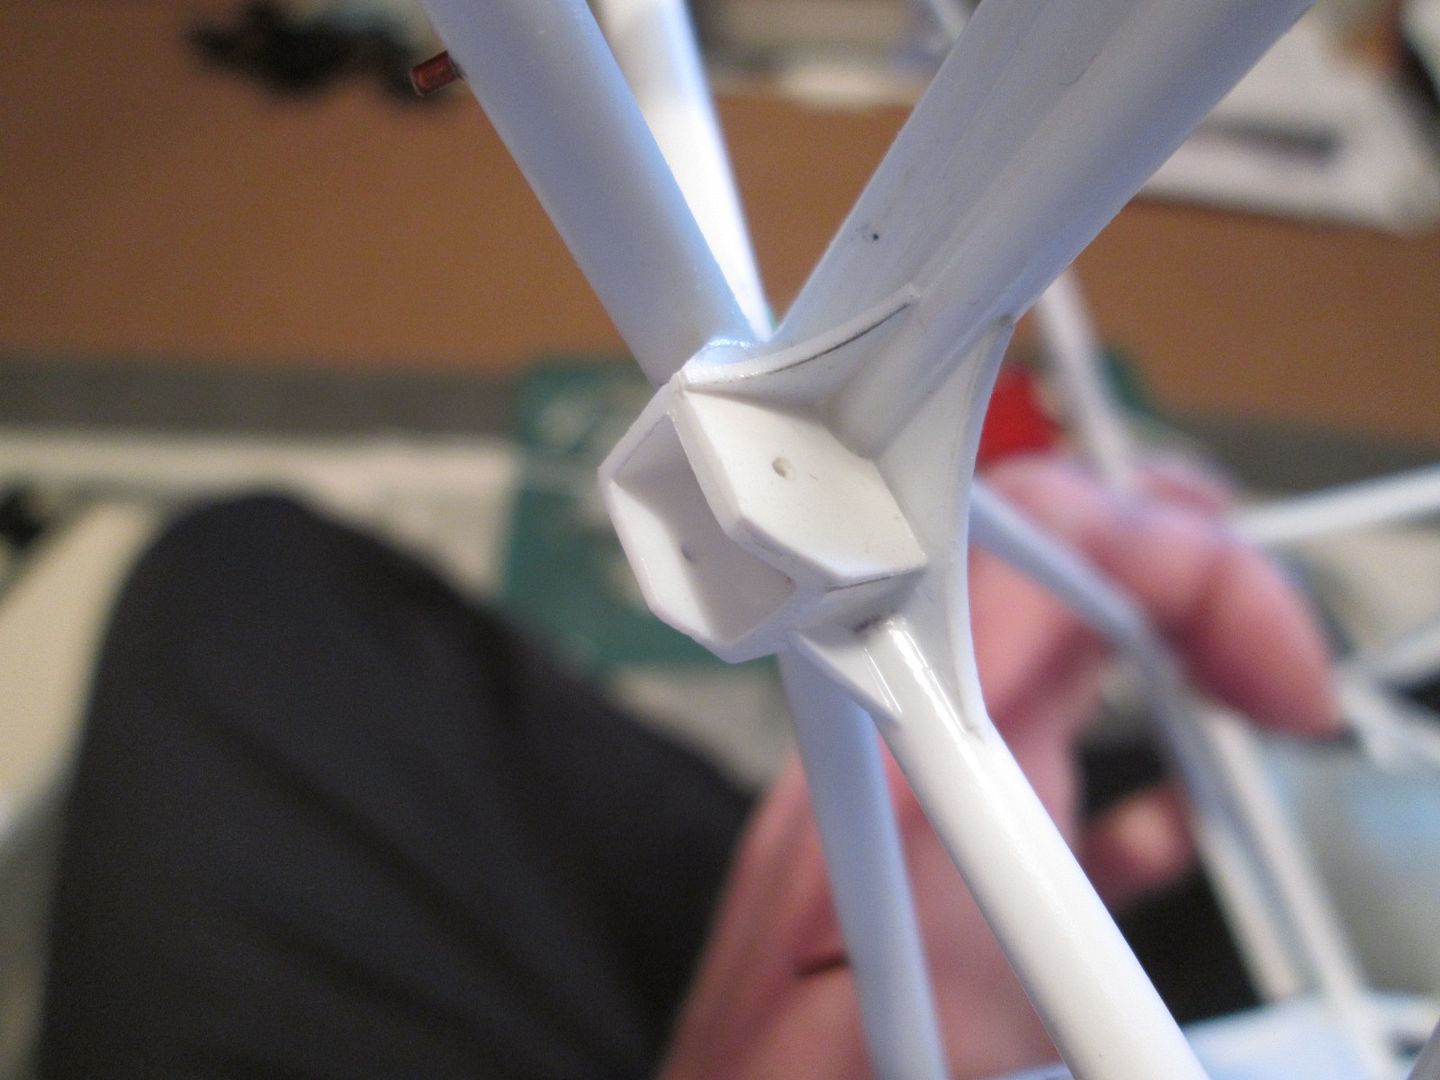 Having done this, I've made a start on filling the remaining gaps with greenstuff, and adding some welding seams:  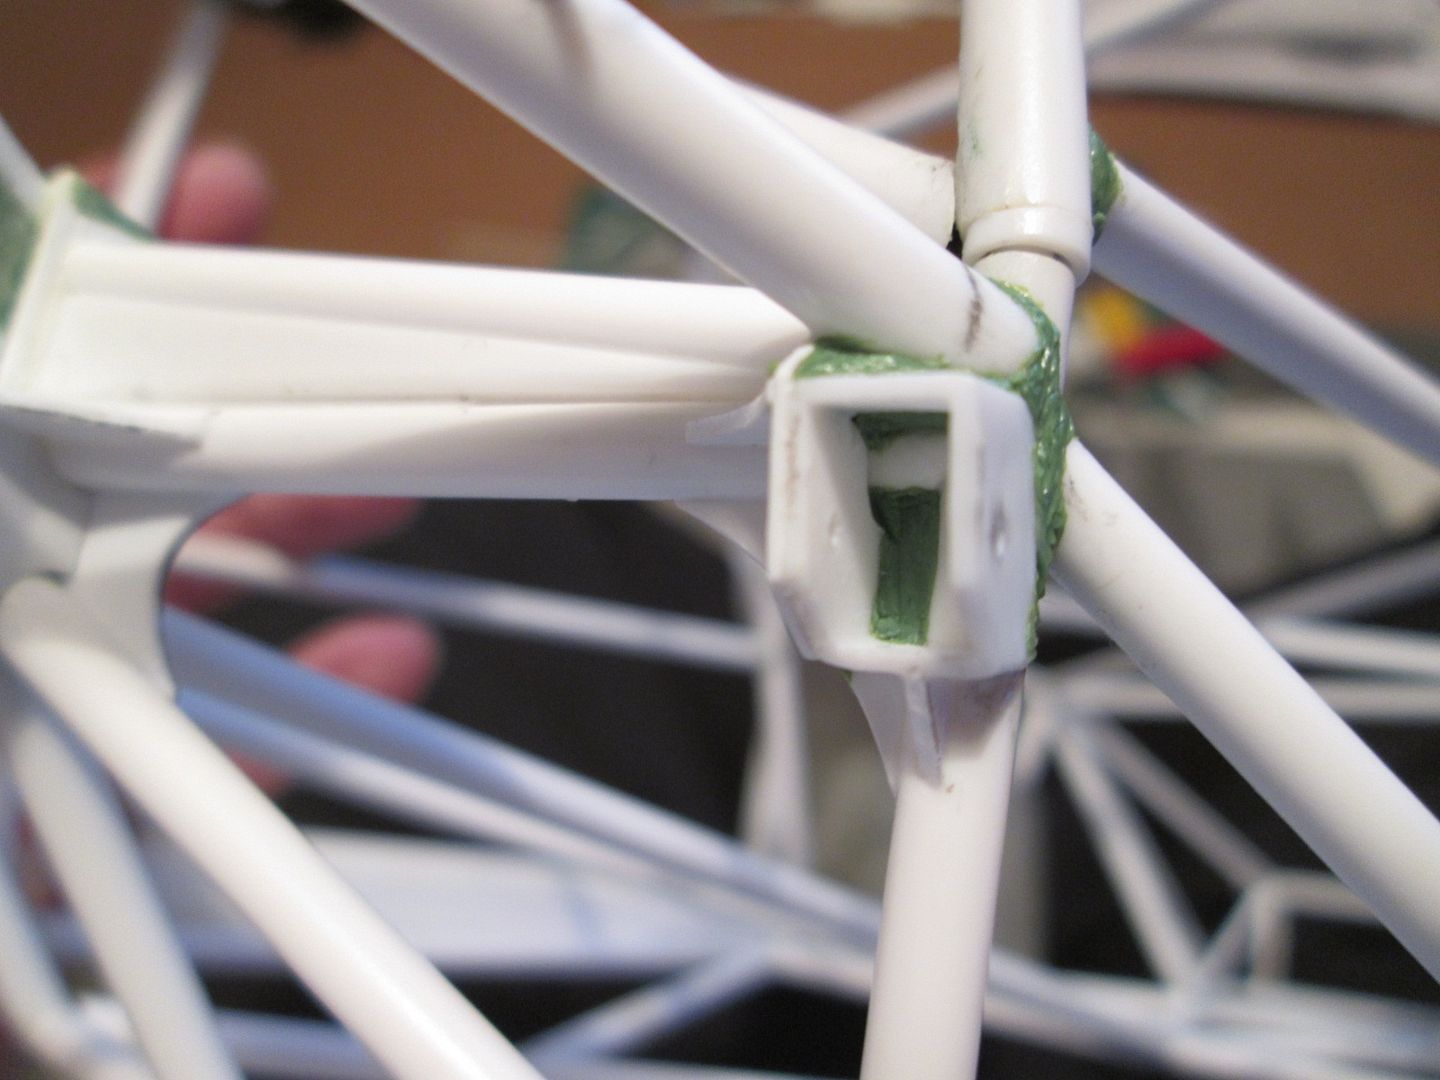 I'm going to have to continue this in small bursts - it's a bit mind-numbing to just keep at it for hour after hour! The greenstuff starts going hard after 45 minutes or so anyway, so that's a good time to stop and do something else. The important thing is that the mountings aren't going anywhere and should be able to handle having the suspension hanging from them. Okay, I'll admit some of the gussets aren't strictly to original spec, but there are some areas where strength has to be the priority. So, I'll continue adding the greenstuff during the coming days, then I can think about the front end. With the rear mountings in place I can also do some more trimming on the fibreglass panels, too. That's it from me for 2012. The 935 has been slow-going at times, but when I look at all the various bits and pieces I've made during the year, I can see where the time has gone. Targets for 2013? For starters I want to get the front and rear suspension sorted out - including discs, calipers, etc - before returning to the front bulkhead panel. Then it's a question of whether I dive straight into the engine and gearbox, or keep busy with fuel and oil tanks, rads and coolers, interior details, etc. Thanks to everyone who's been following, and I hope you all have a Happy New Year. All the best for 2013, SB |
|
|
|
|
| The Following User Says Thank You to ScratchBuilt For This Useful Post: |
lovegt40 (12-31-2012)
|
| ||||||||||||||||||||||||||||||||||||||
|
POST REPLY TO THIS THREAD |
 |
|
|


