|
|
|

|
|
| Search | Car Forums | Gallery | Articles | Helper | AF 350Z | IgorSushko.com | Corporate |
|
| Latest | 0 Rplys |
|
|||||||
| WIP - Motorsports Post topics for any "Work In Process" motorsports vehicles in this sub-forum. |
 |
 Show Printable Version | Show Printable Version |  Email this Page | Email this Page |  Subscribe to this Thread
|
|
|
Thread Tools |
 02-06-2017, 10:57 PM
|
#1 | |
|
AF Regular
Join Date: Feb 2013
Location: Irvine
Posts: 202
Thanks: 56
Thanked 29 Times in 28 Posts
|
Porsche 935 "Martini"
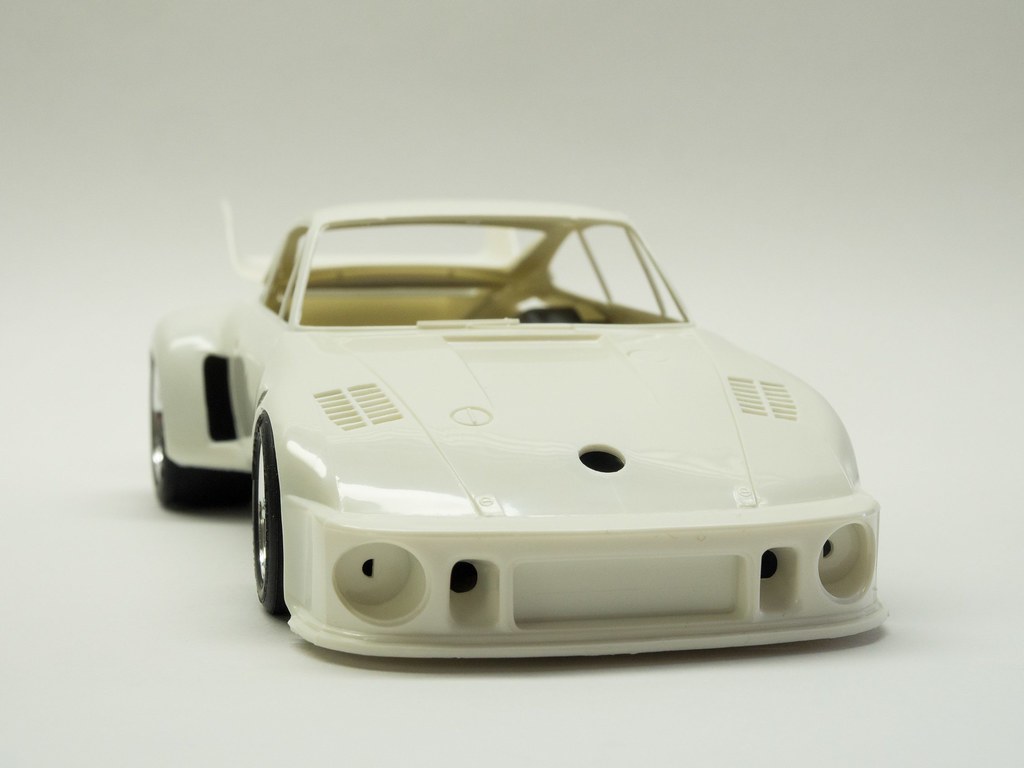
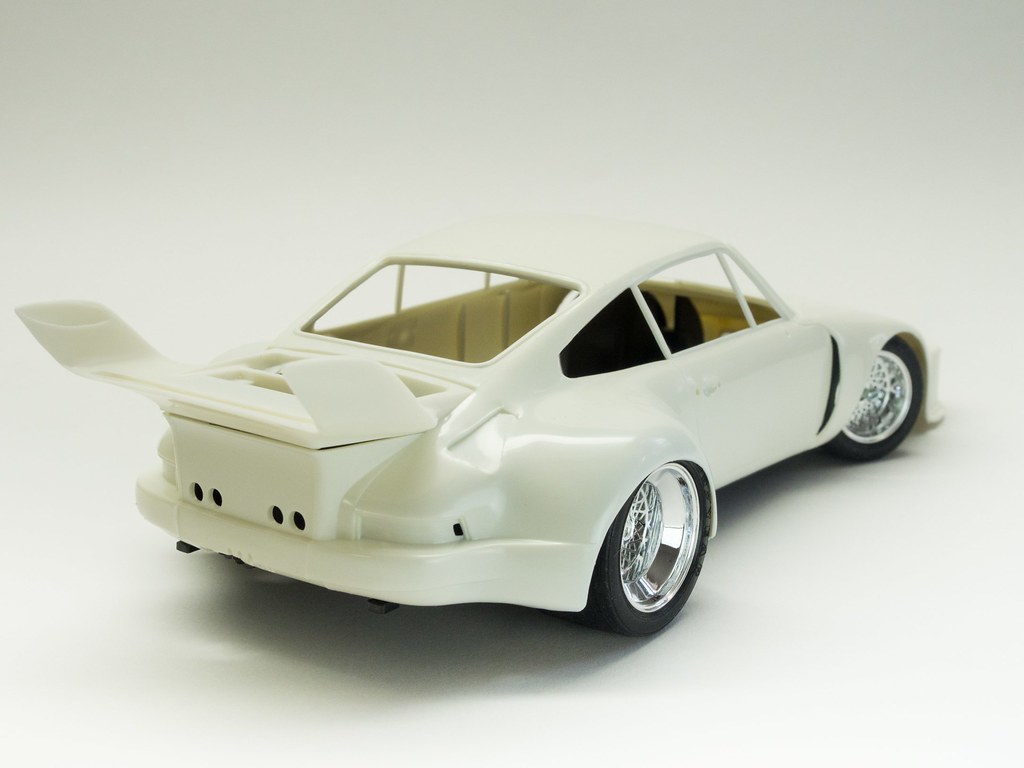
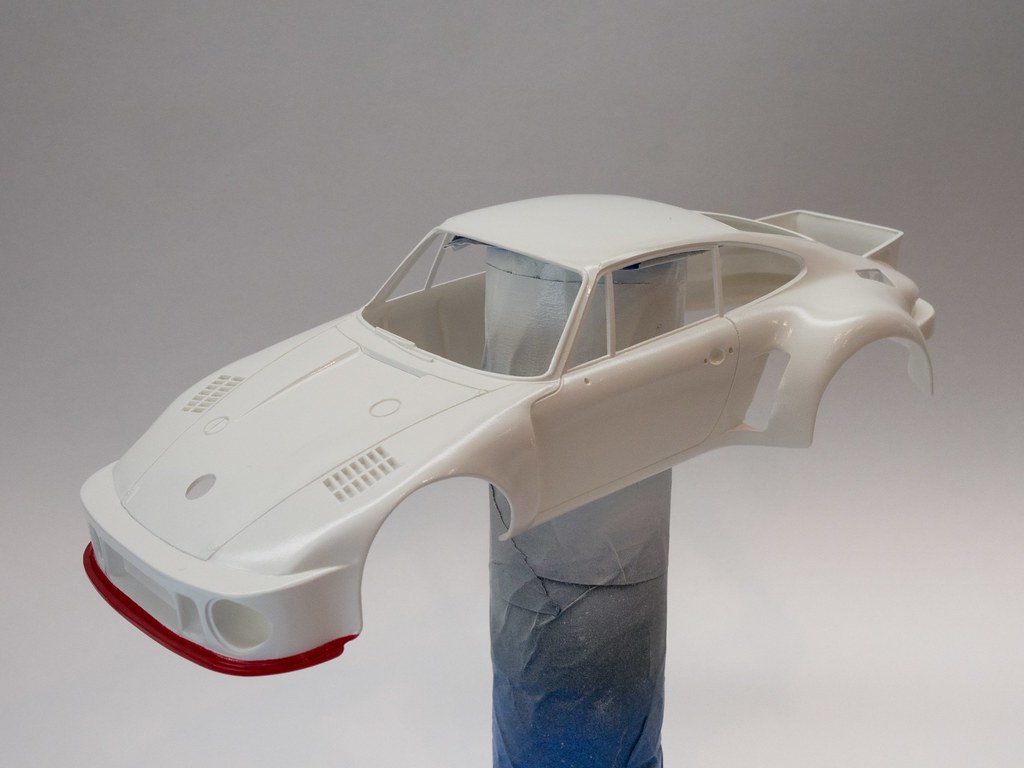
Starting this simple kit which a friend gave me. It's a curbside kit with no engine details, and even the wheels are not see through. I think this was a kit intended for an electric motor in the old days. Still not sure if I should put in the driver, but here are some test fit photos. At first I thought it isn't pretty with the flatnose, but the shape is growing on me. Certain angles look pretty awesome from the front. I think the decals will be a challenge, but that's about it.
   |
|

|

|
|
02-07-2017, 01:24 AM
|
#2 | |
|
AF Regular
Thread starter
Join Date: Feb 2013
Location: Irvine
Posts: 202
Thanks: 56
Thanked 29 Times in 28 Posts
|
Re: Porsche 935 "Martini"
Small update with photos. Body deepen panel lines, removed mold lines, primed with Tamiya White Fine Primer.
 Added front and rear of the hood panel lines, which were strangely absent from the kit. Got carry away on some area, but it's ok. 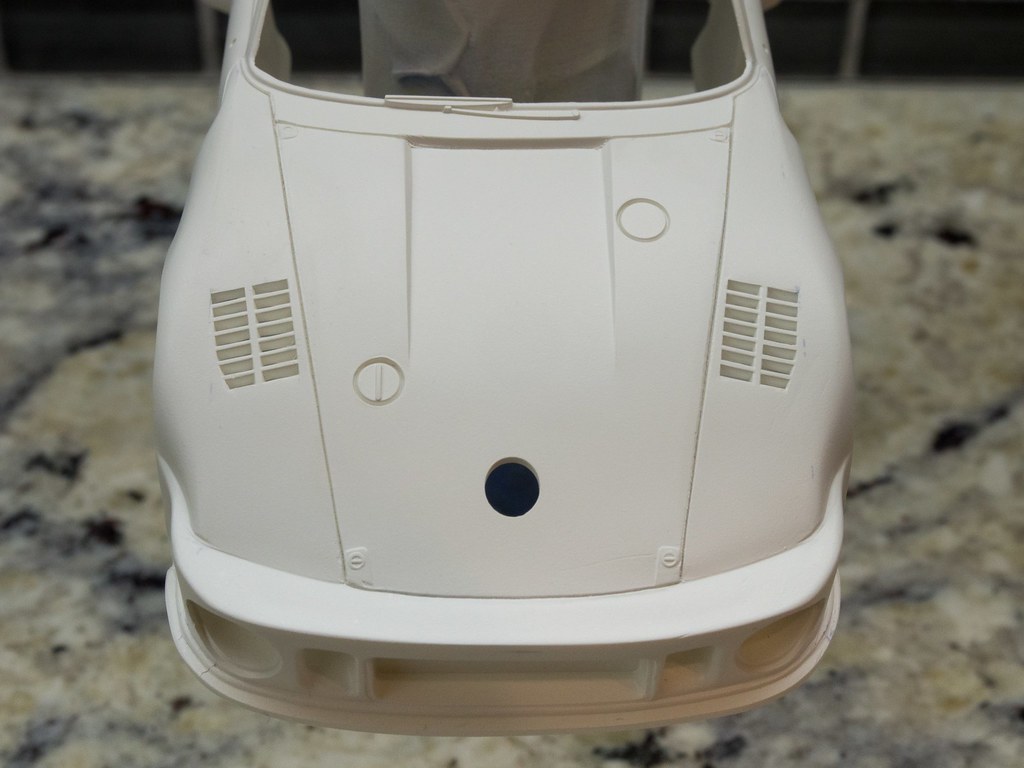 Also added panel lines to the rear hatch. 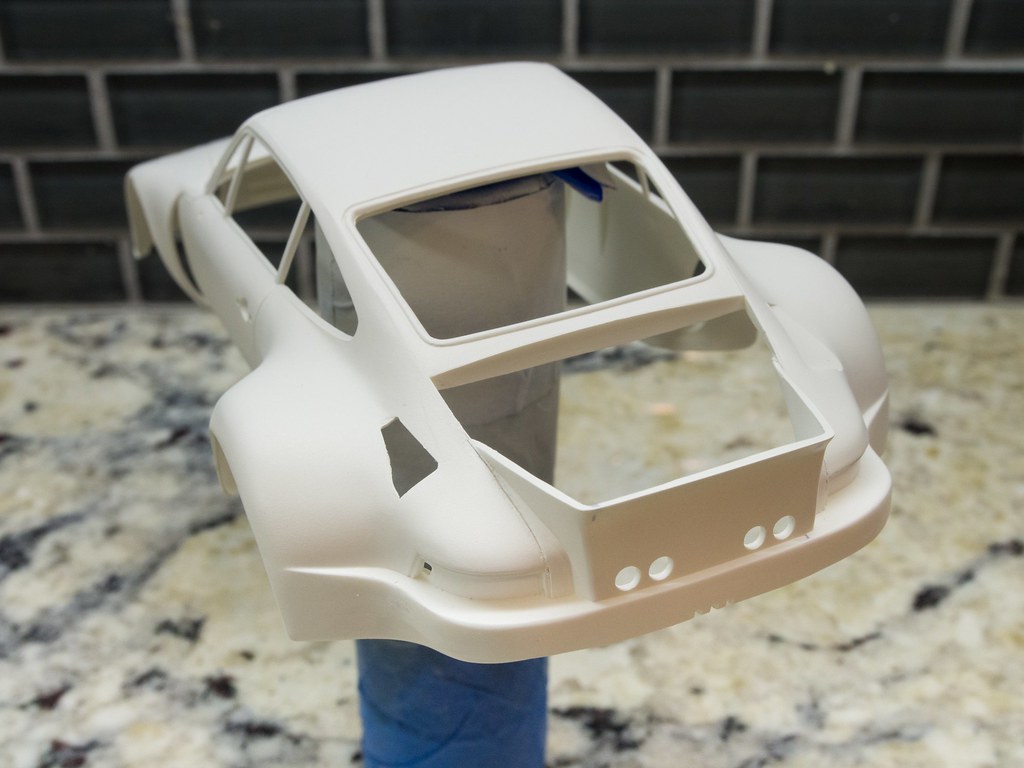 Ran out of gray primer, need to order a can or two, old can just enough to prime the seat and the rollbar. Painted seat with matt black, and rollbar with gun metal. 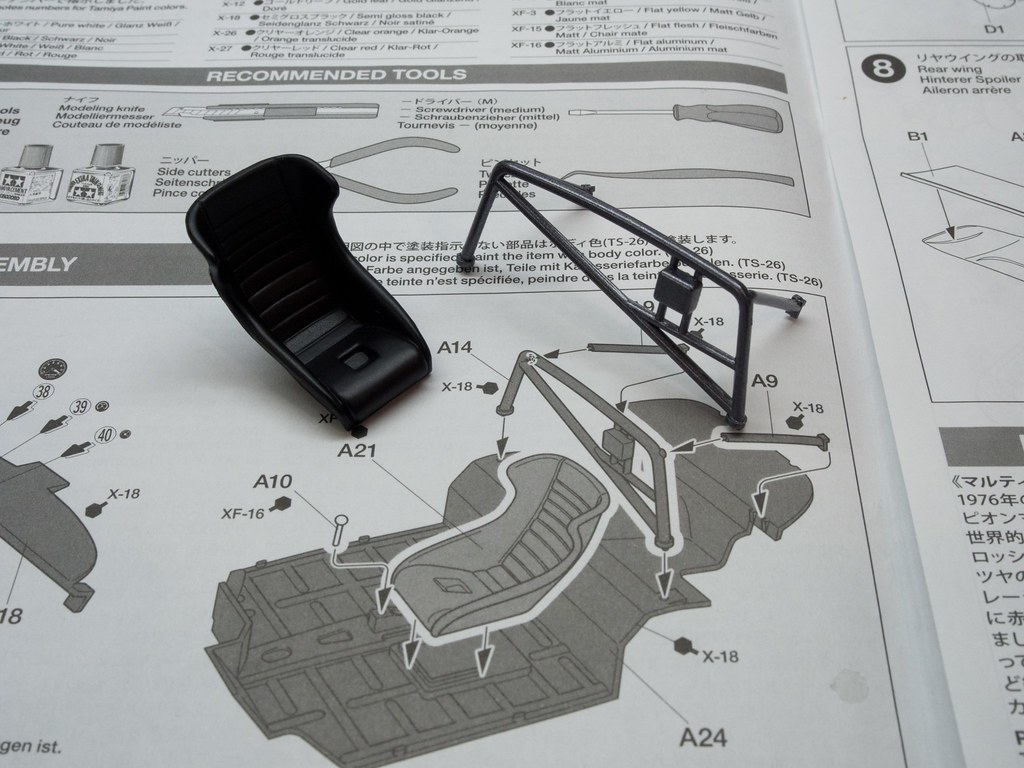 |
|
|
|
|
|
02-16-2017, 04:03 PM
|
#3 | |
|
AF Regular
Thread starter
Join Date: Feb 2013
Location: Irvine
Posts: 202
Thanks: 56
Thanked 29 Times in 28 Posts
|
Re: Porsche 935 "Martini"
Small update on interior and wheels.
Interior got painted in gun metal. Hand painted head rest on roll cage. Side door panels got painted as well. Shifter is glued on. The seat got painted on the back. Next will be adding seat-belts and the dash.  Wheels got painted gold in the center, then hand painted matte black inside since it is one solid wheel. Then slowly using a cloth wrapped on a tip of a small flat screwdriver, with thinner, slowly remove the excess reviewing the gold rim. 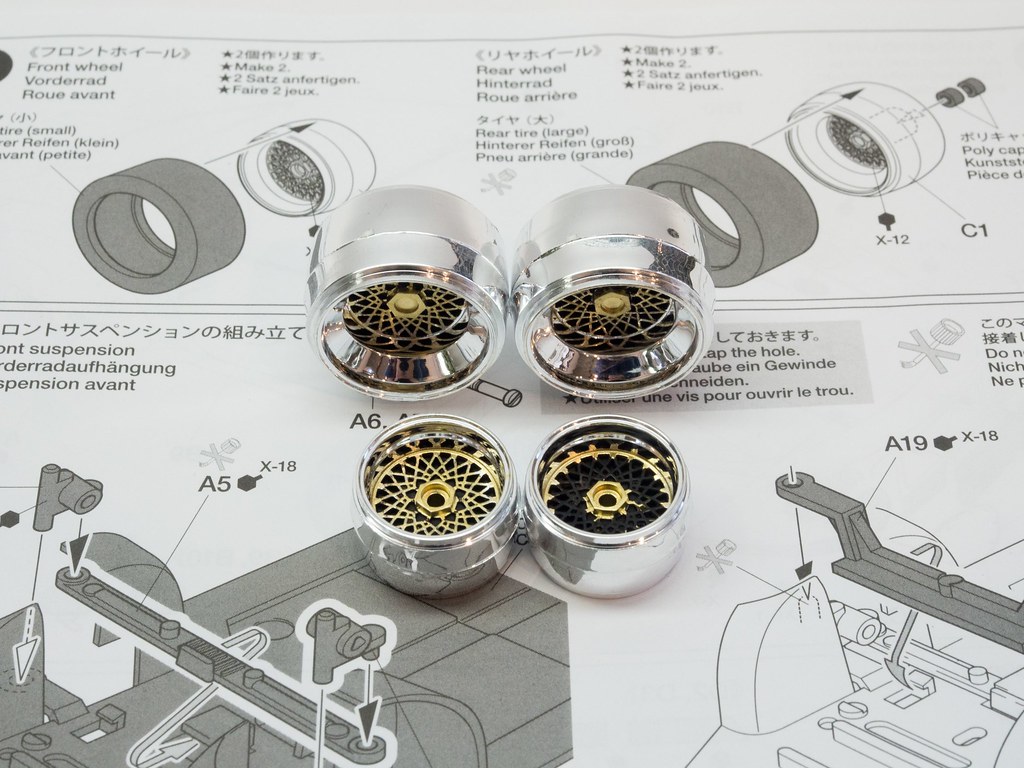 The chassis got painted semi-gloss black. The kit is not very detailed, the engine is just molded on in the back. Still thinking should I paint the engine. 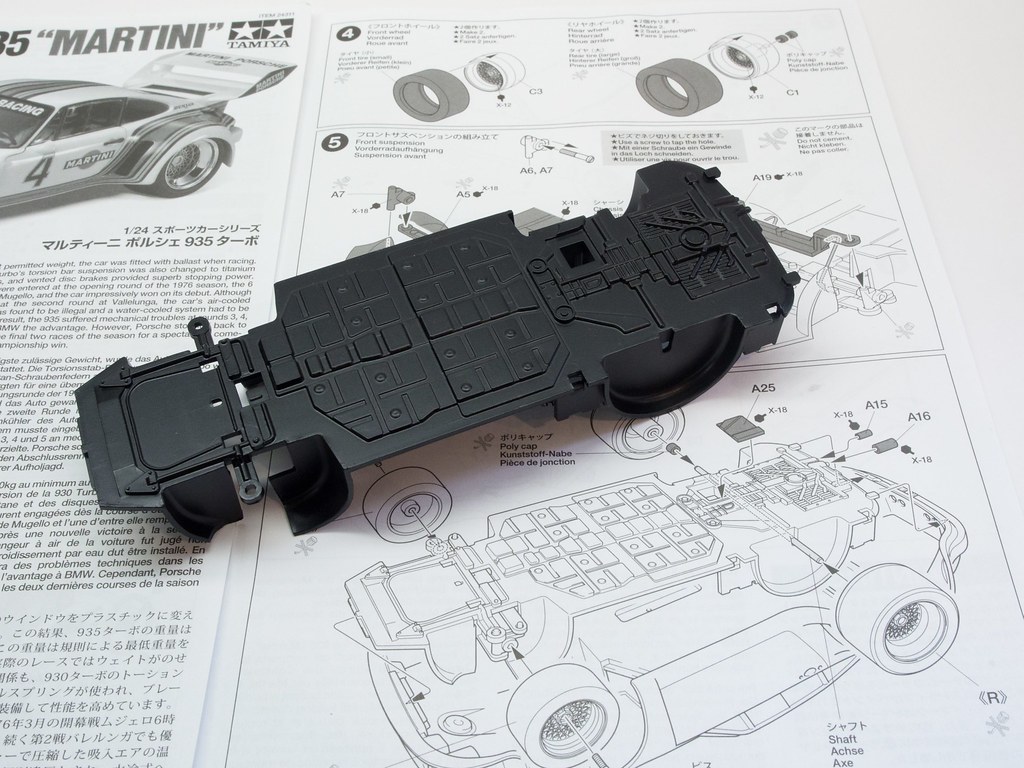 I really don't have much references of this car. If anyone find some, please share. I have been looking at this post from another forum for references, the builder did a good job on it. http://www.modelcarsmag.com/forums/t...-lots-of-pics/ |
|
|
|
|
|
02-18-2017, 12:56 PM
|
#4 | |
|
AF Regular
Thread starter
Join Date: Feb 2013
Location: Irvine
Posts: 202
Thanks: 56
Thanked 29 Times in 28 Posts
|
Re: Porsche 935 "Martini"
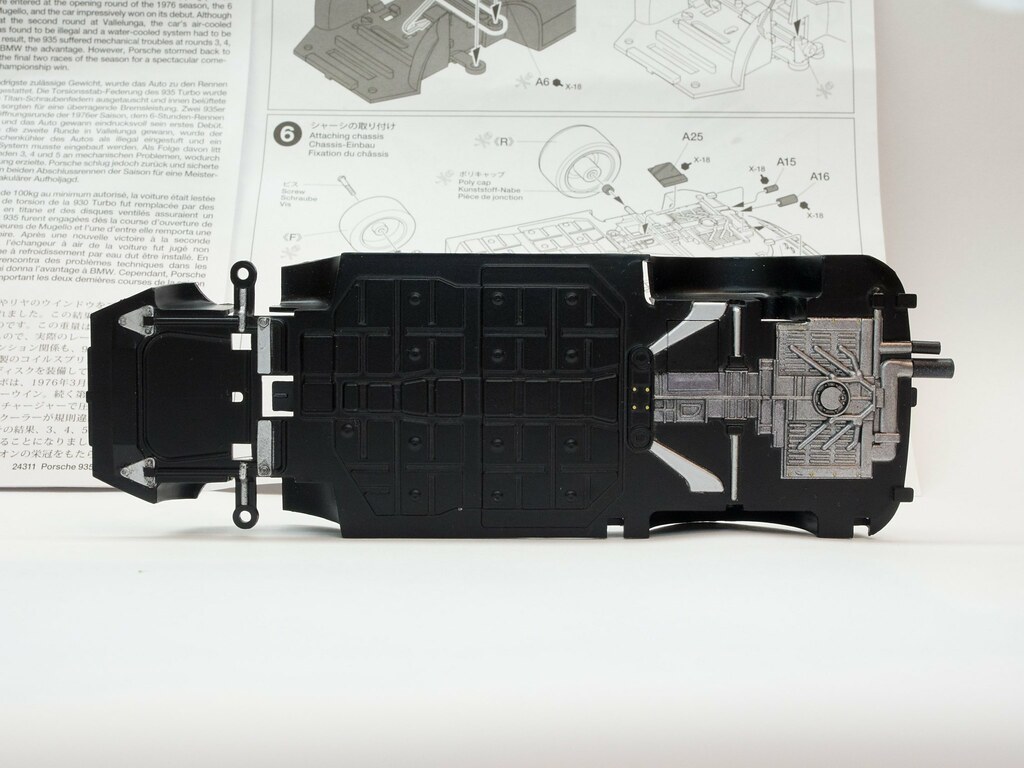
Chassis update. I did paint the engine and few parts. I think the manual is wrong where it says the chassis is black, but I think it's should be white.
 |
|
|
|
|
|
02-19-2017, 01:58 AM
|
#5 | |
|
AF Regular

Join Date: Jun 2005
Location: london
Posts: 414
Thanks: 3
Thanked 22 Times in 20 Posts
|
Re: Porsche 935 "Martini"
Coming on well
|
|
|
|
|
|
02-20-2017, 10:41 PM
|
#6 | |
|
AF Regular
Thread starter
Join Date: Feb 2013
Location: Irvine
Posts: 202
Thanks: 56
Thanked 29 Times in 28 Posts
|
Re: Porsche 935 "Martini"
Thanks. More work done over the long weekend. Base coat on with Tamiya TS-26 pure white, front chin spoiler with Tamiya red (forgot which one).
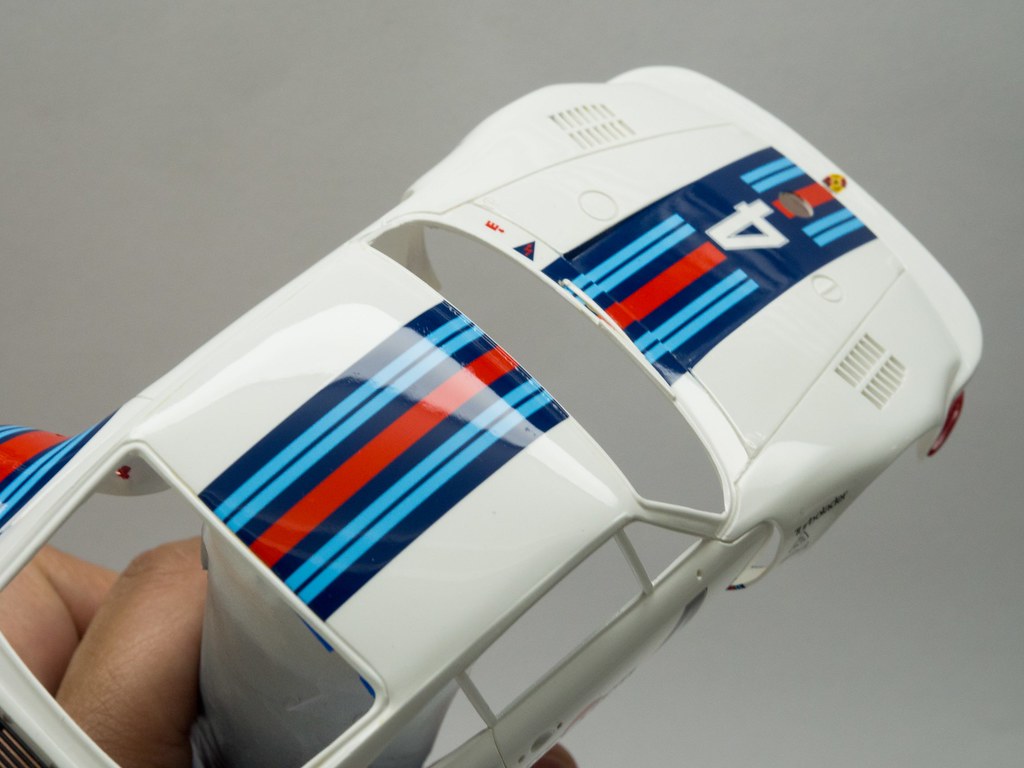
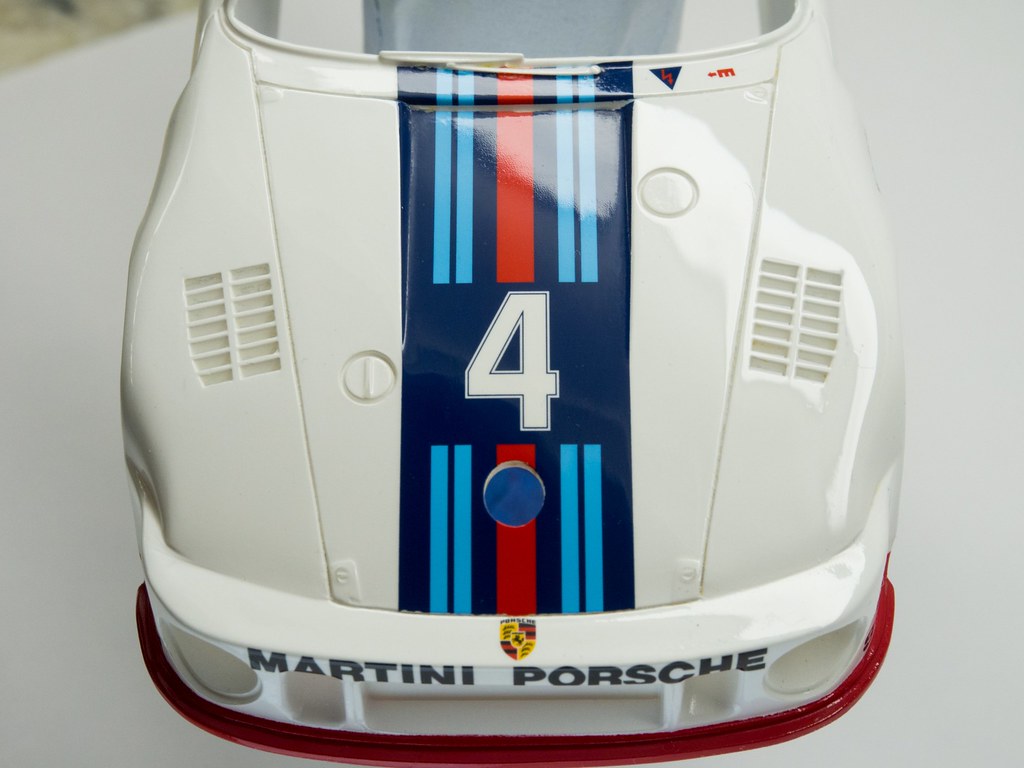
 Started putting on decals. Here is the giant rear wing. Decals went on pretty well. It's an old kit, but it was remanufactured just few years ago. 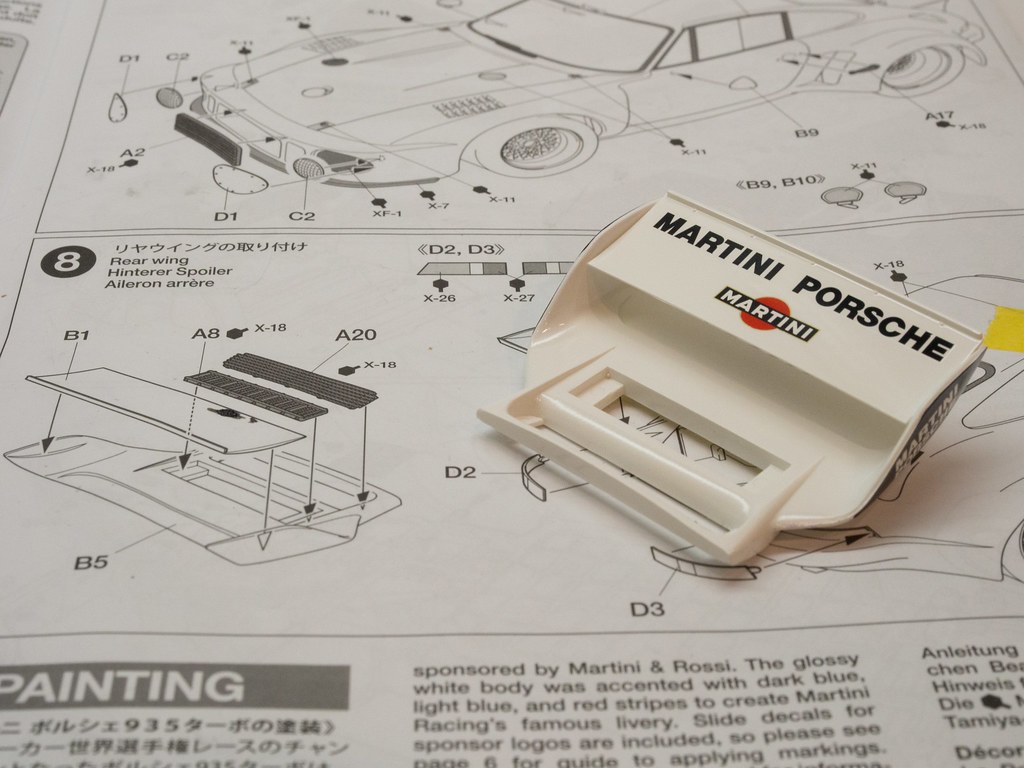 Here are couple decals on the car. 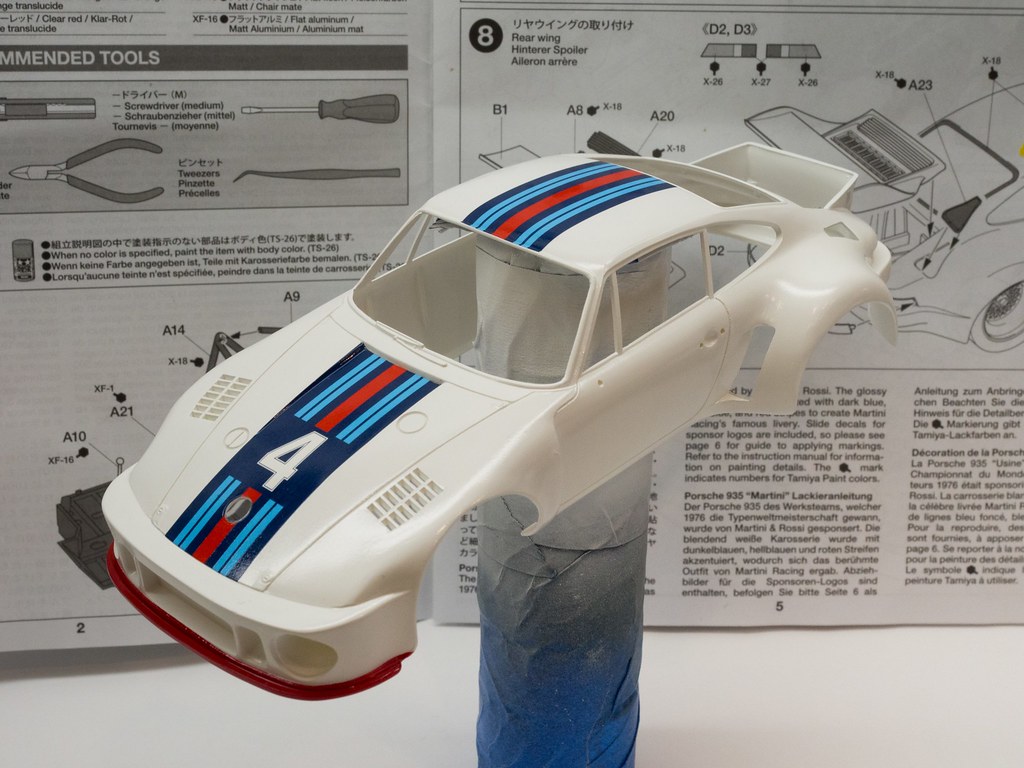 Also made some progress for the interior. Dash is done, gauges had drops of clear to simulate glass. Also drilled holes on spokes of the steering wheel, which came solid, weird. 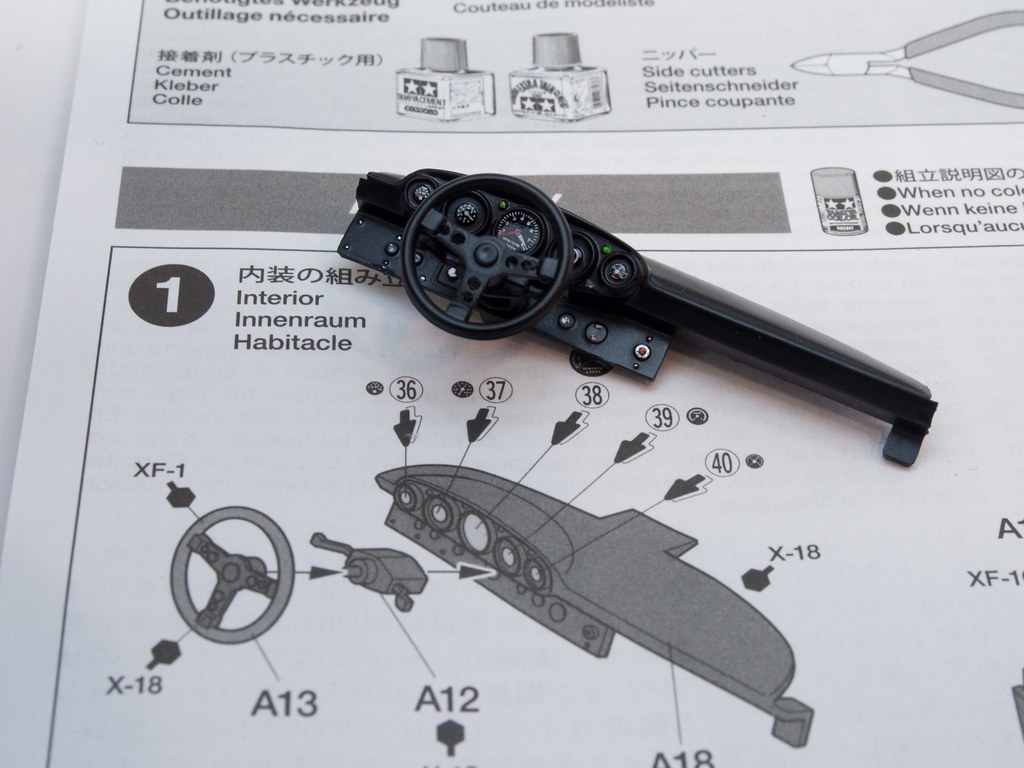 |
|
|
|
|
|
02-22-2017, 11:49 AM
|
#7 | |
|
Loser

Join Date: Aug 2007
Location: Moscow
Posts: 1,170
Thanks: 110
Thanked 248 Times in 195 Posts
|
Re: Porsche 935 "Martini"
Good job! Nice wheels and dash board.
__________________
Best regards, Mikhail   
|
|
|
|
|
|
02-26-2017, 09:33 PM
|
#8 | |
|
AF Regular
Thread starter
Join Date: Feb 2013
Location: Irvine
Posts: 202
Thanks: 56
Thanked 29 Times in 28 Posts
|
Re: Porsche 935 "Martini"
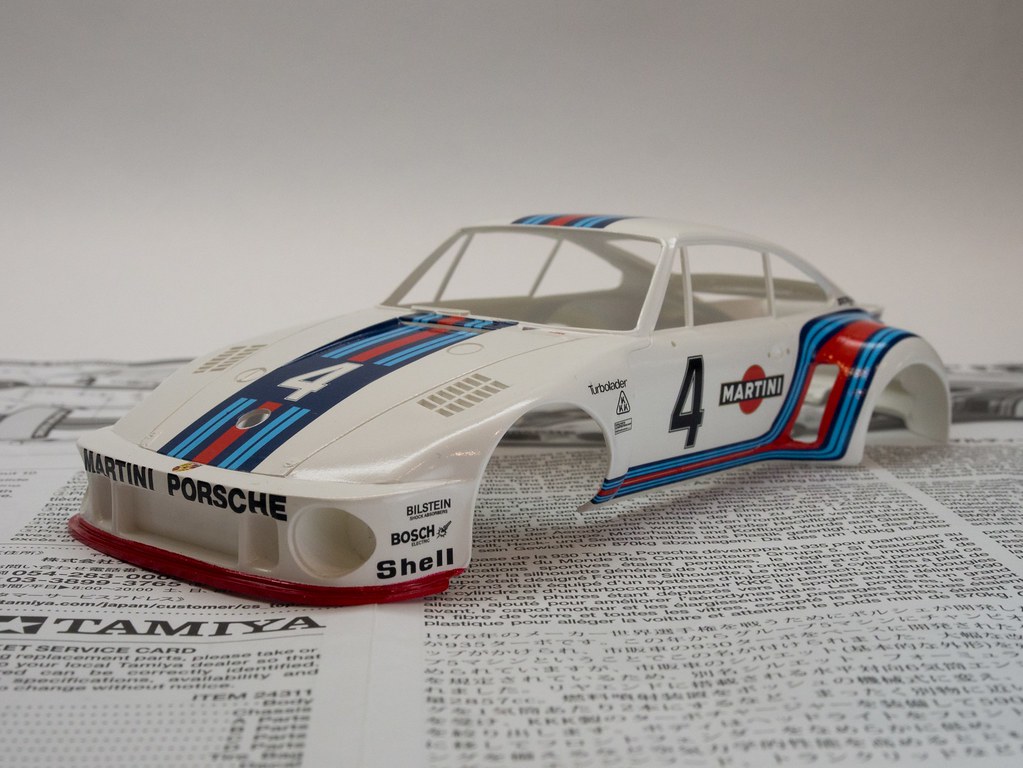
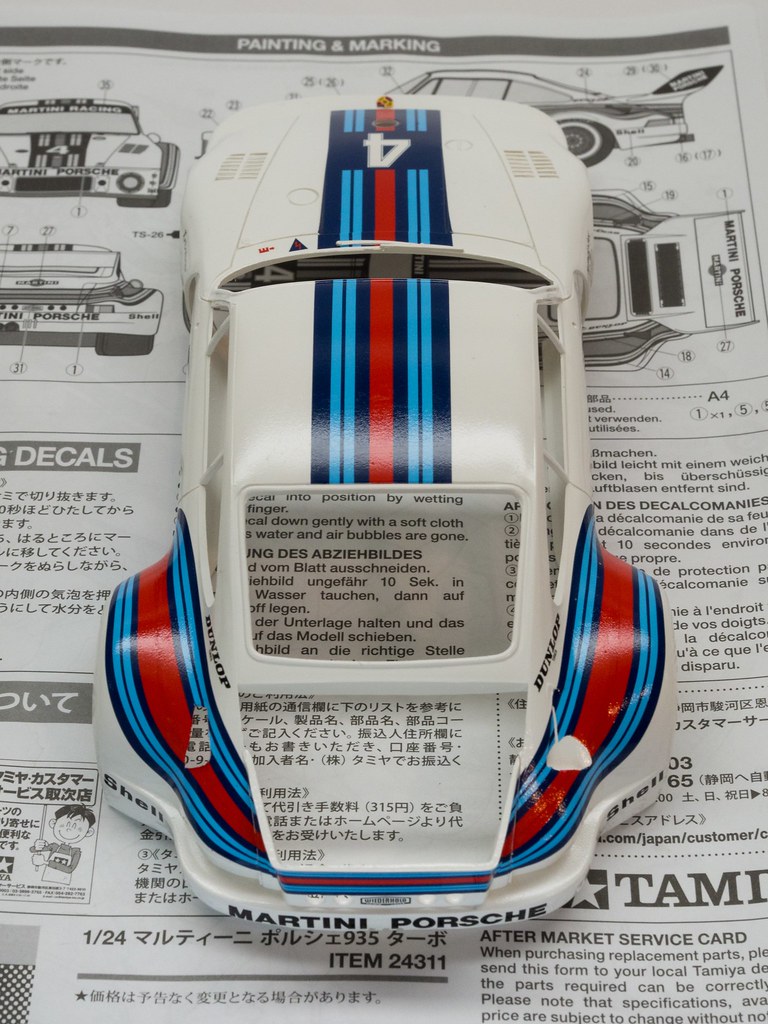
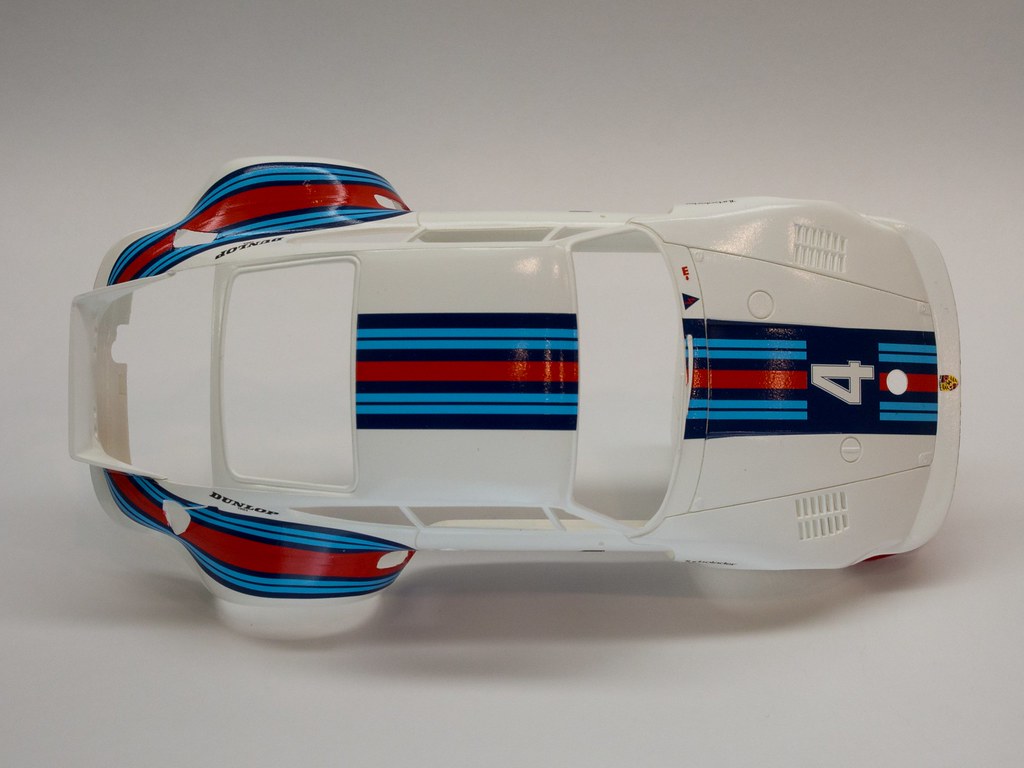
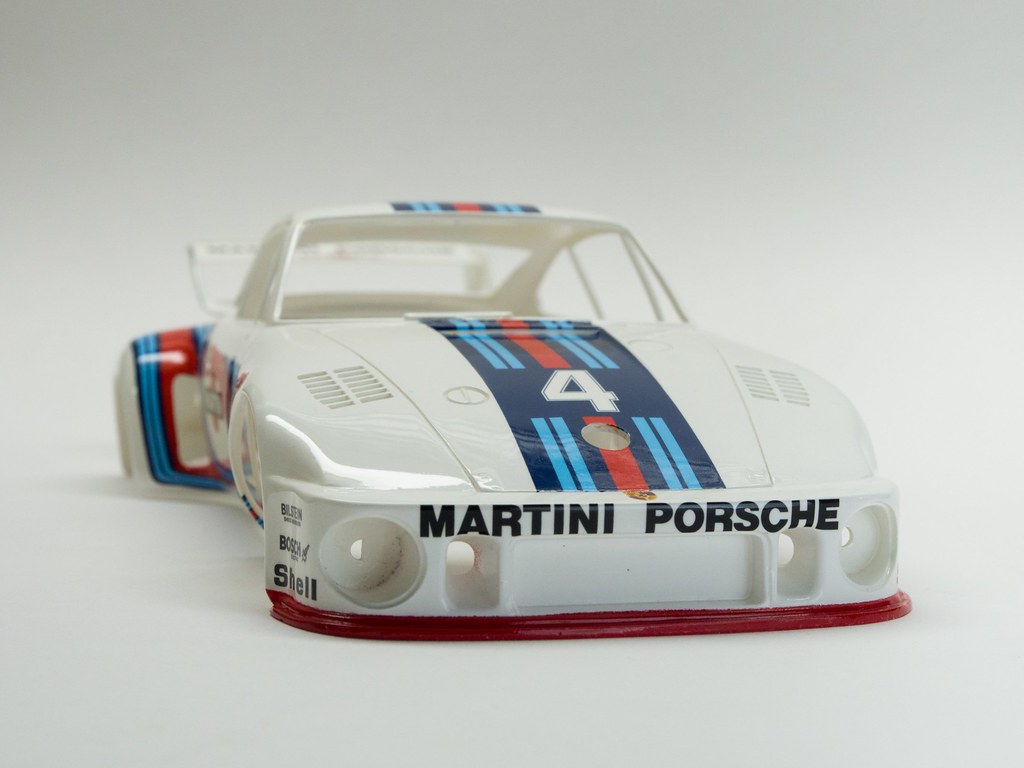
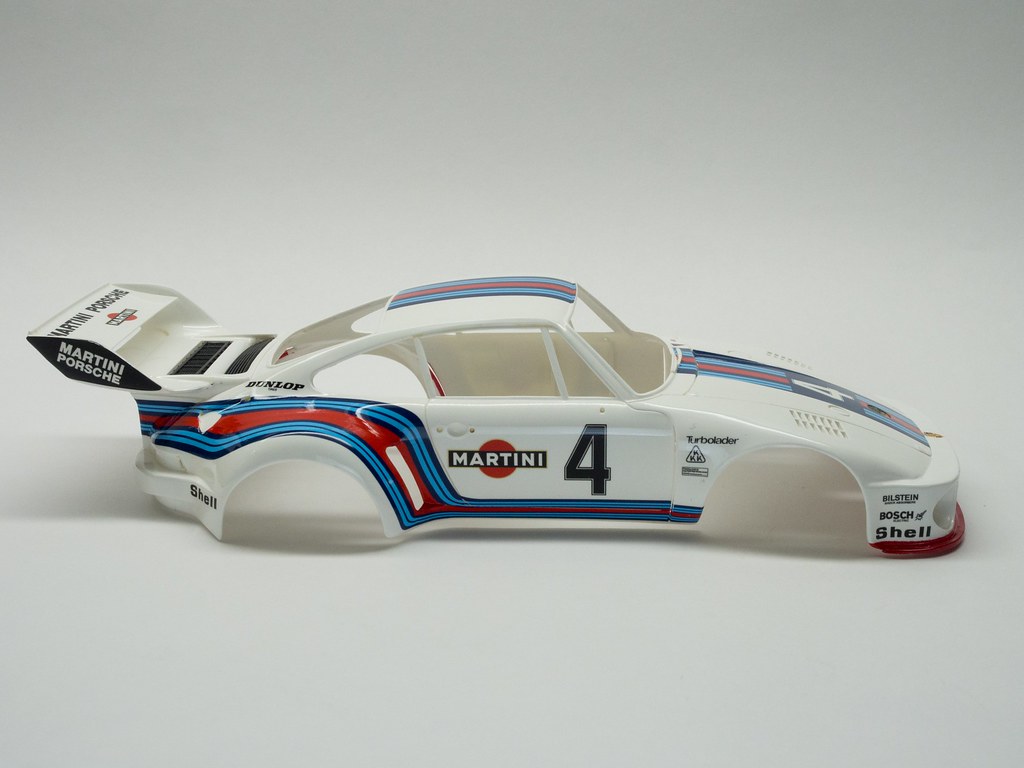
Body decals completed. Tamiya decals went on really well. The cuts were perfect for the shapes. There are only few places I had to touch up the decals gaps.
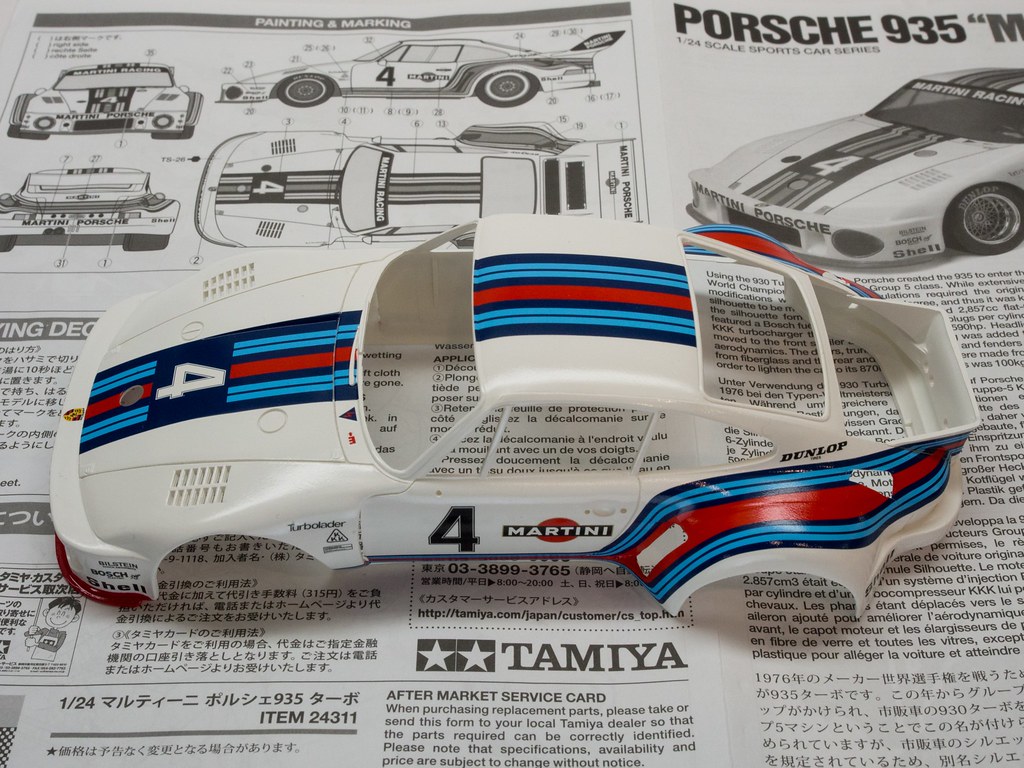    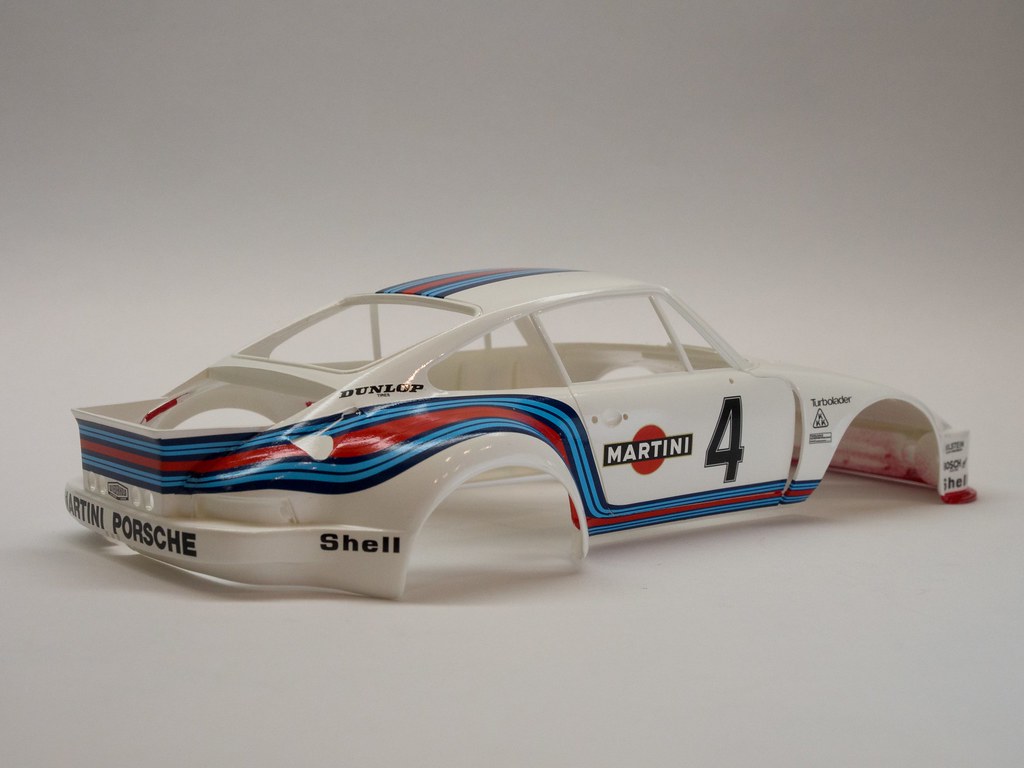 Clear coats will be next. I usually use Mr. Hobby Super Clear Gloss, but I have a can of Tamiya TS-13, and I am thinking to use it this time. I have read somewhere that TS-13 is a really hot lacquer for decals, but some say it's ok, just few mist coats first and decals will be fine, which I had to do with Mr. Hobby Super Clear Gloss anyway. Any experiences with TS-13 over Tamiya decals? Thanks. |
|
|
|
|
|
03-01-2017, 10:55 AM
|
#10 | ||
|
AF Regular
Thread starter
Join Date: Feb 2013
Location: Irvine
Posts: 202
Thanks: 56
Thanked 29 Times in 28 Posts
|
Re: Porsche 935 "Martini"
Quote:
|
||
|
|
|
|
03-03-2017, 12:43 AM
|
#11 | |
|
AF Regular
Thread starter
Join Date: Feb 2013
Location: Irvine
Posts: 202
Thanks: 56
Thanked 29 Times in 28 Posts
|
Re: Porsche 935 "Martini"
Dunlop tire markings done.
 |
|
|
|
|
|
03-03-2017, 01:10 PM
|
#12 | |
|
AF Newbie

Join Date: May 2016
Location: Athens
Posts: 62
Thanks: 6
Thanked 7 Times in 7 Posts
|
Re: Porsche 935 "Martini"
Hey E46 ... regarding TS13 over tamiya decals : as long as you are not a complete barbarian about it, you should be OK especially after you did all the prep work on the body correctly (primer then TS26 on top etc.) and the decals are fresh. Go lightly on the first two coats and then apply one or two wet coats. What I do with clear coats from a can is to spray the mist coats with the airbrush (that involves decanting of course). That way i have more control, and then spray the final coats directly from the can to get a deep shine. Good luck !
|
|
|
|
|
|
03-03-2017, 02:14 PM
|
#13 | ||
|
AF Regular
Thread starter
Join Date: Feb 2013
Location: Irvine
Posts: 202
Thanks: 56
Thanked 29 Times in 28 Posts
|
Re: Porsche 935 "Martini"
Quote:
|
||
|
|
|
|
03-13-2017, 10:56 PM
|
#14 | |
|
AF Regular
Thread starter
Join Date: Feb 2013
Location: Irvine
Posts: 202
Thanks: 56
Thanked 29 Times in 28 Posts
|
Re: Porsche 935 "Martini"
Update. Cleared, polished, and waxed. Really like TS-13. It went on without damaging the decals. Some area is hard to polish, but I think I did the best I could. Next steps, panel lines and black window trims.
     |
|
|
|
|
|
04-11-2017, 01:56 AM
|
#15 | |
|
AF Regular
Thread starter
Join Date: Feb 2013
Location: Irvine
Posts: 202
Thanks: 56
Thanked 29 Times in 28 Posts
|
Re: Porsche 935 "Martini"
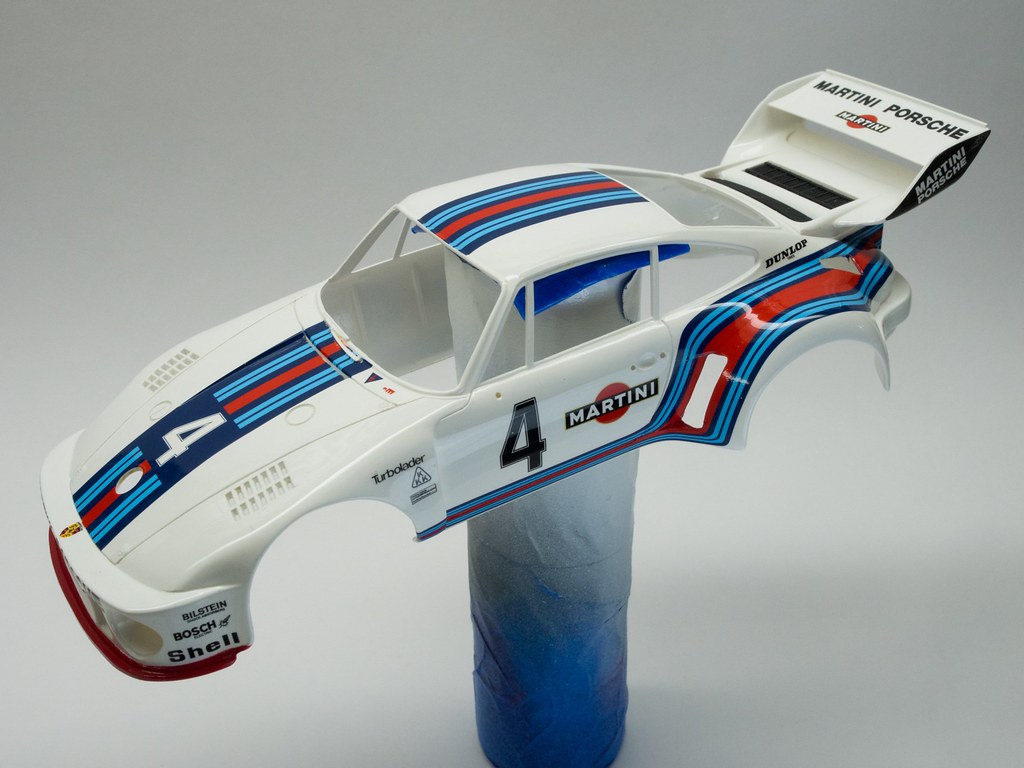
It's mostly done. Here are work since last update.
Added seat belts.  Completed interior with dash.  Window trims and wheels on chassis. Put in 1mm spacer for the front wheels so they are more flush with the fenders. Also made front wheels with a little negative camber. 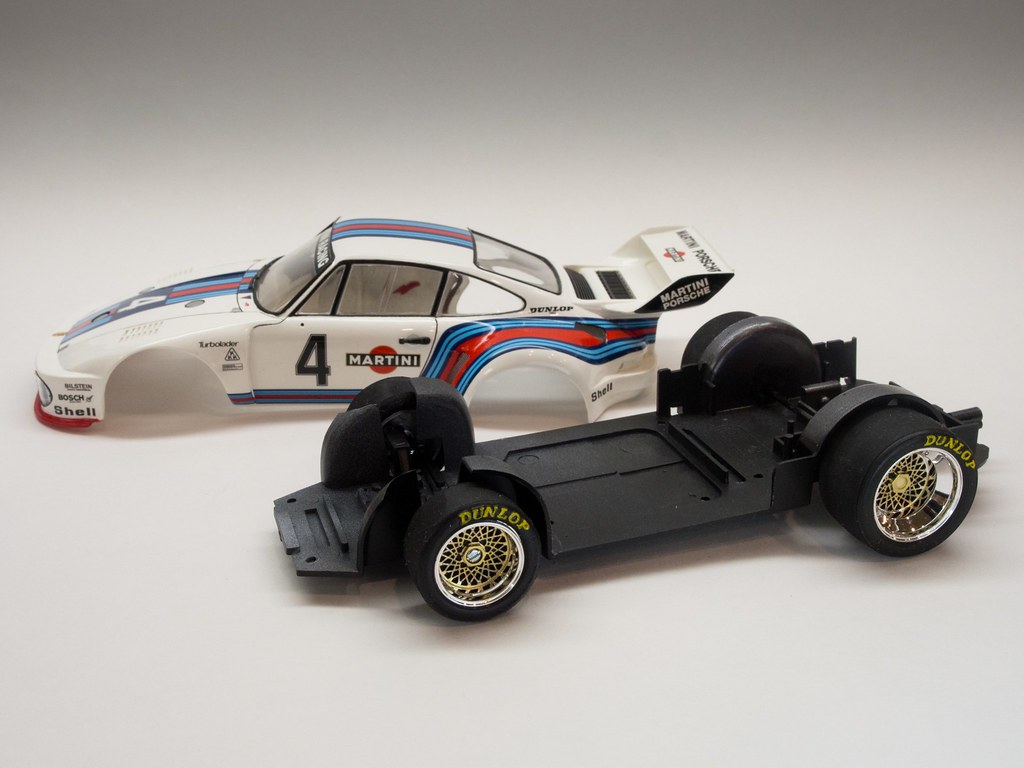 Added left over mesh in various ducts. Side duct meshes were painted in red, but they are hard to see against the white background. 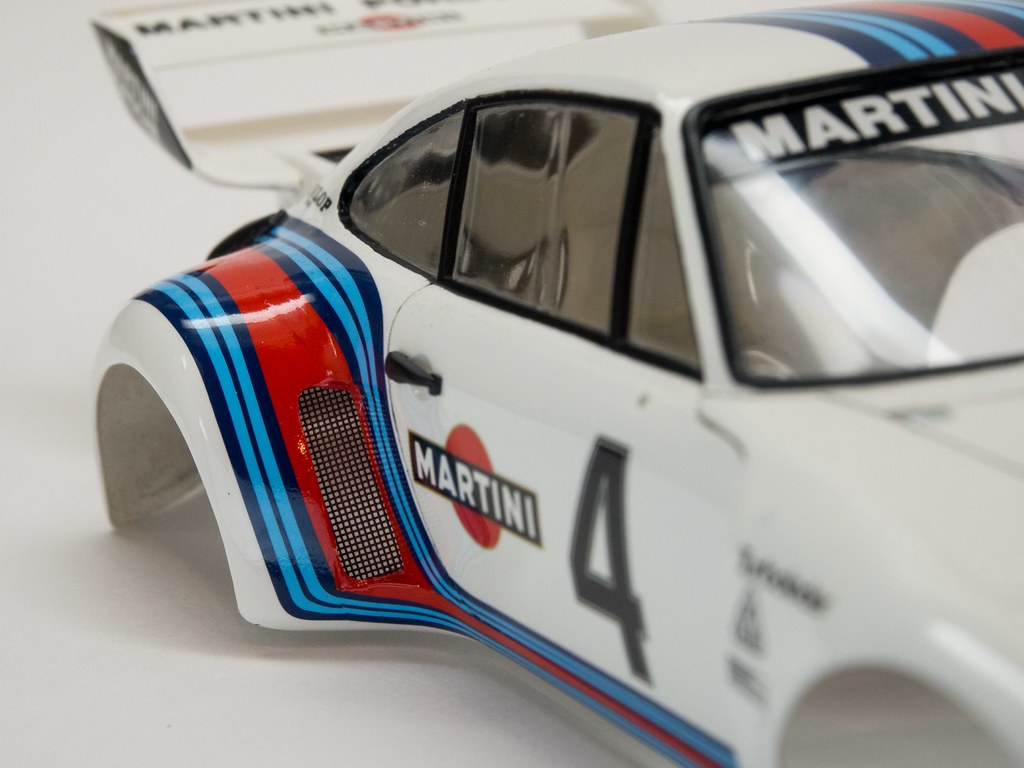  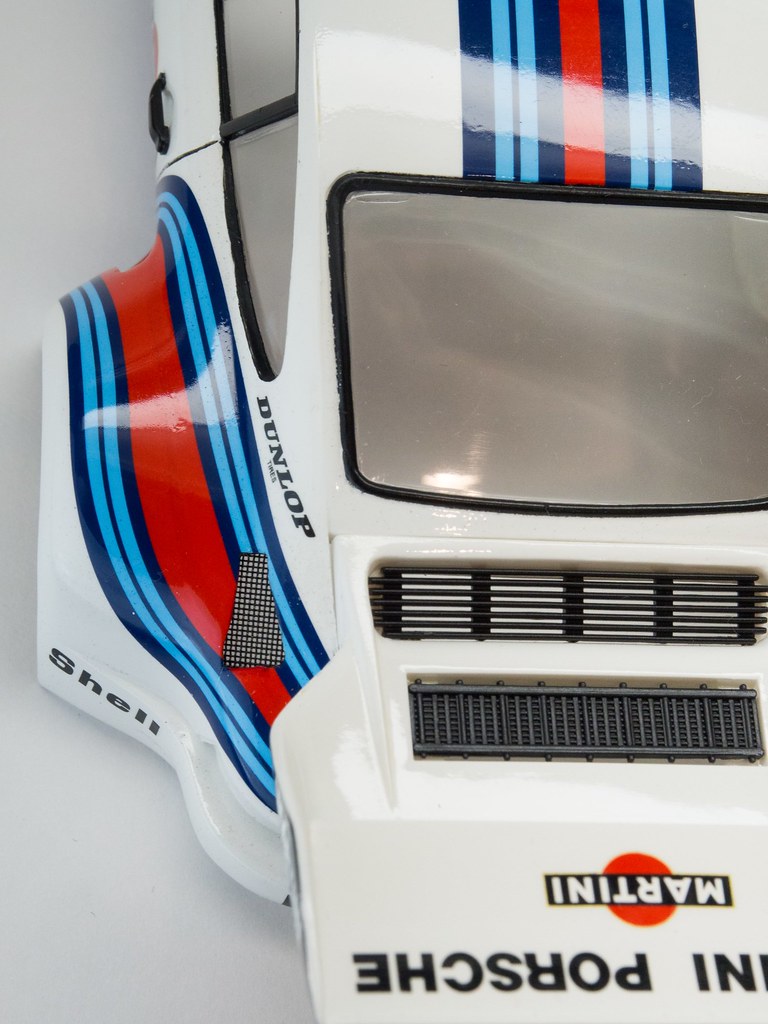 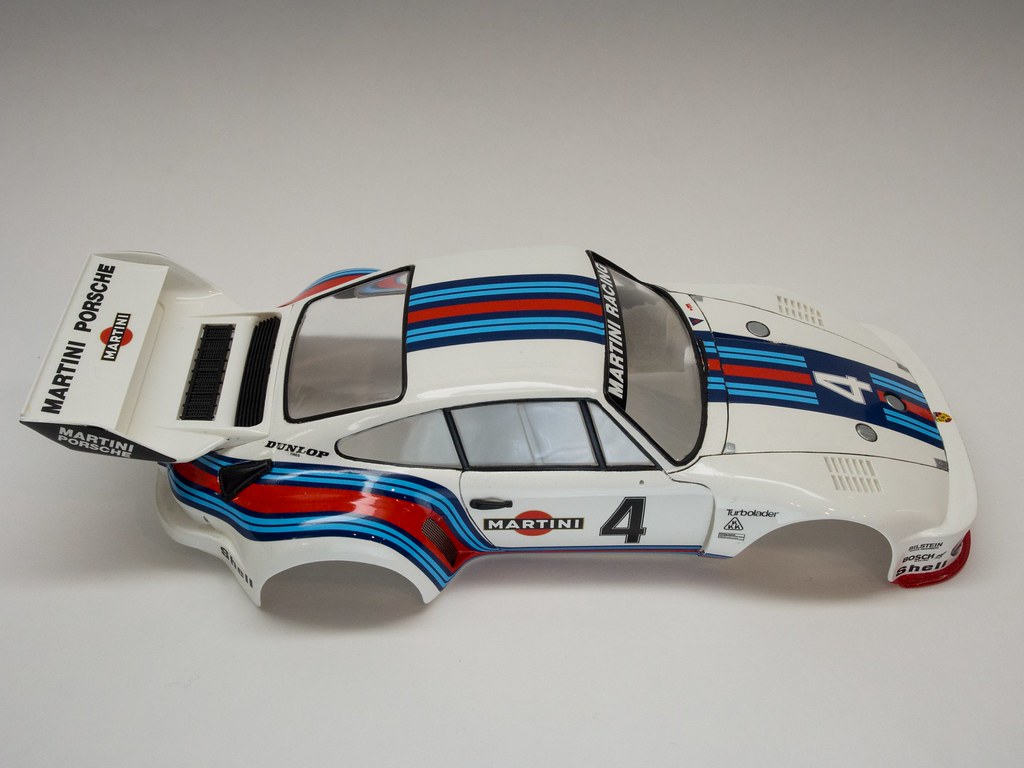 Finally, mated the interior, chassis, and body together. 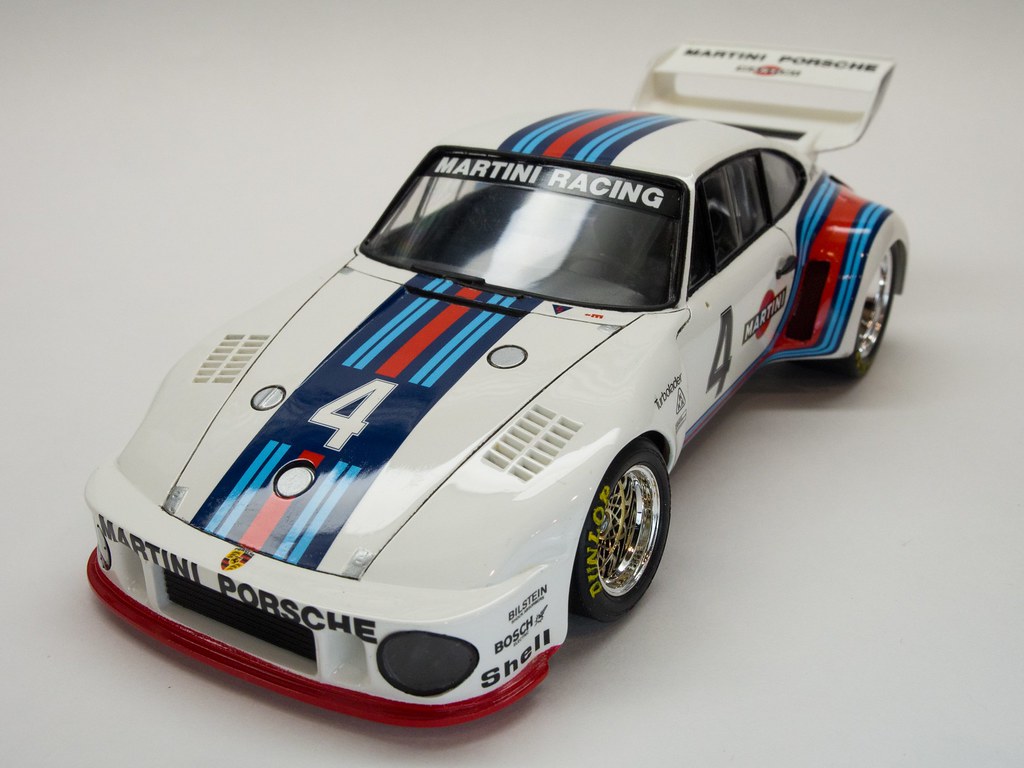 The way the front wheels are actually screw on was weak on this dated kit. 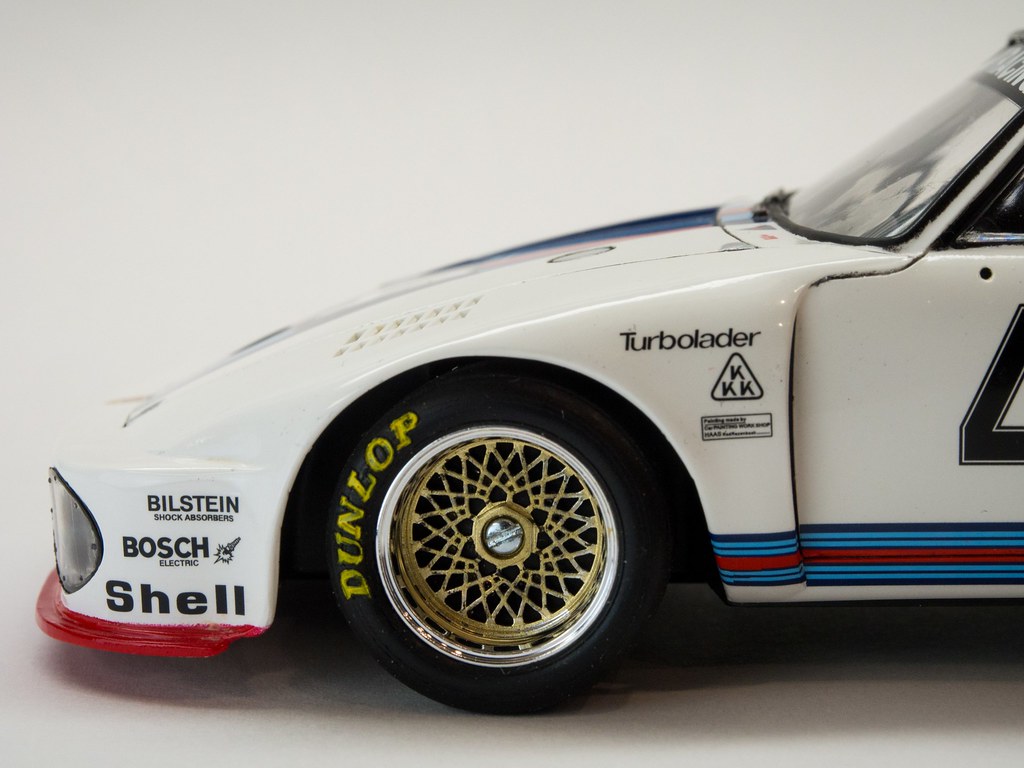 Again, because this kit was from old tooling, even the clear plastics are not clear and they are wavey.  Front wheels flush with fender after spacer. 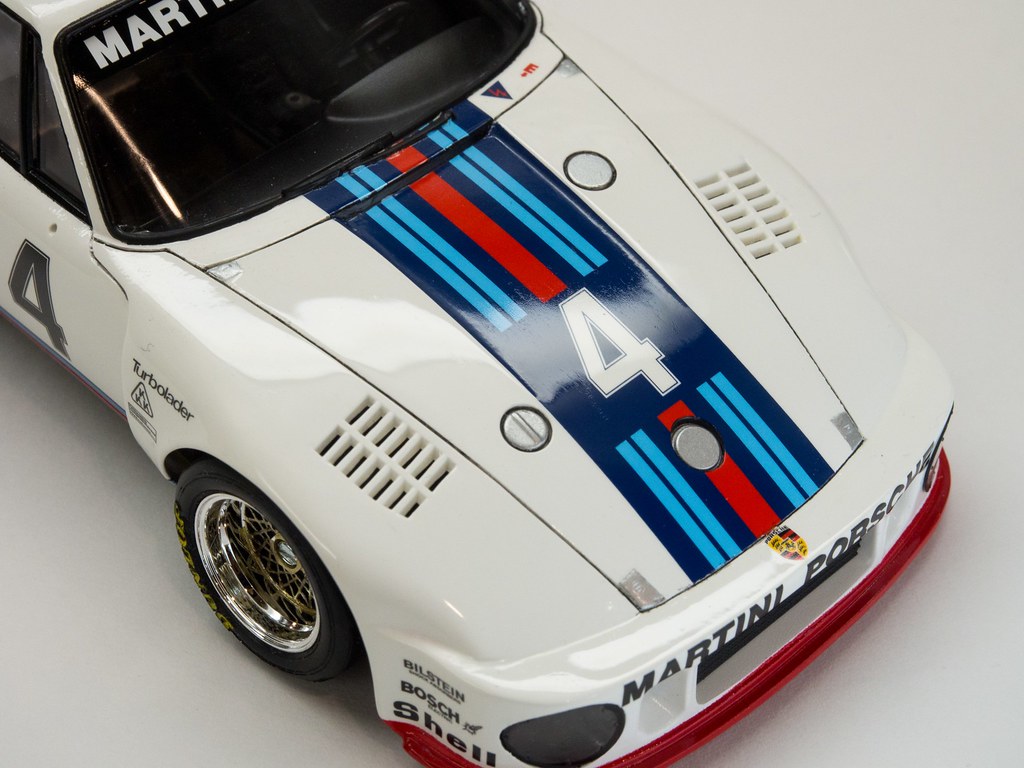 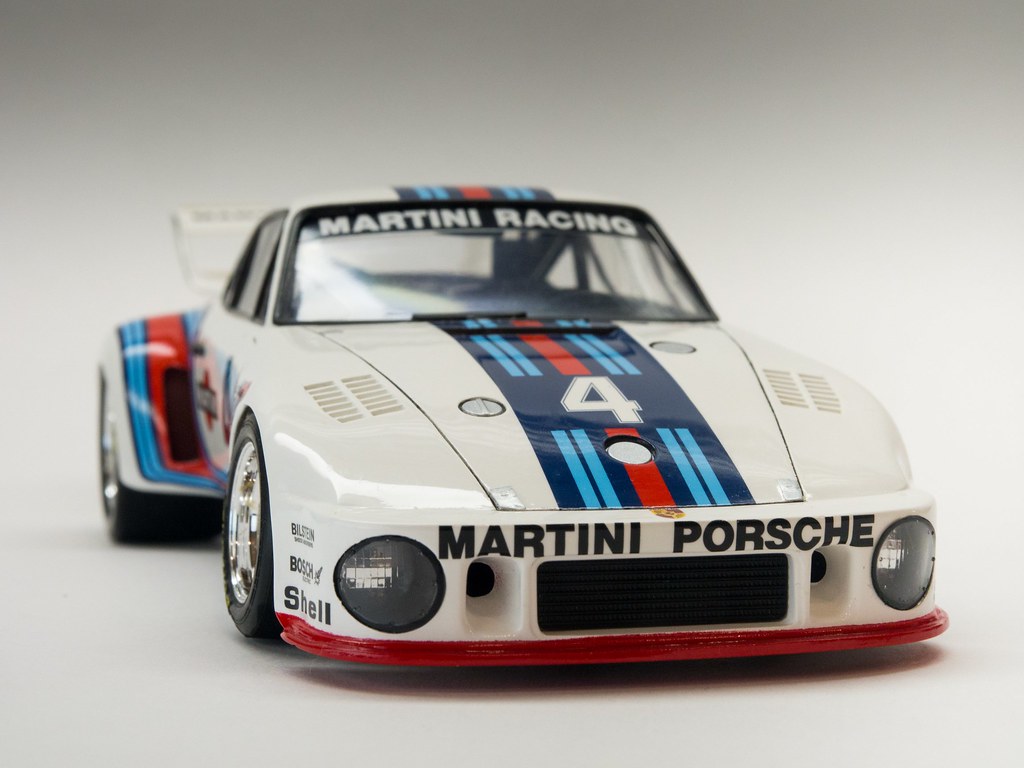 Just few more things left. Paint the rear center of the wheel nut silver. Touch up the wheels with gold paint. Install side mirrors, rear lights. The real car has a white mesh in front of the intake area, still don't know what to do about it since the kit doesn't come with one. Next time, should be just finishing photos. Cheers. |
|
|
|
|
|
|
POST REPLY TO THIS THREAD |
 |
|
|


