

|
| Search | Car Forums | Gallery | Articles | Helper | AF 350Z | IgorSushko.com | Corporate |
|
| Latest | 0 Rplys |
|
|||||||
| WIP - Motorsports Post topics for any "Work In Process" motorsports vehicles in this sub-forum. |
 |
 Show Printable Version | Show Printable Version |  Email this Page | Email this Page |  Subscribe to this Thread
|
|
|
Thread Tools |
|
|
#616 | |
|
AF Enthusiast
Thread starter
Join Date: Nov 2008
Location: Norwich
Posts: 649
Thanks: 21
Thanked 111 Times in 87 Posts
|
Re: 1/8 Porsche 935/78 'Moby Dick'
Thanks, folks - hopefully the next few weeks will see some major developments as things start falling into place...
Just three photos tonight, but real progress. This last weekend was finally time for fitting the front firewall / bulkhead. I was somewhat inspired by knowing I would be watching coverage of the Daytona 24h, and so I could have a really good modelling session. Since the last update I've been trying to get all the little jobs out of the way - anything under, on, or through the firewall that would be awkward to do once it was fitted: 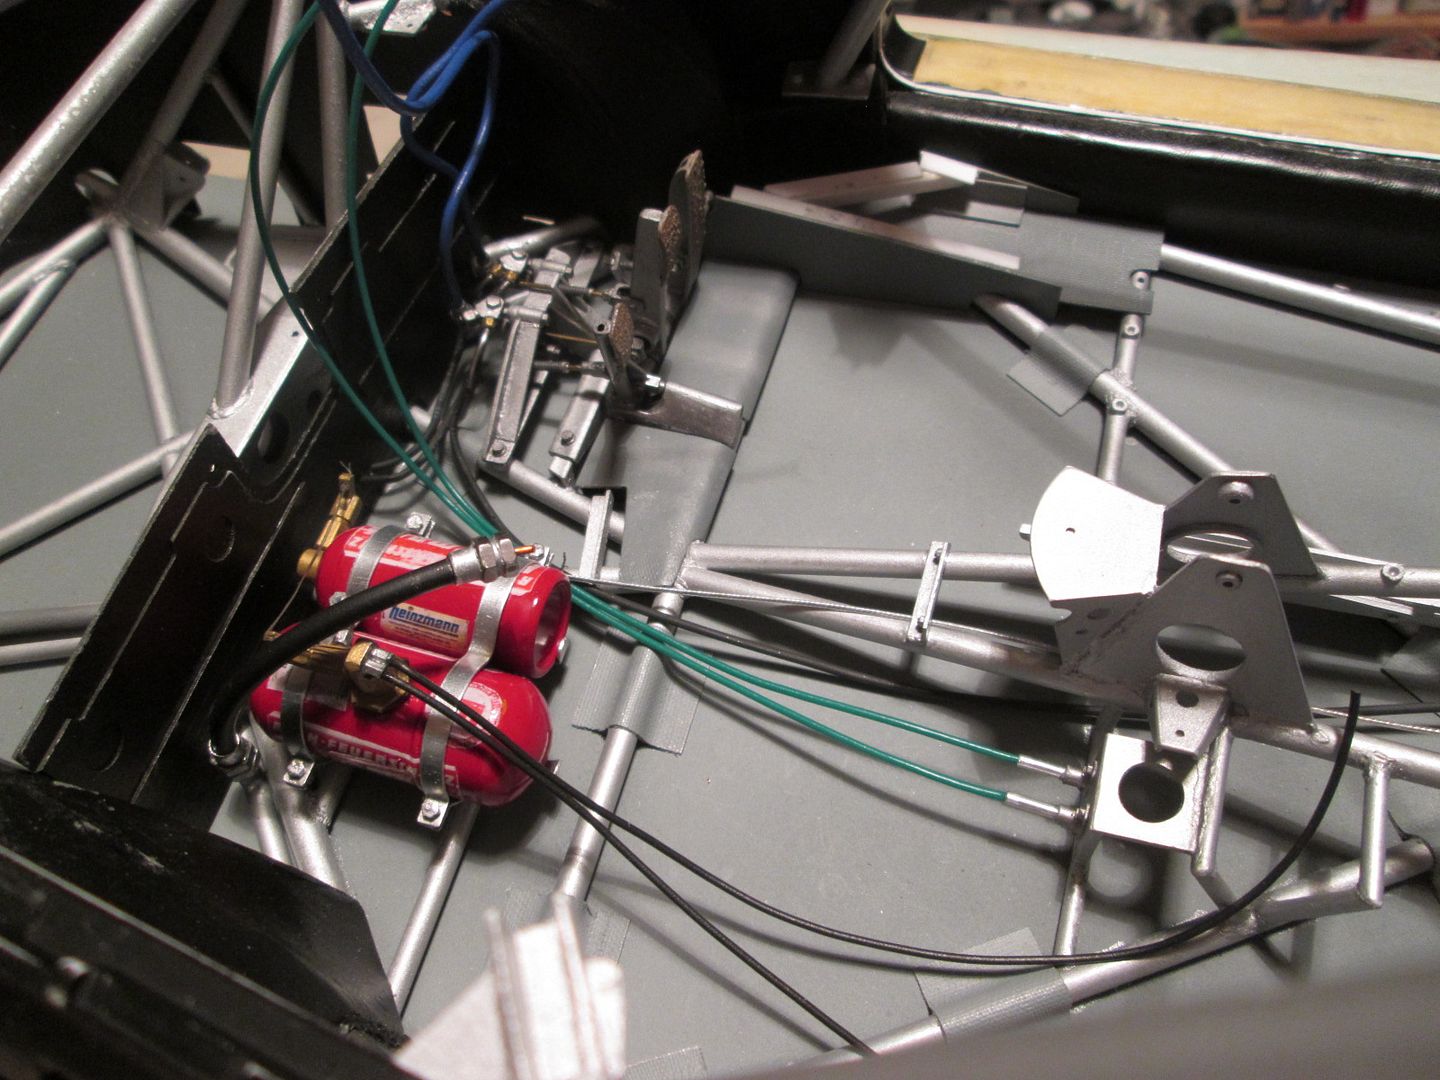 I've routed two solid brake lines through to the front, and one to the rear - this will split at the back of the cockpit before going out to each corner. I used 0.9mm lead wire for these (making it easier to create the shape) with 1.2mm heatshrink as a protective sleeve. The two front lines need extra detailing where they fix to the chassis, but this can be done later. The green cables will connect to each end of the front roll-bar. The larger black hose at bottom-left is the oil-cooler bypass pipe to the tank. After taking this photo I added a small temperature sender fitting to the main chassis rail next to the bypass pipe, to connect to one of the water temperature gauges. The two blue hoses onto the brake master cylinders have been re-made since the last update, as the originals were too stiff and were going to put too much pressure on the reservoirs. The new ones have had all the individual wiring strands removed, and a single piece of thin wire added to keep the shape. Fast-forward to the weekend, and here's the dashboard / firewall in place. I added the decals for some of the gauges and switches last weekend, then sprayed the whole panel with some Games Workshop 'Ardcoat' gloss varnish before fitting. The auxiliary gauge panel which hangs below has also been labelled and sprayed, and will hopefully be fitted this week. I made another small test-piece gauge with the 'water texture' glass and varnished this first, just in case of a reaction... The ignition barrel has had a small key fitted, including key-ring! Might not be technically correct, but it seemed a fun little detail to add. I added a few small hex-nut fittings across the top of the gauge panel, and a couple either side of the dashboard master-switch. The main instrument pod and steering column will be fitted later. 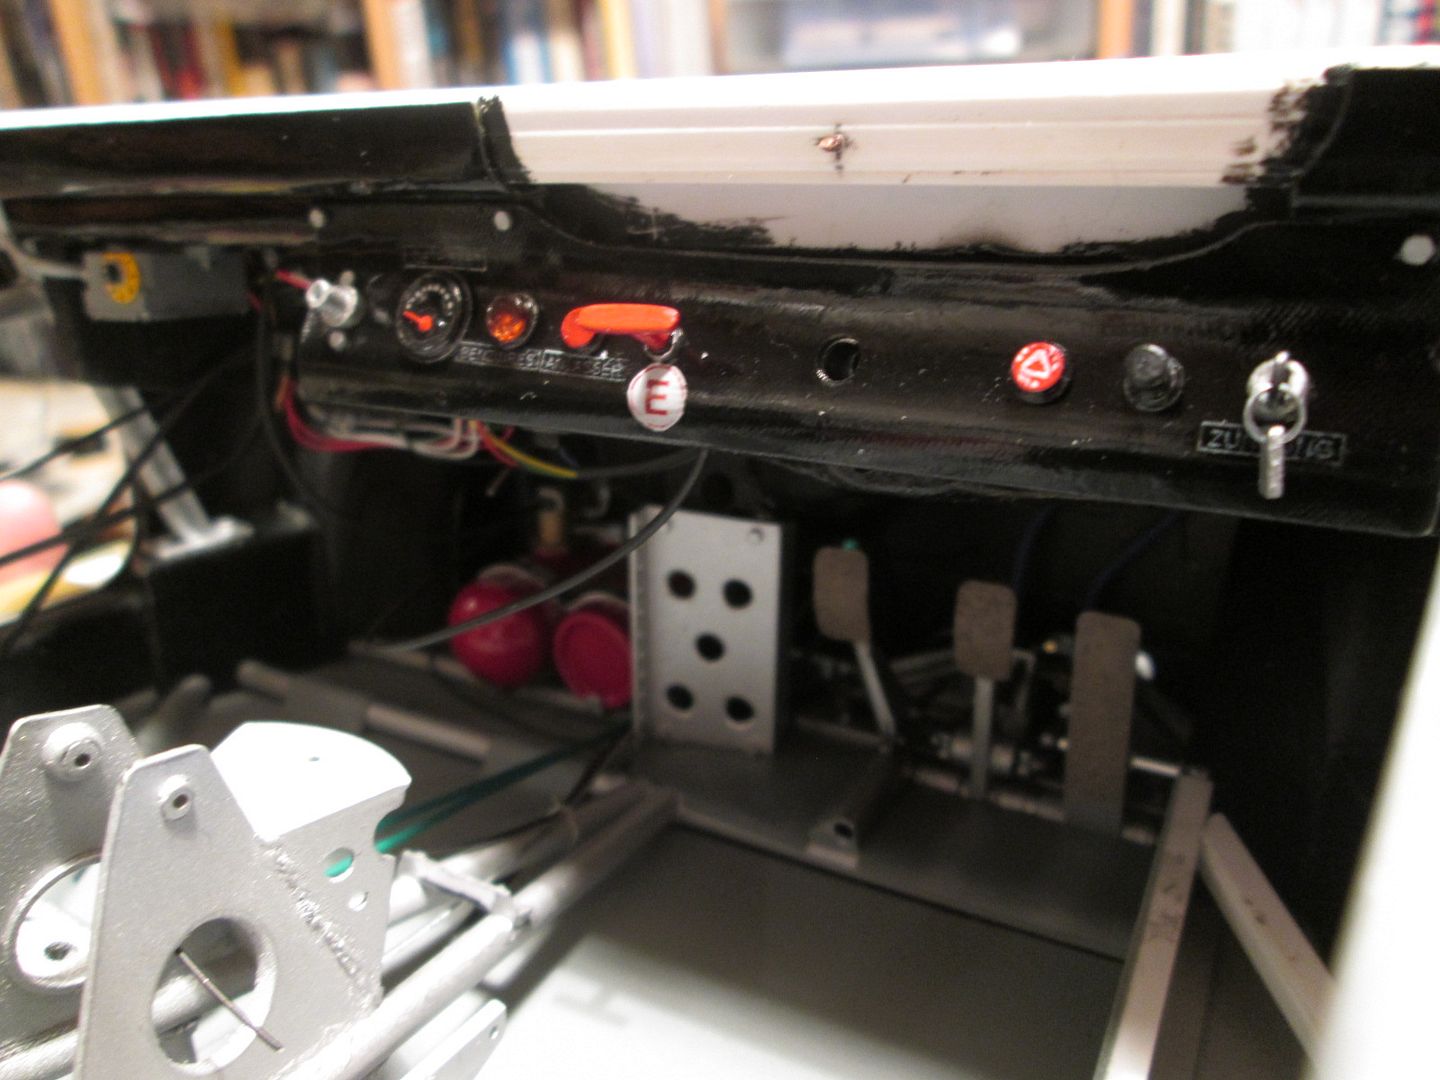 Here's the view from the other side: 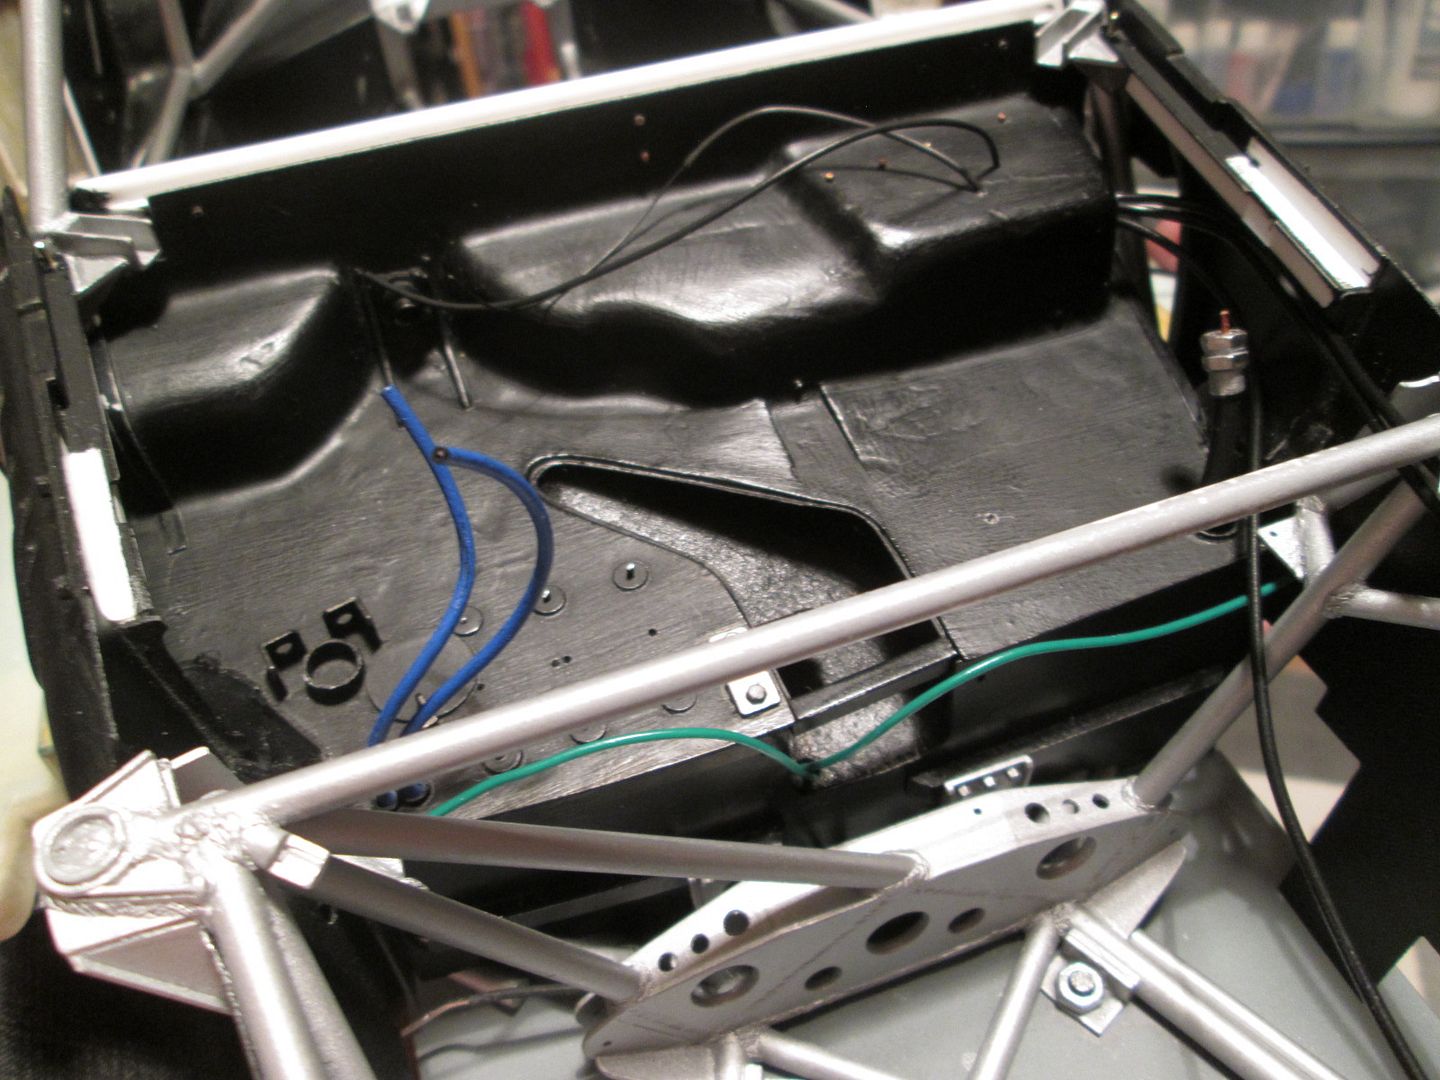 The tricky part during assembly was getting all the wires and cables threaded through the panel - it meant I had to glue the panel after fitting, not during. The roll-bar cables and master cylinder lines have been trimmed a little just to tidy things up - they won't be connected to anything just yet. I've got a bunch of cables snaking down the right-hand side which will connect to the front lights, and there'll be more cabling to add once the battery, fuel pumps, washer bottle, etc, are added. Now the panel is in, it's opened up lots of other jobs to do - the thing that's going to slow me down will be the rate at which I can (spray) paint parts. More next time. SB |
|
|
|

|
| The Following User Says Thank You to ScratchBuilt For This Useful Post: |
Ranger_bgs (02-04-2017)
|
|
|
#617 | |
|
AF Enthusiast
Thread starter
Join Date: Nov 2008
Location: Norwich
Posts: 649
Thanks: 21
Thanked 111 Times in 87 Posts
|
Re: 1/8 Porsche 935/78 'Moby Dick'
More progress from the front end tonight, folks.
As usual, it's all the tiny fiddly things that take all the time, but leave you feeling like you've not done anything! For example, here's a view of the steering rack and front bulkhead area: 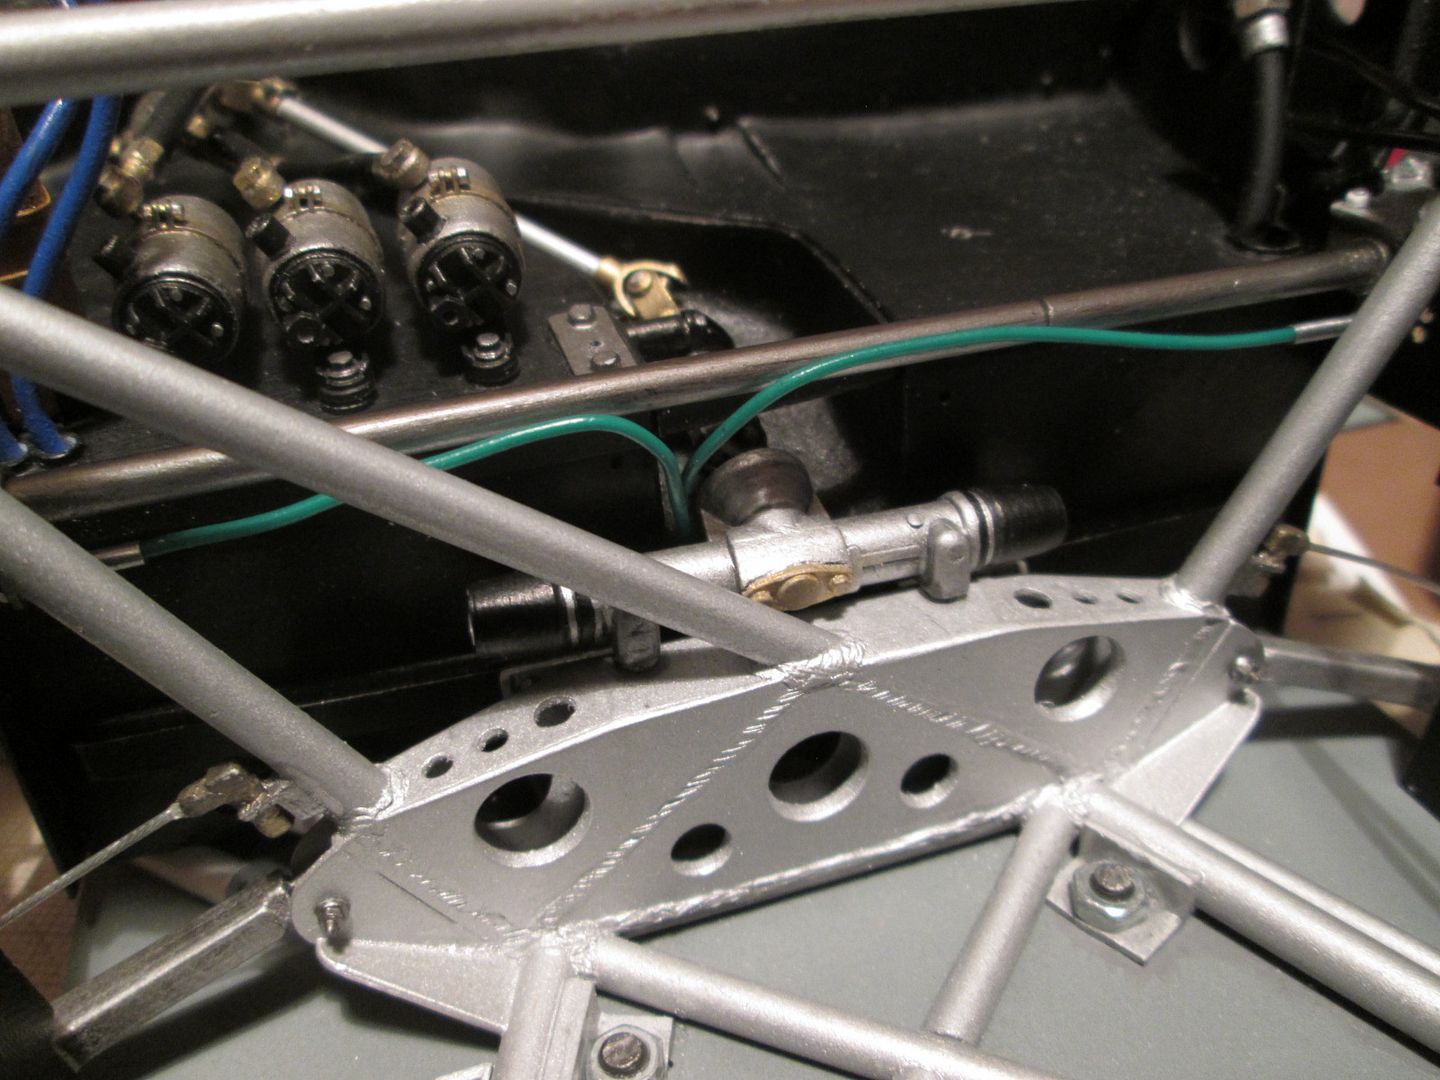 The hard front brake lines now connect to a pair of fittings attached to the chassis, with a length of flexible pipe available to run out to each caliper. Making these fittings was several evening's work, plus the painting and assembly onto the frame. The front lower wishbones have now been fixed - had to make four pins with hex-nut detailing each end. Big news - the front adjustable roll-bar is now fitted. This was another couple of evenings spent drilling holes in the side panels, fitting the mounting blocks, adding some stop-collars to the bar, painting and final assembly. The green adjuster cables have been trimmed to length and glued in place. Amongst all this, I've also been doing a little painting: 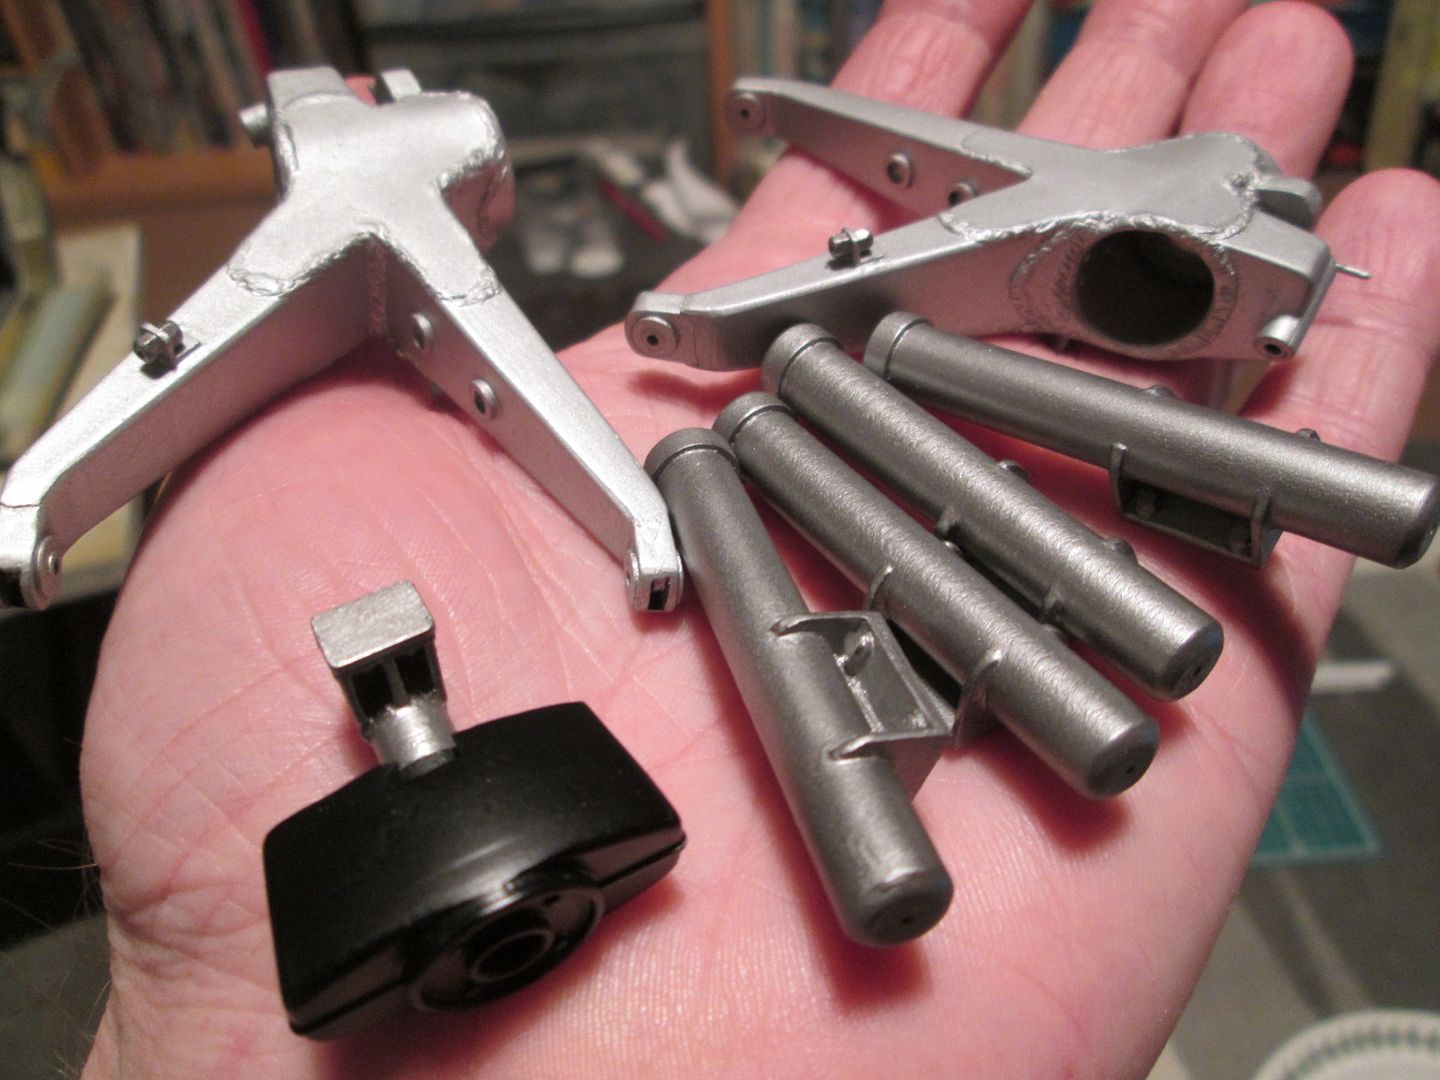 Rear trailing arms, airjacks and the steering column surround - all airbrushed. I'll build up some more colour by hand, over time. Next, the front uprights and lower struts: 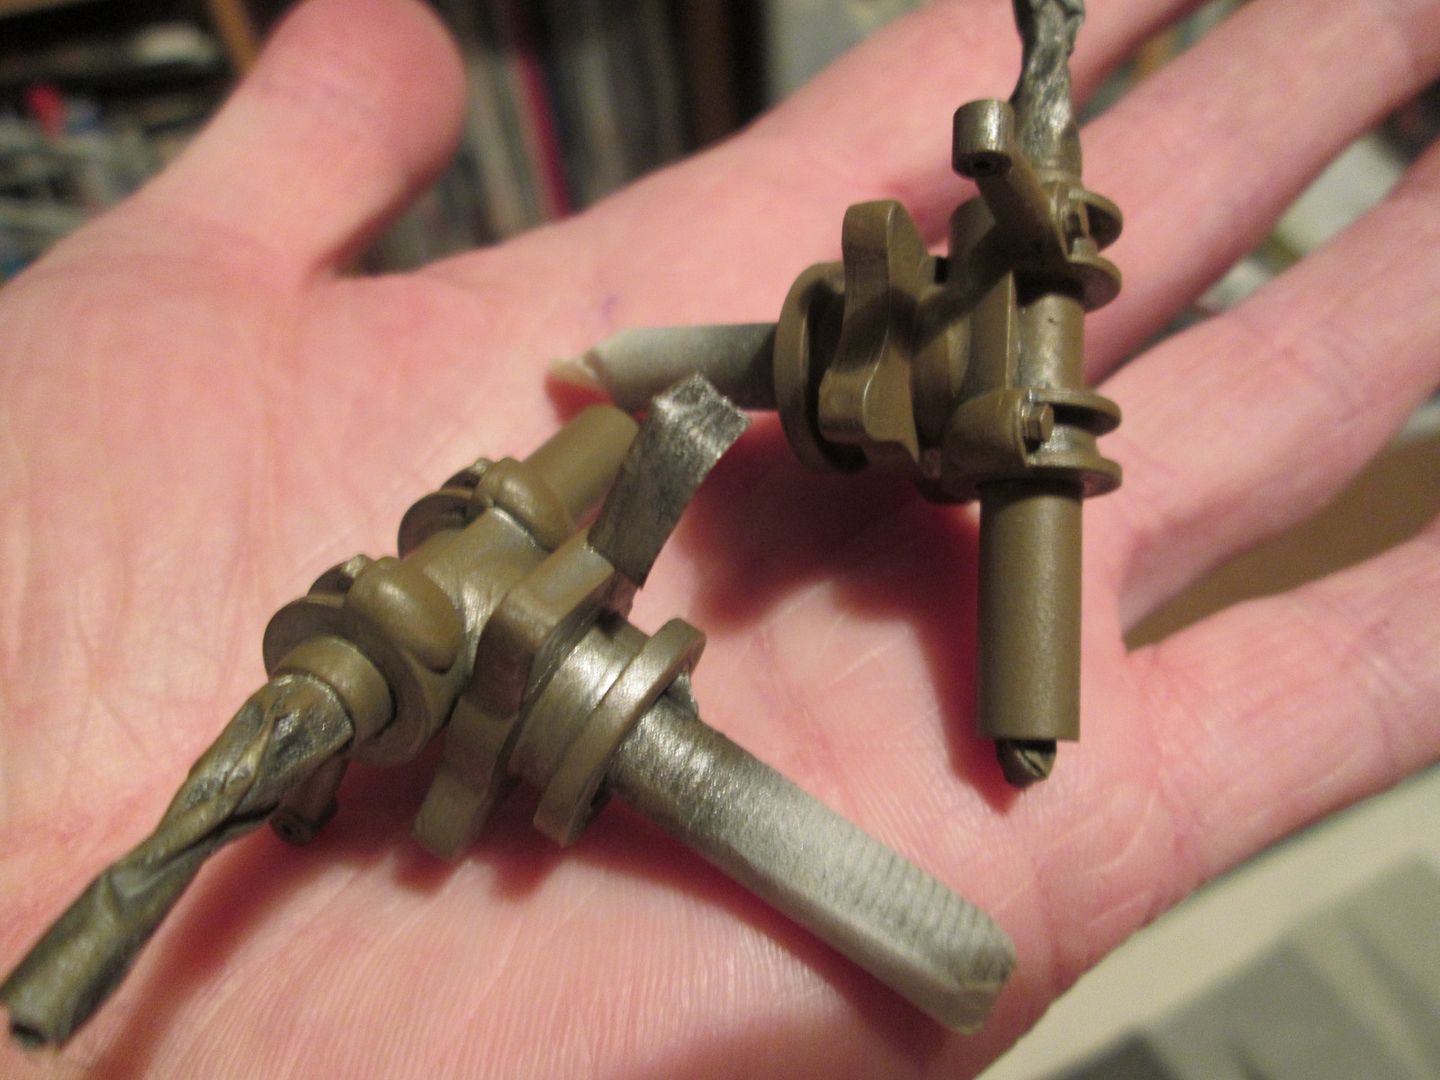 At the moment this is a combination of Citadel 'Graveyard Earth' over an airbrushed coat of Tamiya 'Titanium Silver', but they have a way to go. Finally, I've also started painting the brake discs - here's the four disc bells (again, Titanium Silver): 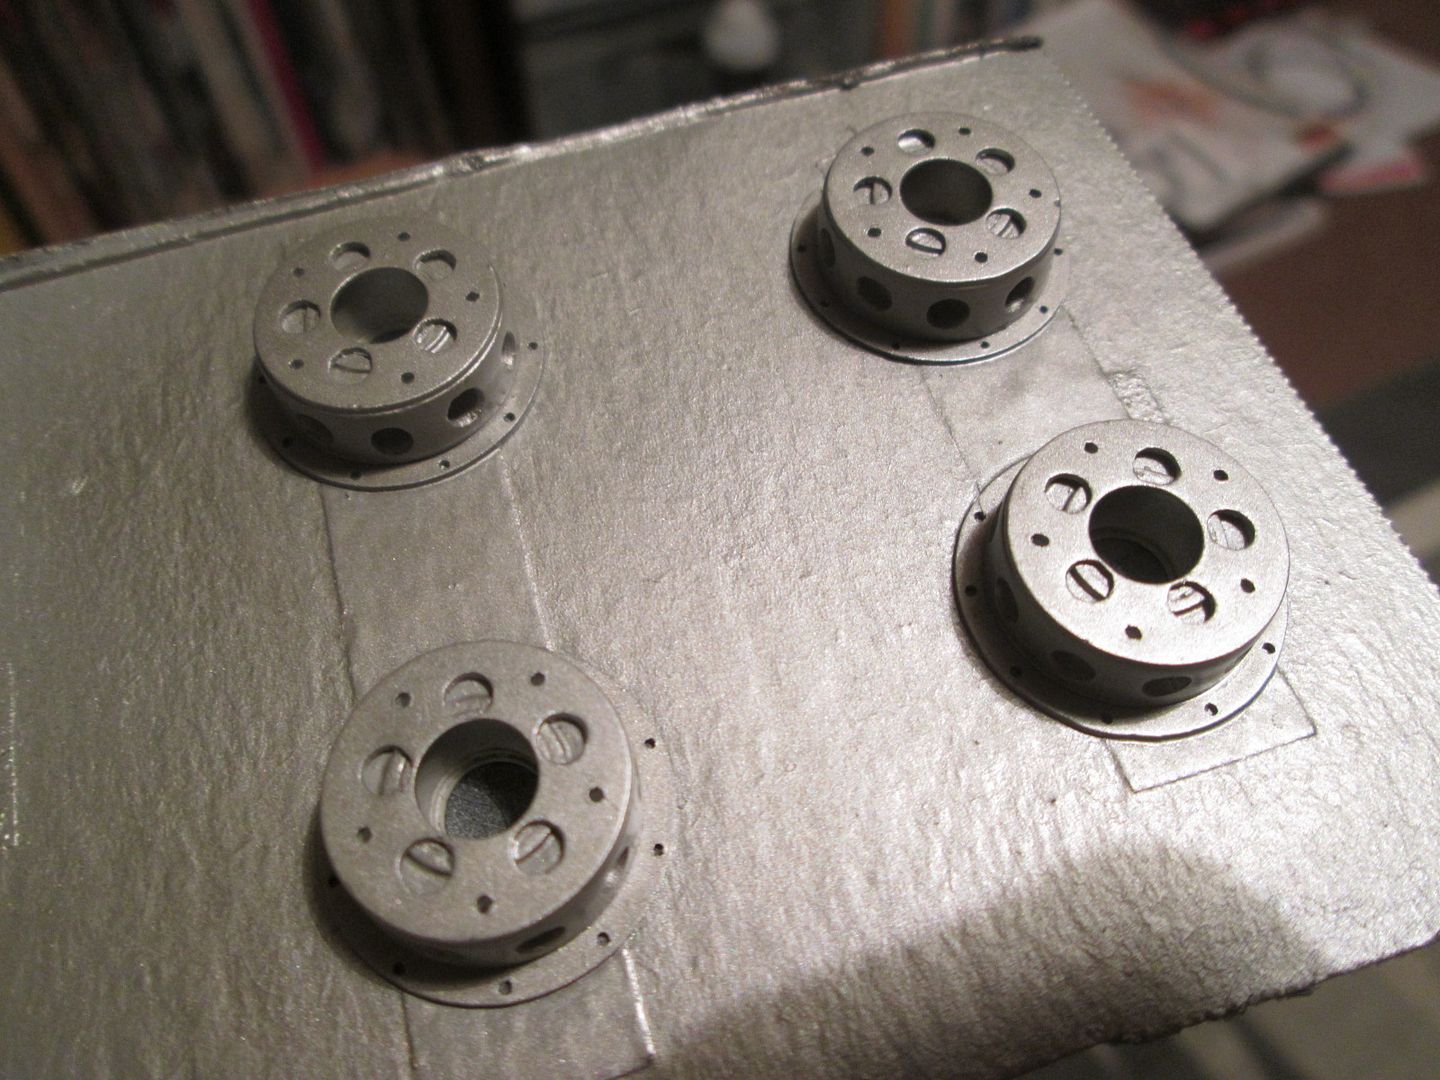 This is all very much 'work in progress', but it keeps things moving along. To finish, here's a couple of up-to-date photos of the front end (taken tonight as the originals were poor-quality!):  The steering rack is now fixed, and I've spent some time playing around with the rack bar and trackrods to get the front geometry just-so. The only adjustment is in the length of the rack bar, so I'll make the final decision on this only when I have the suspension properly fitted; it's been dummied-up a few times, but this is never the same as final assembly! The two fibreglass closing panels have been added either side of the rack, as have the two small curving panels behind the front leg of the lower wishbones. As long as I don't fit the main fuel tank first, I can still access the rack to adjust the bar length, and glue in the trackrods. In this view, the three fuel pumps are now glued in place, and I've trimmed the pipework to length. The two universal joints in the steering column are fixed, and I've added the short stay which connects the top of the bulkhead / firewall to the chassis. The oil catch-tank has been painted, but not permanently fitted yet:  What else? The main gauges have been painted and are now receiving their 'Water Texture' glasses - I'm hoping to have these fitted into the instrument pod during the next few days. I've been painting the various oil and fuel-line fittings for the front of the car, so will probably have a plumbing session soon and trim everything to length. The lower instrument panel has been wired-up and just needs to be fitted in place - possibly a job for this week. I'll probably spend another week or so working on the front of the car, then shift my attention to the engine bay for a while. There's plenty of things to do in there - painting, detailing, assembly, etc - and it feels like I've been concentrating on the front for a looong time. 'A change is as good as a rest', I think they say! Have a good week, SB |
|
|
|

|
|
|
#618 | |
|
AF Enthusiast
Join Date: Oct 2008
Location: Auckland
Posts: 2,761
Thanks: 51
Thanked 136 Times in 134 Posts
|
Re: 1/8 Porsche 935/78 'Moby Dick'
Hard to say whats better, watching you create every single piece or watching you piece every little piece together. Amazing to see it starting to come together!!!
__________________
 It's Not wheather you Win or Lose, its how you look while you play the Game |
|
|
|

|
|
|
#619 | |
|
AF Enthusiast
Thread starter
Join Date: Nov 2008
Location: Norwich
Posts: 649
Thanks: 21
Thanked 111 Times in 87 Posts
|
Re: 1/8 Porsche 935/78 'Moby Dick'
Not a big update tonight, but I wanted to get this photo posted immediately:
 The obvious progress is the main instrument pod. During this week I've been fitting the dials, adding the warning lights and extra switches, and a few decals. It's ready to be glued in place. In addition, I've fitted the solid cockpit fire extinguisher line. I'm pleased with this - the silver makes a good frame for the black dashboard and instrument pod, and it didn't fight me too much when I fitted it! The awkward part was connecting it to the flexible line from the fire-bottle... Finally, the lower instrument panel has been fitted ahead of the gearshift tower. This could only go in after the extinguisher line. The temperature and pressure sender wires have been routed along the chassis tubes each side and run through into the engine bay. I've tied them in place with very thin wire - I've got some MFH scale ty-wraps which I've yet to use, so these could make an appearance soon. So, only one photo, but the cockpit is now looking very 935! SB |
|
|
|

|
|
|
#620 | |
|
AF Newbie
Join Date: May 2016
Location: Athens
Posts: 62
Thanks: 6
Thanked 7 Times in 7 Posts
|
Re: 1/8 Porsche 935/78 'Moby Dick'
with all the pieces you put into this build it would be interesting to find how much the finished model will weight!! I'm guessing more than 2 kilos haha! keep it up though...
|
|
|
|

|
|
|
#621 | |
|
AF Regular
Join Date: Jun 2005
Location: london
Posts: 414
Thanks: 3
Thanked 22 Times in 20 Posts
|
Re: 1/8 Porsche 935/78 'Moby Dick'
Great work
|
|
|
|

|
|
|
#622 | |
|
AF Enthusiast
Join Date: Sep 2011
Location: Redwood City, California
Posts: 651
Thanks: 0
Thanked 39 Times in 39 Posts
|
Re: 1/8 Porsche 935/78 'Moby Dick'
Spectacular!
ianc |
|
|
|

|
|
|
#623 | |
|
AF Enthusiast
Thread starter
Join Date: Nov 2008
Location: Norwich
Posts: 649
Thanks: 21
Thanked 111 Times in 87 Posts
|
Re: 1/8 Porsche 935/78 'Moby Dick'
A few more photos for tonight's update.
As I mentioned a couple of posts ago, my enthusiasm for working at the front of the car has finally started to run out, so one of my last jobs in this area (for now - I will return!) was to do a test-fit of the gear linkage:  The boost-control knob has been fitted and plumbed-in, with two lines running back towards the engine bay. The main rod in the shift-linkage has been trimmed short and I've been checking that the whole lot can be assembled once the fibreglass cover panel is fitted over the front of the gearbox. There's enough slack in the system that even with the main gear-lever fixed in place, I can wriggle the rear section through the cover and connect the two ends together. This all needs final assembly, but it's now the correct length. Next, I returned to work in the engine bay. Although I made the main turbo components a while ago (end of 2015?) there's still lots of little details required - lubrication and control pipework, fixings, etc. The next couple of photos show a selection of these parts: 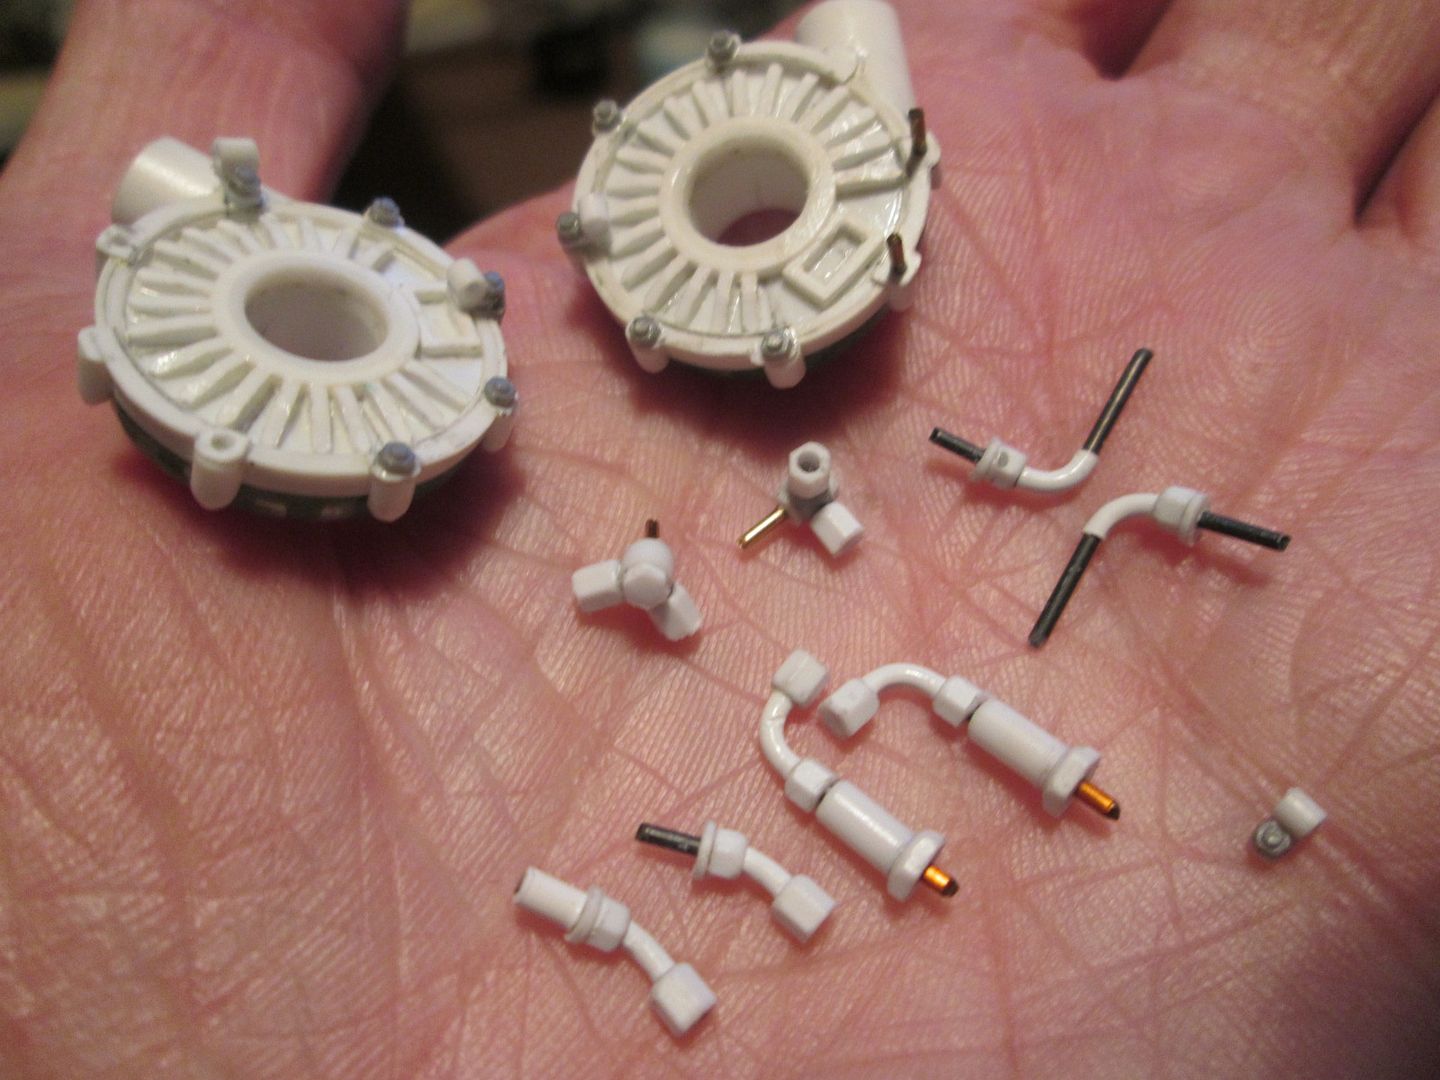 Here's two of the main turbo sections, now with added styrene nut detailing and some tiny P-clips - these will hold some lead-wire cables to be added later. The various fittings will be used to connect the pipework running from...  ...the two parts on the left of this photo! The small block on the right is an external oil pump which will attach to the front of the engine, and connects to the two fittings on the bottom of the other two parts. I've been doing some trimming on the fibreglass engine mounting plate, to allow this extra pump to sit where it needs to go: 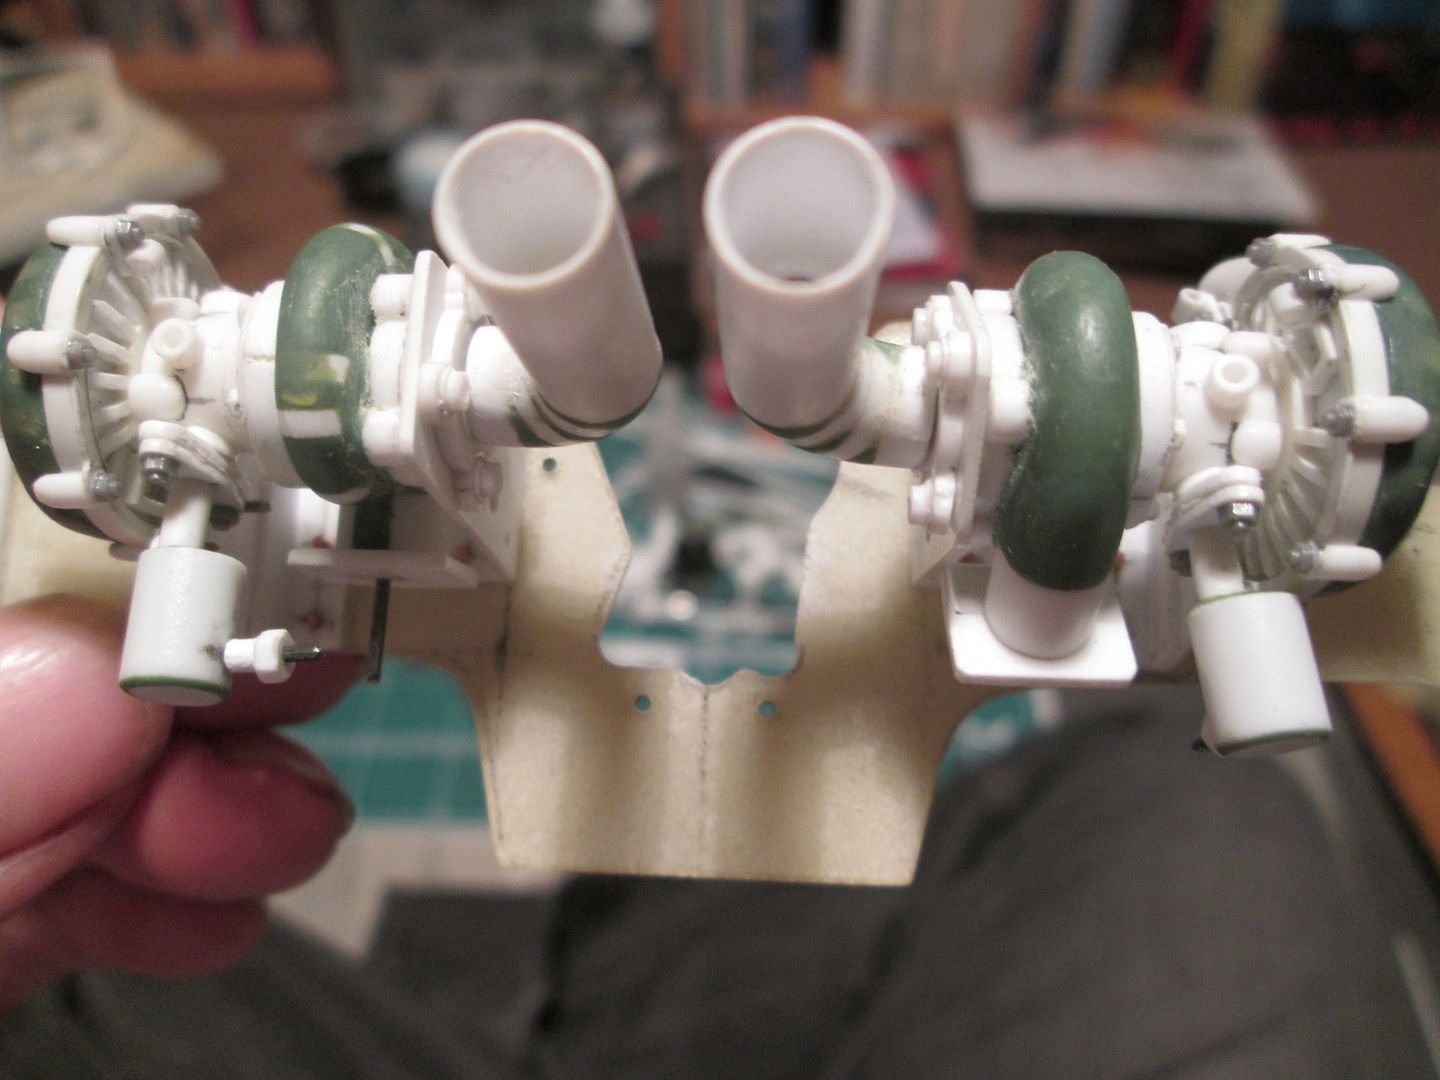 Finally for tonight, I've had another primer session:  I've now got all the main turbo parts primered (a few not shown here) except for the main exhaust primaries, and the engine mounting plate. Some of the above will be brush-painted, some will probably be air-brushed (depending on how I want the final texture). I might add some textured paste to the two connecting tubes for the turbo - must check the reference photos again. Getting this lot painted and assembled should keep me busy for a couple of weeks! Once this is done, I've still got the throttle linkage to finalise, fuel pump, water pump, etc, drive-belts, finish the water system, paint the cam covers...oh, and to actually finish assembling the whole engine! I'm sure there will still be some more pipe-fittings to make, too... Current weight of the main chassis, complete with the fuel tanks in the nose, is about 0.6kg. No engine, gearbox, suspension, bodywork, etc. I can't remember what the 908-03 weighed-in at, but I guess the 935 will comfortably be over 1kg. Closer to 2kg, though? We'll see! All the best, SB |
|
|
|

|
|
|
#624 | |
|
AF Enthusiast
|
Re: 1/8 Porsche 935/78 'Moby Dick'
I haven't been here in quite some time, but I am quite glad to see this thing still going! I am working on dusting off my 1/12th Camaro. Those turbos are killer!
__________________
My name is Russell, feel free to use it. I'd rather be hated for Who I Am than be loved for Who I Am Not |
|
|
|

|
|
|
#625 | |
|
AF Enthusiast
Thread starter
Join Date: Nov 2008
Location: Norwich
Posts: 649
Thanks: 21
Thanked 111 Times in 87 Posts
|
Re: 1/8 Porsche 935/78 'Moby Dick'
The last couple of weeks or so since the previous update have mainly been spent painting a variety of components, all with the aim of eventually being able to assemble more of the engine. While doing this I'm finding small little things I need to re-visit or modify slightly, so nothing is ever straight-forward!
Before I could paint the main engine / turbo mounting plate, I had to add a towing eye hoop to the bottom: 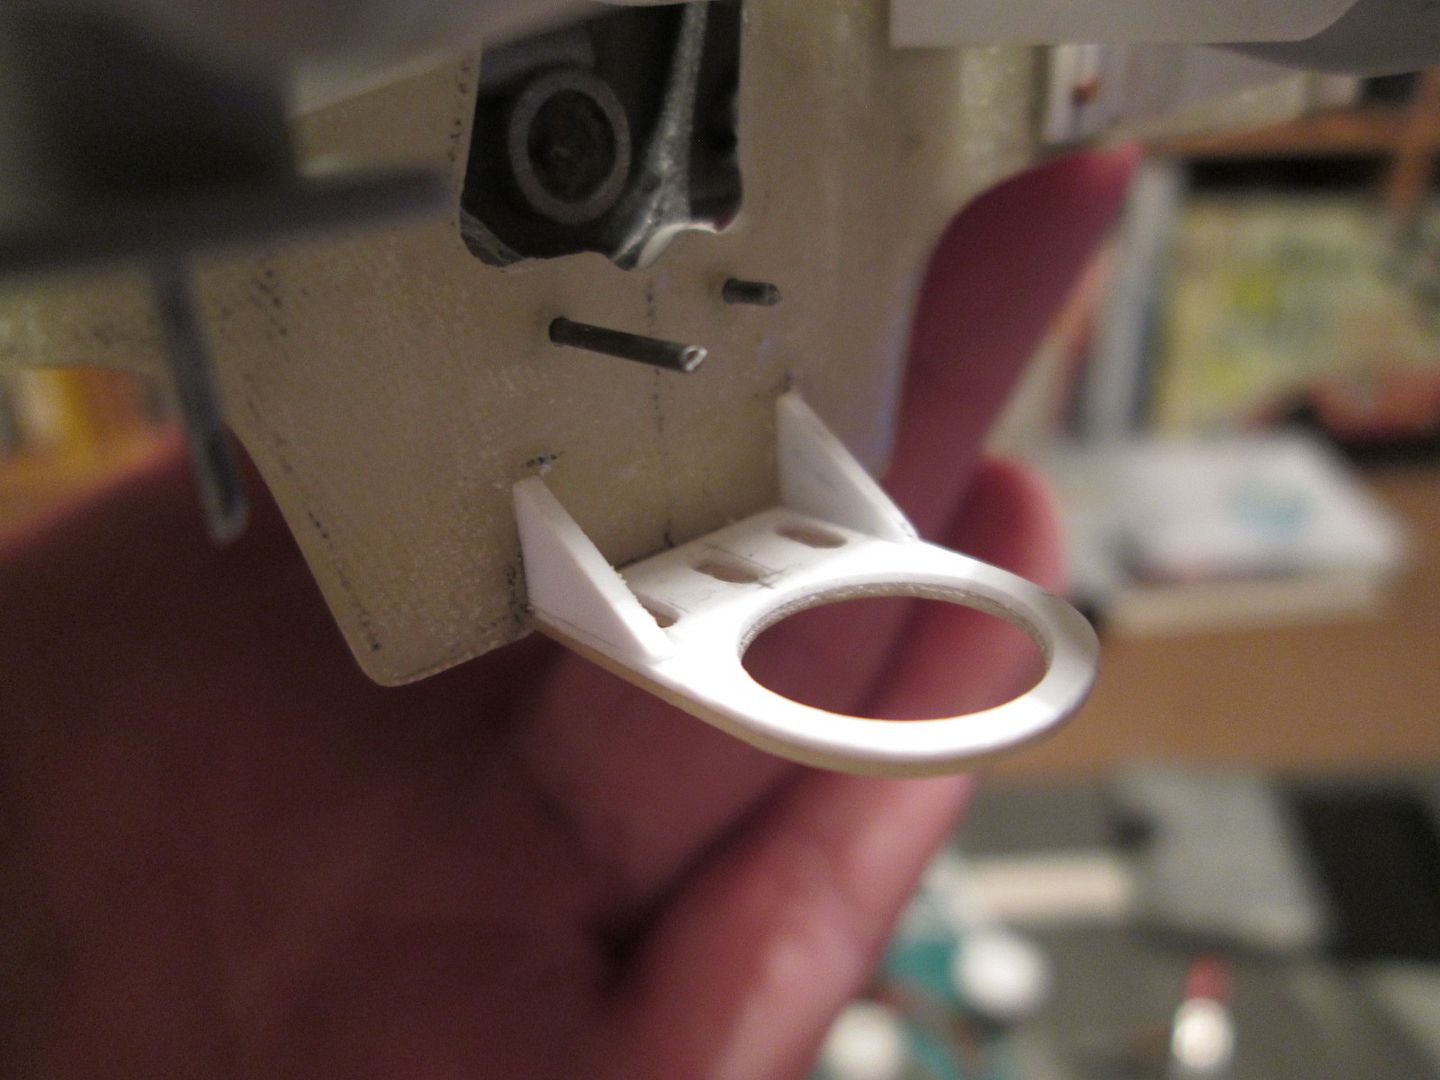 ...and here's some painted parts:  Engine plate, turbo parts, and a cover for the fan drive-pulley. My painting method is becoming a mixture of airbrush and hand-brushing, depending on what sort of final 'texture' I'm trying to achieve. There are a lot of components on this car that are not perfectly smooth, and drybrushing still works well to bring that out. More parts:  The turbo-intercooler connecting pipes were given a coating of Citadel 'Astrogranite' textured paint - it doesn't seem to be quite so thick as the 'sandy paste' used for the intercoolers themselves. The other parts have been dry-brushed over a primer base-coat and are pretty much ready for assembly. And more: 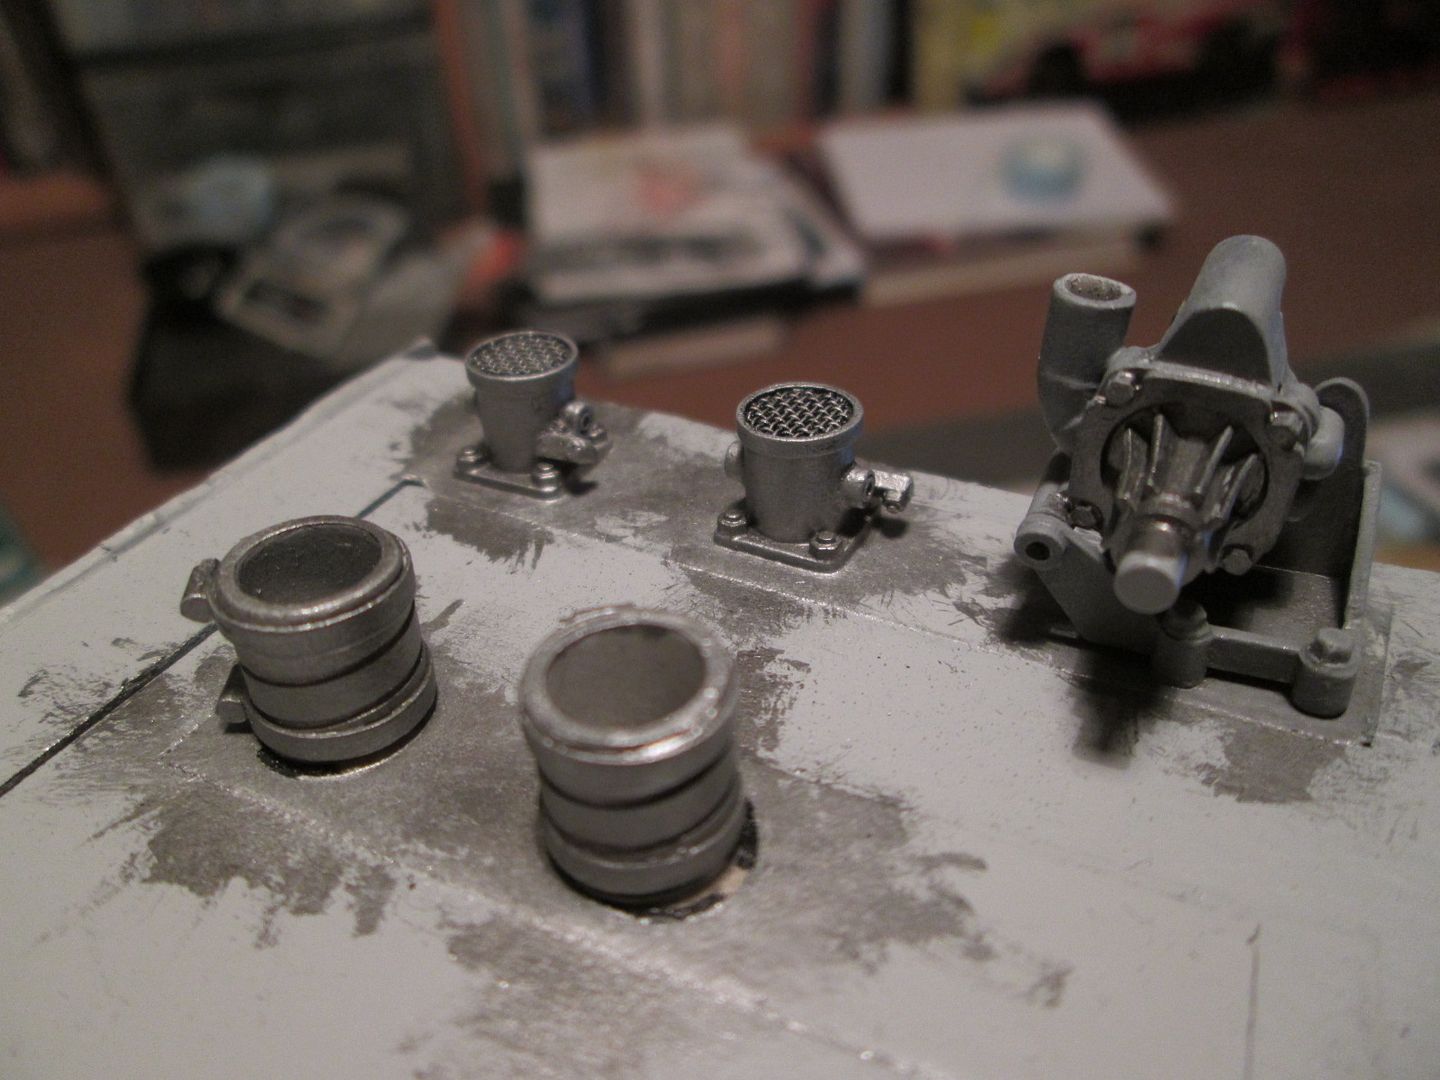 These are not quite ready for assembly. I'm particularly pleased with the small piece of mesh in the tops of the two control valves, now that it's had some black paint run in to give it some contrast. Finally for tonight, I've painted the engine cam-covers: 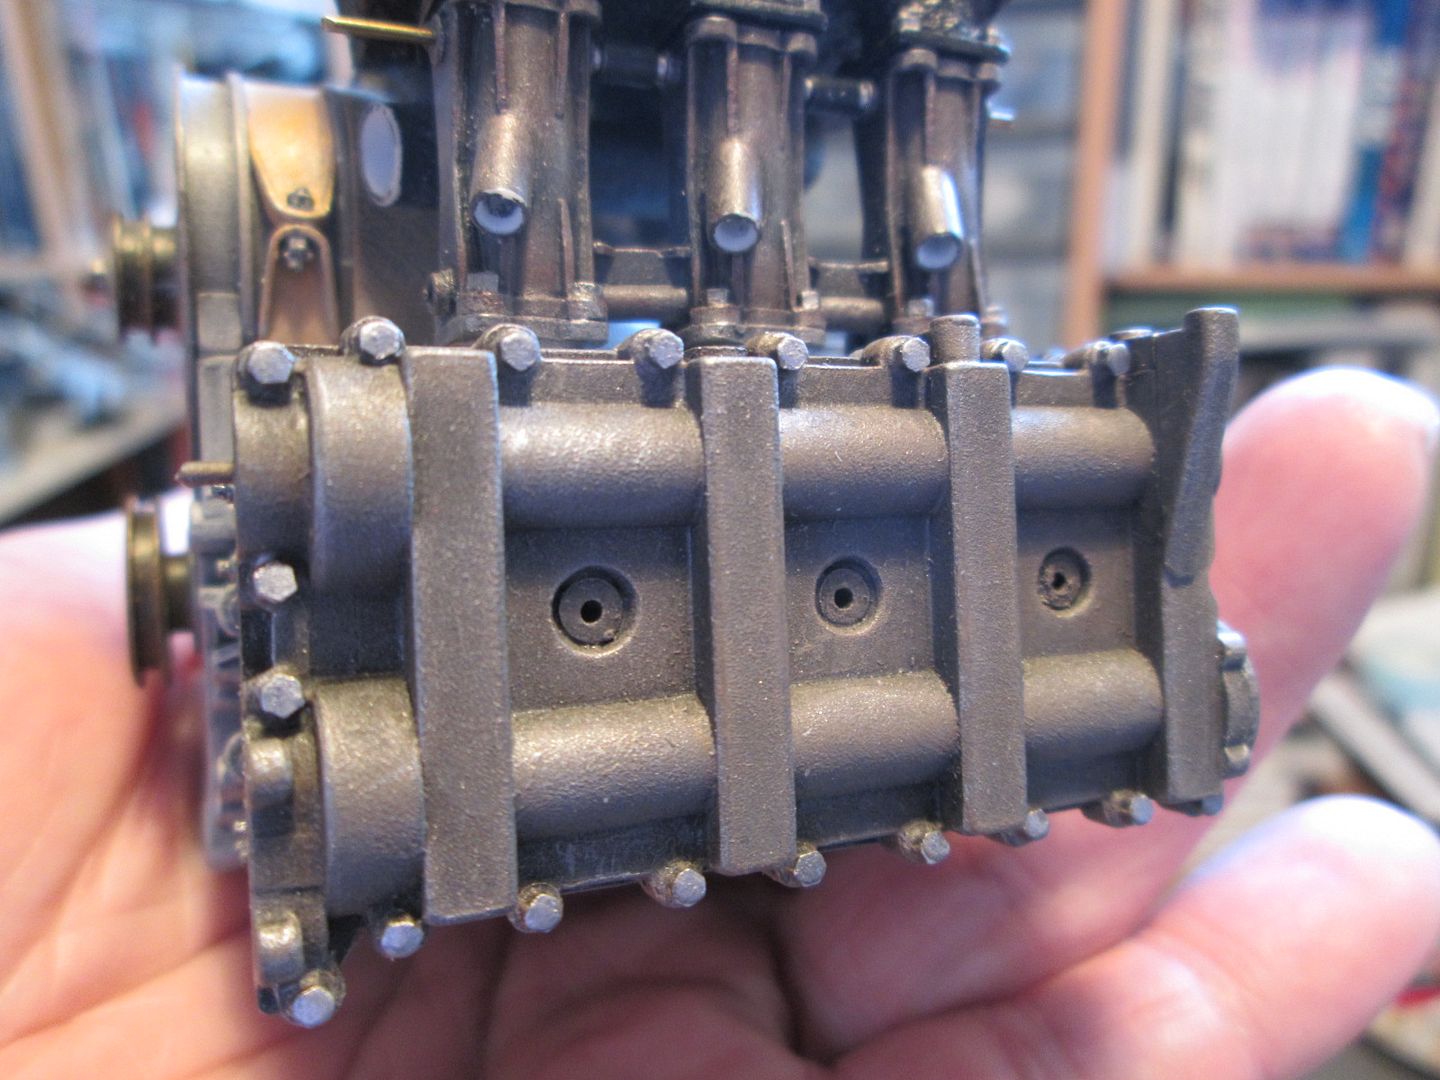 I've left these until now as I know they'll get a lot of handling until the engine is finally in the car, so the paintwork could easily suffer. They were grey-primered, then two airbrush coats of Tamiya 'Flat Black', then the main colour drybrushed in about five different layers. Once they're on the engine I'll spray the whole lot with some matt varnish to (hopefully) give it some protection. So, what else is in progress? I've got the starter motor in base-coat, the water pumps for the head-cooling are ready for undercoating and painting, and there's a bunch of other engine-related parts that need to be painted (distributor cap, plugs and retainers, throttle mechanism, etc). Eventually I might even start gluing some of this together... Have a good week, SB |
|
|
|

|
| The Following 3 Users Say Thank You to ScratchBuilt For This Useful Post: |
|
|
#626 | |
|
Blarg! Wort Wort Wort!
Join Date: Mar 2006
Location: Quezon City
Posts: 2,120
Thanks: 64
Thanked 101 Times in 100 Posts
|
Re: 1/8 Porsche 935/78 'Moby Dick'
Always a joy to see your updates, SB!
__________________
olly olly oxen free |
|
|
|

|
|
|
#627 | |
|
AF Enthusiast
Thread starter
Join Date: Nov 2008
Location: Norwich
Posts: 649
Thanks: 21
Thanked 111 Times in 87 Posts
|
Re: 1/8 Porsche 935/78 'Moby Dick'
Sorry that the updates have been a little irregular recently - it's not for a lack of progress!
Since last time I've been pushing forward with getting the engine assembled - always a nervous time as you're 'passing the point of no return' with every component that is glued in place! I'm always surprised at all the little bits that fitted perfectly six months ago, but don't quite fit when you do the final assembly. So there's little adjustments to make here and there, but so far it's going okay. I should have three extra photos here tonight, but they seem to have vanished somewhere between my PC and arriving in Photobucket. No problem - the five that remain should give you an idea of what I've been doing. First up, the cylinder heads and cam-boxes are now glued in place. This meant that I could (re)make and fit the lower panels, and add some final detailing around the outside edge: 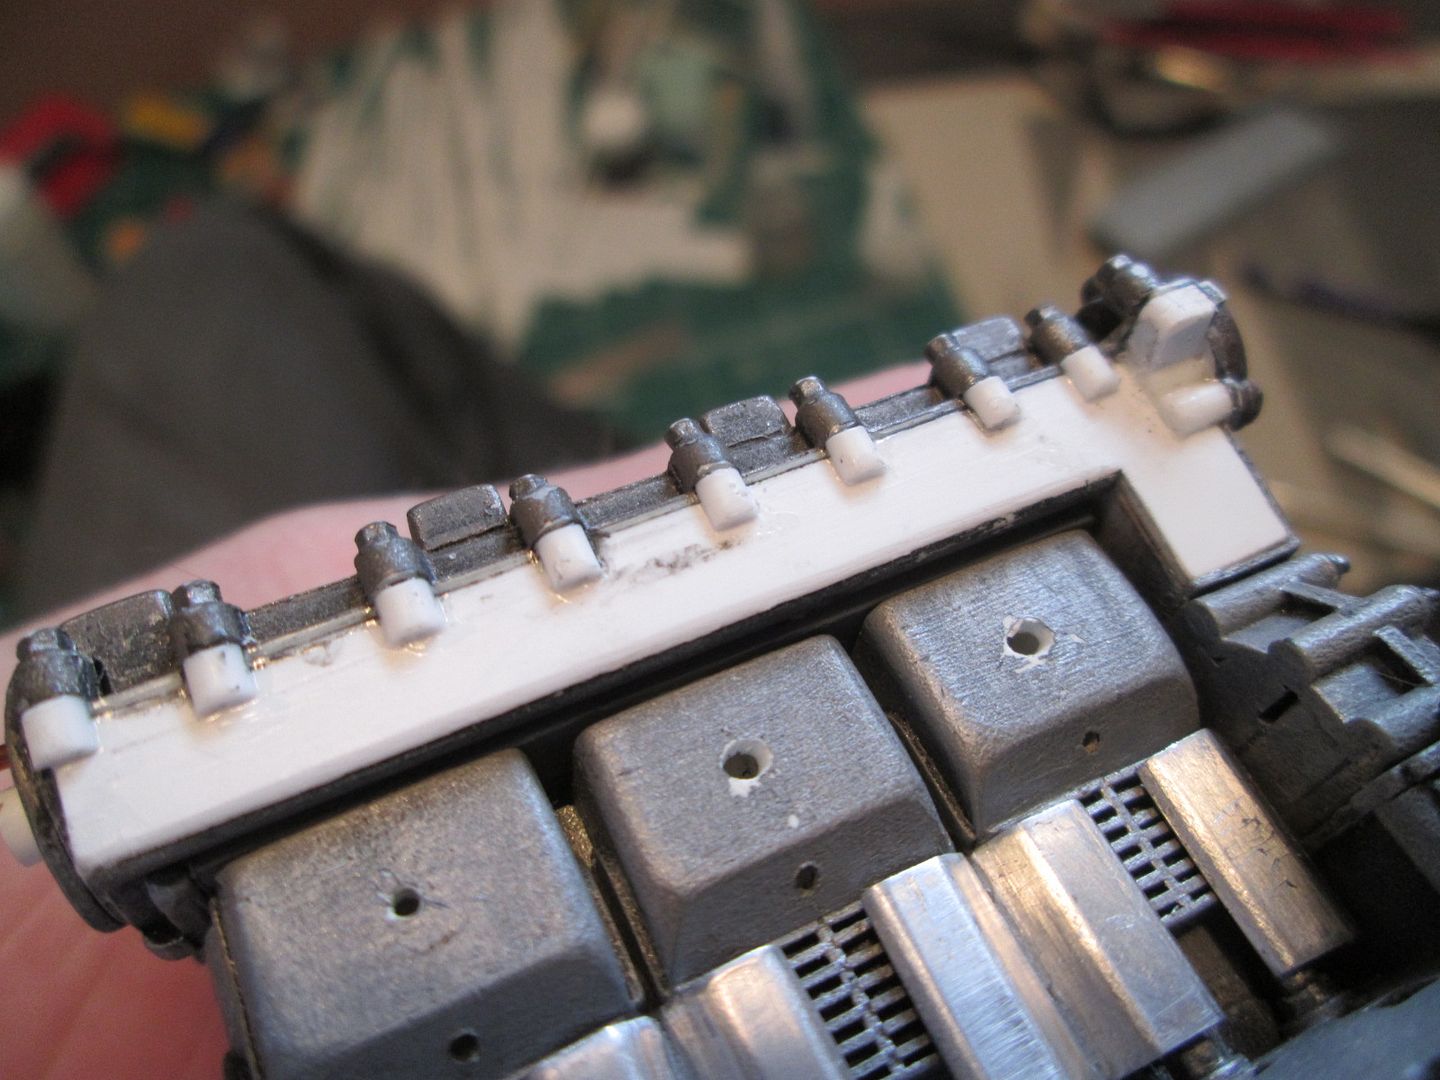 This has all been undercoated and painted to match the upper parts. Once these main sections were in place, I could add the little closing panels at the front of the engine, then fit the lower water rails and the head-cooling water pumps: 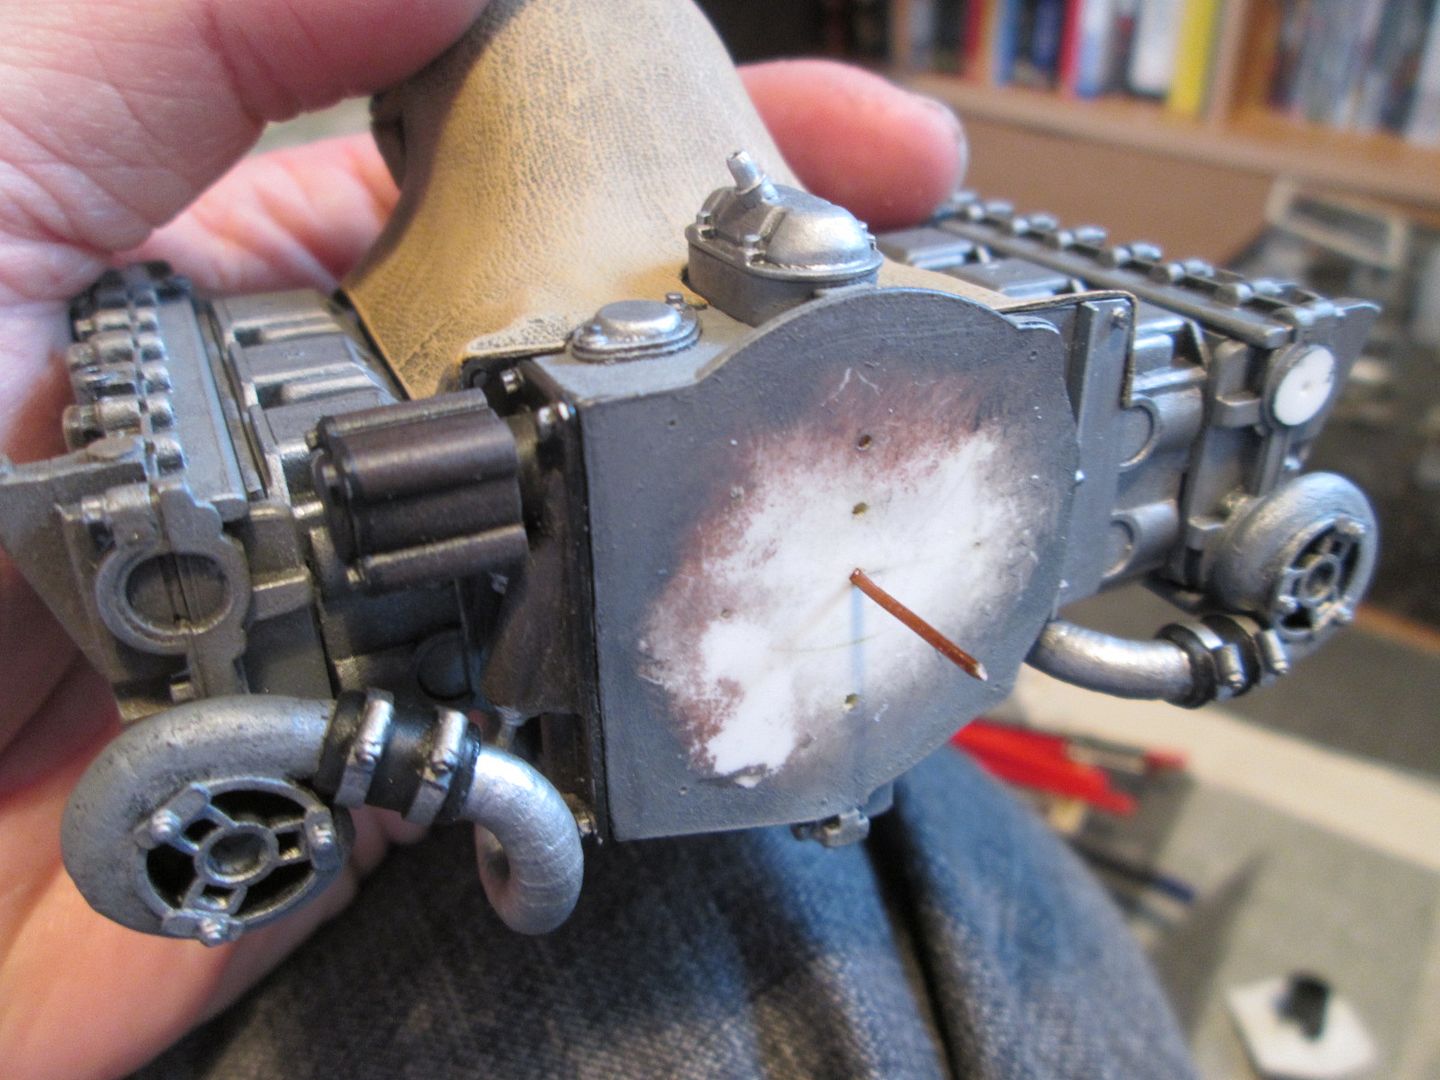 The short pieces of 'water hose' are styrene tube with hose-clip detailing added, and do a great job of hiding the joint between the pumps and rails. Before I went further I sprayed the whole lot with Citadel 'Purity Seal' varnish - not a gloss varnish, but I wouldn't describe it as matt, either. I'm trying not to handle the engine too much (not easy) so there's bound to be more bits of paintwork that need minor repairs later on... Next stage, detailing! I made the diz cap, spark plugs, retainers, etc, months ago, so these have all now been painted (as you'll see below). I've been putting off making the fuel injectors for some time as it's one of those fiddly jobs that isn't particularly fun, but I couldn't avoid them any more! Here's what I ended up with: 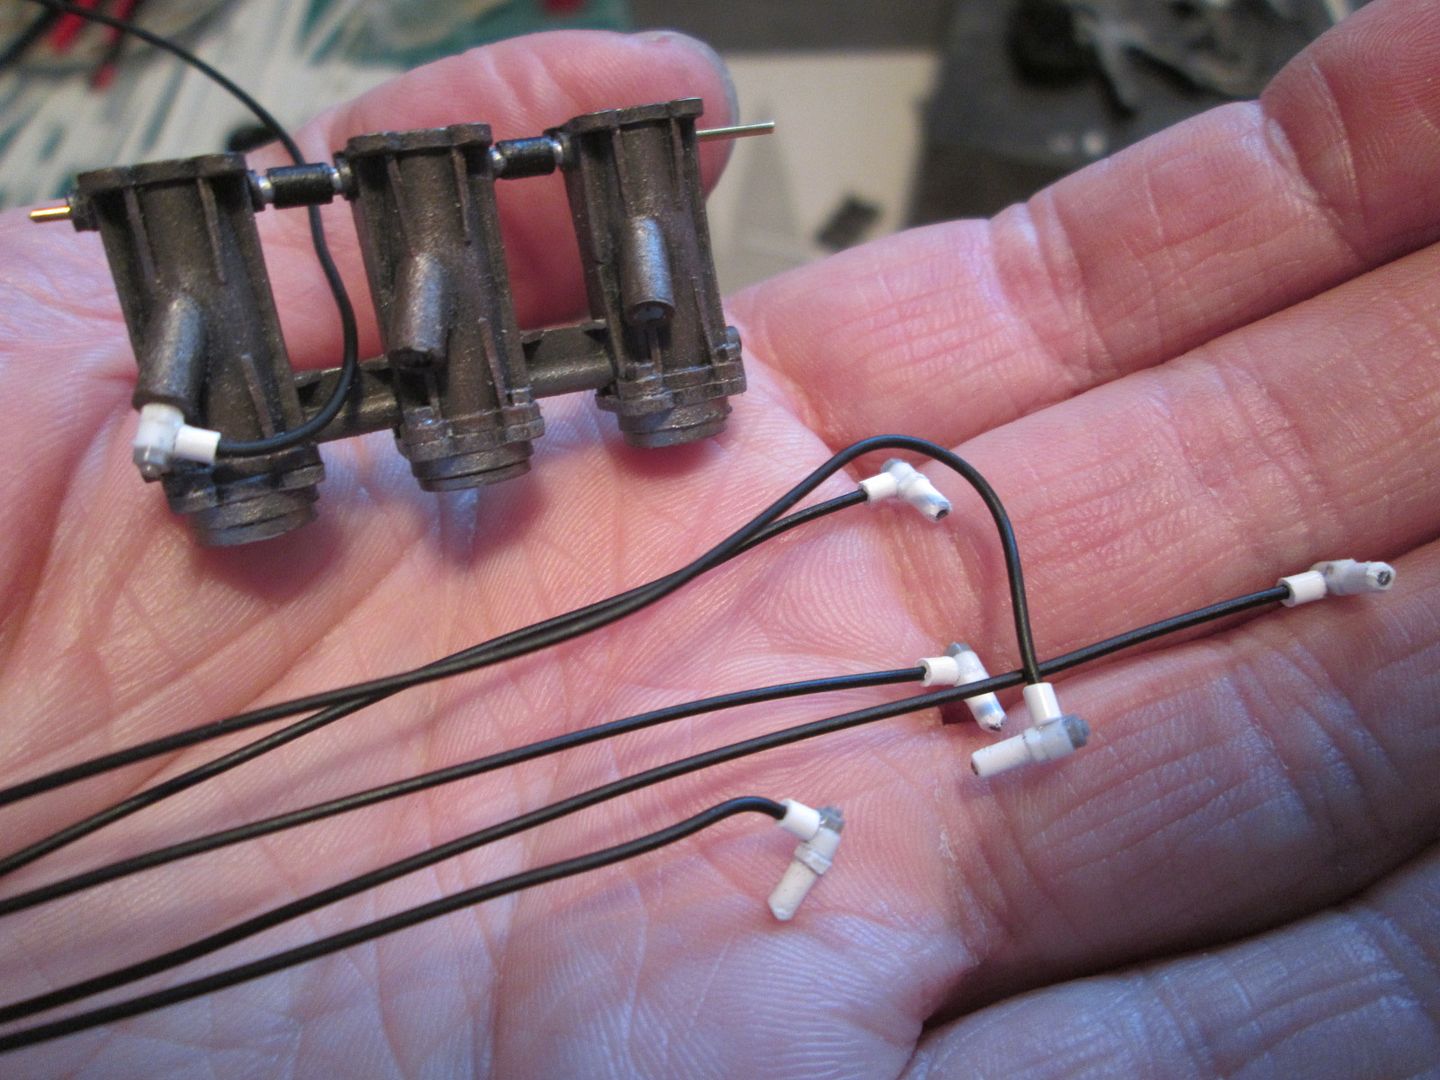 The wire used for the fuel lines is from a telephone exchange box under the pavement, near my home. They're installing some new broadband cabinets and the guys doing the work were ripping out huge bundles of old-school wiring, in all sorts of colours. My parents stopped by during a walk around the village, knew that I would find a use for it, and came home with enough to keep me wiring-up cars for several years to come! So, when you've got all these bits it's a shame not to fit them, right? Here's the left-hand side: 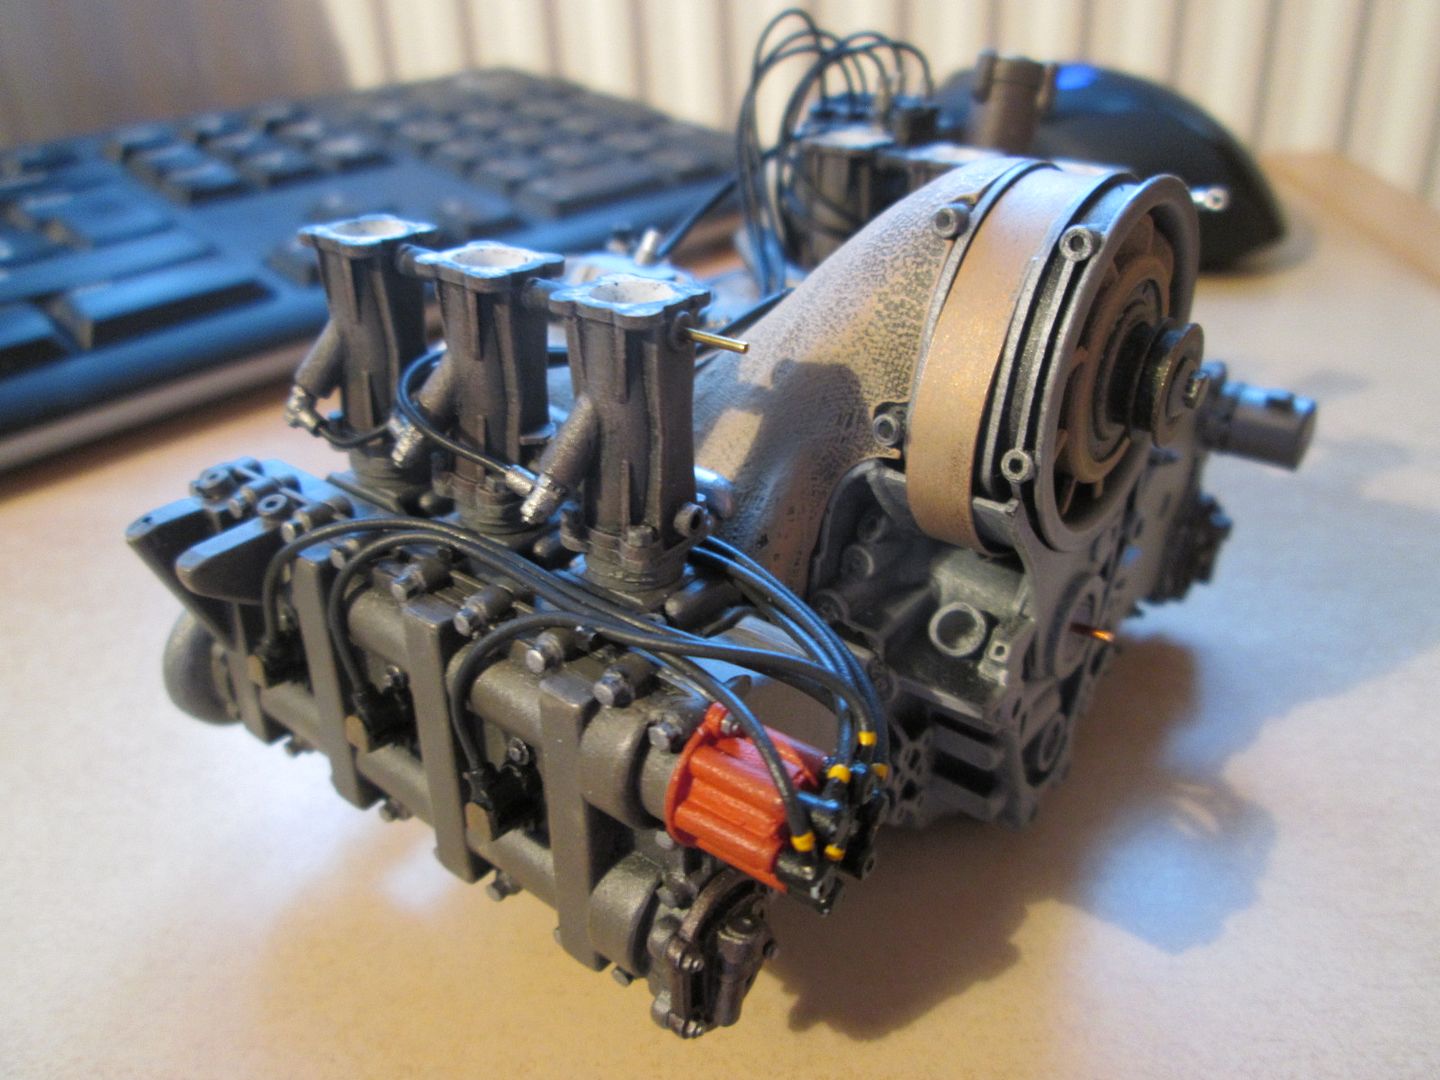 The orange-red of the diz cap introduces a shot of colour to the overall brown / grey tone of the engine - I couldn't resist adding the little yellow indicator marks for the plug leads, too. All six leads were test-fitted, trimmed to approximate length, glued to the diz, routed appropriately, then final-fixed. I've added one or two little retainer clips each side to keep things tidy. In this photo you can also see that I finished making the two little oil pumps which fit on the end of the lower cam-boxes - if I can work out exactly where the oil feeds go to, I will be very happy! Of course, the two inlet stacks have also been fitted, too. The three leads for the other side snake around the back of the cooling fan - some of the reference photos have them going over the top of the fan at the front, others have the routing I'm using: 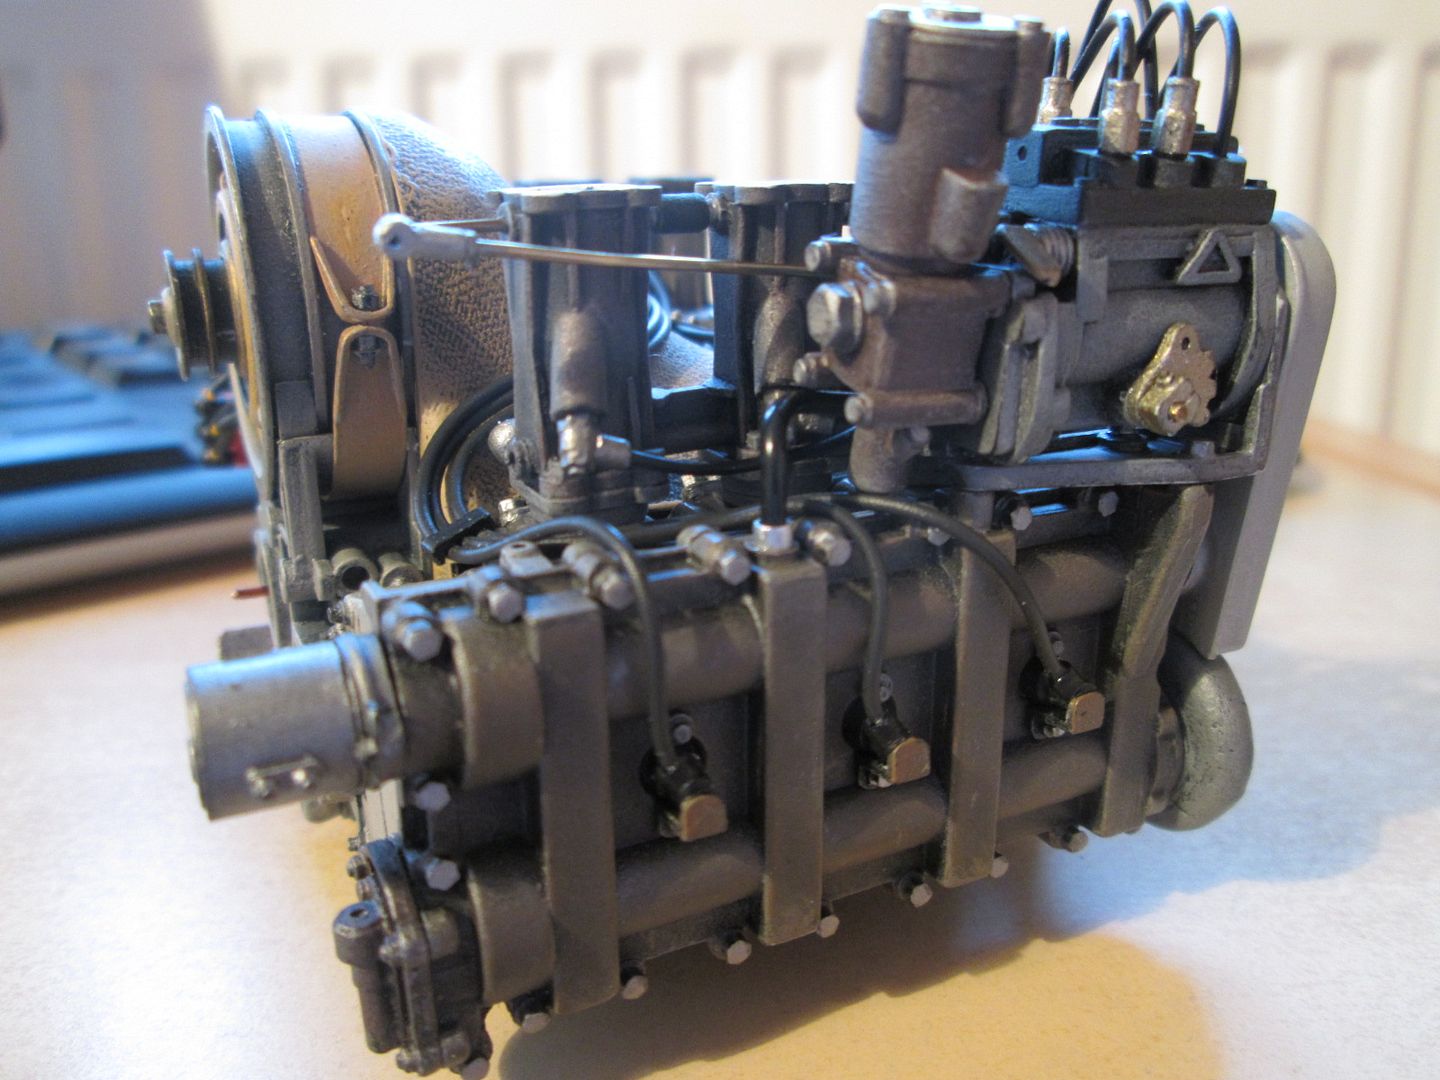 This shot gives a better view of the spark-plug retainer clips, too. The fuel-injection pump assembly has also been fitted - before I could do this I had to paint and fit the connecting linkage which runs up to the main throttle lever, and add the small pipe which comes out the top of the cam-box. At this stage three of the fuel lines have been trimmed to length and glued in place (with end-fitting detailing), the other three are to follow. The cover for the fuel injection drive pulley at the front end does a good job of providing extra security to the pump itself - although the lower connection needed a little modification for a better fit into the cam-box socket. So, major progress. My working pattern has been a bit disrupted recently, as I've been making new bits, painting them, modding old bits, painting old bits, assembling, dis-assembling, etc, all at the same time! In amongst all this I've primed and base-coated all the main driveshaft components, so that's another painting and assembly session to come sometime, and I've also started painting the throttle linkage bits - now the inlet stacks are fixed, I can finalise the length of the throttle cross-tube. I'm also returning to the end-tank detailing on the main intercoolers, as you'll probably see next time. See you soon, SB |
|
|
|

|
| The Following User Says Thank You to ScratchBuilt For This Useful Post: |
stump (05-15-2017)
|
|
|
#628 | |
|
AF Newbie
Join Date: Jul 2009
Location: Wuerzburg
Posts: 32
Thanks: 4
Thanked 3 Times in 3 Posts
|
Re: 1/8 Porsche 935/78 'Moby Dick'
Fantastic as always
|
|
|
|

|
|
|
#629 | |
|
AF Enthusiast
|
Re: 1/8 Porsche 935/78 'Moby Dick'
MAGIC!!!
You know....in a few years time, when this is finished SB (please don't let it end...), people gonna look at it and say "nice model"...............  But seeing it evolve I relate to watching a magic trick exposed. The finer details you miss while the trick is being performed, it all falls into place when you see how it is done. I LOVE seeing that kind of stuff. Just as I LOVE seeing this come together. GREAT work mate. 
__________________
Hello, I'm Greg. I'm an Aussie and a compulsive model starter... http://public.fotki.com/Greg5000/ Currant builds... 1:12 Datsun Z432R 1:12 Datsun OS-Giken |
|
|
|

|
|
|
#630 | |
|
AF Enthusiast
Thread starter
Join Date: Nov 2008
Location: Norwich
Posts: 649
Thanks: 21
Thanked 111 Times in 87 Posts
|
Re: 1/8 Porsche 935/78 'Moby Dick'
Thanks, Stump. I don't think there's any danger of this project being finished this year, but I'd like to have it complete during 2018 - just in time for Moby Dick's 40th birthday! It's quite satisfying at this stage to see the boxes of parts made during the last few years slowly start to empty as more things are assembled - the problem is often remembering how certain things were intended to go together - "why did I do that like that?".
There's also a growing sense of relief at this point that everything is actually coming together: it's all fitting, it's all working. Yes, there are still a few major obstacles ahead - I'm still not looking forward to doing the Martini stripes - but the core car underneath is technically plausible. And for tonight.... Most of last week was spent putting together the throttle lever mechanism and fitting the intercoolers to the tops of the inlet stacks. Although there wasn't too much to actually make at this point, there was still plenty of adjustment and final detailing required as the mechanism was assembled. Here's how it looks: 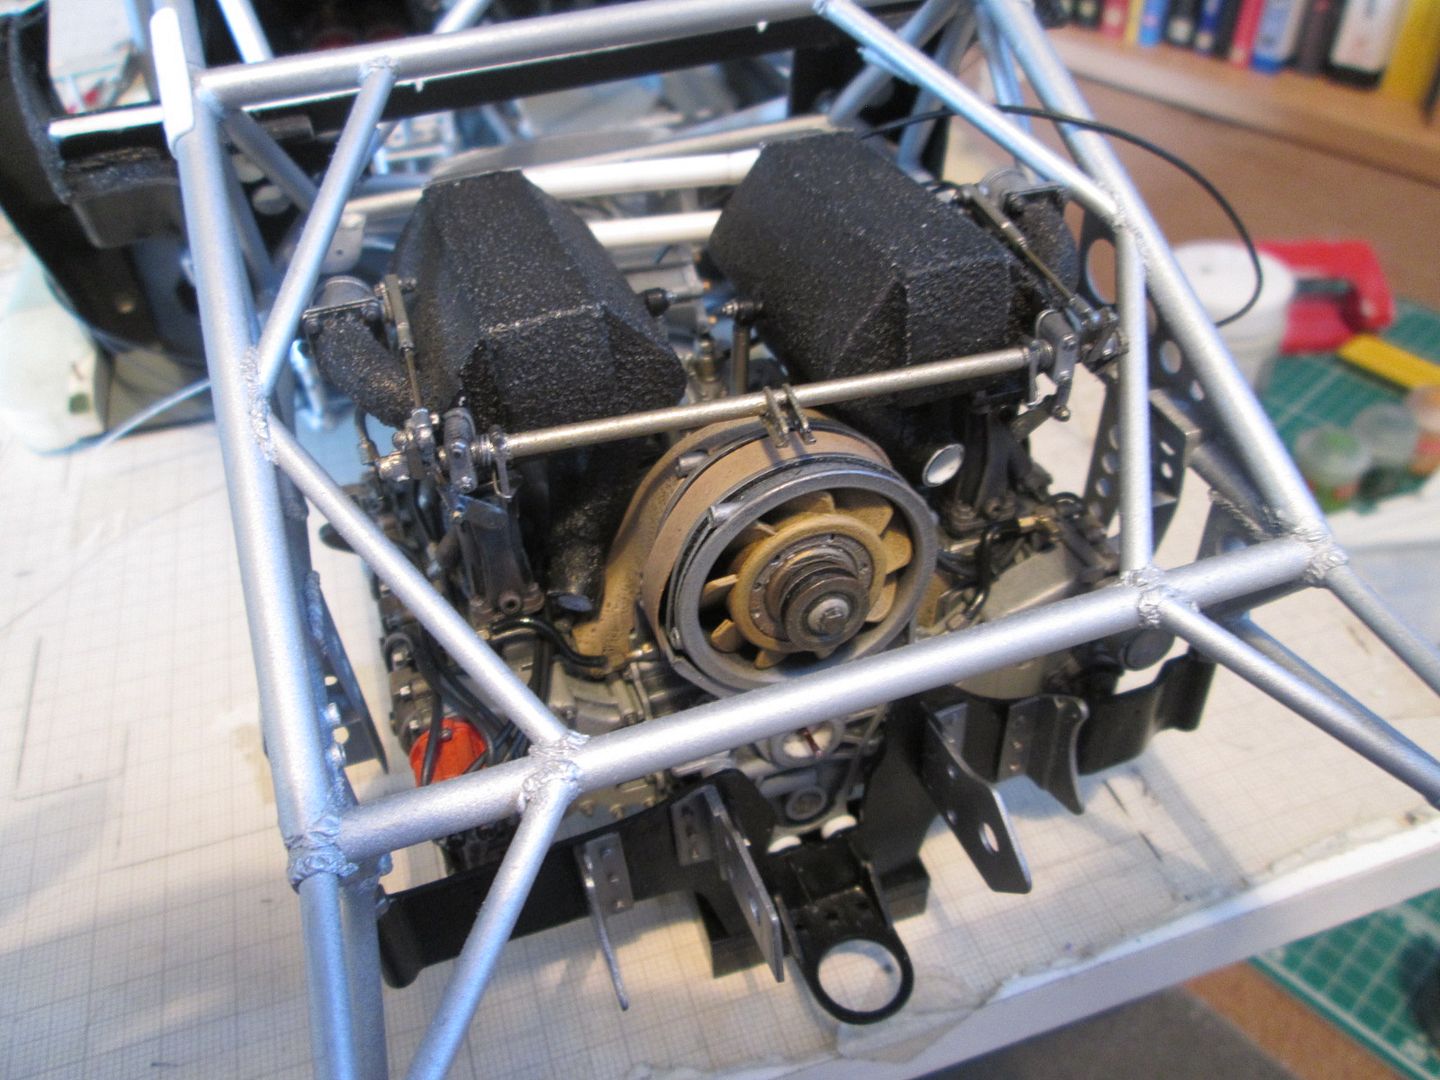 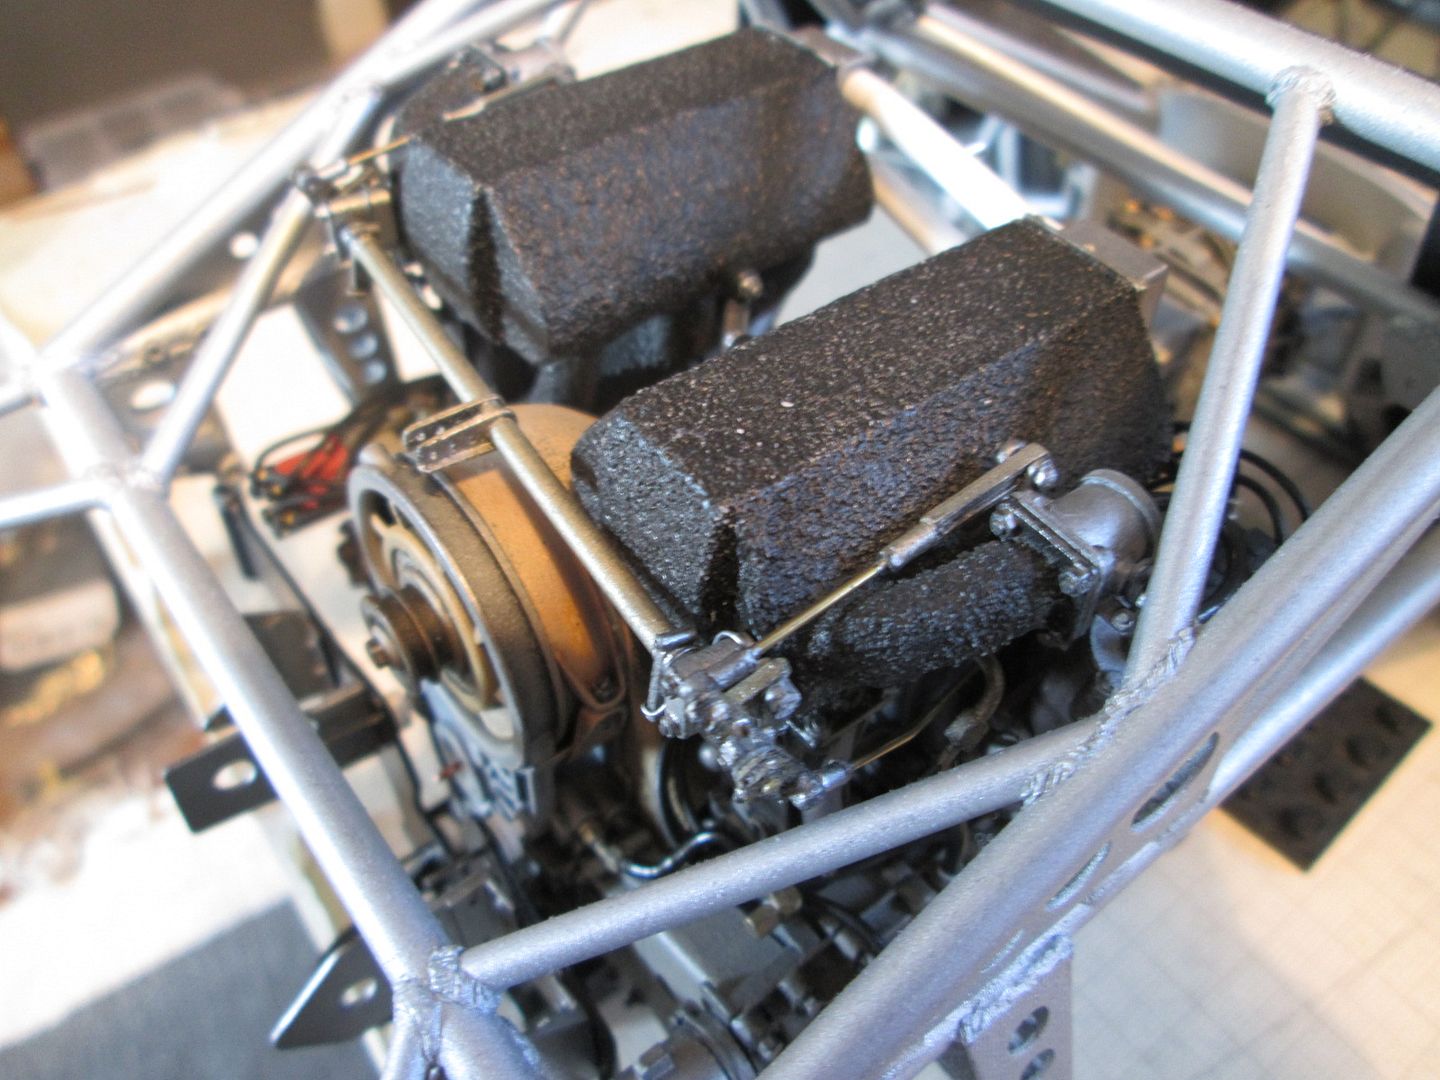 It's a tight fit in the chassis, but it works! The only thing missing now is the throttle cable - this will connect to the lever arm in the middle (above the fan). Although it's lying flat now, this section is still able to pivot on the main shaft, so that I can adjust the angle with the cable. I've also added two support rods between the two intercoolers. I'd seen these on some of the reference photos, but couldn't work out exactly what they were - but it just clicked into place. It made sense to have an extra support for the intercoolers, rather than having all the weight cantilevered from the inlet stacks. So, it was easy enough to make two stays, drill the intercoolers to pin them in place, and put two small holes in the fibreglass fan shroud for the bottom ends to poke through. The next job has occupied this last week: making the water pipes to connect the two intercoolers together. These have an aluminium tube core, 4mm styrene tube over the top (in thin sections at the bends), with greenstuff to fill in the gaps:  Of course, I couldn't make them as a single piece - they were made in sections, then fitted together. Before adding the 'Astrogranite' textured paint to create the hose sections, I wrapped 2mm x 0.3mm strip around to make the hoseclip detailing, with 1mm Wave hex-nuts. The ends of the intercoolers could now be fitted, with the two pipe sections in between: 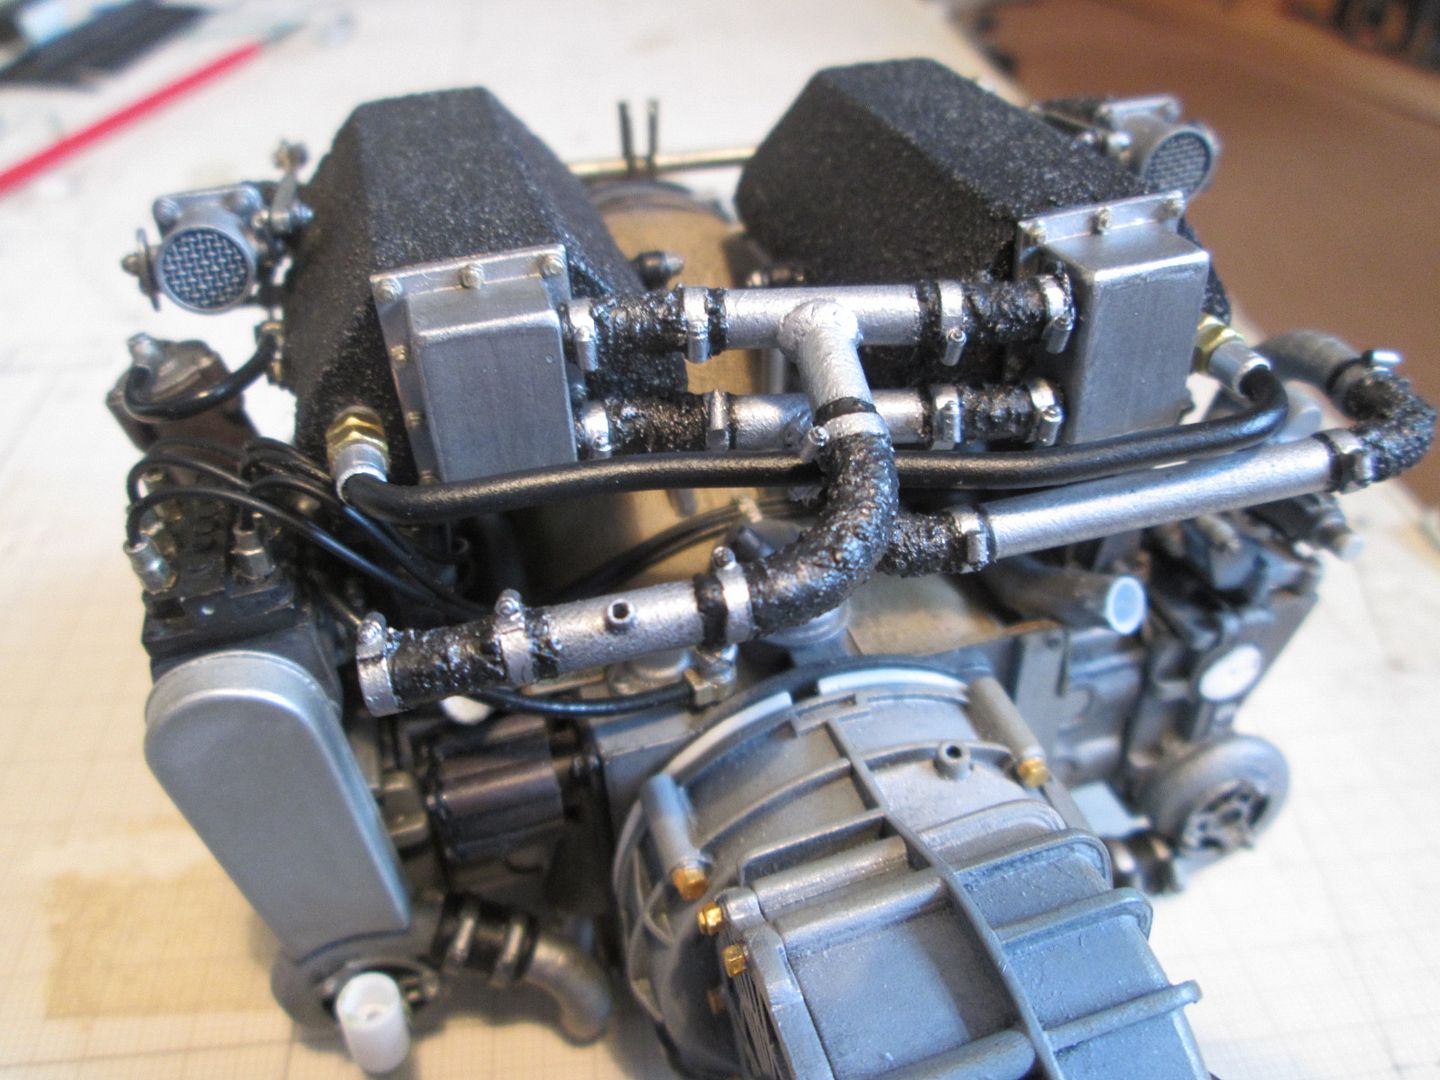 The upper section is still able to pivot, so I've got a little flexibility with the final pipework back to the chassis frame. The black pipe with the hex ends is some sort of balancing system between the two sets of inlet stacks. So, all I have to do now is to add the two short pipes which take the intercooler water back into the chassis frame - that's a job for later. First job for next week is to add the water pump drive pulleys and belt, then I need to add a couple of bits of plumbing to the front of the engine before I forget! I still want to add an extra support somehow, but I'm now concerned that the intercooler pipes above will be right in the way. We'll see. Another item on the 'to-do' list for next week is to start refining the pipework for the two side radiators. That's it for tonight. It's a busy few weeks coming up - Nurburgring 24 next weekend, then Le Mans Test day, then the 24 Heures itself. Fantastic! I should be able to get a couple of updates posted before the big weekend... SB |
|
|
|

|
| ||||||||||||||||||||||||||||||||||||||
 |
POST REPLY TO THIS THREAD |
 |
| Thread Tools | |
|
|