|
|
|

|
|
| Search | Car Forums | Gallery | Articles | Helper | AF 350Z | IgorSushko.com | Corporate |
|
| Latest | 0 Rplys |
|
|||||||
| WIP - Motorsports Post topics for any "Work In Process" motorsports vehicles in this sub-forum. |
 |
 Show Printable Version | Show Printable Version |  Email this Page | Email this Page |  Subscribe to this Thread
|
|
|
Thread Tools |
 04-16-2012, 03:22 PM
|
#46 | |
|
AF Newbie
Join Date: Feb 2010
Location: Little falls, New Jersey
Posts: 57
Thanks: 0
Thanked 0 Times in 0 Posts
|
SB just keeps getting better and better amazing
|
|

|

|
|
04-16-2012, 04:06 PM
|
#47 | |
|
AF Enthusiast

Join Date: Feb 2003
Location: F1...
Posts: 1,410
Thanks: 3
Thanked 3 Times in 3 Posts
|
Re: 1/8 Porsche 935/78 'Moby Dick'
awesome, another masterpiece in the making
 |
|
|
|
|
|
04-16-2012, 06:12 PM
|
#48 | |
|
AF Newbie
Join Date: Jul 2011
Location: lawrenceburg, Kentucky
Posts: 34
Thanks: 0
Thanked 1 Time in 1 Post
|
Re: 1/8 Porsche 935/78 'Moby Dick'
I wasn't sure you were coming back to this one SB. I'm glad to see you've returned! Let the modeling college continue!
|
|
|
|
|
|
04-17-2012, 01:09 PM
|
#49 | |
|
AF Regular
Join Date: Jan 2009
Location: Zuid Holland
Posts: 278
Thanks: 2
Thanked 2 Times in 2 Posts
|
Re: 1/8 Porsche 935/78 'Moby Dick'
SB
A joy to follow this "magic" Ton |
|
|
|
|
|
04-22-2012, 11:11 AM
|
#50 | |
|
AF Enthusiast
Thread starter
Join Date: Nov 2008
Location: Norwich
Posts: 649
Thanks: 21
Thanked 111 Times in 87 Posts
|
Re: 1/8 Porsche 935/78 'Moby Dick'
...oh yes, back in action! I can't wriggle out of this one now - my friends and colleagues at work know what I'm building, and you guys too - I'll never hear the end of it if I quit the project. My only worry is that you're going to find it boring following the early stages as I build the chassis (again) - if so, feel free to skip forward a few pages!
Anyway, hello again. It's a straight pick-up from where I finished last week - I spent a couple of evenings adding the tubes coming off the gearbox frame: 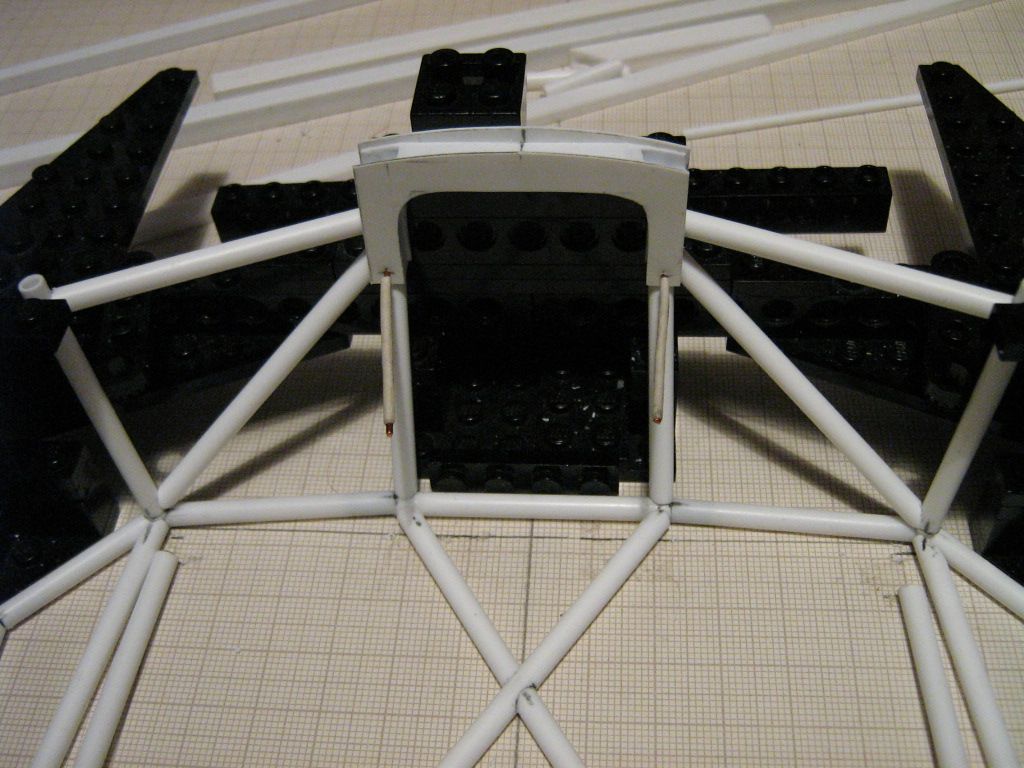 The only joints that are not pinned are the lower ends of the two diagonals - but there's still some small gussets to add at the top, and the whole lot will be panelled-over later, so this is not such a concern. I'm not going to add the gearbox or wishbone pick-ups just yet, so the next job was to fill the gaps on the frame, starting with the curved underside: 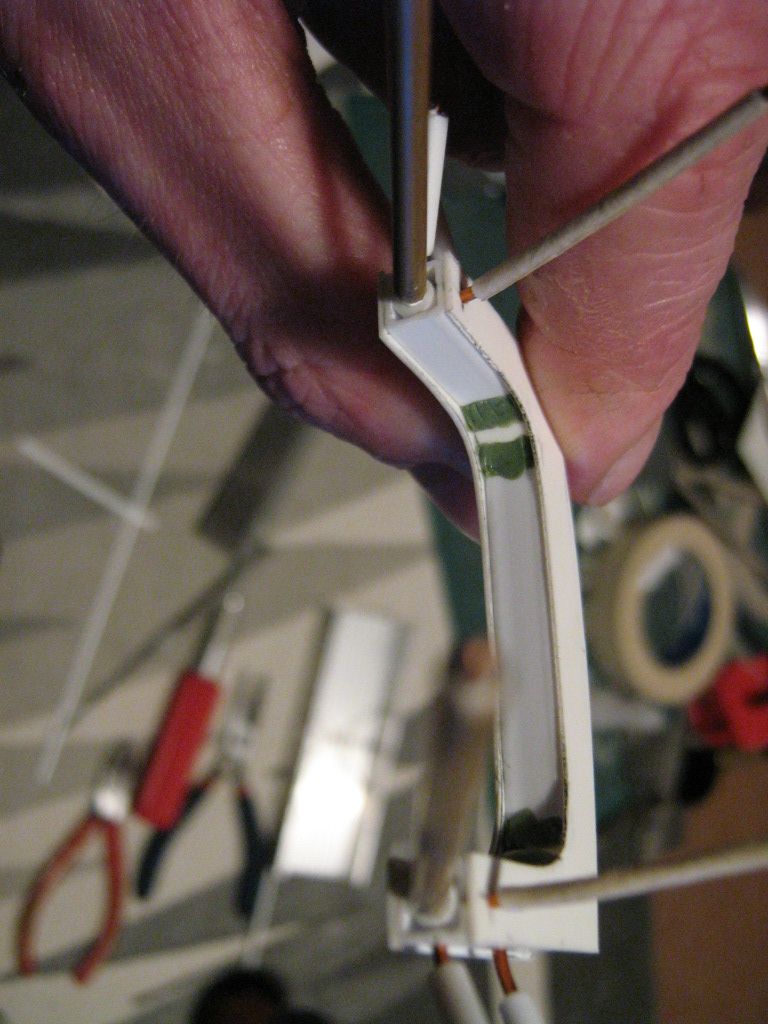 A little greenstuff was pushed into the corners, then 0.4mm strip was added over the top:  The pins for connecting the lower chassis tubes were glued in place, then more strip and greenstuff added to fill in the top: 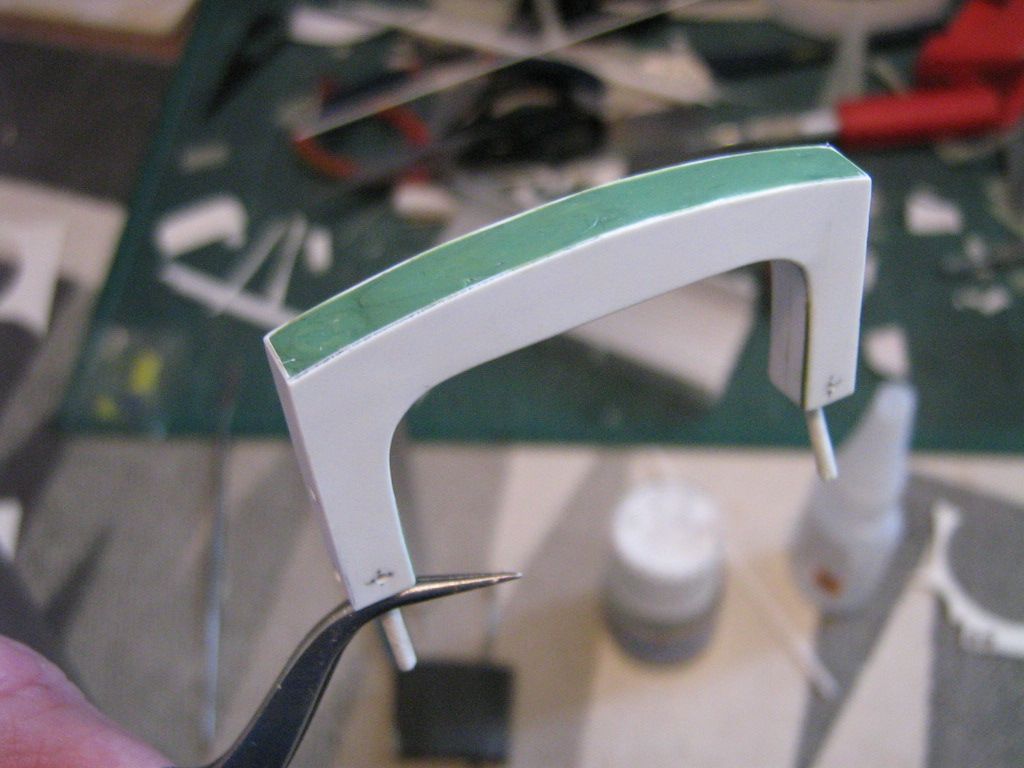 Once the greenstuff has hardened properly I'll give it all a once-over with the file and some fine abrasive paper to take the edges off. There may also be some weld-detail to add... The other big project for this week has been the two reinforced sills: 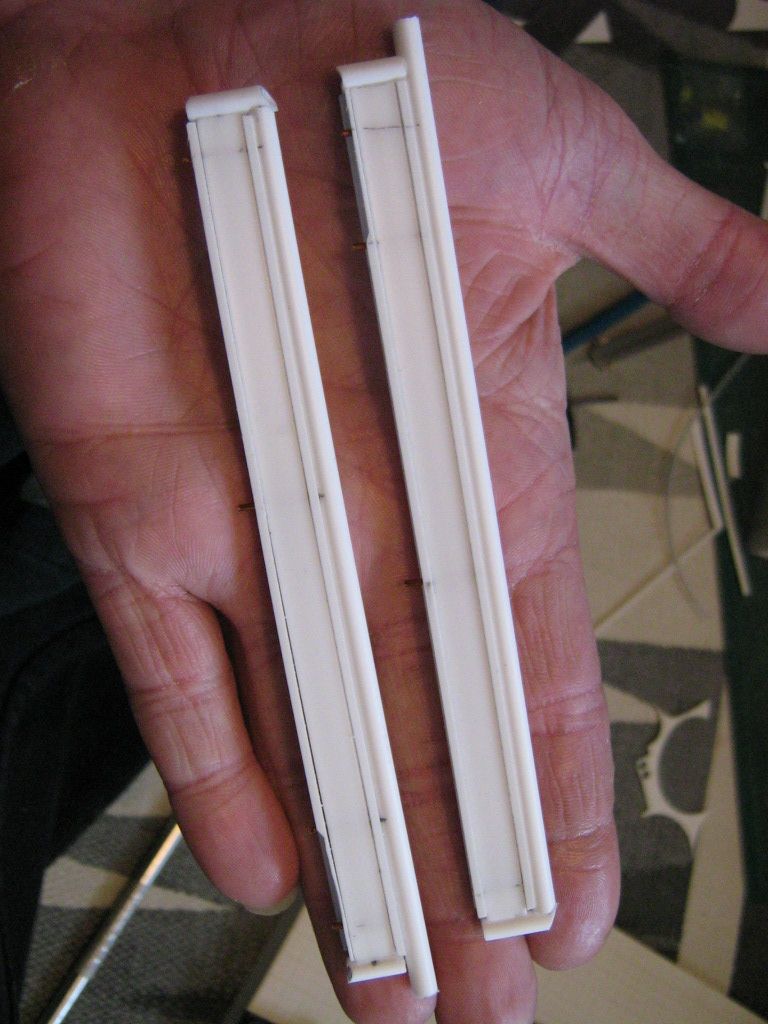 They're not glued yet, but despite appearances they've both taken quite a lot of time to get right. The core is a length of 1/4" x 1/8" box section, with 4mm channels added top and bottom - these locate nicely with the 4mm tubes used for the chassis rails:  There are three pins running through all the main parts for reinforcement, and to plug the assembly into the lower chassis. At each end there are short vertical tubes to connect with the front and rear frames - again, these are pinned for strength. I'll have to be careful when gluing everything together to make sure I don't get any distortion - they're supposed to strengthen the chassis, not turn it into a banana! Here's a comparison with the mk1 chassis: 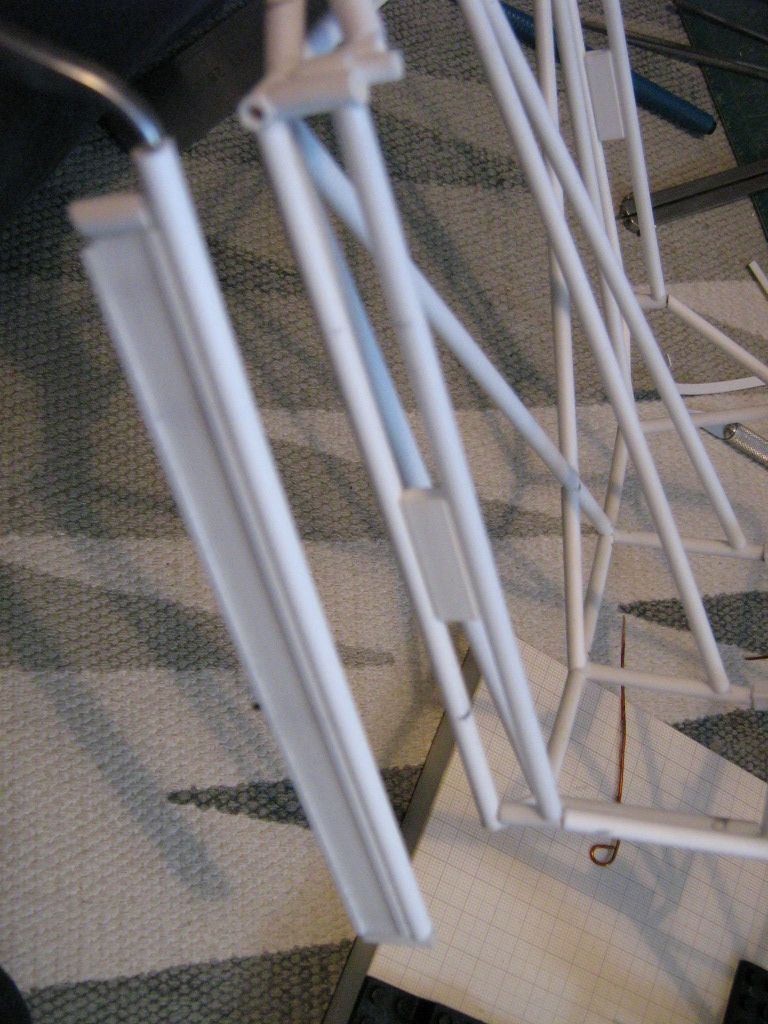 Not the greatest photo, but you get the idea. ...and fitted to the mk2 version: 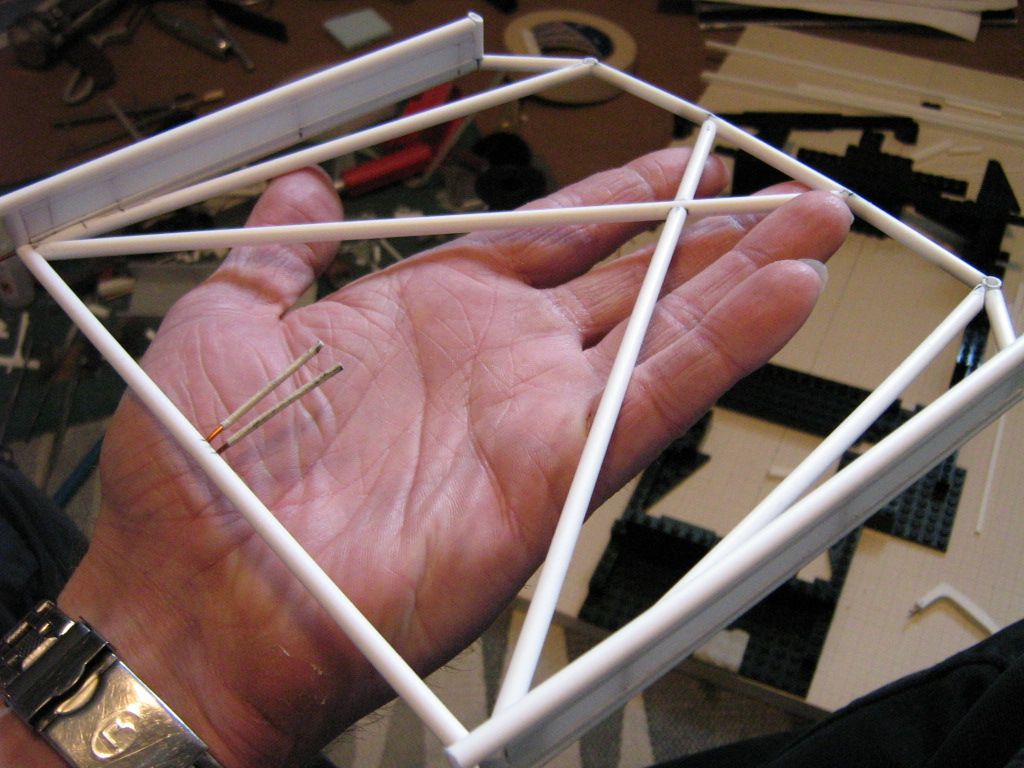 The front ends need a little work, but I'm leaving that until I get further with the footwell section of the chassis. Remember that you won't see any of this once the body is fitted - it's all hidden by the fibreglass structure. I've adjusted the rear verticals too, to improve the fit with the diagonals which will be added later on. So, it's coming along. The goal for this week is to slowly glue it all together - which will probably require a little adjustment of some of the tubes as I go through it. Then I can start on the engine bay and the roof structure - maybe using the extinguisher tubing again, maybe not. All the best, SB |
|
|
|
|
|
04-22-2012, 01:17 PM
|
#51 | |
|
AF Newbie

Join Date: Jul 2005
Location: Antwerpen
Posts: 44
Thanks: 8
Thanked 0 Times in 0 Posts
|
Re: 1/8 Porsche 935/78 'Moby Dick'
Hi SB,
You must be joking when you say " that you're going to find it boring following the early stages". Man, I've never learned this much about scratch building, or have I been speechless as when looking at your work. Every step of this build is nicely documented with lots of pic's, this never can bore me. Keep the updates coming and I'll keep on following them with lots of attention. Thanks for sharing this great build with us. Mark
__________________
There will always be the need for speed. |
|
|
|
|
|
04-29-2012, 11:28 AM
|
#52 | |
|
AF Enthusiast
Thread starter
Join Date: Nov 2008
Location: Norwich
Posts: 649
Thanks: 21
Thanked 111 Times in 87 Posts
|
Re: 1/8 Porsche 935/78 'Moby Dick'
Okay - with that vote of confidence I'll continue!
Before I finally glued the rear frame together, I took the decision to reduce the height slightly - by about 3.5mm. The angles of some of the tubes just weren't matching up with what I could see in the photos, and it was going to annoy me if I didn't do something about it! So, I trimmed the lower verticals beneath the gearbox frame, re-drilled the holes in the outer corner verticals, and shortened the long forward tubes through the cockpit: 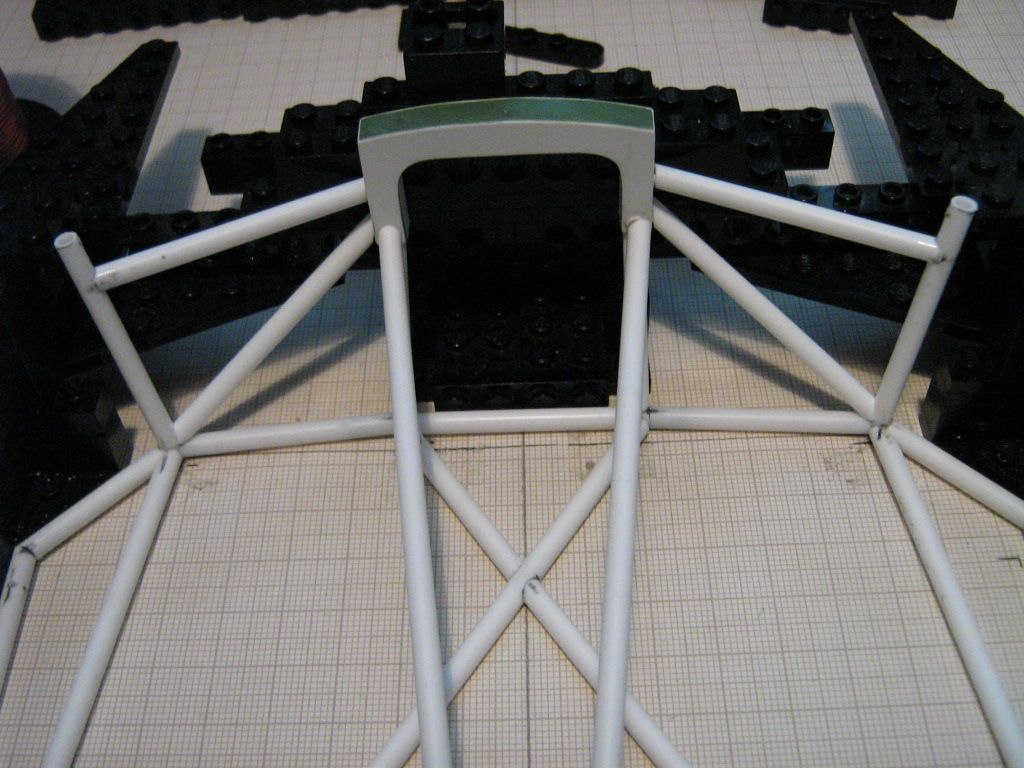 Next job was to attach the reinforced sills and the diagonals to connect these to the rear frame, and add the extra upper tubes: 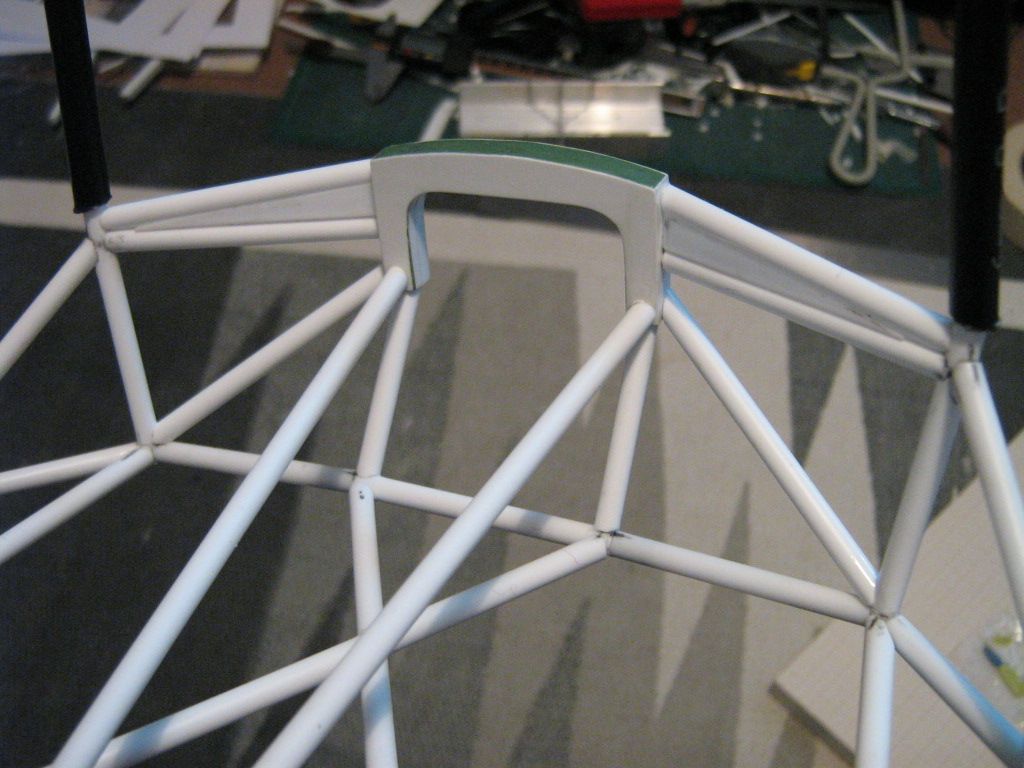  The extra upper tubes aren't pinned at either end, but there's a wedge of 1/4" x 1/8" section to provide a firm anchor to the lower tubes (plus plenty of glue, of course). Later there will either be a thin skin of styrene sheet wrapped over both tubes, or a layer of greenstuff to achieve a similar effect. The main reason for not trying to pin these was that I still have other parts of the frame and suspension pick-ups to add, and I wanted to be sure I wouldn't compromise their pinning.  In this shot you can see I've added the sills and also bent a new rear roll-hoop. I've used the fire-extinguisher piping again as it's just so good for this job - the internal diameter is just right for reinforcing the joints, too. The outer diameter is 6mm, so I don't think it is particularly out-of-scale, either. Once all the tubes are in place I'll use some greenstuff the soften the transition from one tube spec to the other. I won't glue this hoop just yet, but I need it there while I'm working on the engine bay... In these last two photos I've started on the rear frame, re-using the lego support from before. I remembered to reduce the height, too, as the mk1 frame was actually too high in this area! The first three tubes I've cut are all in the larger 4.8mm styrene, rather than the 4mm used elsewhere. The shorter piece across the back of the frame is reinforced with a length of 1/8" ali tube, with 3/32" tubes inside this to pin it all together. Once the engine and gearbox are fitted (oh...maybe sometime next year?!) there will be a lot of weight hanging off this frame...   I've started working on the angled tubes to connect the two parts of the frame together, as you can see above. These are never easy as there's all sorts of angled joints going on at each end - lots of filing, checking, and re-checking. It'll take a while to get them all done, but I'm not on a deadline. So, that's where I am now. I'm hoping to make some good progress this week, especially as there's a three-day weekend coming up. There's the Spa WEC race to listen to on Saturday, and the Snetterton 6 hours on Sunday, so plenty of motorsport to provide the background music to my modelling. Scarily, we're only now seven weeks from Le Mans again - but I don't think I'll be taking my modelling with me this year! Have a good week, SB |
|
|
|
|
|
04-30-2012, 02:11 PM
|
#53 | |
|
AF Enthusiast
Join Date: Sep 2011
Location: Redwood City, California
Posts: 651
Thanks: 0
Thanked 39 Times in 39 Posts
|
Re: 1/8 Porsche 935/78 'Moby Dick'
Brilliant! Looking very good as usual,
ianc |
|
|
|
|
|
05-03-2012, 05:11 AM
|
#54 | |
|
AF Enthusiast
Join Date: Mar 2009
Location: Madrid
Posts: 649
Thanks: 109
Thanked 68 Times in 67 Posts
|
Re: 1/8 Porsche 935/78 'Moby Dick'
Fully amazing...
|
|
|
|
|
|
05-07-2012, 10:40 AM
|
#55 | |
|
AF Enthusiast
Thread starter
Join Date: Nov 2008
Location: Norwich
Posts: 649
Thanks: 21
Thanked 111 Times in 87 Posts
|
Re: 1/8 Porsche 935/78 'Moby Dick'
Hello again,
As it's a long Bank Holiday weekend I decided I would leave the update until today - it's short on photos, but I've certainly been making progress. Most of the action this week has been around the rear of the chassis and it's connections to the cockpit. After assembling the main perimeter rails I added the damper mounting crosstube to tie the front of the frame together - after inserting more ali tubes for stiffness, of course. You'll also see that the main roll-hoop has changed from the 6mm extinguisher tube to a hybrid 4.8mm styrene and brass version - it needs more work to finish it off, but I'm hoping it will be a better solution. I didn't have a lot of success bending the tube (despite the small size) so making the whole frame from a single piece was not going to be an option. I'll eventually glue it all together, with the corners filled with greenstuff and the main vertical tubes with ali reinforcement... 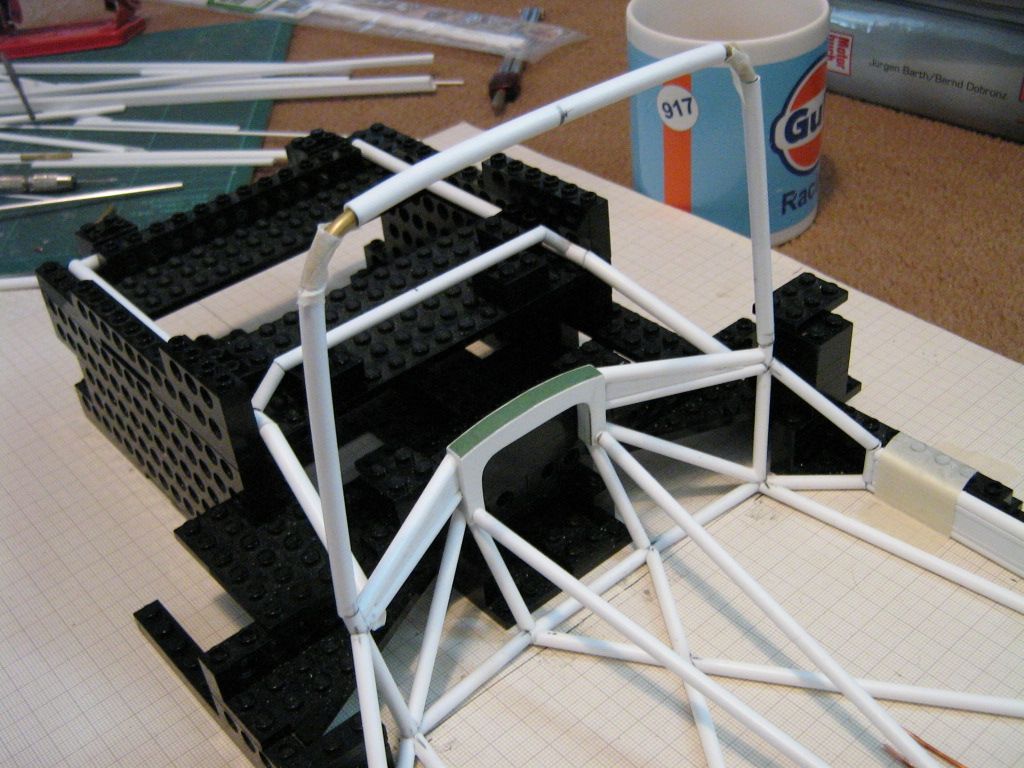 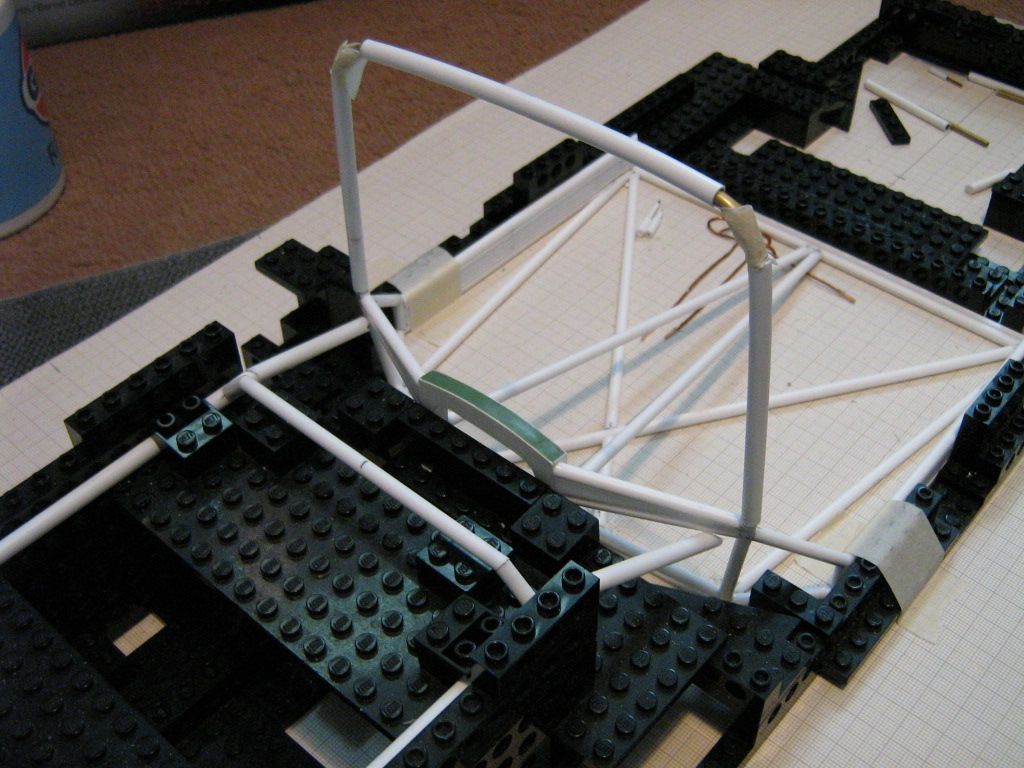 The rest of the week's work has been focussed on the various connecting diagonals between the engine bay and the cockpit - lots of cutting, filing, checking and re-checking. Again, I'm pinning as many as I can, although none are glued in place just yet. I've added a single layer of 1mm styrene sheet to the back of the main gearbox crossframe - this gives it a little more bulk, and will allow me to get a bit more 'shape' to the top edge...more greeenstuff required! Finally, I've started adding the main diagonals which run from the back of the engine bay up to the top of the roll-hoop. I'm still convinced that they are not a single straight length - the photos I'm using just have this suggestion of a change in angle at the half-way point. The positon of the crosstube has changed slightly from the mk1 frame (it sits a little higher than before) but there will still be a slight kink in the top tubes. Again, all the longer 4.8mm tubes have lengths of 1/8" ali inside. 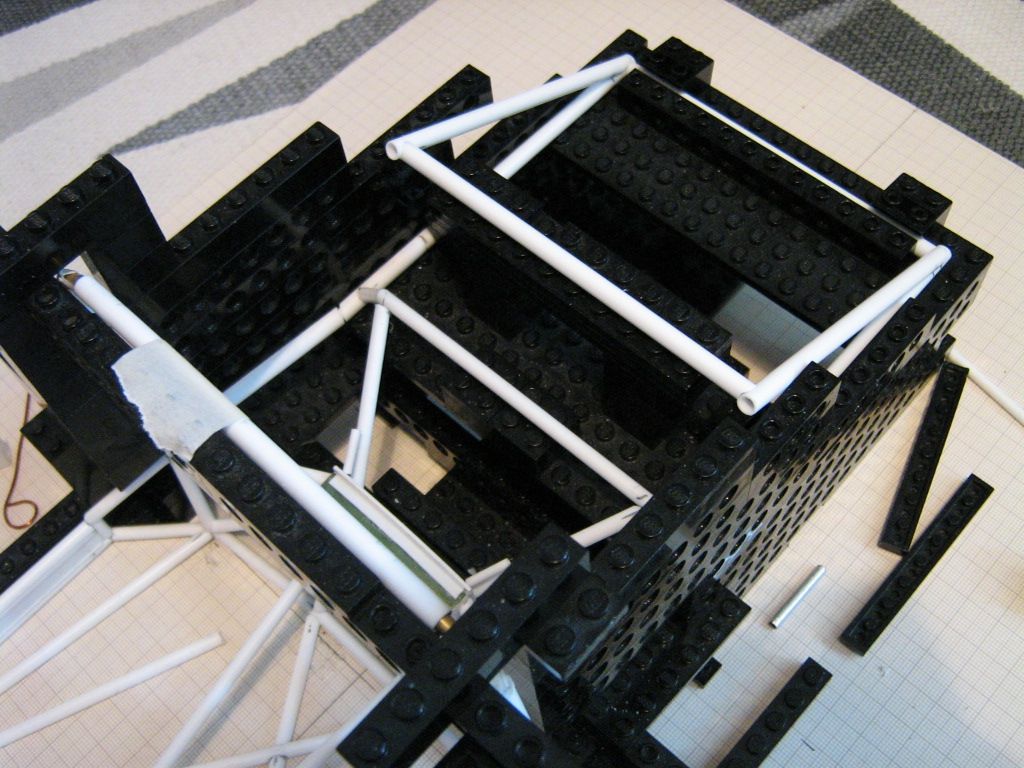 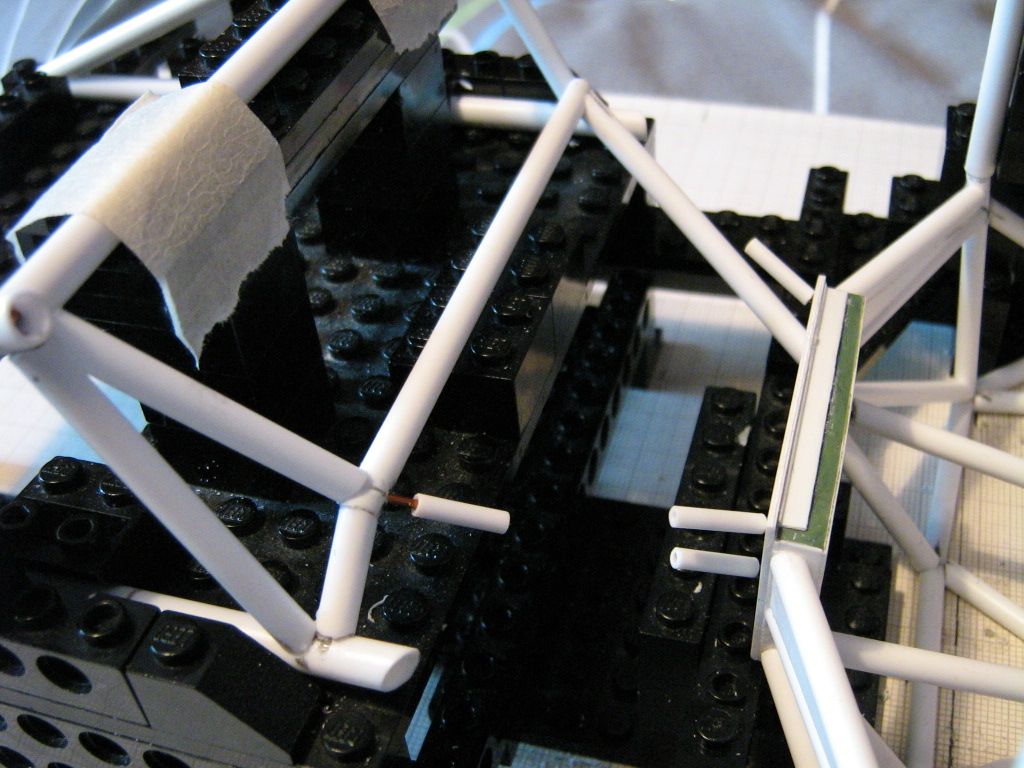 In this last photo you can see how I'm pinning some of the connecting tubes between the sections, and adding more detail to the frame. The damper crosstube is going to be a very busy place - there are also two vertical braces to the main roll-hoop to be added, and another two diagonals, plus the main stays from the gearbox frame. Somehow I'll also have to eventually thread a partial bodyshell over the whole lot...could be fun! So, it's finally starting to look like a 935. I've got plenty of tubes to fit and glue, so there's enough to keep me occupied during the next few evenings. I'm off to Brands Hatch this weekend, so that's Friday, Saturday and Sunday spoken for - not much chance for modelling! I'll get an update posted next Monday, as I should be able to make progress in the early part of the week. All the best, SB |
|
|
|
|
|
05-07-2012, 11:04 AM
|
#56 | |
|
AF Enthusiast

Join Date: Jul 2005
Location: London
Posts: 899
Thanks: 3
Thanked 11 Times in 10 Posts
|
Re: 1/8 Porsche 935/78 'Moby Dick'
Nice mug!
...chassis looks pretty damn fine too!  |
|
|
|
|
|
05-07-2012, 11:54 AM
|
#57 | |
|
ItaloSvensk

Join Date: Mar 2009
Location: Marstrand
Posts: 3,383
Thanks: 1,077
Thanked 296 Times in 270 Posts
|
Re: 1/8 Porsche 935/78 'Moby Dick'
surely taken at le mans ..

__________________
Paolo - LoveGT40 Modelworks website www.alsoldatino.com my YT channel : https://www.youtube.com/channel/UCIp..._as=subscriber FB: https://www.facebook.com/alsoldatino |
|
|
|
|
|
05-07-2012, 01:05 PM
|
#58 | |
|
AF Regular

Join Date: Sep 2008
Location: Jacksonville, Florida
Posts: 310
Thanks: 11
Thanked 3 Times in 3 Posts
|
Re: 1/8 Porsche 935/78 'Moby Dick'
Hey SB,
Super work so far, i also followed your 908/03 build and was in constant awe. I do have one small, silly question for you...when you are joining the styrene are you using CA glue or are you using a solvent based glue to "melt" the tubes together? Thanks, Stu |
|
|
|
|
|
05-07-2012, 01:39 PM
|
#59 | |
|
AF Enthusiast
Join Date: Feb 2009
Location: Palm Desert, California
Posts: 610
Thanks: 108
Thanked 44 Times in 40 Posts
|
Re: 1/8 Porsche 935/78 'Moby Dick'
my brain is too small for this. amazing work!
|
|
|
|
|
|
05-07-2012, 01:58 PM
|
#60 | |
|
AF Enthusiast
Thread starter
Join Date: Nov 2008
Location: Norwich
Posts: 649
Thanks: 21
Thanked 111 Times in 87 Posts
|
Re: 1/8 Porsche 935/78 'Moby Dick'
Hello Stu,
For the pinned joints I'm using CA (Vitalbond 'thin') to glue everything together, and I'll run some liquid poly into the joints later when I can take the frame out of the jig. Obviously there's a few gaps here and there where the tube end profiling hasn't been spot-on, so I'll ease a little more CA into those too. However, I don't want to go overboard with the glue and find my tubes melting in a few weeks' time! No doubt I'll add some 'Porsche welds' with greenstuff later, so that will tidy-up all the joints. I know it's tempting fate, but so far I haven't managed to glue the frame to the lego yet...or dropped anything into my coffee! Have a good week, SB |
|
|
|
|
| ||||||||||||||||||||||||||||||||||||||
|
POST REPLY TO THIS THREAD |
 |
| Thread Tools | |
|
|


