
|
| Search | Car Forums | Gallery | Articles | Helper | AF 350Z | IgorSushko.com | Corporate |
|
| Latest | 0 Rplys |
|
|||||||
| Car Modeling Share your passion for car modeling here! Includes sub-forum for "in progress" and "completed" vehicles. |
 |
 Show Printable Version | Show Printable Version |  Email this Page | Email this Page |  Subscribe to this Thread
|
|
|
Thread Tools |
|
|
#1 | |
|
AF Newbie
Join Date: Dec 2012
Location: Cape Town
Posts: 89
Thanks: 0
Thanked 15 Times in 11 Posts
|
Polishing tutorial
http://12-twentyfour.com/2014/09/23/polishing-a-car/
Hey guys. I did a polishing tutorial on the mini. This is just my way which may have its flaws but so far has worked for me. If anyone has any tips to add please let me know. thanks |
|
|
|

|
| The Following User Says Thank You to dada man For This Useful Post: |
eugene78 (10-06-2014)
|
|
|
#2 | |
|
AF Enthusiast
Join Date: Feb 2009
Location: Palm Desert, California
Posts: 610
Thanks: 108
Thanked 44 Times in 40 Posts
|
Re: Polishing tutorial
You saved my life. I never even thought of using a Dremel to polish. I bought one a few weeks ago for heavy mods, I'll have to get these soft wheels and try it out. Thanks for taking the time to make this.
|
|
|
|

|
|
|
#3 | |
|
AF Regular
Join Date: Dec 2007
Location: Atlanta, Georgia
Posts: 136
Thanks: 0
Thanked 2 Times in 2 Posts
|
Re: Polishing tutorial
Beautiful finish. A guy named Cesar Bossolani posted a youtube video a couple of years ago showing a method similar to yours. I've wanted to try this for a while but I could not find a polishing wheel that was soft enough. Where did you find your?
|
|
|
|

|
|
|
#4 | |
|
Blarg! Wort Wort Wort!
Join Date: Mar 2006
Location: Quezon City
Posts: 2,120
Thanks: 64
Thanked 101 Times in 100 Posts
|
Re: Polishing tutorial
whatever you do, if your dremel/router can be "overclocked" by giving it more voltage, resist the urge to do so, even if in just small increments (ex: stock voltage is 4.5v, you go 6v). you might get to polish things faster, but it's also easier to burn through all the paint layers (yes i managed to do so, burning through 5 2k urethane clear, 5 acrylic clear red, 3 urethane silver and 5 urethane primer layers) in short notice. ^_^
__________________
olly olly oxen free |
|
|
|

|
|
|
#5 | |
|
AF Enthusiast
Join Date: May 2006
Location: Louisville, KY, USA, Kentucky
Posts: 1,066
Thanks: 11
Thanked 18 Times in 18 Posts
|
Re: Polishing tutorial
Great write up!
I noticed you said that orange peel is caused by a change in temperature and not in a controlled environment. I tend to get a bit of orange peel but I always spray inside (I have a spray booth) and once finished, I put it into a food dehydrator to cure. Do you think it would help to cure in the ambient air and then put it into the dehydrator after a few hours? I've always been rather puzzled at this problem... Daniel |
|
|
|

|
|
|
#6 | |
|
AF Newbie
Thread starter
Join Date: Dec 2012
Location: Cape Town
Posts: 89
Thanks: 0
Thanked 15 Times in 11 Posts
|
Re: Polishing tutorial
@ racer 93.
Well one of the reasons is change in temperature. Other reasons can be the layers underneath were not 100% prepped ( i.e. primer and colour layers arent smooth) or it can also be the way the paint was sprayed or mixed. Theres lots of different reasons why it could happen. There will always be a bit of orange peel however if you put your first layer of clear down and let it cure, flat and then reclear it wil come out better. IT is a longer process but is just as effective and sometimes even bettter |
|
|
|

|
|
|
#7 | |
|
AF Newbie
Join Date: Jul 2013
Location: Newcastle NSW
Posts: 24
Thanks: 0
Thanked 5 Times in 5 Posts
|
Re: Polishing tutorial
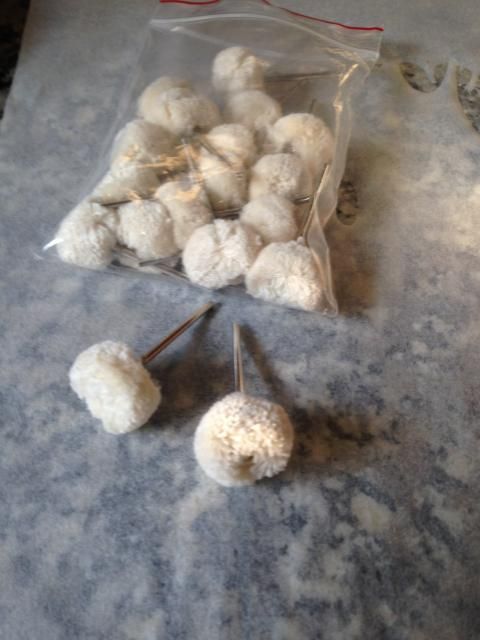
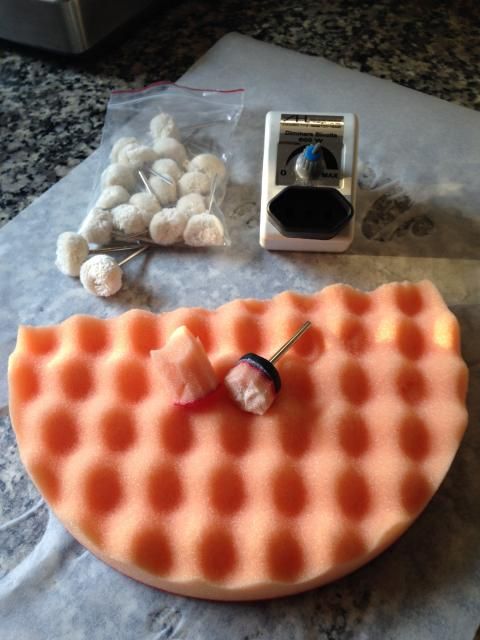
Cesar is a really good mate of mine & showed me his technique for polishing several years ago. There are certain things needed to get a great finish, using a Dremel & jewelers cotton mops. ( these can bbe foundon ebay under jewelery/ jewelers tools & can be purchased in bulk.) As for the speed of your drill, it should be used with no more than 800-1000 rpms, just like 1:1 polishers. You will need a voltage dimmer, which allows you to slow down the rpms on your drill/Dremel. I got mine from Cesar, as there is a guy in Brazil who makes them, &I couldn't source one anywhere else.
|
|
|
|

|
|
|
#8 | ||
|
AF Enthusiast
Join Date: May 2006
Location: Louisville, KY, USA, Kentucky
Posts: 1,066
Thanks: 11
Thanked 18 Times in 18 Posts
|
Re: Polishing tutorial
For the voltage dimmer, you can just use a dimmer switch set up for a normal light dimmer wall switch. I use it on mine and it works great!
Quote:
|
||
|
|

|
|
|
#9 | |
|
AF Regular
Join Date: Sep 2007
Location: Mission, Texas
Posts: 359
Thanks: 6
Thanked 21 Times in 21 Posts
|
Re: Polishing tutorial
This is a great way to polish models, but let me add some things...
You must use the jewelers mops only. There are other polishing mops made of densely packed felt. Do not use these as they will burn through the paint. They can easily be identified by their rigid shape -- disk, barrel, or bullet shaped. Try to keep as much of the stem of the jewelers mop out of the dremel tool as much as possible. The further away you keep the dremel's mandrel away from the model the less likely you are to accidently nick it with the tool. Keeping the stem out of the tool helps keep the tool away from the model. Be careful when you are using the dremel near the edges of your model. In these areas the tool will want to grab the model and the model might slip out of your hands or the tool might try to gouge the model. Care must be taken around the pillars of the windshield. |
|
|
|

|
| The Following User Says Thank You to CFarias For This Useful Post: |
eugene78 (10-06-2014)
|
|
|
#10 | ||
|
AF Newbie
Join Date: Jul 2013
Location: Newcastle NSW
Posts: 24
Thanks: 0
Thanked 5 Times in 5 Posts
|
Quote:
Here's some pics of the mops, dimmer & my miniature foam pads.   Cheers Cliff |
||
|
|

|
| The Following User Says Thank You to Cliff71 For This Useful Post: |
brysonwong (10-06-2014)
|
|
 |
POST REPLY TO THIS THREAD |
 |
|
|