|
|
|

|
|
| Search | Car Forums | Gallery | Articles | Helper | AF 350Z | IgorSushko.com | Corporate |
|
| Latest | 0 Rplys |
|
|||||||
| WIP - Motorbikes Post topics for any "Works In Progress" motobikes projects in this sub-forum. |
 |
 Show Printable Version | Show Printable Version |  Email this Page | Email this Page |  Subscribe to this Thread
|
|
|
Thread Tools |
 03-02-2010, 01:36 PM
|
#1 | |
|
AF Newbie
 Join Date: May 2007
Location: Eastleigh
Posts: 15
Thanks: 0
Thanked 0 Times in 0 Posts
|
Ducati 1/12 "macchiato" 916 Scratchbuild (70%)
Hi Thought id put up a Wip i started a while ago...And have just gone back too.....
 Hi all, Well I finally made a start. No sketch. (for some reason I've lost the ability to draw ) Not ot worry it's all in my head. (the design i mean ! ) The design I've chosen to do is what I'm calling the Macciato ( cafe racer.) It's based around the Ducati 916 engine. I've taken the engine (and possibly the Wheels ) from the ducati 916 Street bike kit by Tamiya. Almost all of the rest will be scratch built I was going to scratch build the engine, but decided that if I use the kit part's I may get the chance to build 2 bikes. (depending on the time I have.) Anyway the bike will have a tubular chassis. (Spondon/Seely style) Telelever front and single sided swing arm. (as used by BMW at times) Rim brakes front and rear. All inspired by MVDK. Below I have listed the pictures of the work done so far. I've dry built most of the engine part's. This was so I could work on getting the exhaust's to take the route I wanted. It will also help when building the chassis. The exhaust has taken about 15 bends and twists in it. The rear section will not be so steep, and will continue until the trumpet exits from under the seat unit. Ive posted pictures of the work done so far below.  1 Left of engine 2 Front of engine 3 Right of engine 4 Rear of engine Hope to get some work done to the engine this week, chassis brackets, shock bracket, reworking the carburettors, and hopefully start the chassis. Oh well till next time Keep up the good work on your builds. Cheers Martin Hello Again, Well ive managed to get some more work done on the bike. The first thing i did was to cut off the upper and lower engine brackets. And blanked off the area removed when removing the lower bracket. In the pictures below, You will see ive added a chassis bracket 1 (a) to the front (Bottom) of the engine. Ive also added one continuos support to the rear of the engine 2 (b). I have made a bracket below the engine for the rear shock 3. not pictured but will go here (c) Ive still to slightly relocate the carburettors.  As You can see ive also been putting some work into the Chassis. As i sayed before no drawings just eyes and a few measurements. So far so good. The first two pictures show the upper and main rails about 80% complete. The third picture is the off what i call the Mid frame rails again about 80% complete, they are pictured with the other components, yet to be fitted.    Well thats it for this week, brackets and additional rails to make and fit for the chassis. I also intend to get the swing arm done as well. Oh and possibly the front and rear shock by next time. (I hope) Still cant make my mind up about the wheels ?........Plenty of time to worry about that. Thanks for looking..... Cheers Martin Hi Well that was quite a productive week, even if it doesn't look like it. The first thing i did was to remove the original engine bracket from the centre of the engine. patched the hole that was left, then readied it for the new carburettor layout i've got planned for the bike. Sorry forgot to take a picture of it, but i've put one below to show where on the engine Im taking about. (Picture 7)  The second task was to put together the pieces for the Mid Frame Rails, Pictured below are the before and after pictures (picture 8) as you will see i replaced 2 of the parts as I felt they were to big. (8a) Oh and added a gusset to the front (8b)  Well thats it for today will more at the weekend. cheers Martin Last edited by silversyrup; 03-02-2010 at 03:30 PM. |
|

|

|
|
03-07-2010, 02:00 PM
|
#2 | |
|
AF Newbie
Join Date: May 2007
Location: Eastleigh
Posts: 15
Thanks: 0
Thanked 0 Times in 0 Posts
|
Re: Ducati 1/12 "macchiato" 916 Scratchbuild (70%)
Then it was on to the Main chassis. You will see that i added the brackets for the Mid (9B)and Lower(9C) Tubes.
I also added 2 other tubes running from the Main (9B) to the Upper(9A). At the front of the Upper rails (9A), I have added the front shock absorber brackets.(9D) Distances, Angles and more Angles ...... If i wanted to be a Mathematician id have tried harder at school....I'm loving it really !!!  The last item i managed to get done this week is the Swinging arm Picture 10. Getting the exact distance between the engine drive train location, to the centre spindal of the rear wheel was a real challenge. Taking in the angle and distance. 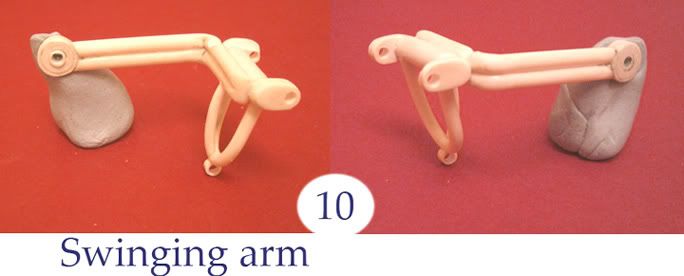 A couple of pictures with the Chassis parts dry fitted together. 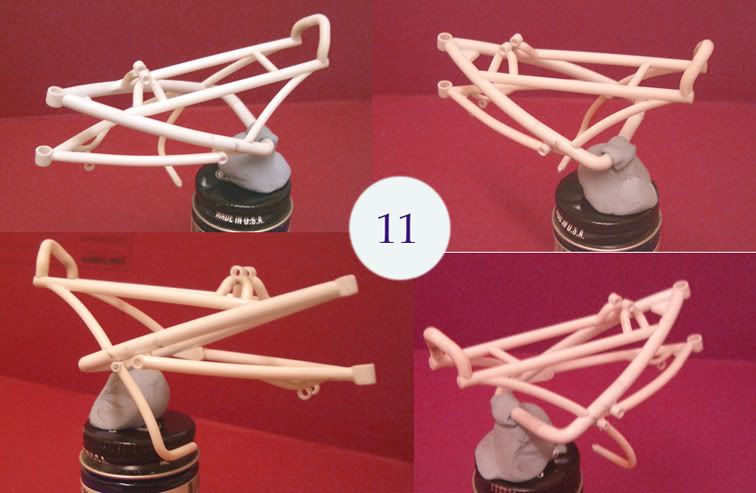 That's it for this week...Had hoped to get the shock absorbers done as well....Think I've done enough for this week....Thanks to the following for soothing my ears this week John Martyn, John Mayer, Donald Fagen Rus Turner (My Brother) and Rush. Until next time.... Cheers Martin |
|
|
|
|
|
03-07-2010, 06:33 PM
|
#3 | |
|
AF Enthusiast

Join Date: Jul 2005
Location: London
Posts: 899
Thanks: 3
Thanked 11 Times in 10 Posts
|
Re: Ducati 1/12 "macchiato" 916 Scratchbuild (70%)
Great looking project Martin - has shades of the old MH900E, which is fine by me! I have no idea how you can do this without drawing it first! I never cut plastic until I have it all drawn up and then it still goes wrong!
Nice shout for John Martyn too...I've only just discovered him myself (via Faithless) but sadly, too late to ever get the opportunity to see him live. Recently found out that a colleague of mine toured with him back in the late 60s/early 70s! |
|
|
|
|
|
03-08-2010, 03:43 PM
|
#4 | |
|
AF Newbie
Join Date: May 2007
Location: Eastleigh
Posts: 15
Thanks: 0
Thanked 0 Times in 0 Posts
|
Re: Ducati 1/12 "macchiato" 916 Scratchbuild (70%)
Hi cinqster,
Thanks for the kind words...Believe it or not i have about 70 sketch books. That i have collected on my travels. From florence to san Diago, I've colleted them with every intention of sketching in them. Up to now i have done 2 sketches in one !. I see something and can re-produce it in 3d. I have real problems trying to just draw something. I think its about time i sat and sketched for 5 mins a day to see if i can improve my sketching. The build is alot further along than the posts show. to give you an idea i took Pic 36 yesterday...I'm listing it slowly. Partly due to having serious eye problems. John Martyn....I love most of his stuff .....Hung up and Over the Rainbow are my favs. My brother (a record producer) introduced me to his music. I dont think he has toured since he lost his legs. Cheers Martin Last edited by silversyrup; 03-09-2010 at 03:09 AM. |
|
|
|
|
|
03-11-2010, 05:41 PM
|
#5 | |
|
AF Newbie
Join Date: May 2007
Location: Eastleigh
Posts: 15
Thanks: 0
Thanked 0 Times in 0 Posts
|
Re: Ducati 1/12 "macchiato" 916 Scratchbuild (70%)
Hi Managed to get the Front and Rear Shocks made, in the picture 12 below you will see that the Front Shock parts have been dry fitted together. And the Rear Shock is still mainly in its component parts. Just the usual cleanup to be done. Oh and a hole to be drilled at one end of the Shock centre.  Pictured Below you will see that i have made and built the Front Forks 13, These are virtually finished only a couple of brackets to add. Cleanup, then primer. The items alongside are the Front end are pip (Top piece) that will go under the top Yoke at the front of the main tubes. The bar with the rounded end (Bottom piece) will go inside the Yoke at the front end of the Mid Tubes (Picture 8) connecting the Mid tubes to the lower part of the Front forks.  Oh yeah, I had someone email me some interesting questions ? Do i ever get modellers block, How do i stay motivated/focused, especially when things are not going as well as id like. And could i put a few tips forward. well im not exactly Mr Wingrove..........and im sure that everybody has their own way to deal with focus and motivation....but as i was asked... Motivation. * I Build something i really want to build. * Doing it the best i can, be my own harshest critic. * I join in on sites like this, you get nice comments, and you feel honour bound to do your best. * I Look at other peoples work, enjoy it and let it drive me. Focus. ( stops modellers block.) * Music that makes me feel good. * Leave my project in view, keep it in mind. * Always have something i love to look at in view when modeling. takes my mind of my build for a few seconds, when i see it. Clears my head. Well thats just me, and the way i do things. Oh i also sit down after the build and document each stage of my build, in words and sketches. ( this is for a project im working on.) Oh the item i have on display at my modelling station (standing in my kitchen for hours) at the moment is pictured below 14. It's Timo Scheider's Audi A4 .  This weeks soundtrack: Icehouse, Grace Jones, Lloyd Cole and Properganda. Cheers Martin Last edited by silversyrup; 03-14-2010 at 11:56 AM. |
|
|
|
|
|
03-16-2010, 07:53 PM
|
#6 | |
|
AF Enthusiast
Join Date: Oct 2008
Location: Austin, Texas
Posts: 748
Thanks: 13
Thanked 25 Times in 21 Posts
|
Re: Ducati 1/12 "macchiato" 916 Scratchbuild (70%)
Great build and an impressive document you're putting together here as well. I love the 916 series and it's fun watching your version come together. Keep up the great scratch work. I'll be watching!
__________________

|
|
|
|
|
|
03-18-2010, 03:43 PM
|
#7 | |
|
AF Newbie
Join Date: May 2007
Location: Eastleigh
Posts: 15
Thanks: 0
Thanked 0 Times in 0 Posts
|
Re: Ducati 1/12 "macchiato" 916 Scratchbuild (70%)
Hi Cratecruncher, Thanks for the kind words....I try to be informative....Hope its of help to someone....
Cheers Martin I had quite a productive week this week. Dry fitted what id built so far to check what id have to adjust. And the list wasnt to bad. Shorten front Shock absorber...... Done (not pictured) Change the shock mounting bracket (slightly to long) on the swinging arm, and the bracket itself. (wasnt happy with it..didnt feel it would be strong enough).......Done (not pictured) Hated the way the line of the exhaust went, as it passed the rear cylinder and went up under the rear of the chassis......It now runs in the same arc as the frame tubes that run from the main rails to the upper rails. Cant believe i didnt think about that when i built it in the first place. The new route for the exhaust is marked in white on the Picture below. m15  I also made the clip-ons, Handlebar grips and hand controls. pictured below m16  Below you will see a picture m17 of the 1 into 2 end cans for the exhaust. Although its not clear in the picture they look really aggressive, and that's what i was hopeing to achieve. They have a coat of silver on them so i can see where they need some work done to them.  Lastly this week i managed to get the Front and Rear Rim discs brakes done. I was dreading making these, not to worry now. Just the 16 brackets to get them on to the wheels to make now and they will be ready. Pictured below m18  Well i guess its those brackets for Me now, and then onto the Calipers and bracketry to attach them to the front forks and swinging arm. Have a good week. Cheers Martin Thanks to Miles Davis, Al Jarreau and Boz Scaggs. Oh a picture i took during the Dry fit. m19  Till next time . |
|
|
|
|
|
03-19-2010, 03:58 PM
|
#8 | |
|
AF Regular

Join Date: Aug 2007
Location: MEXICO
Posts: 267
Thanks: 0
Thanked 0 Times in 0 Posts
|
Re: Ducati 1/12 "macchiato" 916 Scratchbuild (70%)
Come ooooooon! finish the model!!!!!!, As a Ducati fan I cant wait to this this master work finished!!!!!!
__________________
Yes, It causes dependency... VISIT: www.alexgaroli.webs.com FACEBOOK: ALEX GAROLI |
|
|
|
|
|
03-21-2010, 12:19 PM
|
#9 | |
|
AF Newbie
Join Date: May 2007
Location: Eastleigh
Posts: 15
Thanks: 0
Thanked 0 Times in 0 Posts
|
Re: Ducati 1/12 "macchiato" 916 Scratchbuild (70%)
Hi Thanks Alex.
I know you love your Ducati's.....Hope i do it justice. Cheers Martin Pictured (20) below are the Brake Calipers and brackets attached to the Forks and Swingarm.  The Picture below (21) shows the Front Headlight componants on the left. A time consuming job was manufacturing the Lenses. You will see the frosted end to the rod .(bottom left of 21) This is what the pieces above that looked like, before running through 400, 800, 1200, 1500, 2400, 3200, 4000 6000, 8000 and finally 12000 sand paper/cloth. They do end up nice and shinny after though. The right hand side of the picture 21, shows the componants for the front and rear lights.  Doesnt seem much this week, but i also primed the Chassis, Forks and Swingarm to check for defects. I'm hoping to get the lights finnished this week, and i would like to get the exhaust system painted and detailed. Oh and the wheels to the same stage. Until next, be good. Thanks to the Average White Band and The Cars for the music. Tip Tube/Rod bending and twisting. This is primarily amed at Philip, who asked the question. It's not really easy to discribe, and everybody has their own way. But here's mine. When using rod of any diameter, i generally use the same technic. If the rod Im bending has only 1 bend required. I put some boiling water in a mug. Put the tube in the water, and let it sit for a couple of minutes. Then remove the rod and bend it gently between my fingers, I have to be gentle, making sure that Im relaxed (thats important, as it gives you soft hands. As they say in baseball). I generally use this method for any bends that arent very tight. ie anything under 90 degrees. If the bend required is tighter, i use a cigarette lighter, making sure that the lighter is at least 3" - 75mm away from the piece Im working on. I also roll they piece between my thumb and forefinger as i heat it. Always making sure Im working along the entire length of the bend that i require. Never holding the lighter in one spot. One of the best ways of making sure Im doing it right is to mark the piece with a pencil. I mark it at each end of the section Im working on(all tha way round), and along the length of area Im working on. So i can see as i twist the piece that Im heating it equally. If I require 2 pieces to be the same. (ie frame rails) Once i have finished the 1st piece. I will put it on a piece of paper, and draw a line either side of the piece so i have an excellent referance for the next. I also eye the 2nd piece against the 1st. Twisting is using the same method as above but holding the rod firmly (not to firmly, remember its warm and your fingers can leave an impression.) This however is something I mostly have to do by eye. Bends 1st against the paper for referance, Twists by eye against the 1st piece. Its very rare to have to bend and twist 2 rods the same. As for tubing, You can get tube bending spings (from Hiroboy i think ?). Ive never used them personally. I generally use the same method as ive described above for rod. Except that i may puta rod insinde the tube im bending, or if its a really large tube, i will fill the tube with crushed salt, and seal it at both ends (salt doesnt conduct heat !!) Anyway i hope that my explanation isunderstanable, and is of help. PLEASE BE CARFULL WITH HOT WATER AND NAKED FLAMES, AND IF YOUR YOUNG PLEASE ASK AN ADULT FOR SUPERVISION...........BE SAFE As you will see i've finished the Front/Rear Shock absorbers. (Picture 22) They are shown in the picture about twise the real size. 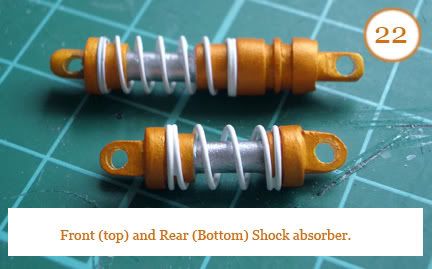 Balsa Fuel tank ? Yeah i decieded to have a go at sculpting the Fuel Tank out of wood. It's the first time i've ever sculpted anything in wood. (I was the useless idiot,You used to have in Your woodwork class) Anyway it was suprisingly easy. I used 3M Sandblaster p180 sandpaper to get the shape. leaving it about 1mm shy of my planned dimensions, then dry sanded with 800 wet/dry to get closer, and lastly dry sanded it with 1200 wet/dry. (all wet/dry paper by halfords, car paper) The picture below shows the sanded piece. (Picture 23) The whole process took around 45 mins. 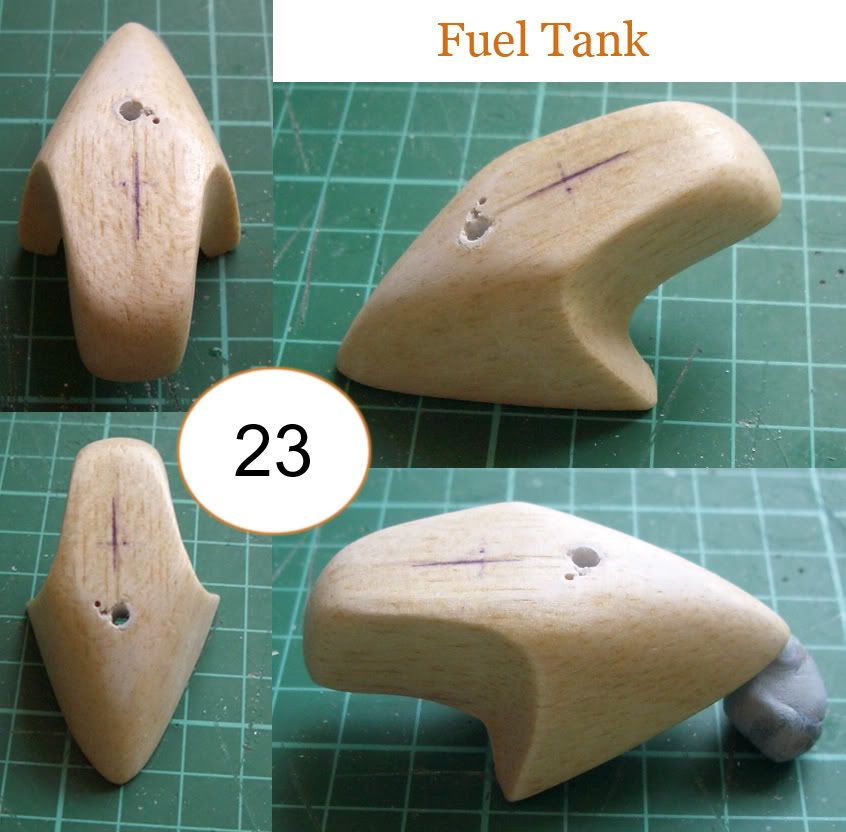 The picture below (Picture 24) shows most of the stages from bare wood to a nearly finished piece in white Fine surface primer. A + B Show the Tank having had 2 coats of sanding sealer, (to seal wood for paint). And having also had several Heavy coats of Filler primer. ( big mistake) The areas that are back to the wood. Are where i changed the contours a little. Had i used common scense i would have laid 1 mist coat of filler primer, made my adjustments. Then added a couple of light coats every couple of hours to build it up slowly, and more importantly, let it gas out. But i didnt and i paid the price. after spending hours sanding back adding more filler primer, only to have holes appear everywhere. (caused by trapped gas) My own fault, strange but as i was doing it i knew i should'nt go to heavy, but i did %£^>?!!(($&£"@?~#. I think that what i called myself anyway. C is after i'd taken the decision to cover the entire top surface in Plasto model filler. And it di the trick. It sanded out well, working wet (lightly) with 1200 wet/dry. D shows the Tank after having a couple of coats of White fine surface primer. Sanded lightly with 3200 sanding pad.(used wet) Cant finish it yet as Im out of fine primer. OH by the way, the hole in the top is so i can ad a scoop to send air directly to the carbs.  Well hopfully i wont make the same mistakes with the seat unit, which i should have progress shots of next time. I also hope to have the complete engine and exhaust system ready by then. As well as the wheels with their rim discs. This weeks music was supplied by : John Farnham, Quincy Jones, Icehouse and Lamke. Until the next time, have fun. Cheers Martin |
|
|
|
|
|
03-24-2010, 08:44 AM
|
#10 | |
|
AF Newbie
Join Date: Feb 2009
Location: Cordoba
Posts: 75
Thanks: 0
Thanked 0 Times in 0 Posts
|
Re: Ducati 1/12 "macchiato" 916 Scratchbuild (70%)
I´m in love. As a fan of classic, cafe racers and italian bikes, I´m waiting anxious for new progress. Of course RED (or yellow...?). I have something seemed in head but perhaps with old engine.
I rated 5. |
|
|
|
|
|
03-27-2010, 03:56 PM
|
#11 | |
|
AF Newbie
Join Date: May 2007
Location: Eastleigh
Posts: 15
Thanks: 0
Thanked 0 Times in 0 Posts
|
Re: Ducati 1/12 "macchiato" 916 Scratchbuild (70%)
Hi DOCQUINO,
Thanks for the kind words....And the 5 stars, i wondered how they got there......I hope you wont be dissapointed that it isnt going to be Red or Yellow......I feel that Ducati using Red, Yellow and Black. Is just copying Ferrari. And the Yellow rarely works for ferrai either. Just my opinion. Still hope you will like it when its finished. Cheers Martin Hi Thanks for the encouragement. Well thet weather hasnt been kind.. Didnt get what i wanted done, mainly the painting. I did however manage to get the scoop, and fuel filler recess done to the Fuel tank. Picture 25 Both of these, should really have been done much earlier in the process. A - After fitting the scoop, and making the recess for the fuel filler. B - Couple of coats of Fine filler primer later, just couple of more coats and its ready for paint. At least i can still get parts prept for paint in this weather. 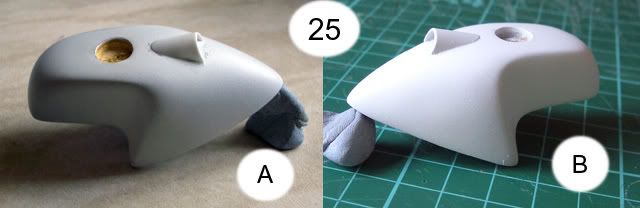 Pictured below are progress pictures of the seat unit. Picture 26 A - the 1st step of the scuplt. B - the underneath, showing the channels for the frame rails. C - a little more sculpting. D - a differant angle of C. E - the sculpting is finished, the Seat unit has been sealed with sanding sealer, and have had a couple of coats of filler primer. a couple of minor areas have been straighten out at this stage. F - another view of E. G- Plasto filler was brushed over the Seat unit, and sanded back, another thin coat of Plasto was added after this picture, and sanded back again to get a smooth hardned exterior. H - A couple of coats of fine surface primer later. A couple more and its ready for paint. 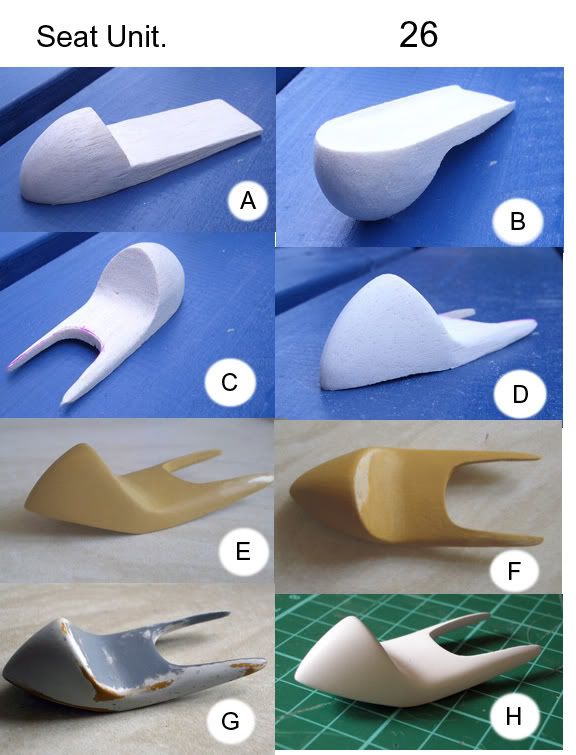 It doesnt look very promising, as far as getting some paint on the bike . The weather looks cold and damp all week. Still ive got some other bits to get on with. The music this week....Yes, Lighthouse family, George Benson and Def Leppard. Anyway until next time. Enjoy your builds. Cheers Martin |
|
|
|
|
|
03-27-2010, 06:21 PM
|
#12 | |
|
AF Enthusiast
Join Date: Sep 2005
Location: Greenville, Illinois
Posts: 540
Thanks: 1
Thanked 1 Time in 1 Post
|
Re: Ducati 1/12 "macchiato" 916 Scratchbuild (70%)
I am enjoying your step by step process! I am sure that this going to end up as a very cool bike!
Do you have a picture of the bike you are trying to duplicate? Mark |
|
|
|
|
|
03-28-2010, 12:33 AM
|
#13 | |
|
AF Regular
Join Date: Aug 2007
Location: MEXICO
Posts: 267
Thanks: 0
Thanked 0 Times in 0 Posts
|
Re: Ducati 1/12 "macchiato" 916 Scratchbuild (70%)
yeah that would be good: a sketch or something you got inspired from.
__________________
Yes, It causes dependency... VISIT: www.alexgaroli.webs.com FACEBOOK: ALEX GAROLI |
|
|
|
|
|
03-28-2010, 09:09 AM
|
#14 | |
|
AF Newbie
Join Date: May 2007
Location: Eastleigh
Posts: 15
Thanks: 0
Thanked 0 Times in 0 Posts
|
Re: Ducati 1/12 "macchiato" 916 Scratchbuild (70%)
Hi Twowheelsrule......Thanks for interest. I have posted a picture of the origanal bike below.....But I must say im not tying to replicate it...I just feel in love with the Chassis.
Hi Alex....A sketch.....if only I could....I see something and can replicate it.....But cant sketch to save my life.......I have started to do a 5 min sketch a day to try and improve that side of things though. Cheers Martin Hi thanks for the interest. The bike I used for the inspiration was designed by Mark van der Kwaak. It was the Chassis that I liked....Ididnt want to use a Harley engine due to my first Scratch build having a S &S Harley engine (which along with the rest of the bike. Was Scratch built. The only thing I didnt Scratch build were the tyres) I also wanted a more modern look to the whole thing.....So I took the Chassis/Forks and changed the rest. My build is a lot further along than the photos show, Im posting it slowly, due to having serious eye problems. Ohterwise anybody interested in the build would be waiting weeks between each update. 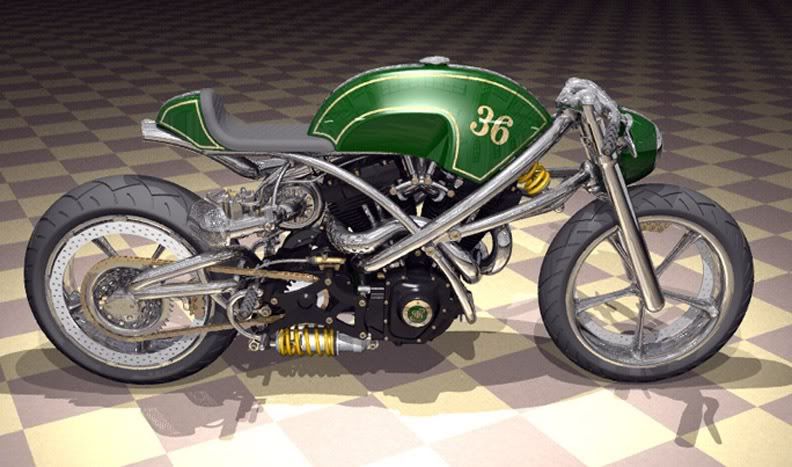 The picture below is of that first bike I Scratch bult.  I may post this build, as there is a lot of information within the WIP that people might find interesting. We will see. And my next project might be one of these.....If I can get enough referance. 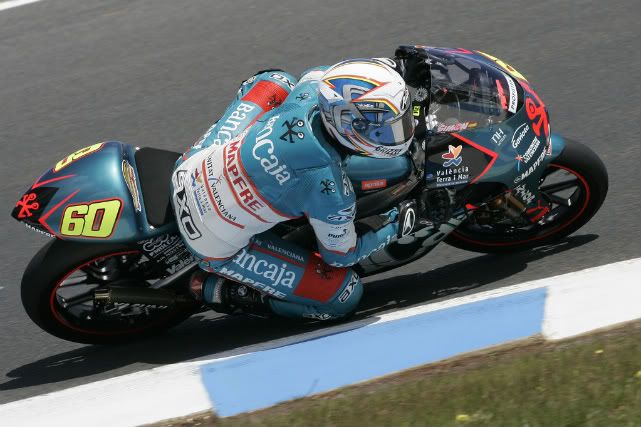 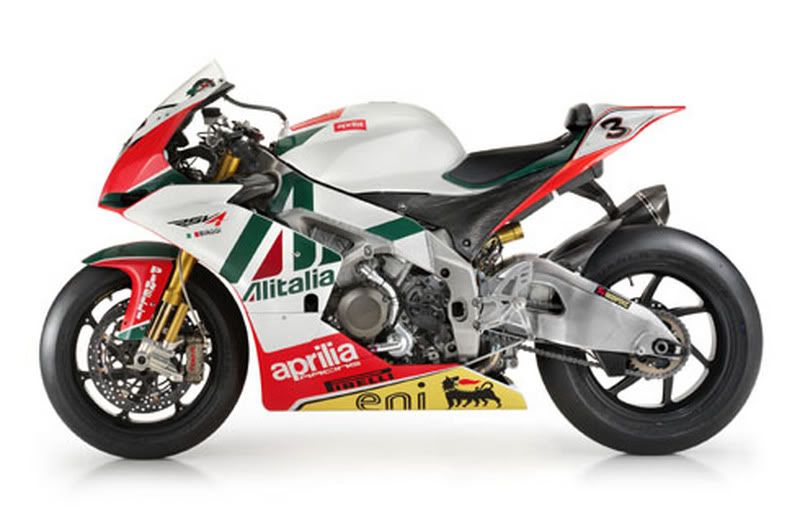 Until the next update....Cheers MartinCheers Martin |
|
|
|
|
|
03-28-2010, 12:15 PM
|
#15 | |
|
AF Enthusiast
Join Date: Jul 2005
Location: London
Posts: 899
Thanks: 3
Thanked 11 Times in 10 Posts
|
Re: Ducati 1/12 "macchiato" 916 Scratchbuild (70%)
The build is looking brilliant Martin!
Forgot it was you that did that Jesse Rooke Rockstar...fell in love with that beastie as he built it on Discovery. Been very keen to assemble his bike kits ever since then...don't fancy importing his 1/1 kits, do you?!!!  The Aprilia would make a nice project too. It's a breath of fresh air seeing the Alitalia logo out on the tarmac again - was stuck in Italy last year when they nearly went down the pan!  |
|
|
|
|
|
|
POST REPLY TO THIS THREAD |
 |
|
|


