|
|
|

|
|
| Search | Car Forums | Gallery | Articles | Helper | AF 350Z | IgorSushko.com | Corporate |
|
| Latest | 0 Rplys |
|
|||||||
| WIP - Motorsports Post topics for any "Work In Process" motorsports vehicles in this sub-forum. |
 |
 Show Printable Version | Show Printable Version |  Email this Page | Email this Page |  Subscribe to this Thread
|
|
|
Thread Tools |
 08-27-2012, 03:56 PM
|
#106 | |
|
AF Enthusiast
Join Date: Sep 2011
Location: Redwood City, California
Posts: 651
Thanks: 0
Thanked 39 Times in 39 Posts
|
Re: 1/8 Porsche 935/78 'Moby Dick'
Looking forward to seeing how those parts come out!
ianc |
|

|

|
|
08-27-2012, 05:10 PM
|
#107 | |
|
AF Newbie

Join Date: Jul 2005
Location: Antwerpen
Posts: 44
Thanks: 8
Thanked 0 Times in 0 Posts
|
Re: 1/8 Porsche 935/78 'Moby Dick'
Hello SB,
Maybe I understood this wrong, then this should be considered as not said : " Then, the shell should really have a moulded edge added, so I'll have to work out a practical way to do that - probably a combination of cardboard and filler." Instead of the combination of cardboard and filler, wouldn't it be easier to use a piece of wire to form this edge ? I'm thinking of electrical- or soldering wire here. Again I'm sorry if I misunderstood this. Keep up the nice work. I'll keep on following your progress. Mark
__________________
There will always be the need for speed. |
|
|
|
|
|
08-27-2012, 06:58 PM
|
#108 | |
|
AF Newbie

Join Date: Apr 2012
Location: michigan
Posts: 70
Thanks: 0
Thanked 2 Times in 2 Posts
|
Re: 1/8 Porsche 935/78 'Moby Dick'
This is just amazing man, all of your porsche builds are just perfect!! suprised porsche hasn't tried to buy your builds......
|
|
|
|
|
|
08-28-2012, 01:57 PM
|
#109 | |
|
AF Enthusiast
Thread starter
Join Date: Nov 2008
Location: Norwich
Posts: 649
Thanks: 21
Thanked 111 Times in 87 Posts
|
Re: 1/8 Porsche 935/78 'Moby Dick'
Hi Shovel - no problem: what I meant was, I want to add a curved edge to the seat moulding - not to add one afterwards. On the 908 I added thickness to the seat edges afterwards with a layer of styrene strip - once the seat was covered with cloth, it didn't matter that it wasn't a rounded edge. Attaching a length of wire would do a similar job, I agree.
However, for the 935 I want to get this edge included as part of the basic seat shape - so I need to add a small curved return to the foam block. It means more work - and I have to be sure the shape is right - but I think the moulded part will be better as a result. ...Actually, I'll make a start on this tonight! It will become clear once I post some more photos later in the week. Thanks Hippie2 - I'm enjoying your 935 project as well. No - I haven't had any enquiries about the 908...but I wasn't really expecting any! I do my modelling for my own enjoyment - and you guys here can see what I do, and my colleagues at work, but that's about it. So far there has been no financial motivation! SB |
|
|
|
|
| The Following User Says Thank You to ScratchBuilt For This Useful Post: |
Shovel (08-28-2012)
|
|
09-09-2012, 03:24 PM
|
#110 | |
|
AF Enthusiast
Thread starter
Join Date: Nov 2008
Location: Norwich
Posts: 649
Thanks: 21
Thanked 111 Times in 87 Posts
|
Re: 1/8 Porsche 935/78 'Moby Dick'
Hello again!
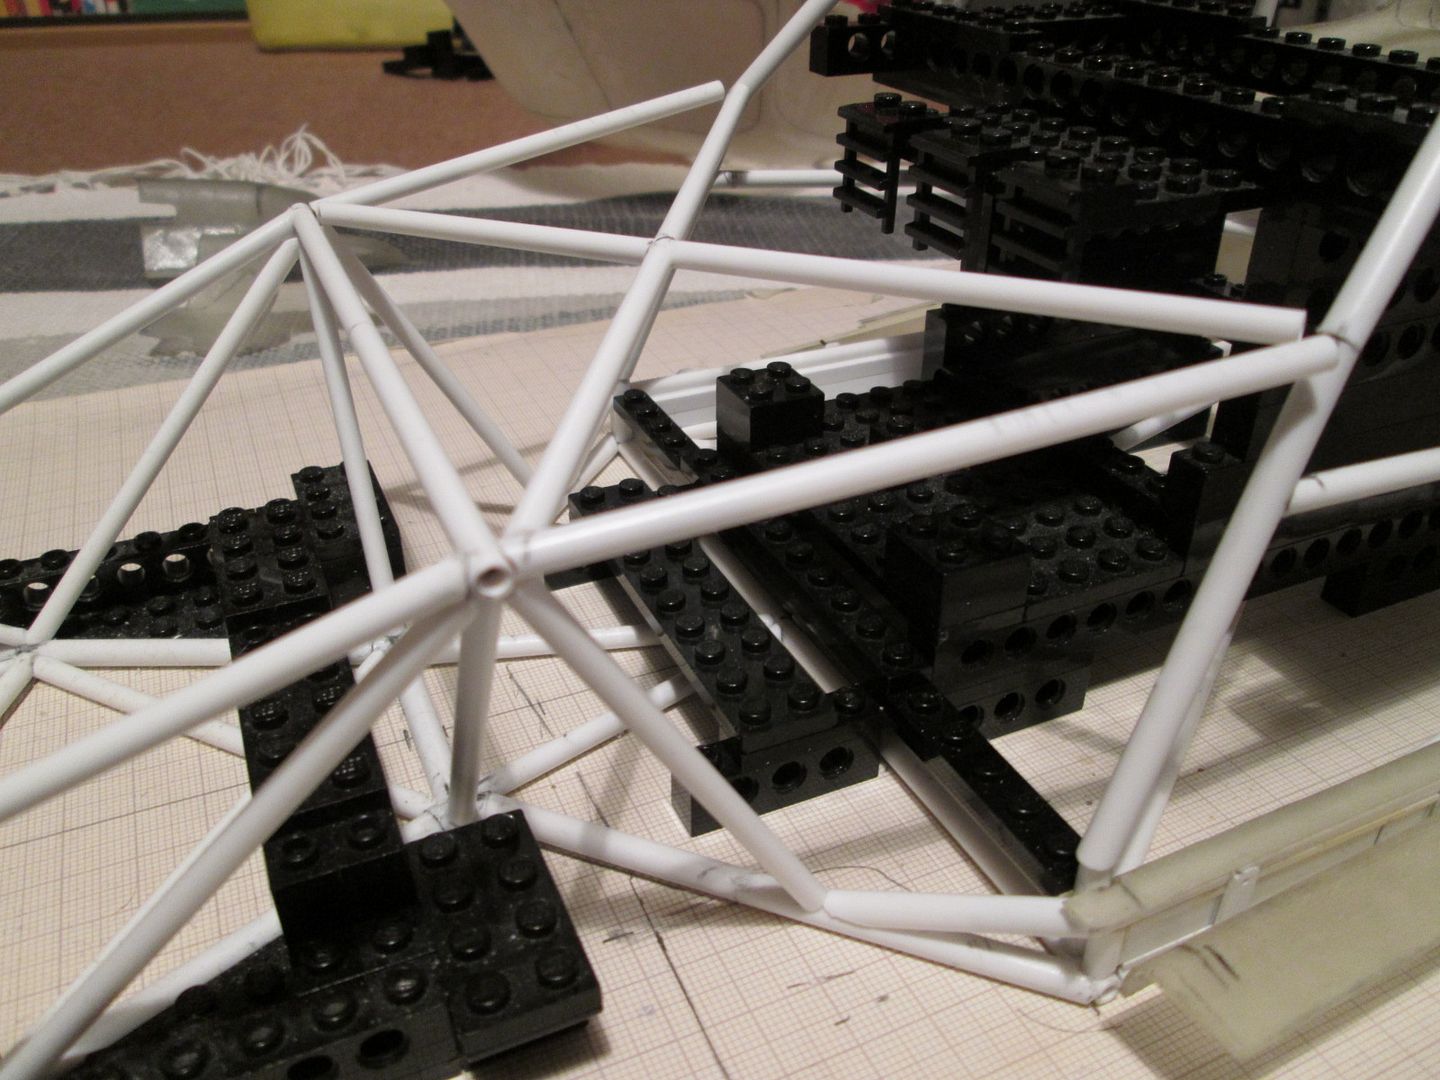
It's been a couple of weeks, and things haven't gone quite to plan, but I'm finally starting to make progress again. It feels like I've spent most of the summer going nowhere fast, but I think it's just the different nature of this project - fibreglassing is not a quick process! The seat has been put on-hold for a while; I spent a couple of evenings trying different ways of creating a lip around the edge of the mould, but wasn't convinced I'd got it right. Then I dismantled the jig so I could try the seat in place...and found it was too wide! Okay, not a problem - before I waste any more time trying to add the lip I'll make a seat, then cut-and-shut it to suit the chassis. Or I'll just make another seat mould... So, returning to the parts I'd laid-up a while back, here's the front inner wing panels after being removed from the moulds and given a quick trim: 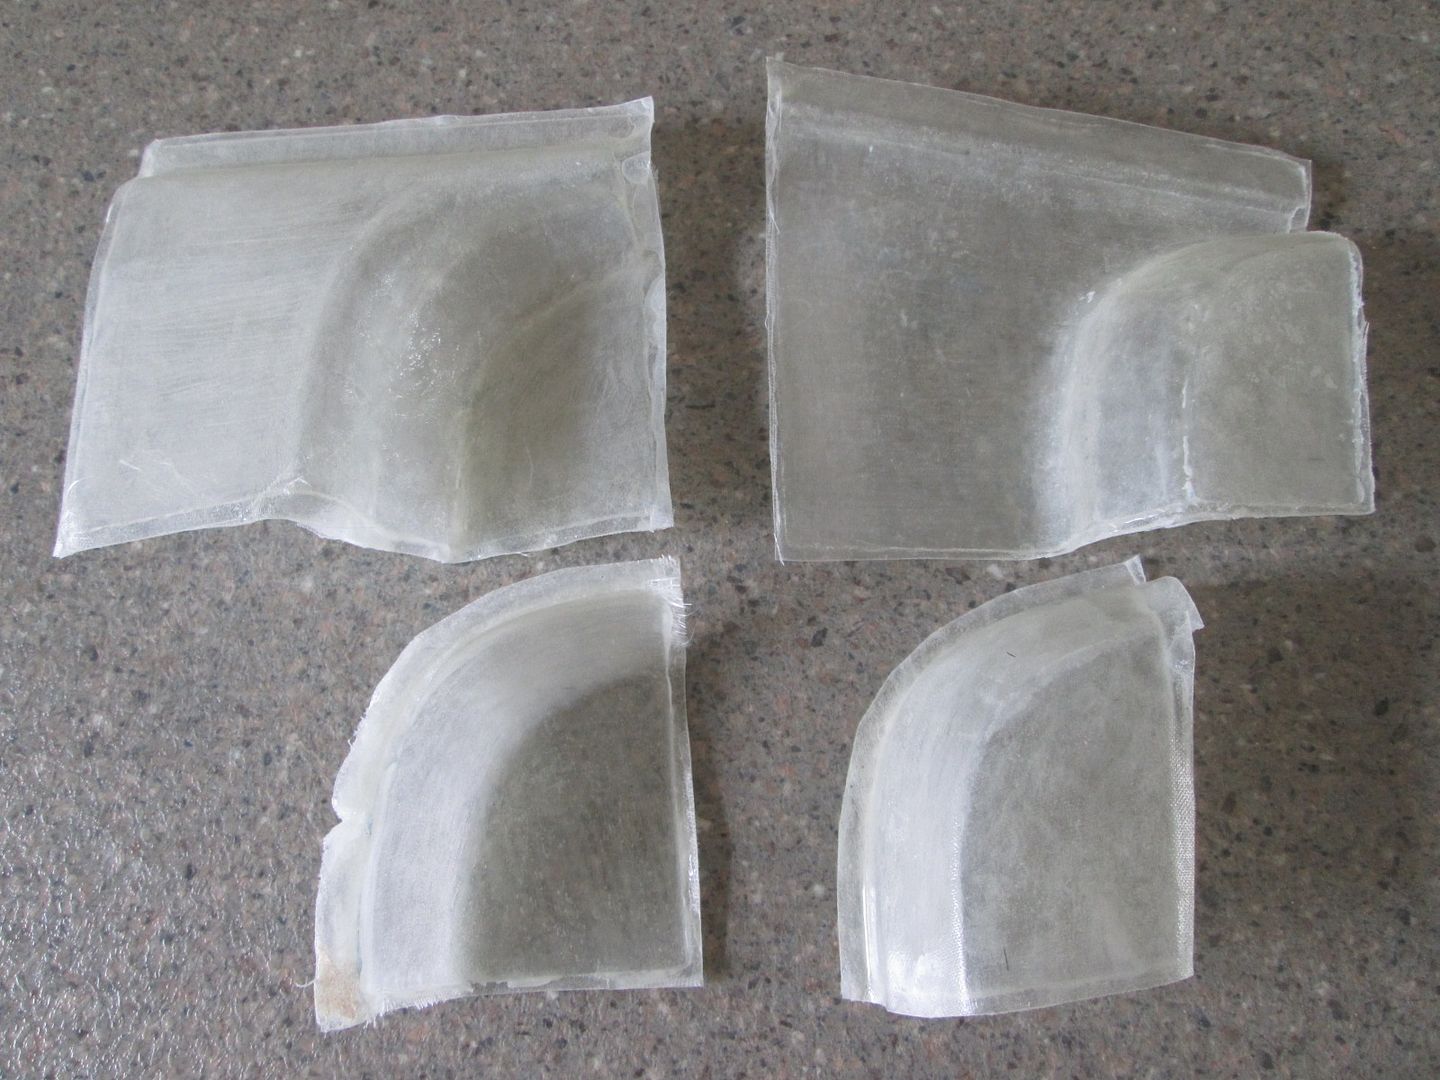 ...and here's the two smaller panels to be added to the rear of the door frames:  I've not taken these two any further just yet - my attention has been focussed on the front wings and bulkhead. I'll probably get back to them in a week or two. The first step was to start trimming the inner wing panels to shape, and fitting them around the lower chassis tubes - so plenty of cutting, snipping and filing. Here's a first fit: 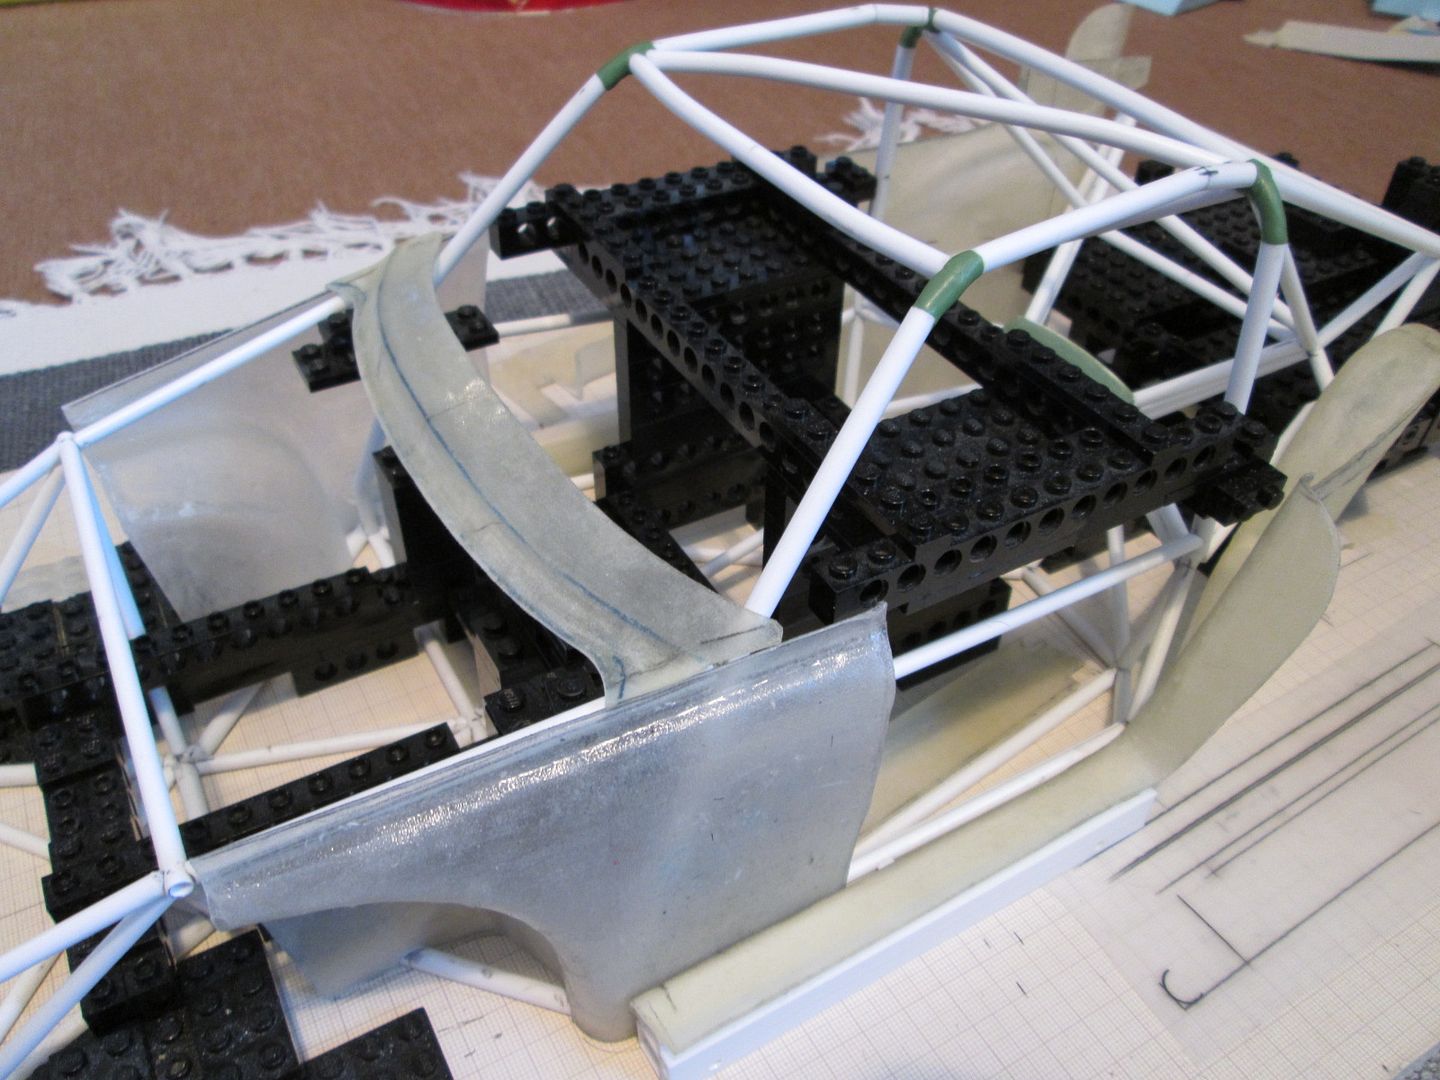  Each time the wings were trimmed closer to their final shape I had to make adjustments, check the positioning, etc, so it's not a quick job. The two small 'ears' on the front of the top-section (for locating it on the jig) were starting to get in the way, so they were eventually removed. I've just realised that I don't think I've shown the mk2 bulkhead moulding so far - well, it's here! Again, it's been trimmed down and fettled to fit into place - around the floor, and the main upper roll-cage tubes. The tricky part has been the fit between the outer edges of the bulkhead and the inner face of the front wings - it's a little gappy in places, but nothing that can't be patched later and filled. Once the fuel tank, oil tank, etc are in position, most of the bulkhead will be hidden from view.   Dropping the bonnet in place doesn't achieve anything, but it helps me to feel that the build is possible! One of the problems in putting this front end together is that there aren't too many fixed points to work with - I've deliberately left the chassis frame incomplete to make it easier to add the bulkhead, etc, but at the same time this makes it harder to line-up the wing panels. So, this afternoon I've been working on putting together the small chassis section which will connect the main roll-cage to the front suspension bulkhead: 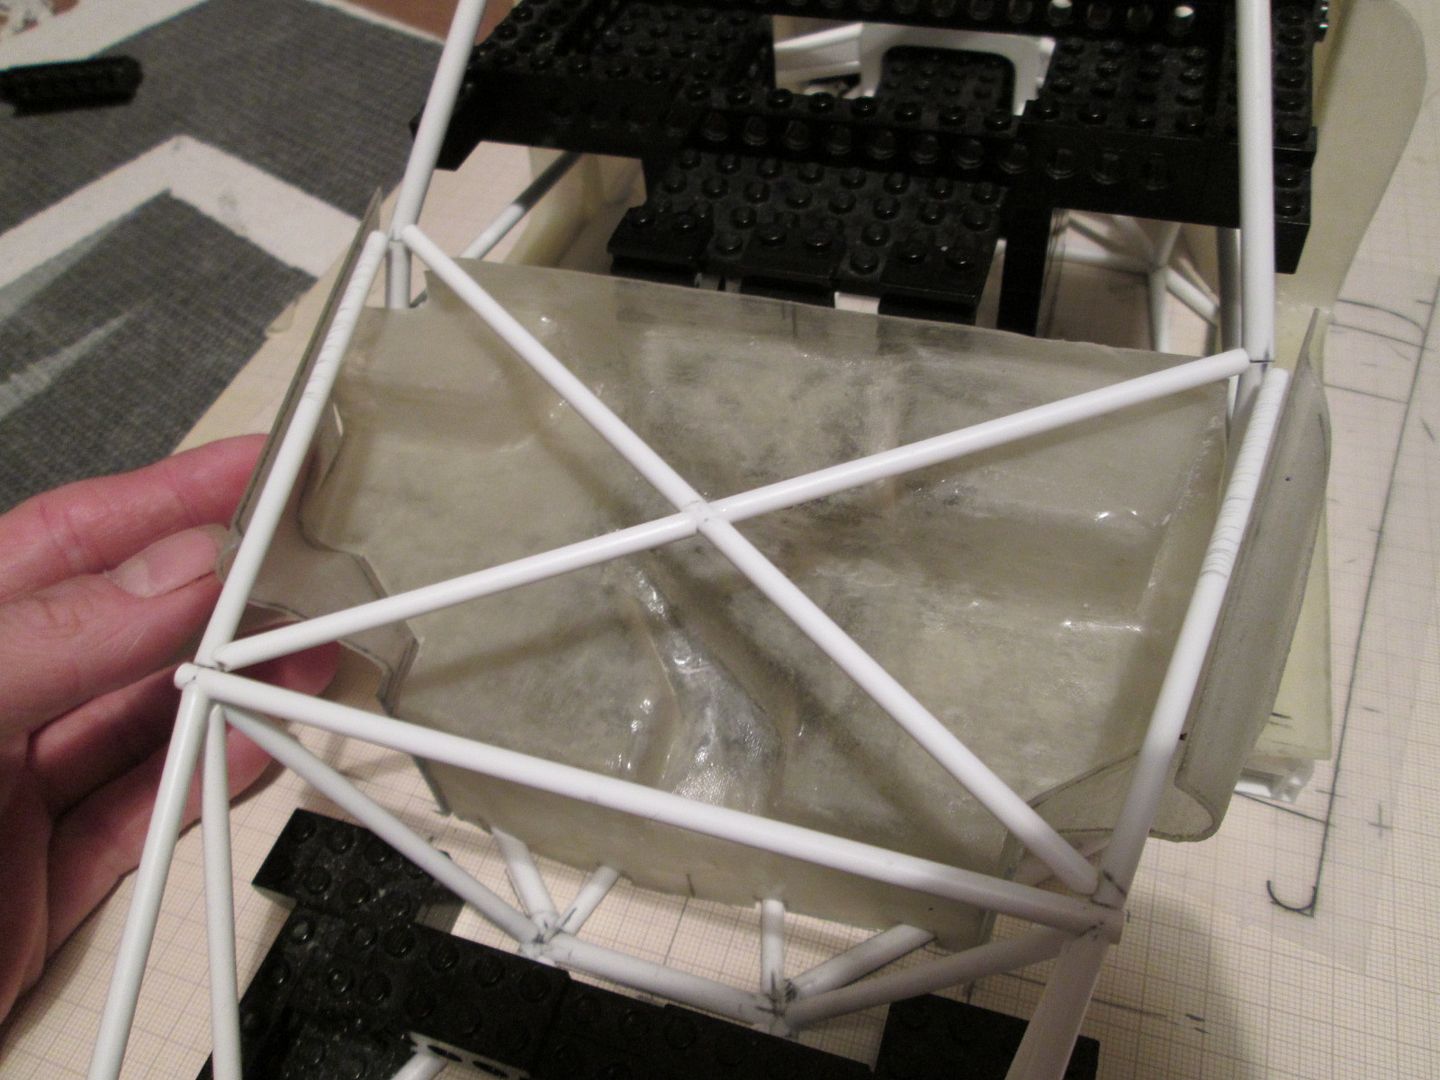 The outermost tubes will be cut short and the stumps will be attached to the front wings; the diagonals will be attached to the roll-cage with brackets and hidden by the dashboard panel. I want to keep this piece removeable for some time, as it will make further work so much harder if it is glued in place! The challenge of this project is as much about how to actually put the model together, as it is about creating the individual parts. I'm trying hard to not think about how I'm going to paint some of this...! I want to get back to doing a regular Sunday-night post again, and now that this fibreglass-work is yielding results I think I'll be able to keep things moving along. We've got a break with the FF2000 racing too, so the next few weekends will largely be spent modelling! Have a great week, SB |
|
|
|
|
|
09-10-2012, 09:09 AM
|
#111 | |
|
AF Newbie
Join Date: Feb 2010
Location: Little falls, New Jersey
Posts: 57
Thanks: 0
Thanked 0 Times in 0 Posts
|
You are the Fiberglass Master. Your patterns are exceptional. Great work SB.
|
|
|
|
|
|
09-16-2012, 12:31 PM
|
#112 | |
|
AF Enthusiast
Thread starter
Join Date: Nov 2008
Location: Norwich
Posts: 649
Thanks: 21
Thanked 111 Times in 87 Posts
|
Re: 1/8 Porsche 935/78 'Moby Dick'
This week I felt like a change from cutting and trimming fibreglass panels, so the first job was to add a few extra chassis tubes - the diagonals running down to the floor frame. The top X-frame is still removeable, so the diagonals below have been trimmed to support it at the correct angle.
 Later there will be some extra pipework snaking around the lower tubes, when I add the plumbing for the front radiators. Next, I wanted to start fixing the positions of the door frame panels. As the inner sill structure was 'full' (in places) I didn't want to drill into it to pin the panels. So I glued a pair of small studs (cut from 1/8" solid styrene, about 1.5mm long) to the box-structure, and made holes in the fibreglass to suit: 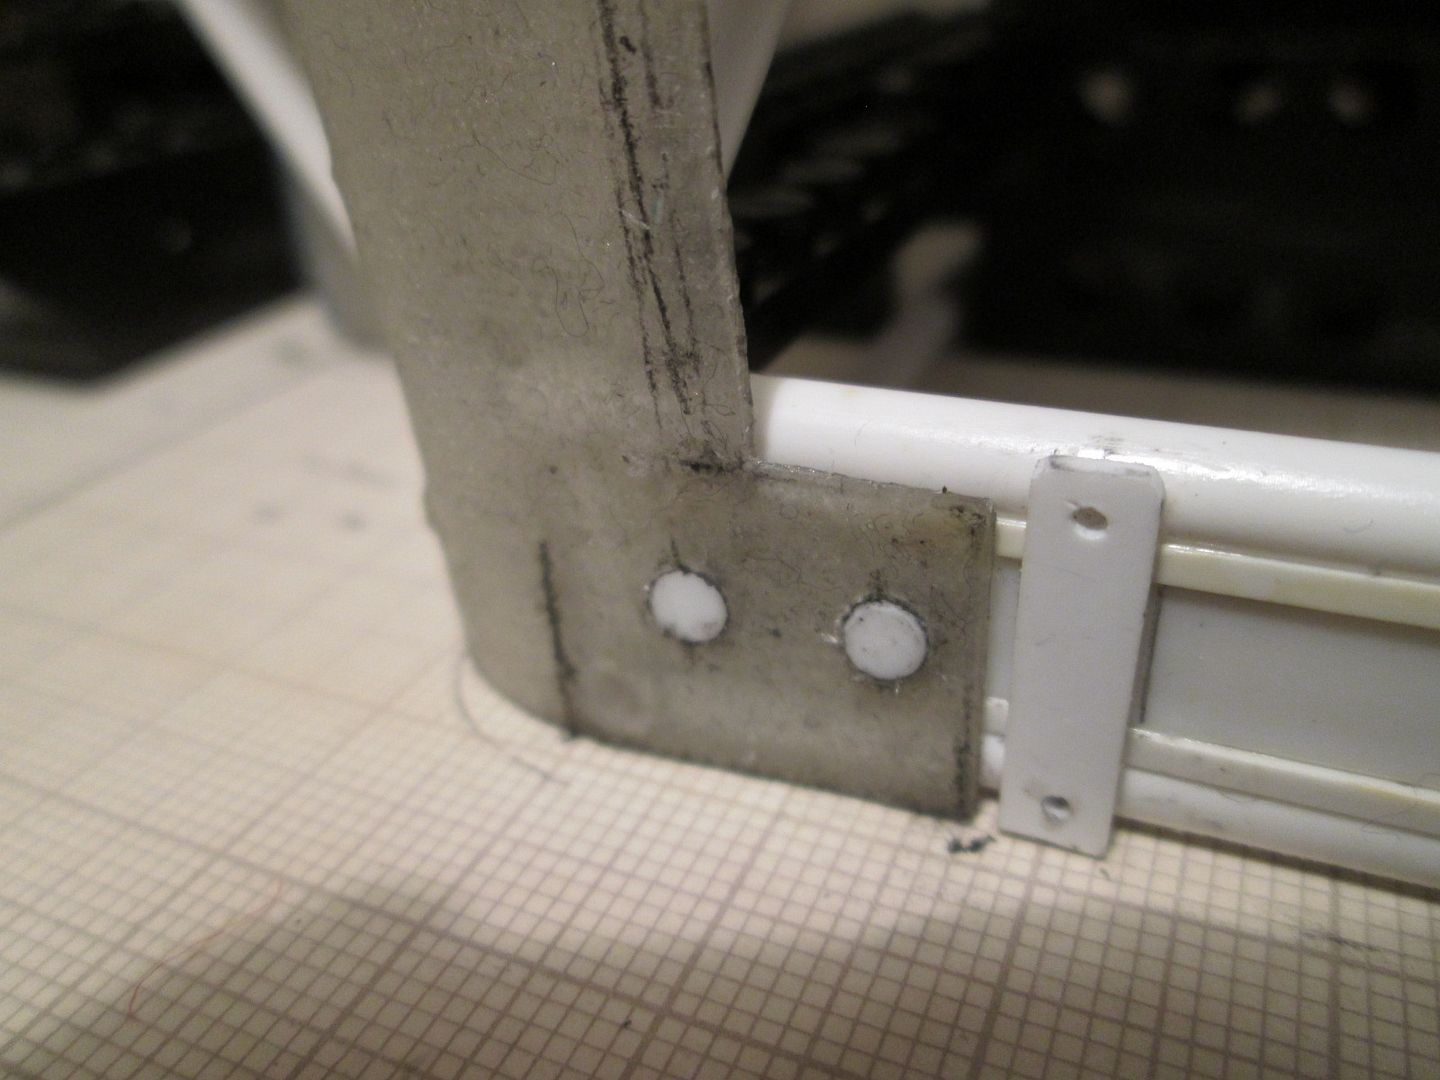 Later in the week I repeated this idea for the main sill panels: 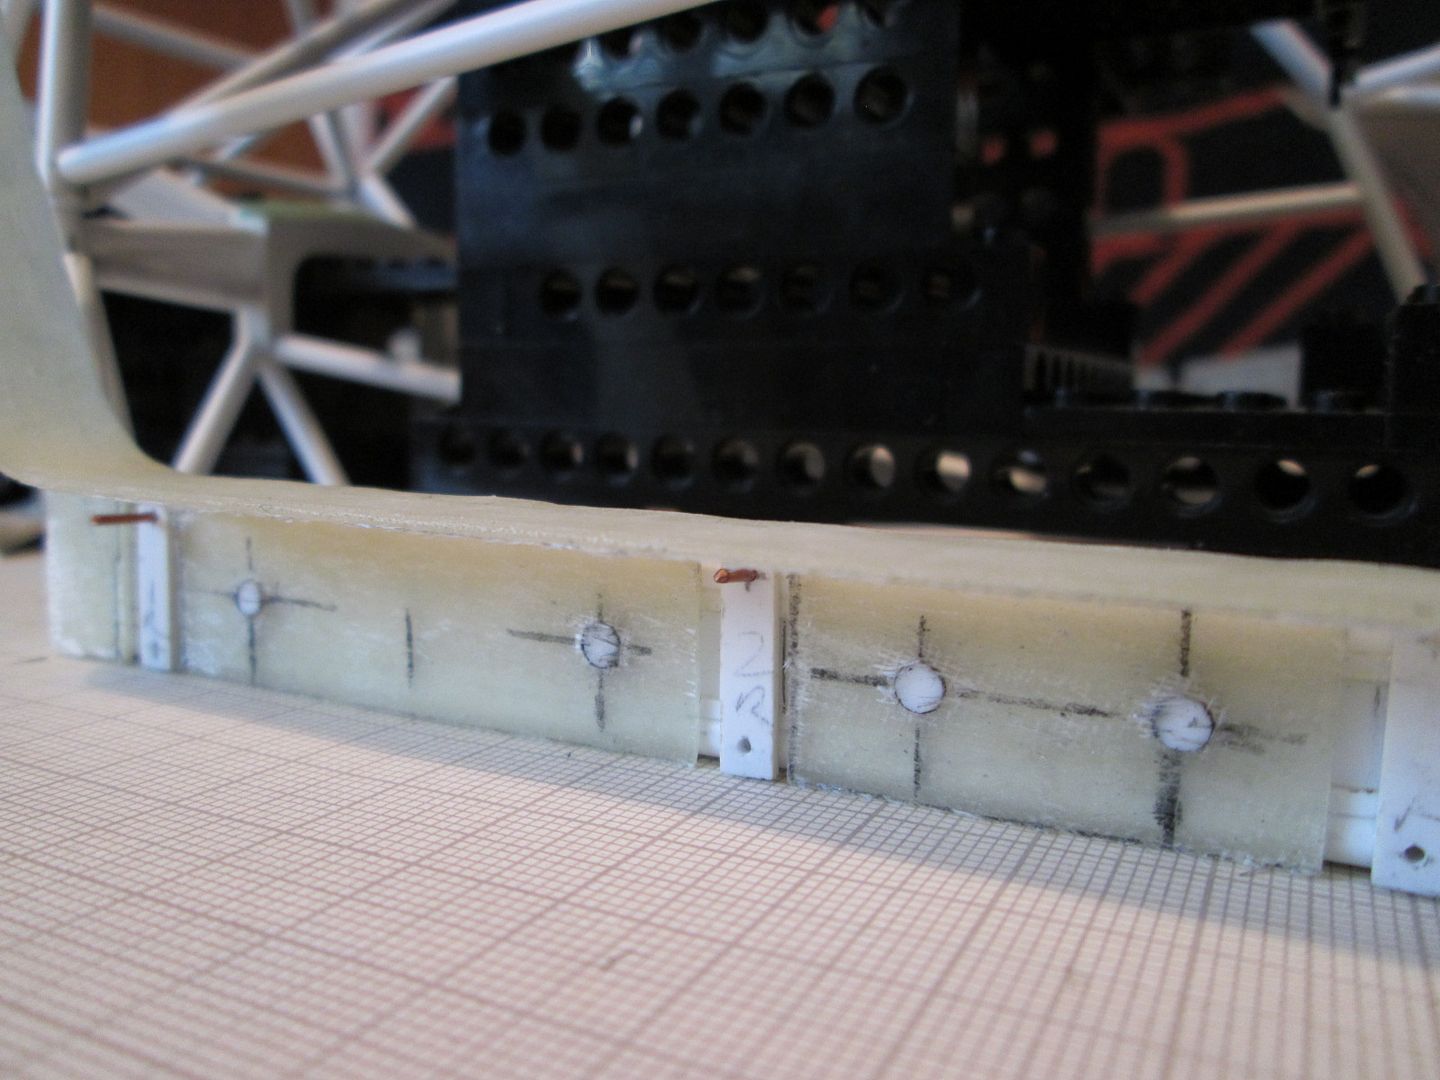 There's enough flex in the fibreglass that it grips the studs quite firmly, and once the outer box-section is attached the whole structure should be secure. Finally, I've made a start on the second X-frame which fits into the nose of the chassis, above the fuel tank. It's not needed yet, but I wanted to work with styrene again! In real-life this frame is bolted into place once the fuel and oil tanks are installed, so I'm making a set of spigots which will fit into the corners of the chassis bay: 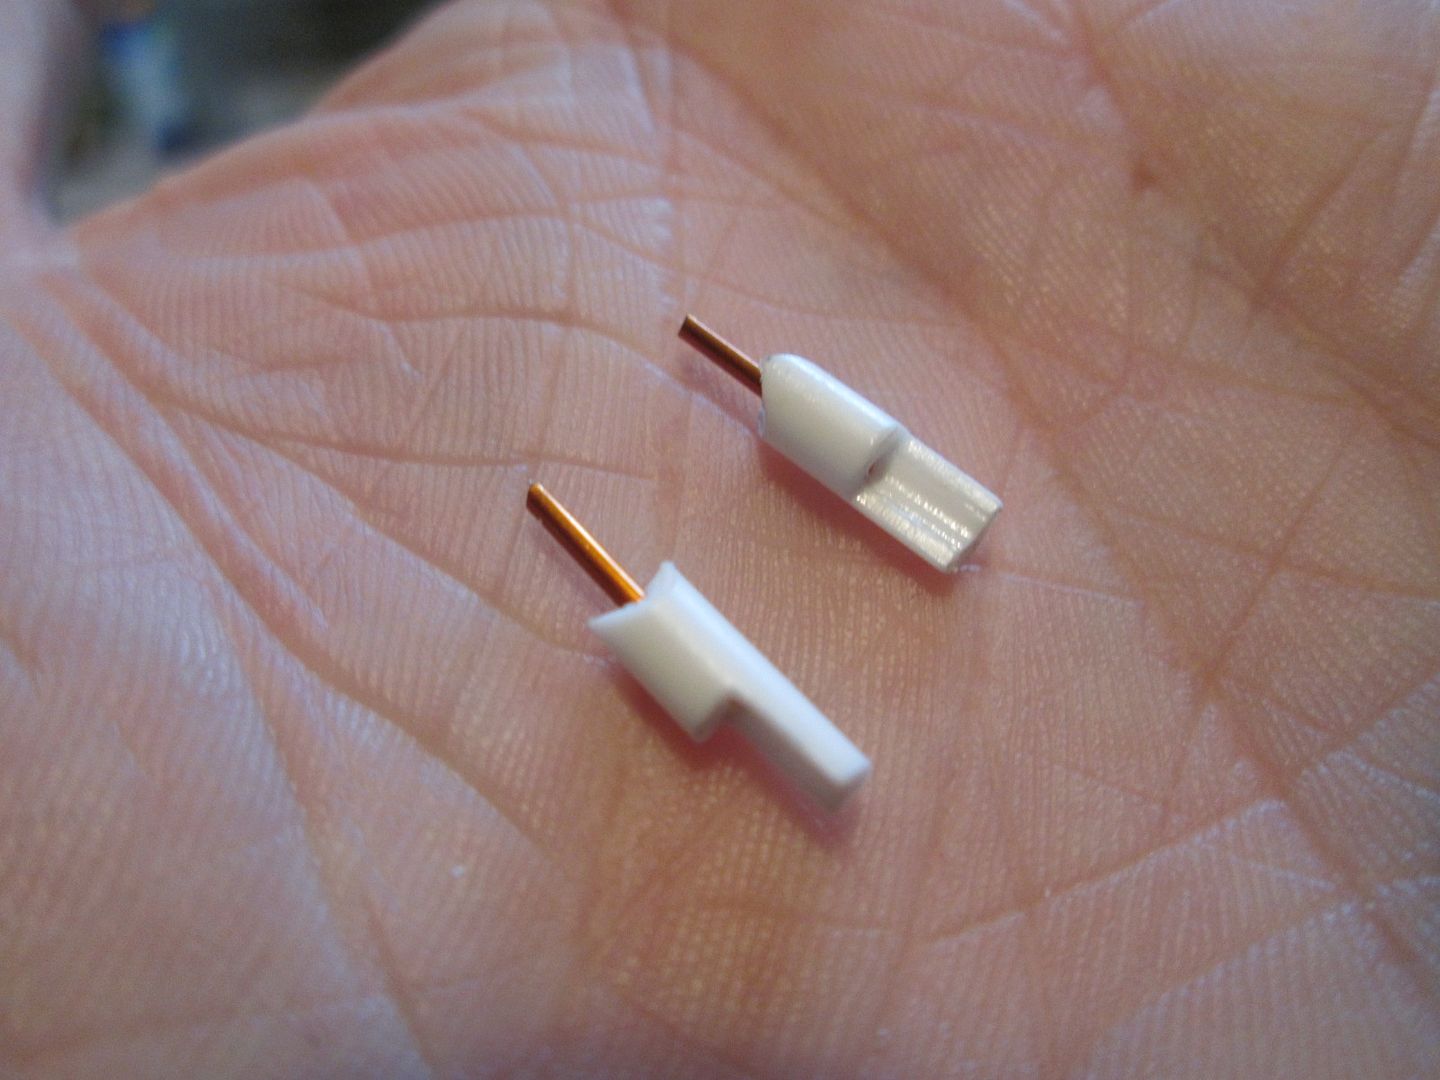 Instead of shaping these from solid 1/8" rod to create the scarf-joints, I've used regular 1/8" tube, then added small lengths of 1.5mm half-round to give it some strength. The X-frame itself will be reinforced with ali or brass rod, and then drop into place (with some hex-nut detailing at each corner). Here's one of the spigots drilled and temporarily pinned in place:  It's not stunning stuff, I know, but it's the early stages of adding detail and realism the the chassis. Another job lined-up for this week is to make attachments for the original X-frame to the roll-cage. Once the fibreglass body core is 'fixed', I can press-on with the styrene work; I've spent a little time this weekend making small adjustments to the positioning of the roof structure - nothing serious, just small corrections to improve the alignment (and stop me being frustrated later on...) More again next weekend. SB |
|
|
|
|
|
09-16-2012, 04:22 PM
|
#113 | |
|
AF Enthusiast
Join Date: May 2009
Location: Tucson, Arizona
Posts: 1,469
Thanks: 12
Thanked 126 Times in 120 Posts
|
Re: 1/8 Porsche 935/78 'Moby Dick'
I'm still amazed at how you build these scale replicas SB. I can't say enough about the work you Christian and Jaykay do - John
|
|
|
|
|
|
09-23-2012, 01:49 PM
|
#114 | |
|
AF Enthusiast
Thread starter
Join Date: Nov 2008
Location: Norwich
Posts: 649
Thanks: 21
Thanked 111 Times in 87 Posts
|
Re: 1/8 Porsche 935/78 'Moby Dick'
Hello everyone,
Not a big post this week, but things are still moving along. I started the week by finishing off the removable X-frame - the four mounting spigots were trimmed slightly shorter, and the frame itself could then be adjusted to suit. It's not glued together yet (just in case...) but it fits in the chassis okay: 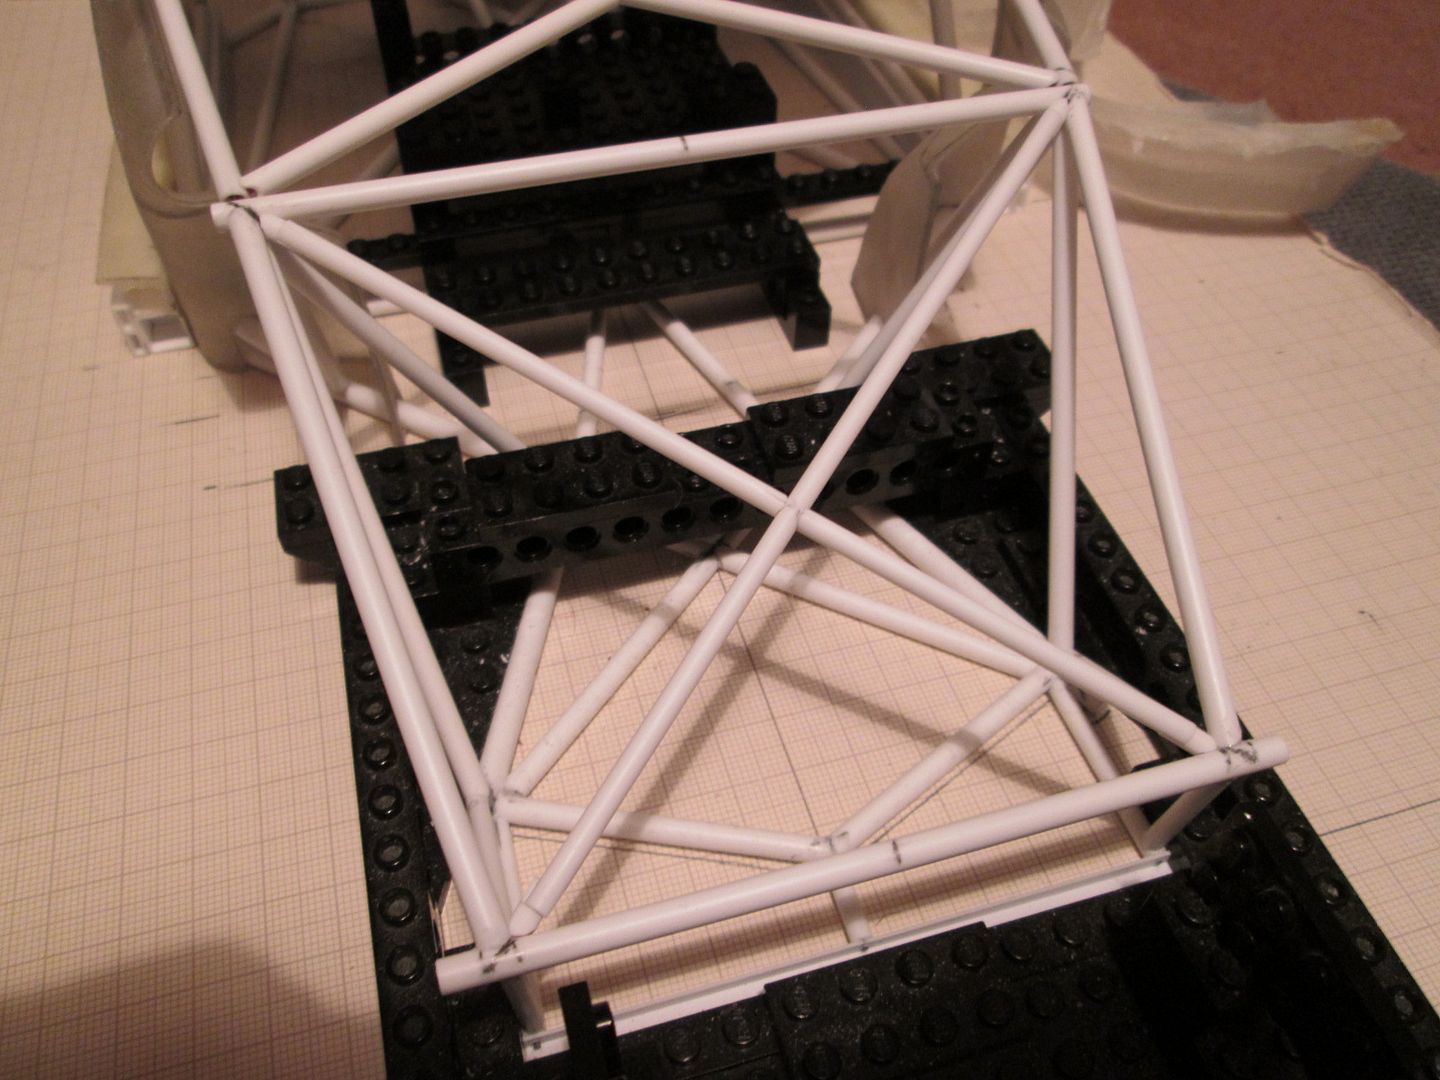 Next job was to make the connection points for the upper X-frame to the main roll-cage. I began by making some inserts which would fit into the ends of the 4mm tubing, but this plan was scuppered when I remembered that one of the diagonals also has a length of ali tube inside. So, plan B was to file the ends of the tubes to a width of about 3mm, and use 3/16" box-section to make the mounting channels:  The channels have been reinforced with the small triangular plates you can see, and in time I will apply a little greenstuff to fill in the joints. There will also be mounting plates to support the dashboard structure, and to tie-in the front inner wing panels. The outer tubes of the X-frame have been trimmed short - sometime soon I will reinforce the fibreglass to make the connection points. The final job for this week has been to start cutting into the rear of the door openings to add the small insert panels:  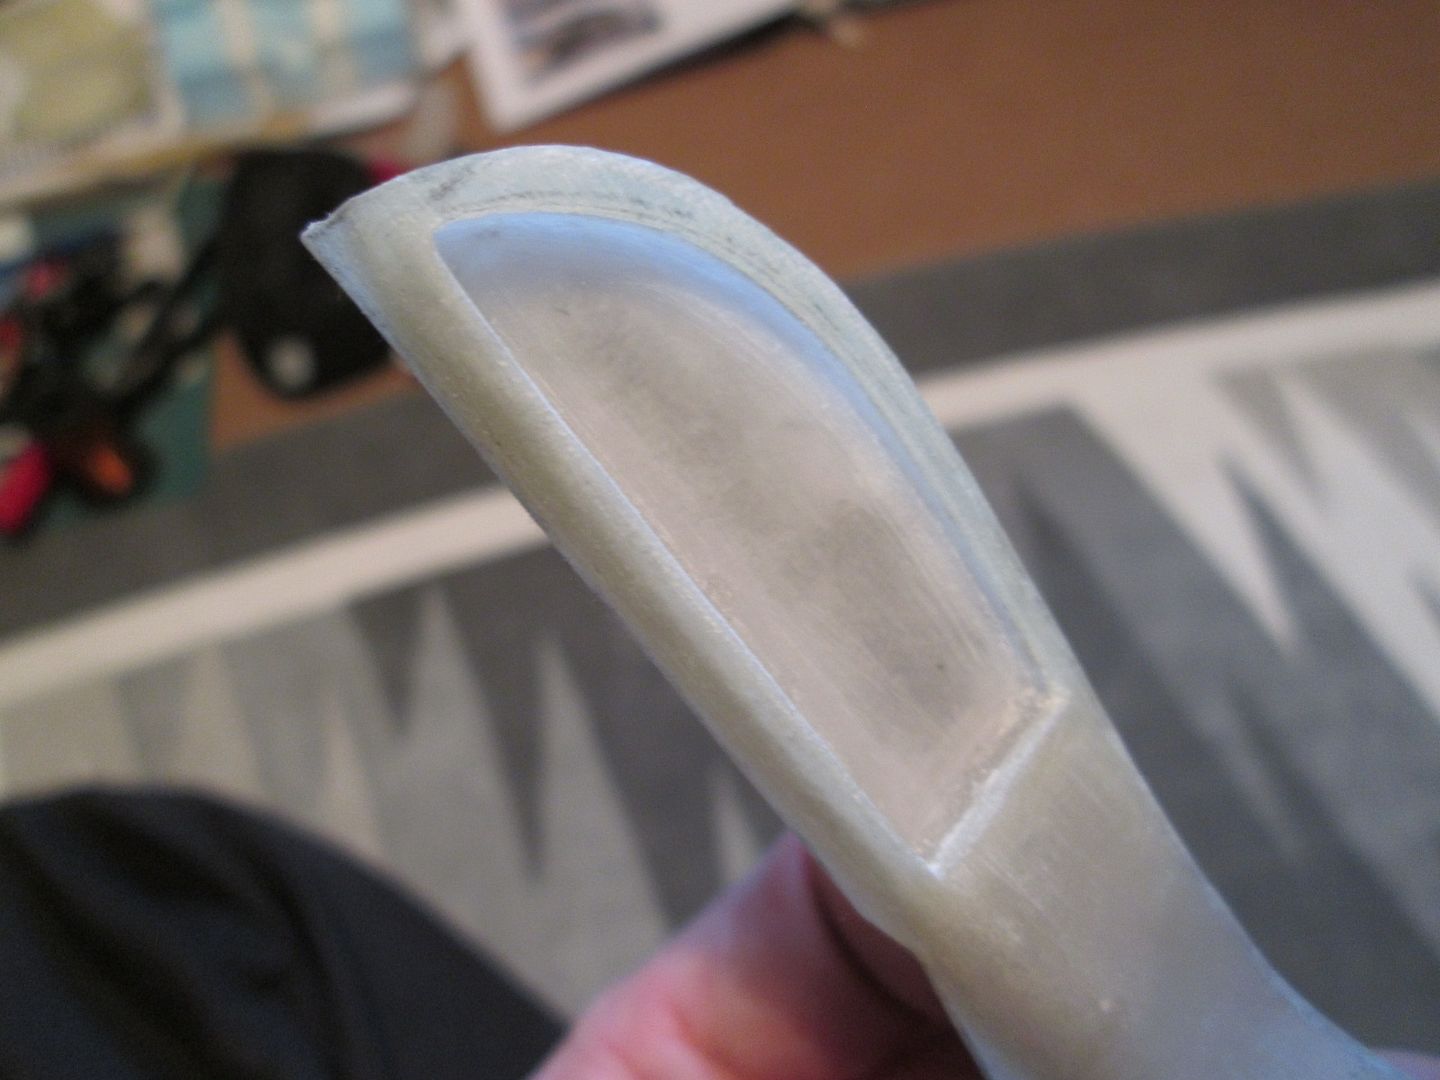 I rough-cut the holes as close to the edge as I dared, tidied the edges with file and emery cloth, then glued the insert panel in position with CA. As the panel was now 'stable' again, I finished cutting back the edges to match the inside of the insert. The left-hand sill is 95% done, as you can see, and the right-hand insert is glued but needs the final trimming. ...and that's it for tonight. A quick word of thanks to John and F40 for the 'positive vibes' - much appreciated: it still doesn't feel like I've really made much progress, but I know that's because of the way I'm structuring the build. I just hope you can all stick with me for a while until it really starts getting interesting! As always, have a good week. SB |
|
|
|
|
|
09-23-2012, 01:54 PM
|
#115 | |
|
AF Enthusiast

Join Date: Dec 2009
Location: Hamme
Posts: 535
Thanks: 77
Thanked 21 Times in 17 Posts
|
Re: 1/8 Porsche 935/78 'Moby Dick'
Hi SB,
As always your updates are truly amazing. I do not always comment on your work, but that doesn't mean that when i get notice of your update, i'm always glued to the screen. Keep the updates coming please. Best regards, Lesley |
|
|
|
|
|
09-23-2012, 04:17 PM
|
#116 | |
|
AF Enthusiast
Join Date: May 2009
Location: Tucson, Arizona
Posts: 1,469
Thanks: 12
Thanked 126 Times in 120 Posts
|
Re: 1/8 Porsche 935/78 'Moby Dick'
SB - I cannot imagine anyone that has found this thread not sticking with it - every posting is a lesson for me - I was a "out of the box" builder until I came across the 908 build when I joined the forum - after seeing what you do and the explanations and pictures you provide, I have learned new things I want to try on my models. I think I can safely speak for others we will keep watching - John
|
|
|
|
|
|
09-23-2012, 06:01 PM
|
#117 | |
|
AF Newbie
Join Date: Jul 2005
Location: Antwerpen
Posts: 44
Thanks: 8
Thanked 0 Times in 0 Posts
|
Re: 1/8 Porsche 935/78 'Moby Dick'
I can only agree with John and Lesley here SB.
I thoroughly enjoy your work, so much so, that mostly I'm glued to my screen when reading your weekly or last update. Very educational and I'm always trying to learn more from your techniques. So please keep those updates coming (they're addictive  ) )Mark
__________________
There will always be the need for speed. |
|
|
|
|
|
09-24-2012, 03:09 AM
|
#118 | ||
|
AF Regular

Join Date: Mar 2006
Location: swansea
Posts: 160
Thanks: 0
Thanked 6 Times in 6 Posts
|
Re: 1/8 Porsche 935/78 'Moby Dick'
Quote:
Keef |
||
|
|
|
|
09-24-2012, 04:21 AM
|
#119 | |
|
AF Enthusiast

Join Date: Mar 2009
Location: Zuhause
Posts: 785
Thanks: 176
Thanked 71 Times in 69 Posts
|
Re: 1/8 Porsche 935/78 'Moby Dick'
It´s always fun to watch this big porsche growing up!
Every little tube that find his place and its getting bigger abd better with every post. This is real art in my eyes. I didn´t trust my skills,and my patience, to do an complete scratchbuild like yours. Wow! kind regards Christian |
|
|
|
|
|
10-07-2012, 02:13 PM
|
#120 | |
|
AF Enthusiast
Thread starter
Join Date: Nov 2008
Location: Norwich
Posts: 649
Thanks: 21
Thanked 111 Times in 87 Posts
|
Re: 1/8 Porsche 935/78 'Moby Dick'
Hello everyone,
So, having made the connections for the X-frame to the base of the windscreen pillars, I wanted to create solid mountings for the two outer short tubes. I glued two lengths of 3/16" angle inside the tops of the fibreglass wings, then added a small fabricated bracket to the X-frame mounting: 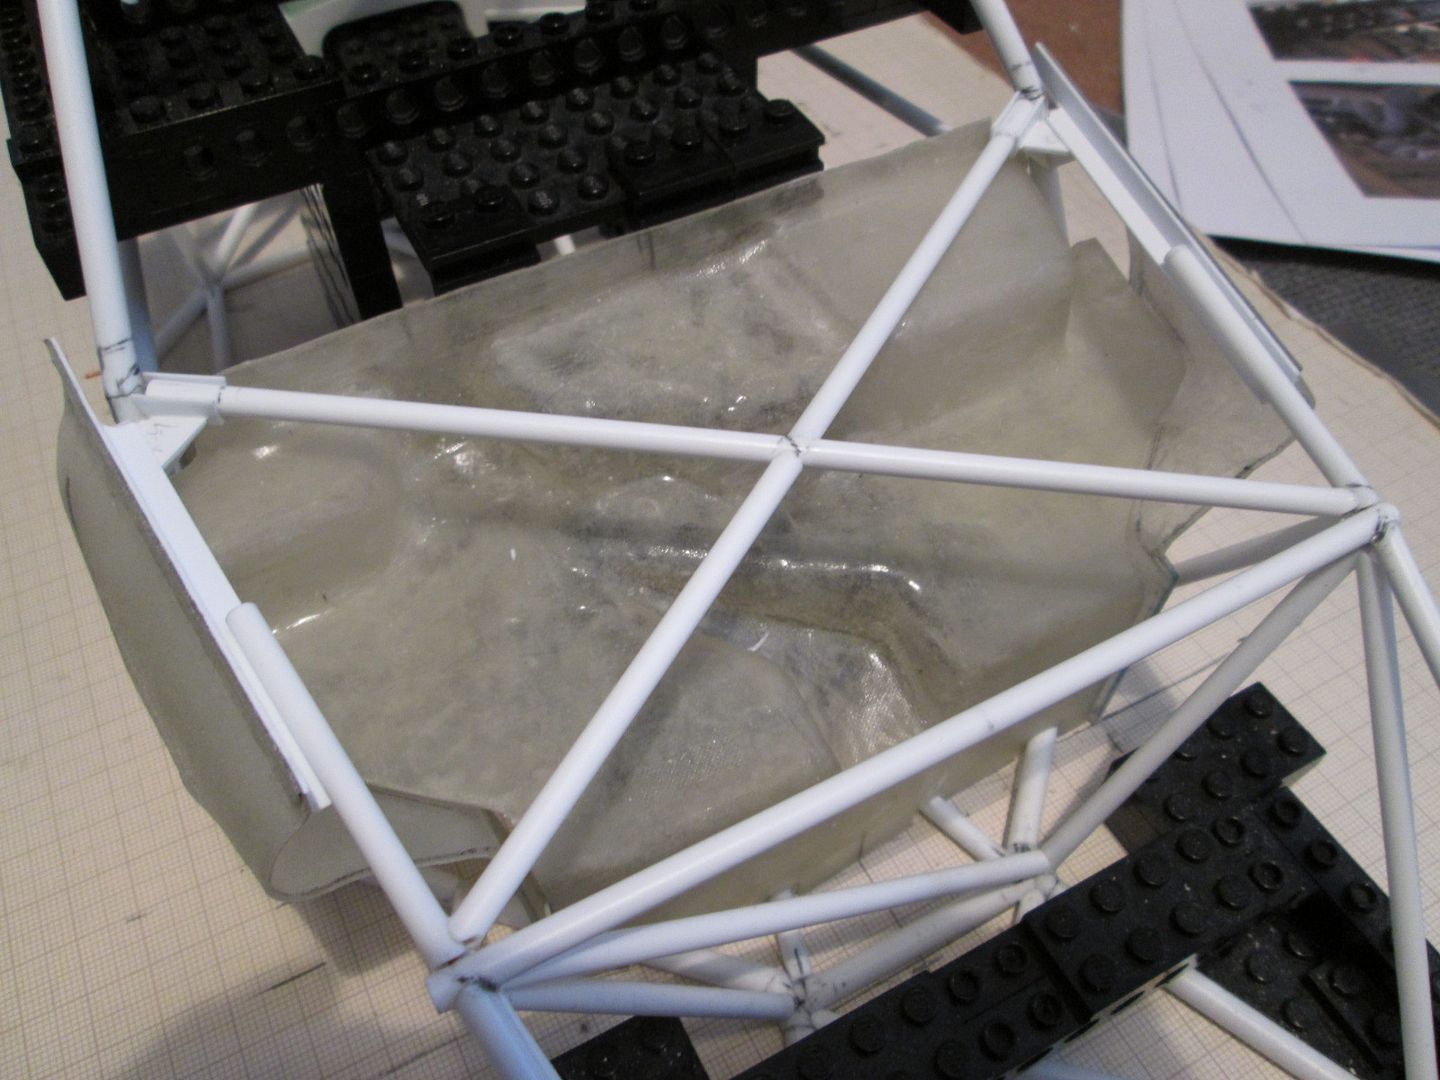 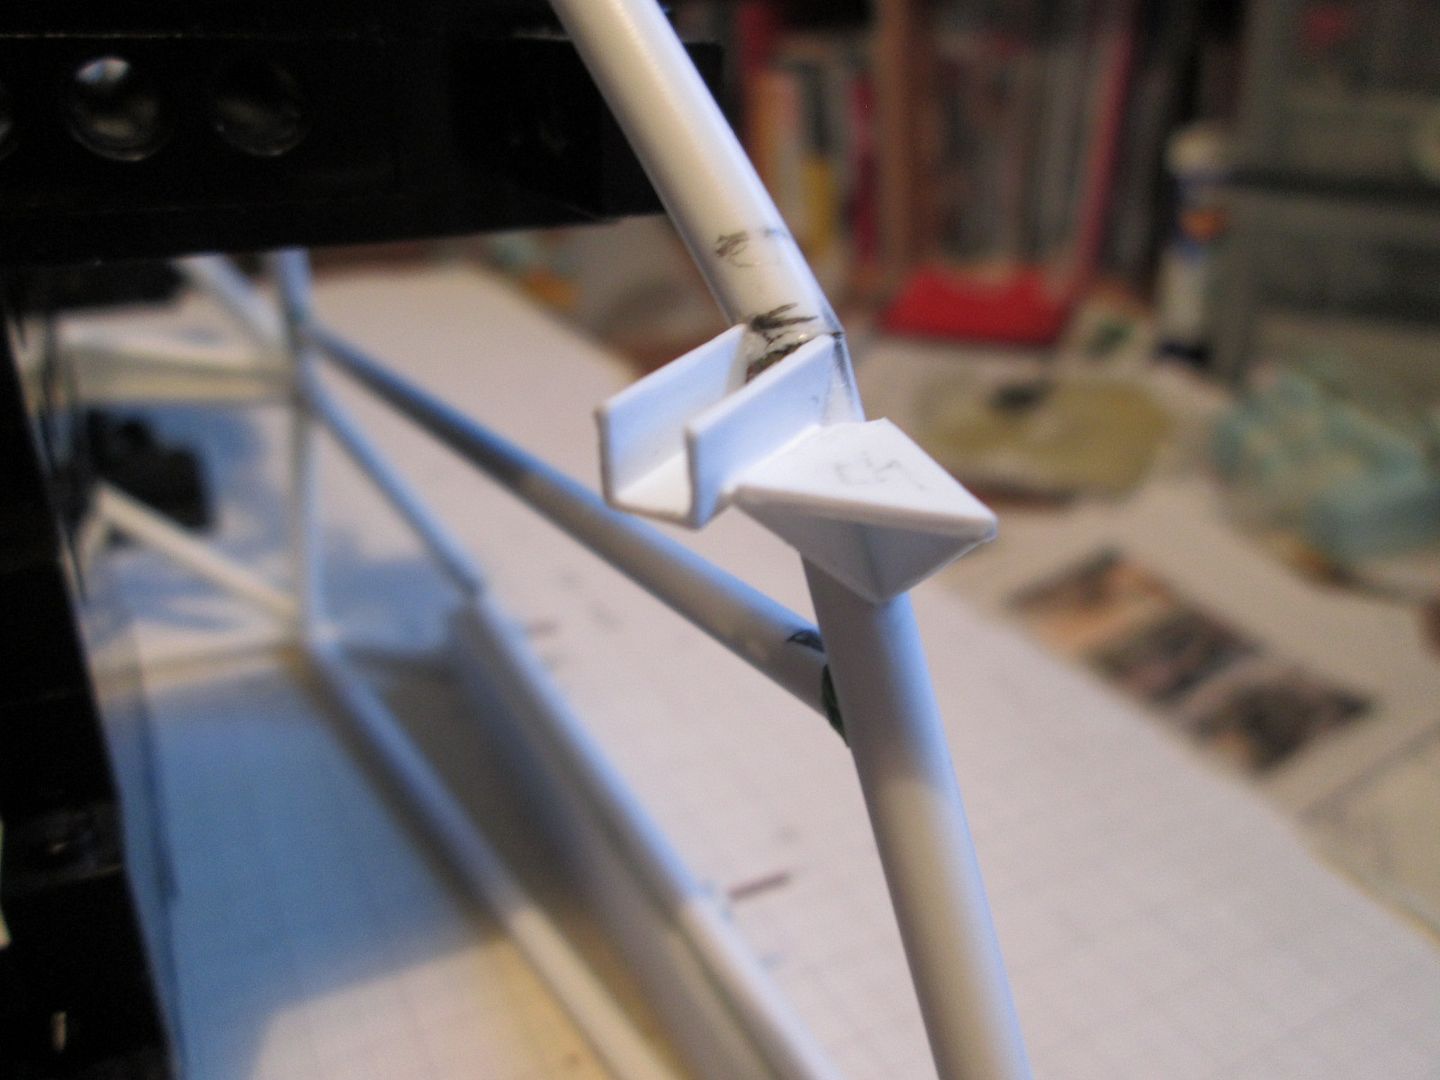 The wing panels still require extra detailing work, but I'm leaving that for later - I want to create an inner skin (either another layer of fibreglass, or maybe styrene), plus there's external features to add. The X-frame tubes will be glued and pinned in place...eventually! The next job I wanted to tackle was trimming the rear of the top-section, but this resulted in a crisis of confidence - I was beginning to think that the rear window-line was wrong, and that it was neither true to the original 911 shell, nor to the extension panel that was (in real life) fitted over the top. After spending a while checking my drawings and taking measurements, I was happy that all was okay and that I could continue - panic over! Here's how it turned out:  It doesn't look much, but it took a bit of juggling to get the rear window re-positioned - the corners will be cut-back some more in time, but not until I've got the side windows finalised. By now I was getting to the point where I really needed to remove the chassis from the jig in order to work on certain jobs - but the top-section could still only be properly positioned when it was on the jig. So, the next job was to create mountings for the shell onto the roll-cage, so it could be self-supporting. I used small pieces of 3/16" box-section cut back to make small brackets, which were then pinned to the top rails of the frame: 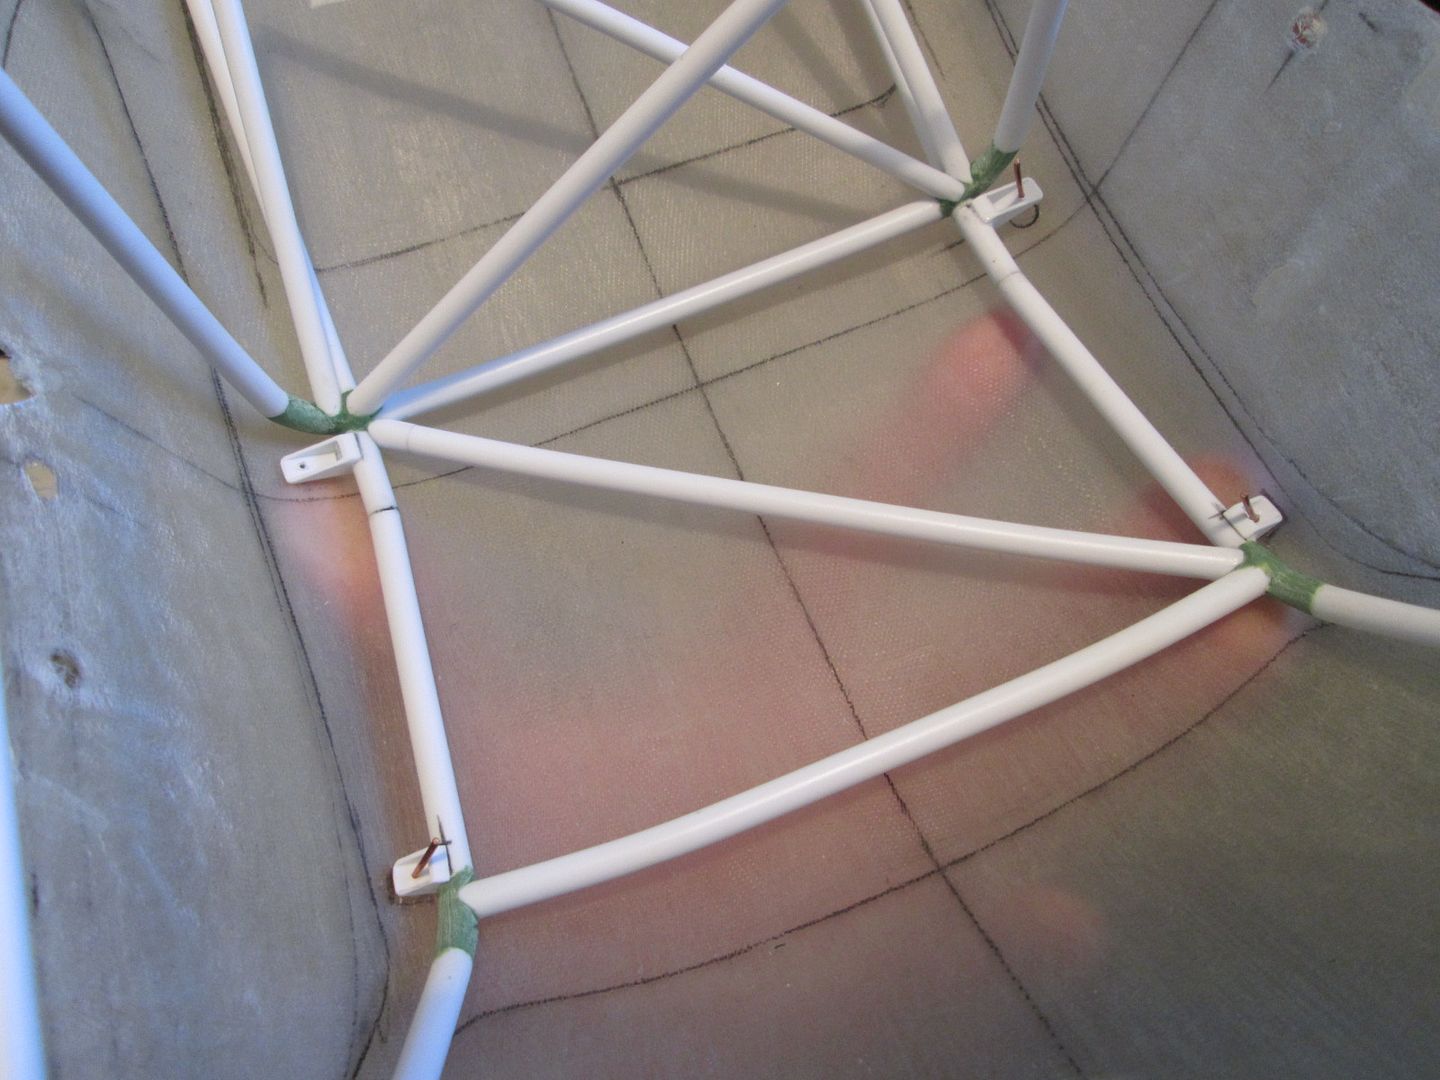 I didn't want to drill through the fibreglass (although it would have made life easier...) so I went through a slow process of drilling the brackets and using short lengths of wire to check the spacing between the inside of the shell and the mounts. I then made small styrene packers, checked the positioning, and glued them inside the shell: 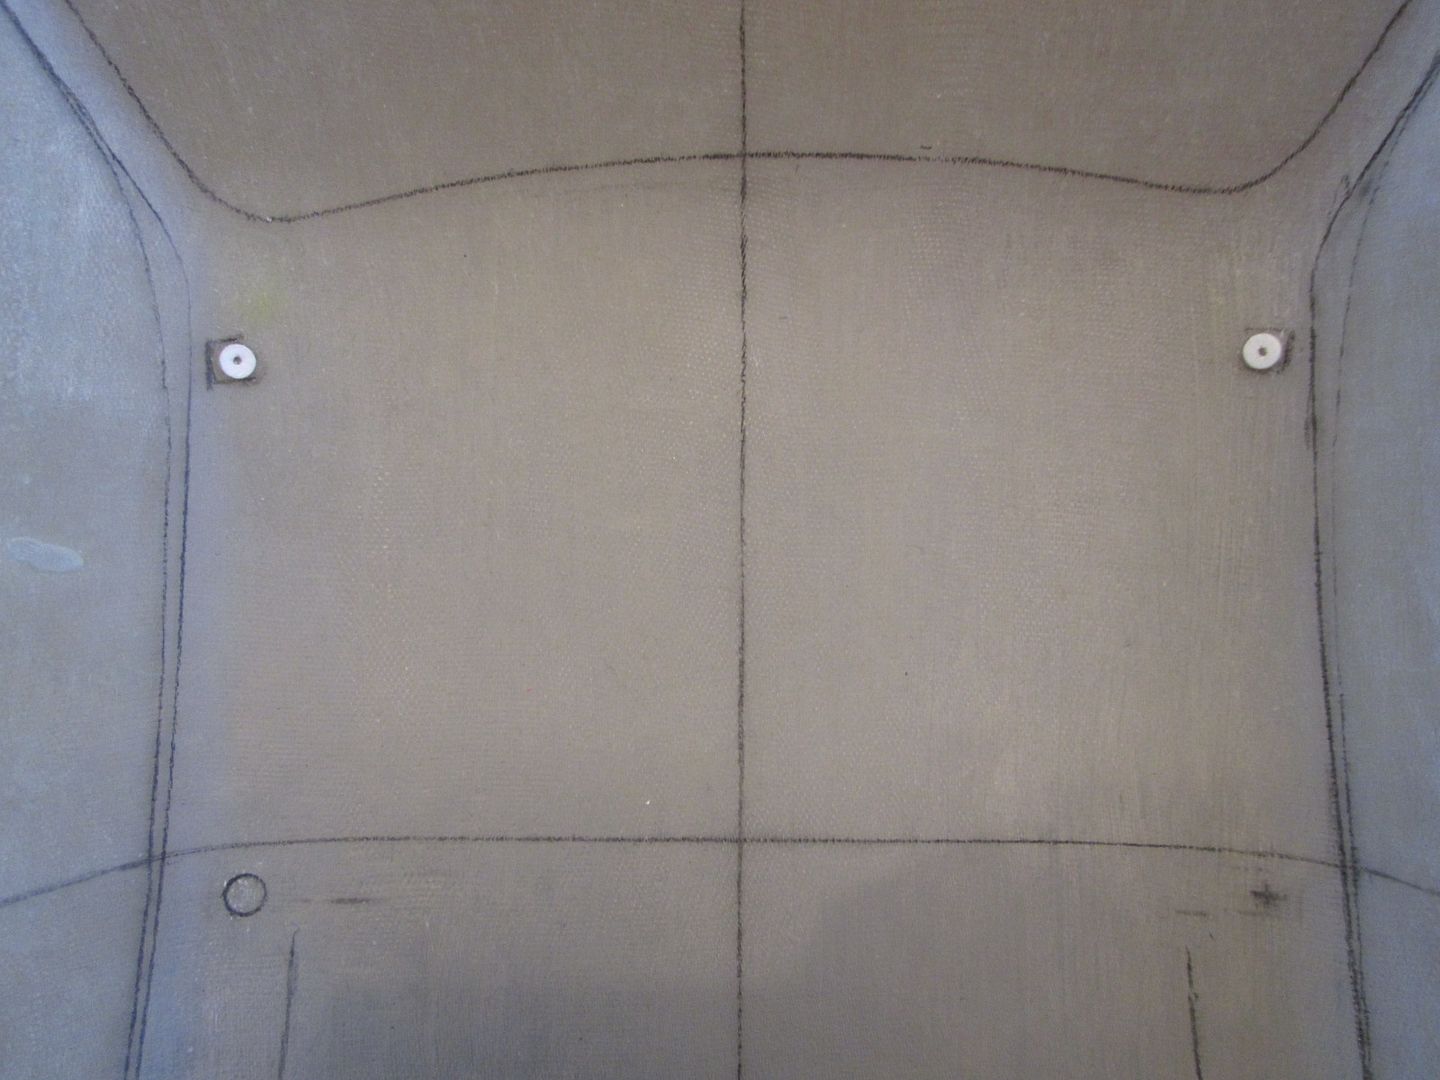 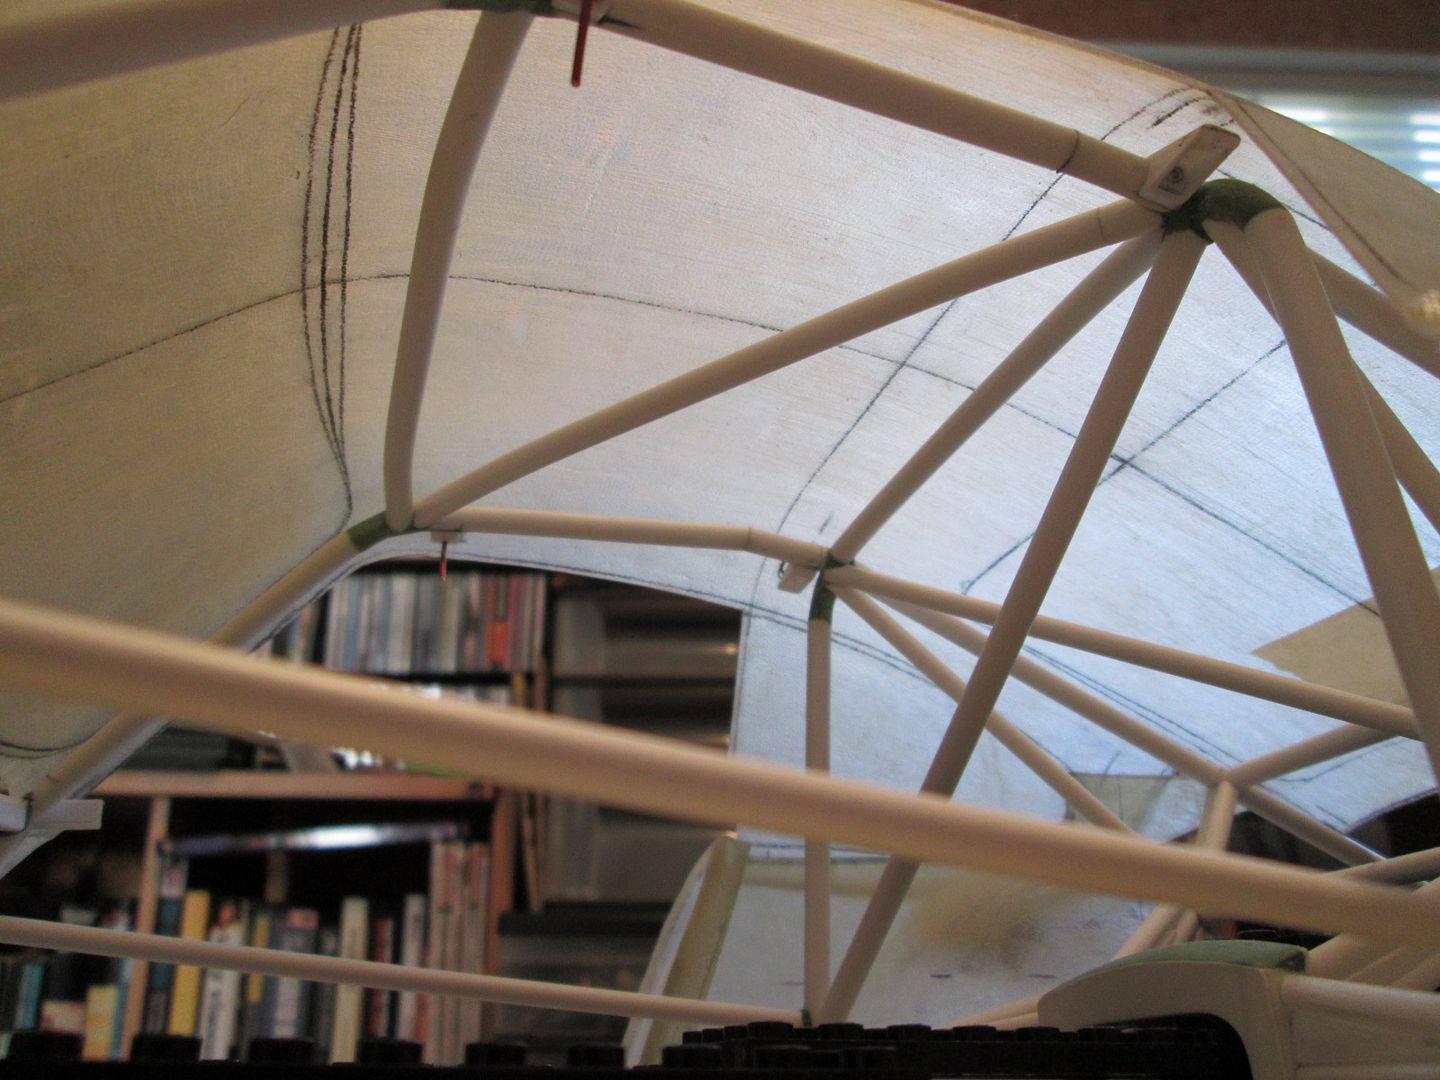 These are enough to hold the shell in place when the frame is off the jig, but will eventually be joined by more across the top of the windscreen, two at the back of the doors, and two by the corners of the rear window - the roof will tie the frame together! Now that the side 'windows' were not required for locating the shell, I could trim them out and get the access I wanted: 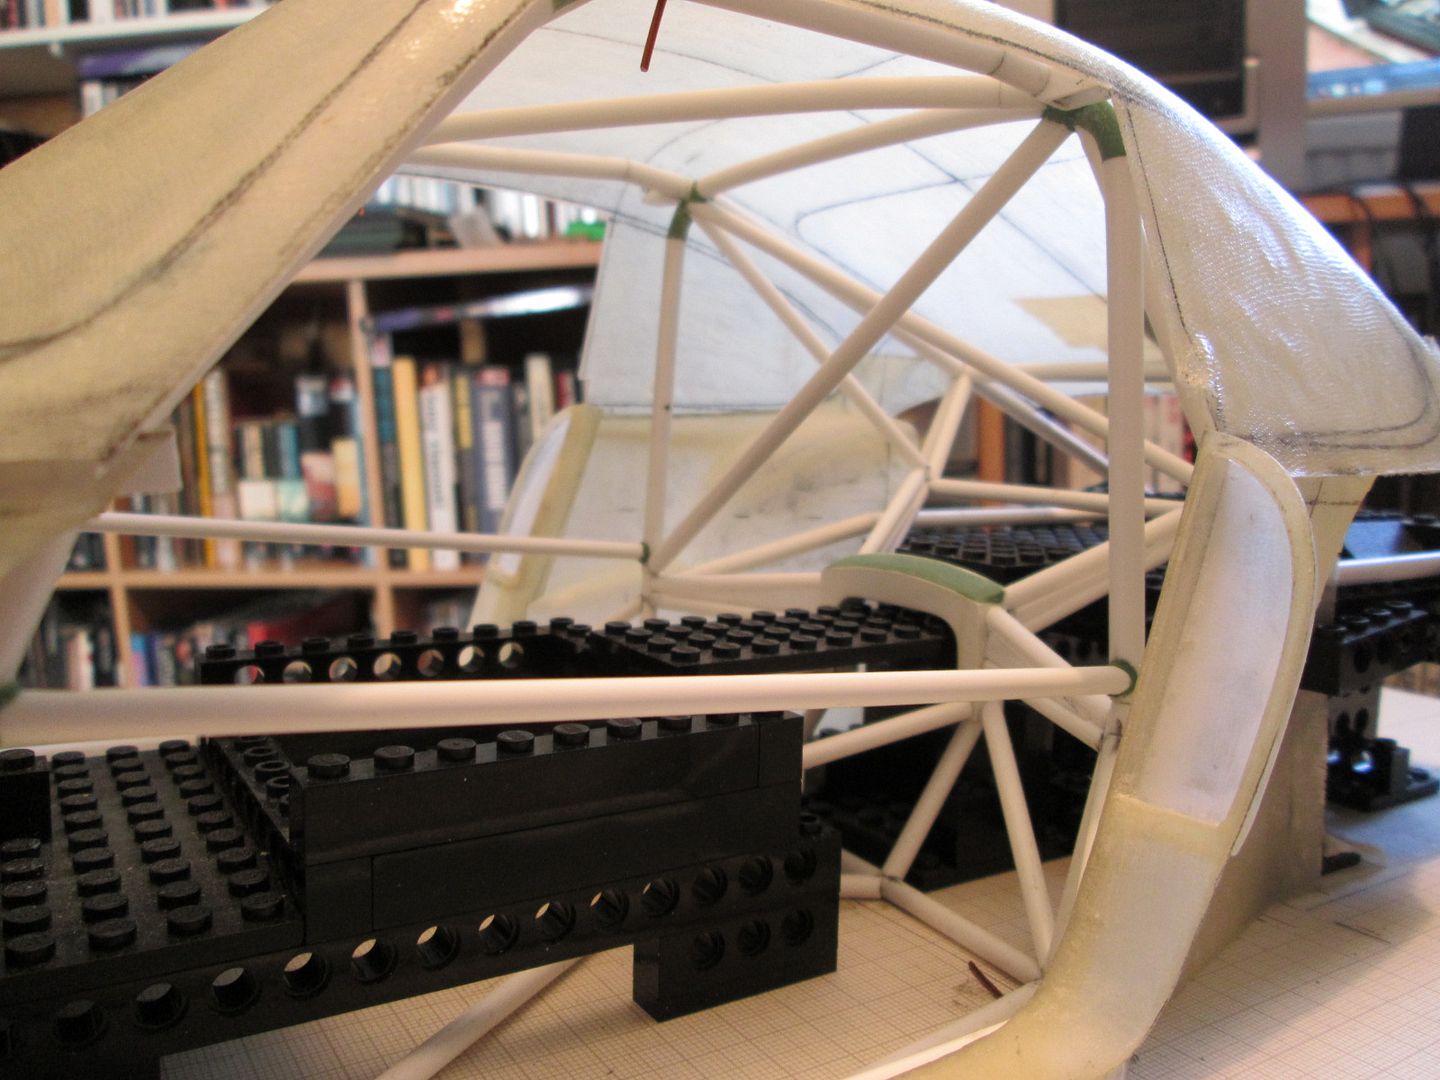 I was worried that the shell would start to flex too much with the sides removed, but it's not a problem (so far). I won't cut the windscreen just yet - I want to add some reinforcement to the screen pillars before that happens! The next panels to be fitted to the frame were the rear inner wings - again, I fitted two small studs first for location, then added more drillings for security. With the positioning taken care of, I could trim the lower edge to match the line of the frame: 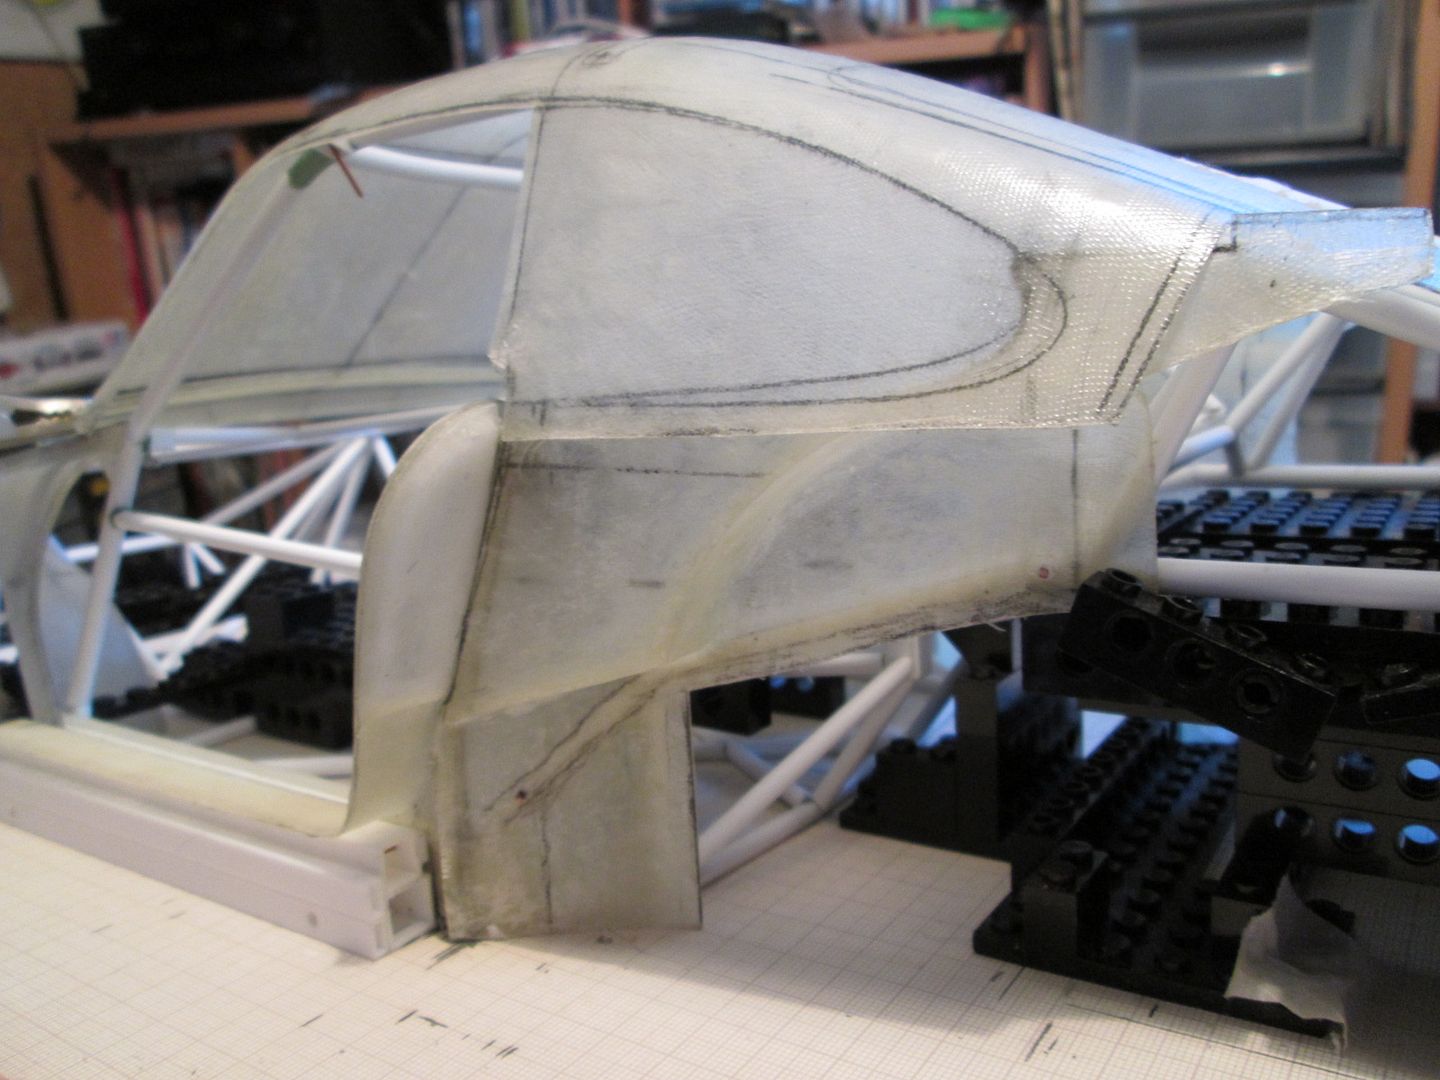 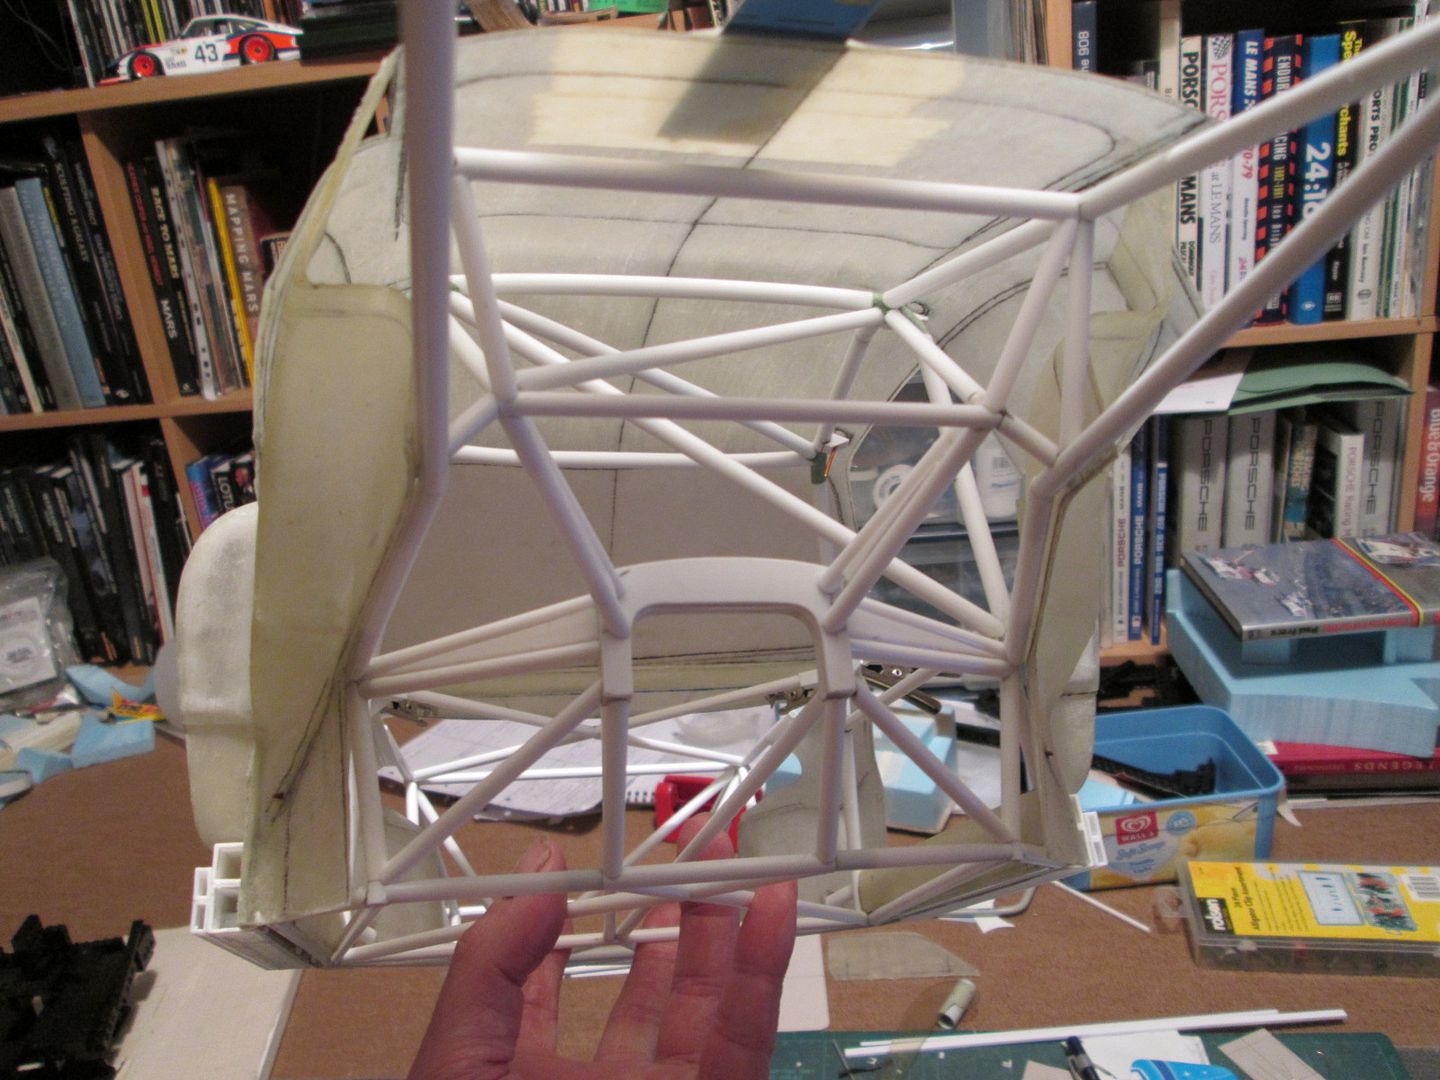 These panels need more work - they have to be trimmed and cut to flex into place around some of the lower frame tubes, and to clear where the suspension trailing arms will attach. At some point I'll have to fix the rear wings to the door frame sections, too. Now the frame is off the jig I feel like I'm making progress at last - trimming the windows out means I can work on the A-pillars, for example - and I'm quite surprised at how sturdy it is; the front X-frame connections seem to work well, and the stiffness will only increase as I add more tubes and the floor panel.  ...So yes, I'm feeling quite pleased tonight! Have a good week, SB |
|
|
|
|
| ||||||||||||||||||||||||||||||||||||||
|
POST REPLY TO THIS THREAD |
 |
|
|


