|
|
|

|
|
| Search | Car Forums | Gallery | Articles | Helper | AF 350Z | IgorSushko.com | Corporate |
|
| Latest | 0 Rplys |
|
|||||||
| WIP - Motorsports Post topics for any "Work In Process" motorsports vehicles in this sub-forum. |
 |
 Show Printable Version | Show Printable Version |  Email this Page | Email this Page |  Subscribe to this Thread
|
|
|
Thread Tools |
 04-01-2013, 11:38 AM
|
#211 | |
|
AF Enthusiast
Join Date: Mar 2009
Location: Madrid
Posts: 649
Thanks: 109
Thanked 68 Times in 67 Posts
|
Re: 1/8 Porsche 935/78 'Moby Dick'
Masterclass!!!
|
|

|

|
|
04-01-2013, 11:41 AM
|
#212 | |
|
AF Enthusiast
Join Date: May 2009
Location: Tucson, Arizona
Posts: 1,469
Thanks: 12
Thanked 126 Times in 120 Posts
|
Re: 1/8 Porsche 935/78 'Moby Dick'
Once again SB words escape me!!!!!!
You are a true master John |
|
|
|
|
|
04-08-2013, 02:26 PM
|
#213 | |
|
AF Enthusiast
Thread starter
Join Date: Nov 2008
Location: Norwich
Posts: 649
Thanks: 21
Thanked 111 Times in 87 Posts
|
Re: 1/8 Porsche 935/78 'Moby Dick'
Thanks guys - I'm trying to work out a few twists on some of these parts so it's not just a straight repeat of the last build. Keeps it interesting for me, and hopefully for you too!
This week it was time to start on the brake calipers. Normally I would create the basic shape by layering styrene parallel to the discs, with suitable box section in between to connect the two sides. After studying the Freisinger photos it was clear this method would not work - there's too much 'shape' on the '78's calipers! For example, instead of the inner edges of the caliper nearly touching the disc surface from top to bottom creating a narrow slot, there's a distinct tapering which make the opening more diamond-shaped. So, this time I decided the way to go was to layer the styrene across the disc, parallel to the axle-line. Rather than jumping straight to the finished items I spent some time making a prototype caliper core, just to see what might be possible - it started with two 0.75mm thick plates cut to fit around the disc: 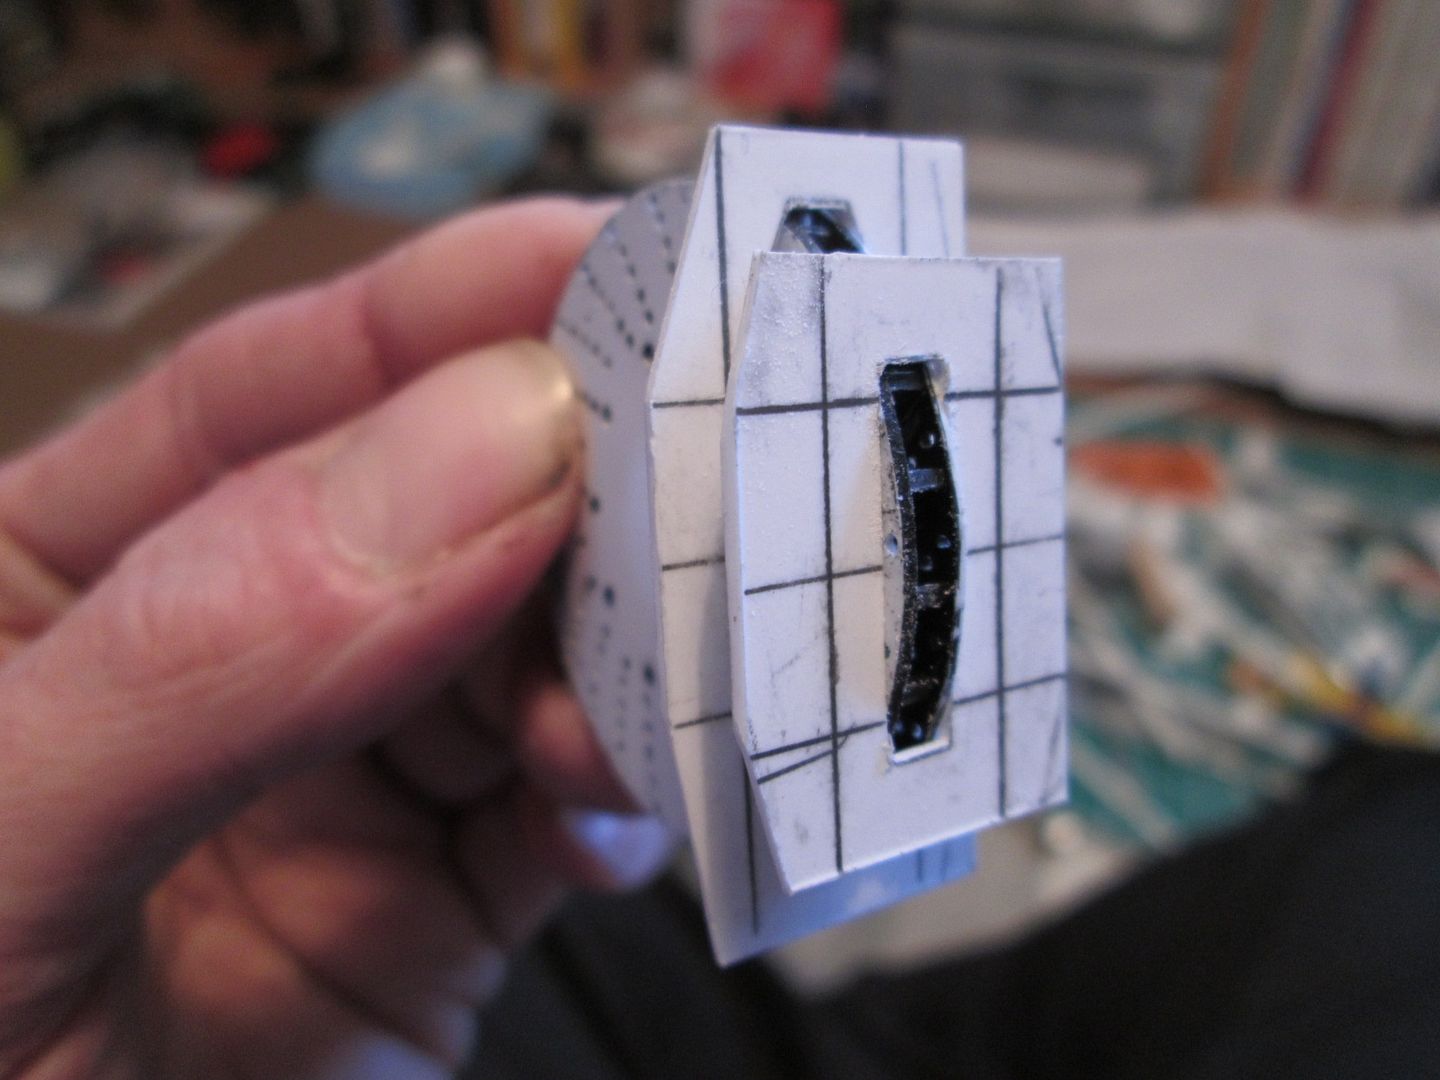 These could then be spaced apart with suitable box section, with more styrene added to fill the top and bottom openings. The curved outer surfaces could be created with greenstuff, as usual, with fine detailing added to finish them off - outlet ports, reinforcing webs, etc: 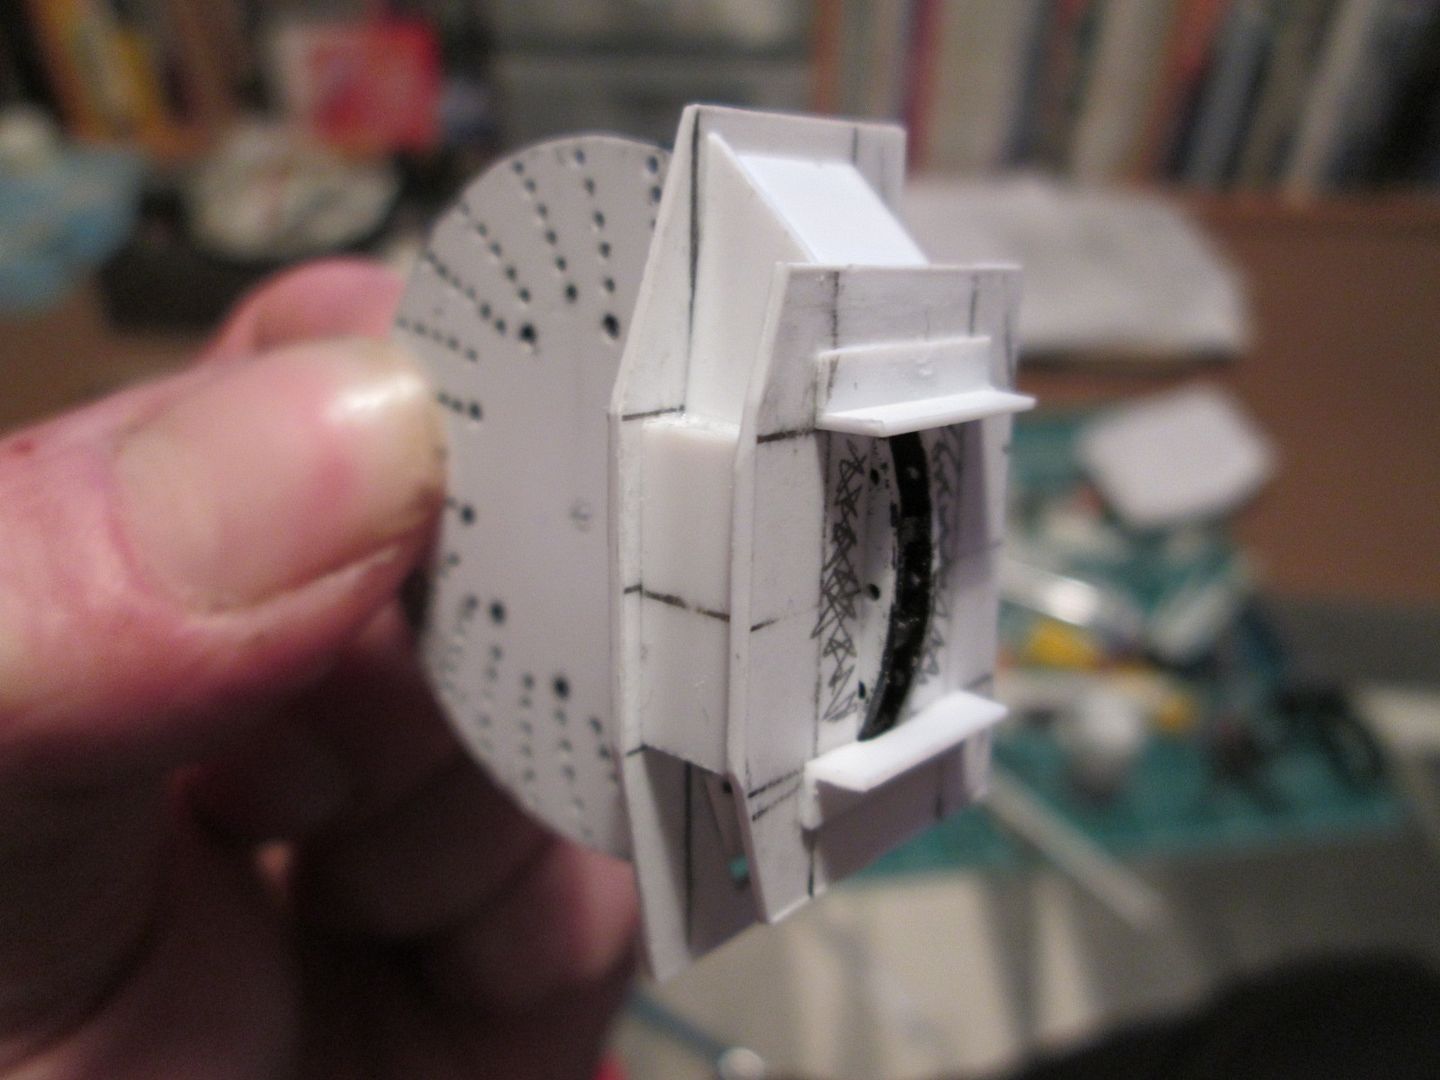 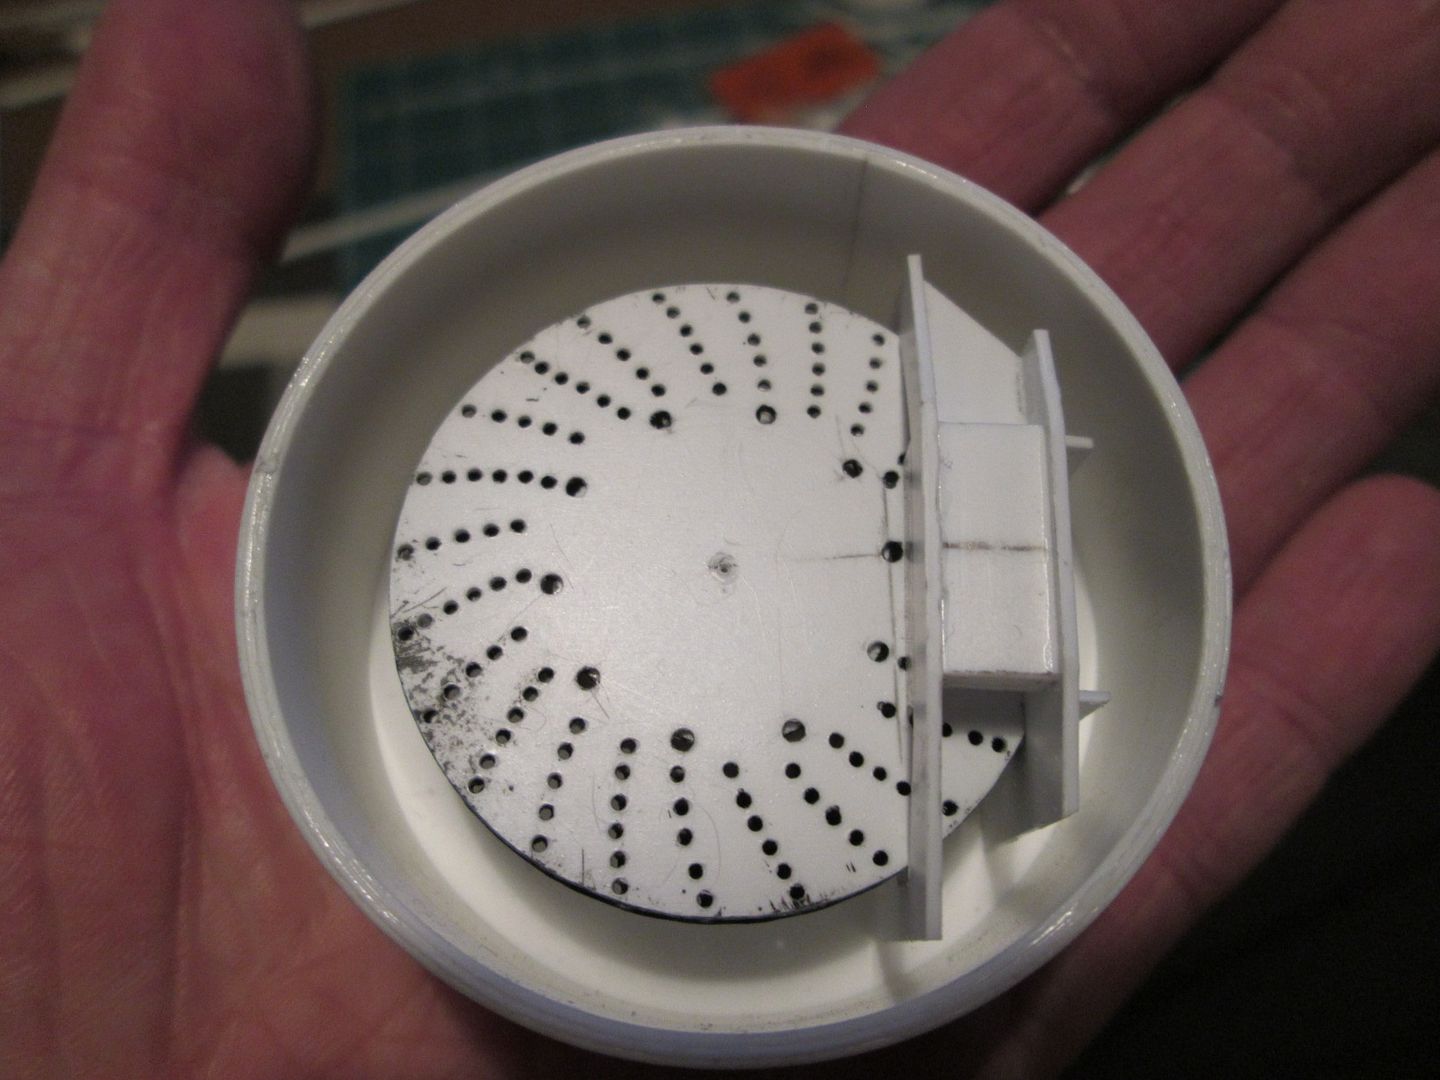 Normally I would make the brake pads as part of the main caliper body...but this time they'll be separate components which can be slotted into place. I've been checking the size of the caliper against both the front wheel rim and on the rear trailing arm (where it has to fit inside the damper pick-up) - so far, so good. Happy that this method would work, I made templates for the two 0.75mm plates and started on the 'production' calipers:  The two plates are separated with lengths of 1/4" x 1/8" box section, with an extra strip of channel inside - this creates the gap for the pads. The angled pieces top and bottom are cut from 3/8" x 1/4" box. You can see from the caliper on the right where I've started closing off the ends of the central box-and-channel sections - this is where the brake line pipework will connect. 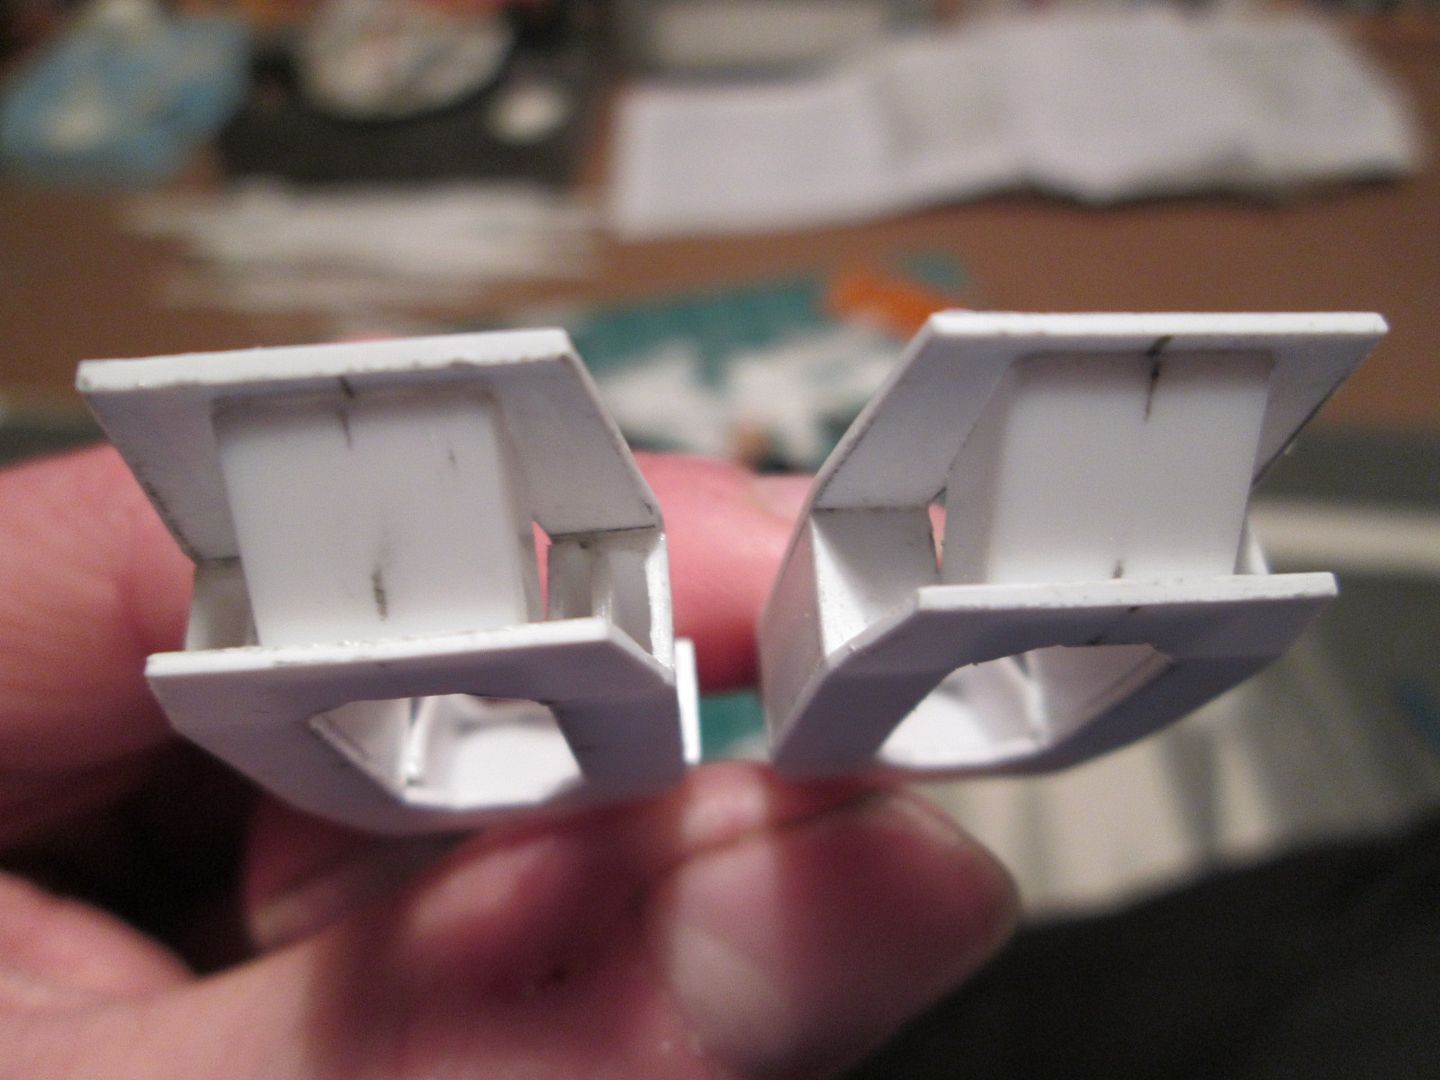 The angled corners of the two 0.75mm plates will be rounded-off eventually, once the outer surface has been built-up with greenstuff. There's also a little more structure to add to the back face surrounding the opening for the brake pads - this will start with short lengths of angle. Although all four calipers are basically identical, I didn't want to launch into making both pairs together - so I'll probably get these two to a suitable point before playing catch-up with the others, before adding the greenstuff and final detailing on all four later. As usual, all plans are subject to change...! Have a good week, everyone, SB |
|
|
|
|
| The Following User Says Thank You to ScratchBuilt For This Useful Post: |
JesusM (04-08-2013)
|
|
04-08-2013, 04:19 PM
|
#214 | |
|
AF Regular
Join Date: Jan 2009
Location: Zuid Holland
Posts: 278
Thanks: 2
Thanked 2 Times in 2 Posts
|
Re: 1/8 Porsche 935/78 'Moby Dick'
Very good ScratchBuilt: your work is an example for me...thanks
|
|
|
|
|
|
04-09-2013, 02:29 AM
|
#215 | |
|
Blarg! Wort Wort Wort!
Join Date: Mar 2006
Location: Quezon City
Posts: 2,120
Thanks: 64
Thanked 101 Times in 100 Posts
|
Re: 1/8 Porsche 935/78 'Moby Dick'
wow. even the pads slot into place. now that is excellent detailing there

__________________
olly olly oxen free |
|
|
|
|
|
04-09-2013, 05:32 AM
|
#216 | |
|
AF Newbie
Join Date: Jul 2008
Location: Johannesburg
Posts: 35
Thanks: 4
Thanked 0 Times in 0 Posts
|
Re: 1/8 Porsche 935/78 'Moby Dick'
Great, great work-awesome
__________________
Regards Martin |
|
|
|
|
|
04-09-2013, 12:02 PM
|
#217 | |
|
AF Regular

Join Date: Oct 2010
Location: Hamburg
Posts: 175
Thanks: 2
Thanked 26 Times in 23 Posts
|
Re: 1/8 Porsche 935/78 'Moby Dick'
Aawweessoommee
__________________
  
|
|
|
|
|
|
04-10-2013, 09:13 AM
|
#218 | |
|
AF Enthusiast
Join Date: Mar 2009
Location: Madrid
Posts: 649
Thanks: 109
Thanked 68 Times in 67 Posts
|
Re: 1/8 Porsche 935/78 'Moby Dick'
Fantastic!! No more words.
|
|
|
|
|
|
04-10-2013, 02:15 PM
|
#219 | |
|
AF Regular

Join Date: Jun 2005
Location: london
Posts: 414
Thanks: 3
Thanked 22 Times in 20 Posts
|
Re: 1/8 Porsche 935/78 'Moby Dick'
Another great update
|
|
|
|
|
|
04-14-2013, 02:57 PM
|
#220 | |
|
AF Enthusiast
Thread starter
Join Date: Nov 2008
Location: Norwich
Posts: 649
Thanks: 21
Thanked 111 Times in 87 Posts
|
Re: 1/8 Porsche 935/78 'Moby Dick'
Hello again,
Today has been motorsport from start to finish - Chinese Grand Prix at breakfast, an hour or so playing Forza 4 mid-morning, then 6 hours of WEC from Silverstone courtesy of Radio Le Mans (whilst I was modelling). Next weekend I'll be off to Brands Hatch for our first two FF2000 races of the season, so I've only got the next few evenings to continue making progress.... However, progress is definitely being made. First job of the week was to add some extra styrene plates to the caliper bodies, and fit the small angle sections which will help to create the 'overhang' either side of the pad slot:  I added several strips of small angle section to give the outer faces of the caliper some curves - and to give the greenstuff something to key to:  Here's the result:  I've left the bottom half of the second caliper exposed - this will be my reference for the second pair. I decided to continue with the other one so I would hopefully have something interesting to show you tonight! So, the next job was to attack the greenstuff with emery cloth and file to get it into shape. The fin detailing is all 0.5mm strip - a bit fiddly to glue in position, but it has to be there. I've given the outer caliper edges an initial filing to remove the corners, but I'm not totally happy with the shape - I think this will need more work. On the other side of the caliper there are two large plugs with a recessed hex-socket - creating a male hex is no problem, but how do I make a female hex? The answer was prompted by thinking about Richy78's 'Black Widow' 936 thread, and how he made a punch to create the headlight and duct shapes. So, I added two thin rings to create the outer edges, then filled them with greenstuff - a piece of suitable hex-rod styrene was pushed into the greenstuff, and this was the result:  Thanks, Richy78! I let the greenstuff harden overnight then filed it to the correct thickness this morning. As you'll see, the inner face of the caliper is 'snug' against the damper mounting on the trailing arm. Another quick job was to make a prototype brake pad - these will be a 0.5mm backing plate, with 2mm thick strip glued together and shaped to create the friction material. It needs refining, but the idea works - there'll be some retaining clips added to the caliper to hold the pads in place, too.  By this point I'm starting to feel quite happy with how this is turning out - there's still more detail to add, but the basic shape is right. To mount the calipers I would need a pick-up on the trailing-arm, and a pair of lugs on the caliper itself. Rather than relying on glue to hold everything together I decided to pin the caliper to the trailing-arm - the pick-up would disguise the pin, and the caliper lug would be decoration, rather than functional. I used a 14mm length of 1/4 x 1/8" box to create the trailing-arm pick-up, filed to suit the curve of the hub carrier section. A smaller piece of solid styrene was glued inside, then drilled through:  All I've got to do now is make some lug plates for detailing to slip between the pick-up and the damper mounting. It's not obvious from this final photo, but the hex-socket detailing on the side is virtually touching the damper mount -no problem, though!  I'll work out how to mount the front calipers in a couple of weeks - during the next few evenings I'll start making the basic components for the second pair, then work on getting all four to the same level. I doubt if I'll have anything 'new' to show by next weekend, though, so don't be surprised if there's not a major update until the end of the month. Have a good week, SB Last edited by ScratchBuilt; 04-14-2013 at 03:10 PM. Reason: Tried to replace missing photos...probably failed... |
|
|
|
|
|
04-15-2013, 06:35 AM
|
#221 | |
|
AF Newbie

Join Date: Sep 2011
Location: Bellbird
Posts: 46
Thanks: 0
Thanked 2 Times in 2 Posts
|
Re: 1/8 Porsche 935/78 'Moby Dick'
Thanks for the update Christian. You mentioned Forza 4 in your update....thinking about buying X Box and Forza 4 as I've come to dead end with GT 5 and the thought of racing the Flying Lizard Porsches is just too appealing. What's your thoughts on Forza 4 -vs- GT5??
Regards Rick H |
|
|
|
|
|
04-15-2013, 01:38 PM
|
#222 | |
|
AF Enthusiast
Join Date: Sep 2011
Location: Redwood City, California
Posts: 651
Thanks: 0
Thanked 39 Times in 39 Posts
|
Re: 1/8 Porsche 935/78 'Moby Dick'
Fabulous work as usual,
ianc |
|
|
|
|
|
04-15-2013, 04:40 PM
|
#223 | |
|
AF Regular
Join Date: Jun 2005
Location: london
Posts: 414
Thanks: 3
Thanked 22 Times in 20 Posts
|
Re: 1/8 Porsche 935/78 'Moby Dick'
I like that, very good.
|
|
|
|
|
|
05-05-2013, 01:59 PM
|
#224 | |
|
AF Enthusiast
Thread starter
Join Date: Nov 2008
Location: Norwich
Posts: 649
Thanks: 21
Thanked 111 Times in 87 Posts
|
Re: 1/8 Porsche 935/78 'Moby Dick'
Evening all - back again.
Although it's a couple of weeks since I posted, I've been busy getting all four calipers brought up to the same level - and making progress in one or two other areas, too. Firstly, I made the second pair of panels for the caliper bodies, added the box-section spacers in the middle, and used one of the first pair as the pattern to add all the plates and ribbing for the greenstuff:  Once I'd got the main caliper bodies sorted out, I wanted to make sure I could create a strong mounting on the front uprights, as on the rear. To provide room for adjustment I used a 3mm thick ring, to which I could attach the mounting bracket and pin through the whole lot into the caliper - the ring would slide over the hub-carrier and could be fixed in place to suit:  As before, the mounting bracket started off as a 15mm length of 1/4 x 1/8" box, with plenty of filing to fit the centre ring. The second mounting is not used, but as it is visible on the car it required extra shaping. After gluing everything together I used a little greenstuff to smooth the transition from the ring to the mounting:   I've also made a couple of slightly thinner rings to add to the outer edge of the hub-carrier - these will give a little extra support to the brake disc assembly.  The capscrew used for the stub-axle is not final! This is another area where I want to improve over the 908, but for now I just need something there to hold everything together and prove it works. So, all four discs have been opened out to suit the 1/4UNF thread, and I've made a couple of sleeves to fit inside the rear trailing arms to get the correct size. Here's the front uprights, with discs and calipers:  Finally, I've made a start on making the eight individual brake pads. Took a while to decide which compound of styrene to use (serious stuff, this) and settled on the reliable 'Evergreen' white! I glued three lengths of 2mm thick strip together to create the pad, and used 0.5mm sheet for the backing plate:  ...and to prove that they fit:  Now to make the other four, and create the retaining clips. The calipers are not finished yet - I need to add all the connections for the pipework, do a little more shaping here and there, and finish off the mounting lugs - but they're complete enough to work with . The last 'big' job will be to sort out the disc bells - then I can finalise the wheel centres. So, the rolling chassis moves a little closer. I'm racing again next weekend (at Snetterton), so it's another opportunity to show everyone what I've been up to - they've not seen anything from me since I finished the 908. I want to assemble as much of the model as I can, so hanging on the four corners will certainly look good. Whether it will look like a year or so's work is another matter... As always, have a good week. SB |
|
|
|
|
|
05-06-2013, 02:27 PM
|
#225 | |
|
AF Enthusiast
Join Date: Sep 2011
Location: Redwood City, California
Posts: 651
Thanks: 0
Thanked 39 Times in 39 Posts
|
Re: 1/8 Porsche 935/78 'Moby Dick'
Looks great as usual SB! How are you making the hex head bolts for the brackets holding the strut to the hub?
ianc |
|
|
|
|
| ||||||||||||||||||||||||||||||||||||||
|
POST REPLY TO THIS THREAD |
 |
|
|


