|
|
|

|
|
| Search | Car Forums | Gallery | Articles | Helper | AF 350Z | IgorSushko.com | Corporate |
|
| Latest | 0 Rplys |
|
|||||||
| Car Modeling Share your passion for car modeling here! Includes sub-forum for "in progress" and "completed" vehicles. |
 |
 Show Printable Version | Show Printable Version |  Email this Page | Email this Page |  Subscribe to this Thread
|
|
|
Thread Tools |
 04-25-2007, 05:42 PM
|
#16 | |
|
AF Enthusiast

Join Date: Sep 2004
Location: Colorado Springs, Colorado
Posts: 1,220
Thanks: 0
Thanked 1 Time in 1 Post
|
Re: How to do your own PE parts in 1 hour ;)
Damn, that is so cool! I n all reality it doesn't seem that hard. I etched years ago but nothing this exact. All I need is,.........well,..........everything. Looks great, I will be the first and ask to buy a set. lol.
 |
|

|

|
|
04-25-2007, 06:27 PM
|
#17 | |
|
AF Enthusiast
 
Join Date: Jun 2004
Location: Houston, Texas
Posts: 1,885
Thanks: 0
Thanked 0 Times in 0 Posts

|
Re: How to do your own PE parts in 1 hour ;)
lol this is great!
Now, go start a business!
__________________
 
|
|
|
|
|
|
04-25-2007, 06:37 PM
|
#18 | |
|
AF Enthusiast

Join Date: Mar 2004
Location: Calgary
Posts: 1,071
Thanks: 0
Thanked 0 Times in 0 Posts
|
Re: How to do your own PE parts in 1 hour ;)
Great tutorial Gio. I have a few questions.
#1 Do have any suggestions on a CAD/graphic design program? #2 I've scanned decal sheets for masking purposes in the past and always found that I could never get the image to print with the same dimensions as the original sheet. How do you make sure that the image prints off with the exact dimensions? #3 Do you have a picture of the UV box you use (without the cardboard)? #4 I was a little unclear as the where the double-sided tape goes? Other than that thanks for sharing very well written with great pictures. Mike.
__________________
    |
|
|
|
|
|
04-25-2007, 06:40 PM
|
#19 | |
|
AF Regular

Join Date: Nov 2002
Posts: 208
Thanks: 0
Thanked 1 Time in 1 Post
|
Re: How to do your own PE parts in 1 hour ;)
what the ...
|
|
|
|
|
|
04-25-2007, 08:59 PM
|
#20 | |
|
AF Enthusiast
Join Date: Apr 2004
Location: C
Posts: 527
Thanks: 0
Thanked 3 Times in 3 Posts
|
Re: How to do your own PE parts in 1 hour ;)
do you take custom orders?
|
|
|
|
|
|
04-25-2007, 10:07 PM
|
#21 | ||
|
AF Fanatic

Join Date: Dec 2004
Location: Up the creek with no paddle
Posts: 5,888
Thanks: 7
Thanked 16 Times in 15 Posts
|
Re: How to do your own PE parts in 1 hour ;)
Brilliant stuff buddy
 Your pictures makes it look so easy (then your Polita make it hard again  j/k) j/k)Seriously, great job  Quote:
I was going to email Gio with the EXACT same question today but I'll just tack on to yours instead 
__________________
Guideline for happy modeling: Practice on scrap. Always try something new. Less is more. "I have a plan so cunning, you could put a tail on it and call it a weasel" - Edmund Blackadder |
||
|
|
|
|
04-26-2007, 12:42 AM
|
#22 | |
|
Authorized Vendor
Thread starter

Join Date: Oct 2005
Location: Vicenza - veneto de rassa
Posts: 3,909
Thanks: 6
Thanked 46 Times in 41 Posts
|
Re: How to do your own PE parts in 1 hour ;)
#1 Do have any suggestions on a CAD/graphic design program?
Two ways: if you need a service to etch you need an electronic CAD with Gerber languages or some graphic professional tools like Illustrator, Freehand or CorelDraw since they have to print on slide. If you like I think to do the same home job like me you'll use everithing willprint on an ink-jet: also Word LOL. BTW I reccomend Adobe Illustrator (or similar) for the fine set-up you'lldo on line weight and CMYK colors, for designing tools I guess AutoCad (or similar) give more 2d options smoothing and cornering lines. Illustrator have some great tools like Boolean 2d operation and offsets that allow you to do the job quickly. #2 I've scanned decal sheets for masking purposes in the past and always found that I could never get the image to print with the same dimensions as the original sheet. How do you make sure that the image prints off with the exact dimensions? I guess it depends just o the scanner dialog and print dialog boxes: I have professional gears (since my job) but I guess also with cheap tools you'll have exactly the same size: at least you'll check everything in Photoshop as a postoprocessor: PSd help me ever to rotate right the scan, check X/Y sizes (to avoid strech) do optimizations. I'm used to scan images at grayscale, 1200 dpi (you'll have something like 1600% zoom level without aliasing). #3 Do you have a picture of the UV box you use (without the cardboard)? Yep: that before I tuned up it raising grass of approx 10 cm, but with an old tall scanner you'll do right from the start: 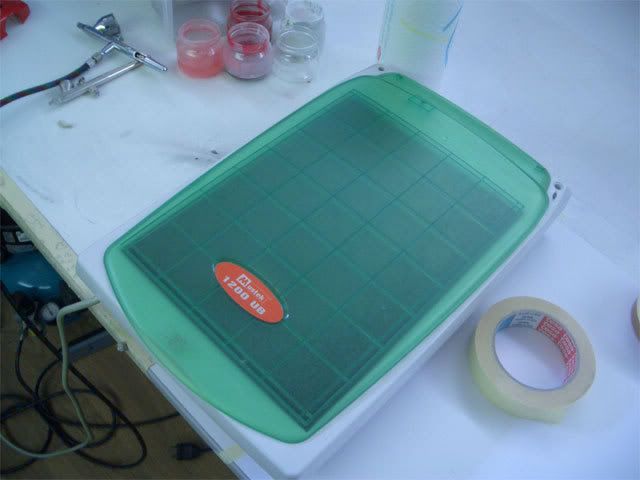 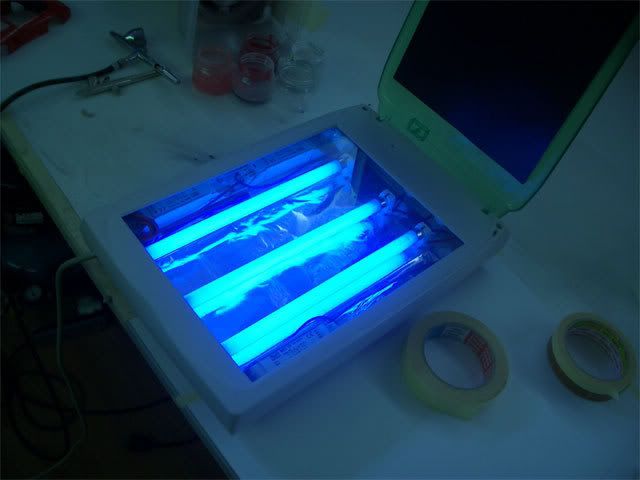 #4 I was a little unclear as the where the double-sided tape goes? double sided tape keep togheter two slides: so I fixed the lower with tape, overlapped well, fixed with tape the top one in the lower side, folded it, placed the tape in the lowe slide and unfold teh top one, seem a joke but is really so easy to do, try with two piece of paper 
__________________
 gio gio
|
|
|
|
|
|
04-26-2007, 04:13 AM
|
#23 | |
|
AF Regular
Join Date: Dec 2005
Location: cape town
Posts: 316
Thanks: 0
Thanked 0 Times in 0 Posts

|
Re: How to do your own PE parts in 1 hour ;)
DUDE! that is just flippin awesome.
im a graphic designer.....now for my questions. ok the same /similar process is used for printing books etc. we also make plates, with positives..(acitate clear sheets) we make the etched plates from aliminium and not steel will it still work? i know its abit softer than brass or steel |
|
|
|
|
|
04-26-2007, 05:27 AM
|
#24 | |
|
Razor Sharp Twit
 
Join Date: Mar 2004
Location: london
Posts: 5,863
Thanks: 0
Thanked 25 Times in 21 Posts
|
Re: How to do your own PE parts in 1 hour ;)
just so there is a frame of reference for relevent costs and achieveable results, in the UK (london) there's a place that can do Custom Photo etch for you that i've used before on an architectural project.
4Dmodel shop etching
__________________
AF's Guidelines Read them. __________________  Currently in the process of re-hosting my photos. If any go missing, drop me a PM. |
|
|
|
|
|
04-26-2007, 05:51 AM
|
#25 | ||
|
Authorized Vendor
Thread starter
Join Date: Oct 2005
Location: Vicenza - veneto de rassa
Posts: 3,909
Thanks: 6
Thanked 46 Times in 41 Posts
|
Re: How to do your own PE parts in 1 hour ;)
Quote:
__________________
gio
|
||
|
|
|
|
04-26-2007, 05:54 AM
|
#26 | |
|
Authorized Vendor
Thread starter
Join Date: Oct 2005
Location: Vicenza - veneto de rassa
Posts: 3,909
Thanks: 6
Thanked 46 Times in 41 Posts
|
Re: How to do your own PE parts in 1 hour ;)
FORGOT A THING
I said something about minimum size doing the artwork: when I said 0.1mm plus 25% it it referred to my board thickness that was 0.1mm: so the minimum size of your details depend of the material thickness: if you're etching a 1mm board you cant (or acid would eat) do details smaller than 1 mm (plust something for safe)
__________________
gio
|
|
|
|
|
|
04-26-2007, 11:47 AM
|
#27 | ||
|
Captain Over Engineer
Join Date: Feb 2003
Location: New York, New York
Posts: 6,711
Thanks: 27
Thanked 29 Times in 23 Posts

|
Re: How to do your own PE parts in 1 hour ;)
Quote:
__________________
-Mike AF Director of Media / Photographer  mike.lawrence@automotiveforums.com | AutomotiveForums.com | Flickr Gallery |
||
|
|
|
|
04-26-2007, 05:02 PM
|
#28 | |
|
AF Enthusiast
Join Date: Mar 2004
Location: Calgary
Posts: 1,071
Thanks: 0
Thanked 0 Times in 0 Posts
|
Re: How to do your own PE parts in 1 hour ;)
Thanks for the answers Gio. I have Adobe Illustrator CS2, just need to learn how to use it. I got an old scanner around here somewhere. Looks like a little time, effort and chemicals and I'll be good to go. Thank you very much for sharing this with us. Thanks to you I am a better modeler and broke (lol)
Mike.
__________________
|
|
|
|
|
|
04-26-2007, 07:08 PM
|
#29 | |
|
AF Newbie
Join Date: Apr 2007
Location: Cleveland, Ohio
Posts: 1
Thanks: 0
Thanked 0 Times in 0 Posts
|
Re: How to do your own PE parts in 1 hour ;)
woah what an amazing guide, awesome!
__________________
Tamiya Enzo 1/24 (Yellow) Revell Enzo 1/24 (Black) Revell Tuner Integra (Light Blue) Revell F50 (White) |
|
|
|
|
|
04-29-2007, 12:49 AM
|
#30 | |
|
AF Regular
Join Date: Jul 2003
Posts: 446
Thanks: 5
Thanked 1 Time in 1 Post
|
Re: How to do your own PE parts in 1 hour ;)
Awesome tutorial Giovanni.
I just need to get the light box and I can do my own etching. Where can I get the UV Lamps from? Any ideas? Regards Nens
__________________

|
|
|
|
|
|
|
POST REPLY TO THIS THREAD |
 |
| Thread Tools | |
|
|

