|
|
|

|
|
| Search | Car Forums | Gallery | Articles | Helper | AF 350Z | IgorSushko.com | Corporate |
|
| Latest | 0 Rplys |
|
|||||||
| WIP - Motorsports Post topics for any "Work In Process" motorsports vehicles in this sub-forum. |
 |
 Show Printable Version | Show Printable Version |  Email this Page | Email this Page |  Subscribe to this Thread
|
|
|
Thread Tools |
 06-27-2019, 07:13 AM
|
#16 | ||
|
AF Enthusiast
Thread starter
Join Date: Mar 2009
Location: Madrid
Posts: 649
Thanks: 109
Thanked 68 Times in 67 Posts
|
Re: Lancia Delta S4 Marlboro Beemax 1/24
Quote:
|
||

|

|
|
07-02-2019, 08:40 AM
|
#17 | |
|
AF Enthusiast
Thread starter
Join Date: Mar 2009
Location: Madrid
Posts: 649
Thanks: 109
Thanked 68 Times in 67 Posts
|
Re: Lancia Delta S4 Marlboro Beemax 1/24
Continuamos modificando piezas del Lancia Delta S4, y lo primero que os muestro es como queda la entrada de aire al turbo con su filtro, así como el radiador de aceite, ambos con la calca de fibra colocada:
We continue modifying pieces of the Lancia Delta S4, and the first thing that I show you is how the air inlet to the turbo with its filter is, as well as the oil radiator, both with the fiber decal placed: 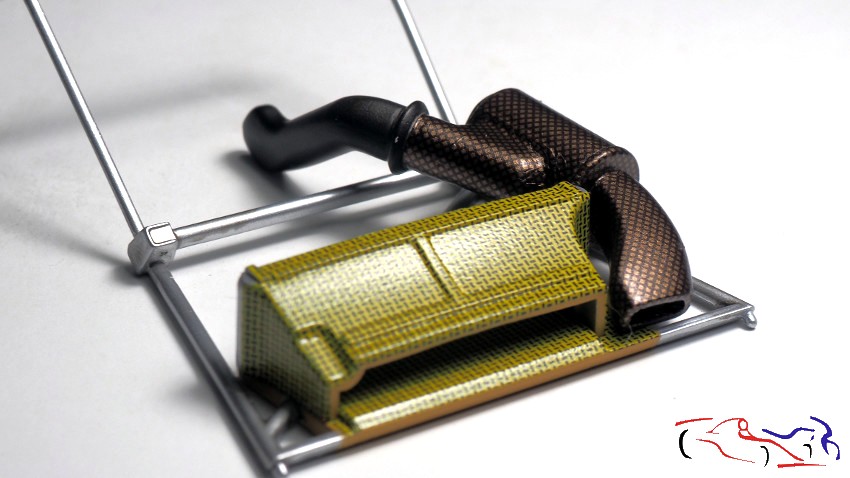 Pero antes de decir como lo hice, vamos paso a paso y empezamos por los botes de liquidos que lleva el coche delante del parabrisas. Recordad que los eliminé para darle profundidad, y después de imprimados, los pinté de blanco. A la izquierda, veis las tapas de dichos botes pintadas de negro satinado. But before saying how I did it, we go step by step and start with the cans of liquids that the car has in front of the windshield. Remember that I eliminated them to give them depth, and after priming, I painted them in white. On the left, you see the covers of these boats painted in black satin.  Para dar el tono amarillento tipico de esos botes, les pongo una gota de óleo MIG a cada cara: To give the yellowish tone typical of those boats, I put a drop of MIG oil on each face:  Con un pincel plano y disolvente, los voy difuminado dejando más cantidad de pintura en la base, simulando la linea del líquido. Después les pondré las tapas. With a flat brush and solvent, I will blur them leaving more paint in the base, simulating the line of the liquid. Then Ill put the covers.  Pasamos al salpicadero y aquí os muestro el original del kit: We went to the dashboard and here I show you the original kit: 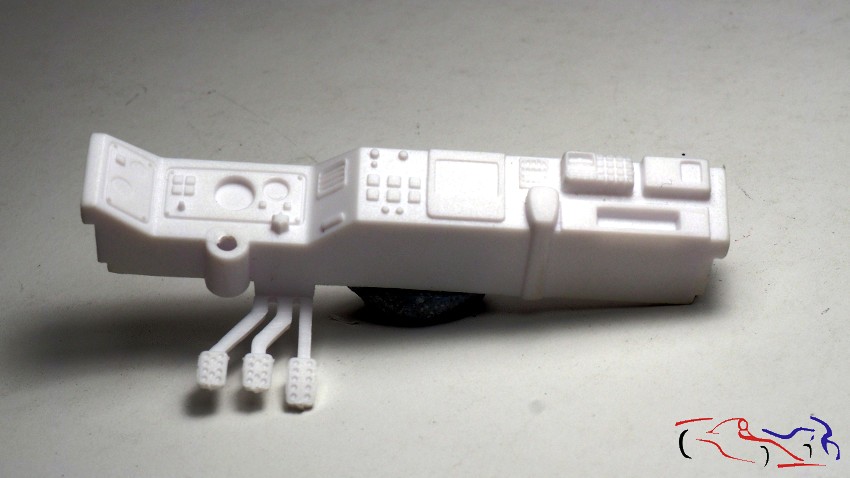 Pero como voy a usar el fotograbado de Hobby Design, elimino todo lo superficial con lima y después lija. También os muestro el fotograbado But since Im going to use Hobby Designs gravure, I eliminate everything superficial with a file and then sandpaper. I also show you the Photoettached 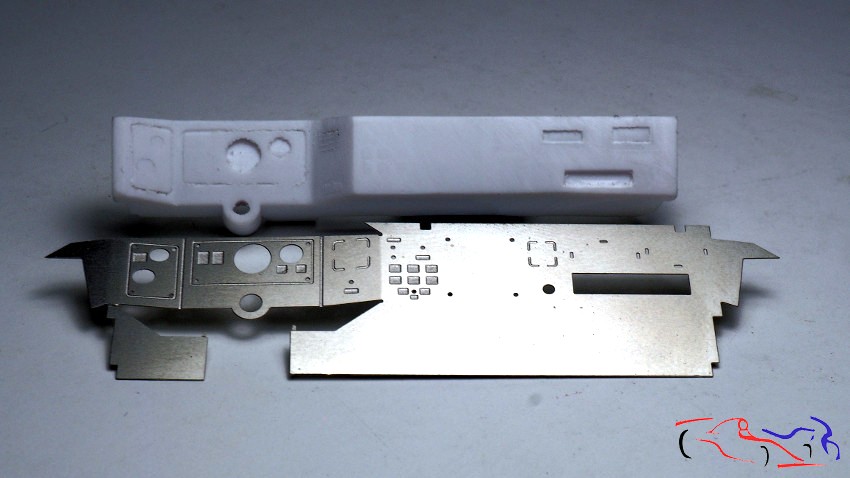 Una vez doblado, miro a ver como emcaja, y veo que es complicado, por lo que elimino del fotograbado las planchas laterales, y la superior que va delante del copiloto: Once folded, I look to see how it emulates, and I see that it is complicated, so I remove the side plates from the gravure, and the upper one that goes in front of the copilot: 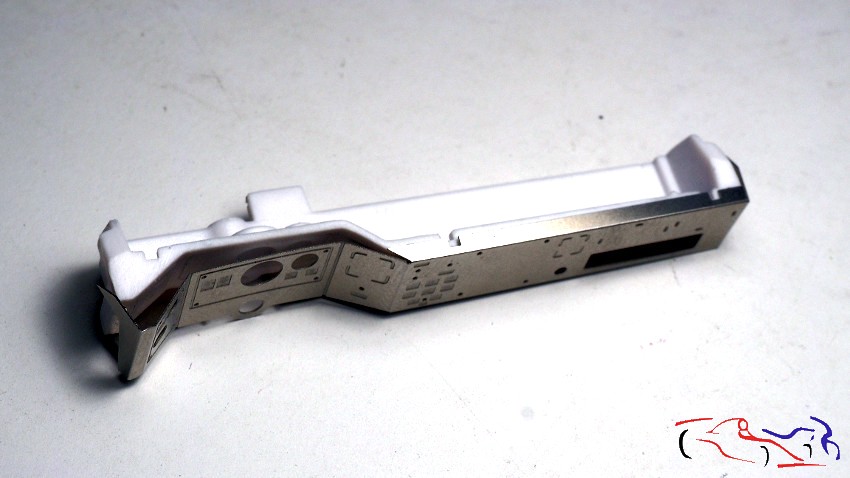 Lo pego con cianocrilato y lo imprimo con Gravity, que también funciona para metales. Siguiente paso es pintar e ir haciendo todas las piezas que lo componen, una a una y pintando antes de pegarlas! I glue it with cyanoacrylate and primed it with Gravity, which also works for metals. Next step is to paint it and make all the pieces that compose it, one by one and painting before gluing them! 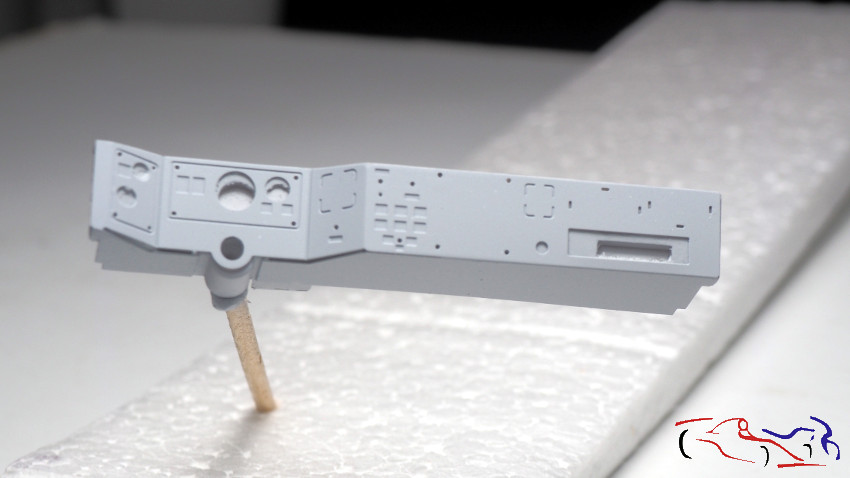 Pasamos a los backets. Una vez imprimados, le doy una capa de negro brillante de Zero, que es la primera vez que uso y me ha resultado muy agradable de usar, con un brillo bastante bueno para aplicar despues la calca de la fibra: We go to the backets. Once primed, I give a layer of bright black Zero, which is the first time I use and it has been very pleasant to use, with a pretty good shine to apply after the decal of the fiber: 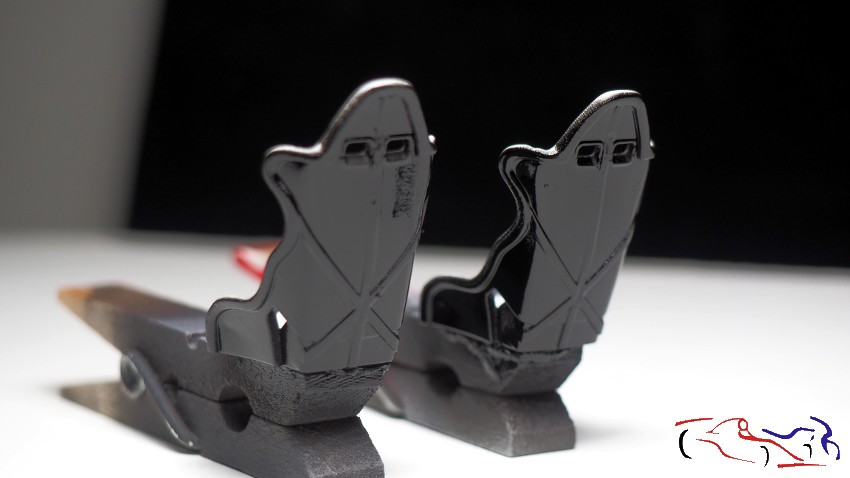 Ya tenemso la calca aplicada, con los líquidos Micro y el secador. Lo siguiente será barnizar para enmascarar, y aplicar el color azul al asiento. We already have the decals applied, with the Micro liquids and the dryer. The following will be varnish to mask, and apply the blue color to the seat. 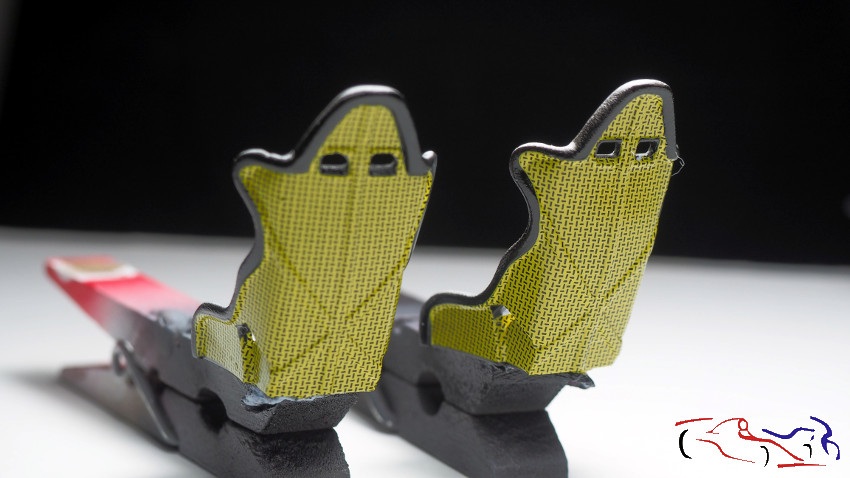 Pasamos a piezas del chasis delantero. Estas dos piezas fueron pintadas en negro satinado, y enmasacardas para aluminio una, y negro plastico la otra, todos los colores de Zero. Aquí ya están las pinturas aplicadas: We move to front chassis parts. These two pieces were painted in satin black, and one masked for aluminum, and black plastic for the other, all the colors of Zero. Here are already the paintings applied: 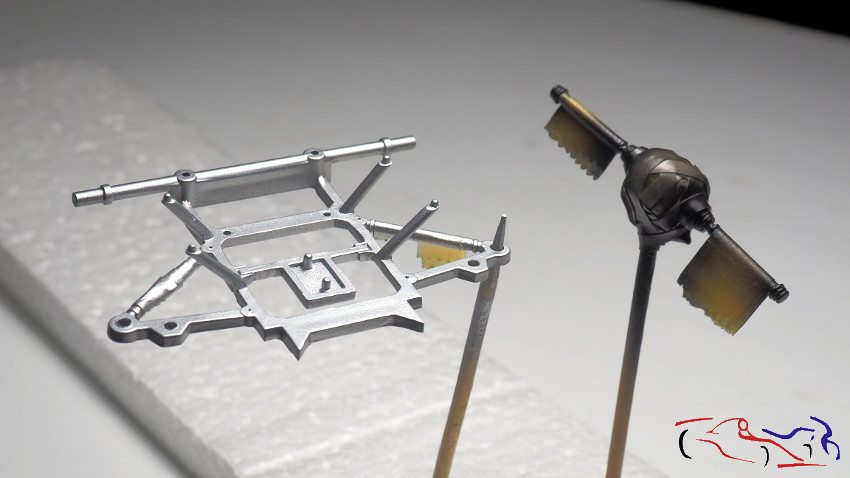 Si quitamos las máscaras y las ponemos en su lugar, queda así: If we remove the masks and put them in their place, it looks like this: 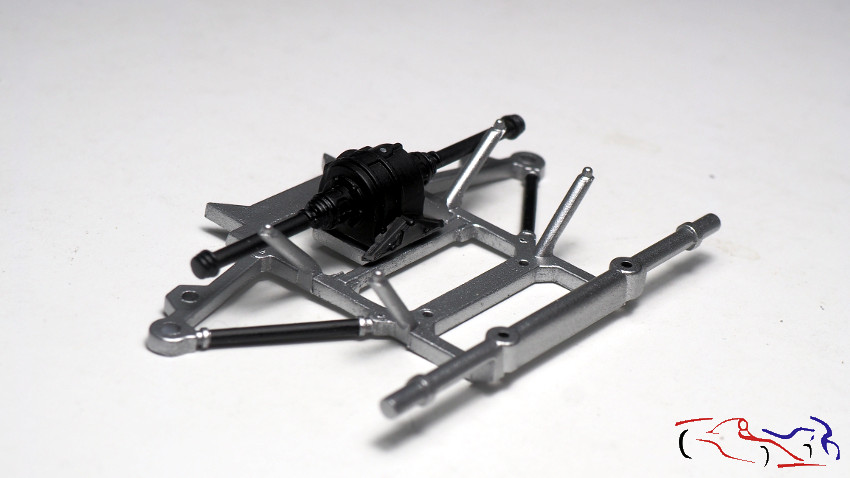 Ahora vamos a modificar las entradas de aire del motor, al Intercooler y al filtro que después va conectado al turbo. Enmascaramos para pintar la parte que va de Kevlar, con la pintura que tiene Zero: Now we are going to modify the air inlets of the engine, the Intercooler and the filter that is connected to the turbo. We masked to paint the part that goes to Kevlar, with the paint that Zero has:  Una vez la pintura está seca, quitamos las máscaras Once the paint is dry, we remove the masks 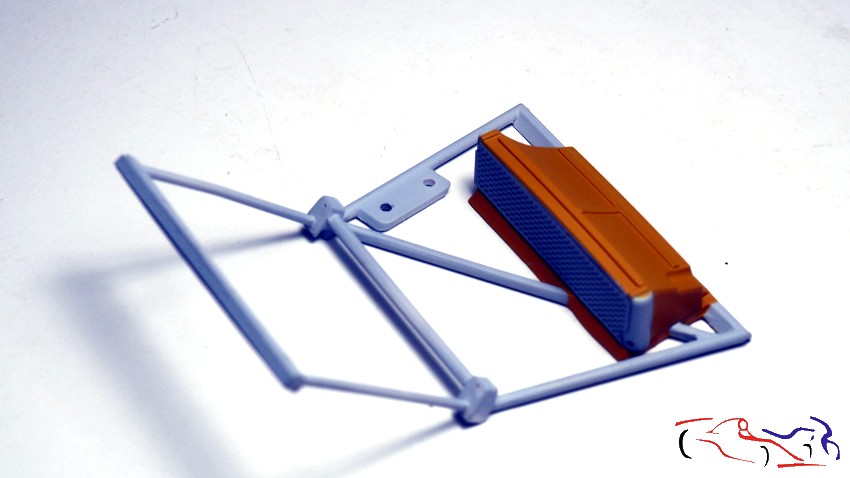 .para ponerlas de nuevo y pintar las barras de aluminio de zero. Quitamos las máscaras y presentamos el conjunto: . to put them back and paint the zero aluminum bars. We remove the masks and present the set: 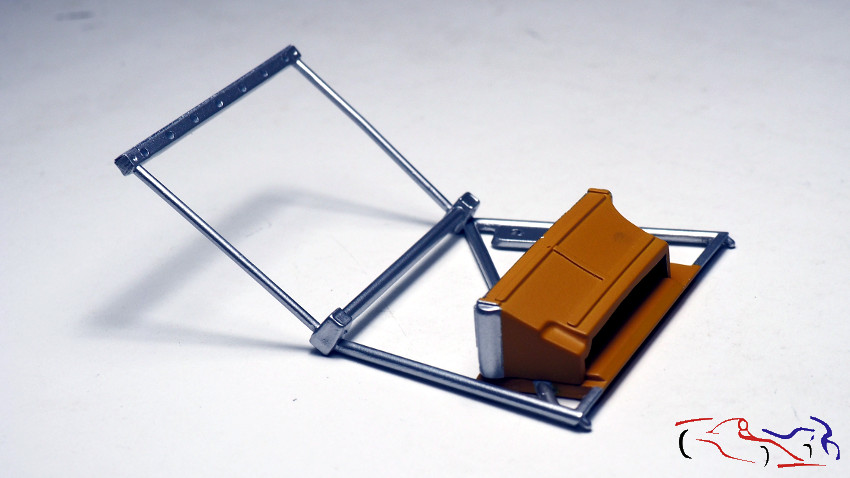 Y aplicamos las calcas del TK extra de Beemax, que se aplican muy bien. Decir que el intercooler tiene la rejilla de fotograbado pegada, a la que hemos recoratdo unas esquinas para poner las entradas de las mangueras de aceite. And we apply the decals of the extra TK of Beemax, which apply very well. To say that the intercooler has the photogravure grid attached, to which we have picked some corners to put the entries of the oil hoses. 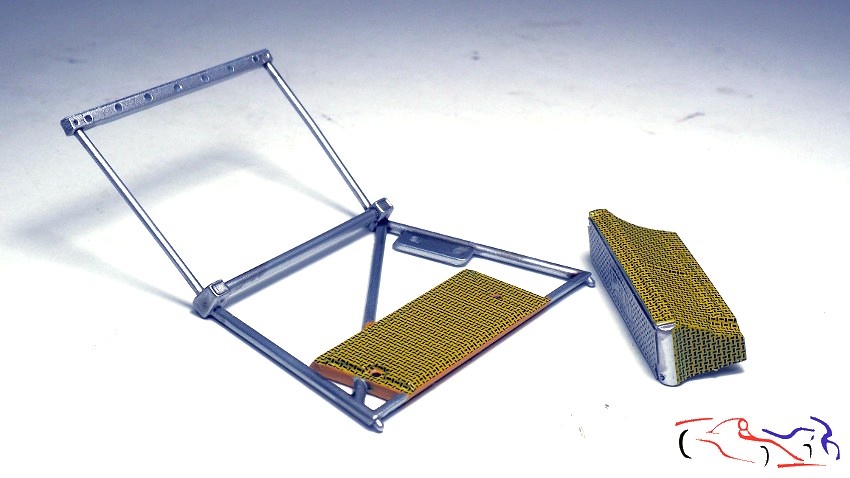 Pasamos al chasis, el cual lo dejamos listo para imprimar, y eso es lo que he hecho: imprimar para ver imprefecciones. We went to the chassis, which we left ready to print, and thats what I did: print to see imprefections. 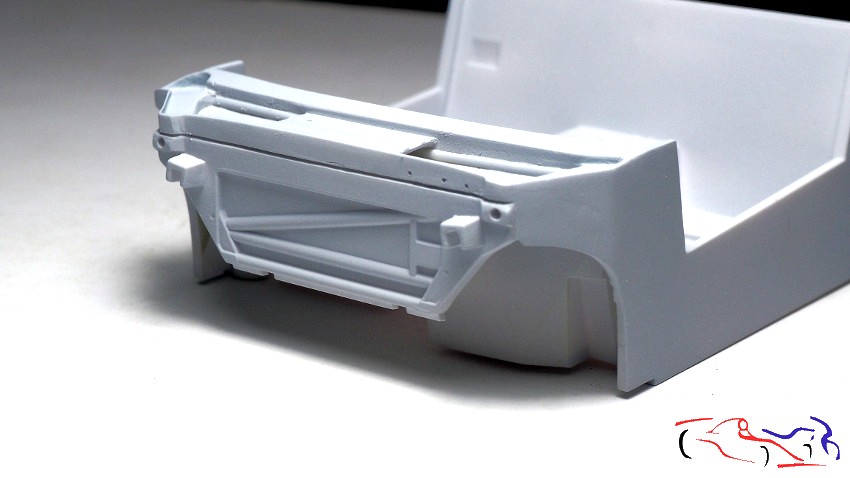 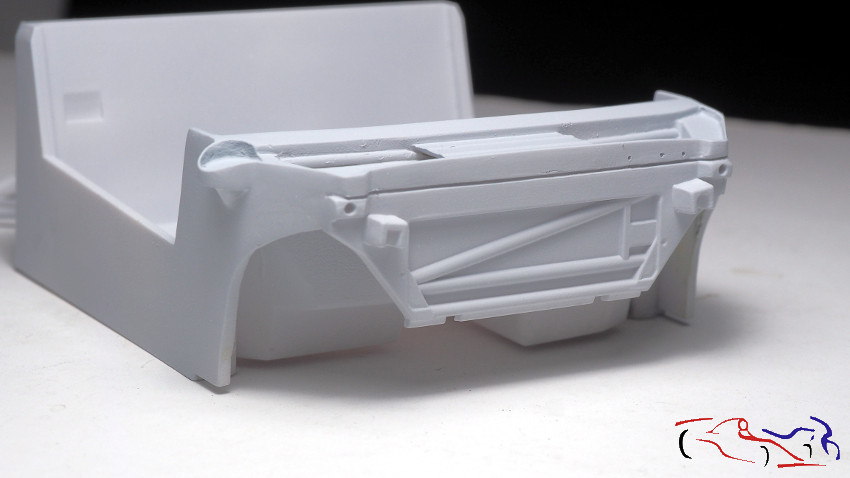 Y volvemos a la pieza de inicio, la del filto de entrada de aire al turbo, que estaba pintada con negro satinado, y en la que tenemos que cubrir con fibra. Lo primero es hacer plantillas con cinta de enmascarar. Ponemos la cinta y marcamos con un lápiz los bordes: And we go back to the starting piece, which is the turbo air intake filter, which was painted in satin black, and we have to cover it with fiber. The first thing is to make templates with masking tape. We put the tape and mark the edges with a pencil: 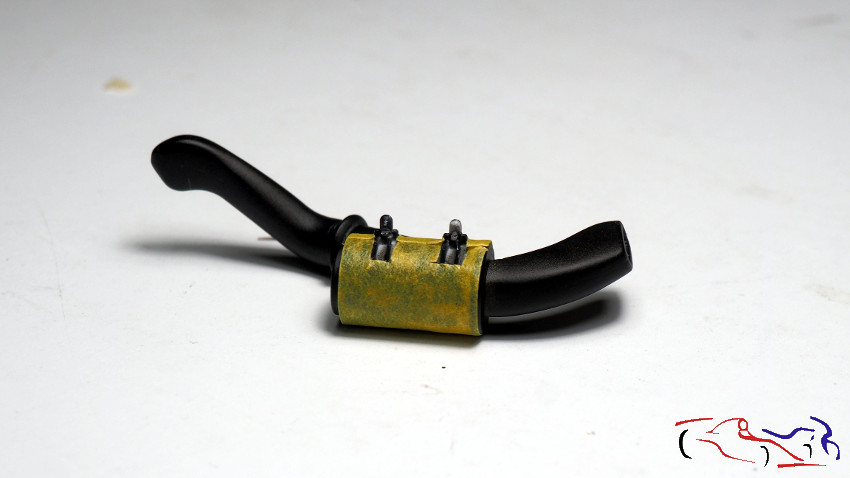 Una vez hechas las plantillas y recortadas con un cutter, las ponemos sobre la plancha de la calca elegida. En este caso, se ven dos tramas y colores diferentes, una para la entrada de aire y el filtro, más dorada, y la del final, más gris. Decir que esas hojas que cogí estaban en mal estado, deshaciendose al salir del agua, con lo que tuve que user otras más nuevas. Once the templates were made and cut with a cutter, we put them on the plate of the chosen decal. In this case, two different patterns and colors are seen, one for the air intake and the filter, more golden, and the one for the end, more gray. To say that those leaves I took were in bad condition, falling apart when leaving the water, so I had to use other new ones. 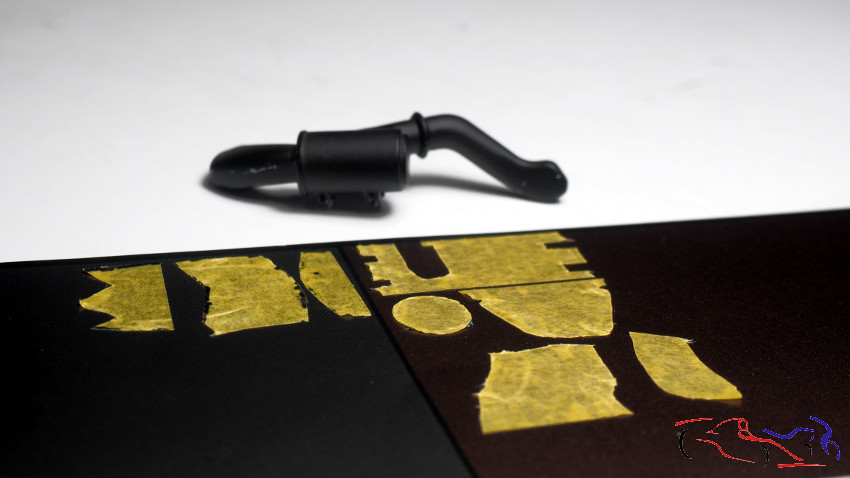 Una vez cortadas, se van poniendo aplicando calor con un secador y los productos micro con una bastoncillo de algodón: Once cut, they are applied with the help of an airdryer and the micro products applied with a cotton swab:  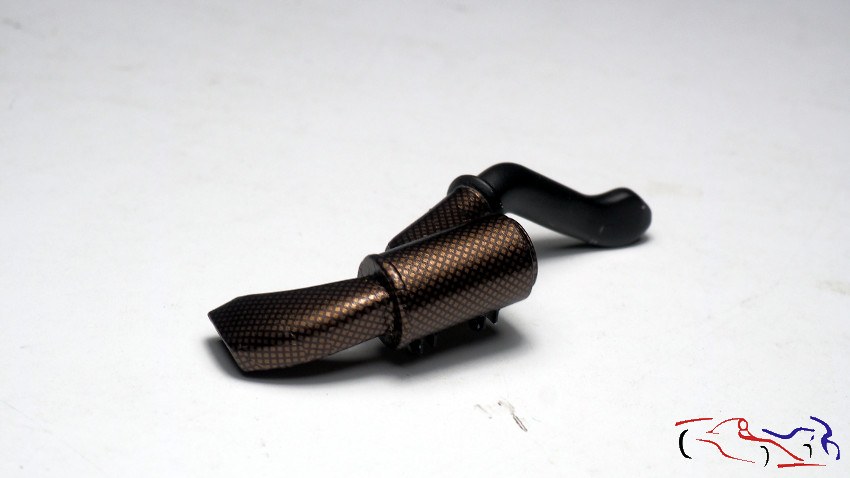 Para terminar, os muestro ahora la primera foto, pero ya sabiendo como se ha realizado: For finishing today, I show you now the first photo, but you already know how it was done: Gracias por ver y comentar! Thanks for viewing and commenting! |
|
|
|
|
|
07-03-2019, 04:05 AM
|
#18 | |
|
AF Regular

Join Date: Sep 2010
Location: Meerhout
Posts: 231
Thanks: 0
Thanked 25 Times in 25 Posts
|
Re: Lancia Delta S4 Marlboro Beemax 1/24
very nice,i love it
__________________
Do you think,I'm crazy |
|
|
|
|
| The Following User Says Thank You to racer1 For This Useful Post: |
JesusM (07-03-2019)
|
|
08-08-2019, 12:35 PM
|
#19 | |
|
AF Enthusiast
Thread starter
Join Date: Mar 2009
Location: Madrid
Posts: 649
Thanks: 109
Thanked 68 Times in 67 Posts
|
Re: Lancia Delta S4 Marlboro Beemax 1/24
Continuamos con el Delta S4 y piezas diversas que voy modificando o rehaciendo para mejorar su detalle.
Vamos con los neumáticos. Después de su imprimación, los pinto con el Negro de Zero para las ruedas. Su acabado es muy bueno como podéis comprobar!! We continue with the Delta S4 and various pieces that I am modifying or redoing to improve its detail. We go with the tires. After priming, I paint them with Zero Black for the wheels. Its finish is very good as you can see!  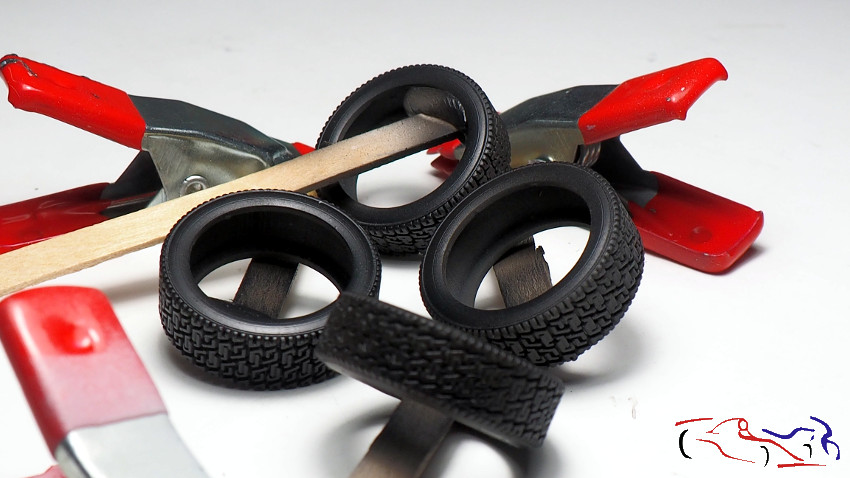 Una vez seco, le ponemos la calca de Pirelli con la ayuda de los productos MIcro y el secador: Once dry, we put the decal of Pirelli with the help of the MIcro products and the dryer: 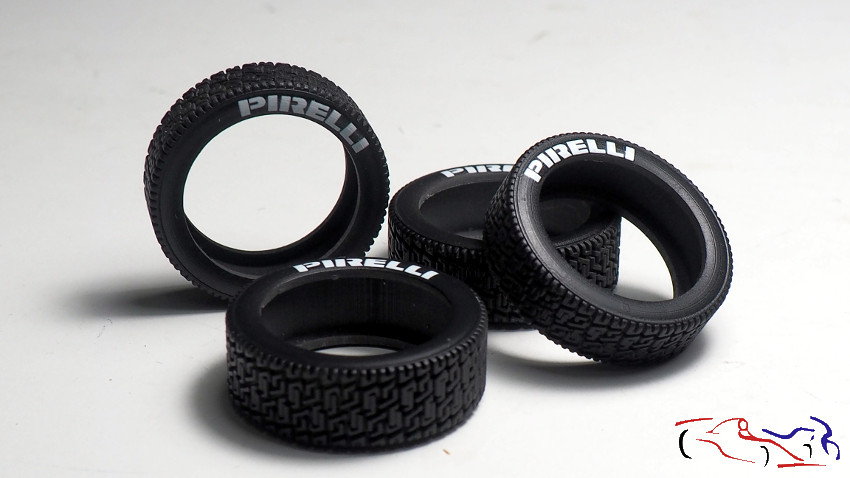 Y si colocamos las llantas, este es el resultado: And if we place the tires, this is the result: 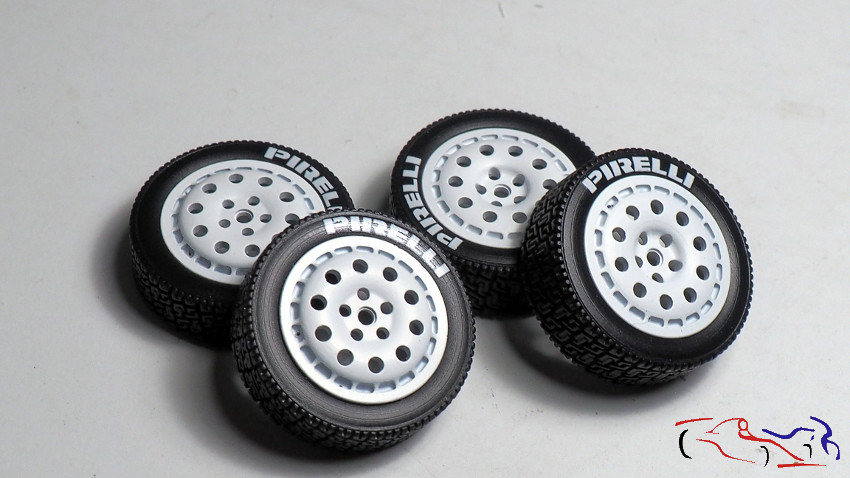 Pasamos al radiador delantero, al que le vamos a añadir los fotograbados de Beemax y de HD. Pero para ello, debemos primero rebajar el ventilador existente de la pieza We go to the front radiator, to which we are going to add the photoetches of Beemax and HD. But for this, we must first lower the existing fan of the piece 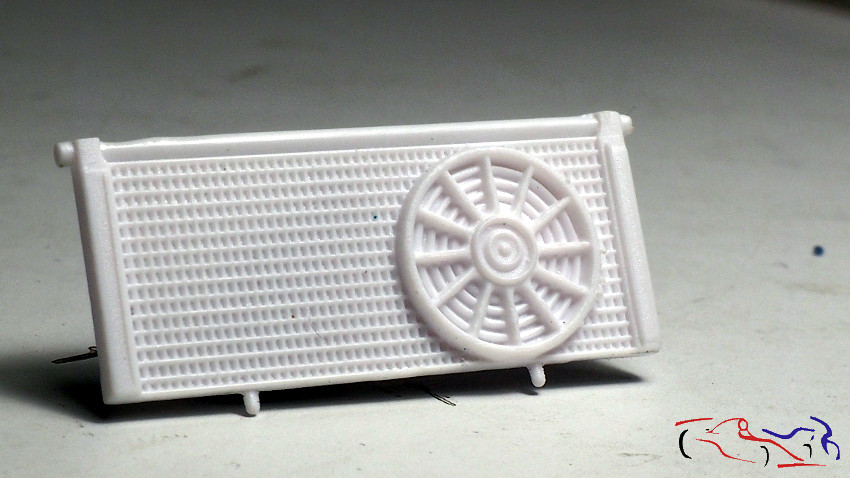 . Y ese filtro de la parte trasera. En su lugar irá el filtro de KMP: . And that filter from the back. In its place will go the KMP filter: 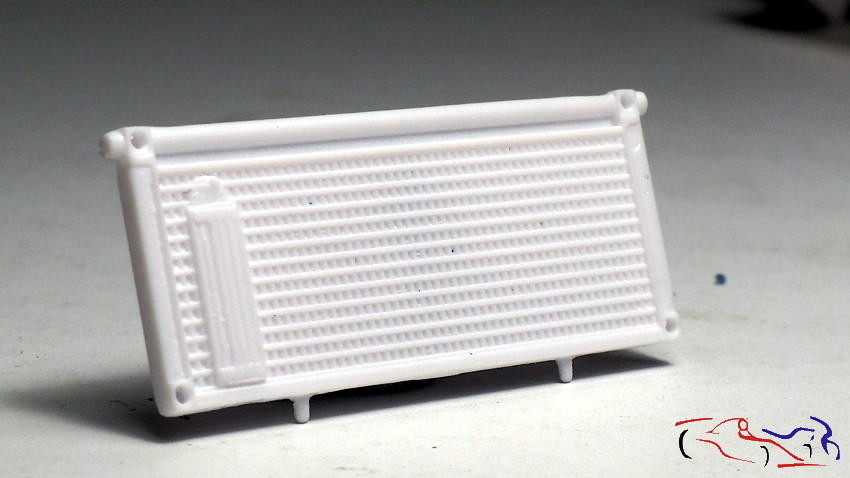 Para ello, utilizamos la fresadora de Proxxon: For this, we use the Proxxon milling machine: 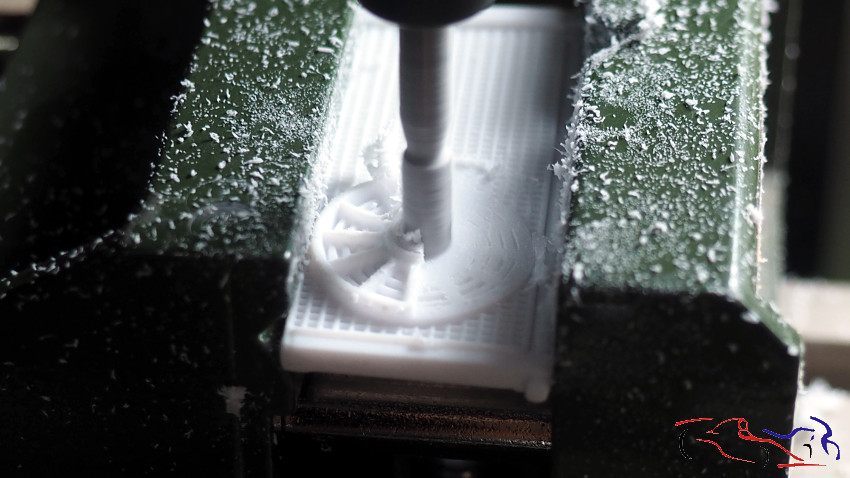 Y este es el resultado del radiador con la rejilla y ventilador de Beemax, ya pintados: And this is the result of the radiator with the grid and fan of Beemax, already painted: 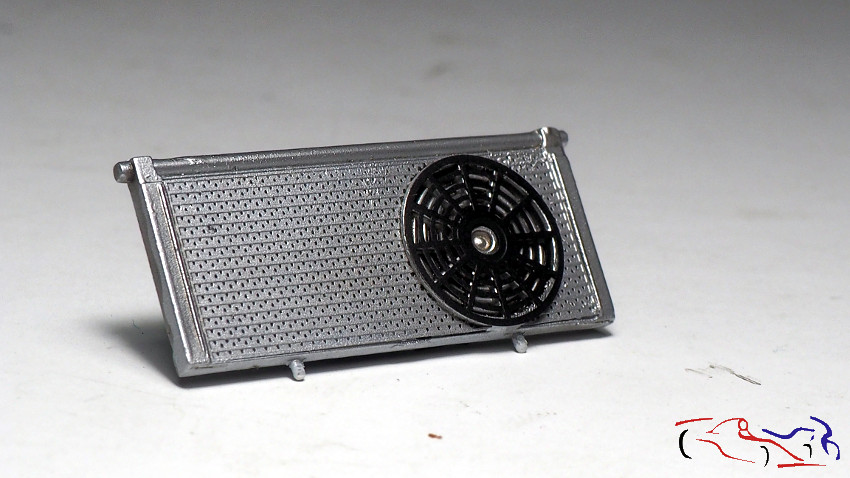 Pero como tengo algunas piezas de recambio, rehago otro radiador con los fotograbados de HD, más completos: But since I have some spare parts, I redo another radiator with the most complete HD photoetches:  Y aquí el resultado en su parte delantera, ya ensuciado y sin cablear: And here the result in its front, already dirty and without wiring: 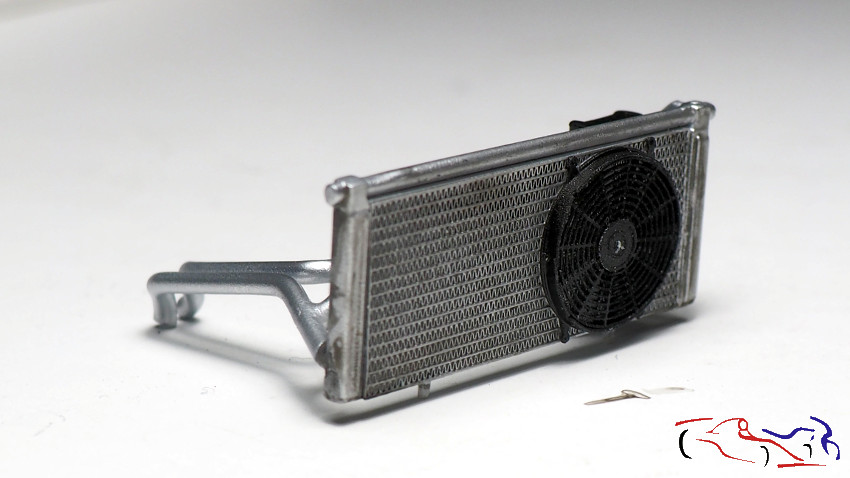 Mientras tanto, en su parte trasera, vemos colocados sin pegar, los tubos realizados con redondo de evergreen y doblados con el calor de un soldador, y el filtro de KMP, ya pintado. Proximamente pondré más información de esta pieza con más detalles aplicados: Meanwhile, in its back, we see placed without sticking, the tubes made with evergreen round and folded with the heat of a welder, and the KMP filter, already painted. Soon I will put more information of this piece with more details applied: 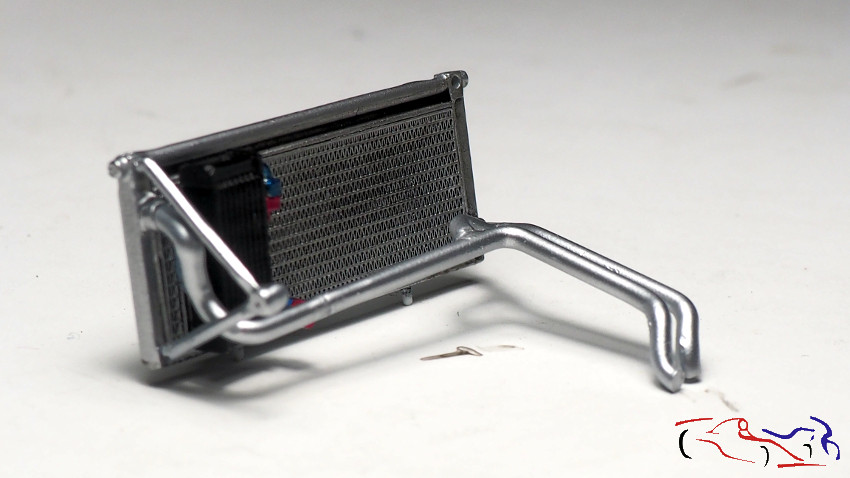 Pasamos a una pieza de KMP, hecha en 3D que se pondrá dentro del portón trasero y que canaliza el aire de las entradas laterales hacia los dos grandes radiadores del motor. Para afinarla, la lijo y relleno con este putty nuevo que se disuelve con agua y que su acabado es muy similar a la verde de Stuco. La aplicamos por casi todos lados: We pass a piece of KMP, made in 3D that will be placed inside the tailgate and that channels the air from the side inlets to the two large radiators of the engine. To refine it, sand it and fill it with this new putty that dissolves with water and that its finish is very similar to Stucos green. We apply it almost everywhere: 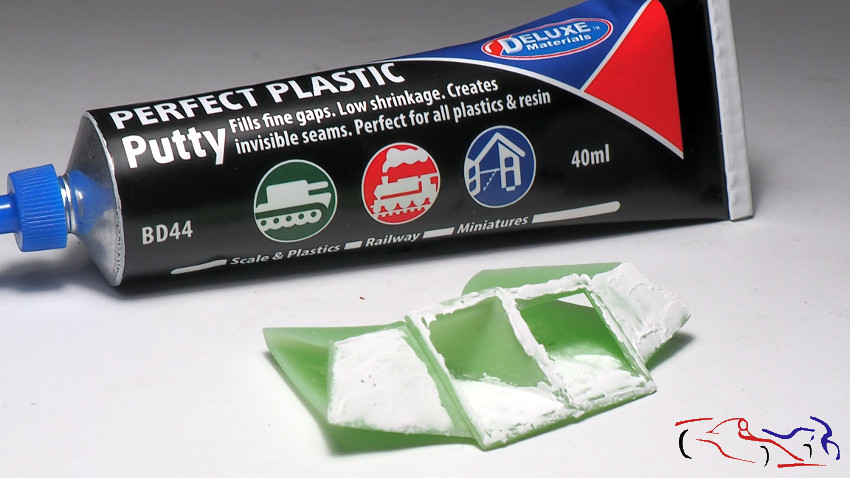 Después lijamos, imprimamos y pintamos con begro brillante de Zero, para aplicar calcas de Kevlar a todo el conjunto: Then we sand, print and paint with bright begro de Zero, to apply Kevlar decals to the whole set: 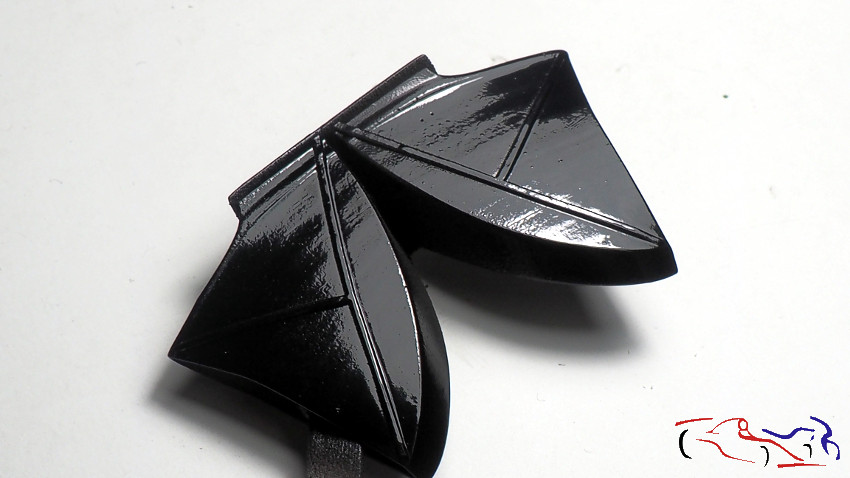 Para ello, ponemos cinta de enmascarar por partes, la recortamos y ponemos en hoja de calca: To do this, we put masking tape in parts, cut it and put on a decal sheet: 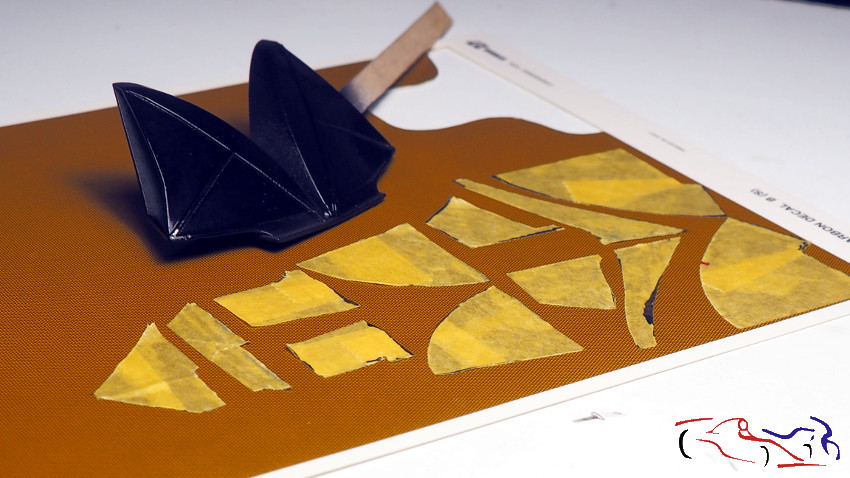 Las cortaremos y aplicaremos por partes con los productos micro y secador de pelo poco a poco: We will cut them and apply parts with micro products and hair dryer little by little: 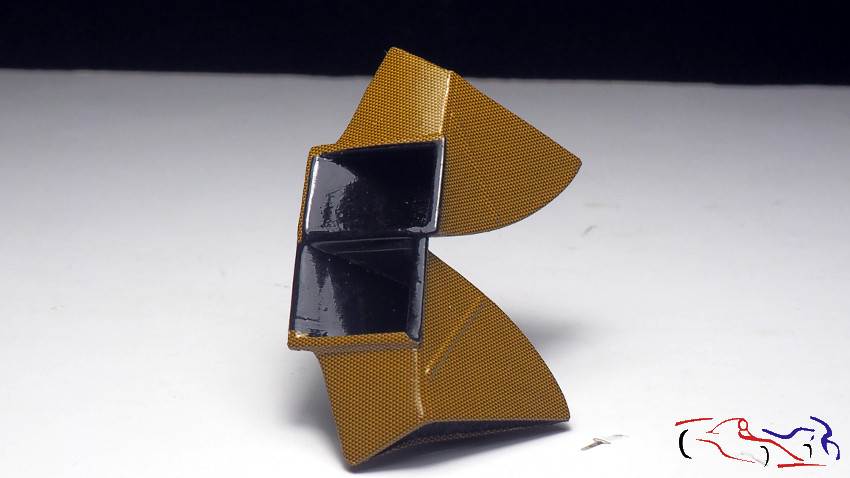 Otra vista de la pieza con más calcas aplicadas Another view of the piece with more applied decals 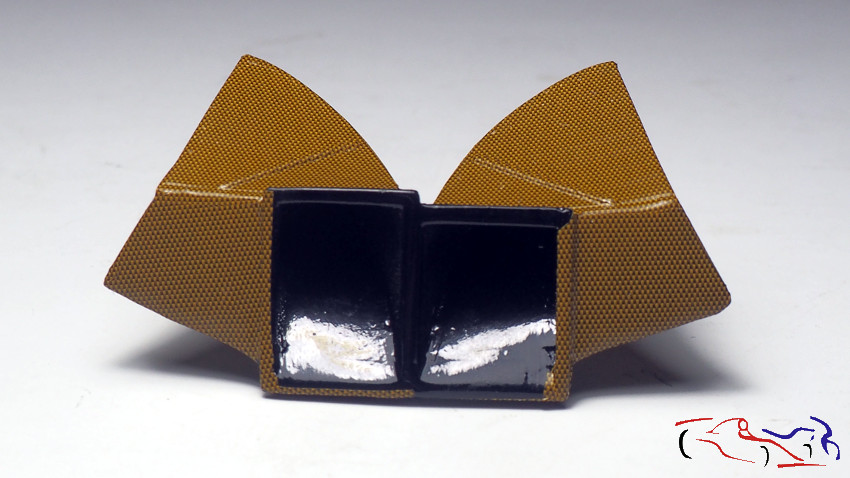 Y ya está terminado!! And its over! 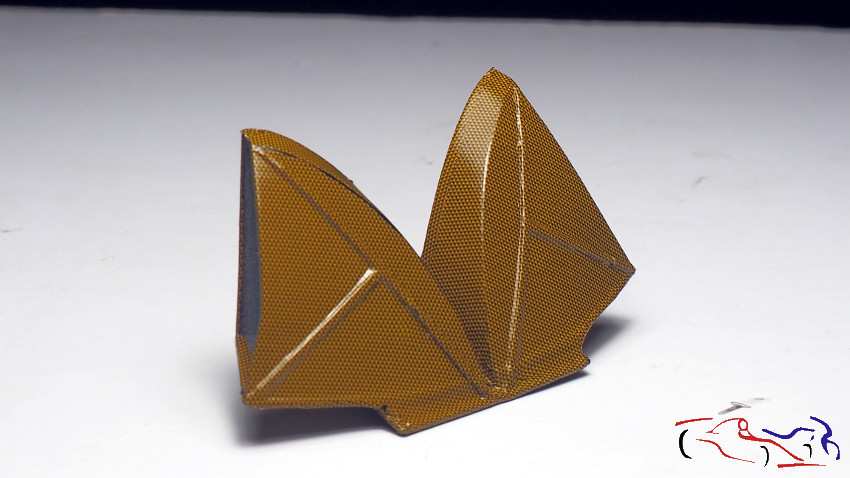 Esta es la posición del mismo en el portón trasero. Decir que irá ensuciado posteriormente tal y como aparece en las fotos del coche real: This is its position in the tailgate. Say that it will go dirty later as it appears in the photos of the real car: 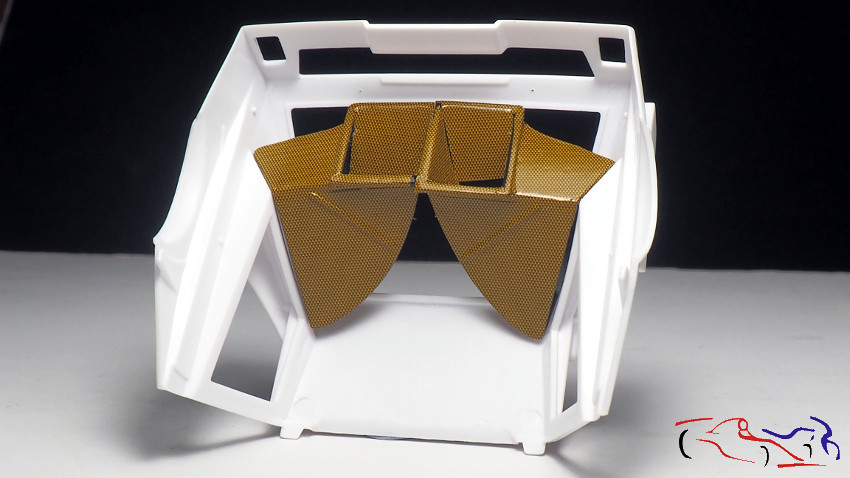 Pasamos a la pieza superior del salpicadero. Ha sido pintado con la pintura texturizada de Zero, una vez le redondeé el borde exitente encima del salpicadero. También le puse los cuatro remaches existentes en lso modelos reales: We pass to the upper part of the dashboard. It has been painted with Zeros textured paint, once I rounded the exciting edge above the dashboard. I also put the four existing rivets on the real models: 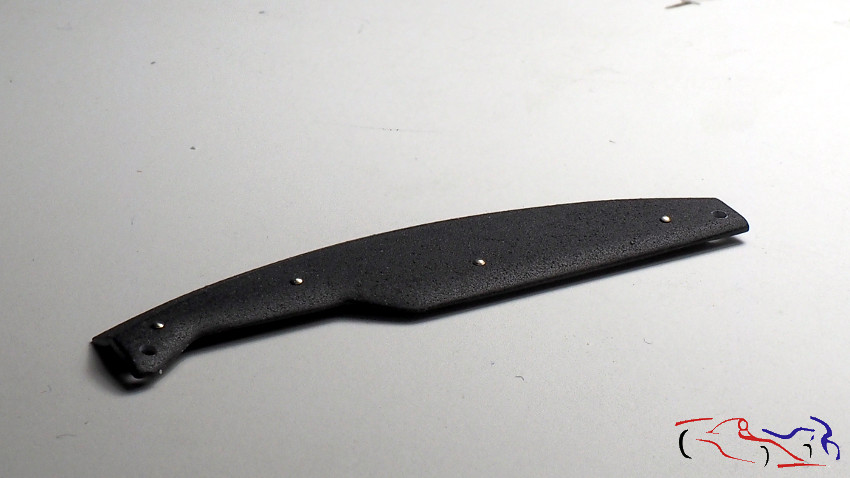 Más piezas de KMP que he imprimado y pintado: los tres filtros con negro semimate y los botes en aluminio, ambos de Zero. Posteriomente les pintaré las conexiones con azul y rojo metálicos: More pieces of KMP that I have printed and painted: the three filters with semi-black black and the aluminum boats, both from Zero. Later I will paint the connections with metallic blue and red:  Aquí vemos de nuevo la pieza de los filtros junto al turbo. Ambos pintados con aluminio Metal de Zero: Here we see again the piece of filters next to the turbo. Both painted with Zero Metal aluminum: 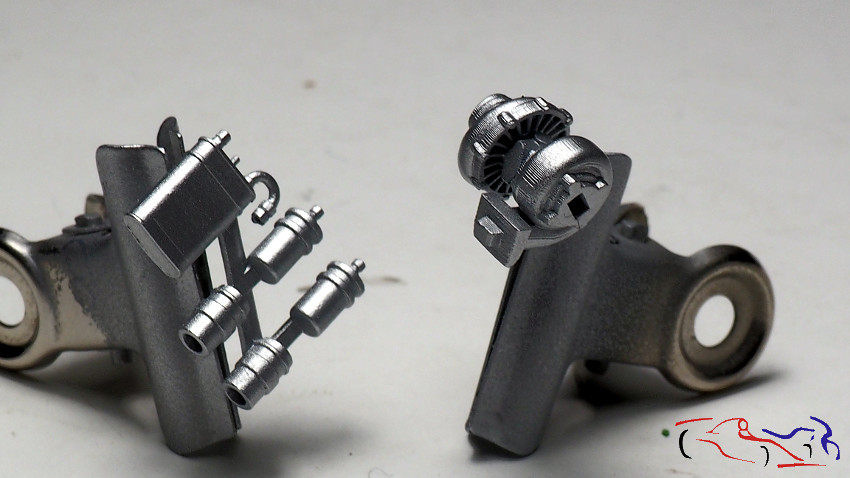 Si bien hemos visto unos tubos en el radiador delantero, más o menos acabados, aquí or muestro el proceso. Los tubos doblados y pegados, con masilla en las uniones. Destacar que las uniones tienen un alambre dentro para asegurarlas así como en los extremos que van acoplados al filtro. Dichos alambres irán metidos en dos piezas que he añadido al filtro con su correspondiente agujerito: While we have seen some tubes in the front radiator, more or less finished, here I show the process. The tubes bent and glued, with putty in the joints. Note that the joints have a wire inside to secure them as well as at the ends that are attached to the filter. These wires will go into two pieces that I have added to the filter with its corresponding hole: 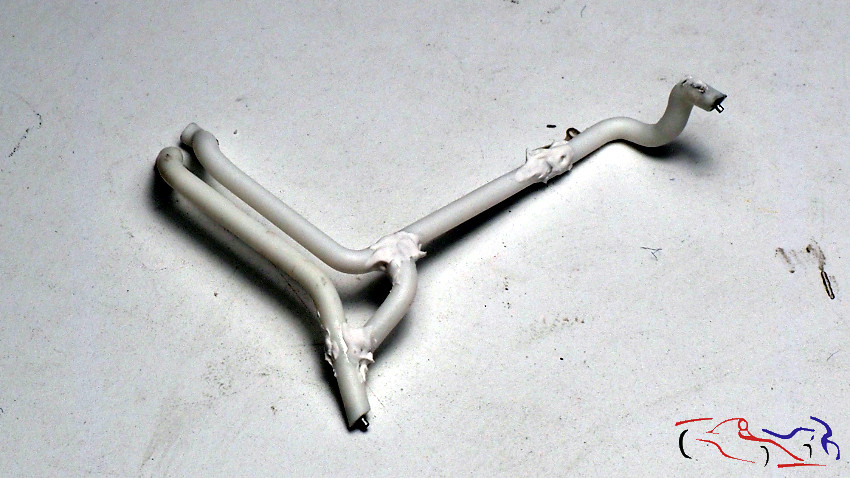 Aquí está esa pieza lijada, imprimada y pintada con aluminio metal de Zero. Le acompaña las piezas de KMP que van encima de las bujias (KMP nos da 8 piezas para asegurar que alguna se nos rompa) y que he pintado con rojo Brabham de Zero, que se parece mucho al color original: Here is that piece sanded, primed and painted with aluminum metal from Zero. It accompanies the pieces of KMP that go over the spark plugs (KMP gives us 8 pieces to ensure that some of them are broken) and that I have painted with Zero Brabham red, which closely resembles the original color: 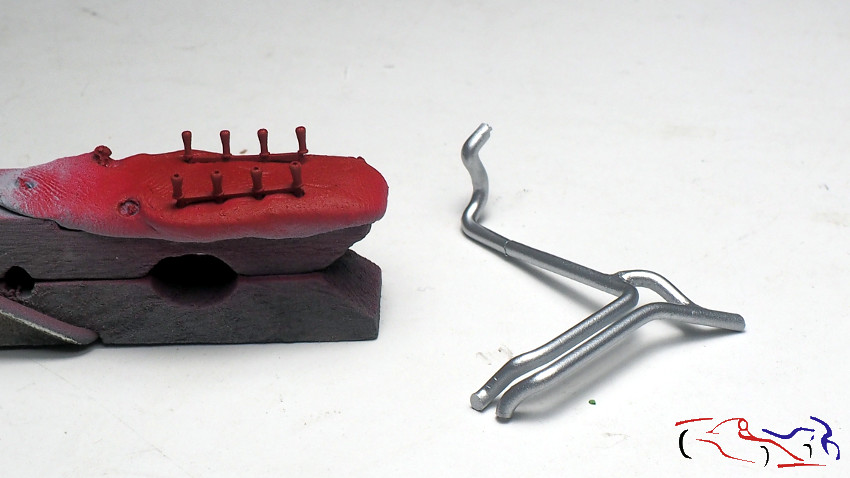 Más piezas: las bombas de los frenos y la pieza donde van. Hechas de plástico a scratch e imprimadas con Gravity: More parts: the brake pumps and the part where they go. Made of scratch in plastic and primed with Gravity: 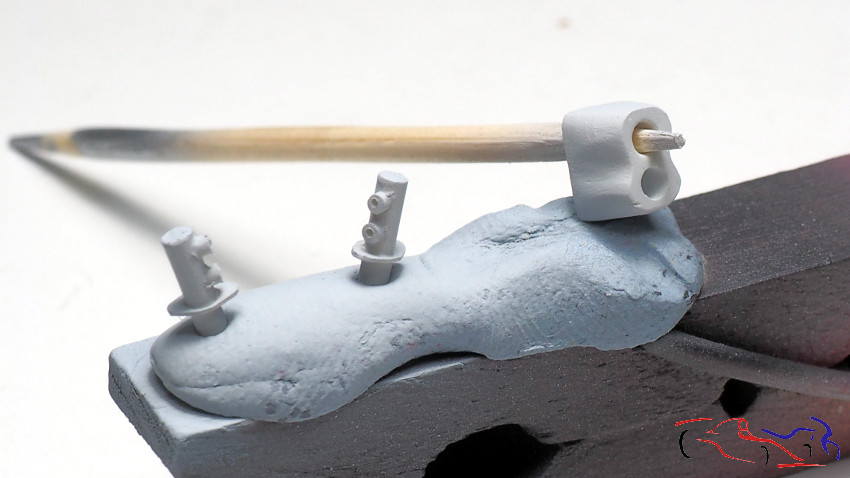 Pasamos a los triangulos traseros de la suspensión. COmo véis, las fijaciones de la pieza no se asemejan nada a la realidad, por lo que las voy a rehacer. Lo primero, maco las medidas en el metal de los diskettes, y hago los taladros . We pass to the rear triangles of the suspension. As you can see, the fixings of the piece do not resemble anything to reality, so I will redo them. First, I make the measurements on the metal of the diskettes, and do the drills . 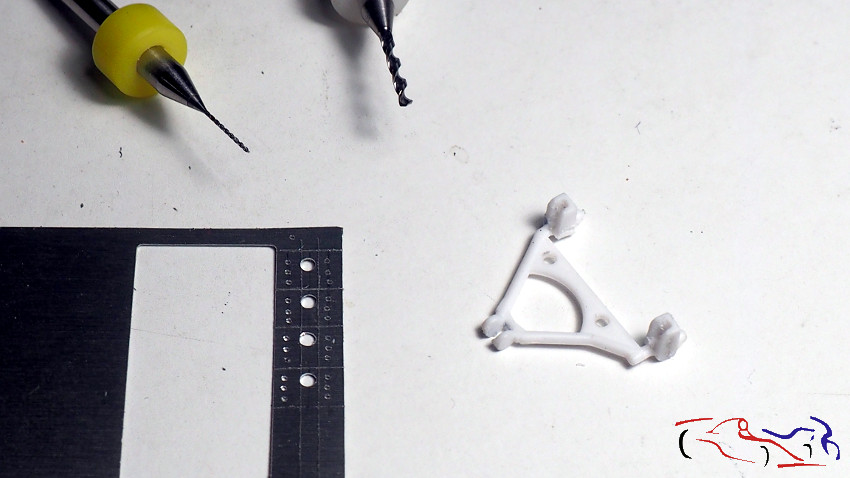 A su vez, tapo los agujeros por los que pasaremos la pieza original, por la parte de atrás. Podeis ver también que he agujereado donde van los remaches de las dos piezas grandes: In turn, I plug the holes through which we will pass the original piece, through the back. You can also see that I have drilled where the rivets of the two large pieces go: 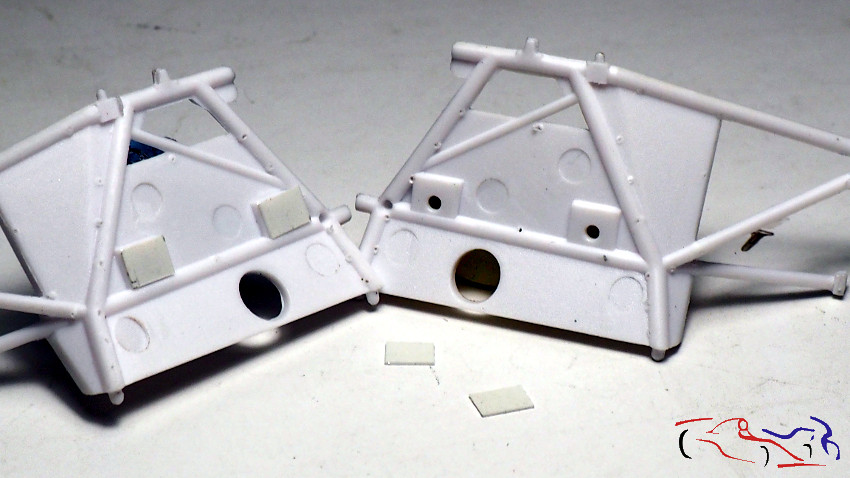 Una vez cortadas y dobladas las piezas de metal, le elimino las esquinas con limas. Estas piezas, las pegaré en los paneles correspondientes. Y como ya no me servirán estas piezas en los triangulos, las eliminaré con cuidado dejando el perno que se introducirá en su lugar: Once the metal pieces have been cut and folded, I remove the corners with files. I will glue these pieces to the corresponding panels. And since these pieces will no longer serve me in the triangles, I will remove them carefully leaving the bolt that will be inserted in its place: 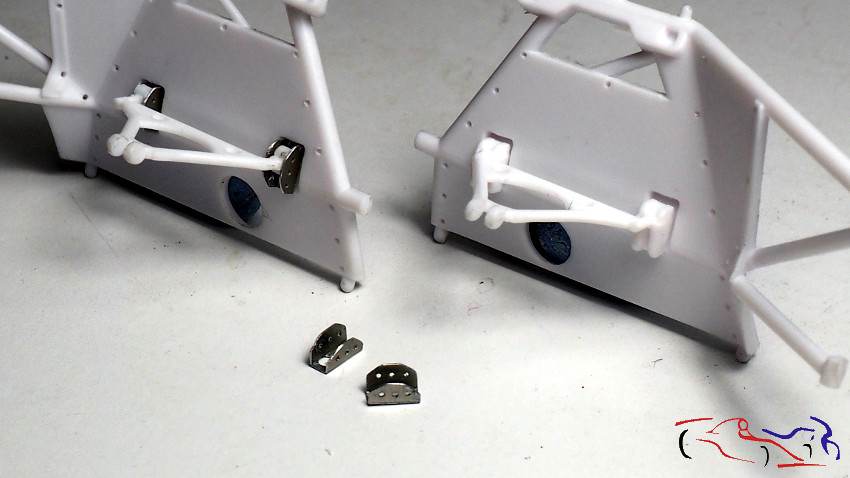 Aquí tenemos las piezas pintadas con aliminio Metal de Zero: Here we have the pieces painted with Zero Metal aluminum: 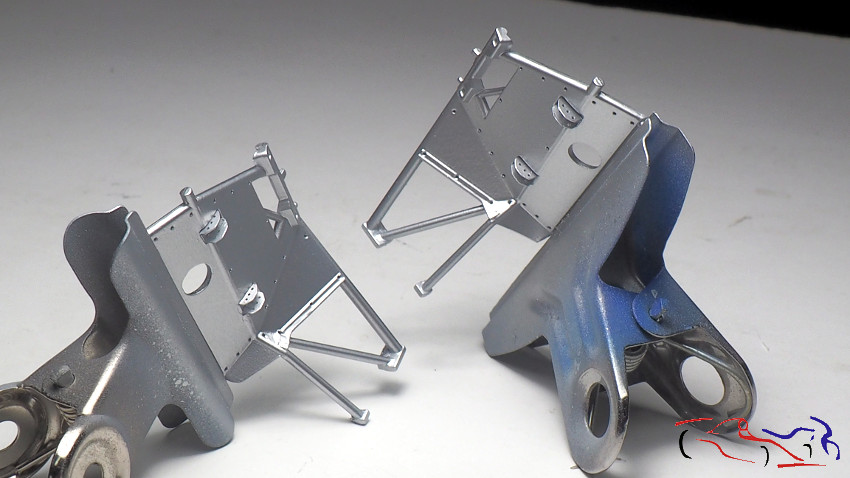 A dichas piezas, les puse calca de Kevlar y aquí las pongo sin pegar para ver el resultado. Aun faltan muchos detalles!! To these pieces, I put Kevlar decal and here I put them without pasting to see the result. There are still many details missing! 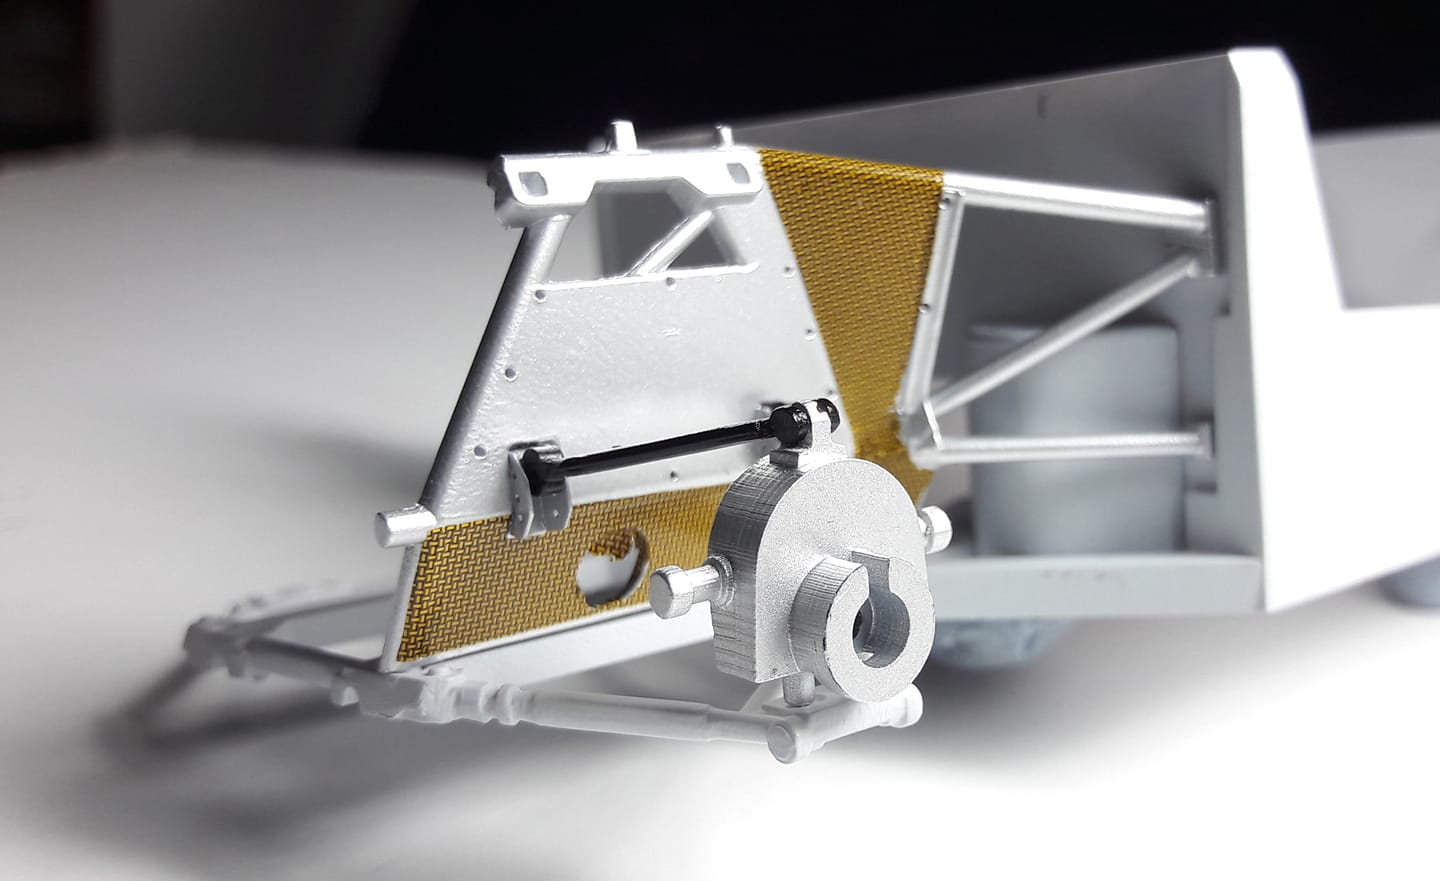 Otras piezas que es conveniente detallar son los amortiguadores, en este caso los delanteros. Podeis ver el original en la parte superior, y debajo, el modificado sin pegar. Abajo veis todas las piezas, una vez he cortado el muelle original dejando los extremos para utilizarlos, dos tubos e metal para el interior del muelle, y el propio muelle hecho de alambre: Other parts that are convenient to detail are the shock absorbers, in this case the front ones. You can see the original at the top, and below, the modified one without pasting. Below you see all the pieces, once I have cut the original spring leaving the ends to use them, two tubes and metal for the interior of the spring, and the spring itself made of wire: 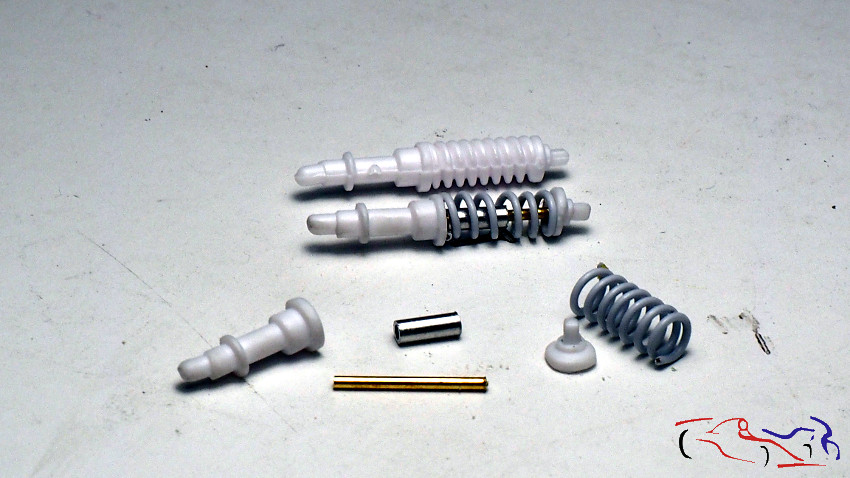 Pegamos los tubos de metal a la parte inferior del amortiguador, imprimamos y pintamos: We glue the metal tubes to the bottom of the shock absorber, print and paint: 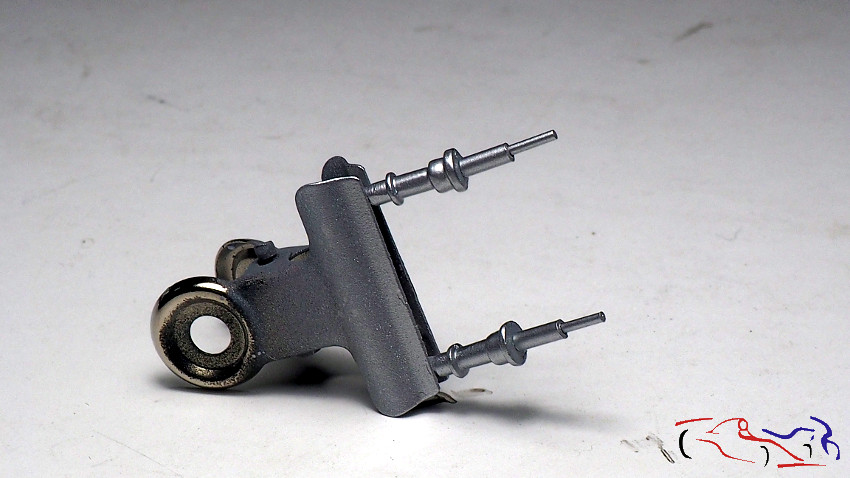 Más piezas: palanca de cambios, brazo de dirección y los ejes de las ruedas traseras: More parts: gear lever, steering arm and rear wheel axles: 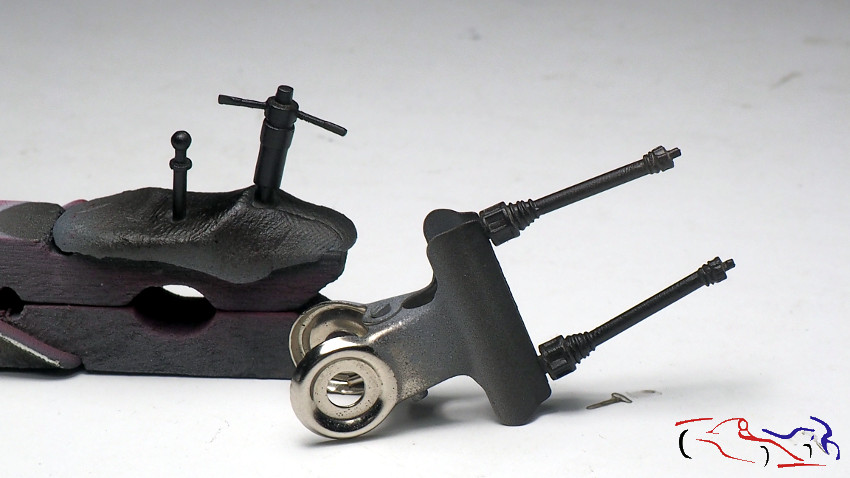 Aquí vemos la pieza de las bombas de freno pintada de color marrón parecido al Kevlar y los muelles, de blanco: Here we see the part of the brown painted brake pumps similar to Kevlar and the springs, in white: 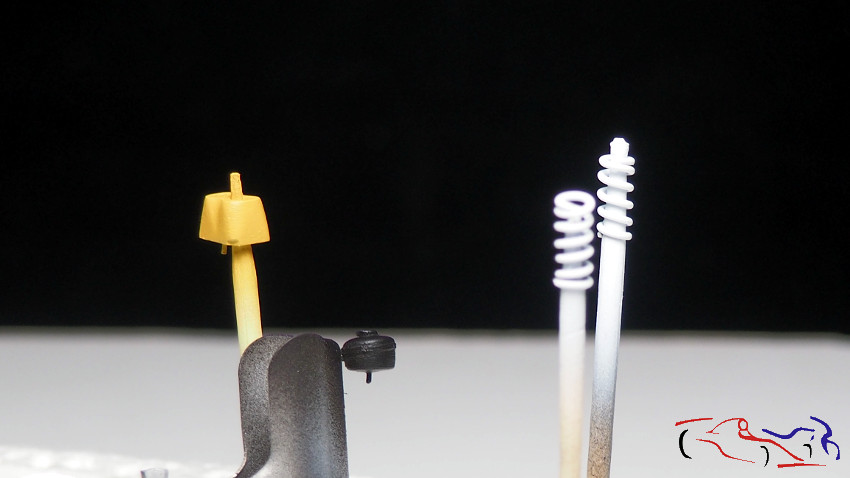 Más piezas modificadas: esta pieza sujeta la estructura del motor con el cortafuegos trasero. Le he colocado unas pletinas de metal y tuercas, todo imprimado con Gravity y pintado con aluminio Metal de Zero: More modified parts: this piece holds the engine structure with the rear firewall. I have placed some metal plates and nuts, all primed with Gravity and painted with Metal Zero aluminum:  En este caso, la pintura es el Metal Cromo de Zero, y las piezas son el deposito de aceite de KMP, el freno de mano y el repartidos de frenada que he renecho con un tubo y una arandela: In this case, the paint is Zero Chrome Metal, and the pieces are the KMP oil reservoir, the handbrake and the brake distribution I have renewed with a tube and a washer: 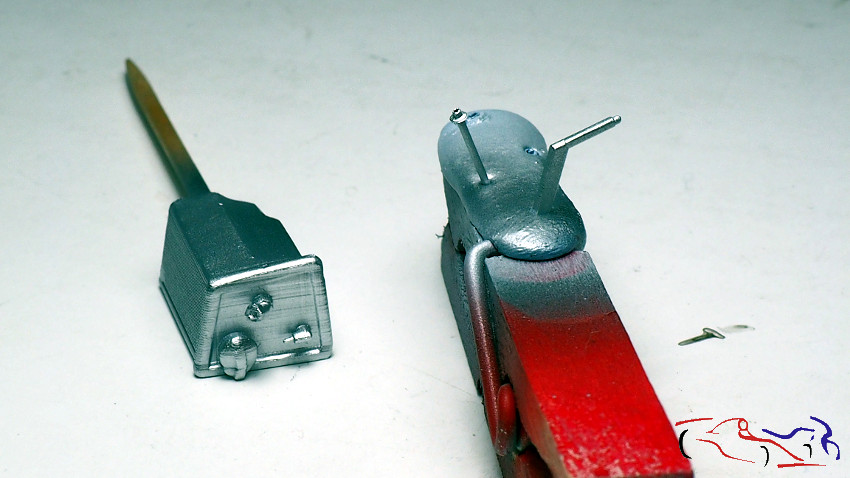 Seguimos con la pintura de piezas en negro semi mate de Zero, para su posterior montaje o detallado: volante, salpicadero, bateria de KMP, y triángulos de suspension traseros: We continue with the painting of pieces in semi-matt black from Zero, for later assembly or detailed: steering wheel, dashboard, KMP battery, and rear suspension triangles: 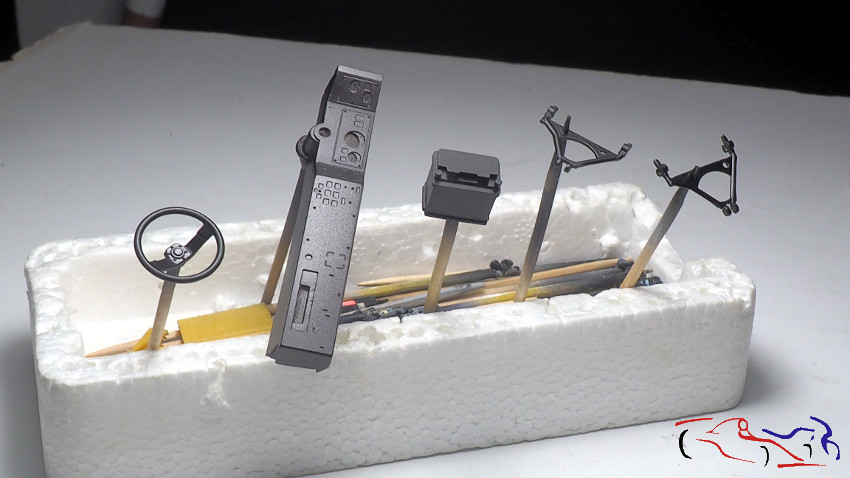 Los paneles de las puertas, pintados de negro semi mate de Zero: The door panels, painted in semi-matt black from Zero: 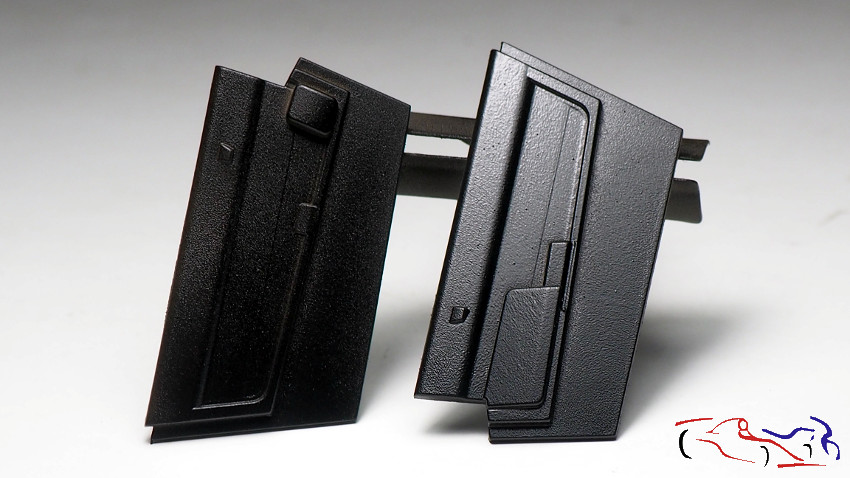 Y con calca de Kevlar aplicada, recortada por mi. Falta un sombreado de la misma And with applied Kevlar decal, trimmed by me. Missing a shading of it 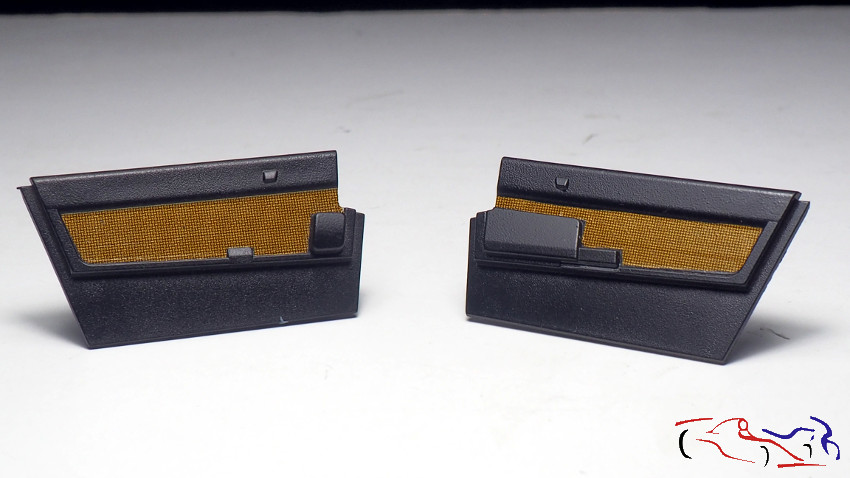 Aquí vemos muchas piezas ya casi terminadas, y pintadas: Here we see many pieces already almost finished, and painted: 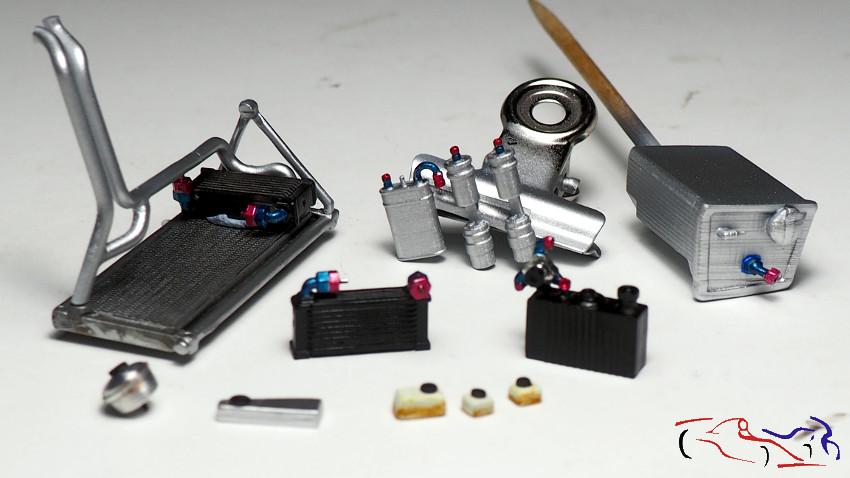 Y para terminar, los dos test de las pinturas de Zero para los asientos. Es necesario un aero 0.6 para que pueda salir la textura. Aun así tengo que hacer alguna prueba más: And finally, the two tests of Zeros paintings for the seats. A 0.6 aero is necessary for the texture to come out. Even so, I have to do some more test: 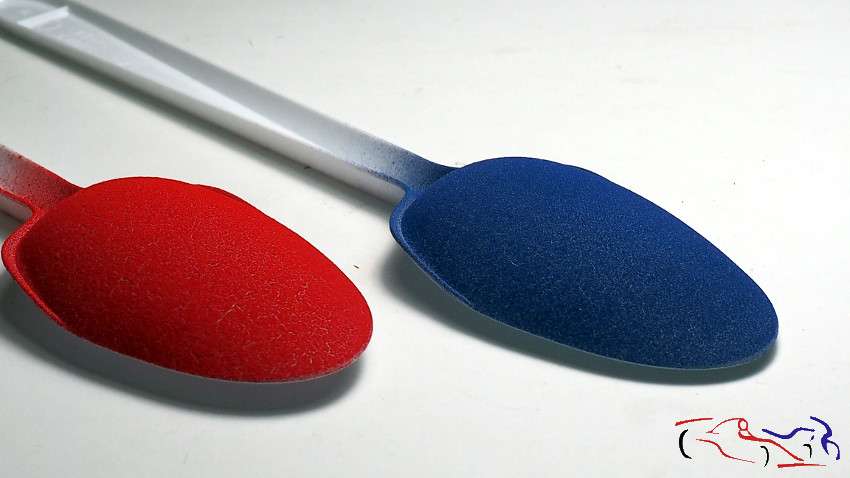 Gracias por ver y comentar!! |
|
|
|
|
|
08-09-2019, 02:23 AM
|
#20 | |
|
AF Newbie

Join Date: Dec 2009
Location: Athens, Greece
Posts: 32
Thanks: 0
Thanked 2 Times in 2 Posts
|
Re: Lancia Delta S4 Marlboro Beemax 1/24
Fantastic work!
|
|
|
|
|
|
08-09-2019, 09:55 PM
|
#21 | |
|
AF Regular
Join Date: Jun 2015
Location: Dunfermline
Posts: 370
Thanks: 38
Thanked 51 Times in 50 Posts
|
Re: Lancia Delta S4 Marlboro Beemax 1/24
Awesome pictures and build so far
|
|
|
|
|
|
08-11-2019, 03:40 AM
|
#22 | |
|
AF Regular
Join Date: Aug 2009
Location: Saint Petersburg
Posts: 357
Thanks: 67
Thanked 48 Times in 43 Posts
|
Re: Lancia Delta S4 Marlboro Beemax 1/24
Such a pleasure to follow your work! Very good progress!
|
|
|
|
|
|
08-11-2019, 05:39 AM
|
#23 | ||
|
AF Enthusiast
Thread starter
Join Date: Mar 2009
Location: Madrid
Posts: 649
Thanks: 109
Thanked 68 Times in 67 Posts
|
Re: Lancia Delta S4 Marlboro Beemax 1/24
Quote:
|
||
|
|
|
|
08-11-2019, 05:40 AM
|
#24 | ||
|
AF Enthusiast
Thread starter
Join Date: Mar 2009
Location: Madrid
Posts: 649
Thanks: 109
Thanked 68 Times in 67 Posts
|
Re: Lancia Delta S4 Marlboro Beemax 1/24
Quote:
|
||
|
|
|
|
08-11-2019, 05:42 AM
|
#25 | ||
|
AF Enthusiast
Thread starter
Join Date: Mar 2009
Location: Madrid
Posts: 649
Thanks: 109
Thanked 68 Times in 67 Posts
|
Re: Lancia Delta S4 Marlboro Beemax 1/24
Quote:
|
||
|
|
|
|
08-11-2019, 07:24 AM
|
#26 | |
|
AF Moderator
 
Join Date: Sep 2002
Location: Fort Worth, Texas
Posts: 3,246
Thanks: 31
Thanked 314 Times in 241 Posts
|
Re: Lancia Delta S4 Marlboro Beemax 1/24
Incredible work. Envy your patience with masking, the results are absolutely great.
Love the shocks as well, truly shaping up like another masterpiece.
__________________
The client is not always right. - Enzo Ferrari ItalianHorses.net    
|
|
|
|
|
|
08-12-2019, 05:51 AM
|
#27 | ||
|
AF Enthusiast
Thread starter
Join Date: Mar 2009
Location: Madrid
Posts: 649
Thanks: 109
Thanked 68 Times in 67 Posts
|
Re: Lancia Delta S4 Marlboro Beemax 1/24
Quote:
|
||
|
|
|
|
08-13-2019, 02:55 AM
|
#28 | ||
|
AF Newbie

Join Date: Mar 2007
Location: Sydney
Posts: 15
Thanks: 1
Thanked 0 Times in 0 Posts
|
Re: Lancia Delta S4 Marlboro Beemax 1/24
Quote:
|
||
|
|
|
|
08-13-2019, 03:02 PM
|
#29 | ||
|
AF Enthusiast
Thread starter
Join Date: Mar 2009
Location: Madrid
Posts: 649
Thanks: 109
Thanked 68 Times in 67 Posts
|
Re: Lancia Delta S4 Marlboro Beemax 1/24
Quote:
https://www.spotmodel.com/advanced_s...=Zero+textured (Copy and paste it in a browser if it does not work!. They are paints to use with a 0.6 airbrush. Thanks for.comenting! |
||
|
|
|
|
08-14-2019, 10:39 AM
|
#30 | |
|
AF Newbie
Join Date: Jun 2004
Location: Auburn, New York
Posts: 97
Thanks: 2
Thanked 5 Times in 5 Posts
|
Re: Lancia Delta S4 Marlboro Beemax 1/24
Great updates! Looks very cool and great work on your part.
|
|
|
|
|
|
|
POST REPLY TO THIS THREAD |
 |
|
|


