|
|
|

|
|
| Search | Car Forums | Gallery | Articles | Helper | AF 350Z | IgorSushko.com | Corporate |
|
| Latest | 0 Rplys |
|
|||||||
| WIP - Motorsports Post topics for any "Work In Process" motorsports vehicles in this sub-forum. |
 |
 Show Printable Version | Show Printable Version |  Email this Page | Email this Page |  Subscribe to this Thread
|
|
|
Thread Tools |
 10-01-2021, 06:53 AM
|
#1 | |
|
AF Enthusiast
Join Date: Mar 2009
Location: Madrid
Posts: 649
Thanks: 109
Thanked 68 Times in 67 Posts
|
Lancia "Deltona" Repsol 1993 - Hasegawa 1/24
Este proyecto lo dejé en Febrero de 2015, porque no tenía fotos de las fijaciones del motor ni tenía decidido el asunto de las bisagras. Pero puesto que ya se como van dichas fijaciones, gracias mi amigo Borja, que va a salir un motor hecho en resina por mi amigo Claudio de Bellis, y que quiero probar una nueva forma de hacer las bisagras, que ya comentaré, he decidido retomar la contrucción del Lancia Delta!!
I left this project in February 2015, because I didnt have photos of the engine mountings and I hadnt decided on the hinges. But since I already know how these fixings go, thanks to my friend Borja, that a resin engine will be made by my friend Claudio de Bellis, and that I want to try a new way of making the hinges, which I will comment later, I decided to resume the construction of the Lancia Delta! Pero primero os pongo en situación para recordar lo que tenía hecho, y para eso tengo las anteriores actualizaciones de mi blog: But first Ill put you in situation to remember what I had done, and for that I have the previous updates of my blog: http://blog.maquetea.com/?p=1913 http://blog.maquetea.com/?p=2058 http://blog.maquetea.com/?p=2118 http://blog.maquetea.com/?p=2183 http://blog.maquetea.com/?p=2282 Y para continuar, unas fotos actuales: Aquí os muestro el chasis, con parte de la cuna añadida, y modificada con todos sus nervios: And to continue, some current photos: Here I show you the chassis, with part of the cradle added, and modified with all its nerves: 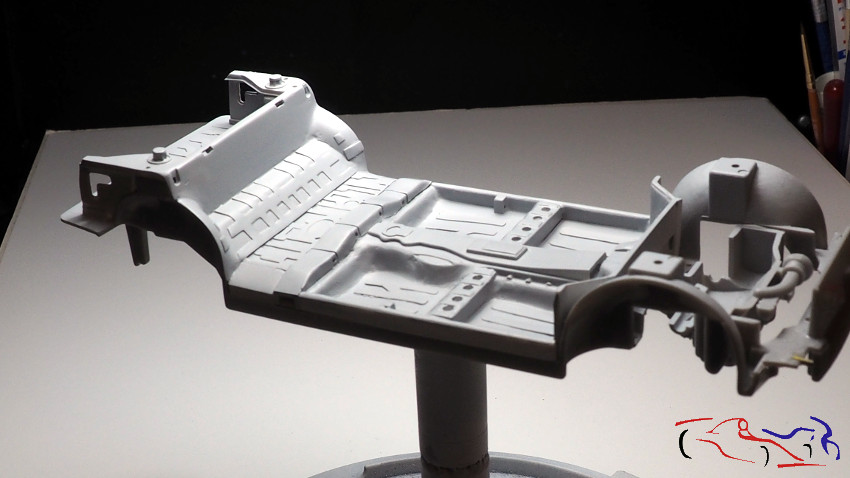 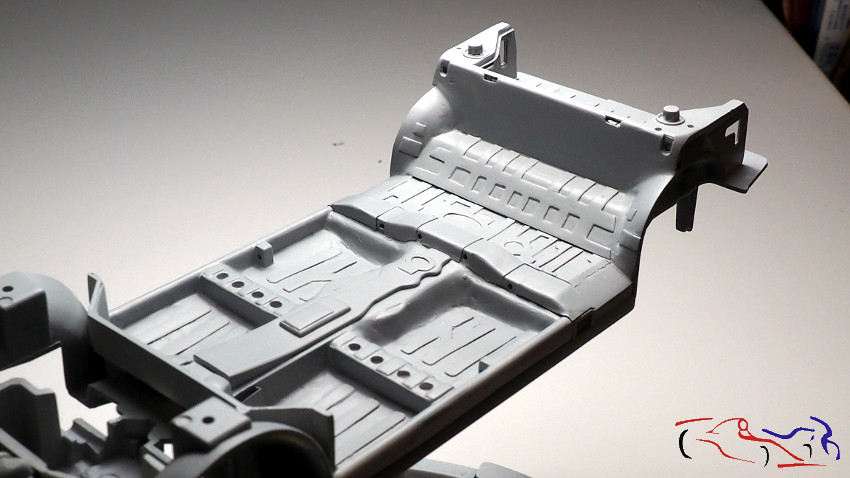 Y a continuación, la parte del maletero: And then the luggage compartment: 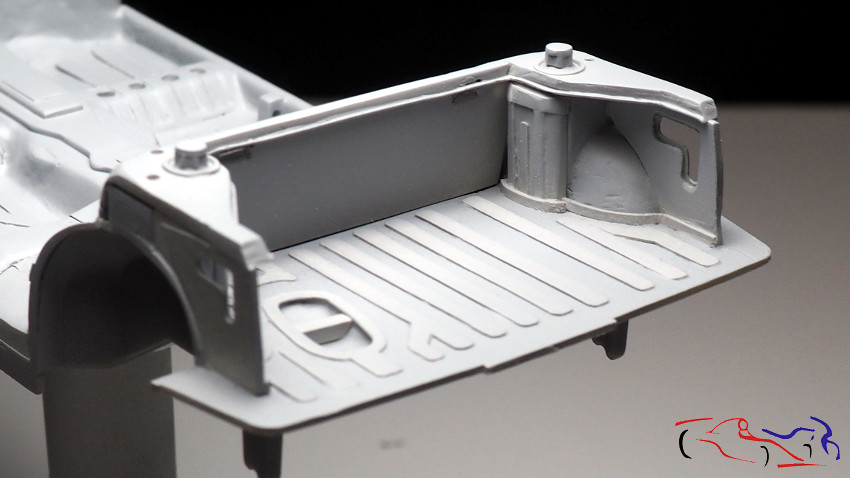 Si pasamos a la carrocería, y una vez abierto todo lo que se puede abrir, os muestro la parte del maletero y de los laterales de las puertas: If we move on to the bodywork, and once everything that can be opened has been opened, I show you the part of the boot and the sides of the doors: 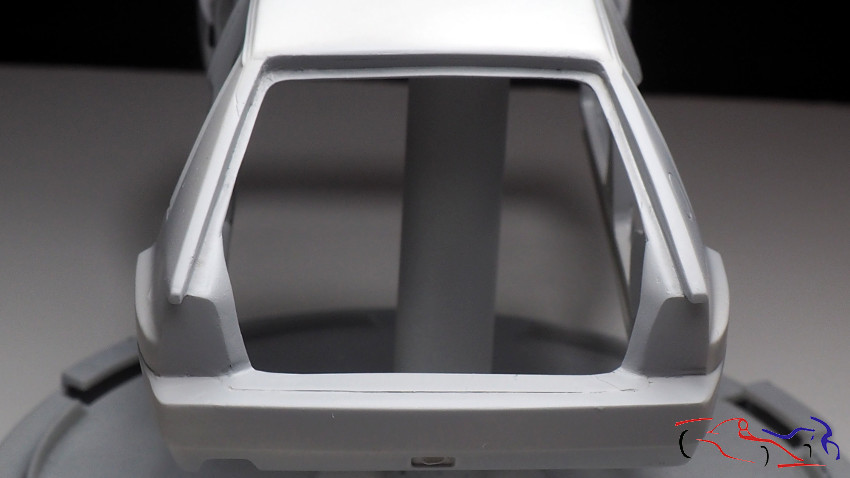  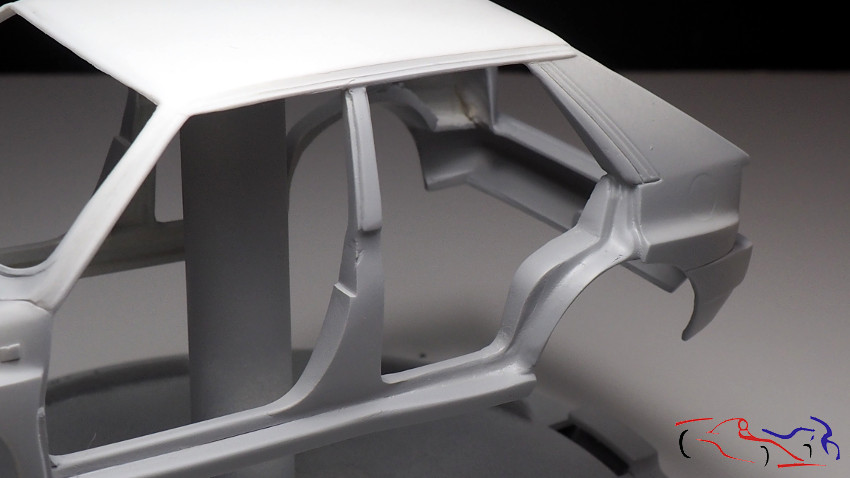 Y si unimos el chasis y la carrocería, este es el resultado: And if we place the chassis and the body both together, this is the result: 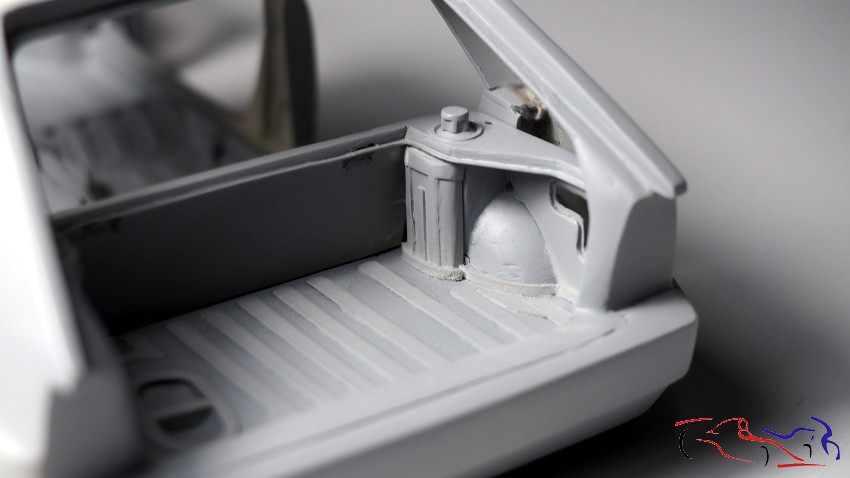 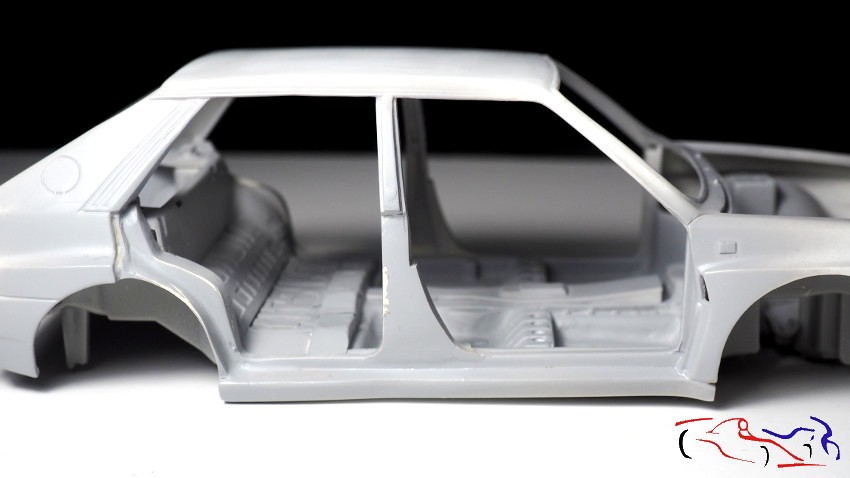 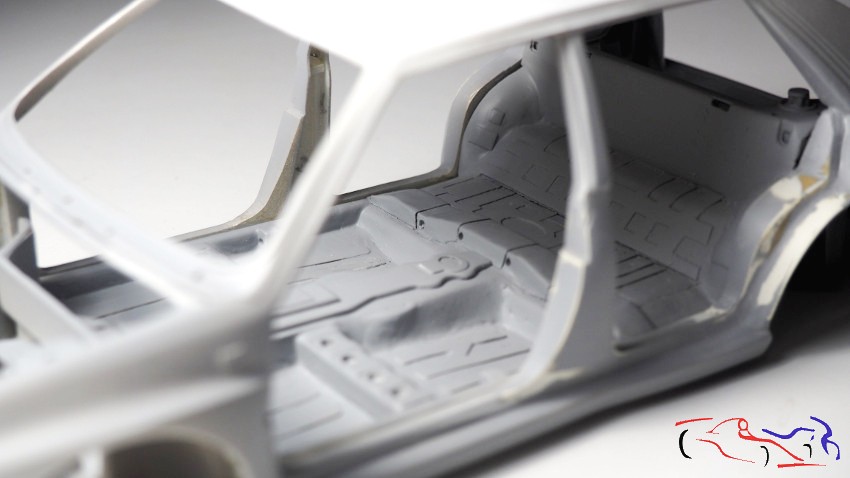 Mención especial tiene el vano motor, sobre el que se construirá todo, eliminando la parte que se incluye en el chasis: Special mention must be made of the engine bay, on which everything will be built, eliminating the part that is included in the chassis: 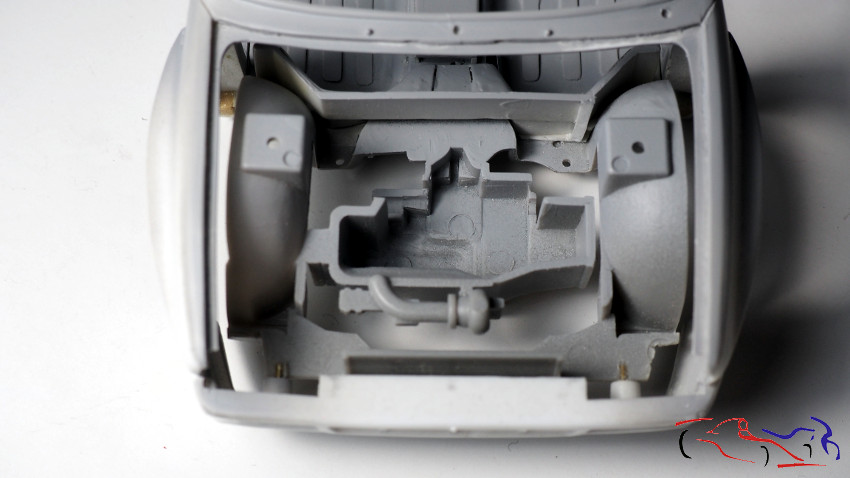 Hasta aquí, lo que ya tengo realizado. Ahora viene lo que empiezo a hacer. Y empezamos por el portón trasero. Lo primero, y para tomar medidas, tengo que recortar la parte del cristal, que viene junta. Para cortarlo, pongo unas tiras de la cinta autoadhesiva Dymo de las antiguas: son suficientemente rigidas para servir de guia para la sierra, quedando cortado en la foto derecha. Después lijaré hasta se ajuste al marco del portón. So far, what I have already done. Now comes what I start to do. And we start with the tailgate. First of all, and to take measurements, I have to cut the part of the glass, which comes together. To cut it, I put some strips of the old Dymo self-adhesive tape: they are rigid enough to serve as a guide for the saw, being cut in the right photo. Then Ill sand it until it fits the frame of the gate. 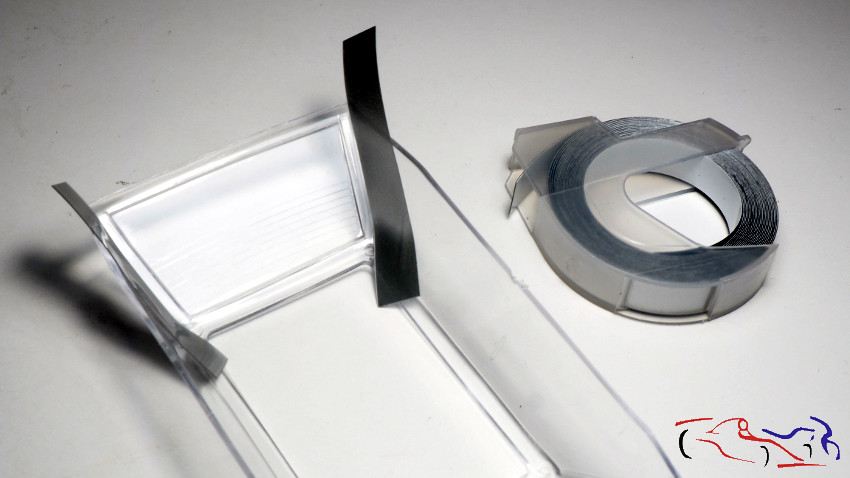 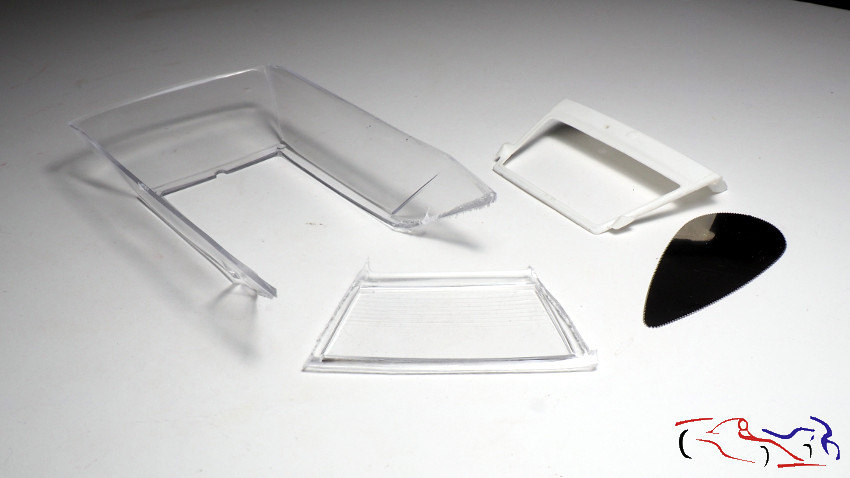 Ahora moficamos el interior del portón, empezando por eliminar los laterales que servían para pegar las luces traseras (dos primeras fotos). Después, con un trozo d eplástico mut fino, lo sujeto al portón, y dibujo los cortes que tengo que hacerle. Y estos cortes se empiezan por las esquinas, con una broca, porque van redondeados, teminando con un corte del cutter entre los circulos. Después se lima todo para afinarlo, y se pega en el portón con unos cuadradillos para dar volumen. Falta ahora, enmasillar los laetrales y lijar: Now we have to mock up the inside of the tailgate, starting by removing the sides that were used to attach the rear lights (first two pictures). Then, with a piece of thin plastic, I attach it to the tailgate, and draw the cuts I have to make. And these cuts start at the corners, with a drill, because they are rounded, ending with a cutter cut between the circles. After that, the whole thing is filed and glued to the door with some squares to give volume. Now its time to putty and sand the edges: 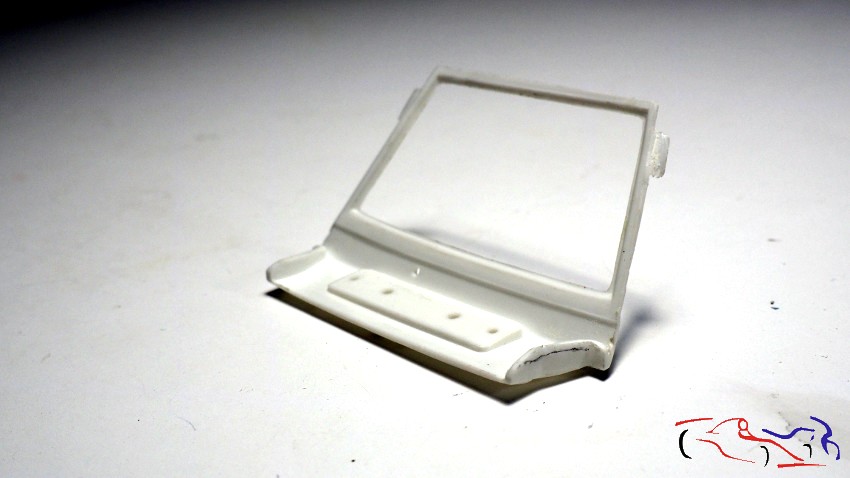 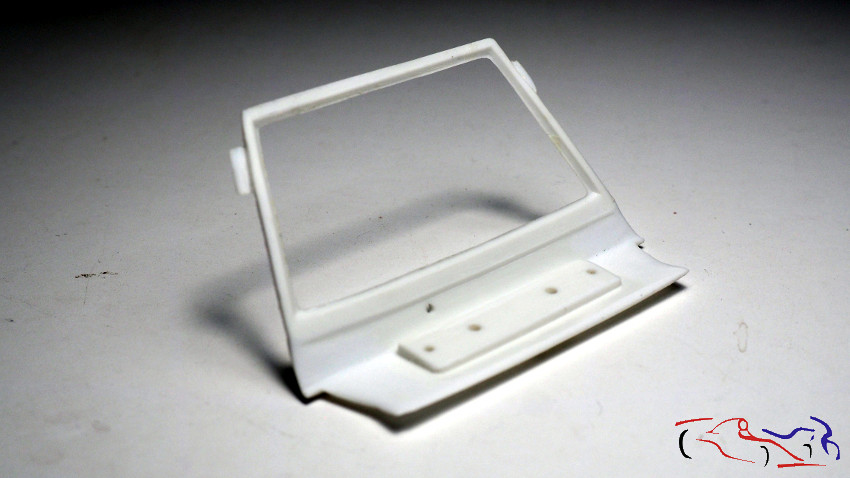 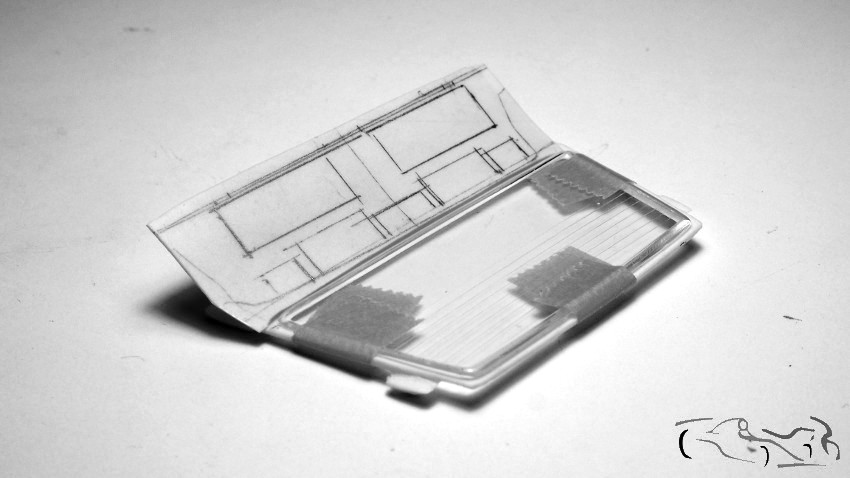 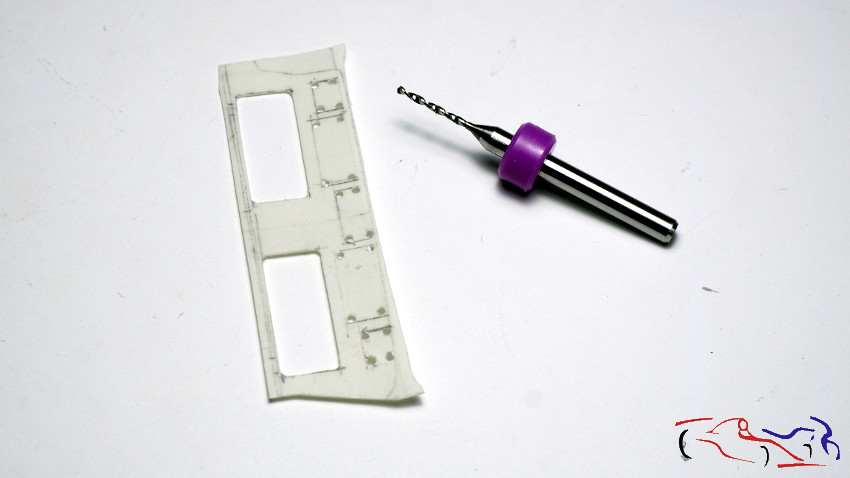 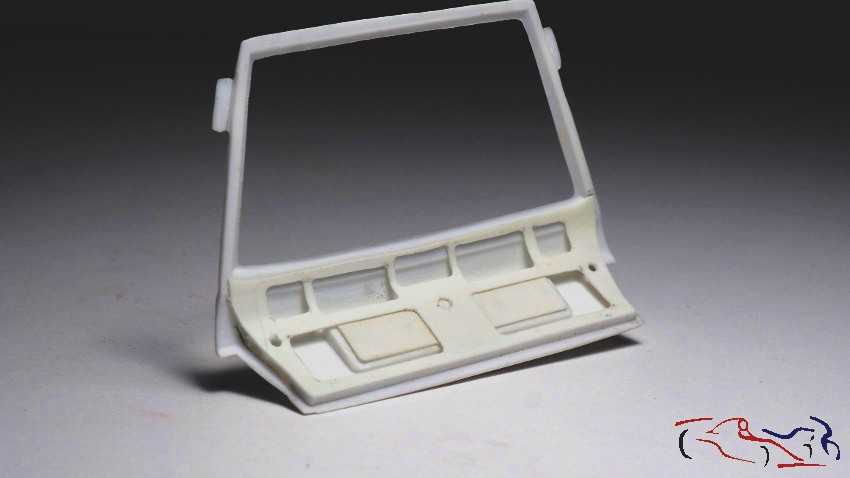 Os pongo esta foto para que veáis el alerón superior, y su fijación, que habrá que modificar y ajustarla a la realidad: Here is a photo to show you the upper wing, and its attachment, which will have to be modified and adjusted to reality:  Y del portón, pasamos al capót, para mostraros el proceso de creación de los nervios interiores, proceso que hice también hace años. Primero ponemos cello autoadhesivo de la marca Scotch, que se pinta muy bien con el lápiz, sobre la parte inferior, y dibujamos los nervios y agujeros. Lo despegamos y pasamos a una plancha fina de Evergreen, y recortamos con el cutter, afinando con minilimas y lijas. And from the tailgate, we move on to the bonnet, to show you the process of creating the interior ribs, a process I also did years ago. First we put Scotch cello sticker, which can be painted very well with a pencil, on the lower part, and we draw the ribs and holes. We peel it off and transfer it to a thin sheet of Evergreen, and cut it out with the cutter, sharpening it with mini files and sandpaper.    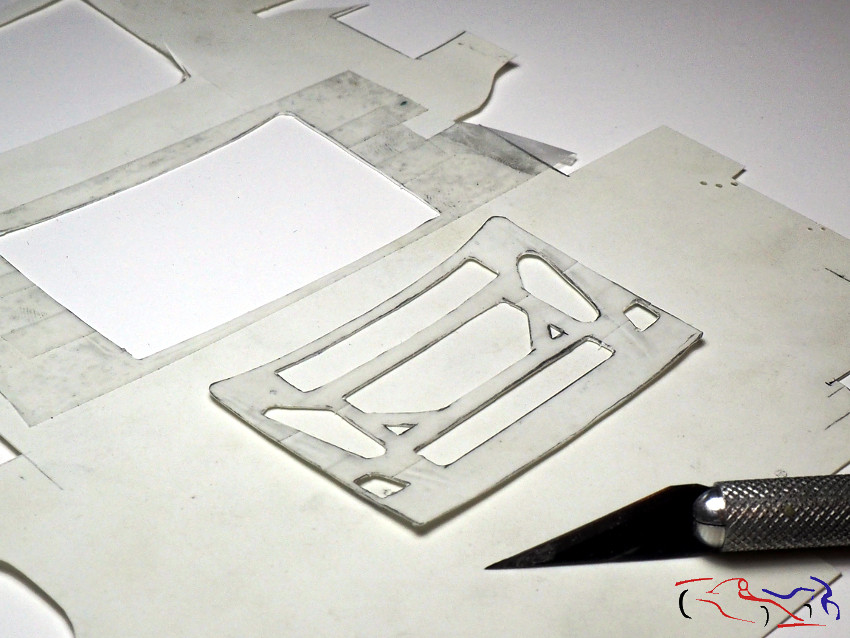 Y por último, os muestro las llantas y ventolines que compré a un modelista italiano, las cuales imprimí con Gravity-colors Spain: And lastly, I show you the rims and rims that I bought from an Italian modeler, which I printed with Gravity-colors Spain: 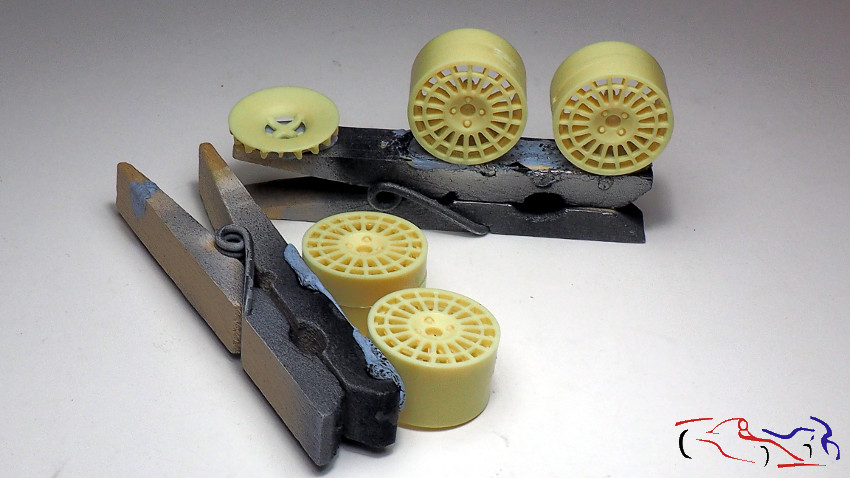 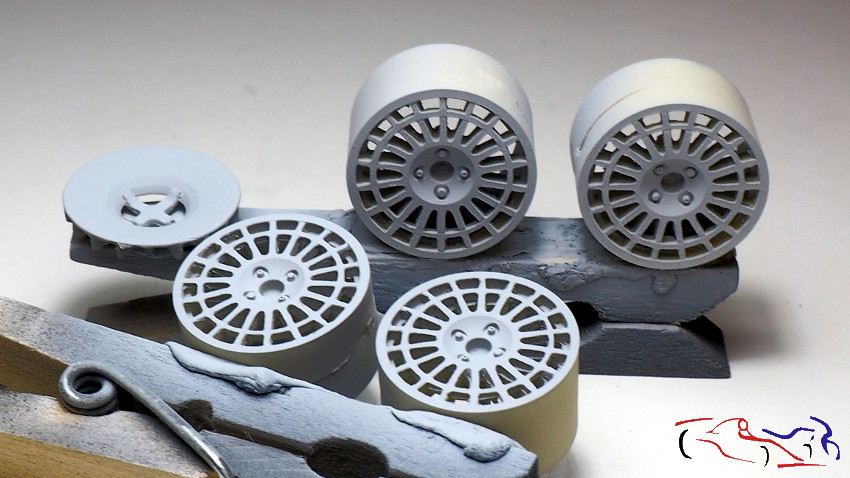 Esto es todo por el momento! Gracias por ver y comentar!! Thats all for the moment! Thanks for watching and commenting! |
|

|

|
|
10-15-2021, 01:47 PM
|
#2 | |
|
AF Enthusiast

Join Date: Jan 2004
Location: Gellivare
Posts: 1,989
Thanks: 1
Thanked 22 Times in 22 Posts
|
Re: Lancia "Deltona" Repsol 1993 - Hasegawa 1/24
Incredible work on al that styreen! Very good work!
__________________
Best Regards Anton |
|
|
|
|
|
10-18-2021, 07:32 AM
|
#3 | ||
|
AF Enthusiast
Thread starter
Join Date: Mar 2009
Location: Madrid
Posts: 649
Thanks: 109
Thanked 68 Times in 67 Posts
|
Re: Lancia "Deltona" Repsol 1993 - Hasegawa 1/24
Quote:
|
||
|
|
|
|
10-18-2021, 07:33 AM
|
#4 | |
|
AF Enthusiast
Thread starter
Join Date: Mar 2009
Location: Madrid
Posts: 649
Thanks: 109
Thanked 68 Times in 67 Posts
|
Re: Lancia "Deltona" Repsol 1993 - Hasegawa 1/24
Continuamos con el Lancia, en una etapa sin mucho color ya que el trabajo con cutter, lijas, limas, pegamentos, masillas e imprimaciones, lo máximo que podemos tener es el gris de la imprimación o el amarillo de las masillas!! Pero se intenta que se ven bien los cambios realizados y las piezas modificadas o nuevas.
We continue with the Lancia, in a stage without much colour because the work with cutter, sandpaper, files, glues, putties and primers, the maximum we can have is the grey of the primer or the yellow of the putties! But we try to make the changes made and the modified or new parts look good. En esta entrada, vamos a trabajar con la parte trasera de la carrocería. Y empezamos con el alerón superior trasero, que lleva el portón. En la siguiente foto, veis la unión original en la parte derecha, y la modificada a la izquierda. Decir que la base triangular del portón se ha rehecho, asi como la fijación propia del alerón, realizada en metal: In this entry, we are going to work with the rear of the bodywork. And we start with the upper rear spoiler, which carries the tailgate. In the following picture, you can see the original joint on the right side, and the modified one on the left. The triangular base of the tailgate has been redone, as well as the metal fixing of the spoiler itself: 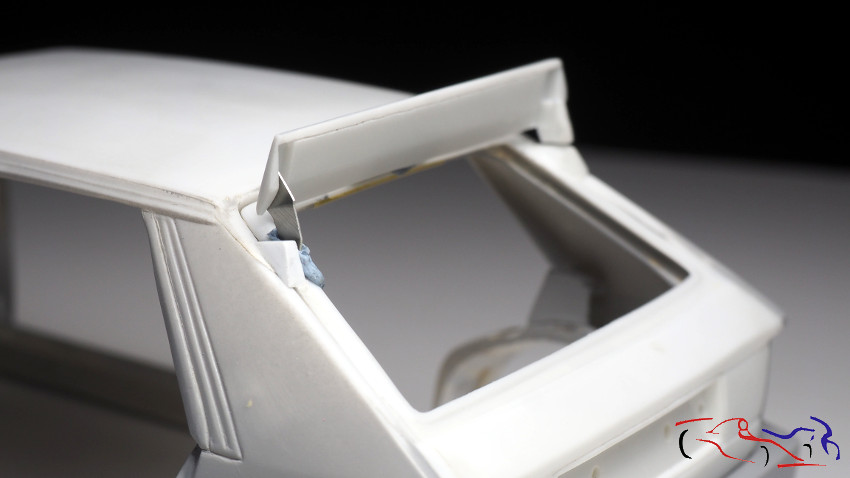 Aquí vemos como la pieza de metal unirá el alerón con el portón. Aun hay que retocar esta parte!! Here we can see how the metal piece will join the spoiler to the tailgate. This part still needs some work! 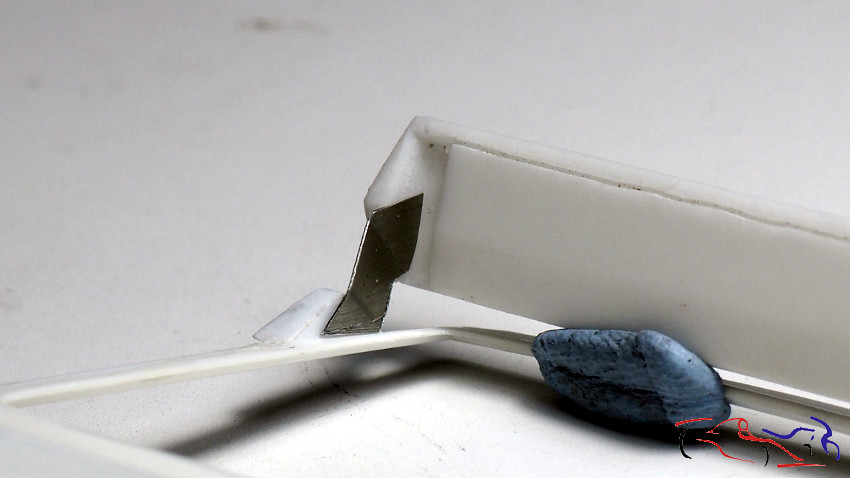 Y siguiendo con la carrocería, el portón se apoya sobre una guía que recorre toda la base, con una ligera curvatura. Cogemos un listón cuadrado, lo cortamos y lo fijamos con cinta para darle la curvatura necesaria. En ese punto, le ponemos una gota del pegamento Extra-thin de Tamiya, en la parte exterior de la unión, donde no hay cinta. Una vez seco, quitamos la cinta y reforzamos la unión con más gotas de pegamento, verificando con el portón y las luces, que todo encaja bien. And continuing with the bodywork, the tailgate rests on a guide that runs along the entire base, with a slight curvature. We take a square strip, cut it and fix it with tape to give it the necessary curvature. At this point, we put a drop of Tamiya Extra-thin glue on the outside of the joint, where there is no tape. Once dry, remove the tape and reinforce the joint with more drops of glue, checking with the tailgate and lights, that everything fits well. 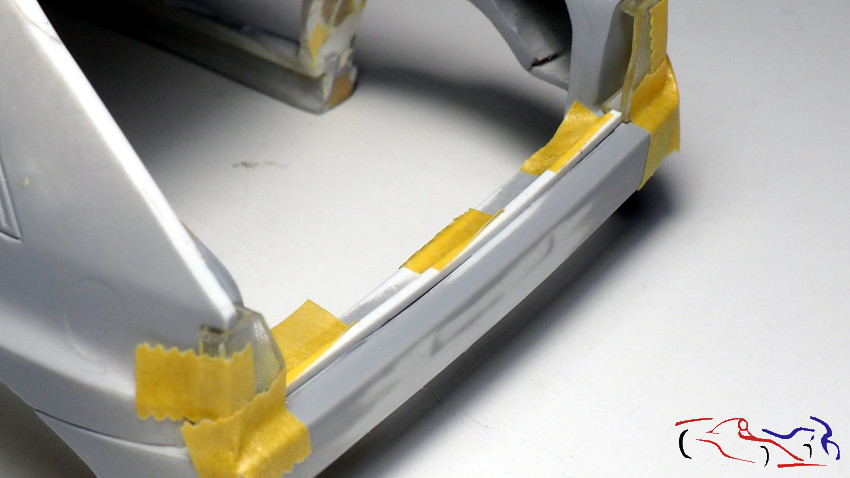 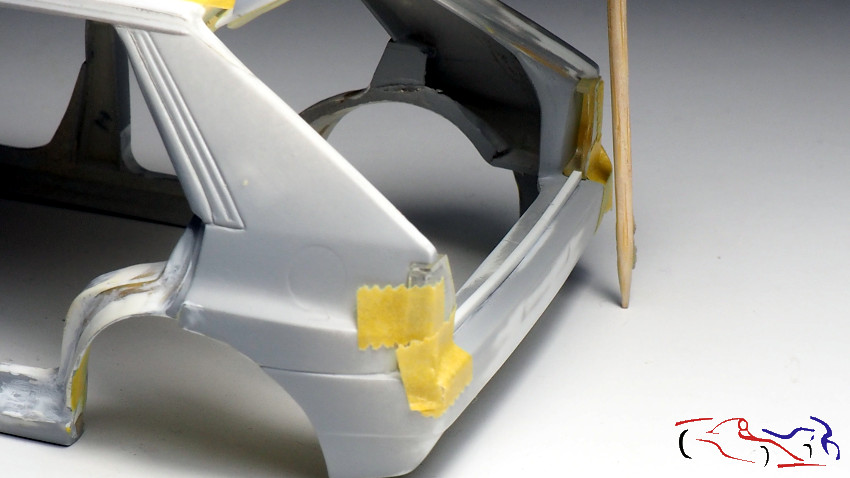 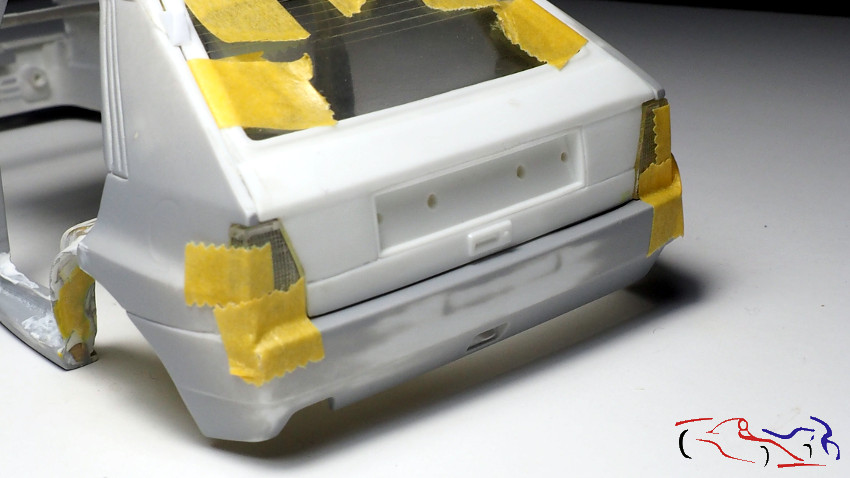 A continuación, añadimos dos listones en los extremos ya que ahí, el ancho aumenta, y le ponemos masilla epoxy Tamiya para dar la forma a la carrocería. Decir que he rebajado estos dos laterales (detrás de los pilotos traseros) de como lo dejé hace cinco años porque me parecían excesivos. En la última foto, vemos como queda con el chasis puesto: Next, we add two strips at the ends as the width increases there, and we put Tamiya epoxy putty to give the shape to the bodywork. I have lowered these two sides (behind the rear lights) from how I left it five years ago because they seemed excessive. In the last picture, we can see how it looks with the chassis on: 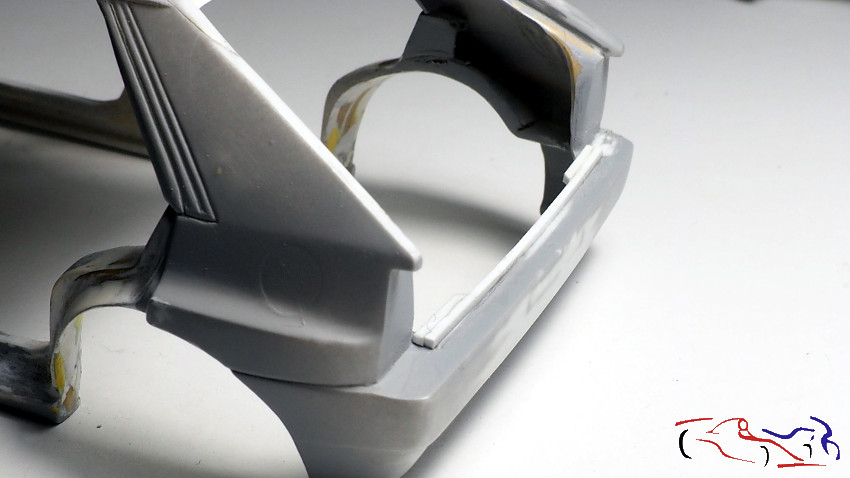 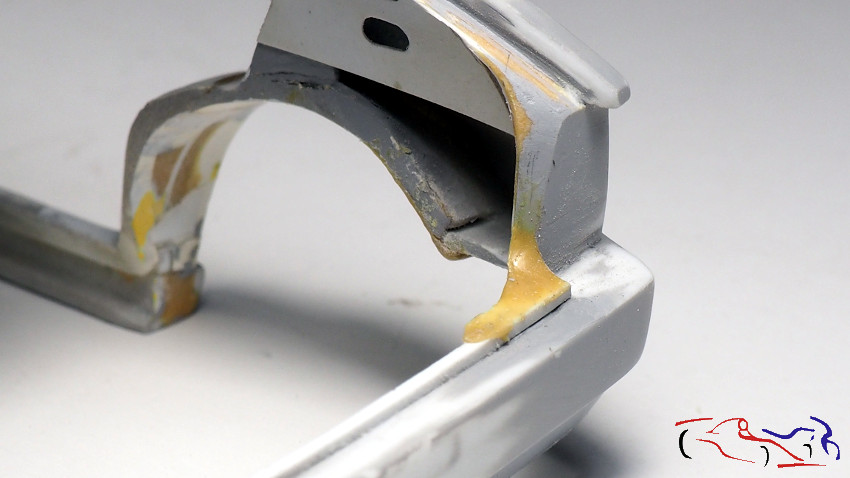 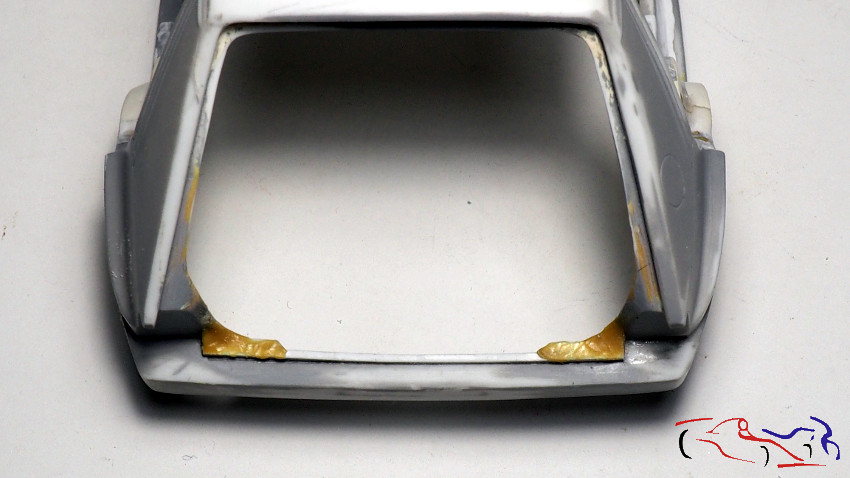 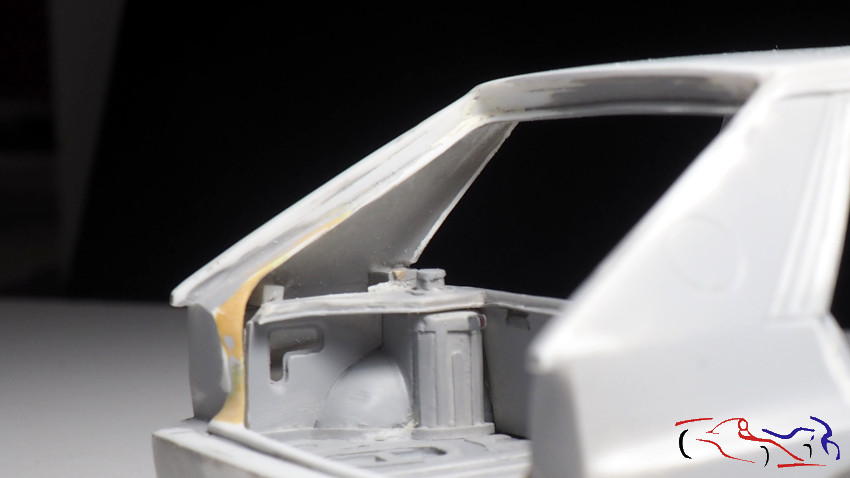 El siguiente paso es rellenar los pilares traseros, tal y como estaban los coches en realidad. No llevaban el guarnecido interior y se veía la chapa de la carrocería, con unos agujeros realizados para disminuir el peso, sin mermar la resistencia. Y después de hacer una plantilla con cartón, dibujé los huecos, los corté, y los pegué en la carrocería en su lugar: The next step is to fill in the rear pillars, just as the cars were in reality. They didnt have the interior trim and the body sheet metal was visible, with some holes made to reduce the weight, without reducing the resistance. And after making a template with cardboard, I drew the holes, cut them out, and glued them to the body in place:   Pero no me gustó el resultado, ya que la lámina era muy fina, y en realidad, se ve que los agujeros tienen relieve, que tiene grosor. Por tanto las despego y hago otras con una lámina más gorda. Y sigo el mismo proceso: pinto los huecos, hago los extremos redondeados con una broca, corto por la tangente de los agujeros, limo, lijo ..Y para terminar, rebajo el canto exterior un poco con limas para darle el efecto deseado de inclinación. Para terminar, le practico unos pequeños agujeros por aquí y allá. Podréis ver, que a la pieza derecha le falta el hueco inferior: esto es debido a que en ese lugar está la toma de combustible. Esta spiezas me llevaron un par de tardes de trabajo!!! But I didnt like the result, as the foil was very thin, and in reality, you can see that the holes are embossed, that they are thick. So I peeled them off and made another one with a thicker sheet. And I follow the same process: paint the holes, make the rounded ends with a drill bit, cut along the tangent of the holes, file, sand, sand ..And to finish, I lower the outer edge a little with files to give it the desired sloping effect. To finish, I make a few small holes here and there. You can see that the right piece is missing the lower hole: this is because thats where the fuel inlet is located. This took me a couple of work afternoons!!! 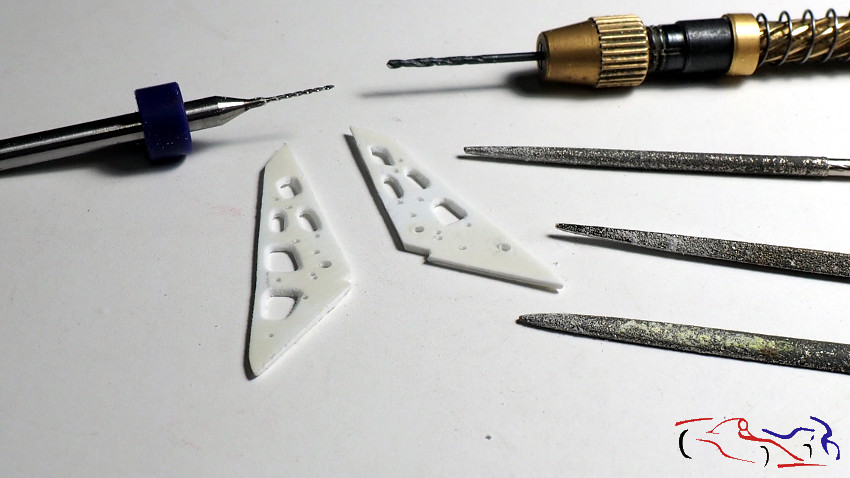 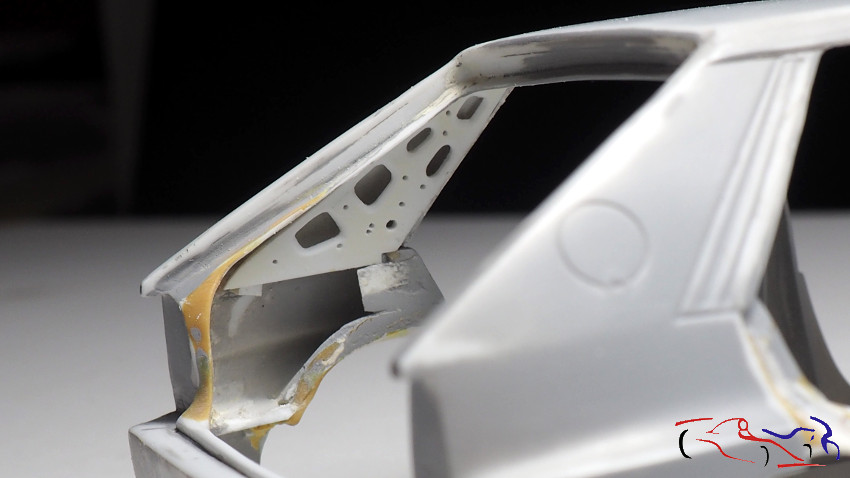 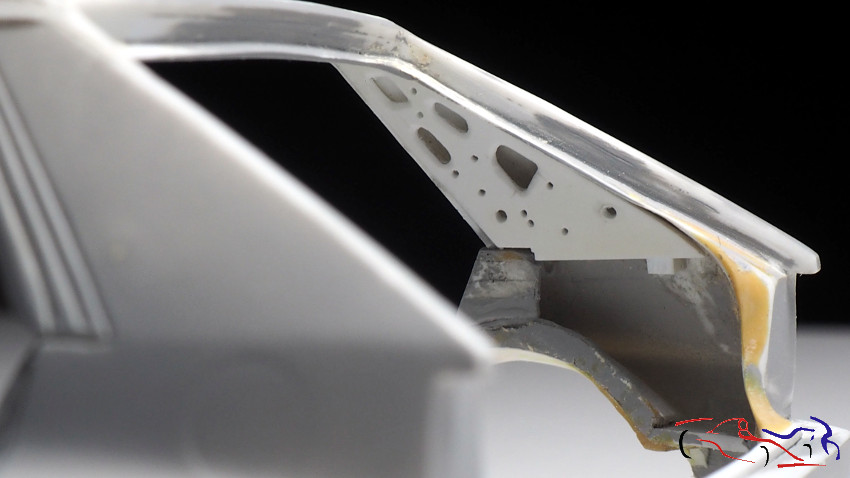 Una vez pegados, vamos a rematarlos. Para ello, cojo una varilla en ángulo, y la pongo en la unión entre la pieza interior del pilar C y la bandeja del maletero. La fijo ocn dos gotitas de Extra-thin de Tamiya, por la parte de la carrocería. Así, esta pieza hará de tope con el chasis. Y por supuesto, relleno los huecos con masilla Tamiya de poliuretano, de dos componentes. Esta masilla es muy fácil de trabajar, sobre todo cuando está seca a las 24 horas de haberse aplicado. Once they are glued, lets finish them off. To do this, I take a rod at an angle, and put it in the joint between the inner part of the C-pillar and the boot tray. I fix it with two drops of Tamiya Extra-thin, on the body side. This way, this piece will be the butt with the chassis. And of course, I fill the holes with Tamiya two-component polyurethane putty. This putty is very easy to work with, especially when it is dry 24 hours after being applied. 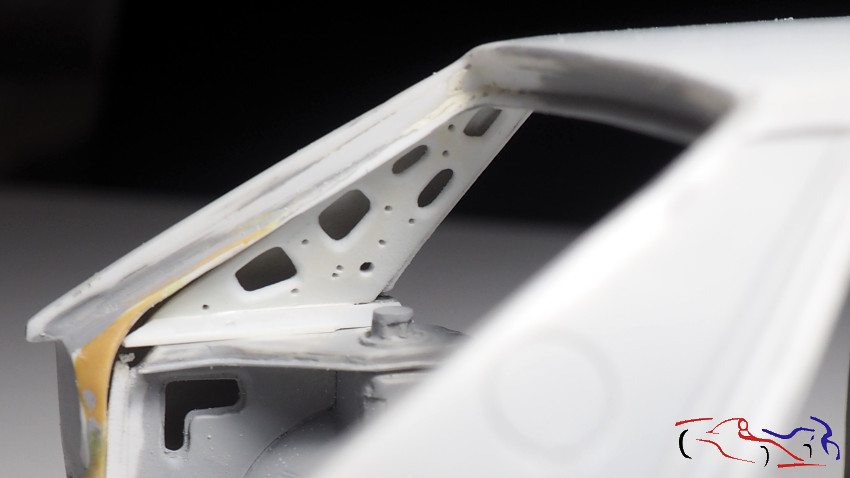   En la siguiente entrada, estará toda esta parte ya lijada. Gracias por ver y comentar! In the next post, all this part will be sanded. Thanks for watching and commenting! |
|
|
|
|
|
11-08-2021, 08:44 AM
|
#5 | |
|
AF Enthusiast
Thread starter
Join Date: Mar 2009
Location: Madrid
Posts: 649
Thanks: 109
Thanked 68 Times in 67 Posts
|
Re: Lancia "Deltona" Repsol 1993 - Hasegawa 1/24
Seguimos con el Deltona Repsol de Carlos Sainz. Aquí os muestro los interiores de los pilares traseros, con su masilla aplicada y lijada. Deciros, que la masilla es Tamiya Polyester Putty, de dos componentes y muy fina. Además, no encoje, y se lija muy bien.
We continue with Carlos Sainzs Deltona Repsol. Here I show you the inside of the rear pillars, with the putty applied and sanded. The putty is Tamiya Polyester Putty, two-component and very fine. In addition, it does not shrink, and sands very well.   Continuamos con el maletero. Cuando dejé este proyecto parado, habia hecho la base donde iría el depósito de combustible, y ahora me parece que es pequeña, por lo que la rehago más grande. Una base que divido en tres partes, sin cortar del todo, para que pueda doblar los extremos hacia arriba. Le pego los laterales, la pruebo en su lugar, y rebajo el inferior de los laterales para que tenga la forma de la base, con los extremos elevados. Lets continue with the boot. When I left this project stopped, I had made the base where the fuel tank would go, and now I think its too small, so Im making it bigger. I divide then base into three parts, without cutting it completely, so that I can fold the ends upwards. I glue the sides, and then, I try it in place, and lower the bottom of the sides so that it has the shape of the base, with the ends raised. 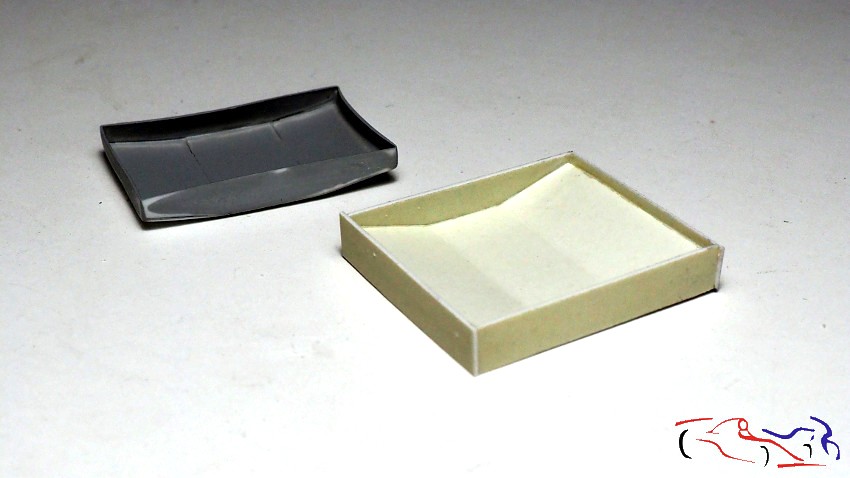 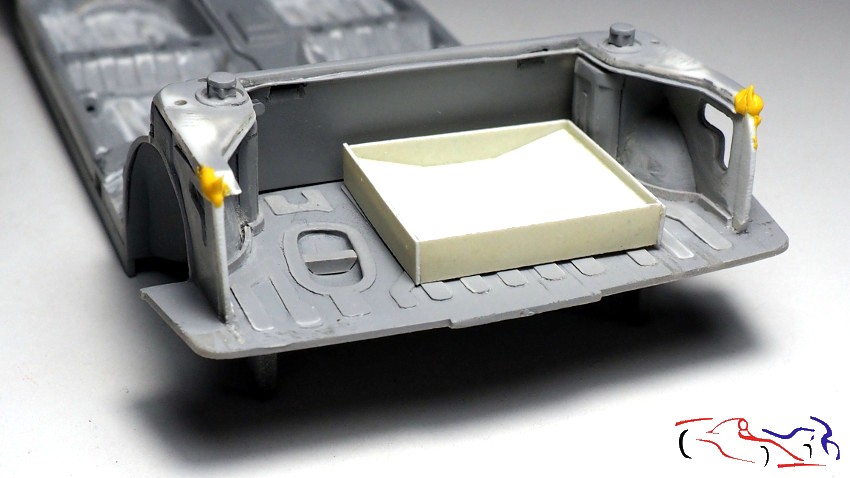 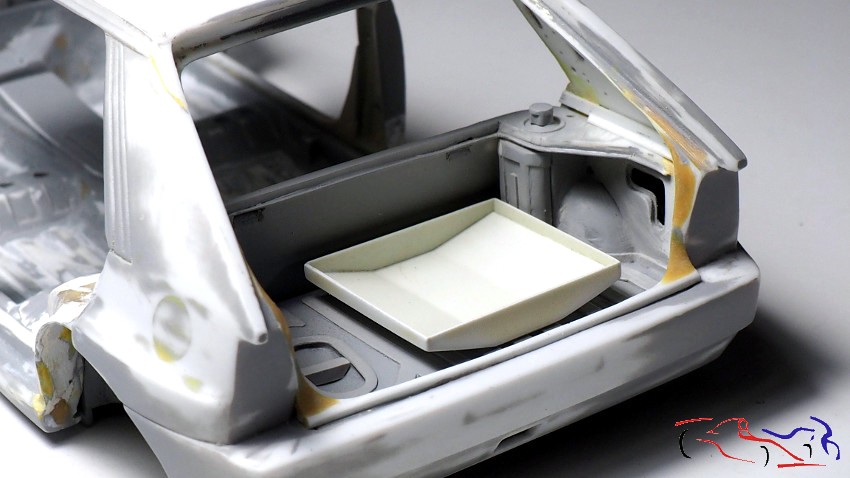 A la hora de hacer los depósitos, hago unas bases del espacio que tengo. Emzamos con el de gasolina, añadiendo unos laterales a la base a modo de cubo: When it comes to making the tanks, I make some bases from the space I have. We start with the petrol tank, adding some sides to the base in the form of a cube: 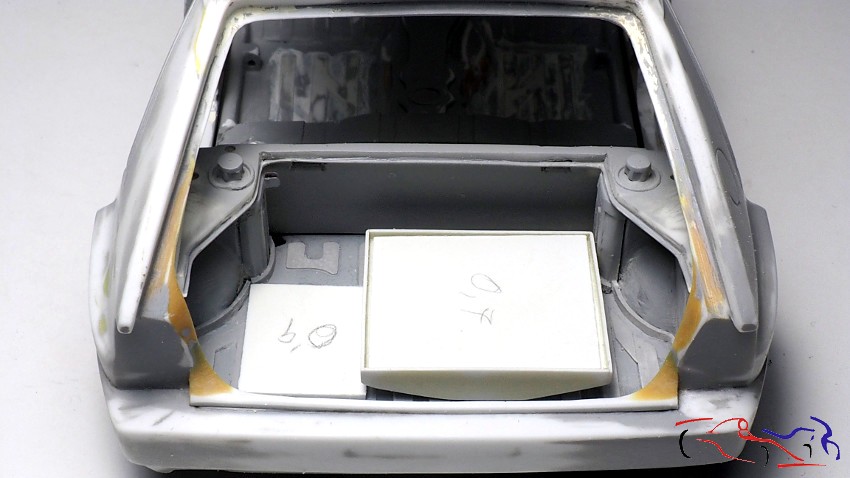 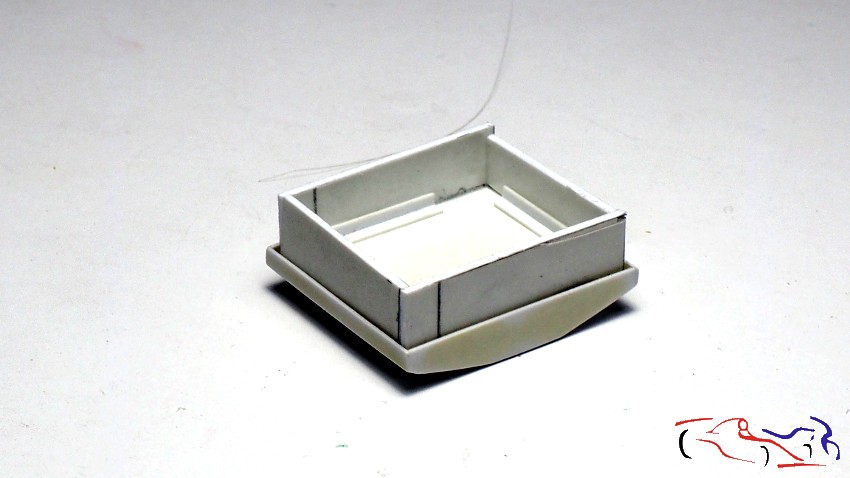 Pero fijandome en el real, el depósito no es una caja fija, sino que es como una bolsa deformable, por lo que decido hacerla con masilla Tamiya epoxy de dos componentes. Una vez mezclada la masilla, la doy forma sobre las bases que hice, teniendo el deposito de gasolina, una parte inclinada que es donde se acoplará la toma de combustible que llega a la carrocería. La del otro depósito, es más cuadrada. Una vez secos, los adapto al maletero, limando y lijando. But looking at the real one, the fuel tank is not a fixed box, but it is like a deformable bag, so I decide to make it with Tamiya epoxy putty of two components. Once the putty is mixed, I shape it on the bases that I made, having the fuel tank, a sloping part which is where the fuel intake that reaches the body will be attached. The other tank is more square. Once dry, I adapt them to the boot, filing and sanding. 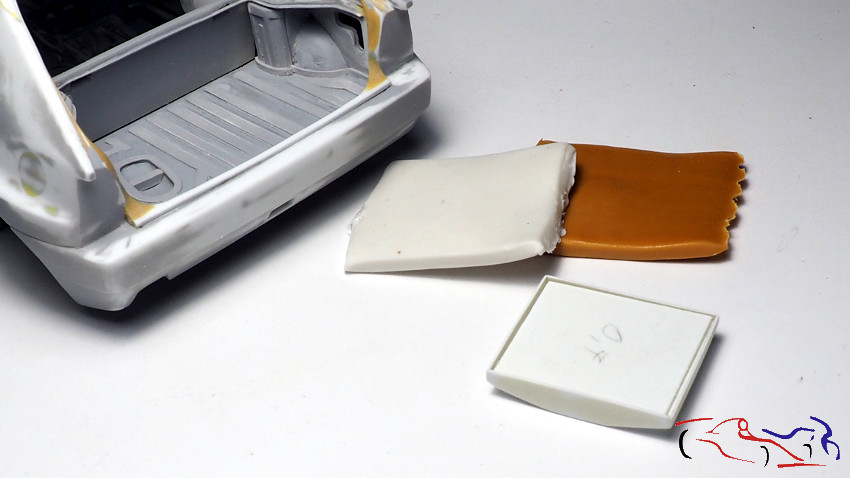 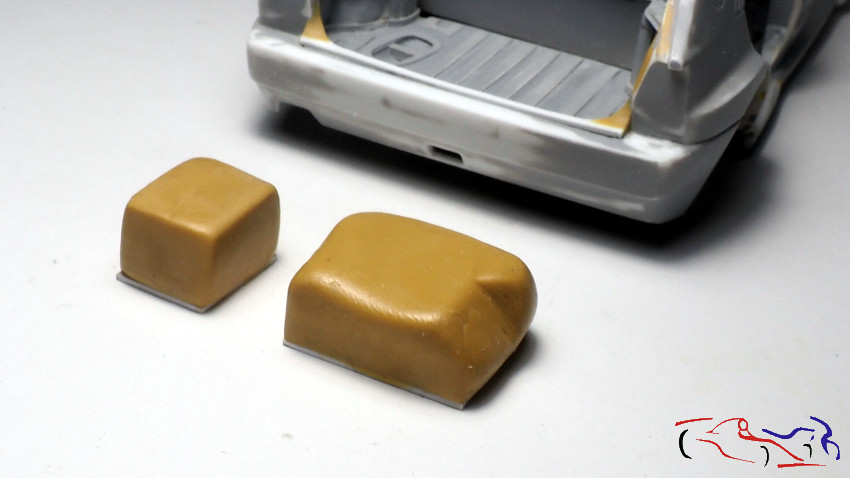 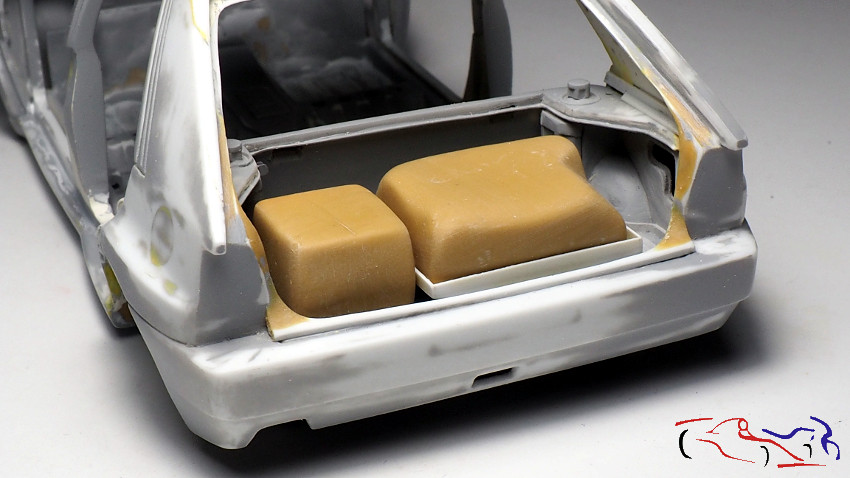 Ahora es el turno de detallar un poco más, y empezamos por las unas placas que tienen de ambos depósitos. La placa del depósito de combustible es ovalada, y lleva las tomas de la bomba de gasolina, por lo que hacemos un dibujo en papel con una plantilla, la cual pegamos sobre una plancha de metal, para trabajar sobre ella. Now its time to detail them a little more, and we start with the plates of both tanks. The fuel tank plate is oval, and has the fuel pump intakes, so we make a drawing on paper with a template, which we stick on a metal plate, to work on it. 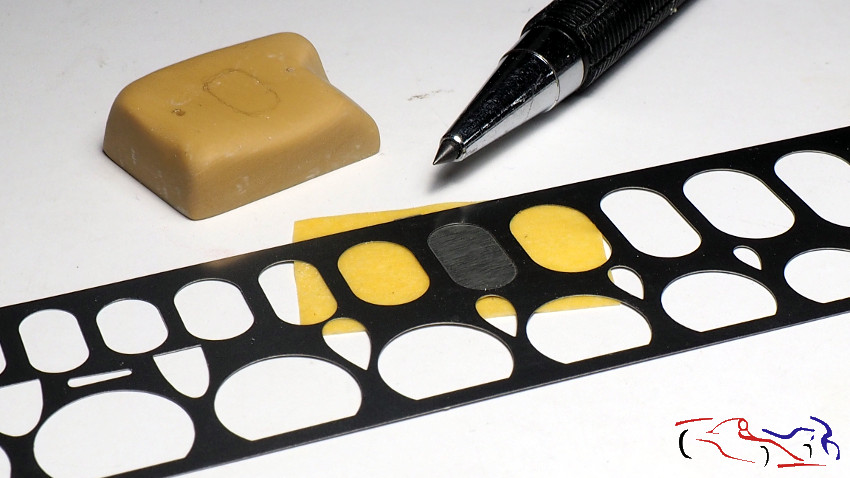 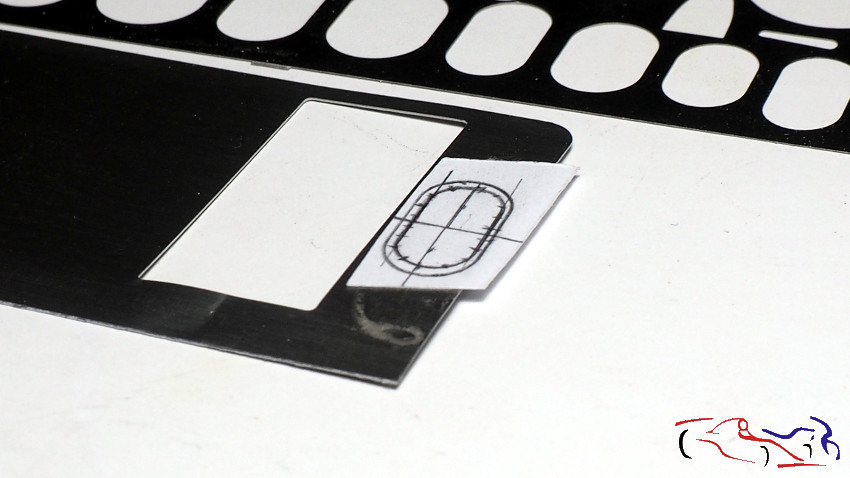 Una vez pegada, la recortamos con el papel, le hacemos los taladros de los remaches. En este punto, quitamos el papel para poner los remaches, y cortamos los extremos sobrantes de la parte inferior. Vemos la tapa del otro depósito con los remaches sin cortar en la parte inferior. También podemos observar que he añadido al depósito de combustible, la boca donde se conectará la toma de combustible. Once glued, we cut it out with the paper and make the holes for the rivets. At this point, we remove the paper to put the rivets, and we cut the excess ends of the lower part. We can see the lid of the other tank with the rivets uncut at the bottom. We can also see that I have added to the fuel tank, the mouth where the fuel inlet will be connected. the fuel inlet. 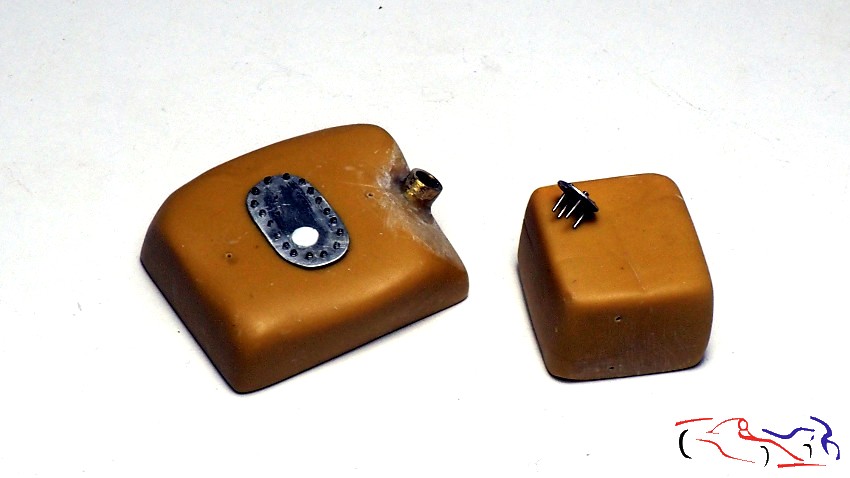 Pero este depósito va fijado con dos soportes de fibra, en ángulo por donde irán las cinchas que lo fijarán. Estos soportes los hago con Evergreen fino, pegando la base perpendicularmente a la plancha, por ambos lados, que después cortaré y ajustaré, como se ve en la foto con el depósito. Decir que aun falta afinarlos, y que la toma de combustible, está recortada pero sin eliminar el papel del dibujo. Y para terminar, la tercera foto muestra los dos depósitos en su lugar, los soportes, las placas superiores, y la toma de combustible, tal como estrá dispuesto en el maletero. Decir también que faltan los mangitos, cables y demás aparatos que controlan dichos depósitos. But this tank is fixed with two fibre supports, at an angle where the straps that will fix it will go. These supports are made with thin Evergreen, gluing the base perpendicularly to the plate, on both sides, which I will later cut and adjust, as shown in the photo with the tank. The fuel inlet is cut out, but without removing the paper from the drawing. And finally, the third picture shows the two tanks in place, the brackets, the top plates, and the fuel inlet, as it will be arranged in the boot. It is also worth mentioning that the hoses, cables and other devices that control the tanks are missing. 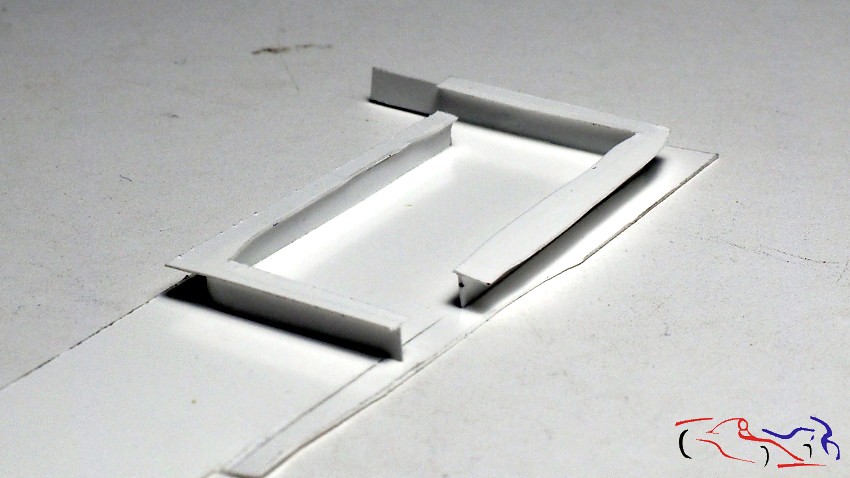 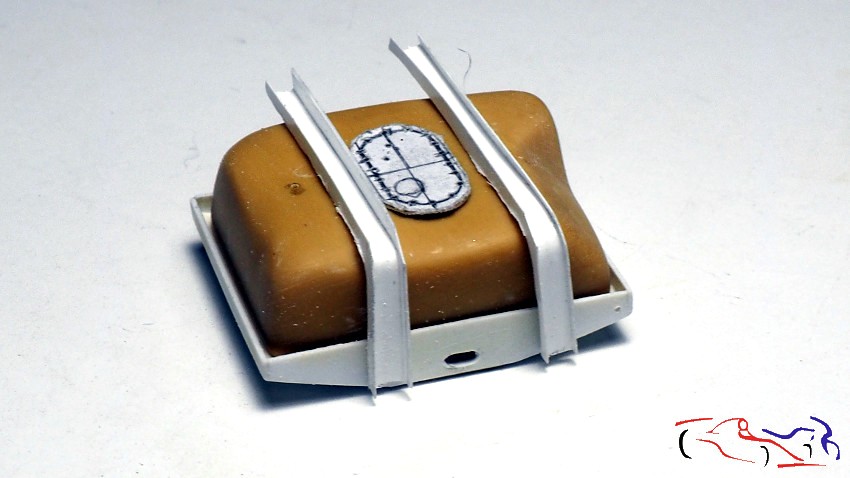 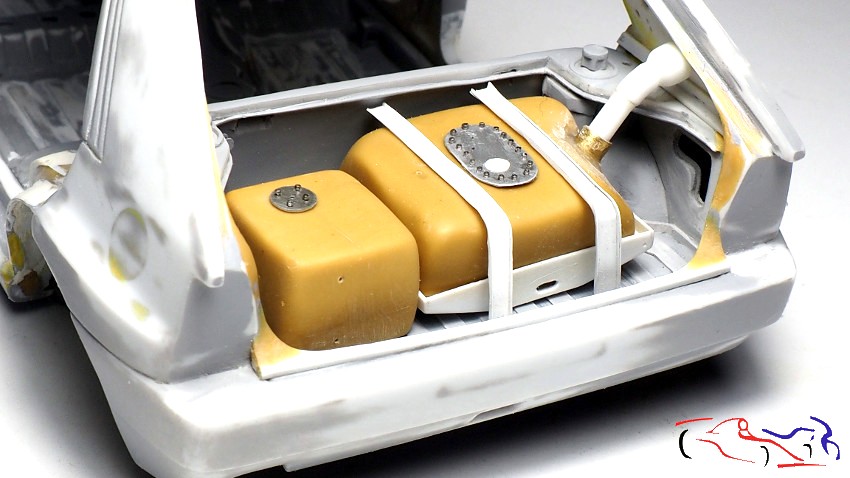 Además, esta semana he recibido el pedido que realicé a Claudio de Bellis, que corresponde al motor del Lancia Delta, que tan fielmente ha creado. Está realizado en 3D, esto es lo que he recibido: todas las piezas con unos soprtes, que hay que cortar. SI nos fijamos en el detalle del bloque motor y el diferencial, vemos que se puede sacar mucho partido de ellos. Y en la tercera foto, vemos también todas las piezas ya limpias, incluyendo la cuna donde va alojado el motor, y la parte de abajo del capó, con todos sus nervios. In addition, this week I received the order I placed with Claudio de Bellis, which corresponds to the Lancia Delta engine that he has created so faithfully. It is made in 3D, and this is what I have received: all the parts with some supports, which have to be cut. If you look at the detail of the engine block and the differential, you can see that you can make a lot of use of them. And in the third photo, we can also see all the parts already cleaned, including the cradle where the engine is housed, and the underside of the bonnet, with all its ribs. 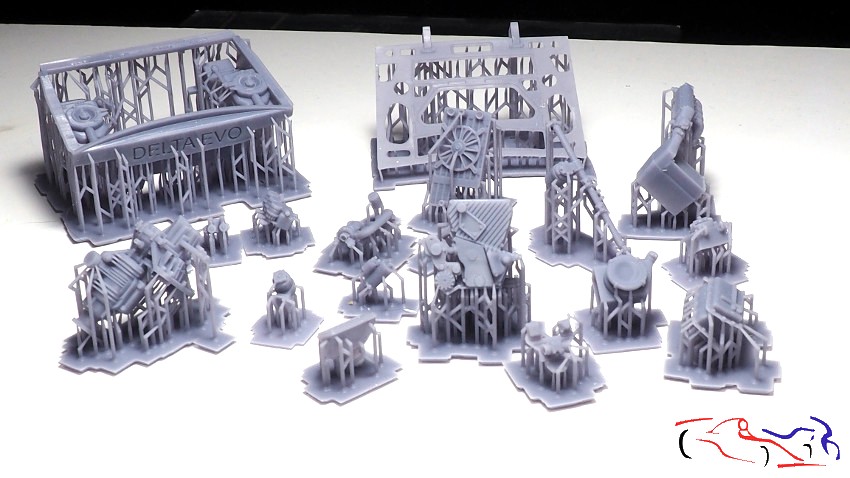 http://blog.maquetea.com/wp-content/.../LDR-08-21.jpg 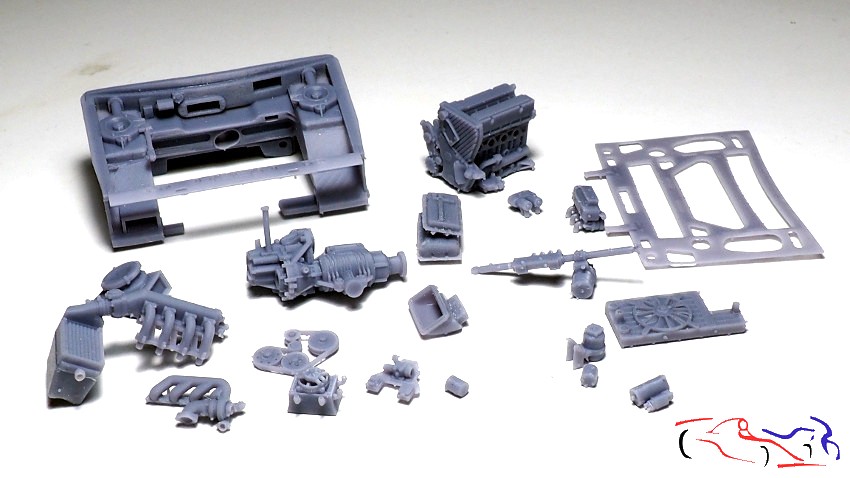 Y como hay muchas ganas de probarlo todo, vamos a acometer, la eliminación del motor que tiene el chasis originalmente, según las indicaciones escritas de Claudio. Vemos como viene el chasis con el motor, tanto por debajo como por encima, para finalizar, en una foto con el motor eliminado. And as we are eager to test everything, we are going to undertake the removal of the engine that the chassis originally has, according to Claudios written instructions. We see how the chassis comes with the engine, both below and above, to finish in a photo with the engine removed. 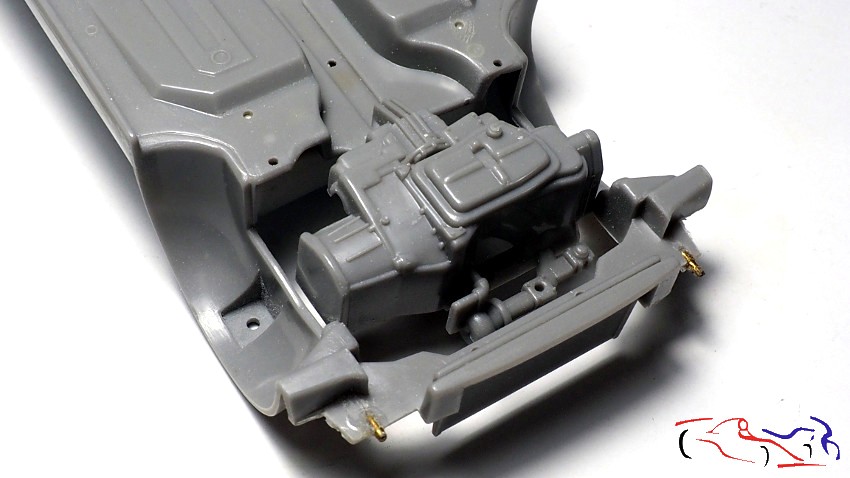 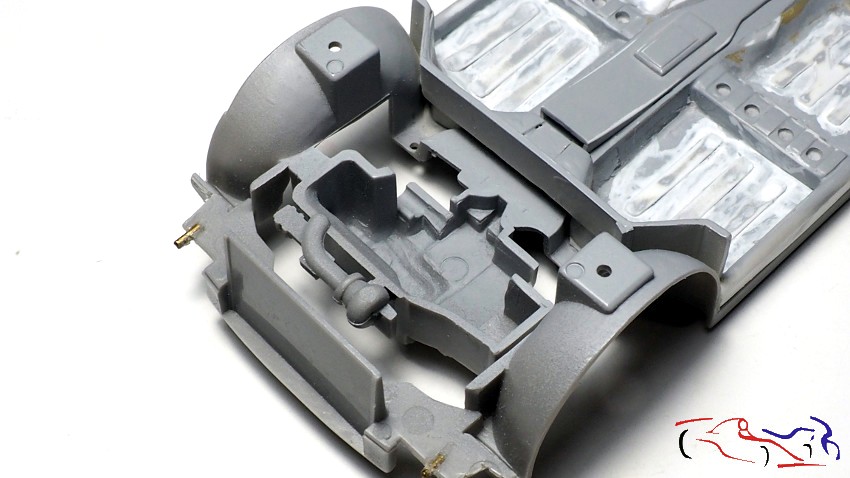 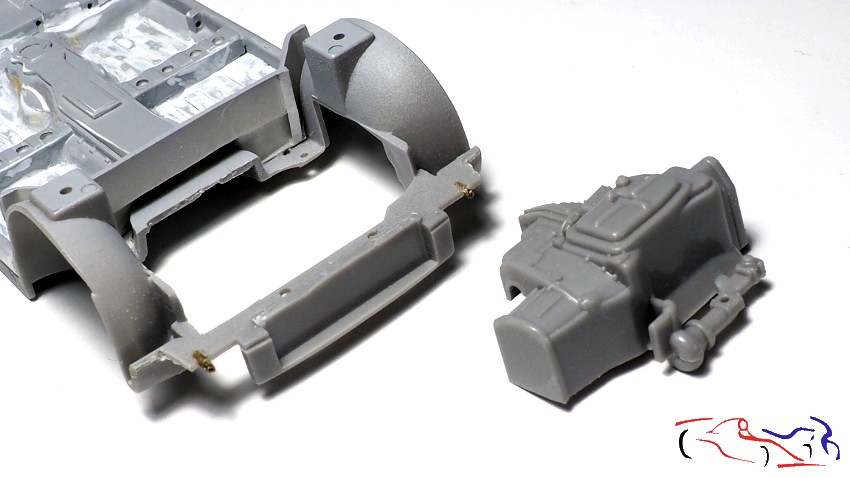 Y para finalizar hoy, una imagen del chasis, la carrocería y la cuna motor del transkit: And to finish today, a picture of the chassis, body and engine cradle of the transkit:  Espero que os haya parecido tan interesante como a mi, y con ganas de seguir en este proyecto. Gracias por ver y comentar!! I hope you found it as interesting as I did, and I look forward to continuing with this project. Thanks for watching and commenting! |
|
|
|
|
|
11-08-2021, 02:03 PM
|
#6 | |
|
AF Regular
Join Date: Aug 2011
Location: Torino
Posts: 390
Thanks: 175
Thanked 62 Times in 58 Posts
|
Re: Lancia "Deltona" Repsol 1993 - Hasegawa 1/24
Really great advance with the Lancia Jesus! Your work on the chassis and the body is stunning! The engine and engine bay from Claudio looks superb as well, together with it will be a super Delta build! Looking forward to see the advance! Great work as usual Jesus!
 |
|
|
|
|
|
11-08-2021, 02:59 PM
|
#7 | ||
|
AF Enthusiast
Thread starter
Join Date: Mar 2009
Location: Madrid
Posts: 649
Thanks: 109
Thanked 68 Times in 67 Posts
|
Re: Lancia "Deltona" Repsol 1993 - Hasegawa 1/24
Quote:
Last edited by JesusM; 11-08-2021 at 03:45 PM. |
||
|
|
|
|
11-08-2021, 07:57 PM
|
#8 | |
|
AF Enthusiast
Join Date: Mar 2009
Location: Rio de Janeiro, Brazil
Posts: 1,209
Thanks: 6
Thanked 144 Times in 136 Posts
|
Re: Lancia "Deltona" Repsol 1993 - Hasegawa 1/24
wow!!!!!
__________________
https://www.instagram.com/denilsonvm_modelcars/ |
|
|
|
|
|
11-09-2021, 03:05 AM
|
#9 | ||
|
AF Enthusiast
Thread starter
Join Date: Mar 2009
Location: Madrid
Posts: 649
Thanks: 109
Thanked 68 Times in 67 Posts
|
Re: Lancia "Deltona" Repsol 1993 - Hasegawa 1/24
Quote:
|
||
|
|
|
|
11-12-2021, 07:12 AM
|
#10 | |
|
AF Regular
Join Date: May 2010
Location: LIEGE
Posts: 401
Thanks: 148
Thanked 48 Times in 48 Posts
|
Re: Lancia "Deltona" Repsol 1993 - Hasegawa 1/24
Another masterpiece on its way !!
|
|
|
|
|
|
11-12-2021, 09:34 AM
|
#11 | ||
|
AF Enthusiast
Thread starter
Join Date: Mar 2009
Location: Madrid
Posts: 649
Thanks: 109
Thanked 68 Times in 67 Posts
|
Re: Lancia "Deltona" Repsol 1993 - Hasegawa 1/24
Quote:
|
||
|
|
|
|
11-13-2021, 05:58 AM
|
#12 | |
|
AF Regular
Join Date: Oct 2011
Location: Kilmarnock, Scotland
Posts: 306
Thanks: 6
Thanked 37 Times in 35 Posts
|
Re: Lancia "Deltona" Repsol 1993 - Hasegawa 1/24
Fantastic work Jesus. The evolution of 3D printing really has taken modelling to a new dimension. It's limits are endless.
The Hasegawa Lancia Delta just didn't sit right and I'm sure your version will be superb |
|
|
|
|
|
11-15-2021, 04:48 PM
|
#13 | ||
|
AF Enthusiast
Thread starter
Join Date: Mar 2009
Location: Madrid
Posts: 649
Thanks: 109
Thanked 68 Times in 67 Posts
|
Re: Lancia "Deltona" Repsol 1993 - Hasegawa 1/24
Quote:
|
||
|
|
|
|
12-02-2021, 08:34 AM
|
#14 | |
|
AF Enthusiast
 
Join Date: Mar 2005
Location: Barnsley
Posts: 3,199
Thanks: 8
Thanked 111 Times in 107 Posts
|
Re: Lancia "Deltona" Repsol 1993 - Hasegawa 1/24
Wow, I'm speechless!! Stunning work on everything so far..
__________________
Steve Noble |
|
|
|
|
|
12-02-2021, 11:44 AM
|
#15 | ||
|
AF Enthusiast
Thread starter
Join Date: Mar 2009
Location: Madrid
Posts: 649
Thanks: 109
Thanked 68 Times in 67 Posts
|
Re: Lancia "Deltona" Repsol 1993 - Hasegawa 1/24
Quote:
|
||
|
|
|
|
|
POST REPLY TO THIS THREAD |
 |
|
|


