|
|
|

|
|
| Search | Car Forums | Gallery | Articles | Helper | AF 350Z | IgorSushko.com | Corporate |
|
| Latest | 0 Rplys |
|
|||||||
| WIP - Street Post topics for any "Works In Progress" street vehicles projects in this sub-forum. |
 |
 Show Printable Version | Show Printable Version |  Email this Page | Email this Page |  Subscribe to this Thread
|
|
|
Thread Tools |
 10-10-2022, 08:10 AM
|
#31 | |
|
AF Regular
Thread starter
Join Date: Feb 2005
Location: Kaatsheuvel
Posts: 221
Thanks: 26
Thanked 45 Times in 40 Posts
|
Re: Porsche 986 Boxster S - Tamiya
Time to spray some color
 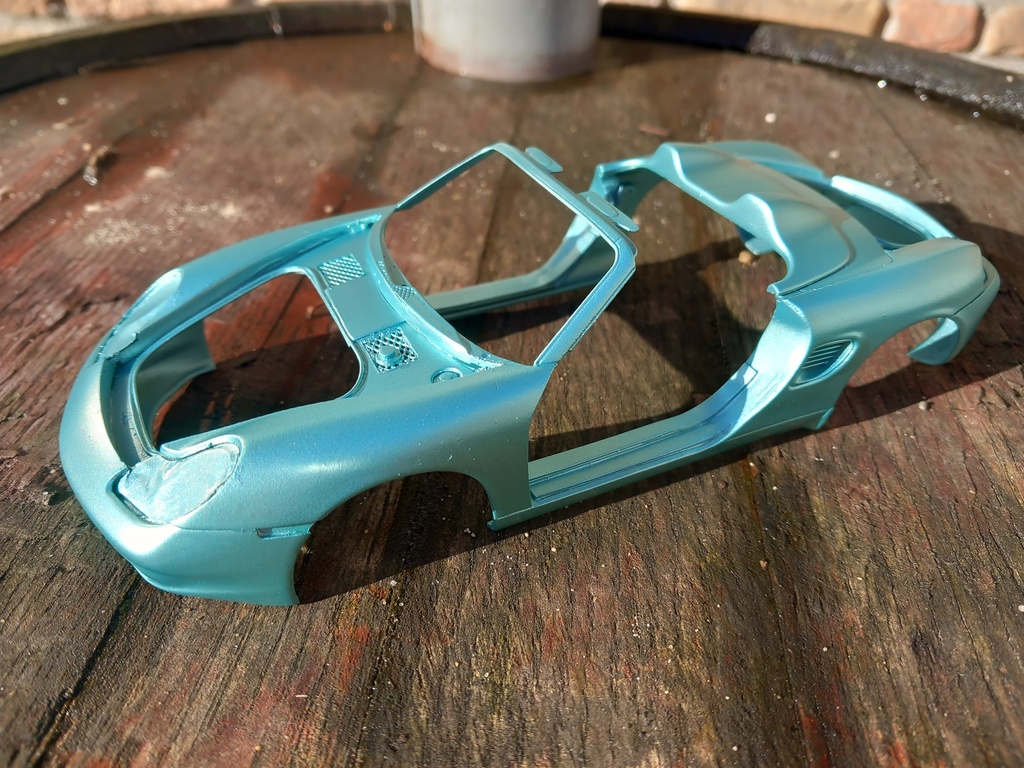 Next up, I'm applying some gloss coat. First time I used Zero Paints 2K gloss. It works pretty fine, but remains a bit tacky longer that my previous 2k lacquer. Some parts need to get a gloss coat on 2 sides, so I will need to spray some more later this week.   Arno |
|

|

|
| The Following 2 Users Say Thank You to Deathtrap For This Useful Post: |
fafnir (10-10-2022)
|
|
10-28-2022, 04:11 AM
|
#32 | |
|
AF Regular
Thread starter
Join Date: Feb 2005
Location: Kaatsheuvel
Posts: 221
Thanks: 26
Thanked 45 Times in 40 Posts
|
Re: Porsche 986 Boxster S - Tamiya
Some more paint works done. Interieur in its base color and the black parts of the trunk spaces. Now I need to do a little bit of sanding on the body and give it a second gloss coat.
 Since I have little time at the moment for doing the gloss, I'm focusing a bit on the suspension.  The kits suspension is not bad, but still is relatively simple. So I'm looking into replacing some parts by scratching more real life versions of it. First look at some reference pictures    So I started out with duplication the suspension subframes (from holding the brakes and wheels) as well and the bridging part between the left and right hand side.  And currently it is looking like this.  Now moving on the the remaining parts of the subframes. |
|
|
|
|
|
10-31-2022, 02:31 AM
|
#33 | |
|
AF Regular
Thread starter
Join Date: Feb 2005
Location: Kaatsheuvel
Posts: 221
Thanks: 26
Thanked 45 Times in 40 Posts
|
Re: Porsche 986 Boxster S - Tamiya
I had quite a bump in the road over the weekend. I wanted to finish off the gloss coat, but spotted a few specs. Carefully using a 3200 sanding sponge I attended the specs. Unfortunately on the driver side door, the first swipe cut through all the paint. Not sure what is was, but not your regular everyday dust spec.
I decided that the best way was to lightly sand the door panel and give it a respray. But it became even worse. :cry:  It appears the gloss coat was being dissolved by the color paint. It started to react and slightly bubble. This was Zero Paint 2K clear... never had that with my previous 2K clears I'd used. The only real way to move forward was to take some wipes and thinner and strip all the paint down. Now thinner also etches the plastic, so the sight was quite the horror...  After some careful yet sturdy sanding, I managed to get the door panel smooth again. Using a scriber the panel lines where cleaned and after a wash and dry, the door could be primed again.  Unfortunately that was all the time I had this weekend... so the new paint job needs to wait, but at least it is looking hopeful again. Arno |
|
|
|
|
|
12-01-2022, 04:45 AM
|
#34 | |
|
AF Regular
Thread starter
Join Date: Feb 2005
Location: Kaatsheuvel
Posts: 221
Thanks: 26
Thanked 45 Times in 40 Posts
|
Re: Porsche 986 Boxster S - Tamiya
So after the door disaster there was also the front lid disaster. A droplet of thinner found its way on the fresh paint. So again... this needed rework. Removing paint, sanding and priming. But I scratched the part while sanding. So a 2nd round was needed using some filler to smooth it out again.
 Nearly finished the interior. Only some small details to be picked out in silver and the seat belts.   I've started to remodel the rear suspension a bit. Rough shape is getting there.  Although not bad, the default Tamiya parts are lacking a bit in detail. And since I'll be running a open design wheel, the brakes will be visible. The 3D parts are of the design from PixelSun from Cults3D. The perforations have clogged up and became invisible (maybe over exposure). I'm trying to drill them by hand. I've spoken to PixelSun and he is considering a slight redesign.     |
|
|
|
|
|
12-02-2022, 05:32 AM
|
#35 | |
|
Loser

Join Date: Aug 2007
Location: Moscow
Posts: 1,170
Thanks: 110
Thanked 248 Times in 195 Posts
|
Re: Porsche 986 Boxster S - Tamiya
Pay attention to the right hand twisting of the springs.
__________________
Best regards, Mikhail   
|
|
|
|
|
|
12-09-2022, 03:31 AM
|
#36 | |
|
AF Regular
Thread starter
Join Date: Feb 2005
Location: Kaatsheuvel
Posts: 221
Thanks: 26
Thanked 45 Times in 40 Posts
|
Re: Porsche 986 Boxster S - Tamiya
I had some thoughts on how to proceed with the brakes and I figured: they need to be corrected. So I spend some time in Blender to design my own discs
  I only need to make a small cut out on the back to fit the Tamiya attachment and this can be printed. Fingers crossed I've got it all right in the first instance  Arno |
|
|
|
|
|
12-09-2022, 12:16 PM
|
#37 | |
|
AF Regular
Thread starter
Join Date: Feb 2005
Location: Kaatsheuvel
Posts: 221
Thanks: 26
Thanked 45 Times in 40 Posts
|
Re: Porsche 986 Boxster S - Tamiya
I made a quick video of the brake disc after finishing it. Let's see how it prints tomorrow https://youtu.be/eA3F2YfhEa0
|
|
|
|
|
|
12-15-2022, 02:25 AM
|
#38 | |
|
AF Regular
Thread starter
Join Date: Feb 2005
Location: Kaatsheuvel
Posts: 221
Thanks: 26
Thanked 45 Times in 40 Posts
|
Re: Porsche 986 Boxster S - Tamiya
Over the weekend and the past few days, I tried to get my brake discs printed. Unfortunately I kept these misprints where all holes were gone
  After many searches and chats I found the problem in my 3D design. The red areas are the problem.  Red means wrong. Basically it means I'm looking at the inside of an object. This should clearly be the outside. Note: those rods will be subtracted from the model, leaving holes instead. After inverting the red areas I printed again  Not ideal yet, but were are getting closer. Now it is time to tune the printer settings and the model a bit. Arno |
|
|
|
|
| The Following 2 Users Say Thank You to Deathtrap For This Useful Post: |
fafnir (12-16-2022)
|
|
12-19-2022, 02:29 AM
|
#39 | |
|
AF Regular
Thread starter
Join Date: Feb 2005
Location: Kaatsheuvel
Posts: 221
Thanks: 26
Thanked 45 Times in 40 Posts
|
Re: Porsche 986 Boxster S - Tamiya
I had to experiment quite a lot to get to a satisfactional result. A quick overview of the different attempts.
 But, we have a winner. 13.4mm in diameter that is usable after a bit of cleaning up.  Here some final 3D renders of both the small disk (13.4mm) and the larger one (14.8mm).     I'll try to print the larger one today. If that works out, I can continue the suspension and I'll put the designs online for the community  Arno |
|
|
|
|
|
01-23-2023, 07:37 AM
|
#40 | |
|
AF Regular
Thread starter
Join Date: Feb 2005
Location: Kaatsheuvel
Posts: 221
Thanks: 26
Thanked 45 Times in 40 Posts
|
Re: Porsche 986 Boxster S - Tamiya
Long time since I've left an update (oops)
Well I have my ups and downs with this model. I like the overal things I did, but only to like 90%. It's just up to a standard I would like to keep. Nevertheless, this project was meant to learn new skills, try to get to a next level of scratch building and altering parts. And I have learnt many new things and I'm sure I will try some more in future projects. For now, this model will just have to do and sit in my cabinet. Let's move on, this is how the model currently stands, bit by bit the parts are being assembled.    So my plans have changed a bit. Since I can't get both doors to work nice, the driver side one will remain hingable. The other one will be glued in place. I'm doubting if I will not just go for a full exposed model with all doors opened permanently. At least that would show all the extra work that has gone into it. On a different topic, I've ordered some custom decals. I want some nice Porsche logos on the calipers and I did order some more/extra decals for future projects.   And this is a close up of the rear suspension. I managed to attach the sway bar to the upright suspension using a bit of 0.35mm copper rod.  It is a tiny detail you probably will never see again, but I know it is there and it makes me happy. And it could be a step up towards a project where I will put the rear suspension up on display. A bit like this: Last thing that really needs some work is spraying the black trim around the main windscreen and 2 cover plates for the underside. Arno |
|
|
|
|
| The Following 2 Users Say Thank You to Deathtrap For This Useful Post: |
fafnir (01-23-2023)
|
|
01-23-2023, 01:16 PM
|
#41 | |
|
AF Regular

Join Date: Nov 2012
Location: Kamloops
Posts: 310
Thanks: 77
Thanked 51 Times in 51 Posts
|
Re: Porsche 986 Boxster S - Tamiya
Some really incredible work you've put into this build.
|
|
|
|
|
| The Following 2 Users Say Thank You to fafnir For This Useful Post: |
Deathtrap (01-23-2023)
|
|
01-25-2023, 09:55 AM
|
#42 | |
|
AF Regular
Thread starter
Join Date: Feb 2005
Location: Kaatsheuvel
Posts: 221
Thanks: 26
Thanked 45 Times in 40 Posts
|
Re: Porsche 986 Boxster S - Tamiya
My new decals arrived and are really looking nice and sharp.
  And then applying the first ones... they are only 8 microns thick, so they level out very nicely.   |
|
|
|
|
|
01-27-2023, 07:01 AM
|
#43 | |
|
AF Regular
Thread starter
Join Date: Feb 2005
Location: Kaatsheuvel
Posts: 221
Thanks: 26
Thanked 45 Times in 40 Posts
|
Re: Porsche 986 Boxster S - Tamiya
Small steps.
I've used flocking to create the interior fabrics of both trunk spaces. Now I'm aligning the hinges to glue both lids in place. I'm guessing one more weekend of work and it is ready for display   Arno |
|
|
|
|
|
02-04-2023, 04:58 PM
|
#44 | |
|
AF Regular
Thread starter
Join Date: Feb 2005
Location: Kaatsheuvel
Posts: 221
Thanks: 26
Thanked 45 Times in 40 Posts
|
Re: Porsche 986 Boxster S - Tamiya
Apparently there was still a lot of work to do before I could call the project 'done', but this learning project has now come to an end. Tomorrow I will make some daylight pictures.
 |
|
|
|
|
|
02-06-2023, 01:26 AM
|
#45 | |
|
AF Regular
Thread starter
Join Date: Feb 2005
Location: Kaatsheuvel
Posts: 221
Thanks: 26
Thanked 45 Times in 40 Posts
|
Re: Porsche 986 Boxster S - Tamiya
I managed to finalize the build. It took me nealy a year and had some ups and downs. All in all I've learned a lot from all the modifications and scratch buildings. Yes, not everything worked out well, but I still enjoyed it. And there will definitely be more builds like this where I can use all my learnings.
For now... this will be up on display with the rest of the collection.       And a bonus video https://youtu.be/M-7psLWt4Is |
|
|
|
|
|
|
POST REPLY TO THIS THREAD |
 |
| Thread Tools | |
|
|

