|
|
|

|
|
| Search | Car Forums | Gallery | Articles | Helper | AF 350Z | IgorSushko.com | Corporate |
|
| Latest | 0 Rplys |
|
|||||||
| WIP - Street Post topics for any "Works In Progress" street vehicles projects in this sub-forum. |
 |
 Show Printable Version | Show Printable Version |  Email this Page | Email this Page |  Subscribe to this Thread
|
|
|
Thread Tools |
 11-25-2013, 08:31 AM
|
#1 | |
|
AF Regular

Join Date: Mar 2012
Location: Sydney
Posts: 139
Thanks: 11
Thanked 10 Times in 10 Posts
|
LEXUS IS 350 (Fujimi 1/24)
Hi all,
I've started my rehabilitation. I choose Fujimi's LEXUS IS350 (1/24), because.... 1, I've heard lots of good reputation; great on styling, good parts fitting, etc 2, Engineless easy kit= I can try several thing on painting of body 3, I like this car, but not too much= I can stop doing too much (I feel sorry about this to owners of IS 350 or IS 250) 4, Overall, I thought this is the best for now for my rehabilitation (I got ill doing too much on the last one; 288GTO full open). What's included in the box  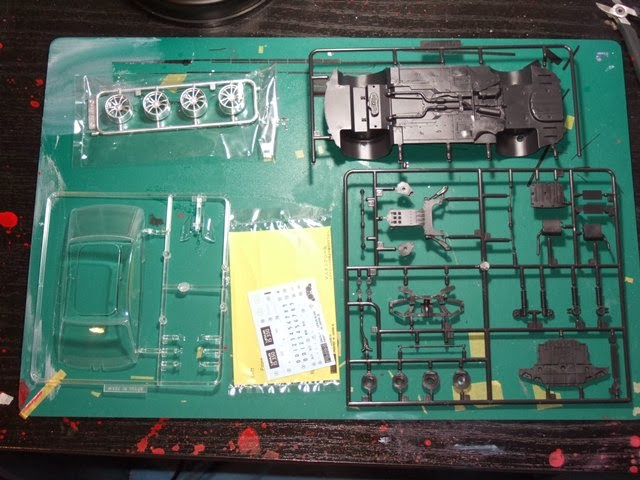 ...Every part has fine and sharp molds, I felt like I was looking at Tamiya's kit.  Dry fitting. Front and rear bumpers, side skirts... everything showed perfect fits!! I really doubt like "Is this really Fujimi's job???". Some say the tires and wheels are small, but I like this balance. I like the height, too. Amazing thing was, there needed no adjustments!!!  Front grills also showed perfect fits. Window part as well.... Oh, I am really confused, am I really working on Fujimi's kit...??! Anyway, this is perfect for my rehab.   First sanding with #800. Some dents were found, but still not so deep so that easily I could sand off.  This time I'll try something new (or, back to my basic). To examine the painting and polishing scheme, I airbrushed GSI Creos (Gunze Sangyo) Super Clear (lacquer based paint), thinned with Retarder Mild (Super Clear 1: Retarder Mild 2). After drying for 3 days, I polished with #1500, #2000, #3000, #4000 sanding papers, then polished with Tamiya's Course Compound, Fine Compound, Finishing Compound. I am so happy with this smooth gross. Since I was using only GSI Creos's paint and was only happy with result (such as 246GTS, 427 Cobra), now I decided to use them again.  Then the body color was airbrushed. GSI Creos's Metal Black 70%+ GSI Creos's Super Italian Red 30% = Dark Brown Metallic. I couldn't take good pictures though, this color seems better to my eyes than this picture! I'll wait for 3 days, then I'll apply some clear coat (with Super Clear).  During waiting for the body paint dries, just quickly proceed to chassis. Since I would never see the chassis from the bottom after completing this Lexsus, I airbrushed silver on certain places...  Then airbrushed flat black around the silver, even without masking. It's enough, even I thought I didn't need to paint the chassis (I couldn't be that too lazy). I believe I would do the same thing on these kind of easy kits.  Quickly move to wheels and tires. Still, it shows perfect fits, I don't even need to cut the back rims out...! The plating were taken off by soaking in the breach (I used White King, thinned with the same amount of water). Then I found these wheels had nice colors themselves!! I don't even paint the wheels (maybe), because I don't think better result would come up by painting. That's all for today, I reckon I'll finish this work very soon (I would take only about 10 hours total to finish, I believe!!). I am sure I am having fun....  Have a nice day!
__________________
Umihito We can learn from mistakes. 
|
|

|

|
|
11-25-2013, 05:22 PM
|
#2 | |
|
AF Enthusiast
Join Date: Nov 2008
Location: Highland, California
Posts: 652
Thanks: 1
Thanked 7 Times in 7 Posts
|
Re: LEXUS IS 350 (Fujimi 1/24)
Looks good so far.
I'm just curious about your first step of painting. Do you remove the polish shine? I didn't think paint would stick after using polishing compounds. |
|
|
|
|
|
11-26-2013, 02:47 AM
|
#3 | ||
|
AF Regular
Thread starter
Join Date: Mar 2012
Location: Sydney
Posts: 139
Thanks: 11
Thanked 10 Times in 10 Posts
|
Re: LEXUS IS 350 (Fujimi 1/24)
Quote:
 I just washed the compound away with dish washing detargent then overcoated the body color. It doesn't trouble you at all. even Tamiya says "after apllying surfacer, please try to sand and polish with compound, then apply the body color. These steps would lead splendid result". I was always following these steps and having very good result. I just washed the compound away with dish washing detargent then overcoated the body color. It doesn't trouble you at all. even Tamiya says "after apllying surfacer, please try to sand and polish with compound, then apply the body color. These steps would lead splendid result". I was always following these steps and having very good result.
__________________
Umihito We can learn from mistakes.
|
||
|
|
|
|
11-27-2013, 08:19 AM
|
#4 | |
|
AF Regular
Thread starter
Join Date: Mar 2012
Location: Sydney
Posts: 139
Thanks: 11
Thanked 10 Times in 10 Posts
|
Re: LEXUS IS 350 (Fujimi 1/24)
Hi,
Some of my friends asked me in person, "what paints and thinner did you use actually?" These are the all casts for Lexus body painting.  I called the thinner "Retarder Mild" in the last post but that was wrong, sorry. It was "Mr. Color Leveling Thinner". That's the special thinner for airbrush which provides us smooth surface. "Retarder Mild" was the additive to normal lacquer thinner; if the "Retarder Mild" was added to lacquer thinner, it works the same as "Leveling Thinner", actually. 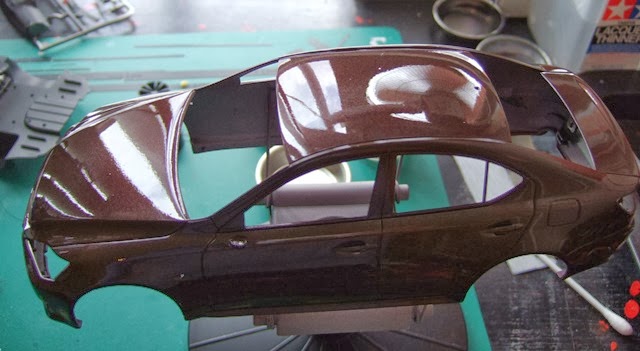 This is the picture after Super Clear applied. I can say the sanding or polishing are almost not needed (actually I will).  The gross on the bonnet is not enough, but on the fender or around the head lights are almost perfect, 'cause I made the airbrush "stay" fairly long (You could say I should have done the same thing on the bonnet. Yes, I should). I should have applied more clear at the same time on the bonnet to save my time to polish. But I also know, this "Orange peel" would disappear once some sanding process were taken place.  Side body also shows almost perfect shine. Muum, I should have used this method on last GTO, I don't know why I didn't trust my good-old method. Now I am looking forward to the next process; sanding and polishing. Have a good night (or good day, good evening!; Thanks for visiting from all over the world  ) )
__________________
Umihito We can learn from mistakes.
|
|
|
|
|
|
11-28-2013, 01:10 PM
|
#5 | |
|
AF Newbie
Join Date: Apr 2013
Location: Warsaw
Posts: 28
Thanks: 0
Thanked 3 Times in 3 Posts
|
Re: LEXUS IS 350 (Fujimi 1/24)
Nice build, actually i was thinking about buying this model and propably i will do it
 U have normal or aero version? U have normal or aero version? |
|
|
|
|
|
11-28-2013, 05:14 PM
|
#6 | ||
|
AF Regular
Thread starter
Join Date: Mar 2012
Location: Sydney
Posts: 139
Thanks: 11
Thanked 10 Times in 10 Posts
|
Re: LEXUS IS 350 (Fujimi 1/24)
Quote:
It's normal version.   It says "Inch-up" series #18, but ironically you can see the wheels seem to be "Inch-downed"  . But still I like that body-wheels balance. . But still I like that body-wheels balance.
__________________
Umihito We can learn from mistakes.
|
||
|
|
|
|
12-01-2013, 05:08 AM
|
#7 | |
|
AF Regular
Thread starter
Join Date: Mar 2012
Location: Sydney
Posts: 139
Thanks: 11
Thanked 10 Times in 10 Posts
|
Re: LEXUS IS 350 (Fujimi 1/24)
Hi from sunny Sydney
I know most of you are now preparing for the winter, but here it is now getting hotter and hotter. I should be patient to keep myself from going fishing but modeling.The polishing process has been started on my Lexus.  #3000 Mr. Hobby's Polishing Cloth, and #6000 Laplos, then Soft 99 Fine Compound applied. After every process, I washed with dish washing detergent.  Then Tamiya Course Compound applied. Still fine scratches were seen, but these would go away after the next step.  Tamiya Fine compound applied. most of scratches had gone.  Tamiya Finish Compound applied. I am happy with this result!! These are the weapons for this build.  "Sujiborido's micro polisher 123" on Toyo Associates' Mr. Meister Pen-type motor tool "PT-αⅡ". To apply compounds with this combo, I set the rotate speed very low. These combos made the job much easier and quicker. I don't feel any numbness on my hand.  Now I'm sure I'll be finishing this one very soon happily. What a good rehabilitation! See you soon
__________________
Umihito We can learn from mistakes.
Last edited by Umihito; 12-01-2013 at 04:42 PM. |
|
|
|
|
|
12-01-2013, 05:23 AM
|
#8 | |
|
AF Enthusiast

Join Date: Aug 2012
Location: Canada
Posts: 546
Thanks: 121
Thanked 45 Times in 40 Posts
|
Re: LEXUS IS 350 (Fujimi 1/24)
Paint work looks great, bravo!
|
|
|
|
|
|
12-01-2013, 08:16 AM
|
#9 | |
|
AF Regular
Join Date: Mar 2013
Location: Durham, North Carolina
Posts: 463
Thanks: 1
Thanked 49 Times in 49 Posts
|
Re: LEXUS IS 350 (Fujimi 1/24)
Now that's some shiny!
|
|
|
|
|
|
12-05-2013, 02:37 PM
|
#10 | |
|
AF Regular

Join Date: Nov 2013
Location: Dhaka
Posts: 266
Thanks: 6
Thanked 14 Times in 14 Posts
|
Re: LEXUS IS 350 (Fujimi 1/24)
Impressive paint job. Keep up the good work
|
|
|
|
|
|
01-05-2014, 07:51 AM
|
#11 | |
|
AF Regular
Thread starter
Join Date: Mar 2012
Location: Sydney
Posts: 139
Thanks: 11
Thanked 10 Times in 10 Posts
|
Re: LEXUS IS 350 (Fujimi 1/24)
Hi all, sorry again I was away so long. You know, it was Christmas time
 . .But now I'm almost there with my lovely Lexus. Let's post for today. 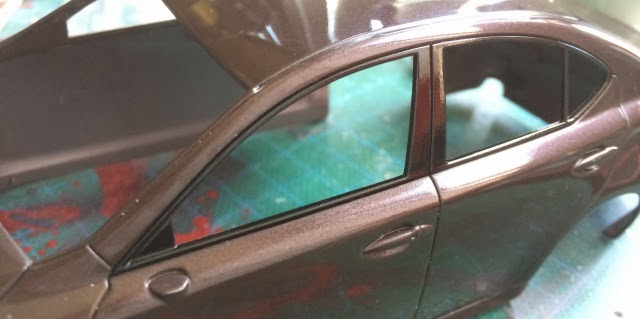 I masked and black out the rims of the windows.  Then tried to apply the Mirror Finish (Hasegawa's) on edges. From distance, it seemed fairly ok...  But I could see it was not clean enough from near. I found I couldn't do any better so...  I peeled the Mirror Finish off and masked again. This pic shows how I mask the curved edges. I make skinny masking tape by cutting, then it becomes easy to apply to the curved lines (if the curve is sharp, I apply the wide tape on body then cut with design knife; as you can see on the right). 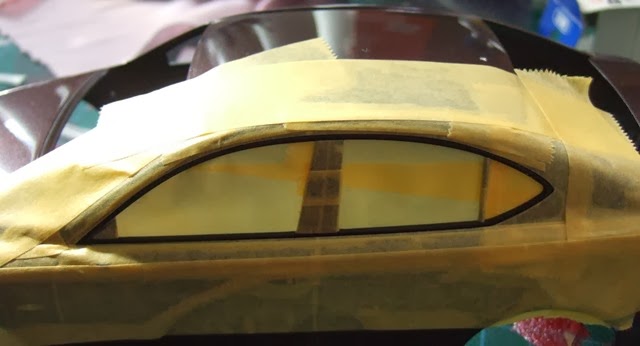 Then use wide tapes to cover other areas. Then I would apply cling wraps to the lest of the part.  This time I used this good one on the moles.  Now I'm confident with masking.  I'm happy with this brilliant finish, too. Actually the real car has black moles inside (window side), but I think this is clean enough and fairly looking good as a scale model.  Another problem came up  . The masking tapes left the marks on body paint. I heard someone said "using leveling thinner, the paint never dries so the mark would be left", now it is verified... lol. . The masking tapes left the marks on body paint. I heard someone said "using leveling thinner, the paint never dries so the mark would be left", now it is verified... lol. So I again clear coated (using normal lacquer thinner) and polished... Though it was good to protect the silver window moles. To prevent the fade of the gross on silver moles, I managed to apply the clear coat from far (20-30cm away from body) and made mat finish firstly, then after looking the silver paint being protected finely, I applied more coat then polished (like clear coating on the decals).  Just some metal files were used on the back of this plated part to fit to the body. Looking good overall.  To attach the clear parts, I use this method. Masking tape on tip.  Then use just a little bit of clear bond (Konishi's Aquri-Anchor). This glue is good, 'cause it's easily wiped off by tooth pic or enamel thinner without harming the body paint.  I reckon the rear combi looks somehow too brilliant as if it's turned on, but still it's fair. It was already in clear red, so I surrender to replicate "clear orange" part. That's all for today, have a nice Monday!! I'll go to bed....
__________________
Umihito We can learn from mistakes.
|
|
|
|
|
|
01-05-2014, 10:03 AM
|
#12 | |
|
AF Regular
Join Date: Mar 2013
Location: Durham, North Carolina
Posts: 463
Thanks: 1
Thanked 49 Times in 49 Posts
|
Re: LEXUS IS 350 (Fujimi 1/24)
Car looks great! Wonderful progression.
|
|
|
|
|
|
01-05-2014, 05:20 PM
|
#13 | |
|
Blarg! Wort Wort Wort!
Join Date: Mar 2006
Location: Quezon City
Posts: 2,120
Thanks: 64
Thanked 101 Times in 100 Posts
|
Re: LEXUS IS 350 (Fujimi 1/24)
wow. amazing work, considering that you called it "rehabilitation work." and i like the body color
__________________
olly olly oxen free |
|
|
|
|
|
01-06-2014, 08:16 PM
|
#14 | |
|
AF Enthusiast
Join Date: Mar 2004
Location: Oakland, Minnesota
Posts: 1,015
Thanks: 31
Thanked 57 Times in 55 Posts
|
Re: LEXUS IS 350 (Fujimi 1/24)
This looks fantastic! What is that mirror finish product? I am not familiar with it...
Nevermind, I looked it up, lol |
|
|
|
|
|
01-07-2014, 10:06 AM
|
#15 | |
|
AF Regular
Thread starter
Join Date: Mar 2012
Location: Sydney
Posts: 139
Thanks: 11
Thanked 10 Times in 10 Posts
|
Re: LEXUS IS 350 (Fujimi 1/24)
Thanks to everybody watching this WIP, sorry for not replying to your comments... Please allow me for it, this built is a rehab for me to recover from crazy days with last GTO... I know I'm too relaxed, though
Anyway I'm recovering now and I found making kits are fun again...!  Before docking the body and chassis, these hoes were needed to be drilled.  This is backside. Using very small nuts and bolts; they are actually for the glasses, about 1mm thickness.  Nuts were fixed onto the chassis with CA glue. Now it is ready to attach to the base. But for now I'll leave this until finishing all the works.  One more thing to do before docking the body and chassis. I attached the black tape (insulating tape) on the bottom of the rear window 'cause I could see through the inside body from the gap. I can't leave it if there were any gaps between the body and windows which the real car doesn't have.  Now docked and the wheels were test fitted.  Muhhh.....? I can say the wheels look a bit small now. It's a kind of fair seeing the pictures, but if I actually have a look with my eyes, still... yes, they were small.  Then I tried to "inch-up"... oh, this was what FUJIMI meant!!! (It's not, as you knew  ) )I applied 0.25mm plastic paper, 2 layers. This was, 1mm-up for the 1/24 wheel, meaning about 1 inch up.  Slightly inched-up.  Then applied silver paint for the test fitting, please ignore the rough surfaces on the wheel rims.  It was fairly looking... fair. I felt it still plain.  Then I tried this. Looking super cool!!!  To fit Aoshima's wheel to Fujimi's kit, I needed to slim the axle.  ...Still showed the negative camber, also the height of the body was a bit high.  I found the wheel rim was hitting to the shock spring. It's a bit rough solution but I scraped the spring. Don't care what we can't see...lol. And, top of the shock absorber were 1mm cut off to low down. I attached 1mm cut plastic pipe to the lower arm to fit the low-downed shock.  To fit to Aoshima's loose hole (I can say Fujimi's pin is too skinny, anyway they were from other makes), I simply attached slender masking tape.  Now it's good! Centre gold parts were re-painted in Tamiya's enamel Gold Leaf (X-12? as I remembered) 'cause the original surface was a bit rough.  There was no need to adjust the height or width on rear ones. That's the progress so far, thanks for watching!!! Have a good nite... zzzz
__________________
Umihito We can learn from mistakes.
|
|
|
|
|
|
|
POST REPLY TO THIS THREAD |
| Tags |
| creos , fujimi , gsi , is350 , lexus |
 |
|
|


