|
|
|

|
|
| Search | Car Forums | Gallery | Articles | Helper | AF 350Z | IgorSushko.com | Corporate |
|
| Latest | 0 Rplys |
|
|||||||
 |
 Show Printable Version | Show Printable Version |  Email this Page | Email this Page |  Subscribe to this Thread
|
|
|
Thread Tools |
 07-13-2005, 12:10 AM
|
#31 | |
|
Resident Chemist
 
Join Date: Feb 2004
Location: Rockville, Maryland
Posts: 8,586
Thanks: 105
Thanked 157 Times in 157 Posts

|
Re: Camry FAQs and Information
TECHNICAL ARTICLES ON TOYOTA ENGINE SYSTEMS
EXTENSIVE AUTOMOTIVE INFORMATION LINKS Q: Where can I find technical information on my EGR system? I want to modify it and I'd better understand what's going on there first.  A: A good source of technical articles and automotive information links is Kevin Sullivan's Autoshop 101 site: http://www.autoshop101.com/ Here are the titles of his technical articles followed by direct links to the articles: Technical Articles Toyota Series - Electrical Electrical Fundamentals with questions.pdf http://www.autoshop101.com/forms/h1.pdf Electrical Circuits with questions.pdf http://www.autoshop101.com/forms/h2.pdf Electrical Components with questions.pdf http://www.autoshop101.com/forms/h3.pdf Analog vs Digital Meters with questions.pdf http://www.autoshop101.com/forms/h4.pdf Wire, Terminal and Connector Repair w/qu.pdf http://www.autoshop101.com/forms/h5.pdf Automotive Batteries with questions.pdf http://www.autoshop101.com/forms/h6.pdf Toyota Starting Systems with questions.pdf http://www.autoshop101.com/forms/h7.pdf Toyota Charging Systems with questions.pdf http://www.autoshop101.com/forms/h8.pdf Understanding Toyota Wiring Diagram.pdf http://www.autoshop101.com/forms/h09e.pdf Electrical Diagnostic Tools.pdf http://www.autoshop101.com/forms/h10e.pdf Diagnosing Body Electrical Problems.pdf http://www.autoshop101.com/forms/h11e.pdf Semiconductors with questions.pdf http://www.autoshop101.com/forms/h12.pdf Transistors with questions.pdf http://www.autoshop101.com/forms/h13.pdf Computers / Logic Gates with questions.pdf http://www.autoshop101.com/forms/h14.pdf Overview of Sensors & Actuators w/quest.pdf http://www.autoshop101.com/forms/h15.pdf Electronic Transmission #1 - Operation.pdf http://www.autoshop101.com/forms/h16.pdf Electronic Transmission #2 - Diagnosis w/quest.pdf http://www.autoshop101.com/forms/h17.pdf Shift Interlock System.pdf http://www.autoshop101.com/forms/h18.pdf Technical Articles Toyota Series - Engine Performance OBDI (pre-1996 5S-FE/3S-FE and pre-1994 V6) EFI#1 EFI System Overview.pdf http://www.autoshop101.com/forms/h20.pdf EFI#2 Air Induction System.pdf http://www.autoshop101.com/forms/h21.pdf EFI#3 Fuel Delivery & Injection Controls.pdf http://www.autoshop101.com/forms/h22.pdf EFI#4 Ignition System.pdf http://www.autoshop101.com/forms/h23.pdf Engine Controls #1 - Input Sensors.pdf http://www.autoshop101.com/forms/h24.pdf Engine Controls #2 - ECU/Outputs.pdf http://www.autoshop101.com/forms/h25.pdf Engine Controls #3 - Idle Speed Control.pdf http://www.autoshop101.com/forms/h26.pdf Engine Controls #4 - Diagnosis.pdf http://www.autoshop101.com/forms/h27.pdf Technical Articles Toyota Series - Engine Performance OBD-II (1996 and newer 5S-FE, and '94 and newer 1MZ-FE) Sensors#1 - Mode Sensors and Switches.pdf http://www.autoshop101.com/forms/h31.pdf Sensors#2 - Thermistors with questions.pdf http://www.autoshop101.com/forms/h32.pdf Sensors#3 - Position Sensors with questions.pdf http://www.autoshop101.com/forms/h33.pdf Sensors#4 - Air Flow Sensors with questions.pdf http://www.autoshop101.com/forms/h34.pdf Sensors#5 - Pressure Sensors with questions.pdf http://www.autoshop101.com/forms/h35.pdf Sensors#6 - Speed Sensors with questions.pdf http://www.autoshop101.com/forms/h36.pdf Sensors#6 - Oxygen / Air Fuel Sensors w/ques.pdf http://www.autoshop101.com/forms/h37.pdf Sensors#8 - Knock Sensors with questions.pdf http://www.autoshop101.com/forms/h38.pdf Ignition#1 - Ignition Overview w/questions.pdf http://www.autoshop101.com/forms/h39.pdf Ignition#2 - Electronic Spark Advance w/quest.pdf http://www.autoshop101.com/forms/h40.pdf Ignition#3 - Distributor / Distributorless w/qu.pdf http://www.autoshop101.com/forms/h41.pdf Fuel System#1 - Overview with questions.pdf http://www.autoshop101.com/forms/h42.pdf Fuel System#2 - Injection Duration w/ques.pdf http://www.autoshop101.com/forms/h43.pdf Fuel System#3 - Closed Loop /Fuel Trim w/qu.pdf http://www.autoshop101.com/forms/h44.pdf OBDII#1 - Overview of On-Board Diagnostics.pdf http://www.autoshop101.com/forms/h46.pdf OBDII#2 - Serial Data.pdf http://www.autoshop101.com/forms/h47.pdf OBDII#3 - Data Interpretation.pdf http://www.autoshop101.com/forms/h48.pdf Emission#1 - Chemistry of Combustion.pdf http://www.autoshop101.com/forms/h55.pdf Emission#2 - Emission Analysis.pdf http://www.autoshop101.com/forms/h56.pdf Emission#3 - Engine Sub Systems.pdf http://www.autoshop101.com/forms/h57.pdf Emission#4 - Closed Loop Feedback Systems.pdf http://www.autoshop101.com/forms/h58.pdf Emission#5 - Electronic Spark Advance.pdf http://www.autoshop101.com/forms/h59.pdf Emission#6 - Idle Speed Control Systems.pdf http://www.autoshop101.com/forms/h60.pdf Emission#7 - Exhause Gas Recirculation.pdf http://www.autoshop101.com/forms/h61.pdf Emission#8 - Evaporative Emission Control.pdf http://www.autoshop101.com/forms/h62.pdf Emission#9 - Positive Crankcase Ventilation.pdf http://www.autoshop101.com/forms/h63.pdf Emission#10 - Catalytic Converter.pdf http://www.autoshop101.com/forms/h64.pdf Emission#11 - Secondary Air.pdf http://www.autoshop101.com/forms/h65.pdf Don't ignore the information and links in the "Automotive Links" section. Also, the "Online Bookstore" is useful if you want to get ASE certified.
__________________
Forum Guidelines:http://www.automotiveforums.com/vbulletin/guidelines.html "What we've got here is a failure to communicate" Last edited by Brian R.; 11-09-2006 at 08:55 AM. |
|

|
|
07-14-2005, 02:51 PM
|
#32 | |
|
Resident Chemist
Join Date: Feb 2004
Location: Rockville, Maryland
Posts: 8,586
Thanks: 105
Thanked 157 Times in 157 Posts
|
Re: Camry FAQs and Information
Thanks to Toysrme for the following discussion:
WON'T RUN GUIDE Cranking = turning over. Because this is the won't RUN guide, we assume the car cranks fine. Even so, the battery wires should be taken off and cleaned, even if they look OK. When the car cranks fine, but won't run, here's what you need to know! To run, an engine needs spark, fuel, compression, and they all have to happen at the right time! It's really that simple... **************************************** Let's start at the beginning. If you have any idling problem, you start with cleaning the Idle Air Control AKA Idle Speed Control (IAC, ISC - same thing) valve is clogged with carbon from the EGR system. If it's not clogged now, it will be in the future, and you just staved it off. It's not a question of if yours will clog. It's simply a question of when it clogs. Remove the valve, and clean it by hand. 3s-fe's, 5s-fe's, and 1mz-fe's, it's located on the underside of the throttle body, and is held on by four phillips screws. On 2vz-fe, and 3vz-fe's, it's on the firewall side of the throttle body, held on by two 12mm bolts. 3s-fe, 5s-fe, 1mz-fe:  2vz-fe 3vz-fe:  Next, check for vacuum leaks. Unplugged vacuum hoses, and especially cracks on the rubber hose that runs from the throttle body, to the air box. Yes... 75% of idle problems are that easy. If it's not the Idle valve, clogged with carbon, it's probably a vacuum leak. Another possible fix for IAC-Related Idling Problems: Thanks to Daniel M. Dreyfus for the following discussion. Here's my take on this - also 1994 4 cylinder Camry. Your car feels like it is running on three cylinders at cold start up because the IAC (idle air control valve) is sticking and not enough fuel gets into the cylinders for smooth cold start up idle speed. If you remove the hose clamp at the throttle body opening and pull aside the large black air intake hose - at the bottom of the throttle body is a small rectangular hole - the air inlet for the IAC valve. The best cure I've found for a sticking valve is TriFlow. It is a lubricant with teflon sold at bicycle and hardward stores. Just spray a small amount into the IAC air intake with the engine cold and stumbling at idle. After I removed the throttle body, replaced the IAC valve with new, and performed all the adjustments and calibrations for the TB according to the factory service manual, this annoying sympton of cold start stumble returned but the TriFlow seems to have cured it. My best guess is that the cylinder disk that covers and reveals the air port inside the IAC valve has no lubrication and the bimetallic thermostatic coil on the other end of the shaft running through the valve sometimes doesn't develop enough pressure to fully open the valve when cold. **************************************** Check for spark. Pull a single spark plug out, grounding it well to the frame. Turning the engine over, you should have a strong white spark. Old plugs, or weak spark will be a blue color. That does not directly spell a problem. As long as it is a strong spark, with some white in the blue color, the plug is fine. If you have a 3s-fe, 2vz-fe, or 3vz-fe you have a distributor! Mark the distributor cap so you know it's orientation with paint, or a sharpie. They typically are held on by three screws, or three 10mm bolts. Check the distributor cap for small cracks - they *WILL* let moisture in. Check all of the contact points for corrosion. Check the rotor for corrosion. If any corrosion is present, you can take a small bit of emory paper (or very fine sand paper) and knock it off. If there is any suspect in the rotor, and cap, or you had to work them to get the car running - replace them. They're not $15 parts, and will go bad at some point. While the cap is off, note the orientation of the rotor and crank the engine. If the rotor moves, your timing belt is in-tact. 5s-fe's use a distributorless ignition. 1mz-fe's use coil on wire. Ignition timing is universally 10*btdc in all modern, wide-scale Toyota production engines. It is only adjustable on distributor equipped vehicles. If ignition timing is off for no reason on a distributor equipped engine, this can be indicative of a slipped timing belt. Spark plug wires are NOT a typical wear item. If the car is kept inside, they regularly last 250,000 miles + before deteriorating. Simply said, if they are not grounding out, and the contacts are not damaged, they do NOT need to be replaced. Replacement wires ARE inferior... Spark plugs wires are also expensive! Ranging $90-$110usd for the v6 OEM replacement wires. Other than OEM wires, only use quality replacement wires, like Vitek, or extremely expensive ($250usd) Magnecor wires. No Auto store replacement wires! Spark plugs are important. DO NOT use split electrode type plugs, or American brands in general. The resistance is far different that what the Nippon-Denso ignition system is designed to work on. Simply put... You will have a problem with putting Bosch plugs in most Toyota's. Normally in a short amount of time. Only use Denso, or NGK plugs. NGK makes good generic plugs, that are very cheap (Typically on "permanent sale" in most areas for around $1-$2usd a plug). They are the OEM replacement plugs at most dealers (Surprisingly not Denso), they are not platinum, and last much longer than the 60,000 mile replacement interval. Making platinum plugs a complete waste of money. Iridium plugs are nice, with 80,000 up to 120,000 mile life spans! Unfortunately, you would never want them in a Toyota factory engine that long. Carbon build-up will make you clean spark plugs around 60,000 miles. Which makes you ask the question... Why pay $11-$15usd a plug, for something you have to take out and clean, when you can pay $1-$2 a plug, and simply replace it. If you have no spark at all. Check the 15amp EFI fuse (fuse box nearest battery). Check the 7.5 amp ignition fuse (same box). If still no ignition, Bridge E1 & TE1 in the Diagnostic's port (3s-fe, 2vz-fe, and 3vz-fe) and make sure the Check engine light is flashing a stead on & off. If it is the computer is fine. The ignitor, coil/coil packs, and distributor can all be tested with a multi-meter, but go beyond this post. Ask for specific directions. **************************************** Check for fuel getting to the injectors / fuel rail! Fuel pressure at idle is normally only 30-35psig. If you are using a pressure gauge don't be shocked if you don't get at least 40psig. Testing for fuel is laughably easy. Start by taking the gas cap off, and putting it back on. That will de-pressurize the fuel system. If you have a cold-start injector (2vz-fe, 3vz-fe) Slowly unbolt the 12mm banjo bolt. If fuel starts draining out, you have no fuel problem. Otherwise, pull the rubber fuel hose off the fuel rail. Gas will pour out. If gas pours out, don't test the fuel pump, don't change the fuel filter, don't check the injectors. Check for compression, or re-check ignition. Forget the fuel filter... Like plug wires, they are NOT typical wear items in modern Japanese designed cars. They may claim 15,000-30,000 mile lives, you may hear it has a 15,000-30,000 mile. Barring the owner is a complete moron, and you pours dirt and debris in your gas. The simply fact is they all actually *need* to be replaced on a 100,000-150,000 mile cycle. Fuel pumps are easy to check. When you supply them voltage, they turn on. For Air-flow Meter cars (3s-fe, 2vz-fe, 3vz-fe) The fuel pump will NOT turn on when you turn the ignition key is on. (except after an ECU reset) There is a switch in the air-flow meter that trips when the vane flap is sucked open (engine cranking). If you take your airbox apart and turn the iganition to ON, you can reach in and push the vane-flap open. Not only can you hear the fuel pump turn on. But you can hear, and feel the fuel injectors working. 5s-fe, and 1mz-fe's must apply battery voltage directly to the pump to check them. **************************************** Next check compression with a compression tester. On All modern, wide-scale Toyota production engines. Minimum compression is 142psig, maximum compression is 180psig. You want even compression across all cylinders. If there is compression problems across all cylinders, check the timing belt, and cam orientation. The belt may have slipped, or snapped. (or the cams installed incorrectly after a re-build) Otherwise, there could be a blown head gasket (Common on Toyota v6's from the late 80's through the late 90's), or bad rings. If compression tests OK, re-check ignition components, and check all the more in-depth parts skipped, or not tested. CAR WON'T START - NO SPARK Q: My 4 cyl 94 Camry died and won't start. I unhooked the plug wires and no spark when cranking. Any ideas on how to troubleshoot my ignition? A: http://www.automotiveforums.com/vbul...d.php?t=217128
__________________
Forum Guidelines:http://www.automotiveforums.com/vbulletin/guidelines.html "What we've got here is a failure to communicate" Last edited by Brian R.; 09-04-2005 at 12:22 PM. |
|
|
|
|
07-22-2005, 09:20 AM
|
#33 | |
|
Resident Chemist
Join Date: Feb 2004
Location: Rockville, Maryland
Posts: 8,586
Thanks: 105
Thanked 157 Times in 157 Posts
|
Re: Camry FAQs and Information
OBDI CODES AND TROUBLESHOOTING
OBDI Procedures and Diagnostics: http://personal.utulsa.edu/~nathan-b...85diagnosi.pdf and [http://www.automotiveforums.com/vbul...2&goto=3198722 Download and see page EG1-300 and http://www.autoshop101.com/forms/h27.pdf Summary: If your car is a '96 or newer, you need an OBDII code reader. If your car is '94-'96, then you have to check under your hood on the emissions sticker to tell if it is OBDII or OBDI. If your car is '93 or older, then it is OBDI. For OBDII codes, check: http://www.automotiveforums.com/vbul...5&postcount=21 Codes: 1 O2A - Oxygen sensor #1 2 O2B - Oxygen sensor #2 3 MAP - manifold absolute pressure sensor 4 CKP - crank position sensor 5 MAP - manifold absolute pressure sensor 6 ECT - water temperature sensor 7 TPS - throttle position sensor 8 TDC - top dead centre sensor 9 CYP - cylinder sensor 10 IAT - intake air temperature sensor 12 EGR - exhaust gas recirculation lift valve 13 BARO - atmospheric pressure sensor 14 IAC (EACV) - idle air control valve 15 Ignition output signal 16 Fuel injectors 17 VSS - speed sensor 19 Automatic transmission lockup control valve 20 Electrical load detector 21 VTEC spool solenoid valve 22 VTEC pressure valve 23 Knock sensor 30 Automatic transmission A signal 31 Automatic transmission B signal 36 traction control found on JDM ecu's 41 Primary oxygen sensor heater 43 Fuel supply system 45 Fuel system too rich or lean 48 LAF - lean air fuel sensor 54 CKF - crank fluctuation sensor 58 TDC sensor #2 61 Primary oxygen sensor 63 Secondary oxygen sensor 65 Secondary oxygen sensor heater 67 Catalyst low efficiency. (same as P0420) 71 random misfire cylinder 1 72 random misfire cylinder 2 73 random misfire cylinder 3 74 random misfire cylinder 4 80 Exhaust Gas Recirculation insufficient flow detected 86 ECT Sensor (Engine Coolant Temperature) circuit range / performance problem 90 Evaporative Emission Control System leak detected in the fuel tank area 91 Evaporative Emission Control System insufficient purge flow
__________________
Forum Guidelines:http://www.automotiveforums.com/vbulletin/guidelines.html "What we've got here is a failure to communicate" Last edited by Brian R.; 12-27-2005 at 03:07 PM. |
|
|
|
|
08-06-2005, 12:48 PM
|
#34 | |
|
Resident Chemist
Join Date: Feb 2004
Location: Rockville, Maryland
Posts: 8,586
Thanks: 105
Thanked 157 Times in 157 Posts
|
Re: Camry FAQs and Information
2ND GENERATION V6/AUTO POWER UPGRADES
Thanks again to Toysrme for the following discussion: Q: What can I do to get more performance from my '89 Camry V6 with an automatic transmission? A: The engine has *the* funkiest factory Y-pipe of all time. If you throw out cruise control, and move the battery to the back, it would be the easiest Toyota v6 to turbocharge, simply by tapping the funky y-pipe. The y-pipe sucks tho... It needs to be replaced if you're not putting a turbo on it. It's going to be expensive... Exhaust/performance shops are going to pee their pants when they see the work they're going to have to do! The 2vz-fe is also the only Toyota v6 with really, really restrictive headers. So it has a little more to gain with a set of headers. Check Australia, they're more Toyota parts to be had down there. I know someplace down there use to make 2vz-fe headers. All Toyota ECU's run overly rich. You can install a piggyback to lean out the mid-upper rpm range. Always 10 horsepower to be found somewhere in there. If you get a Y-pipe made, and you have no emissions testing, get rid of the Cat convertor. Another easy 5-10hp to gain from loosing that restrictive hunk of metal. You can get the heads ported & polished. That can be fairly big money, and loose the car for a week, but nothing else N/A will give you as big a gain. Any cam trick is going to cost out the wazoo. Forget it. Avoid any intake modification. It's a waste of money. Simply put... You don't have 3hp to gain with a perfect intake, or 3hp to loose with a bad one. The stock intake is all ready CAI, if you want it louder, remove the resonator. A Cat-back exhaust also has no power to give you. The factory system isn't very restrictive. n2o is always a cheap way to add power. A 75 wet shot oughta be nice. If you're running over a 75 wet shot, you need a bigger fuel pump, and injectors / extra injectors. You can swap to a later 3vz-fe with custom mounts, A 1mz-fe if you want all the OBD-II re-wiring, the 3.4L 5vz-fe simply won't fit in the engine bay. Inches too tall. You can also do a direct swap to a 3s-gte. That's gonna be the easiest way to make 300hp. For stuff you can do right now without any money. Adjust your AFM here, and adjust your transmission kick-down cable for a sporty feel here. Also, see previous posts in this FAQ. I forget if the 2vz-fe has ACIS (Varriable intake) or not. If it does, I can show you how to change it so it activates much earlier. Get some pictures of the passanger side of your upper intake manifold, the front of the entire upper intake manifold, and a few closeups of the vacuum hoses on top of the throttlebody (see a previous post in this FAQ). Suspension parts are all around, any gen2 Camry part will fit. There are a few gen2 body kits. TRANSMISSION You can always swap the E-153 M/T from a 92-93 Camry, or a 97+ Camry/Solara. It's fairly stout. A good clutch & it handles 400-500hp without problems. Read on ToyotaNation.com also. A couple of 2vz-fe guys doing some modding. Jetspeed finally did his E-153 M/T swap. Toyota used the A540/A541 series automatic without major mechanical modifications from 1987-2001. It's good for 250hp easy without any changes. A valve body upgrade & aux cooler takes them up to around 300hp. I wouldn't drive 320hp+ on a daily basis without a full rebuild. 350bhp+ will destroy the third gear clutch pack on the first pull. Stock vs Stock, a m/t will win, simply becuase they have less power loss. Automatics, with a valve body upgrade, shift much faster than any manual can, and are always consistant. All reasons why almost all the fastest professional drag racers (in nearly any division) have built automatic transmissions. Best thing going if you drag race. If you like to turn, a manual is still better. 
__________________
Forum Guidelines:http://www.automotiveforums.com/vbulletin/guidelines.html "What we've got here is a failure to communicate" |
|
|
|
|
08-06-2005, 12:56 PM
|
#35 | |
|
Resident Chemist
Join Date: Feb 2004
Location: Rockville, Maryland
Posts: 8,586
Thanks: 105
Thanked 157 Times in 157 Posts
|
Re: Camry FAQs and Information
1MZ-FE V6 FIRING ORDER
Q: What is the firing order for a 1999 1MZ-FE? I changed the valve cover & spark plug gaskets, spark plugs, and wires for a friend and forgot to note the order the wires went on. A: For 1997 and later 1MZ-FE, firing order is 1-4-2-5-3-6. For 1996 and earlier 1MZ-FE, firing order is 1-2-3-4-5-6. Cylinder numbering: No 1 cylinder is nearest accessories, on right bank (nearest passenger seat) No 3 cylinder is next one to rear on that bank. No 2 cylinder is front cylinder on bank nearest radiator. <=front of engine (accessory belts, passenger side of car) 1-3-5 2-4-6
__________________
Forum Guidelines:http://www.automotiveforums.com/vbulletin/guidelines.html "What we've got here is a failure to communicate" Last edited by Brian R.; 08-08-2005 at 03:20 AM. |
|
|
|
|
08-15-2005, 09:58 PM
|
#36 | |
|
Resident Chemist
Join Date: Feb 2004
Location: Rockville, Maryland
Posts: 8,586
Thanks: 105
Thanked 157 Times in 157 Posts
|
Re: Camry FAQs and Information
AIR CONDITIONING PROBLEMS
BLOWS HOT AIR Q: My a/c doesn't work any more. All it does is blow hot air, never cold. What could be the problem? A: Refill your a/c with freon. Put in freon until the compressor starts and there are no bubbles showing in the sight glass. If adding freon with the a/c on doesn't immediately start up the compressor, check the pressure sensor. Q: Do I have to add any compressor oil when I fill the freon? A: No, the only time you have to add compressor oil is if you have replaced a part in the system. There are tables that show how much oil to add, depending on which part(s) were replaced. COMPRESSOR DOESN'T KEEP SPINNING Q: 2.0 Toyota Camry 4 cylinders What's happened is that when i turn on my ac, my compressor does start working, but it looses grip. I'm talking about the pulley. When you look at the pulley with the belt on it, there is another thing like a pulley inside it. when ac is off, it doesn't spin, and that's how it should be. but when ac is on, it grips and spins for a second or two, then stops. It grips for another second or two, and stops. this goes on forever. when it does grip and spin, the second fan behind radiator starts. (other one keeps running). when it stops spinning, so does the fan. Any suggestions? A: Sounds like its low on refrigerant and its cutting off because of the low pressure, short-cycling. It probably needs to be recharged. ENGINE IDLES REALLY BAD WITH A/C ON Q: I just had my A/C fixed & it is blowing cold air! Anyways when I run it my A/C it feels like the engine is going to fly out of the hood! My whole car is like shaking then when I stop at stops it feels like the engine is going to die! Like it doesn't have enough engine power to keep both of them running! Any help would be useful. Thanks I have a 1991 toyota camry wagon. V6 engine. Automatic. A: Let me tell you this much. Most of the time, it is only a matter of adjusting your intake (commonly known as idle). Now, when you stop, you said that the engine feels like it's about to die. That, to the best of my judgement without hands-on work on the car, is because when you turn on the AC, the clutches in the ac compressor grip and engine is losing power because it's being used to spin the compressor pulley. That means it needs more fuel now. The mixture of air/fuel is not right. This CAN be a real pain in the backyard. For an easy no-brainer fix, all you have to do is get a flat screw driver and increaser the idle. How do you do that? Don't make me die laughing, but look at the intake, (you can see it looks like a tube right behind the engine where the air filter hose is going and I think it should say EFI (electronic fuel injection) on it). Look from above it and you should see a screw with a flat head that's probably made up of plastic. all you do is open it up, that's turning left just in case you don't know. This increases the amount of air going inside the engine. Open it up until the engine doesn't shake and the car runs smooth. All this should be done with the AC turned on all the way to full. Next, when all this is done, turn the AC off and see if it shakes now. If it doesn't, BINGO!!!! If it does, welcome to our world. Just keep tweaking and messing around with it until you get it to your liking. WHAT REFRIGERANT IS IN 1993 CAMRY? Q: Does anyone know what type of A/C refrigerant the 5S-FE 93 Camry takes and how much and where I'd pump it into? I know I'm not supposed to be messing with that, but I think it's out of refrigerant anyway, and I just need to recharge it. A: The 93 will take R12 but check the label under the hood to make sure, just in case someone has converted it to R134A. You can't purchase R12 over the counter any longer without a certificate, so if it's still R12 you will have to take it in some place to have it recharged. Be prepaired to pay some heavy dollars for it. Q: I can't find any label under the hood, and, quite frankly, I wouldn't know what to look for as far as a 134A conversion. A: The ports for R-12 has thread on them. The ones for R134a are quick connect type. If it's not converted, you should still have R-12. I just converted my 92 to 134a refrigerant. It was quick and easy. The low end is in the back left side of the engine bay and the high side(you dont really use it) is right up front. I got a kit from autozone for 30bucks. 3 cans of refrigerant, pressure gauge/filler, and the adapters. It took longer to find the low end cap then it did to fill it. Quick 15min job. Well worth it. I have Ice cold A/c now! You can buy Freeze12 and use it as a replacement for R12. It is available in stores and you can install it yourself. Q: On the 134a conversion...did you end up having to do anything with the actual condensor? I've seen stuff where you have to remove that and change oil in it or something to that effect. And does the Freeze 12 require anything special, or do you just pump it into the system? Can you point me in the direction of the low end cap? pics would be nice, too. thanks in advance A: Freeze12 just pumps in. looking at the car from the front, with the hood up, its at the very back of the engine bay, against the firewall, at the back left corner, and its about 8 inches or so down into the engine bay. its kinda down below the passenger side of the engine bay, all the way in the back left corner. With the incompatibility of the fittings, I don't think you can mix the two propellants unless you really work hard at it.
__________________
Forum Guidelines:http://www.automotiveforums.com/vbulletin/guidelines.html "What we've got here is a failure to communicate" Last edited by Brian R.; 08-15-2005 at 11:23 PM. |
|
|
|
|
08-15-2005, 11:48 PM
|
#37 | |
|
Resident Chemist
Join Date: Feb 2004
Location: Rockville, Maryland
Posts: 8,586
Thanks: 105
Thanked 157 Times in 157 Posts
|
Re: Camry FAQs and Information
WINDSHIELD SCRATCHES
Q: My windshield has 2 wiper marks from crappy wiper blades. how can i get rid of them? Is there some kind of cleaner that wil bring them off? A: If you can feel them with your finger nails they will not come out by cleaning, If not too deep you may be able to get the out with some very fine rubbing compound, some people use tooth paste. Do a Google search and see what come up. Be advised, it will require lots of time and effort and still may not work. Q: Thanks for the reply. The marks are very light. I have some stuff called Plastix from Meguiers. It does an excellent job on plastic getting scratches and oxidation out. Do you think that will work? A: It shouldn't hurt anything to try the Plastix. If that doesn't help here is an article that describes how to polish out scratches in windshields. http://www.valvoline.com/carcare/art...0101wp&print=1
__________________
Forum Guidelines:http://www.automotiveforums.com/vbulletin/guidelines.html "What we've got here is a failure to communicate" Last edited by Brian R.; 08-18-2005 at 01:31 PM. |
|
|
|
|
08-19-2005, 07:01 PM
|
#38 | |
|
Resident Chemist
Join Date: Feb 2004
Location: Rockville, Maryland
Posts: 8,586
Thanks: 105
Thanked 157 Times in 157 Posts
|
Re: Camry FAQs and Information
HESITATION IN 2004-2005 CAMRY
Q: My 2005 XLE 4 cylinder Camry (6k miles) hesitates when I give it gas. Highway speeds are not a problem, mostly at low speeds, trying to pull out into traffic. No "Check Engine" light has come on and it seems normal in other aspects. I didn't feel this when the car was new, but recently it has gotten noticably worse. My dealer said that all 2004-2005 Camrys do this and it is normal - nothing he can do about it. Anyone have an idea on what is wrong? Any ideas are appreciated. A: Some 2004-2005 Camrys are known to have a hesitation problem because they have a computer-controlled throttle and transmission. There are TSBs out for both the V6 and I4 Camrys, as well as the '04-'05 Sienna, '04-'05 I4 Highlander, and '04-'05 I4 Solara. The fix entails reprogramming the ECM. TSBs are found at: http://www.alldata.com/tsb/Toyota/index-issue.html Print out the TSBs and bring them to your dealer. Maybe he will do something about it.
__________________
Forum Guidelines:http://www.automotiveforums.com/vbulletin/guidelines.html "What we've got here is a failure to communicate" |
|
|
|
|
08-24-2005, 11:01 PM
|
#39 | |
|
Resident Chemist
Join Date: Feb 2004
Location: Rockville, Maryland
Posts: 8,586
Thanks: 105
Thanked 157 Times in 157 Posts
|
Re: Camry FAQs and Information
BRAKE LIGHTS COME ON WHEN HEADLIGHTS ARE APPLIED
Q: Just purchased a 96 Camry. Has a few problems that I am working through. Have one that is a real stumper for me. The brake lights work fine during normal daytime driving conditions. When the headlights are turned on the brake lights are on. I have check the wiring and have found nothing shorted together. Thanks for any help. A: The bulbs are probably installed incorrectly. You may have single filament bulb in a socket meant for double filament bulbs, or the correct bulbs may have been forced in backwards.
__________________
Forum Guidelines:http://www.automotiveforums.com/vbulletin/guidelines.html "What we've got here is a failure to communicate" |
|
|
|
|
08-25-2005, 07:25 PM
|
#40 | |
|
Resident Chemist
Join Date: Feb 2004
Location: Rockville, Maryland
Posts: 8,586
Thanks: 105
Thanked 157 Times in 157 Posts
|
Re: Camry FAQs and Information
HOW TO MAKE MY CAR LAST AS LONG AS POSSIBLE
Q: My Camry (2.0L I4 EFI) has 189,998 miles on it and it is running like a charm; all the things that I believe need to be replaced have been. I'm not going to be able to invest in another car for a while since I'm in college. Therefore, I'm going to need this car to last close to forever until I get a good job with some formidable income. I was wondering if there are any tips you could suggest for me to keep this thing running like the energizer bunny..? A: Add an auxiliary transmission cooler. Pick a core up at a junkyard for $5-15usd, two 5/16" brass T fittings, 8 small hose clamps, zip ties, 5/16" oil hose. Flush the transmission fluid every other year, or drain the pan every other oil change. Change the oil every 5,000 miles - 6 months for dino oil, 7500-10,000 miles - 10 months for good synthetics. If your engine is one that is prone to sludge, shorten the above intervals appropriately (see first post in this thread). Clean oil pan & screen, transmission pan & screen & change transmission filter every 5 years. Rotate tires every oil change, twice if you're using a long life synthetic. Clean the inside of the upper portion of the intake manifold, throttle plate, ISC/IAC valve(idle valve), and EGR valve yearly. Change differential fluid every four years. Flush the brake system with fresh DOT3, DOT4, or DOT4+/DOT5.1 every three years. Change the fluid in the power steering reservoir every year, or flush the power steering system every other year ( http://www.toyotanation.com/forum/t19334.html ). Flush the cooling system every other year, or drain yearly. Change radiator cap<s> & thermostat every 5 years. Change PCV valve every 5 years. Change O2 sensor<s> before 100,000 miles accumulates. Change cat convertor before 100,000 miles accumulates. Change distributor cap & rotor every other spark plug change (120,000 miles). Check belts yearly, change belts when needed, change all belts (including timing belt) every 90,000 miles. Replace the water pump every other timing belt change. Otherwise, just keep track of things. Like CV boots, things you need to grease, seals that can leak etc. Use only NGK, or Denso spark plugs. Might as well be the generic $1 versions, as they last over the specified change time. If spark plug wires ever become damaged, only replace with OEM wires, or high quality wires. Lightly spray your CV boots with silicone lubricant when you're under the car for each oil change. Get as much of the surface shiny as you can. They will last a long time. Pay attention to the body lube points and check the torque the chassis bolts as recommended by Toyota. Make sure you use a high quality air filter. Some are very coarse and let in alot of abrasive dust. They do this in the name of high-performance, but other real hp filters are much better. Oil-wetted elements are the best (AMSOIL, TRD, etc). They actually trap the dust in the oil and prevent it from bouncing off the filter element. Wash off the bottom of the car, wheel wells, bottom of engine compartment, etc a couple of times after salt exposure in the winter. As long as it's really cold, the salt is not too harmful. Once it has warmed above freezing, wash it off as soon as you can, at least once. Wax your paint at least once a year before winter. More often is better. Use a good quality wax (I like Meguires, but there are alot of good ones). Get the carbon out of your combustion chambers periodically - maybe every 100k or so. SeaFoam is quite good for this. Adding some to the gas (or Techron) once in a while is a good idea to minimize deposits on the injectors. Watch all your fluid levels often. Even if they never change, if one of them suddenly start dropping, it is much better to catch it now than when something starts making noise. To state the obvious: Drive your car like you want it to last. Everything else being equal, the harder you drive it, the less miles it will have in it. (Thanks to Toysrme for alot of the above recommendations) See also hints in http://www.automotiveforums.com/vbul...d.php?t=449003
__________________
Forum Guidelines:http://www.automotiveforums.com/vbulletin/guidelines.html "What we've got here is a failure to communicate" Last edited by Brian R.; 08-16-2006 at 07:19 PM. |
|
|
|
|
09-07-2005, 12:48 PM
|
#41 | |
|
Resident Chemist
Join Date: Feb 2004
Location: Rockville, Maryland
Posts: 8,586
Thanks: 105
Thanked 157 Times in 157 Posts
|
Re: Camry FAQs and Information
INCREASING GAS MILEAGE
Q: How can I increase my gas mileage? A: Make sure you are using a fresh air filter. If you use an oil-wetted filter from TRD K&N, or AMSOIL, be aware that the oil coming off the filter element can foul your MAF Meter which is expensive. Here is a link to air filter testing: http://www.bobistheoilguy.com/airfilter/airtest1.htm Tweak your AFM (on engines that have them instead of a MAF meter) as shown in: http://www.automotiveforums.com/vbul...4&postcount=11 There is probably an optimum setting for gas mileage. Your engine may get better mileage with higher octane gas, particularly if you do alot of highway driving. Use higher octane gas for a few tankfuls when you are on a trip, keeping track of the mileage and gas used, and see if that makes any difference. If not, don't waste your money. Say the price of 87 octane is 30 cents cheaper than 89 octane and you get 20% better mileage (from 15 mpg to 18 mpg) with the 89 octane. If the price of gas for the 87 octane is $3.00/gal, then you are paying 10% more per gallon, while saving 20% in gasoline usage. This is a good bargain. If you break even, I would still use the higher octane gas. You have to do the math and the experiment on your truck. At some price, it will be worth it for some percent increase in mileage. In all honesty, you probably won't see a difference in mileage between the octanes, meaning you should use 87 octane. However, it doesn't cost much to try and you should know about it if your vehicle derives a benefit from the higher octane gas. Keep an eye on your ignition timing, idle speed, and wheel alignment. A high idle speed will cost you, as well as retarded ignition timing or bad alignment. Fill your tires with 4-6 more psi than that recommended in your door label. Low tire pressure will cost you. Don't fill the tires above the maximum psi labeled on the tire. Keep your injectors clean with a fuel additive periodically. Get any "Check Engine" light problem immediately. Many times you engine will default to a standard condition when a sensor goes bad. It gets you where you're going, but it is far from optimum as far as engine efficiency goes. Exhaust headers and lower restriction cat converters and mufflers will help your mileage to varying degrees. Buy stuff that you find has helped other Camry owners. I don't believe in cold air intakes. They are a waste of money IMO. Maybe some vehicles have poorly-designed intake systems and are helped by almost any mod. Yours is not one of them. Use 5W20 oil in your engine if approved by Toyota - possibly 0W20. Toyota has approved the use of 5W20 GF-4 oils (e.g., Mobil1) in most modern engines, and 0W-20 in 2AZ-FE engines as shown in the folowing TSB. 5W-20 is approved for use in the Camry V6 1MZ-FE, 2VZ-FE, and 3VZ-FE. I have been using the 5W-20 oil in my 5VZ-FE 4Runner engine for about 6 months now and can see the difference in mileage. It doesn't appear that either of these oils are approved for the 22R, 3S-FE or 5S-FE engine. I have been using a 50:50 mix of the 5W-20 and 5W-30 Mobil1 in my '96 5S-FE Camry for about 8k miles without any noticable problems. I have also notices a marked increase in mileage in this engine. I have been getting 410 miles/tank (about 27 mpg with 75:26 highway:city). I used to get around 360-375 miles per tank. 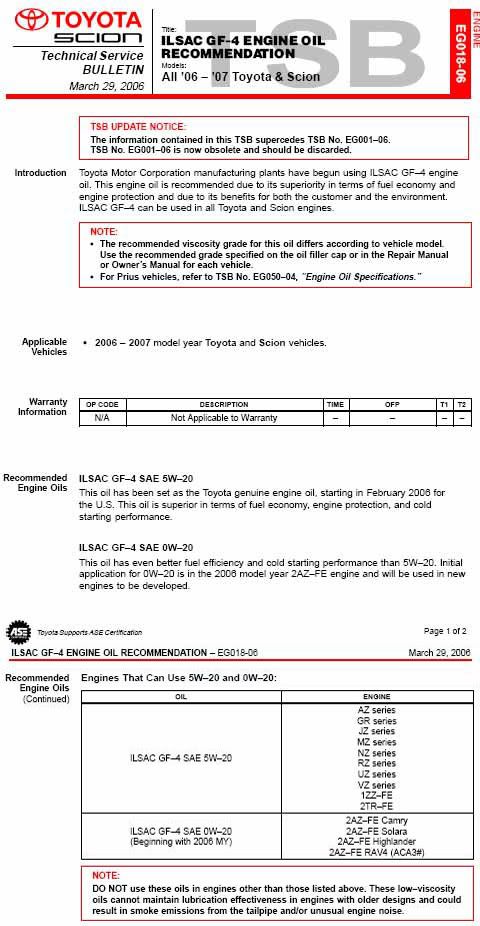 For additional hints and suggestions, see the following links: http://www.procarcare.com/icarumba/r...fuelsaving.asp http://www.performancempg.com/lubric...el_mileage.htm (information on the above two sites authored by ctelsa)
__________________
Forum Guidelines:http://www.automotiveforums.com/vbulletin/guidelines.html "What we've got here is a failure to communicate" Last edited by Brian R.; 04-01-2013 at 04:55 PM. |
|
|
|
|
10-14-2005, 12:14 AM
|
#42 | |
|
Resident Chemist
Join Date: Feb 2004
Location: Rockville, Maryland
Posts: 8,586
Thanks: 105
Thanked 157 Times in 157 Posts
|
Re: Camry FAQs and Information
WHEEL SIZE FOR 4TH GEN 97-01 CAMRY
Q: What is the largest wheel size that will fit on my '97 Camry without interference when I'm driving? A: They highly recommend that you don't go any higher than 17-inch rims with a 7-inch width at the most. If you want to actually drive the car, than go for the 17s. If you just want to sit it somewhere and show it off without turning the wheel, go for higher size. 17s look rather good on the Gen4s, and they're much safer to have since there's not any modification required. There is just way too much work involved to get a bigger tire size in that well than a 17. If you're not sure about how the 17s would look on your Camry, go to http://www.tirerack.com and pick out your model car and go through and look at all the 17s. You can click on them and it will actually show you what they will look like on your car. Q: Will there be any problem with bad speedometer calibration if I put on 17" rims? A: Well, not exactly a problem, but, naturally your speedo will be wrong. You'll be going faster than your speedo says. How much faster depends on your wheels & tires. Thanks yotatechie04 and AccordCodger
__________________
Forum Guidelines:http://www.automotiveforums.com/vbulletin/guidelines.html "What we've got here is a failure to communicate" |
|
|
|
|
10-18-2005, 10:40 PM
|
#43 | |
|
Resident Chemist
Join Date: Feb 2004
Location: Rockville, Maryland
Posts: 8,586
Thanks: 105
Thanked 157 Times in 157 Posts
|
Re: Camry FAQs and Information
REPLACE 1989 V6 VALVE COVER GASKET
Q: My rear valve cover on my 1989, Camry V6 is leaking oil (replaced the front gasket several years ago). I am planning to replace the rear gasket. I have reviewed my Haynes repair manual regarding the steps for this repair, but I did not find the information very helpful. If you have replaced the rear valve cover gasket or know the steps, could you help by providing the 1, 2 3's for this repair and/or could you let me know some areas during this repair that I may experience some problems. A: Here is a link to the procedures for various engines as described by Autozone.com: http://www1.autozone.com/servlet/UiB...3d8013e886.jsp A: I did this a couple years ago on my '90 V6, and it wasn't that tough (and I am most certainly NOT a mechanic by any stretch of the imagination). It took me a while to psych up to it, but the trick was just to go slow and label every vacuum and other hose that I disconnected on both the hose and nipple side so I knew where everything went back together. There wasn't anything tricky about it, just a lot of stuff to disconnect. I worked for a while and then looked to see what else was holding up that whole assembly sitting on top of the valve cover and disconnected whatever I could find and then checked again. Then the whole thing came off in one piece. I did the whole job in an evening or two. The Haynes manual freaked me out talking about fuel lines and such, but there really wasn't anything to worry about. Another thing to try is just to tighten down the six bolts on the existing valve cover. I've had to do this at least twice since I installed the new gasket when it loosens up and oil leaks out and starts to burn. It's just a stupid design with that thing positioned to drip oil down on the hot exhaughst pipe. Tighten them down and then drive for a week or two to burn off the existing oil and see if any more leaks out. It stops the oil leaking for a year or so if you crank them down tight. If you do replace the gasket, replace the PCV valve while you're in there. Dumb that they put it on the rear cover buried under all that stuff. Q/A: Thanks for all the advice regarding the procedure for replacing the rear valve cover gasket. I did the repair this past weekend took 4 hours (great deal of time was spent cleaning valve cover and other parts). On a 1 to 10 scale (10 being hard), I would rate this repair a 4. I checked with the Toyota dealer and they wanted $396 to replace the valve cover gasket. I believe my comments below will help others in removing the air intake/throttle body (take off as a unit) to get to the rear cylinder head. Note: The steps below apply to a 1989 V6 but the process should be similar on other V6 Camry engines: · Disconnect battery cable · Unhook air filter case and loosen clamp on large tube going to throttle body you do not need to disconnect electrical connection, since you can move the unit to the side out of the way · Mark and disconnect any hoses going to the air intake manifold/throttle body I took four close up pictures with my digital camera to help me during the re-assembly process · Remove the hose that goes from air intake manifold to the PCV valve (note: if you try to remove the hose at the PCV valve you will have a difficult time PCV is located on top of the valve cover) · Disconnect top motor mount bracket on the passage side of engine (3 bolts) · Remove the two bolts to ground wires (passenger side of air intake) · Detach fuel line bolt (be careful not to lose the two washer seals) · Remove the two bolts that go to the EGR valve (you will need a new gasket) rear of engine on passenger side · Attached to the air intake/throttle body are two brackets (located at the rear of engine on the right and left sides) used to support the unit remove the two bolts · Remove the bolt on the rear of throttle body that is used to hold the wire harness in place · Remove all electrical plugs · Remove the two bolts and two nuts that hold the air intake to the engine · If you have disconnected all hoses, wires and plugs to the unit you should be able to lifted the unit from engine and move forward you may need to tap the unit to free it from the gasket · Note: I did not remove the throttle and transaxle cables from the unit since you can move the air intake unit forward while the cables are attached gives you needed access to valve cover · With the air intake unit removed you can easily remove the rear valve cover and hose going to PCV valve · Clean valve cover gasket slot and gasket areas that hold the air intake manifold to engine · If the gasket to air intake comes off easily remove, if not, it is next to impossible to scrap off (I did not remove gasket, since it was attached to engine block) · I would also suggest that if you need plugs and/or ignition wires you install them while the air intake is removed. You might want to replace the o-ring on the distributor · I would advise installing a new PCV valve, replace PCV grommet that holds the valve in place on the valve cover and replace hose if needed · Place the gasket into valve cover slot and install - tighten 6 bolts holding valve cover to specifications · Re-install air intake manifold assembly (use gasket seal on surfaces) in reverse order · Problem area: Since the tubing to the EGR valve is not very flexible you may have problems installing the two bolts holding the tube to the EGR valve - it will go together Now that I know how to take off the air intake manifold/throttle body, it will take me less that 2 hours to complete the job next time. Thanks Henryf and camrycurt
__________________
Forum Guidelines:http://www.automotiveforums.com/vbulletin/guidelines.html "What we've got here is a failure to communicate" |
|
|
|
|
10-20-2005, 12:07 AM
|
#44 | |
|
Resident Chemist
Join Date: Feb 2004
Location: Rockville, Maryland
Posts: 8,586
Thanks: 105
Thanked 157 Times in 157 Posts
|
Re: Camry FAQs and Information
RESET AIRBAG (SUPPLEMENTAL RESTRAINT) DTCs/WARNING LIGHT
Q: How do you reset the airbag warning light in a '94 Camry? A: Clearing the warning light in '92-'96 Camrys by the following procedure: In the DLC1 (data link connector under the hood, see following diagram) Use two short wires, one wire at terminal TC and a different wire at terminal AB With the ignition key ON - wait 6 seconds, then: Ground terminal TC to good body ground for one second Then ground terminal AB for one second Then TC one second Then AB one second Then ground TC until the light blinks. Make sure the interval between grounding terminals is not more than 0.2 sec. Remove the ground wires Be very careful to only use the correct terminals. Here is a diagram and explanation from Toyota: 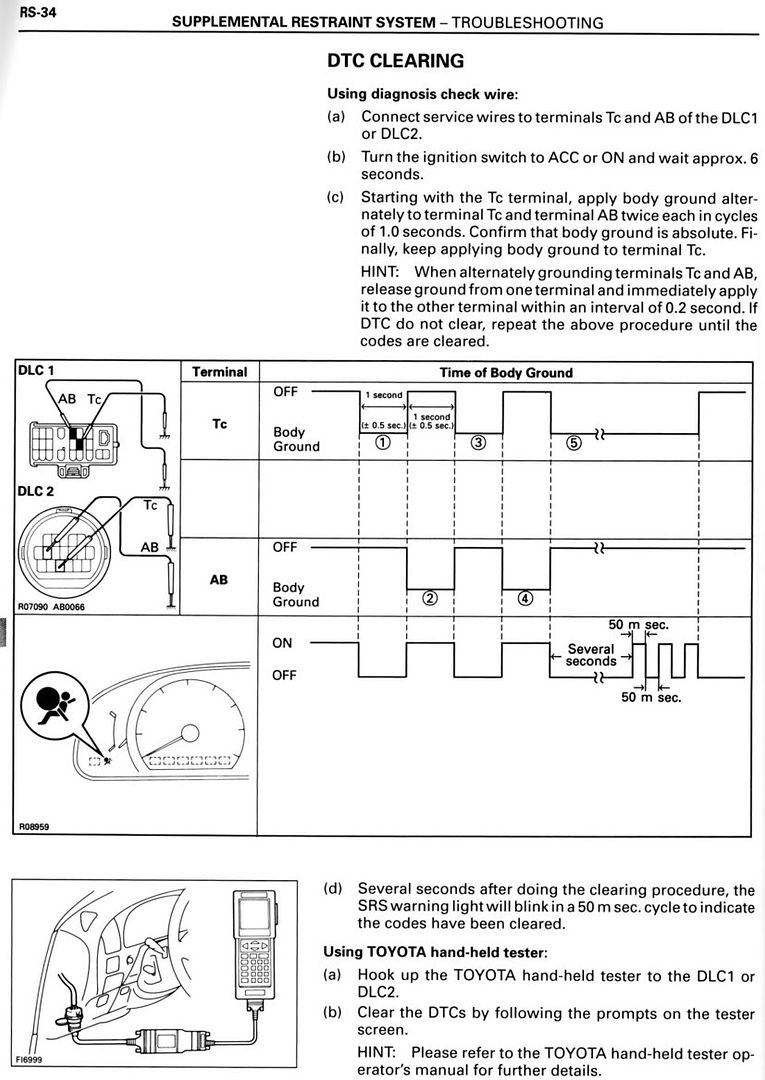 Thanks Daniel M. Dreyfus.
__________________
Forum Guidelines:http://www.automotiveforums.com/vbulletin/guidelines.html "What we've got here is a failure to communicate" |
|
|
|
|
10-20-2005, 09:30 PM
|
#45 | |
|
Resident Chemist
Join Date: Feb 2004
Location: Rockville, Maryland
Posts: 8,586
Thanks: 105
Thanked 157 Times in 157 Posts
|
Re: Camry FAQs and Information
FIXING PAINT CHIPS AND SCRATCHES
Materials 1. Small bottle of the proper Toyota touch up paint and Toyota clear coat, if needed (Toyota metallic finishes are clearcoat; a non-metallic colors were not). 2. DuPont PrepSol (available from autobody supply). 3. Disposable touch-up microbrushes made by ProTouch (from an autobody supply). 4. 3M Perfect-It II Rubbing Compound, Fine Cut (from an autobody supply). 5. Lacquer thinner to keep brush clean. 6. Wet-dry sandpaper: 1000 grit, 1500 grit, and 2000 grit (there is a new product out that is an alternative to wet sanding for use in auto touch ups - check it out at http://www.langka.com). Procedure - Scratches Use this procedure for long scratches and for large chips. 1. Use 1000 grit paper and wet-sand the scratch and the area around it. Make sure to use lots of water when sanding. This keeps scratching to a minimum. 2. Use DuPont Prepsol to clean wax off before touch-up. 3. Using microbrush and liberal amounts of paint, touch up the full-length of the scratch. As soon as the paint drys (10 minutes) do another coat. Repeat until you have done sufficient coats to have built a small mound of paint over the length of the scratch. 4. Let dry for 24 hours. 5. Now wet-sand the touched up surface with 1500 grit wet sandpaper. Sand in a front to rear motion since that's the direction the car is painted with, hence: you're going with the grain of the paint. Sand until you have eliminated the mound and any touchup paint outside of the scratch. 6. Clean area thoroughly and let dry. 7. Take a clean microbrush and begin to apply the clearcoat to the area. Don't be afraid to be liberal with it and don't try and keep the clearcoat within the scratch area. Apply approximately 3-4 coats, again until there is a small mound. Let it set and completely dry for 4-5 days. 8. Now, wet sand with 2000 grit wet sand paper. You will begin to see the clearcoated scratch blend into the rest of the paint - thus disappearing. (It produces a very gratifying feeling!) Procedure - Chips You can use this abbreviated procedure to fix the many small chips on the hood and front fascia. 1. Use 1000 grit paper and wet-sand the scratch and the area around it. Make sure to use lots of water when sanding. This keeps scratching to a minimum. 2. Use DuPont Prepsol to clean wax off before touch-up. 3. Using microbrush and liberal amounts of paint, touch up the chip. As soon as the paint drys (10 minutes) do another coat. Repeat until you have done sufficient coats to have built a small mound of paint over the expanse of the chip. 4. Let dry for 24 hours. 5. Wet sand with 2000 grit wet sand paper. You will begin to see the touch-up paint blend into the rest of the paint - nearly disappearing. The repairs are not noticable to passersby, and look much better than the chips did. Note: The clear coat on the flexible plastic parts doesn't rub back as well as the rest of the paint, probably due to the flex agents in the paint.. Adapted from a post to VetteNet by Doug Johnson, and to the Grand Prix mailing list by Paul Berndt.
__________________
Forum Guidelines:http://www.automotiveforums.com/vbulletin/guidelines.html "What we've got here is a failure to communicate" |
|
|
|
|
|
POST REPLY TO THIS THREAD |
 |
|
|

