|
|
|

|
|
| Search | Car Forums | Gallery | Articles | Helper | AF 350Z | IgorSushko.com | Corporate |
|
| Latest | 0 Rplys |
|
|||||||
 |
 Show Printable Version | Show Printable Version |  Email this Page | Email this Page |  Subscribe to this Thread
|
|
|
Thread Tools |
 09-13-2006, 02:25 PM
|
#61 | |
|
Resident Chemist
 
Join Date: Feb 2004
Location: Rockville, Maryland
Posts: 8,586
Thanks: 105
Thanked 157 Times in 157 Posts

|
Re: Camry FAQs and Information - SEARCH/READ HERE BEFORE POSTING
TRANSMISSION FLUIDS
Q: My '94 Camry is a little low in tranny fluid. I checked the book and it states using Dextron ll Automatic Tansmission Fluid. I have been to two different stores in the area and no one seems to have it. Is there another name that it goes by? What gives???? I even called the Toyota Dealer and he said that Dextron ll is the correct fluid for my '94 Camry. What's going on? I feel as though I'm in a twilight zone!!!! I even checked Advance Auto online and there isn't a listing for it there either. Any help would be appreciated! A: You can use Dexron III anytime Dexron II was recommended. From Chevron.com: Maintaining Your Transmission These days there's no such thing as "normal" driving conditions. Heavy stop-and-go traffic, frequent short trips, trailer towing; they all put your engine to the supreme test and can take a toll on your transmission. Under these tough conditions, you can help your transmission run better and longer when you follow the vehicle manufacturer's severe service schedule and change the automatic transmission fluid at the recommended intervals (typically every 15,000 to 30,000 miles). Also, if you suspect that your ATF has oxidized or deteriorated between service intervals, you may want to consult with your local automotive service center. Selecting the proper quality of ATF is not as easy as it once was. In the past, ATF came in two types: DEXRON®, MERCON® or ATF Type F. However, as transmissions have become more advanced, automobile manufacturers have introduced fluids specifically designed for their transmissions. Always check your owner's manual for the required type of ATF. Here are the most commonly specified ATFs: DEXRON® -III This is a specification for General Motors vehicles, but many foreign manufactures specify a DEXRON approved ATF as well. DEXRON-III can be used in transmissions that call for DEXRON-IIE or DEXRON-II. MERCON® Most Ford vehicles manufactured between 1980 and 1999 specify a MERCON ATF. ATFs that meet DEXRON-III requirements usually meet the MERCON requirements as well. MERCON® V Beginning with the 1997 model year, Ford introduced a higher performance level ATF with the MERCON V specification. Many Ford automatic transmissions from 1999 on will require a MERCON V fluid. The most notable exceptions are the E40D, 4R100, and CD4E transmissions, which still specify regular MERCON ATF. Type F Type F is specifically designed for all pre-1977 Ford vehicles and some makes between 1977 and 1981. Effective March 1997, Ford discontinued administration of approvals for Type F fluids. However, there are still many vehicles on the road that use Type F. Type F and MERCON fluids are not interchangeable. ATF+3® /ATF+4® DaimlerChrysler has had their own ATF specifications for many years, but as of 1997, Chrysler owners' manuals no longer list DEXRON as an acceptable replacement. ATF+3 is a readily available mineral oil-based ATF that is suitable in any application calling for ATF PLUS® , ATF+2® , or a Type 7176® fluid. Vehicles manufactured after 1999 require ATF+4® , a synthetic-based ATF only available through DaimlerChrysler.
__________________
Forum Guidelines:http://www.automotiveforums.com/vbulletin/guidelines.html "What we've got here is a failure to communicate" |
|

|
|
09-17-2006, 03:54 AM
|
#62 | |
|
Resident Chemist
Join Date: Feb 2004
Location: Rockville, Maryland
Posts: 8,586
Thanks: 105
Thanked 157 Times in 157 Posts
|
Re: Camry FAQs and Information - SEARCH/READ HERE BEFORE POSTING
ALTERNATIVE REFRIGERANTS TO R12 AND R134A
Here is an interesting article on alternative refrigerants: A/C: New Alternative Refrigerants by Larry Carley If you have bought any R-12 refrigerant lately, you know it is pretty pricey stuff. Last year, the price peaked at about $20 a pound ($600 for a 30 lb. tank) in some areas of the country. This year some predict the price could shoot as high as $30 to $33 per lb. ($1000 per tank!) if we get a long hot summer. Consequently, people are searching for less expensive alternatives to recharge their A/C systems. NO DROP-INS Though some alternative refrigerants are being marketed as "drop-in" replacements for R-12, there is really no such thing. According to the EPA, the concept of a "drop-in" replacement for R-12 is a marketing myth. Such words imply a substitute refrigerant will perform the same as R-12 under all conditions, that it will require no modifications to the A/C system or changes in lubricant, and that it is compatible with R-12 and can be added to a system that still contains R-12. Federal law prohibits the topping off A/C systems with refrigerants that are different from what is in the systemunless all of the old refrigerant is first removed so the system can be converted to a new refrigerant. The truth is no substitute refrigerant meets all of these requirements. There are, however, a number of alternative refrigerants that have been reviewed by the EPA and have been found to meet the EPAs SNAP (Significant New Alternatives Policy) criteria for environmental acceptability and usage. The SNAP rules prohibit flammable refrigerants or ones that contain ozone-damaging CFCs. But just because a refrigerant meets the EPA's usage criteria does not mean it is endorsed or "approved" by the EPA, or that it will perform well as a refrigerant. THE ALTERNATIVES There are currently seven alternative refrigerants from which to choose. One is R-134a, which is the only alternative currently approved by all vehicle manufacturers worldwide for new vehicles as well as for converting older R-12 applications. The OEMS say R-134a can perform well in most R-12 systems provided the proper retrofit procedures are followed. The also recommend R-134a because it is a single component refrigerant, unlike most of the alternatives which are blends of two to four ingredients. The OEMS do not like blends because blends can undergo "fractionation." This is when the individual ingredients in a blend separate for various reasons. Fractionation can be caused by chemical differences between the refrigerants (lighter and heavier elements dont want to stay mixed), different rates of leakage through seals and hoses (smaller molecules leak at a higher rate than larger ones), and different rates of absorption by the compressor oil and desiccant. Fractionation is a concern because it can change the overall composition of the blend once it is in use, which can affect the performance characteristics of the refrigerant. Fractionation also makes it difficult to recycle a blended refrigerant because what comes out of the system may not be the same mix that went into the system. The OEMS also say limiting the alternatives to one (R-134a) simplifies things, reduces the risk of cross-contamination and eliminates the need for multiple recovery machines (EPA rules require a separate dedicated recovery only or recovery/recycling machine for each type of refrigerant serviced). BLENDS Alternative refrigerants that have been found acceptable for automotive applications or are currently being reviewed by the EPA include the following blends:
The suppliers of the alternative blends also insist the fractionation problem is exaggerated and do not foresee any major problems with recovering and recycling their products (recycling blends is currently illegal, but the EPA is reviewing its feasibility). Are blends establishing a niche in the marketplace? One supplier of these products said they sold over a million pounds of their alternative refrigerant last year alone! Most are predicting increased sales as the price of R-12 continues to rise and stockpiles dwindle. MACS FIELD STUDY A field study of various refrigerants conducted by the Mobile Air Conditioning Society (MACS) compared the cooling performance of R-12, R-134a and three blended refrigerants (Freeze 12, FRIGC and McCool Chill-It). The study found that all the alternative refrigerants (including R-134a) did not cool as well as R-12 in the vehicles tested (a 1990 Pontiac Grand Am and a 1987 Honda Accord). But the study did find that the blends outperformed R-134a in the Honda (but not the Pontiac). The increase in A/C outlet temperature with the different refrigerants ranged from less than a degree to almost 11 degrees. ILLEGAL REFRIGERANTS Another class of alternative refrigerants has also appeared on the scene: illegal refrigerants. Some products that have been introduced (OZ-12, HC-12a, R-176 and R-405a) do not meet the EPAs criteria for environmental acceptability or safety. Flammable refrigerants such as OZ-12 and HC-12a that contain large quantities of hydrocarbons (propane, butane, isobutane, etc.) have been declared illegal for use in mobile A/C applications, but are still turning up in vehicle systems anyway because of their cheap price. Flammable refrigerants pose a significant danger to a vehicles occupants should a leak occur. A spark from a cigarette or a switch can ignite the leaking refrigerant causing an explosion and turning the vehicles interior into an inferno. It only takes about four ounces of a flammable hydrocarbon refrigerant such as propane or butane to create an explosive mixture inside a typical automobile passenger compartment. Frontal collisions can also release the refrigerant if the condenser is damaged, which could result in a severe underhood fire causing extensive damage to the vehicle. Theres also a risk to service technicians who might encounter leaks while servicing a vehicle or operating recovery/recycling equipment. Merely topping off an A/C system with a flammable hydrocarbon can make the entire charge of refrigerant flammable if the amount added exceeds a certain percentage: 10% in the case of an R-12 system and only 5% with R-134a! Thats only three or four ounces of hydrocarbon depending on the overall capacity of the system. Flammable refrigerants are used in some stationary applications as well as truck trailer refrigeration units because theres less risk of leakage or fire. Also, the amount of refrigerant is typically much less, only five or six ounces total instead of several pounds. BOOTLEGGERS & COUNTERFEITERS Less dangerous but equally illegal is bootleg R-12 thats being smuggled into the U.S. from offshore. Though most of the industrialized nations have stopped manufacturing R-12 (production ended here December 31, 1995), R-12 is still being made in some Third World countries including Mexico. Some of this product is finding its way past customs in mislabeled containers or concealed in various ways. The EPA warns that much of the refrigerant it has confiscated thus far is of poor quality, contaminated by air, moisture, R-22 and other substances. The EPA has worked with customs authorities and the FBI to make a number of arrests. Fines for violating the clean air rules can run up to $25,000 per instance. Counterfeiting branded product is another scam thats being perpetrated to turn a fast buck in todays market. Cylinders of counterfeit Allied Signal Genetron R-12 have reportedly been turning up in various parts of the country. The cylinders do not contain R-12 but some "unknown" refrigerant. Allied Signal says the counterfeit boxes do not have cut-outs where lot numbers strapped on cylinders would appear and there are no bar codes or white painted stripes on the sides. The number "Q 1167" may also appear on the bottom of the packaging. The cylinders themselves may be marked with a pressure-sensitive decal whereas the genuine product has markings printed on the cylinder itself. CONTAMINATED REFRIGERANT The high price of R-12 has also lead to an increase in incidences of virgin R-12 being adulterated with other less expensive refrigerants. Most technicians assume a tank of virgin refrigerant is pure, but some are finding thats not the case. Some supplies say they now test every single tank of refrigerant to make sure it contains the proper refrigerant and that the quality of the refrigerant meets specifications. The primary threat of contamination, though, is that of accidentally cross-contaminating refrigerants when vehicles are professionally serviced. Because the law requires all refrigerants to be recovered, theres a potential risk of contaminating when recovery and recycling equipment is connected to a vehicle. The problem is compounded, many say, by the proliferation of alternative and illegal refrigerants. The dangers of cross-contamination are the effects it can have on cooling performance and component reliability. R-12 and R-134a are not compatible refrigerants because R-134a will not mix with and circulate mineral-based compressor oil (which may lead to compressor failure). Nor is R-134a compatible with the moisture-absorbing desiccant XH-5, which is used in many R-12 systems. Intermixing refrigerants can also raise compressor head pressures dangerously. Adding R-22 (which is used in many stationary A/C systems but is not designed for use in mobile A/C applications) to an R-12 or R-134a system may raise head pressures to the point where it causes the compressor to fail. Straight R-22 can cause extremely high discharge pressure readings (up to 400 or 500 psi!) when underhood temperatures are high. R-22 is also not compatible with XH-5 and XH-7 desiccants used in most mobile A/C systems. R-134a also requires its own special type of oil: either a polyakylene (PAG) oil or a polyol ester (POE) oil. The OEMS mostly specify a variety of different PAG oils because some compressors require a heavier or lighter viscosity oil for proper lubrication (though General Motors does specify only a single grade of PAG oil for most service applications). The aftermarket generally favors POE oil because POE is compatible with both R-12 and R-134a and unlike PAG oil it will mix with mineral oil. Mineral oil, as a rule, should still be used in older R-12 systems. DECISIONS, DECISIONS The use of alternative refrigerants such as blends will likely grow because theyre a cheap alternative to R-12. The OEMs dont like it, but the EPA has said it will let the market decide the fate of alternative blends. Consequently, you need to be aware of whats potentially out there and be prepared to handle (or not handle) blends. To minimize the risk of cross-contamination, the EPA requires that each type of refrigerant (including blends) have unique service fittings (permanently installed) and proper labeling. The EPA also requires shops to use a separate dedicated recovery/recycling machine for R-12 and R-134a, plus one or more additional recovery only machines for any other refrigerants that might be used. For this reason, many shops may choose to avoid blends. But fleets may find blends to be an acceptable alternative if they dont want to convert (or it would cost too much to convert) their vehicles over to R-134a. To protect recycling equipment and customers vehicles against cross-contamination or bad refrigerant, service facilities should use a refrigerant identifier to check every vehicle before it is serviced. An identifier can also help the shop monitor the quality of their recycled refrigerant as well as any virgin refrigerant that might be purchased. Most identifiers that are available today can only tell you if the system contains pure R-12, R-134a, hydrocarbons, or R-22 or an "unknown" refrigerant. Each blend has its own characteristic finger print, but because of the fractionation problem getting a precise fix on exactly whats in a vehicle isnt as easy as it sounds. The best advise is this: if you dont know what type of refrigerant is in your vehicle, take it to a shop that has a refrigerant identifier and have it checked. Intermixing different refrigerants can cause cooling problems as well as shorten the life of the compressor. CONTAMINATION ALERT! As the use of alternative refrigerants grows, so does the risk of cross-contamination. A recent survey by the Florida EPA revealed some startling results. When they tested the refrigerant recovery tanks in about 100 shops, heres what they found: Thirty-eight percent of the recovery tanks showed some type of contamination! Independent repair garages and service shops had the lowest rate of contamination, but it was still 32% (nearly one out of three). Used car dealers were the worst, with 71% of their recovery tanks (almost three out of four) showing signs of contamination. Air contamination was the worst problem, being present in 22% of the tanks tested overall. But cross-contamination between R-12 and R-134a was also found in 15% of the tanks. The most cross-contamination (29%) was discovered in used car dealers. RETROFIT OR NOT? The OEMS say R-12 should be used in all R-12 systems as long as it is available because R-12 provides the best cooling performance in these applications. They say theres no need to retrofit to R-134a or to use any other refrigerant as long as the system is cooling normally. But if the system requires major repairs such as a new compressor or condenser, the cost to retrofit may be justified. The OEMS say switching an older R-12 system to R-134a does not require a lot of modifications in many instances. Changing the accumulator or receiver-dryer, removing the old compressor oil and replacing the high pressure switch is generally all thats neededa job that can usually be done for less than $200. For more information, consider purchasing the R134A RETROFIT GUIDE on this website. OEM as well as aftermarket retrofit kits are now available for such conversions. But some vehicles (namely those with viton compressor seals, compressors that cant handle higher head pressures or have small condensers) arent so easy to convert. Changing some of these vehicles over to R-134a requires extensive and expensive modifications. So for these applications there are no kits or easy answersother than to switch to a blend refrigerant if R-12 becomes too expensive or is unavailable.
__________________
Forum Guidelines:http://www.automotiveforums.com/vbulletin/guidelines.html "What we've got here is a failure to communicate" |
|
|
|
|
09-27-2006, 07:24 PM
|
#63 | |
|
Resident Chemist
Join Date: Feb 2004
Location: Rockville, Maryland
Posts: 8,586
Thanks: 105
Thanked 157 Times in 157 Posts
|
Re: Camry FAQs/Information - SEARCH HERE AND FORUM BEFORE POSTING
2nd GENERATION CAMRY TAIL LIGHTS OR BRAKELIGHTS DON'T WORK
Q: What can be the problem when my brake lights or tail lights in my 2nd gen Camry don't work correctly? Also, some owners have to press the shift lock override to get my transmission out of PARK. A: See posts in thread: http://www.automotiveforums.com/vbul...ad.php?t=80545
__________________
Forum Guidelines:http://www.automotiveforums.com/vbulletin/guidelines.html "What we've got here is a failure to communicate" Last edited by Brian R.; 10-10-2006 at 09:55 PM. |
|
|
|
|
10-07-2006, 02:01 PM
|
#64 | |
|
Resident Chemist
Join Date: Feb 2004
Location: Rockville, Maryland
Posts: 8,586
Thanks: 105
Thanked 157 Times in 157 Posts
|
Re: Camry FAQs/Information - SEARCH HERE AND FORUM BEFORE POSTING
__________________
Forum Guidelines:http://www.automotiveforums.com/vbulletin/guidelines.html "What we've got here is a failure to communicate" |
|
|
|
|
10-31-2006, 12:30 PM
|
#65 | |
|
Resident Chemist
Join Date: Feb 2004
Location: Rockville, Maryland
Posts: 8,586
Thanks: 105
Thanked 157 Times in 157 Posts
|
Re: Camry FAQs/Information - SEARCH HERE AND FORUM BEFORE POSTING
CHECKING AND ADJUSTING THE IGNITION TIMING ON A 3S-FE ENGINE
Q: Is the ignition timing in my 89 Camry adjustable? If so, does anyone have "how to" info on setting it? I did a search on this and came up with only the stock setting of 10* no other info. A: Check the label on the underside of your hood for the procedure for checking the ignition timing. Normally, you attach a tachometer (remove cap on service connector of distributor for connection, blue wire with green connector) and a timing light (no 1 spark plug wire), start the engine, and then insert a jumper wire (paper clip) between terminals T and E1 on the service connector next to the AFM. Check the timing at a specific rpm by shining the timing light on the crank pulley and seeing where the timing mark sets with relation to the marks on the scale on the engine. Adjust the timing if wrong by loosening the hold-down bolt on the distributor and turn the distributor a small amount to correct the timing. If you're careful, you can adjust the timing while the engine is running and check it with the timing light as you make the adjustment. Tighten the hold-down bolt and remove the jumper.
__________________
Forum Guidelines:http://www.automotiveforums.com/vbulletin/guidelines.html "What we've got here is a failure to communicate" |
|
|
|
|
11-08-2006, 11:09 PM
|
#66 | |
|
Resident Chemist
Join Date: Feb 2004
Location: Rockville, Maryland
Posts: 8,586
Thanks: 105
Thanked 157 Times in 157 Posts
|
Re: Camry FAQs/Information - SEARCH HERE AND FORUM BEFORE POSTING
POSTING A LINK TO AN IMAGE FILE OR INSERTING AN IMAGE INTO A POST
Get an account at Photobucket.com (or some equivalent host) and upload the images from your computer (or camera directly) to there. Then copy and paste either the Url link to the image file or the Img reference itself to a post. Both the Img link and the Url link are generated under the image on photobucket.com by that site automatically. Here's a couple of examples: If I post the following link, you only see the link in the post, clicking on it will allow you to download the linked image from photobucket.com: http://i16.photobucket.com/albums/b8/rogersb/i1010.gif If I post the IMG link (as below), then I will have the actual image inserted into the post, as long as I don't break the link by moving the image file on photobucket.com. If you do, you have to update the links to that file or you only see a placeholder, no image any more. [IMG]xhttp://i16.photobucket.com/albums/b8/rogersb/i1010.gif[/IMG] gives you without the "x" at the beginning: 
__________________
Forum Guidelines:http://www.automotiveforums.com/vbulletin/guidelines.html "What we've got here is a failure to communicate" |
|
|
|
|
02-03-2007, 04:11 PM
|
#67 | |
|
Resident Chemist
Join Date: Feb 2004
Location: Rockville, Maryland
Posts: 8,586
Thanks: 105
Thanked 157 Times in 157 Posts
|
Re: Camry FAQs/Information - SEARCH HERE AND FORUM BEFORE POSTING
'96 - '98 Camry Extended EVAP Warranties
Certain 1996 1997 1998 Toyota's are eligible for extended warrantly/free repairs The evaporative emission control system warranty will be extended from the current two years or 24,000 miles to 14 years or 150,000 miles. The extended warranty is estimated to cost Toyota about $3 million, and will reduce emissions of hydrocarbons by affected vehicles by an estimated 30 tons, in addition to the 1,200-ton reduction of hydrocarbons achieved by the supplement environmental project. Owners who have not received a notice within 12 months are encouraged to contact their local Toyota dealer. Owners of affected vehicles who suspect a problem with their evaporative emission control system (including the smell of gasoline vapors) should contact an authorized Toyota dealer for service under the extended evaporative system warranty. Toyota will not cover the cost of repairs or diagnosis for systems other than the evaporative emission system or for repairs performed by parties other than authorized Toyota repair facilities. See the following list for affected vehicles:  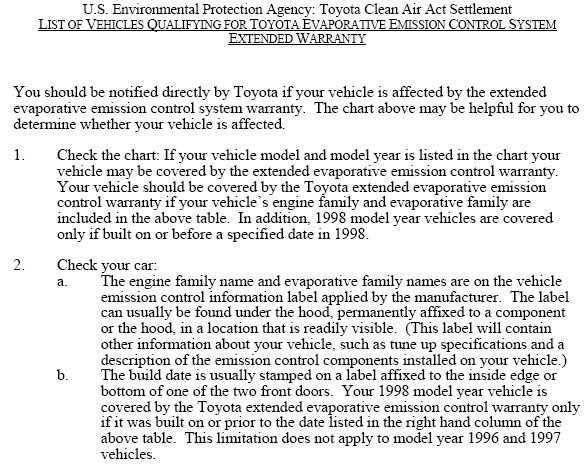
__________________
Forum Guidelines:http://www.automotiveforums.com/vbulletin/guidelines.html "What we've got here is a failure to communicate" |
|
|
|
|
02-11-2007, 04:25 PM
|
#68 | |
|
Resident Chemist
Join Date: Feb 2004
Location: Rockville, Maryland
Posts: 8,586
Thanks: 105
Thanked 157 Times in 157 Posts
|
Re: Camry FAQs/Information - SEARCH HERE AND FORUM BEFORE POSTING
HARD STARTING
Q: My vehicle (100k miles) is acting up when I try to start it on cold mornings (-10,-15 deg C) Canadian weather. The starter turns 2-3 times then it stops while all the lights in the dash are on. Usually when I try the second or sometimes the third time, the engine eventually starts. Some mornings the starter does not make any noises at all when I try it the first time, but after I try the second time it turns rather slowly and eventually the truck starts up. I had the same problem about three weeks ago and I purchased a new battery. The truck started OK all this time but now I have the same problem again. The truck starts OK during the day except when it is parked for 8 hours or more. I never liked the way the truck starts since I purchased it 2 years ago. The starter needs to turn 4-5 times before the engine starts. All my previous vehicles started at one turn (4 cyl cars). A: 1. How long a drive do you take? If the new battery solved your problem and now it's back, then it may be you are not driving the truck long enough to charge the battery. Along with this, you may have a big drain on your battery because of an accessory that is running, such as a large amplifier/stereo, etc. A high-current drain would make your alternator work much harder and longer to get the battery recharged. Starting the vehicle in the cold puts a large drain on the battery and the alternator can only put out a limited amount of current to replace that used in starting. Check your battery. If it is poorly charged, then it is likely that the alternator or alternator connections are your problem. It may also be that your alternator drive belt is loose and slipping so that you are not charging the battery as well as you could. Check the drive belt for the alternator and make sure it's tight as it should be. 2. In that respect, your alternator may be inadequate to recharge your battery. Consider having it's output checked. It may not be putting out enough juice to charge the battery quick enough to keep you going. Also, the cable from the alternator may be bad and limiting the current to charge the battery. If you find that the alternator is fine, but the battery is not well charged because you don't drive it but 10 min after you start it, you can replace it with a higher curent alternator to charge the battery faster. Again, make sure the cable from the alternator is in good shape. 3. Help your truck get started by making sure the plugs are fresh and you are using a light-weight synthetic motor oil. Dino oil gets thicker when it is older, but not synthetic. I would recommend you use 0W-20 Mobil1 or equivalent brand in Toronto in the winter. 4. A high-capacity battery is also necessary (as I'm sure you know from living up there). When you buy a battery, make sure you buy one with alot of cold-cranking amps. Maybe, your battery isn't up to the task of day-to-day starting because you didn't get one with adequate reserve capacity. 5. If the truck doesn't start right away under the best of circumstances, you may have a fuel delivery-related problem. Check your fuel filter, lines, and fuel pump to make sure you are getting fuel pressure quickly. There should be no delay in building up fuel pressure. A kink in the line, a dirty/clogged filter, or a bad fuel pump can delay starting until the pressure is adequate. The engine will not get the necessary rich mixture to start until the fuel pressure is up to spec. A rich mixture may not be available if the injectors are partially plugged. You can try cleaning them with some gas treatment or bring them to a shop that specializes in fuel-injector cleaning. 6. Check the current draw on the starter. If the starter is going bad, it will begin to draw alot more current to do the same work and drain the battery to a much greater extent than a good starter. This will make charging the battery take alot longer and wear out your battery sooner. 7. Under any circumstances, a high drain on the battery will cause a loss of electrolyte. Check the electrolyte level in your battery (all cells) and make sure they are up to the recommended level. Fill them as needed with distilled or deionized water. It's one of those chicken and egg problems where the engine is not able to start quickly and thus drains the battery. The drained battery turns the engine over more slowly and makes it more difficult to start, which drains the battery further.
__________________
Forum Guidelines:http://www.automotiveforums.com/vbulletin/guidelines.html "What we've got here is a failure to communicate" |
|
|
|
|
04-09-2007, 10:36 PM
|
#69 | |
|
Resident Chemist
Join Date: Feb 2004
Location: Rockville, Maryland
Posts: 8,586
Thanks: 105
Thanked 157 Times in 157 Posts
|
Re: Camry FAQs/Information - SEARCH HERE AND FORUM BEFORE POSTING
__________________
Forum Guidelines:http://www.automotiveforums.com/vbulletin/guidelines.html "What we've got here is a failure to communicate" |
|
|
|
|
04-27-2007, 10:47 PM
|
#70 | |
|
Resident Chemist
Join Date: Feb 2004
Location: Rockville, Maryland
Posts: 8,586
Thanks: 105
Thanked 157 Times in 157 Posts
|
Re: Camry FAQs/Information - SEARCH HERE AND FORUM BEFORE POSTING
__________________
Forum Guidelines:http://www.automotiveforums.com/vbulletin/guidelines.html "What we've got here is a failure to communicate" |
|
|
|
|
05-06-2007, 01:02 AM
|
#71 | |
|
Resident Chemist
Join Date: Feb 2004
Location: Rockville, Maryland
Posts: 8,586
Thanks: 105
Thanked 157 Times in 157 Posts
|
Re: Camry FAQs/Information - SEARCH HERE AND FORUM BEFORE POSTING
BREAKING-IN NEW ENGINES
An interesting article on breaking in 4-stroke engines from a very successful engine builder. http://www.mototuneusa.com/break_in_secrets.htm And one about breaking in Lycoming aircraft engines as recommended by Lycoming. http://www.lycoming.com/support/tips...Operations.pdf See the first page... "A new, rebuilt or overhauled engine should receive the same start, warm-up and preflight checks as any other engine. There are some aircraft owners and pilots who would prefer to use low power settings for cruise during the break-in period. This is not recommended. A good break-in requires that the piston rings expand sufficiently to seat with the cylinder walls. This seating of the ring with the cylinder wall will only occur when pressures inside the cylinder are great enough to cause expansion of the piston rings. Pressures in the cylinder only become great enough for a good break-in when power settings above 65% are used. Full power for takeoff and climb during the break-in period is not harmful; it is beneficial, although engine temperatures should be monitored closely to ensure that overheating does not occur. Cruise power settings above 65%, and preferably in the 70% to 75% of rated power range, should be used to achieve a good engine break-in. Remember that if the new or rebuilt engine is normally aspirated (non-turbocharged), it will be necessary to cruise at lower altitudes to obtain the required cruise power levels. Density altitudes in excess of 8000 feet (5000 feet is recommended) will not allow the engine to develop sufficient cruise power for a good break-in. For those who still think that running the engine hard during break-in falls into the category of cruel and unusual punishment, there is one more argument for high power settings during engine break-in. The use of low power settings does not expand the piston rings enough, and a film of oil is left on the cylinder walls. The high temperatures in the combustion chamber will oxidize this oil film so that it creates a condition commonly known as glazing of the cylinder walls. When this happens, the ring break-in process stops, and excessive oil consumption frequently occurs. The bad news is that extensive glazing can only be corrected by removing the cylinders and rehoning the walls. This is expensive, and it is an expense that can be avoided by proper break-in procedures. To summarize, there are just a few items to remember about engine break-in: 1. If a preservative oil has been added by the aircraft manufacturer, drain it no later than the first 25 hours of operation; 2. Follow the engine manufacturers recommendation regarding the oil to be used for break-in and the period between changes; 3. Run the engine at high cruise power levels for best piston ring/cylinder wall mating; 4. Continue break-in operation for 50 hours or until oil consumption stabilizes. These simple procedures should eliminate the possibility of cylinder wall glazing and should prepare the engine for a long and satisfactory service life."
__________________
Forum Guidelines:http://www.automotiveforums.com/vbulletin/guidelines.html "What we've got here is a failure to communicate" Last edited by Brian R.; 12-08-2007 at 02:34 PM. |
|
|
|
|
06-24-2007, 06:36 PM
|
#72 | |
|
Resident Chemist
Join Date: Feb 2004
Location: Rockville, Maryland
Posts: 8,586
Thanks: 105
Thanked 157 Times in 157 Posts
|
Re: Camry FAQs/Information - SEARCH HERE AND FORUM BEFORE POSTING
1998 Camry 4 cyl 5S-FE HO2 Sensor (Bank 1, Sensor 2) Replacement to cure DTC P0141
Thanks to Soilent Green for the following post: Have a P0141 Heated Oxygen Sensor Circuit Malfunction (bank 1, sensor 2). I do not know for how long I've been running the car with that particular code since the CEL has been on for a year with P0446 but didn't want to go with a defective 02 sensor for too long so started thinking about doing it right away. I'm less of a car noob everyday. The hardest part of the job was to remove the old sensor from the exhaust. My car is a '98 Camry 5sfe with 290 000 Kilometers, non-California model. Things you will need : 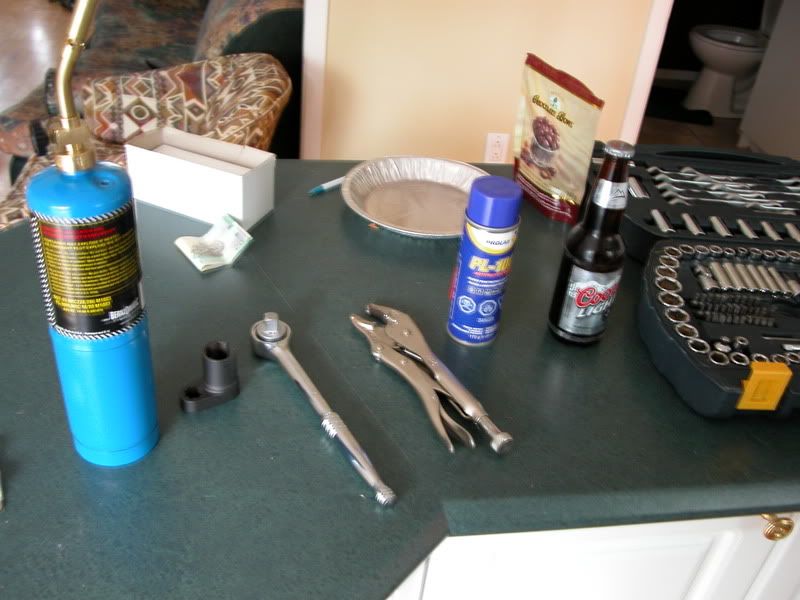 1.A Torch : It will be MUCH easier to remove it by heating the base (where the sensor screws in) a lot. I started working on the car without a torch, just by idling until exhaust was hot and tried to unscrew, then gave up and went out to buy one, old sensor was out half an hour later. 2.02 sensor socket : You could easily go without one. You could use an open 22 millimeter wrench or a vise grip. The 02 sensor socket damaged the old sensor, and my self pride along the way. I bough a pair of big Vise Grip and a torch to remedy the problem, worked like a CHARM. The socket was useful to gently screw the new sensor back in though, so it was good to have one anyway 3.Ratchet wrench : I don't know which size, it wasn't specified, but it's the biggest one in my kit. 4.Vise Grip pliers: I used it to unscrew the old screwed up sensor. I think this would work better than an open 22 millimeter wrench since you don't care about damaging it at that point, although you're obviously not gonna use a vise grip to put the new one back in. 5.Lube : heat/fire resistant penetrating oil 6.And of course, beer. To ease off the possible frustration of the first step. 7.Not shown on picture (sorry) : New 02 sensor, paid 293$ CDN at dealer. I think people in U.S.A. get them for cheaper though. The process : 1 : Lube/heat/repeat until the old sensor comes off. What you want to do is heat around the base, and the base itself to expand the threads. Don't heat the sensor itself, that'll do no good. Believe me, I didn't have a torch when I started and this would've been impossible for me. I'm not a big guy so muscle comes in the form of neighbours or roomates. So get a torch. I used a vise grip to break it free and unscrew it because the 02 sensor socket damaged the sensor's "bolt" 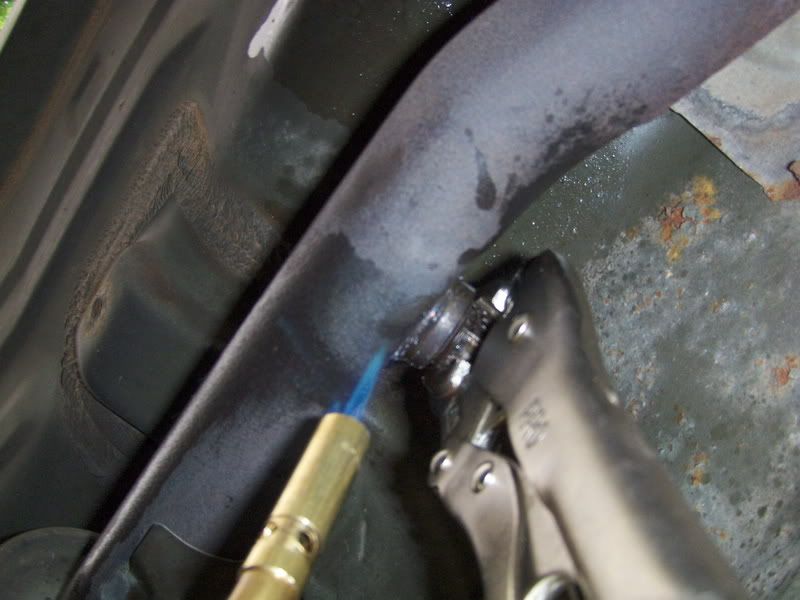 2. I removed the front driver seat. A lot of people say you can access the connector from underneath it, through the hole in the carpet where the air ducts are, but I don't like working on things I can't see, so I went the noob way. Haynes manual says not to disconnect the seatbelt safety system connector, or your airbag light could come on, so I called several local Toyota dealers and spoke to techs that told me it was not a problem as long as the ignition key wasn't in. Now that I think of it, I forgot to disconnect the battery. There's a black plastic clip holding the wire underneath the seat, stick your fingernail in the crack on the backside of it and it will clip open so you can let the wire free, then Disconnect it. Remove the 4 bolts holding down the seat and take it out. Here's what that connector looks like : 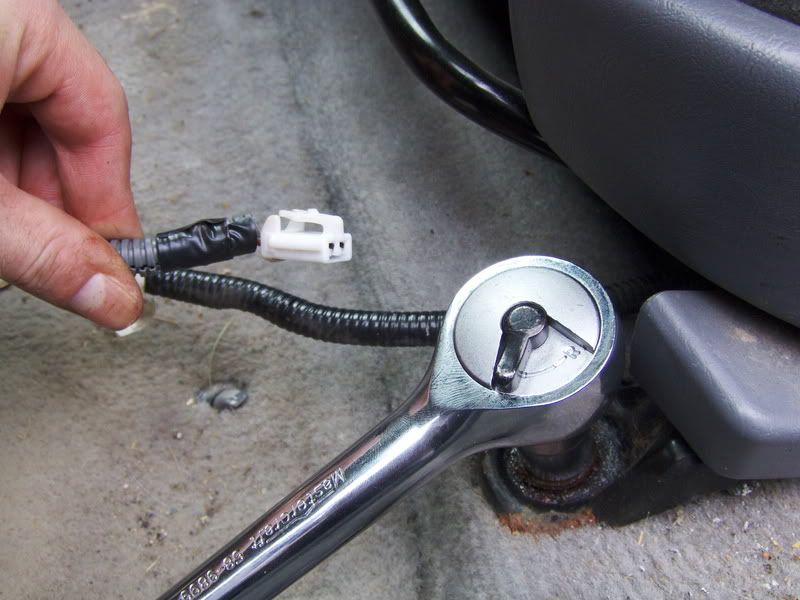 3.Pull the carpet back starting from behind the pedals, it comes off easily, you have to carefully pull the center console's plastic "flap" towards you to slide the carpet out of it until you can see the connector and work on it properly. It's disconnected on this picture, the female part of the connector was held on to the floor by some kind of clip that you don't need to undo anyway. I pulled the rubber pigtail inside of the car (it is actually pulled in on the following picture), then snaked it back out along with the connector. The old sensor was out! I thought about completely destroying it with a hammer and the torch while laughing out loud hysterically but held on to myself.  4. Carefully screw the new sensor in, I used the 02 sensor Socket and my ratchet for that. I didn't screw it in too tight. Until the metal ring at the base of it was seating and it was harder to turn, I locked it in securely and was done. Slide the connector through the hole in the floor and snake the rubber pigtail back in the car then reconnect and properly seat the rubber pigtail against the hole. Easy, but hard to explain, you would understand just by looking at it though. Replace carpet properly. Again be careflul not to rip it up, just slide it back underneath the plastic flap of the center console. 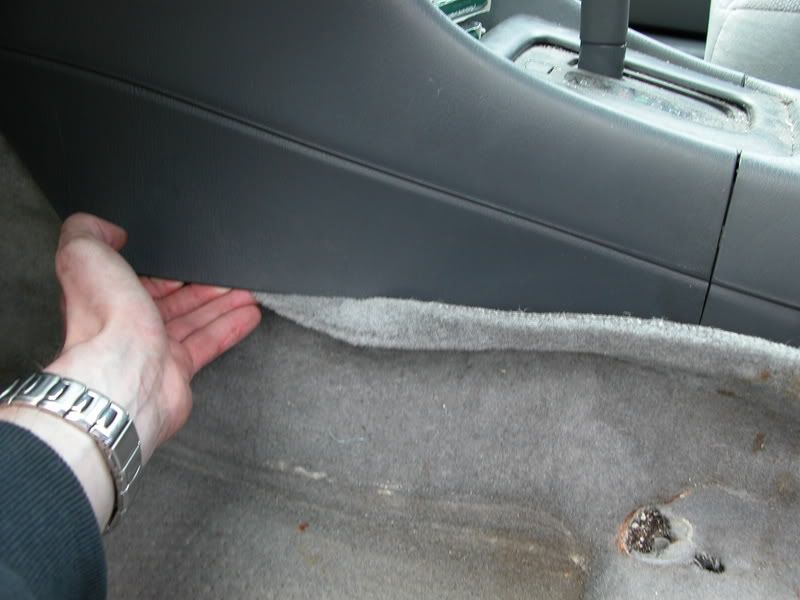 5. Put the seat back in and disconnect your battery to reset computer and codes. I used a sensor I got on ebay to do that. You're done, I will report back in about a week to let you know if P0141 came back. If you got any questions or comments you are welcome. I'm still pretty much a noob at cars by the way, so any tips or additions are also welcome.
__________________
Forum Guidelines:http://www.automotiveforums.com/vbulletin/guidelines.html "What we've got here is a failure to communicate" |
|
|
|
|
02-15-2008, 03:48 AM
|
#73 | |
|
Resident Chemist
Join Date: Feb 2004
Location: Rockville, Maryland
Posts: 8,586
Thanks: 105
Thanked 157 Times in 157 Posts
|
Re: Camry FAQs/Information - SEARCH HERE AND FORUM BEFORE POSTING
INCORRECT TORQUE PUBLISHED FOR TIGHTENING HEAD / VALVE COVER IN 5S-FE 4 CYLINDER IN 4TH GENERATION CAMRY
The Toyota 1997 and 1999 FSMs and some Hayne's/Chilton's manuals have an incorrect torque specification for the tube nuts that attach the head cover on a 5S-FE engine. The above manuals instruct to tighten the four tube nuts to 33 ft-lbs. This is incorrect and an excessive torque which will likely cause the head cover to crack. See the following discussion: http://www.automotiveforums.com/vbul...d.php?t=360295 The correct torque for the head cover tube nuts is 17 ft-lbs, and should be accomplished gradually in increments (5, then 10, then 17 ft-lb, from the inside two out, is adequate - use an in-lb torque wrench at 60, then 120, then 204 in-lbs). The 17 ft-lb torque value is published in both the 1994 and 1996 Camry, and the 1990 Celica FSMs for the 5S-FE 4 cylinder. A mechanic at my local Toyota dealer confirmed that the correct torque for all 5S-FE engine tube nuts is 17 ft-lbs.
__________________
Forum Guidelines:http://www.automotiveforums.com/vbulletin/guidelines.html "What we've got here is a failure to communicate" Last edited by Brian R.; 03-04-2010 at 09:32 AM. |
|
|
|
|
02-29-2008, 07:27 AM
|
#74 | |
|
Resident Chemist
Join Date: Feb 2004
Location: Rockville, Maryland
Posts: 8,586
Thanks: 105
Thanked 157 Times in 157 Posts
|
Re: Camry FAQs/Information - SEARCH HERE AND FORUM BEFORE POSTING
REMOVE AND REPLACE LEAKING STEERING GEAR HOUSING (RACK) AND AXLES IN 3RD GENERATION CAMRY
The following description is from ToyotaNation, thanks to 73sport and is specific for a V6, but should be really close to that for a 5S-FE. "Here are a couple of things I did different to get the rack out and get it back with out messing around inside the car, screaming profanities or bleeding under the car...... Lowering the back of the engine cradle ~3/4" / 20mm allows easy access to the sway bar bolts. I think it made the job much easier. Below you will also find a quick method to dial in the new rack so the Toe-In is back the way it was (or pretty darn close). 1) Before you jack it up, pull the rear O2 sensor. 2) Jack it up and support body (not engine cradle), pull wheels off. 3) Position the steering wheel straight and centered. Secure with seat belt. 4) With a 24" extension and a wobble, remove the pinch bolt at the steering column coupler. Turn the wheel to the 11:00 o'clock position if you don't have a wobble. 5) Remove 2 10mm bolts holding the rear fender apron at the bottom (both sides). 6) Remove the 2 14mm bolts connecting the body to the cradle under the apron and loosen the 19mm bolts holding the cradle. Do this on both sides. *** NOTE *** Support the cradle in case you run the bolts out of threads and drop the cradle. There is approx 20mm of threads before it departs - BE CAREFUL - 7) Remove the 4 12mm bolts holding the swaybar to the cradle. I also removed the 4 14mm bolts holding the swaybar ends to the lower control arms. 8) Remove the line set and plug the top line with a Golf "T" to keep the mess smaller. 9) Remove the 12mm bolt supporting the lines. 10) With a 19mm wrench, break the tie-rod adjusting nuts loose. Seat them back on the tie-rod end gently. 11) Remove the cotter pin and tie-rod end castle nuts (17mm). If you don't have a puller, no worries IF YOU CAN HIT WHERE YOU AIM! With a 16oz hammer take 2-3 good wacks at the End Of the Steering Arm where the ball stud pokes through. I AM NOT SAYING POUND on the THREADS! Hitting the castings end will momentarily distort the tapered hole and drop the tie-rod end. Mine popped easy. 2 swings each -- one to aim, one to smack it. 12) Remove the 19mm bolts holding the rack in. Yes, the factory tightened them REAL GOOD. Don't slip! 13) Twist pull and slide the leaky old rack out. 14) Center the rack, Turn input shaft all the way one direction. Count back 1.5 turns. This is center. 15) Align the tie rods so the whole rack assembly is straight to the eye with the ball joints pointing at the ground. USING A CARPENTERS SQUARE and a felt pin align the square to the inside of the Jamb nut and draw a line on the ground. DO NOT MOVE THE RACK. With the square, align it to one of the tubes feeding the rack piston. Draw a line on the ground. Go to the other end of the rack and place the square against the jamb nut. Draw a line. These three lines now represent your vehicles "TOE-IN" and the basic position of the rack since you centered it and made a reference line to the rack body. I suggest you move the old rack, relaign it too the marks and see if all three marks line up. If so, good job, move on..... NOTE: If installing new t/r ends and nuts, do some measuring and see if the parts are identical. If they are different it will change your toe-in! Pull the the tie-rod ends and jamb nuts from the old rack. Center your new rack (1.5 turns from full lock). Install the jamb nuts and tie-rod ends on the new rack. Align the rack body to the mark on the floor. Adjust the jamb nuts to the lines on the floor, install t/r ends and snug the nuts. Doing this alone should place the toe-in back very close to where it was. You should still have the toe and alignment checked at the shop. Reverse all the them steps and youl'l be back in business. Follow all the flushing and purging instructions to bleed the system. Test drive! Good Luck, /randy PS - It took longer to clean up the mess from the torn boots and leaky rack than it did to do the work."
__________________
Forum Guidelines:http://www.automotiveforums.com/vbulletin/guidelines.html "What we've got here is a failure to communicate" |
|
|
|
|
12-21-2008, 02:55 PM
|
#75 | |
|
Resident Chemist
Join Date: Feb 2004
Location: Rockville, Maryland
Posts: 8,586
Thanks: 105
Thanked 157 Times in 157 Posts
|
Re: Camry FAQs/Information - SEARCH HERE AND FORUM BEFORE POSTING
Battery Ratings
According to Consumer Reports, car batteries cost and ratings are as follows (best ratings are at the top of each Group): Group 65 DieHard Platinum 50065 $180 90 Duralast Gold 65-DLG $97 80 CR Best Buy Kirkland Signature 12866 $75 78 NAPA Performance Select 8465 $90 77 AutoCraft Titanium 65-2 $90 77 CR Best Buy EverStart Maxx-65N (North) $75 76 CR Best Buy EverStart Maxx-65S (South) $75 73 Interstate Mega-Tron Plus MTP-65 $114 72 DieHard Gold 33165 (South) $110 67 Duralast 65-DL $88 66 DieHard Gold 33065 (North) $110 62 Interstate Mega-Tron II MT-65 $100 60 DieHard 30065 (North) $90 54 DieHard 30365 (South) $90 50 Group 34/78 & 78 DieHard Platinum 50090 $180 91 Optima RedTop SC34U $150 76 Deka Intimidator 9A78DT $188 75 DieHard SUV, Truck and Van 39990 (South) $120 72 CR Best Buy NAPA Select 84 34/78 $82 67 CR Best Buy AutoCraft Titanium 34/78-4 $83 66 DieHard SUV, Truck and Van 39890 (North) $120 66 Orbital Exide Select ORB78DT-84 $172 66 Interstate Mega-Tron Plus MTP-78DT $113 63 Duralast Gold 34DT-DLG $95 63 EverStart Maxx-78N (North) $75 60 EverStart Maxx-78S (South) $75 59 Interstate Mega-Tron II MT-78DT $99 52 Group 24 /24F Interstate Mega-Tron Plus MTP-24 $101 83 CR Best Buy EverStart Maxx-24N (North) $75 82 CR Best Buy EverStart Maxx-24S (South) $75 78 DieHard Gold 33123 (South) $110 76 Duralast Gold 24-DLG $89 75 AutoCraft Titanium 24-6 $85 72 DieHard Gold 33023 (North) $110 59 Interstate Mega-Tron II MT-24 $88 43 Group 35 Duralast Gold 35-DLG $93 79 CR Best Buy EverStart Maxx-35N (North) $75 79 DieHard Gold 33035 (North) $110 78 CR Best Buy EverStart Maxx-35S (South) $75 73 Interstate Mega-Tron Plus MTP-35 $90 68 DieHard Gold 33135 (South) $110 64 Group 75 Duralast Gold 75-DLG $89 75 Interstate Mega-Tron Plus MTP-75 $100 75 AutoCraft Titanium 75-3 $85 74 CR Best Buy EverStart Maxx-75N (North) $75 73 CR Best Buy EverStart Maxx-75S (South) $75 73 DieHard Gold 33075 (North) $110 72 DieHard Gold 33175 (South) $110 69 CR Best Buy Kirkland Signature 12869 $60 68 NAPA Select 84 8475 $90 68 Die Hard At Sears and Kmart only. Duralast At AutoZone only. Kirkland At Costco only. NAPA At NAPA only. Autocraft At Advance Auto Parts only. EverStart At Wal-Mart only.
__________________
Forum Guidelines:http://www.automotiveforums.com/vbulletin/guidelines.html "What we've got here is a failure to communicate" |
|
|
|
|
|
POST REPLY TO THIS THREAD |
 |
| Thread Tools | |
|
|

