|
|
|

|
|
| Search | Car Forums | Gallery | Articles | Helper | AF 350Z | IgorSushko.com | Corporate |
|
| Latest | 0 Rplys |
|
|||||||
| WIP - Street Post topics for any "Works In Progress" street vehicles projects in this sub-forum. |
 |
 Show Printable Version | Show Printable Version |  Email this Page | Email this Page |  Subscribe to this Thread
|
|
|
Thread Tools |
 07-19-2012, 06:08 AM
|
#31 | |
|
AF Regular
Thread starter

Join Date: Mar 2012
Location: Sydney
Posts: 139
Thanks: 11
Thanked 10 Times in 10 Posts
|
Re: Ferrari 288GTO Revell + Fujimi 2 in one 1/24
Hi, thanks god it'll be Friday tomorrow
 Post for today!   Nuts and "burnt" color (mixture of TAMIYA enamel clear orange, flat black, clear and flat base; I can't remember the ratios, but maybe 8:8:8:1, I used the brush) were applied to the exhaust pipes. 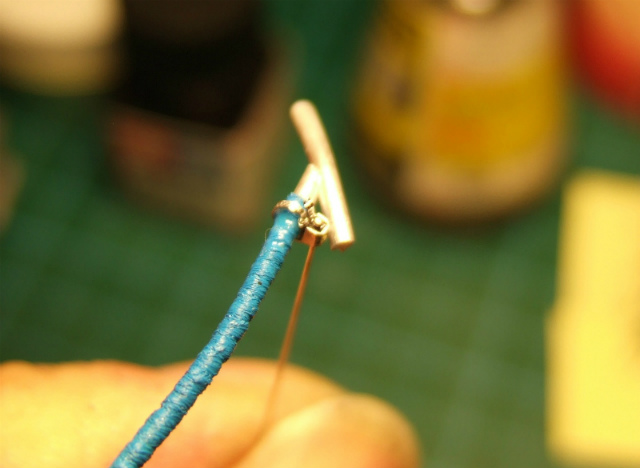 I don't even know what this part is for, but I thought I needed to make this. They are, maybe 1.5mm (2mm?) plastic rods and the blue pipe is my daughter's broken hair band; light blue applied. And the hose clip is from KA Models, also insect pin as the nut which was cut after this photo. 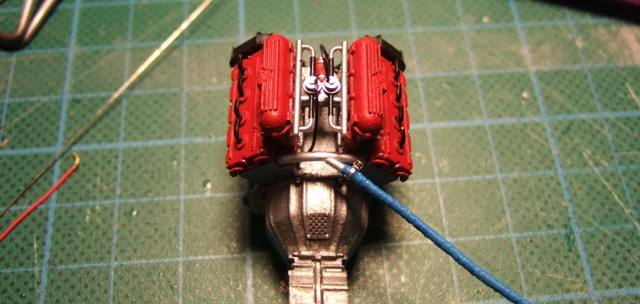 I believe this part gives mechanical atmosphere to the engine bay. Please someone, tell me what this pipe is for and where the blue hose goes???  Plug covers were from 0.7mm (inside is 0.5mm) brass rods so that I could put 0.5mm plug codes and painted in black.  This is Fujimi's frame. To be fitted horizontally to Revell's chassis, 0.3mm plastic boards were fitted; white part.  ...Once I started to use the insect pins, I became insect pins addicted. The black hose was from price tug bands attached to my daughter's shoes. Maybe some hair bands have the same textures.  Using plastic rod and the bands... (small holes were applied on rods so that I could attach the bands easily with CA glue.) 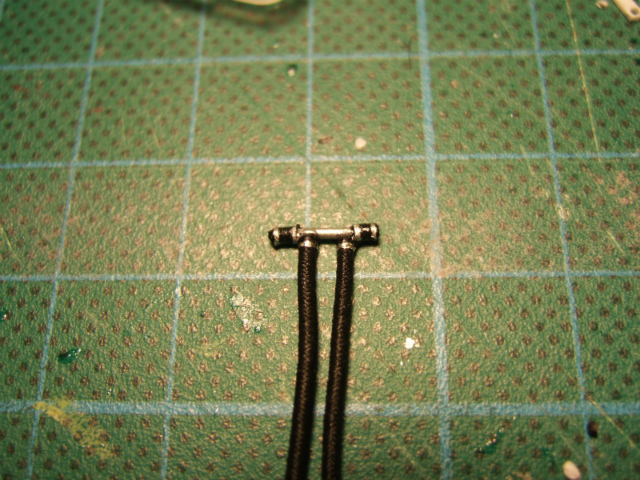 Now you can see what this part is for. I used the same bands for both sides of the rod. The silver lines are aluminum foils and silver paints.  Fujimi has this part actually, but this time it could not be fitted in because it was too short (also because I adjusted the bank angles. Fujimi's instruction says their angles are vertical, but I believe they incline a bit to outsides).  Fuel injection pipes were inserted as shown on top in this picture. It took more than an hour to set and adjust the plug codes to the brass rods (plug covers).  Radiator hoses (?maybe) had dull molds, so I carved it to be seen as two hoses. Please someone tell me, where the long red code as shown in the bottom in this picture goes to??? ( Is it actually needed???) Oops, I haven't mentioned about exhaust pipes from engine.  No wonder Revell's exhaust pipe looks better. so I did lots of cuts and pastes to fit it to Fujimi's engine. (...I reckon the engine won't get high power with Fujimi's exhaust pipe.)  The engine was temporary set in the frame to raise my spirit. Wow, they look really cool!!! But I found the bolt on the frame that you can see on right-top was not in the right place seeing this picture. I fixed it after this photo. It is good to take photos to find mistakes that my old bare eyes couldn't find..  For this part, I used the insect pins for 4 nuts, metal seal from Fujimi's box (actually it was for head cover, but I didn't use it for that purpose) and the biggest bolt was from ancient MODELER's plugs & connectors sets. If I didn't have the MODELER's sets, I would use... well, some machined bolts, I would find. That's all for today. Thanks for looking!! Looking forward to the weekend... 
__________________
Umihito We can learn from mistakes. 
Last edited by Umihito; 07-19-2012 at 07:26 AM. |
|

|

|
|
07-19-2012, 04:56 PM
|
#32 | |
|
Blarg! Wort Wort Wort!
Join Date: Mar 2006
Location: Quezon City
Posts: 2,120
Thanks: 64
Thanked 101 Times in 100 Posts
|
Re: Ferrari 288GTO Revell + Fujimi 2 in one 1/24
you do have a good point there - if you like the model you're building, you'll definitely make it your best...until you find your next favorite car, that is. LOL!
nice updates, btw.
__________________
olly olly oxen free |
|
|
|
|
|
07-20-2012, 09:19 AM
|
#33 | |
|
AF Regular
Thread starter
Join Date: Mar 2012
Location: Sydney
Posts: 139
Thanks: 11
Thanked 10 Times in 10 Posts
|
Re: Ferrari 288GTO Revell + Fujimi 2 in one 1/24
Still I'm looking forward to the answers where are the hoses goes to... I know it'll be a difficult question though.
Post for today   Heat shields under the inter coolers were made from 0.3mm plastic paper.  The hose clamps (KA models) were also attached.  The band (same as the last post ones) was applied to this part. Connector parts were from ancient MODELER'S plugs and connectors set and plastic rod. Still, I don't know where this black pipe goes....  Every pipe has nickel silver rod or pin hole to be settled together in proper position. Without this works, I don't think I could assemble these pipes with enough strength. These rods were also convenience when painting. Of course they were cut short when assemble.  Hose clamps were from ancient MODELER'S "Metalook". Of course we can find several foils like this now.  These were also troublesome and irritating works  , but now I got used to these kind of works. Once you think 1/3 to 1/2 of trials will be the mistakes, you would never give up when making mistakes. , but now I got used to these kind of works. Once you think 1/3 to 1/2 of trials will be the mistakes, you would never give up when making mistakes.  Plastic rods were applied and cut to set the inter coolers horizontally. Heights and stay positions adjustments were needed. For the piping, I decided to set the inter coolers firstly, because those are the most impressive parts in the engine room and have to be settled in proper positions. Then the other pipes were adjusted according to the inter cooler's positions. Of course there were lots of cuts and pastes on the pipes.  I checked the position not to touch the engine hood. It was OK. ...Sorry, I didn't take any photos during the piping, since I was too serious to assemble them.  This is an accent (yellow parts; from plastic rod and paper), though I don't know what this is for. The pipe itself was cut short to be set in.  Other pipes were applied. Nickel silver rods, brass pipes, steel wire, plastic rods and so on. I made holes for every pipes to be settled. Sorry, I know this expression is too rough but I was concentrating too much to take pictures.  The black pipe from gearbox is from MODELER'S plug hose (painted in black).  The progress so far.  The looks through louvers... cool..!!! I was reworded for the hard works. That's all for today. Have a nice weekend!! 
__________________
Umihito We can learn from mistakes.
Last edited by Umihito; 07-20-2012 at 11:44 AM. |
|
|
|
|
|
07-21-2012, 06:39 AM
|
#34 | |
|
AF Regular
Thread starter
Join Date: Mar 2012
Location: Sydney
Posts: 139
Thanks: 11
Thanked 10 Times in 10 Posts
|
Re: Ferrari 288GTO Revell + Fujimi 2 in one 1/24
Let's start today's post
Sorry for low definition for first 4 photos, 'cause I couldn't connect my camera to my PC and I had to take those photos from the camera's screen.  Air cleaner units are from Revell. I believe Fujimi's (left, gray one) has more accuracy, but Fujimis' didn't fit to the air intakes of engine hood because of their sizes. But I thought I could do something to Revell's parts. Firstly I cut them with saws...  then drilled inside, glued and reshaped with sand paper after this photo.  and the pipes are from Fujimi. You can see the hole at the end of the pipe above. I set the rod to be inserted on another pipe to be set to this hole, I didn't take its picture though.  This crumpled aluminum foil (just the kitchen foil) was for heat shield plates beside the air cleaners. This was applied on 0.3mm plastic paper with CA glue, but it was still easy to be removed... Maybe some epoxy glue could be better?? (I kept going 'cause I didn't have epoxy glue, besides I should only be carefully)  The heat shield on the back (PE parts) was cut short to be fitted in Revell's body. * To settle the pipes; sons of a gun, I used clear bond to set temporally then CA glue with CA glue hardener spray (sorry the link is Japanese, but I believe you can find several types of same kinds). Without them, I could hardly assemble the pipes, I reckon.  I glued and removed the air cleaners maybe 3-4 times to set them in proper positions.  This picture is of the last one's I made. It's clean, but I feel it's so called... simple. I indeed reckon, I got a progress (just slowly). At this stage I felt engine itself was done. But I felt something was still left...... even I tried not to even think about it. That was...... Throttle levers....... I firstly (at the time I was starting this project) thought they would be omitted feeling they were beyond my skill. but I couldn't help thinking about it at this stage. But there was very small spaces left to set them in.... I considered, thought and thought, worried and worried, but I decided. My answer was....,  0.3mm plastic board and 0.3mm nickel silver rod was prepared for the throttle lever.  Centre part was from 1mm(?) plastic rod. Seeing this picture, the surface was a bit rough but please consider this was just 7-8mm part and would be painted over. Besides, I can hardly look at it being covered by fuel injection system (I know this is my excuse).  The throttles themselves were from brass rods (flattened by the pliers), and the rods were 0.3mm nickel silver rods. The brass rods were so easy to be cut, flatten and bent because of their softness.  I used the "G clear bond then CA glue with hardener" method here, too. The top on throttle was cut from 0.7mm brass rod. It was a very hard job to set these tiny parts in very very tiny space after the settlement of all other parts. I nearly showed the finger in the process with lots of tries and errors, to be honest. But now, I feel just terrific !! That's it for today, my bros!!
__________________
Umihito We can learn from mistakes.
Last edited by Umihito; 07-25-2012 at 09:31 AM. |
|
|
|
|
| The Following User Says Thank You to Umihito For This Useful Post: |
eugene78 (07-22-2012)
|
|
07-22-2012, 08:28 AM
|
#35 | |
|
AF Regular
Thread starter
Join Date: Mar 2012
Location: Sydney
Posts: 139
Thanks: 11
Thanked 10 Times in 10 Posts
|
Re: Ferrari 288GTO Revell + Fujimi 2 in one 1/24
Post for today
Assembling the shock absorbers.  I replaced the spring section to 0.3mm nickel silver rod, the dumper to 3mm plastic pipe and 1mm brass rod. Just because I thought these works were as easy as masking and painting, and would lead a much better result. (This picture is for the front suspensions)  I coiled the nickel silver rod to plastic pipe, then stretched and cut to a certain length.  Then painted in these colors.  I didn't glued the brass rod and pipe but only the end of the spring so that this part has the mobility to fit in the right place without adjustments of its length. Right one is the original part.  And the rear ones.  The rear shock absorbers were fitted. I had been afraid if they would obstruct the air cleaner pipes, but they didn't. Lucky me. The upper arms and the brake system sections are from Fujimi. Fitting the tires and looking the balance with the body, I tried several times to fit them to the right place.  The process of fitting rear wheels... at the beginning, the wheels came outside and forward.   So I had to peel off the brake disks so that I could shorten the width of the centre part on this picture. I should do this before I glue and paint these parts properly... but I don't care to redo the same jobs.  And this part had to be cut short to fit the shorten part on picture above.  The shapes of the brake disks deformed by being peeled off. I used these clips to set the discs while the glue dried out.  I use "Post-it" papers to adjust the heights. The suspension parts were glued just a bit backward. The wheels were set to preferable positions.  Being applied lots of cuts, pastes and removals cycles, some paints were getting bold. I have to treat them later on. 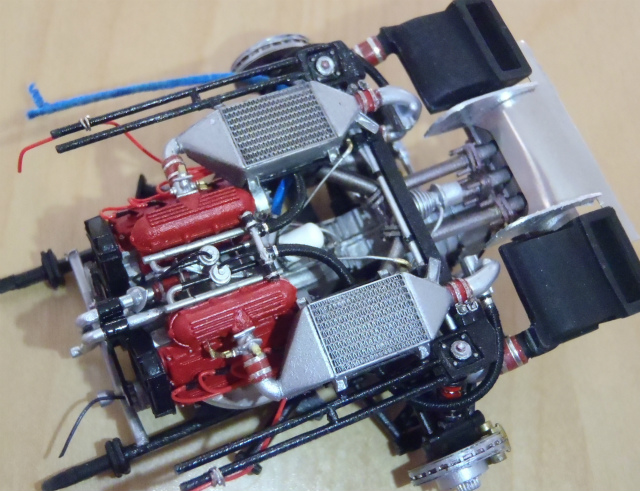 Some decals have to be applied, but almost of all jobs were done on this section. I enjoyed so much (It was a hard time as well). Don't you think GTO's engine is really beautiful, do you? Thanks for looking and see you next time
__________________
Umihito We can learn from mistakes.
|
|
|
|
|
| The Following User Says Thank You to Umihito For This Useful Post: |
eugene78 (07-22-2012)
|
|
07-22-2012, 03:43 PM
|
#36 | |
|
AF Regular
Join Date: Feb 2009
Location: Lelystad
Posts: 137
Thanks: 0
Thanked 2 Times in 2 Posts
|
Re: Ferrari 288GTO Revell + Fujimi 2 in one 1/24
What an excellent work are you doing here Umihito. You're techniques are clearly written in your WIP, thanks for that. Though I'm no Ferrari enthousiast I will follow your amazing work.
Eric |
|
|
|
|
|
07-23-2012, 08:54 AM
|
#37 | ||
|
AF Regular
Thread starter
Join Date: Mar 2012
Location: Sydney
Posts: 139
Thanks: 11
Thanked 10 Times in 10 Posts
|
Re: Ferrari 288GTO Revell + Fujimi 2 in one 1/24
Thanks for your "thanks", eugene7 . I was amazed by your BMW507 , if I were the owner of the real car, I would buy it for more than 5K!
Quote:
I am really looking forward to seeing your 911S to be completed!! I respect your sense of capturing the shapes. I found your work on 935 Turbo is stunning!! I can't believe it is a quick build, it contains lots of modifying....!
__________________
Umihito We can learn from mistakes.
|
||
|
|
|
| The Following User Says Thank You to Umihito For This Useful Post: |
eugene78 (07-31-2012)
|
|
07-23-2012, 09:12 AM
|
#38 | |
|
AF Regular
Thread starter
Join Date: Mar 2012
Location: Sydney
Posts: 139
Thanks: 11
Thanked 10 Times in 10 Posts
|
Re: Ferrari 288GTO Revell + Fujimi 2 in one 1/24
Today I got drunk having met my good old friend.... I'll post tomorrow, sorry...!!

__________________
Umihito We can learn from mistakes.
|
|
|
|
|
|
07-24-2012, 06:08 AM
|
#39 | |
|
AF Regular
Thread starter
Join Date: Mar 2012
Location: Sydney
Posts: 139
Thanks: 11
Thanked 10 Times in 10 Posts
|
Re: Ferrari 288GTO Revell + Fujimi 2 in one 1/24
Sorry for yesterday, I still had hangover this morning (but of course I went to work).
Now I'm fine and let's start the post today! Assembly of front suspension section.  Mainly out of box of Fujimi. I of course used PE brake disks. The gates (seam lines?) on parts were treated after this photo... taking photos, lots of mistakes are shown on them.  To fit into the width of Revell's body, I sanded this parts about 1mm on top and the second-top to set the brake disks in narrower position. Mmmm, hard to explain. Anyway, I had to make the width narrower about 2mm in total.  On top of battery, I attached EVER GREEN "H" plastic strip. I cut it in the shape of "T" then applied. On each end, I put insect pins. And the codes (MODELER'S 0.45mm) applied.  Now ready to temporary set to the chassis.  PE brake disk and modified suspension gives good atmosphere.  The battery came to the right place. Inside the battery, I set a small magnet so that the rid (it also has a magnet) can be settled without glues.  The height of front section was adjusted by sanding the chassis. Today's post is a bit short... sorry I feel so sleepy now See you later...
__________________
Umihito We can learn from mistakes.
Last edited by Umihito; 07-24-2012 at 06:39 AM. |
|
|
|
|
|
07-24-2012, 02:50 PM
|
#40 | |
|
Blarg! Wort Wort Wort!
Join Date: Mar 2006
Location: Quezon City
Posts: 2,120
Thanks: 64
Thanked 101 Times in 100 Posts
|
Re: Ferrari 288GTO Revell + Fujimi 2 in one 1/24
love that engine bay with all the details.
__________________
olly olly oxen free |
|
|
|
|
|
07-28-2012, 06:07 AM
|
#41 | |
|
AF Regular
Thread starter
Join Date: Mar 2012
Location: Sydney
Posts: 139
Thanks: 11
Thanked 10 Times in 10 Posts
|
Re: Ferrari 288GTO Revell + Fujimi 2 in one 1/24
Sorry for having day off...
I thought I have to treat the gaps around front bonnet.  I glued 0.3mm plastic papers on both sides, then fulled the normal putty.  You can see the difference of colors on right and left edges. Don't say I've got to treat them earlier. (Of course I should)  Then I applied moving section on bonnet. This picture is the temporary one, I will cut the upper excess parts on bonnet. Followings are how I made these moving parts.  I made 0.5mm hole in a 0.7mm plastic board, then inserted the 0.5mm brass pipe. This part will be glued to the body. From my experience, this part should be as front as you can, so that the moving width would be bigger (so that the body and the bonnet wouldn't hit each other).  This (right small one) is the part on bonnet. The 0.5mm nickel silver rod will be inserted into the pin hole. I am using the number plate part from Fujimi's box, just thinking it is thicker than 0.5mm plastic board.  I made lots of tries and errors on this stays (0.5mm nickel silvers). If they were too narrow, the bonnet and the body hit. If they were to large, the bonnet wasn't fit in the right place...  After some attempt, I found the right place to fit them in. Now I think I could use 0.7mm rods and more thick pipes for more strength, but I don't have guts to redo this job now. Move to body modifying.. Then glued and sanded to the right shapes.  I should do this works earlier, now I can tell.  Using 0.5mm plastic board...   These parts are not only the gum packing inside the doors, but also they give strength to the body. Oh, I should make the ceiling parts as well... still long way to go.  The interior tub had to be sanded to fit in the packing parts. Again, I should do this job earlier to make things easier. Anyway, things are proceeding little by little That's all for today, have a nice Sunday!!
__________________
Umihito We can learn from mistakes.
|
|
|
|
|
|
07-30-2012, 06:09 AM
|
#42 | |
|
AF Regular
Thread starter
Join Date: Mar 2012
Location: Sydney
Posts: 139
Thanks: 11
Thanked 10 Times in 10 Posts
|
Re: Ferrari 288GTO Revell + Fujimi 2 in one 1/24
Happy Monday? Let's start today's posting.
Revell's interior tub looks fairly good, especially the foot mat's detail. But it seems to me too square. So I decided to make the mat from scratch.  Firstly, I replicate the shape of mat to silicon replicator.  I filled the black CA glue with glue hardener. These were so fragile, so I made some spares. 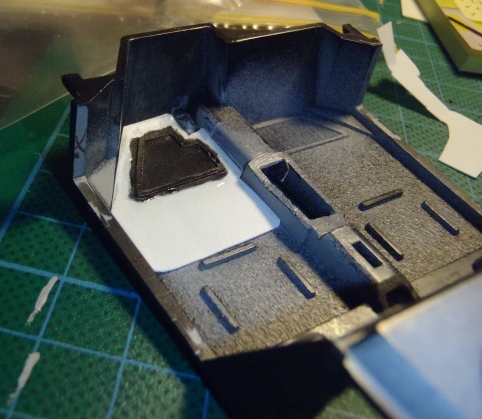 They were applied onto the 0.3mm plastic paper (edge curved)  Then KA MODELS Flocking powder (soft gray) was applied. To apply, I coated the woodwork bond (diluted with water) on the preferable area, then sprinkled the powder by fingers.  These white plastic papers are to fill up the gaps between interior and engine bay. I traced the rear window, body's pillar and the side walls. Without these, I could see the engine bay from the cabin (I couldn't believe it, but Fujimi has also the same problem!).  I applied the colors onto the flocking powder. Floor and back of seats are flat black, the higher part is flat gray (black and white). The colors were diluted with thinner to spread to flocking powder easily and evenly.  These pedals are from Fujimi's box. The surface of pedals are PE parts from Fujimi's box as well. The top of the part was cut because it hit the Revell's body. That's all for today It's still Monday, but still enjoying my life...!
__________________
Umihito We can learn from mistakes.
|
|
|
|
|
| The Following User Says Thank You to Umihito For This Useful Post: |
HokTar (05-03-2013)
|
|
07-30-2012, 08:11 AM
|
#43 | |
|
AF Fanatic

Join Date: Feb 2004
Location: Hartford, Connecticut
Posts: 5,601
Thanks: 7
Thanked 108 Times in 103 Posts
|
Re: Ferrari 288GTO Revell + Fujimi 2 in one 1/24
Sweet progress.
__________________
In Progress    
|
|
|
|
|
|
07-30-2012, 01:36 PM
|
#44 | |
|
AF Regular

Join Date: Jul 2004
Location: Lodz
Posts: 183
Thanks: 24
Thanked 15 Times in 14 Posts
|
Re: Ferrari 288GTO Revell + Fujimi 2 in one 1/24
Great job! It is a real pleasure to watch.
Maybe you already know this site: http://www.eurospares.co.uk/index.asp Check the spare parts catalogue for your GTO and it might help you with some issues, like what goes where. =) Good luck with your project. |
|
|
|
|
| The Following 2 Users Say Thank You to ridefast For This Useful Post: |
Ratman_2004 (08-02-2013),
Umihito (07-31-2012)
|
|
07-30-2012, 02:11 PM
|
#45 | |
|
Blarg! Wort Wort Wort!
Join Date: Mar 2006
Location: Quezon City
Posts: 2,120
Thanks: 64
Thanked 101 Times in 100 Posts
|
Re: Ferrari 288GTO Revell + Fujimi 2 in one 1/24
great update!
btw, is that oyumaru that you're using to duplicate parts?
__________________
olly olly oxen free |
|
|
|
|
| ||||||||||||||||||||||||||||||||||||||
|
POST REPLY TO THIS THREAD |
 |
|
|


