|
|
|

|
|
| Search | Car Forums | Gallery | Articles | Helper | AF 350Z | IgorSushko.com | Corporate |
|
| Latest | 0 Rplys |
|
|||||||
| Car Modeling Share your passion for car modeling here! Includes sub-forum for "in progress" and "completed" vehicles. |
 |
 Show Printable Version | Show Printable Version |  Email this Page | Email this Page |  Subscribe to this Thread
|
|
|
Thread Tools |
 04-19-2006, 10:32 AM
|
#1 | |
|
AF Fanatic

Join Date: Dec 2004
Location: Up the creek with no paddle
Posts: 5,888
Thanks: 7
Thanked 16 Times in 15 Posts
|
How To: Alternative Flocking Technique
HOW TO: ALTERNATIVE FLOCKING TECHNIQUE
aka Klutz Kustom Karpets I came up with this idea last night and I thought I would share it with you as it worked out even better than I thought it would. I don’t know if you have the same problem as I do with flocking using white glue. Basically it always comes out a little bit “patchy” (even when using added paint) and requires a couple of applications. Also the glue needs to be applied carefully so as to get it only where you want it or you end up flocking the dashboard  . The glue pulls away from the edges leading to thin/patchy flocking. And finally, I get flocking bits all over the interior of the kit. . The glue pulls away from the edges leading to thin/patchy flocking. And finally, I get flocking bits all over the interior of the kit.Basically I’m really “flocked off” by the time I’ve finished. There are a couple of alternative methods out there. Seljic uses flocked wall paper (I can’t get any); MFH makes a prepared carpet material (expensive). This is a quick, cheap, clean and very effective alternative method that allows you to use your current flocking supplies. To show just how versatile this method can be, there’s a “quick and dirty” Special Edition director’s cut at the end I should add that everything you see in this “How To” took me no more than 30-35 mins including taking pictures. The basic principle is deadly easy – double-sided adhesive tape used for laying carpets. I use this stuff all the time for attaching parts to bamboo sticks for painting so I always have a couple of rolls handy. It is particularly good for this flocking function as the adhesive it uses is pretty darn sticky! Here’s what you will need: 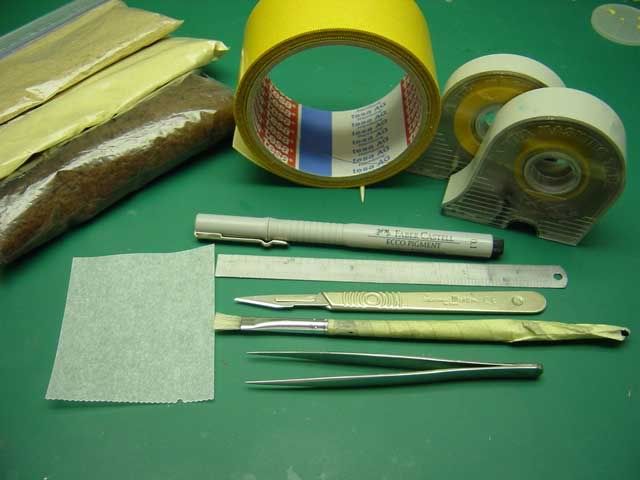 Double sided carpet tape Masking tape Greaseproof kitchen paper (also known, I think, as baking paper or sandwich paper) Flocking Other odds and sods Step 1: 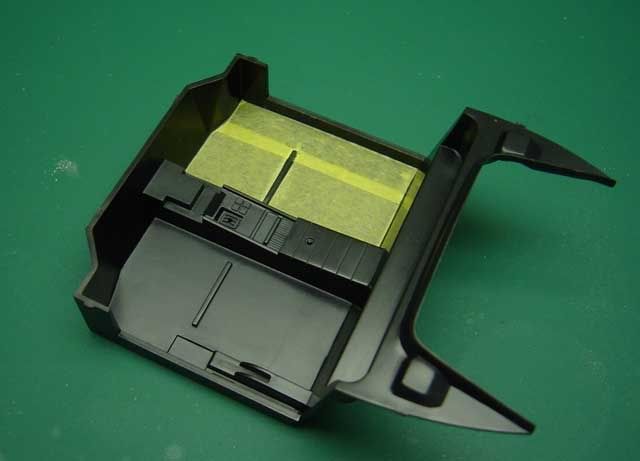 The first 60 seconds of this method are spent making a template of the part you want to flock. Here I just took the first kit box that came to hand from my stash – Fujimi's 348gtb and covered it with 2 strips of Tamiya masking tape and trimmed around the edges with a sharp scalpel blade. Step 2. Now we need to make our sheet of “carpet” material. Cut off a suitable strip of the sticky tape. Fortunately this kind of tape is by definition very wide and will almost certainly be wide enough for most model kits. 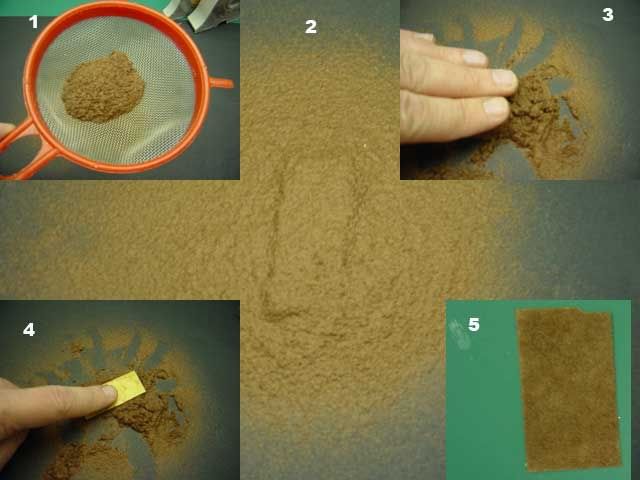 Lay the strip sticky side up on a piece of old newspaper (to collect the excess flocking). Tip the flocking material into a sieve (1) and then sprinkle very liberally (2) all over the sticky tape. Really make a huge pile and then vigorously push it all in to the tape (3) with your fingers. You can then pick up the tape, tip it over and then push it back into the pile of flocking (4). Don’t be gentle or delicate at this stage – the objective is to work as much flocking as possible into the adhesive for maximum coverage. You should end up with something similar to (5) STEP 3: 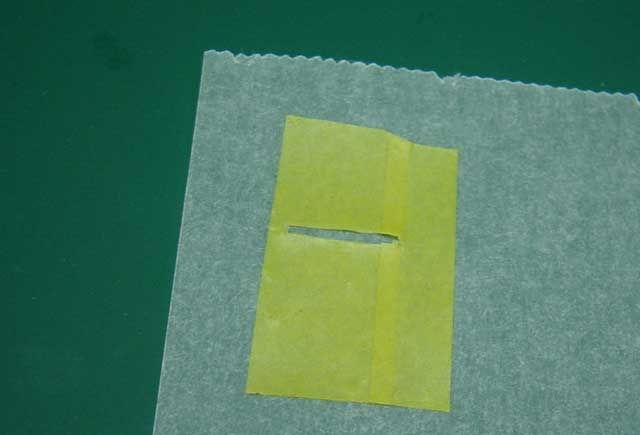 Since we will be cutting the carpet from the back, we need to make a negative of the floor plan template. The easiest way to do this was to peel it from the model, put it onto a piece of greaseproof kitchen paper and then trim to size with metal ruler and scalpel. STEP 4: 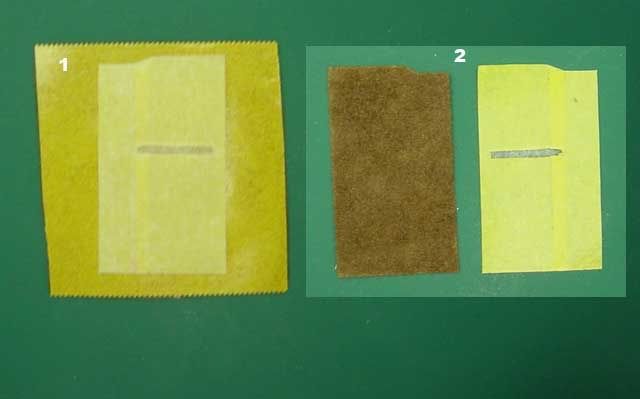 Take your template and place it “Tamiya side down” (1) on the backing paper of your carpet sheet and cut around it. You should end up with something like (2). This was actually for me the hardest part to do. The backing paper of the carpet tape was veeeeery slippery and the template was hard to keep in place. The strip you can see cut out is for the seat mounting bar on the kit floor pan. STEP 5: Put you carpet in place  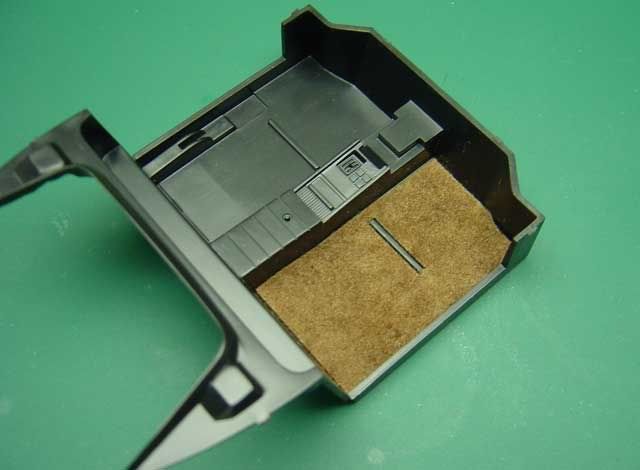 You can either just put it in place or remove the backing paper from the carpet tape and fix it in place permanently – the choice is yours. Free extra material! Directors cut! When I had finished this tutorial, I had sort of an “after shock” thought. I said to myself “I wonder if….” And it turned out that the answer was “yes, you can” 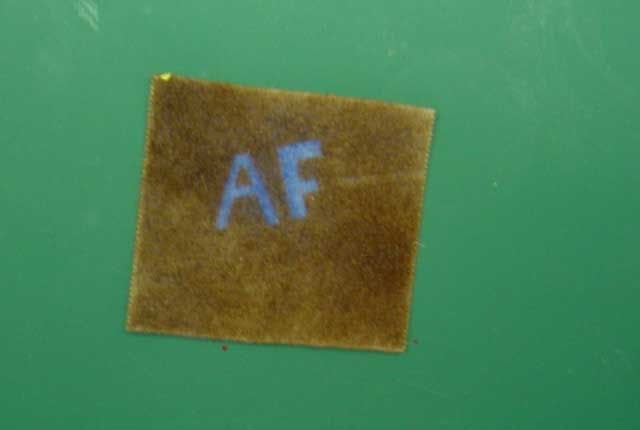 Before I put flocking on the carpet tape, I cut out some letter shapes from the greaseproof paper and placed them on the adhesive (the kitchen paper won't adhere stongly and behaves like backing paper). I then proceed to flock the tape as above with the main color – in this case brown. 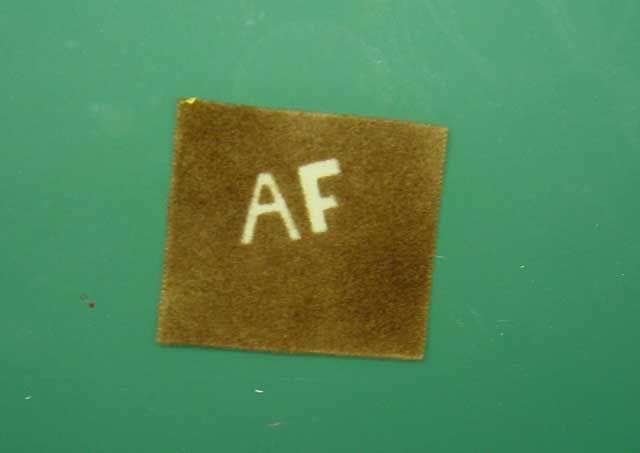 I then peeled off the letters to re-expose the adhesive and applied the second color – blue. Voila! – Klutz Kustom Karpets  This was a reaaaallly rough and ready tryout and I don’t know just how precise you can get with it but……you show me EDITS: Gionc also had a great additional idea for kits with symmetrical floor plans. "Make one mask, then put 2 pieces of tape together with "waxed paper" between them. Cut out one template shape, separate the tape and hey presto!, 2 ready shapes for flocking." Thanks for that Gio! Also check out below what MPWR did with this technique!! Here's a peek  
__________________
Guideline for happy modeling: Practice on scrap. Always try something new. Less is more. "I have a plan so cunning, you could put a tail on it and call it a weasel" - Edmund Blackadder Last edited by klutz_100; 04-20-2006 at 02:38 AM. |
|

|

|
|
04-19-2006, 10:46 AM
|
#2 | |
|
Banned
 
Join Date: Apr 2006
Location: London
Posts: 17
Thanks: 0
Thanked 0 Times in 0 Posts
|
Re: How To: Alternative Flocking Technique
Fantastic tip! I'm gonna' use this method on my next project! Thanks for sharin'!
 |
|
|
|
|
|
04-19-2006, 10:55 AM
|
#3 | |
|
Authorized Vendor

Join Date: Oct 2005
Location: Vicenza - veneto de rassa
Posts: 3,909
Thanks: 6
Thanked 46 Times in 41 Posts
|
Re: How To: Alternative Flocking Technique
Fantastic tutorial, my friend, one of "why I didn't tought before"? Becouse I'm not Stevensky, or not at all
J/K cheers giovensky
__________________
 gio gio
|
|
|
|
|
|
04-19-2006, 10:56 AM
|
#4 | |
|
Not A Hoarder!

Join Date: Jun 2003
Location: Englewood, Colorado
Posts: 2,240
Thanks: 0
Thanked 19 Times in 19 Posts

|
Re: How To: Alternative Flocking Technique
That's really cool!
I bet if you painted the logo (or whatever) on the tape, then simply let it dry, the flocking would not stick to the logo and you'd get the same result only in the color of the paint not the color of the tape.
__________________
SCCA 7, The lost Z Contest entry thread: Mystery? Beetle + Boxster = Bugster, P.T. Panel:click here Diablo Roadster: click here, & Porsche C2 Cab |
|
|
|
|
|
04-19-2006, 10:59 AM
|
#5 | |
|
AF Enthusiast

Join Date: Jan 2003
Location: Chatan, Kadena
Posts: 1,170
Thanks: 0
Thanked 2 Times in 2 Posts
|
Re: How To: Alternative Flocking Technique
I have to five that a try. Thanks!
|
|
|
|
|
|
04-19-2006, 11:11 AM
|
#6 | |
|
AF Enthusiast

Join Date: Jan 2004
Location: San Jose, California
Posts: 1,099
Thanks: 0
Thanked 1 Time in 1 Post
|
Re: How To: Alternative Flocking Technique
WOW!
I could have used this on my 240Z!!! SUper tutorial and many thanks!! |
|
|
|
|
|
04-19-2006, 12:11 PM
|
#7 | |
|
AF Enthusiast

Join Date: Dec 2004
Location: Germany
Posts: 3,431
Thanks: 28
Thanked 79 Times in 73 Posts
|
Re: How To: Alternative Flocking Technique
Hey Mr. Carpet,
you are the REAL flocking-master Great How-To, btw  . Looks good, I´ll give it a try . Looks good, I´ll give it a try
__________________
Micha      
|
|
|
|
|
|
04-19-2006, 12:30 PM
|
#8 | |
|
AF Enthusiast

Join Date: Jun 2005
Location: Céroux-Mousty
Posts: 506
Thanks: 11
Thanked 5 Times in 5 Posts

|
Re: How To: Alternative Flocking Technique
Great How to......!
Really interesting.  Jamme |
|
|
|
|
|
04-19-2006, 12:41 PM
|
#9 | |
|
Image Hosting Exceeded
 Join Date: May 2003
Location: Flying in circles
Posts: 4,233
Thanks: 23
Thanked 95 Times in 86 Posts
|
Re: How To: Alternative Flocking Technique
Great how to, and terrific idea. You've got me thinking now....
By the way, I think this 'greaseproof kitchen paper' may also be called 'waxed paper' in some parts of the world. I may give it a try, and post my results.
__________________
PHOTOBUCKET SUCKS |
|
|
|
|
|
04-19-2006, 12:41 PM
|
#10 | |
|
Sweet, sweet tiny Hondas.
 Join Date: Jul 2003
Location: Austin, Texas
Posts: 5,720
Thanks: 48
Thanked 89 Times in 65 Posts
|
Re: How To: Alternative Flocking Technique
Brilliant!!
__________________
It ain't cool 'till your wife hates it. Imagine a world without Alabama Recent builds: Rocket Bunny FR-S and stock BRZ Toyota bB Bro-style Civic K20 powered SiR converted EK WIP I build slowly and poorly. 
|
|
|
|
|
|
04-19-2006, 12:52 PM
|
#11 | |
|
AF Regular
 
Join Date: Sep 2005
Location: Toronto
Posts: 400
Thanks: 0
Thanked 0 Times in 0 Posts
|
Re: How To: Alternative Flocking Technique
Man this is good stuff. I have used double sided tape for a lot of modeling needs but now there is one more use for them. Thanks for the great tutorial.
Winston |
|
|
|
|
|
04-19-2006, 01:11 PM
|
#12 | |
|
AF Regular

Join Date: Mar 2005
Location: jersey, New Jersey
Posts: 261
Thanks: 0
Thanked 0 Times in 0 Posts
|
Re: How To: Alternative Flocking Technique
That is awesome. I will definitly be using this on a future custom lowrider build. THANKS!!!!!
By the way where do you pick up some of the double sided tape? |
|
|
|
|
|
04-19-2006, 01:20 PM
|
#13 | ||
|
AF Regular
Join Date: Sep 2005
Location: Toronto
Posts: 400
Thanks: 0
Thanked 0 Times in 0 Posts
|
Re: How To: Alternative Flocking Technique
Quote:
Any hardware store like Home Depot should have them. Winston |
||
|
|
|
|
04-19-2006, 01:36 PM
|
#14 | |
|
AF Regular
Join Date: Mar 2005
Location: jersey, New Jersey
Posts: 261
Thanks: 0
Thanked 0 Times in 0 Posts
|
Re: How To: Alternative Flocking Technique
cool thanks
|
|
|
|
|
|
04-19-2006, 01:45 PM
|
#15 | |
|
Image Hosting Exceeded
Join Date: May 2003
Location: Flying in circles
Posts: 4,233
Thanks: 23
Thanked 95 Times in 86 Posts
|
Re: How To: Alternative Flocking Technique
Great idea Stevenski! I tried it out, and it does work. The 'sandwich paper' is in fact sold at my local grocery as 'waxed paper'.
I think I'm going to need a bit more practice with this technique. I tried it out to make a floor mat for the Mythos, but I got this odd little fuzzy horse shape in the center.  
__________________
PHOTOBUCKET SUCKS |
|
|
|
|
|
|
POST REPLY TO THIS THREAD |
 |
|
|


