|
|
|

|
|
| Search | Car Forums | Gallery | Articles | Helper | AF 350Z | IgorSushko.com | Corporate |
|
| Latest | 0 Rplys |
|
|||||||
| WIP - Motorbikes Post topics for any "Works In Progress" motobikes projects in this sub-forum. |
 |
 Show Printable Version | Show Printable Version |  Email this Page | Email this Page |  Subscribe to this Thread
|
|
|
Thread Tools |
 05-25-2009, 10:12 PM
|
#1 | |
|
AF Regular

Join Date: Jan 2004
Location: hong kong
Posts: 430
Thanks: 2
Thanked 5 Times in 3 Posts
|
Rossi in faith: M1 2005 Sepang
Hi Brothers,
Having a great fun from the Top Studio transkit for '04 M1, I was just had enough at the moment and would like to get some lighter and more relaxed builds. LOL~!  This was actually been started back in 2008 August. But I barely touch it after the fairing is polished. I think I can treat the chassis as a seperate kit now so I can focus on the details around (without the transkit). I hope I can be doing this soon after a couple of 4-wheelers are done. Please also find more text descriptions about the progress I have written on my own web: http://www.joeyko.com/diary/rossi_m1_mal_2005.htm I am glad to have any comments of any kind. Enjoy~ Joey 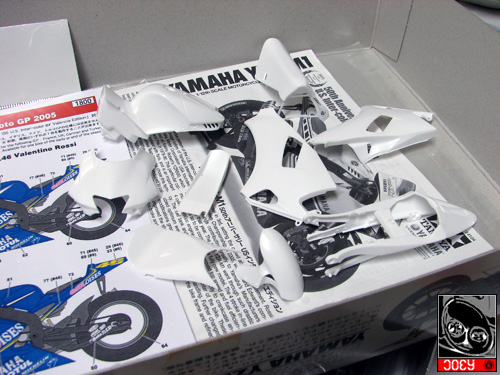 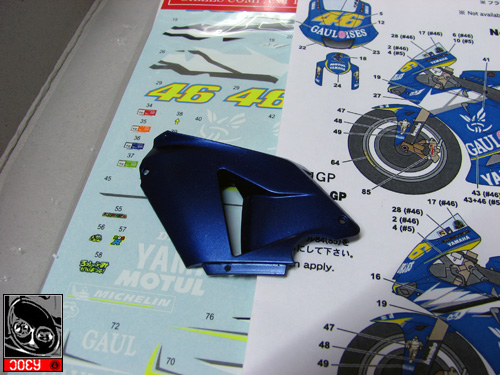  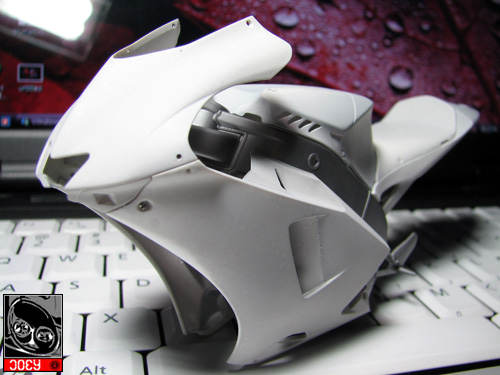 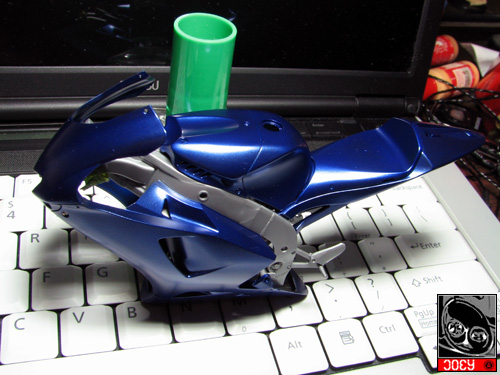 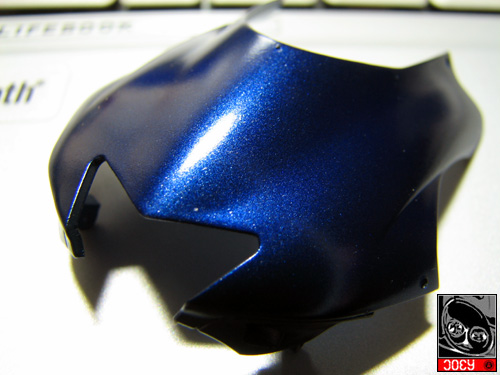 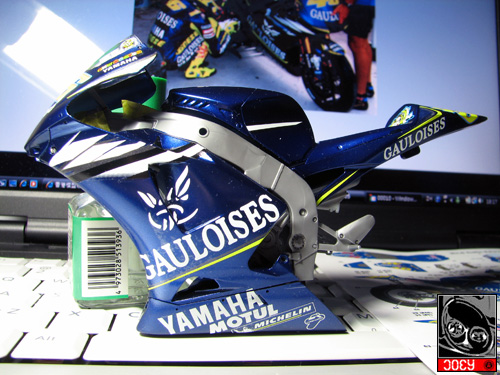 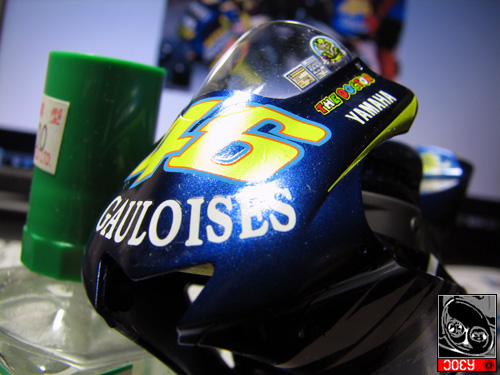 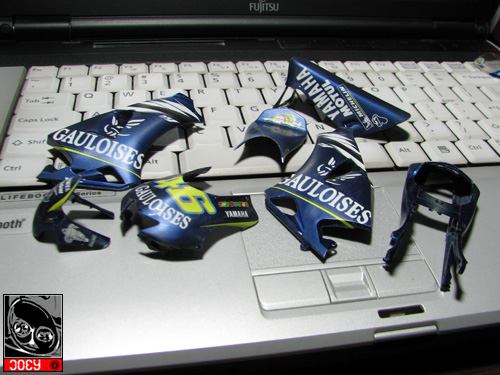 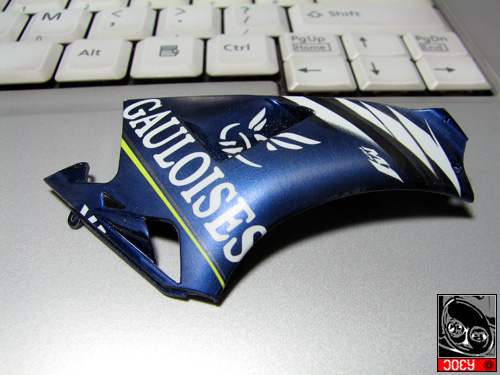 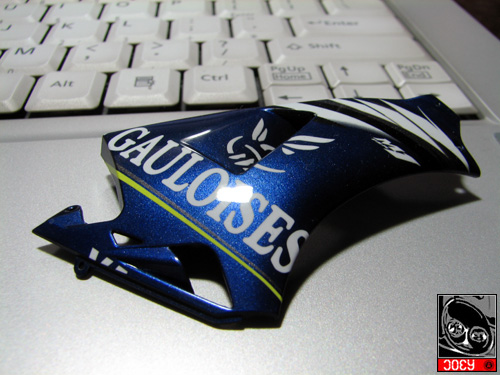 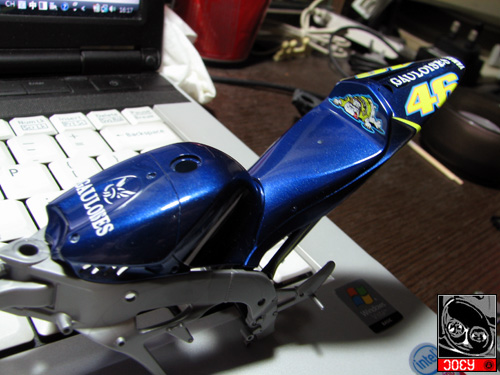  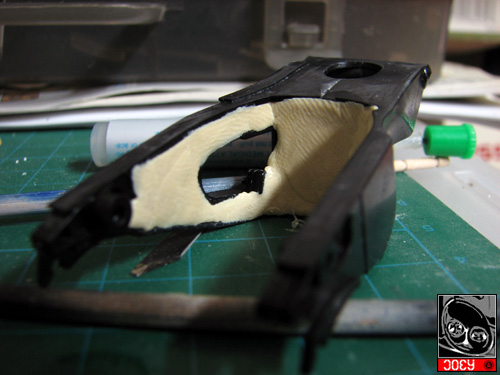 |
|

|

|
|
05-26-2009, 05:02 AM
|
#2 | |
|
AF Newbie
Join Date: Sep 2008
Location: GIBRALTAR
Posts: 35
Thanks: 0
Thanked 0 Times in 0 Posts
|
Re: Rossi in faith - M1 2005 Sepang
Nice work so far!!! In have this build in my to do stash but with out any detailed parts.
BTW excellent job on your 04 M1 it has inspired me for a future build which I will for sure use your pics for reference. Regards, Adrian |
|
|
|
|
|
05-29-2009, 02:48 PM
|
#3 | |
|
AF Enthusiast
 Join Date: Jan 2004
Location: None
Posts: 652
Thanks: 0
Thanked 1 Time in 1 Post
|
Re: Rossi in faith - M1 2005 Sepang
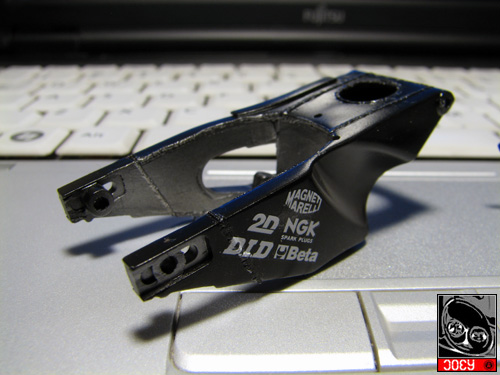
Great work ! I like the shine and the attention to detail on the rear arm to make it like the real one for the inner area.
I will keep the eye on this.. very promising, let's go to work!  Roca |
|
|
|
|
|
05-30-2009, 05:23 AM
|
#4 | |
|
AF Enthusiast
Join Date: May 2004
Location: Kalmar
Posts: 2,047
Thanks: 66
Thanked 25 Times in 25 Posts
|
Re: Rossi in faith - M1 2005 Sepang
Paintwork looks flawless. I wish I could do all the cowls before I start with the details and frame/engine. I sort of go everywhere at once...
/Joel
__________________
Visit my FB page www.facebook.com/one12th |
|
|
|
|
|
05-30-2009, 09:14 AM
|
#5 | |
|
AF Regular
Join Date: Nov 2008
Location: mother earth
Posts: 175
Thanks: 0
Thanked 0 Times in 0 Posts

|
Re: Rossi in faith - M1 2005 Sepang
is that telefonica blue youre using? its a very nice color.. too bad i never managed to succeed painting with that color... T_T
__________________
sylvia |
|
|
|
|
|
06-03-2009, 10:04 AM
|
#6 | |
|
AF Regular

Join Date: Sep 2008
Location: Jacksonville, Florida
Posts: 310
Thanks: 11
Thanked 3 Times in 3 Posts
|
Re: Rossi in faith - M1 2005 Sepang
subscribed!!!!! i followed your last build and can't wait to see how this one turns out...
Stuart |
|
|
|
|
|
06-03-2009, 02:28 PM
|
#7 | |
|
AF Regular
 
Join Date: Apr 2005
Location: Chesterfield
Posts: 141
Thanks: 0
Thanked 0 Times in 0 Posts
|
Re: Rossi in faith - M1 2005 Sepang
Bodywork looks fantastic, nice work so far
|
|
|
|
|
|
06-07-2009, 08:39 PM
|
#8 | |
|
AF Regular
Thread starter
Join Date: Jan 2004
Location: hong kong
Posts: 430
Thanks: 2
Thanked 5 Times in 3 Posts
|
Re: Rossi in faith - M1 2005 Sepang
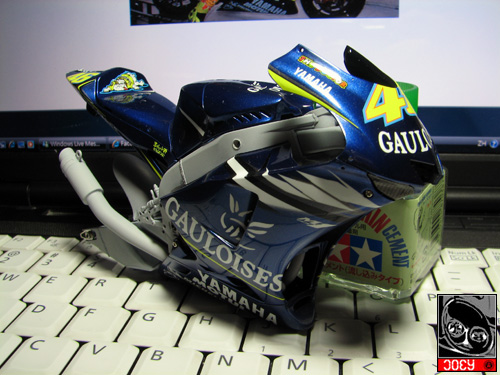
A little update from the weekend.
Since I didn't apply TS trasnkit for this kit, some new aftermarket parts are in use for details. (but i guess those metal tuned parts still cost me a lot.....LOL) 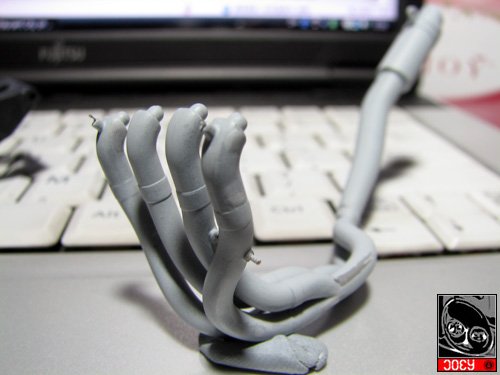 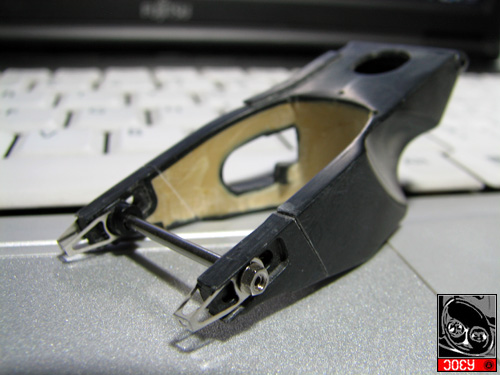 |
|
|
|
|
|
06-08-2009, 12:40 AM
|
#9 | |
|
AF Enthusiast
Join Date: Jan 2004
Location: None
Posts: 652
Thanks: 0
Thanked 1 Time in 1 Post
|
Re: Rossi in faith - M1 2005 Sepang
Nice progress!! I forgot to ask... on the body you first applied primer next colour decals and clear and then did you sanded with P2000 and applied compound? I want to use that product for my next build...
Bye!! Roca. |
|
|
|
|
|
06-08-2009, 09:24 PM
|
#10 | |
|
AF Regular
Thread starter
Join Date: Jan 2004
Location: hong kong
Posts: 430
Thanks: 2
Thanked 5 Times in 3 Posts
|
Re: Rossi in faith - M1 2005 Sepang
Thanks all brothers above and I am really glad for all your comments.
I have started picking this up recently and I really hope this can be done soon as I dare to start the 08M1 now~ HAHA~~ To Roca46: my steps are as follows: primer > sanded lightly with 2000 sand paper to smoothen the surface for paint > Gunze Gloss black as a base coat for metalic blue > metalic blue from Ricebox > a thin layer of clear coat as to seal the metalic paint before decals > decals > clear coat that is thick enough for polishment > sanded with #1500 sand paper to flaten the stepping effect from decals > sanded with #2000 sand paper for smooth surface > polishing with Modeler compound 2000 for gloss. these steps are almost identical to the rest of my recent builds. I had put an article about polishing or better say car model body processing in chinese in my web site. i have translate about half into eng in fact, but i have been too lazy to complete that..... but i guess the pics inside may still help about knowing the concept behind. hope these help~ |
|
|
|
|
|
06-09-2009, 12:39 AM
|
#11 | |
|
AF Enthusiast
Join Date: Jan 2004
Location: None
Posts: 652
Thanks: 0
Thanked 1 Time in 1 Post
|
Re: Rossi in faith - M1 2005 Sepang
Thank you Joey!
Your tip will be very useful, for sure I must put in practise on my next build, thank's! Roca. |
|
|
|
|
|
06-09-2009, 08:44 PM
|
#12 | |
|
AF Regular
Thread starter
Join Date: Jan 2004
Location: hong kong
Posts: 430
Thanks: 2
Thanked 5 Times in 3 Posts
|
Re: Rossi in faith - M1 2005 Sepang
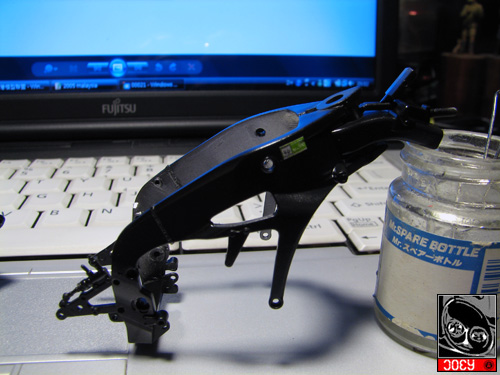
Added the weildings on the swing arms. And then I got the whole thing primed.
I am just about to accept the result. I may have to round a bit those weildings to make it softer and be more natural........ 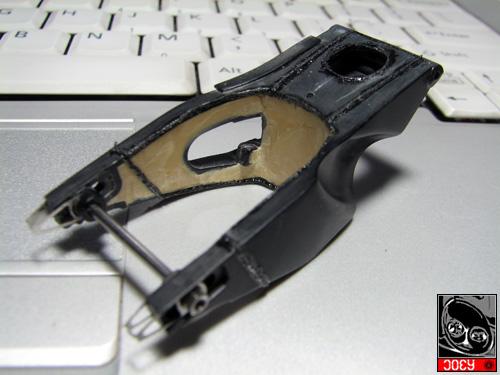 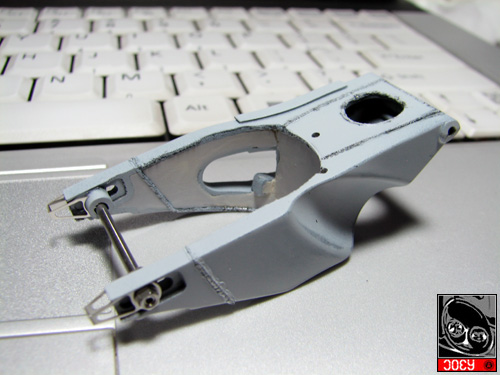 Coming next will be the main frame. I am not going to fill the insside with putty as I found it hard to be smoothened with those junctions and joints. As I probably will not open up the fairings after it is finished, I would prefer to save those sweating..... 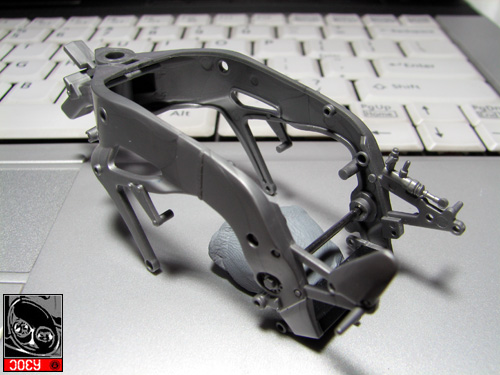 |
|
|
|
|
|
06-14-2009, 08:14 PM
|
#13 | |
|
AF Regular
Thread starter
Join Date: Jan 2004
Location: hong kong
Posts: 430
Thanks: 2
Thanked 5 Times in 3 Posts
|
Re: Rossi in faith - M1 2005 Sepang
Some more update over the weekend. The main chassis is touched up and was painted together with the swing arms. Some decals are applied over it and to be coated with a little flat clear coating (hope to give a semi-glossy effect this time than just a matt layout)
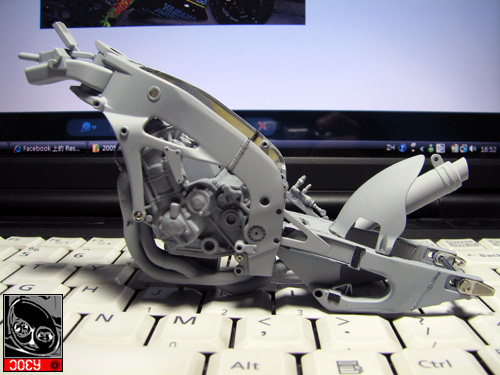    And I started to paint the engine and exhausts as well. I used SM07 on this. Many people have asked about what chrome to use on these kind of exhaust. In my own thought, since Alcad #107 can easily been tuned down by paints on top of it, I really don't think it is a good option for bike's exhausts even its chrome is superb. And since I will be doing some more work on top of the silvery, I am using Gunze SM paint to make sure the paint stick with the ground and not being tuned down by the clear colors that I am going to put on it. 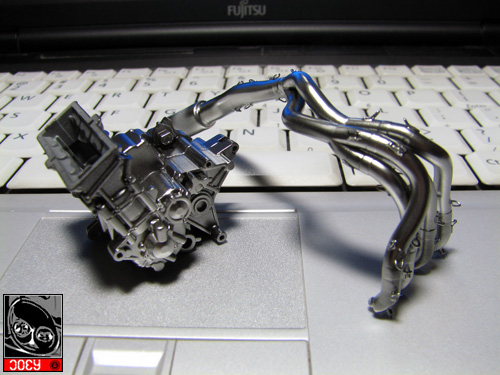 |
|
|
|
|
|
06-15-2009, 12:30 AM
|
#14 | |
|
AF Enthusiast
Join Date: Jan 2004
Location: None
Posts: 652
Thanks: 0
Thanked 1 Time in 1 Post
|
Re: Rossi in faith - M1 2005 Sepang
Great job!
I can see that you finally filled the inside of the frame with putty... well done  . Fantastic work on the welds! . Fantastic work on the welds!Roca. |
|
|
|
|
|
06-15-2009, 01:28 AM
|
#15 | ||
|
AF Regular
Thread starter
Join Date: Jan 2004
Location: hong kong
Posts: 430
Thanks: 2
Thanked 5 Times in 3 Posts
|
Re: Rossi in faith - M1 2005 Sepang
Quote:
But I didn't really do it so well as I have clued the parts together before, so the sanding job is much more difficult and I didn't do it completely at all.... But afterall those were not so visible and I think this taught me another lesson anyway.  |
||
|
|
|
|
|
POST REPLY TO THIS THREAD |
 |
|
|