|
|
|

|
|
| Search | Car Forums | Gallery | Articles | Helper | AF 350Z | IgorSushko.com | Corporate |
|
| Latest | 0 Rplys |
|
|||||||
| WIP - Street Post topics for any "Works In Progress" street vehicles projects in this sub-forum. |
 |
 Show Printable Version | Show Printable Version |  Email this Page | Email this Page |  Subscribe to this Thread
|
|
|
Thread Tools |
 07-07-2012, 06:56 AM
|
#1 | |
|
AF Regular

Join Date: Mar 2012
Location: Sydney
Posts: 139
Thanks: 11
Thanked 10 Times in 10 Posts
|
Ferrari 288GTO Revell + Fujimi 2 in one 1/24
Sorry I've been away from here so long... I was just concentrating on this project.
    *Body, chassis & dash board: Revell *Engine, interior, inside the front bonnet, wheels and tires: Fujimi I'll mention the steps one by one from the beginning soon. See you later...  Last edited by Umihito; 07-07-2012 at 10:04 AM. |
|

|

|
|
07-07-2012, 10:13 AM
|
#2 | |
|
AF Regular
Thread starter
Join Date: Mar 2012
Location: Sydney
Posts: 139
Thanks: 11
Thanked 10 Times in 10 Posts
|
Re: Ferrari 288GTO Revell + Fujimi 2 in one 1/24
I made Fujimi's 288GTO already, but I thought I would be able to gain more on my favorite Ferrari.
*I've chosen Revell's body and chassis. Overall, I prefer the lines of it than Fujimis. Ms. Fujimi is too fat... Pros and cons on Revell's.It's only my point of view. <Pros> *Good shape on rear and side section *Atmosphere overall is good (Less emphasis) <Cons> *Face doesn't look similar (Too right-angled edges on Light covers, bonnet. They are also too close to the front edges.) *Rounded edges on front and back on doors OK, I'll sort those cons out! Face Before ... I nearly throw this kit away because of this appearance. Look at these shape of edges of light lids and bonnet. 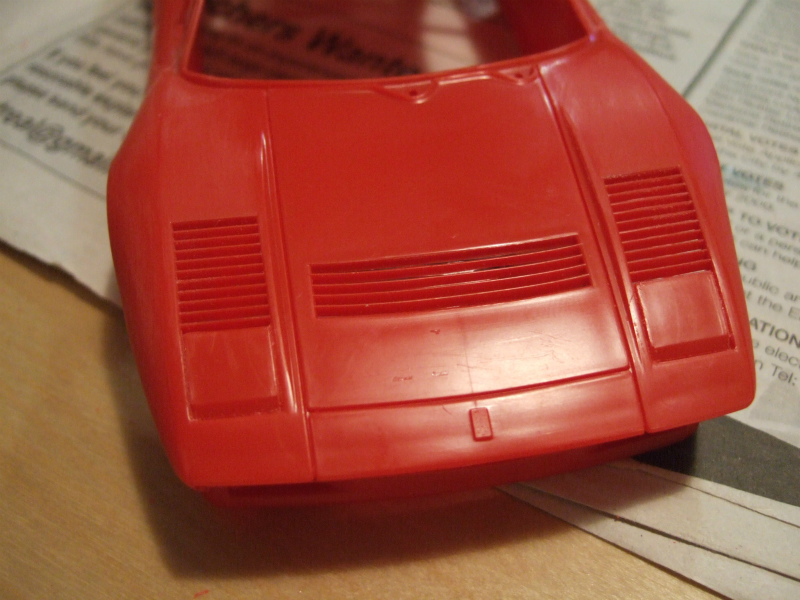 Compare with the real one. I also have to think about louvers. I don't actually like to make louvers from scratch,, but only to 288GTO... 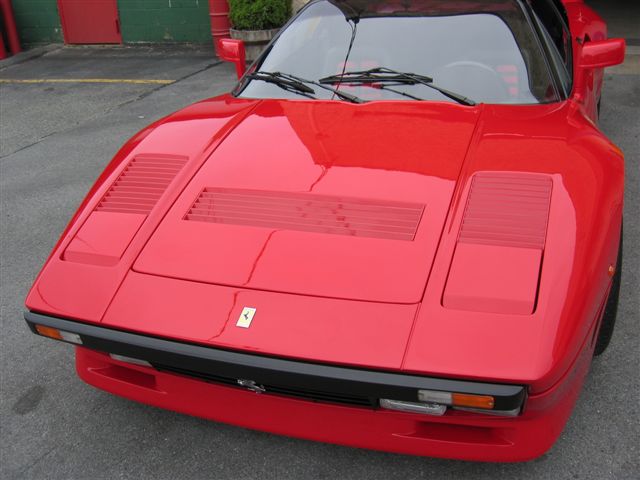 I cut all those away and applied 0.3mm plastic papers. 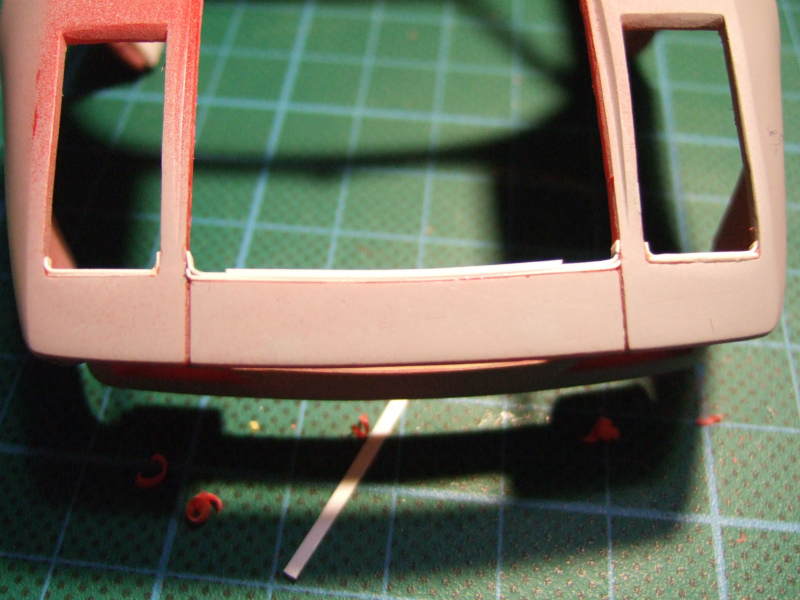 And filled the putty... 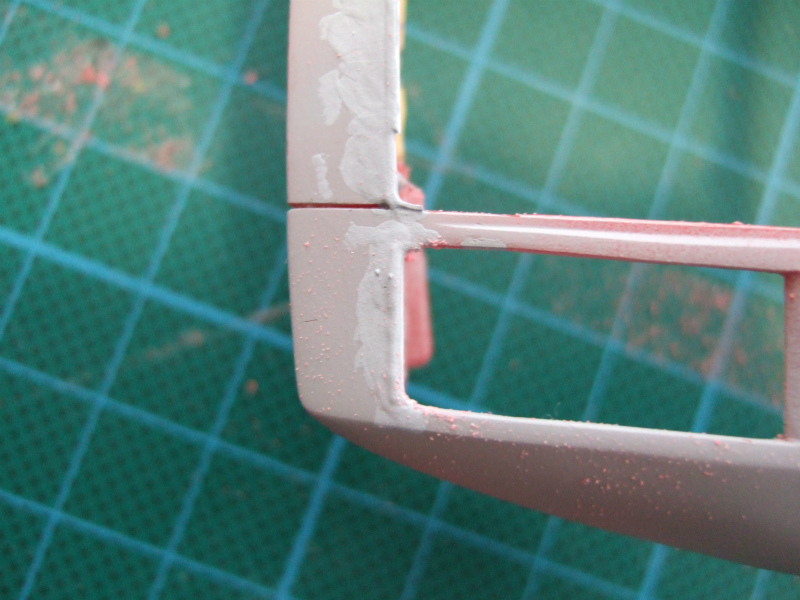 Then sanded. OK, I feel much better now!!  Oops.. ... I was too bad to apply holes... (These following photos are before the works on light covers and bonnet) 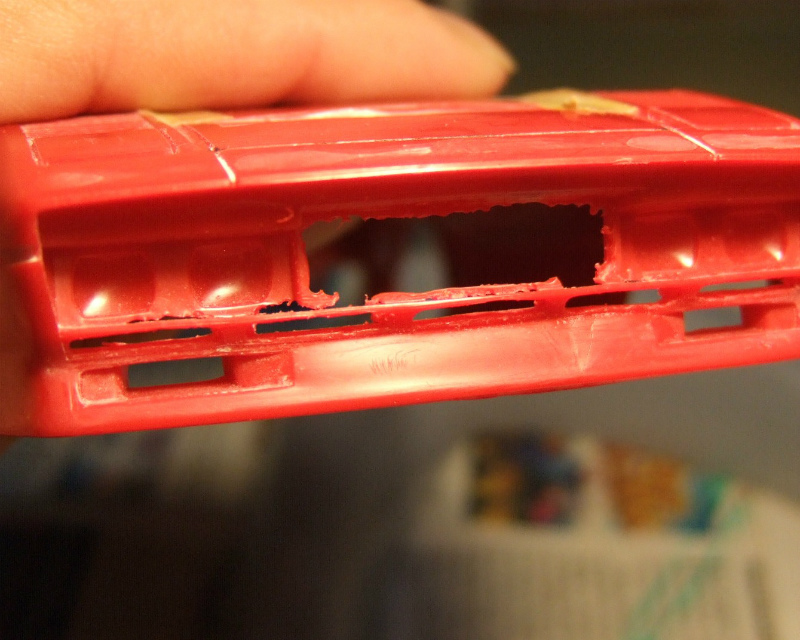 I have to sort my terrible works out...  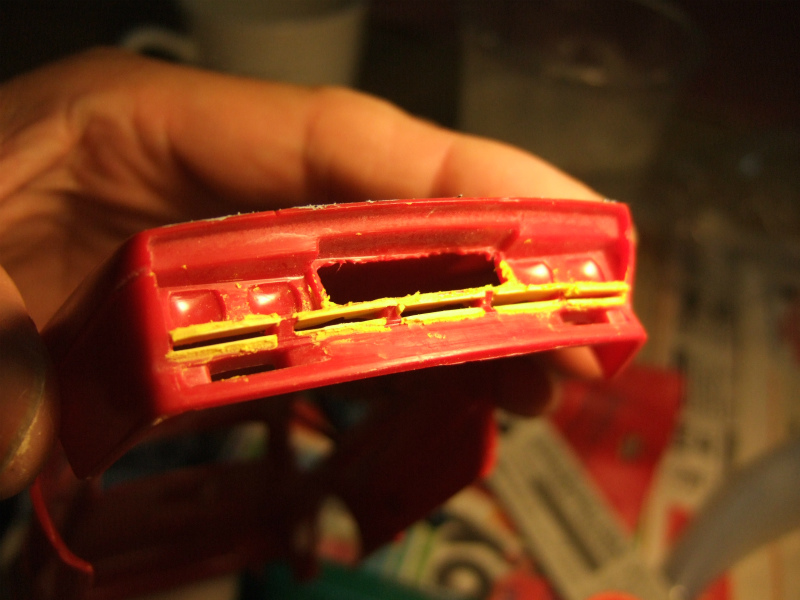 Putty was applied. Then sand up... yes, acceptable. Don't pursue the perfect. 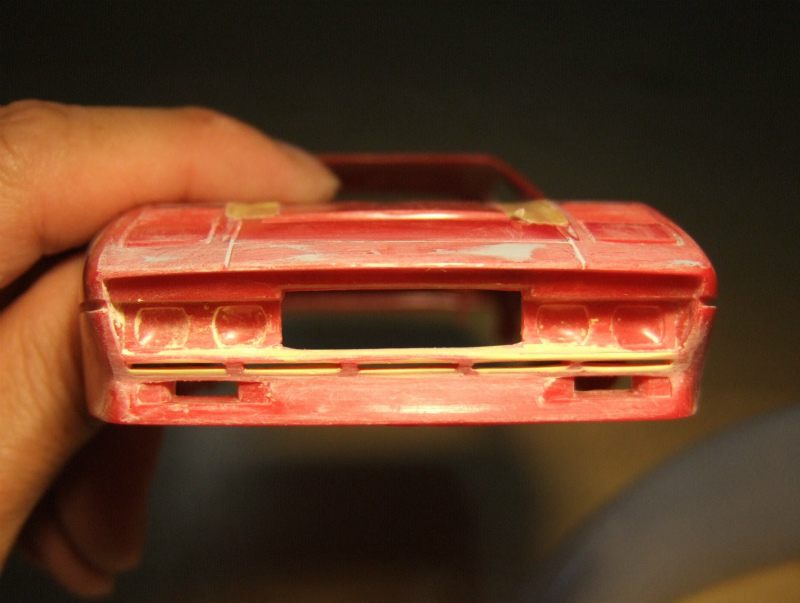 I felt those driving light lenses are too big. To apply Fujimi's lenses, I put plastic board on the area and made the area smaller .  Rounded edges on front and back on doors Before: 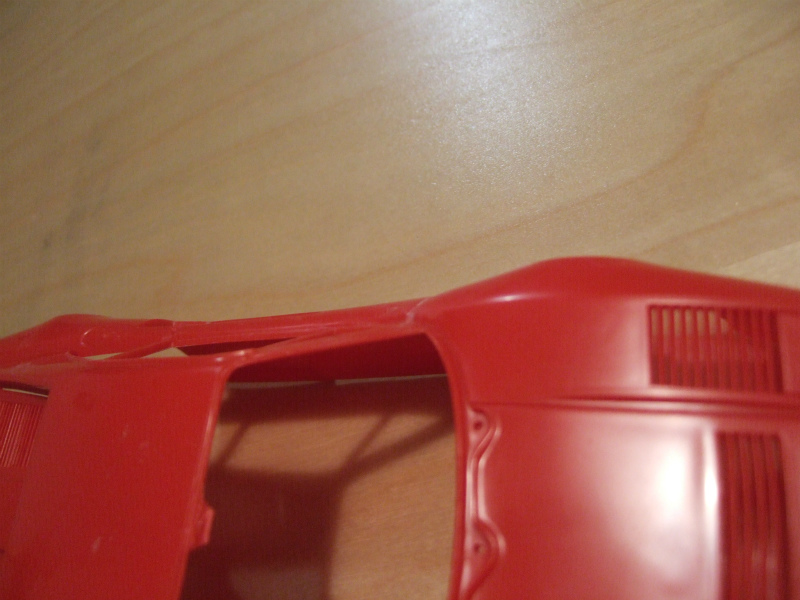 After: 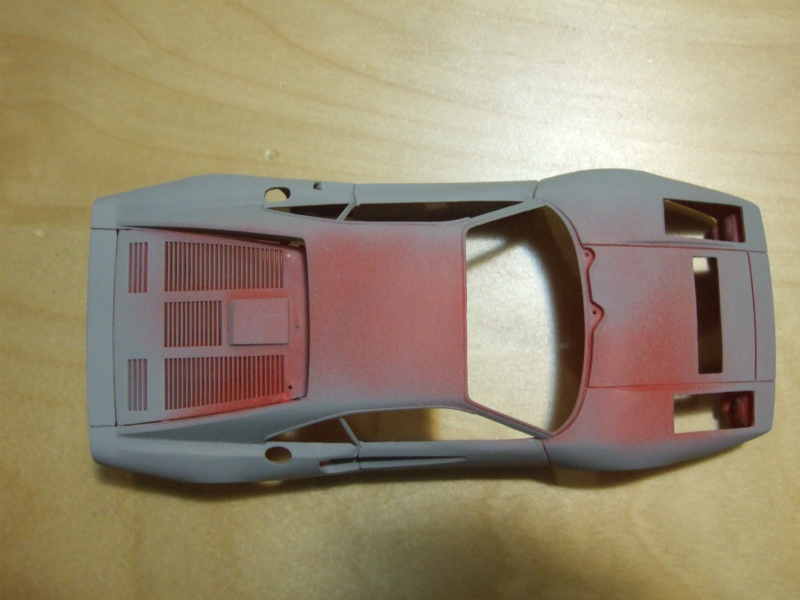 (This photo is before the changing the shape of bonnet and light lids.) The doors were sanded up to make straight line from front to back. Can't see the deference...? The loubers on front section was also removed. To check the deference, I spray the surfacer from time to time. That's all for today. Thanks for visiting! |
|
|
|
|
|
07-08-2012, 06:27 AM
|
#3 | |
|
AF Regular
Thread starter
Join Date: Mar 2012
Location: Sydney
Posts: 139
Thanks: 11
Thanked 10 Times in 10 Posts
|
Re: Ferrari 288GTO Revell + Fujimi 2 in one 1/24
Quick post...
Edge up and gathering the body-color parts. 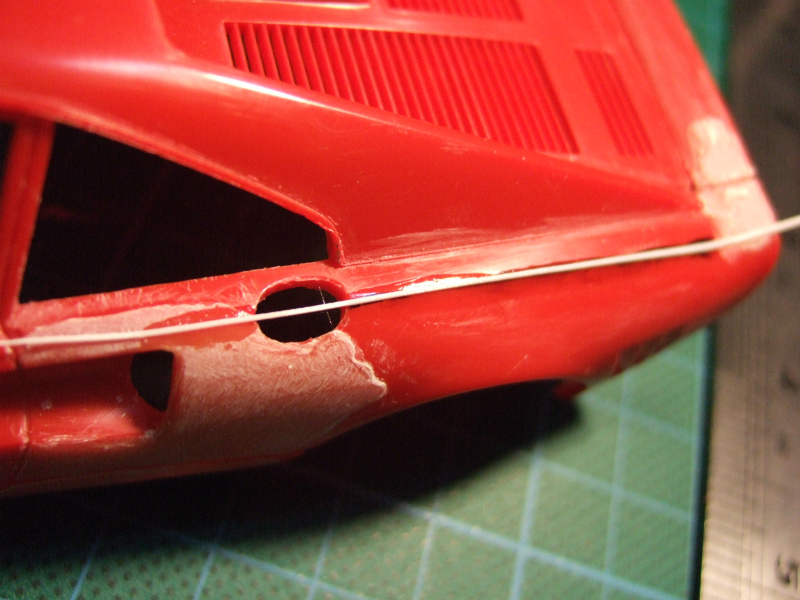  To edge-up, I put plastic strings and put the putty on, then sand up.  Some volume-ups on fenders. Yellow putty is Tamiya's epoxy, gray ones are normal putty. The ones which have the transparency are Tamiya's Light-curing putty, but I didn't like it. Because it's edges are easy to come off even if I sand the body before applying. In my point of view, I recommend epoxy and normal putty for these works..  Rear bumpers have to be removed, 'cause I don't like masking on this bumpy surface.   The gaps are filled and glued with plastic papers. 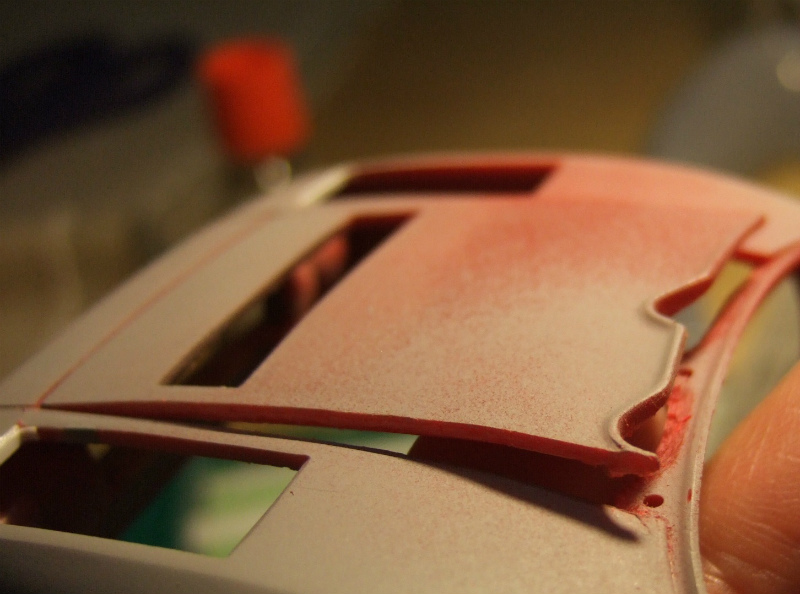 As mentioned already, front bonnet was removed. What a thick plastic body! Though this thickness strengthen the body. Yes, I like Revell's.  I think I'm too picky, but last section of front fender has to be this shape (I cut off the edge).  'cause I don't like the gaps on body, I cut this last section of chassis off.  Then glued to the body. Gaps are filled with putty (then sand up).  This interior part is from Revell's. I cut the rear window section off.  Then attached and glued to the body. I attached plastic papers from the back side of the body as supports. This was a bit tough work and has to be treated very carefully not to be taken off throughout the paint works, but I prefer "no gaps and no uneven body color  ". ".Oh, doors and lids (fuel and oil) were removed already. That's it for today..! Thanks for looking. Let's have a good sleep for happy Monday. 
__________________
Umihito We can learn from mistakes. 
Last edited by Umihito; 07-08-2012 at 06:45 AM. Reason: My wrong grammer, sorry...!! |
|
|
|
|
|
07-08-2012, 04:33 PM
|
#4 | |
|
AF Regular

Join Date: Jan 2006
Location: Zeewolde ( netherlands )
Posts: 182
Thanks: 1
Thanked 2 Times in 2 Posts
|
Re: Ferrari 288GTO Revell + Fujimi 2 in one 1/24
You must have a great hart to get a Revell GTO ( in the Netherlands we call revell: rehell
 ). ).I've build both the fujimi and the rehell kit. The fujimi was better on every part in scale, the rehell kit is to wide on the rear and to small on the front  . .They took the front of the 308, or it looks like they did. my opinion is that this is one of the most beautiful ferrari's ever build.
__________________

|
|
|
|
|
|
07-09-2012, 07:46 AM
|
#5 | ||
|
AF Regular
Thread starter
Join Date: Mar 2012
Location: Sydney
Posts: 139
Thanks: 11
Thanked 10 Times in 10 Posts
|
Re: Ferrari 288GTO Revell + Fujimi 2 in one 1/24
Quote:
I know Fujimi 288GTO is very good kit (I was actually thinking Fujimi's was better and I've completed it), but many Japanese modelers are thinking Revell 288GTO has better looking (Once again, Fujimi did excellent work, Fujimi's parts such as engine are sharper, I admit). Please look at these pictures and comments . (These are just my opinion ) ) Looking this real picture above, I can find it doesn't have so wide section as I thought. ....And, this is Fujimi's 288GTO I made. Even I did lots of modifying on body, still too fat and the front section is too big, in my opinion. It is beyond the deformation.  Another picture of real one. 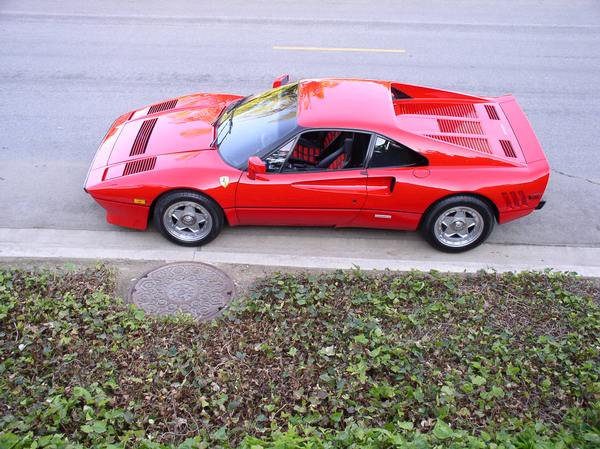 And, Revell's body from almost the same angle.  Over there is Fujimi's GTO I was making (Don't think I was widening the Fujimi's body, looking the putty applied. That was only because I widened the wheel arches so the width on each fenders went narrower). I believe you can find the Revell's body has more accuracy overall (of course not perfect, though). I also found good sample of Revell's completed work (From http://blogs.yahoo.co.jp/renaisssance90/60554683.html ; sorry, this is written in Japanese but you can see the pictures). 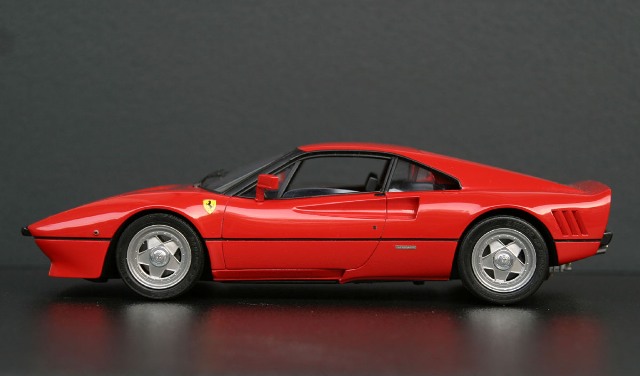 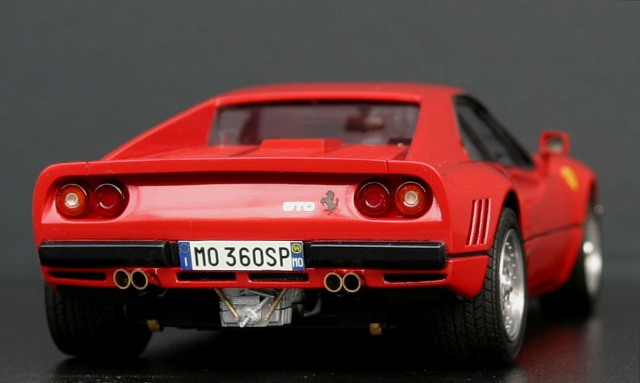 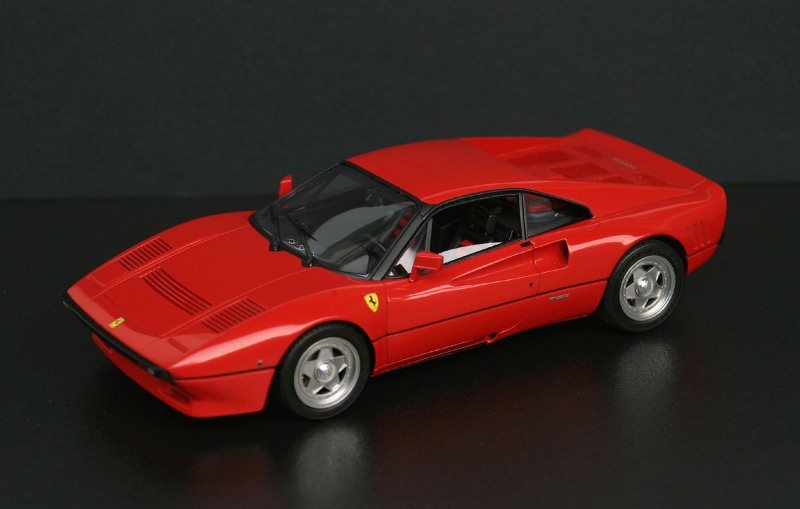 Tires and wheels are from Fujimi, but most of the parts are from Revell. I think this is one of the best 288GTO kit ever made. ....These are why I decided to use Revell's body and chassis with some (many) mods. Soo far I am happy with my decision. (Though I did lots of mods. I'll mention them one by one)  I just want to have MY BEST 288GTO, because I love it!  Wow, I wrote too much... But I was thinking someday I want to mention why I chose the Revell's body once again  . .Have a good night! (Oops, in Netherlands is it Morning now?? )See you again and happy modeling!!
__________________
Umihito We can learn from mistakes.
|
||
|
|
|
| The Following User Says Thank You to Umihito For This Useful Post: |
eugene78 (07-09-2012)
|
|
07-09-2012, 02:00 PM
|
#6 | |
|
Blarg! Wort Wort Wort!
Join Date: Mar 2006
Location: Quezon City
Posts: 2,120
Thanks: 64
Thanked 101 Times in 100 Posts
|
Re: Ferrari 288GTO Revell + Fujimi 2 in one 1/24
nice to see another great work from you. the attention to detail is great!
__________________
olly olly oxen free |
|
|
|
|
|
07-10-2012, 05:41 AM
|
#7 | ||
|
AF Regular
Thread starter
Join Date: Mar 2012
Location: Sydney
Posts: 139
Thanks: 11
Thanked 10 Times in 10 Posts
|
Quote:
I really appreciate your comment I'll let you know (through AF) about the progress. I myself is looking forward to seeing the result!!And, eugene78 , thanks to your "Thanks" . I really like your clean finish such as http://www.automotiveforums.com/vbul...d.php?t=952033, http://www.automotiveforums.com/vbul...d.php?t=974123, http://www.automotiveforums.com/vbul....php?t=1061771. It's good to see your very neat, tidy finish!!
__________________
Umihito We can learn from mistakes.
|
||
|
|
|
|
07-10-2012, 07:08 AM
|
#8 | |
|
AF Regular
Thread starter
Join Date: Mar 2012
Location: Sydney
Posts: 139
Thanks: 11
Thanked 10 Times in 10 Posts
|
Re: Ferrari 288GTO Revell + Fujimi 2 in one 1/24
Wooow... I am exhausted working hard...
 but I'll post just quickly!!! Yet sleepy ...zzzz but I'll post just quickly!!! Yet sleepy ...zzzz One door was separated. Mmmm, thick body. But it means strong enough!  Holes are applied as you can see... (Section under radiator). After this picture, front suspension's section was discarded and replaced to Fujimi's because I want the front wheels steerable.  Left one is Fujimi's chassis, and right one is Revell's. I never know how the real one looks, but I thought Revell's could be more real. Could be a though work, but I decided to incorporate most of Fujimi's parts; engine, front suspension and so on, to Revell's chassis. Yet it is easy to fit the prompt chassis to Revell's body, it shows the great fit!! Thanks, Revell!!  Are you ready to be cut..?  Ready or not, I've cut this section to fit Fujimi's suspension unit in.  Once I set the circular saw on the rotary tool, I become a cutting addicted. I believe the same things may sometimes happen to you too. But I think my decisions were right.  Black interior tub is from Revell, gray parts are from Fujimi. Of course there were lots of cuts and pastes.  To make the lid removable so that I can see the engine from cockpit.... 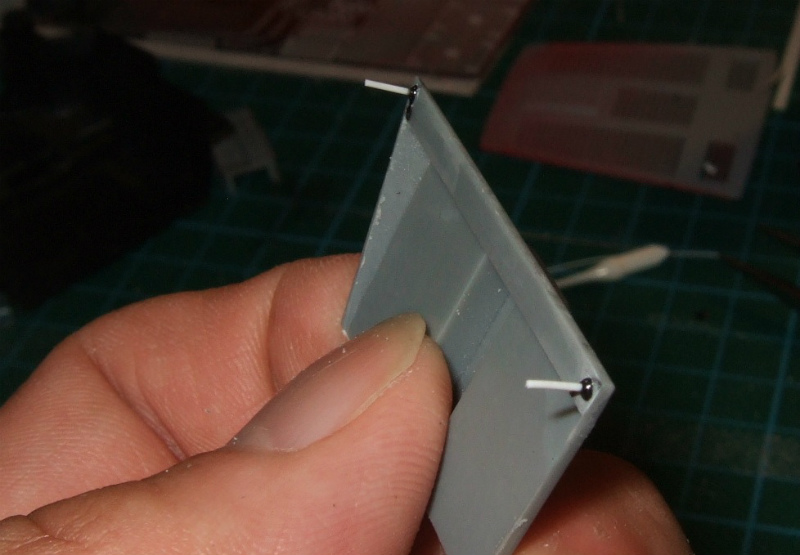 Mmmm.... I am noww soooo sleeeepy and my fingeeers areeee not leavingg frooom thhe keysss..... Alloww meeee to sleeeep...... See you sooon
__________________
Umihito We can learn from mistakes.
Last edited by Umihito; 07-10-2012 at 10:07 AM. Reason: Again my wrong grammar, sorry.... |
|
|
|
|
|
07-11-2012, 05:55 AM
|
#9 | |
|
AF Regular
Thread starter
Join Date: Mar 2012
Location: Sydney
Posts: 139
Thanks: 11
Thanked 10 Times in 10 Posts
|
Re: Ferrari 288GTO Revell + Fujimi 2 in one 1/24
I feel better today...
Thanks, my co-workers for helping a lot!!Let's start posting for today..!!  The shape of air intake is one of the weakest point of Revell's body. I have to do something here...  Firstly, I edged up..  Then I tried to cast inside with epoxy putty with the silicone tip (curved; following picture)  The result is...  Terrible.   After all, I need to fill normal putty and sand up inside. This is the picture on the way. I didn't actually need the silicone tip, I think. If I try the same kind of work next time, I will just fill up with the normal putty and make a hole with the rotary tool, then sand up. By the way, before I saw this picture I hadn't thought I could sand up such a tiny tiny place as the air intake.  (from http://modelers-press.main.jp/?p=4976#more-4976 ) Sand paper is applied on the tip of toothpick with double-sided adhesive tape. But I myself set the sand paper with CA glue, because with double-sided adhesive tape, it was very easy to come off.  This is the result so far (still some "KAIZEN"; improvement needed) Oops, I didn't say anything about side-skirt (how do you call this part?)  I cut this off because this was just about to come off when I was cutting out the door.  I thought it was good to edge-up this intake under door.  Then, plastic paper was glued from the back.  The plastic paper is the rim under the body. Rear section of the paper was cut after this photo.  Another plastic paper was applied on the edge of.... what can I call this part?? just before the front window. Lots of works are still remained.... That's all for today, thanks for looking!!
__________________
Umihito We can learn from mistakes.
|
|
|
|
|
|
07-11-2012, 09:25 AM
|
#10 | |
|
ItaloSvensk

Join Date: Mar 2009
Location: Marstrand
Posts: 3,383
Thanks: 1,077
Thanked 296 Times in 270 Posts
|
Re: Ferrari 288GTO Revell + Fujimi 2 in one 1/24
incredible work.
very nice, keep on posting !
__________________
Paolo - LoveGT40 Modelworks website www.alsoldatino.com my YT channel : https://www.youtube.com/channel/UCIp..._as=subscriber FB: https://www.facebook.com/alsoldatino |
|
|
|
|
|
07-12-2012, 02:48 AM
|
#11 | |
|
AF Newbie
Join Date: May 2009
Location: Hong Kong
Posts: 2
Thanks: 0
Thanked 0 Times in 0 Posts
|
Re: Ferrari 288GTO Revell + Fujimi 2 in one 1/24
A very strong modifications..
Waiting for update. ^^ |
|
|
|
|
|
07-12-2012, 03:55 AM
|
#12 | |||
|
AF Regular
Thread starter
Join Date: Mar 2012
Location: Sydney
Posts: 139
Thanks: 11
Thanked 10 Times in 10 Posts
|
Re: Ferrari 288GTO Revell + Fujimi 2 in one 1/24
Quote:
! Quote:
(and keep building my GTO. ...Now I'm sort of too much concentrating to post, not to built it ) )
__________________
Umihito We can learn from mistakes.
|
|||
|
|
|
|
07-12-2012, 07:00 AM
|
#13 | |
|
AF Regular
Thread starter
Join Date: Mar 2012
Location: Sydney
Posts: 139
Thanks: 11
Thanked 10 Times in 10 Posts
|
Re: Ferrari 288GTO Revell + Fujimi 2 in one 1/24
OK, I'll start posting for today
 I use a special gadget to connect the body and chassis. This is essential if I make a full-open (door open) model to place them exactly the same position every time. This is the special gadget.  Miniature connector. I think you can find several type of connector in PC shops. *Mr. Koji Kappa (famous Japanese modeler: http://www.cims.jp/sun/kappakoji/index.html ) told and gave these to me, many many thanks!!!! Also look at this stunning, astonishing work of him !! http://kappakoji.untokosho.com/gallery_Miura.htm   Now back to my work.  I fixed them with CA glue and putty never to come off. Wow, body's back side is so ugly... I'll fix it with rotary tools after a while. Now starting the jobs on chassis.  I am going to make the engine section detachable. Holes are applied on the chassis, engine flame are extended forward to fit in the holes. And the connector are applied as following...   (On this picture, the connector was applied on right hole. )   The engine stands are cut from Fujimi's chassis. Holes are applied as the real cars have them.  Then glued to Revell's flame.  To fit Fujimi's engine horizontally, applied plastic boards.  I feel it's a perfect fit! It's position seems good. Cool!  By the way, the real works just in this post took about 4-5 hours or more... Now I'm getting used to taking time to pursue the reality. For this project, I'm going to forget about the time. That's all for today, thanks for looking Other body works come next...
__________________
Umihito We can learn from mistakes.
|
|
|
|
|
|
07-12-2012, 10:08 AM
|
#14 | |
|
Blarg! Wort Wort Wort!
Join Date: Mar 2006
Location: Quezon City
Posts: 2,120
Thanks: 64
Thanked 101 Times in 100 Posts
|
Re: Ferrari 288GTO Revell + Fujimi 2 in one 1/24
using the connectors is a neat trick. fortunately i have a stash of those from one of my classes, will try to use them the next build.
your build's definitely moving along nicely
__________________
olly olly oxen free |
|
|
|
|
|
07-14-2012, 07:35 AM
|
#15 | |
|
AF Regular
Thread starter
Join Date: Mar 2012
Location: Sydney
Posts: 139
Thanks: 11
Thanked 10 Times in 10 Posts
|
Re: Ferrari 288GTO Revell + Fujimi 2 in one 1/24
Sorry I didn't post yesterday.... it was Friday night.
Today's will be a bit longer because I took day off for posting yesterday. I want to express this; the hollow of the body for emblem.   I placed the PE emblem, then traced around by scraper.   Traced, traced and traced, then scraped inside by the rotary tool.  Considering the thickness of paint, the hollow was made a bit larger than the emblem. The PE emblem was from MUSEUM COLLECTION, but I think many manufactures are making the same kinds.   And the front fender's lower part was reshaped as shown above... sorry, I didn't take the "before" picture. "Before" was too narrow on the bottom.   I filled the gaps between the body and the interior with plastic boards.  Then applied another board and reshaped.  OK, the the door fits in proper position. 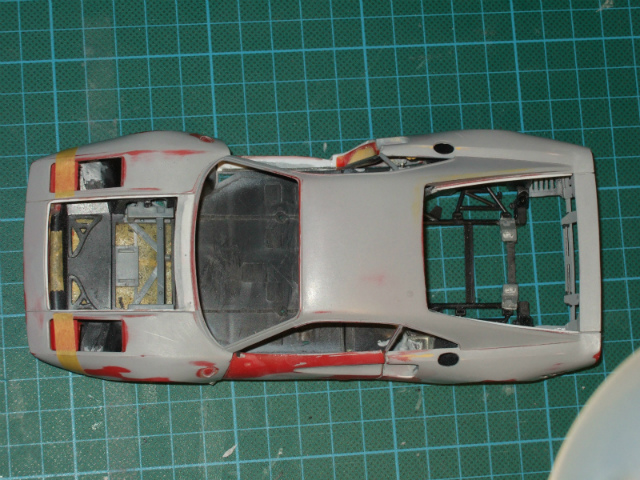 I am happy with the straight line of the door as well.  The light covers are from Fujimi. The widths were narrowed and fitted.  I was afraid of this troublesome work... but I started on the door movable sections. This base part was cut and sanded out from a runner.  I made 2 types pf base, one has long hands and another has short hands to see how the door moves smoothly without hitting the body. In this case I chose the left one.  This picture shows how it works. The blue cord is just a temporary one, later on it'll be replaced to the brass rods.  The base was glued to the body.  The brass rods are removable so that I can take doors off when needed.  Hmmmm, it's cool!! ...But I think this is better solution. From http://www.geocities.jp/factory_chik...y_2012_02.html . He uses 0.5mm brass rods and plastic boards. I found this much later than I finished the work on doors.   This is much easier and could lead better result, I believe. Now move to engine hood. I decided to use Fujimi's engine hood, because I want to use PE louvers in the kit. The louvers' part didn't fit to Revell's (I tried and tried to fit the PE part to the Revell's without succeeding).  This is the PE louvers. It took a few hours to make them the same angles using the design knife.In the instruction Fujimi says it's 90 degree, but I think it'll be 45 degree.  Making the PE louvers 45 degrees, I had to thin up the hood part so that the tops of louvers come to the right place.  Since Fujimi's hood is shorter than the Revell's, I have to lengthen it.  I have not suffered in vain. The result is good!!!  I thought I have to edge up this line. I use masking tapes and sand up beside it.   For the louvers on front fenders, I used 0.3mm plastic papers. Firstly I fixed the side ribs and marked 11 dots to fit the louvers (real GTO has 11 louvers) . I put the middle dot firstly, then other dots by freehand.   It went bumpy when I did this work in the evening. So I discard them all once and retried in the afternoon in the sun. We need sunshine, indeed.  Front bonnet. The curve for wipers are too wide, I realized. I applied 0.3mm plastic paper from the back then filled putty to narrow them.  The louvers. The same process as front fender's. But to make them a bit curvy, the width of louvers are just a bit wider than the bonnet's.  I am happy with the result.  Body works last so long... seeing this thread it seems like I didn't take time so much, but until this page I took more than 2 month since starting. Especially "putty and sand again and again" takes time... This is the first time to pursue the reality so deeply. But I believe this experiences improve me to do the same thing faster next time. That all for today! Have a nice weekend
__________________
Umihito We can learn from mistakes.
|
|
|
|
|
| ||||||||||||||||||||||||||||||||||||||
|
POST REPLY TO THIS THREAD |
 |
|
|


