|
|
|

|
|
| Search | Car Forums | Gallery | Articles | Helper | AF 350Z | IgorSushko.com | Corporate |
|
| Latest | 0 Rplys |
|
|||||||
| Car Modeling Share your passion for car modeling here! Includes sub-forum for "in progress" and "completed" vehicles. |
 |
 Show Printable Version | Show Printable Version |  Email this Page | Email this Page |  Subscribe to this Thread
|
|
|
Thread Tools |
 09-18-2002, 12:19 PM
|
#1 | |
|
AF Regular

Join Date: Mar 2002
Posts: 63
Thanks: 0
Thanked 0 Times in 0 Posts

|
***Integra's just came in***
here's the pics
  i already started   im having buncha problems cutting the hood  ...i just don't want to mess up other parts...any suggestions? and how would i put it back if it has no support once i cut the hood? glue it to what?thanx. ...i just don't want to mess up other parts...any suggestions? and how would i put it back if it has no support once i cut the hood? glue it to what?thanx.
__________________
.:*Current Projects*:.My First Time !!!!  "God Needed An Angel"1979-2001 Aaliyah you will be dearly missed.R.I.P....Babygurl.../.\ |
|

|

|
|
09-18-2002, 12:23 PM
|
#2 | |
|
AF Regular
Thread starter
Join Date: Mar 2002
Posts: 63
Thanks: 0
Thanked 0 Times in 0 Posts
|
..........
hmm where are the pic's
 ...i did upload them ...i did upload them mods u have any idea whats goin on?
__________________
.:*Current Projects*:.My First Time !!!!"God Needed An Angel"1979-2001 Aaliyah you will be dearly missed.R.I.P....Babygurl.../.\ |
|
|
|
|
|
09-18-2002, 12:39 PM
|
#3 | |
|
AF Regular
Thread starter
Join Date: Mar 2002
Posts: 63
Thanks: 0
Thanked 0 Times in 0 Posts
|
i guees im gonna have to do the old fashion way
__________________
.:*Current Projects*:.My First Time !!!!"God Needed An Angel"1979-2001 Aaliyah you will be dearly missed.R.I.P....Babygurl.../.\ |
|
|
|
|
|
09-18-2002, 12:44 PM
|
#4 | |
|
AF Regular
Thread starter
Join Date: Mar 2002
Posts: 63
Thanks: 0
Thanked 0 Times in 0 Posts
|
in progress
__________________
.:*Current Projects*:.My First Time !!!!"God Needed An Angel"1979-2001 Aaliyah you will be dearly missed.R.I.P....Babygurl.../.\ |
|
|
|
|
|
09-18-2002, 01:00 PM
|
#5 | |
|
AF Regular
Thread starter
Join Date: Mar 2002
Posts: 63
Thanks: 0
Thanked 0 Times in 0 Posts
|
another 1
mods thanx for the BIG help :/
__________________
.:*Current Projects*:.My First Time !!!!"God Needed An Angel"1979-2001 Aaliyah you will be dearly missed.R.I.P....Babygurl.../.\ |
|
|
|
|
|
09-18-2002, 02:00 PM
|
#6 | ||
|
Horizontally Opposed
 Join Date: Mar 2001
Location: Las Vegas, Nevada
Posts: 16,856
Thanks: 0
Thanked 11 Times in 9 Posts

|
What are you using to cut it with?
Quote:
|
||
|
|
|
|
09-18-2002, 02:06 PM
|
#7 | |
|
AF Enthusiast

Join Date: Sep 2002
Posts: 1,473
Thanks: 1
Thanked 25 Times in 23 Posts
|
To cut doors hoods and trunks one of the best ways is to take the X-acto
knife around backwards and cut with the back side of the point of blade. It takes allot of repeated passes but it takes the least amount of plastic. When it is cutting right you will see a curl of plastic coming out just like you see with a good wood chisel. After cutting out the hood add some plastic strip on the bottom edge of hood opening and create a lip to catch the hood(after all real cars have one.) |
|
|
|
|
|
09-18-2002, 02:30 PM
|
#8 | |
|
AF Regular
Thread starter
Join Date: Mar 2002
Posts: 63
Thanks: 0
Thanked 0 Times in 0 Posts
|
*935k3* i appreaciate ur help
 but this cutting process is very complicated(well..for me that is) see where front lights located is extremely close to the hood...that mesess me up "Hey, I tried editing your post to find the pics, but I'm not a magician..."-Jay@af im sorry Jay i was mad frustrated when pic's didn't show up...u kno that feeling 
__________________
.:*Current Projects*:.My First Time !!!!"God Needed An Angel"1979-2001 Aaliyah you will be dearly missed.R.I.P....Babygurl.../.\ |
|
|
|
|
|
09-18-2002, 02:30 PM
|
#9 | |
|
AF Enthusiast

Join Date: Jul 2002
Location: New York, New York
Posts: 400
Thanks: 0
Thanked 0 Times in 0 Posts
|
not sure what you want to know, but here is the problem when building a fujimi.
I think the hardest part to cut is the hood and headlight joint area. You really need alot of time to cut when you don't want to damage the head light BADLY(no matter how you cut you still cut out some of the light). If you want the fast way, cut the headlight roughly and use putty to rebuild the headlight area because fujimi make a crap out of their model car headlight that make you really want to redo them. I HATE YOU,FUJIMI, BUT I'M STILL BUYING YOUR MODEL BECAUSE YOU MADE ALOT OF CAR!!!  |
|
|
|
|
|
09-18-2002, 02:51 PM
|
#10 | |
|
AF Enthusiast
 
Join Date: Aug 2002
Location: Southampton
Posts: 792
Thanks: 0
Thanked 0 Times in 0 Posts
|
I use a dental probe to depen the lines, and give me a better chance with the back of a blade, but I found the two best tricks are to use masking tape to protect delicate areas, and to not press to hard. It takes ages, and strains my patience... but it's worth it!
__________________
My current work-  
|
|
|
|
|
|
09-18-2002, 02:55 PM
|
#11 | |
|
Ferrari Guy
 
Join Date: Jun 2001
Location: nowhere
Posts: 3,404
Thanks: 0
Thanked 0 Times in 0 Posts
|
Also tried to edit the post and see what was wrong, but i couldn't see anything that was wrong with the IMG code. then i tried to copy and paste the jpeg url's and it said page cannot be displayed, try uploading them again.
__________________
The contents of this post may be fictitious. |
|
|
|
|
|
09-18-2002, 04:18 PM
|
#12 | |||
|
Horizontally Opposed
Join Date: Mar 2001
Location: Las Vegas, Nevada
Posts: 16,856
Thanks: 0
Thanked 11 Times in 9 Posts
|
Quote:
In this pic you can see my hood is removed, and also the original front bumper is gone, replaced by the Mugen bumper. I managed to cut the headlight assemblies out as separate pieces. I tried to save the cowl part at the back of the hood (where the wipers hide...), but the remaining contact points were to weak after the hood was off. 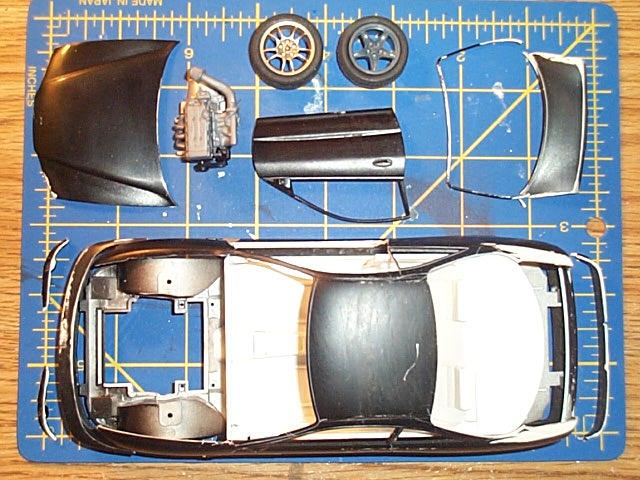 Here's approximately the cuts I made  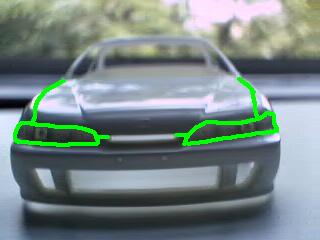 I scored all the lines with the back of the Xacto #11 blade, like 935k3 said, but then I did most of the sawing with a thread. About cutting with thread. flyonthewall's tutorial: How to - Opening hoods, doors etc If you do try and etch out the hood around the tops of the headlights, make sure to angle the blade up under the hood a bit... HTH. Quote:
|
|||
|
|
|
| ||||||||||||||||||||||||||||
|
POST REPLY TO THIS THREAD |
 |
|
|


