|
|
|

|
|
| Search | Car Forums | Gallery | Articles | Helper | AF 350Z | IgorSushko.com | Corporate |
|
| Latest | 0 Rplys |
|
|||||||
| WIP - Street Post topics for any "Works In Progress" street vehicles projects in this sub-forum. |
 |
 Show Printable Version | Show Printable Version |  Email this Page | Email this Page |  Subscribe to this Thread
|
|
|
Thread Tools |
 06-07-2007, 09:43 PM
|
#1 | |
|
AF Enthusiast

Join Date: Feb 2003
Location: Chicago
Posts: 528
Thanks: 2
Thanked 17 Times in 16 Posts
|
1/24 Tamiya Ferrari Enzo "Build Diary"
Hi everyone,
This would be my first WIP in this forum. Hope this goes well and smooth.  I know this would be yet another Enzo build; I must confess that I can't show anything different than what everyone else has posted before for the Enzo WIPs... Before I initiate this WIP thread, please accept my apology for not coming up with something fresh and exciting... As you already know, the biggest impediment for building this one would the "carbon fiber" decal work as it is taking way too much time applying. To start off, here is the things I have been prepared to build my Enzo. 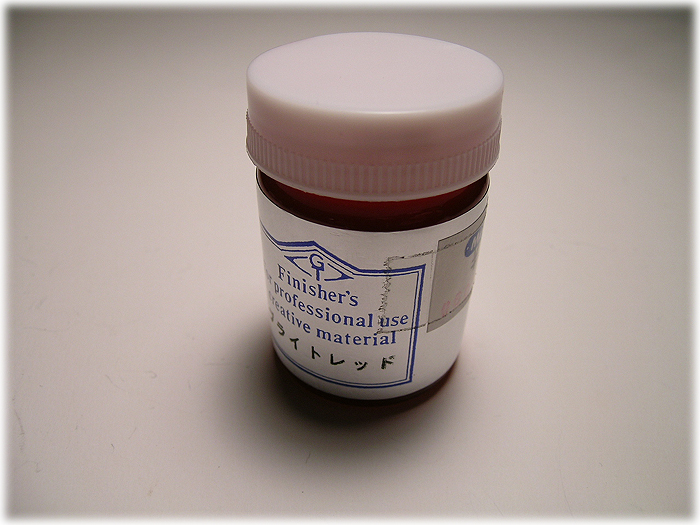 Most of the time, I prefer acrylic paints, but for this occasion, I would like to try "Brighe-'to Re't-o" from Finisher's. 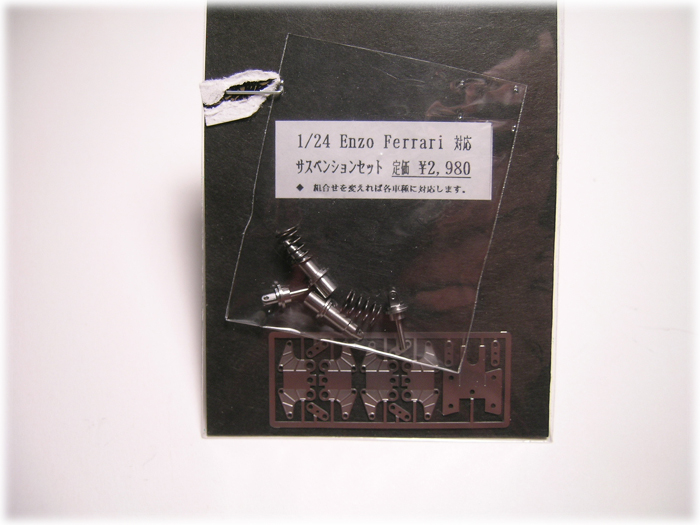 Acu-Stion shock. 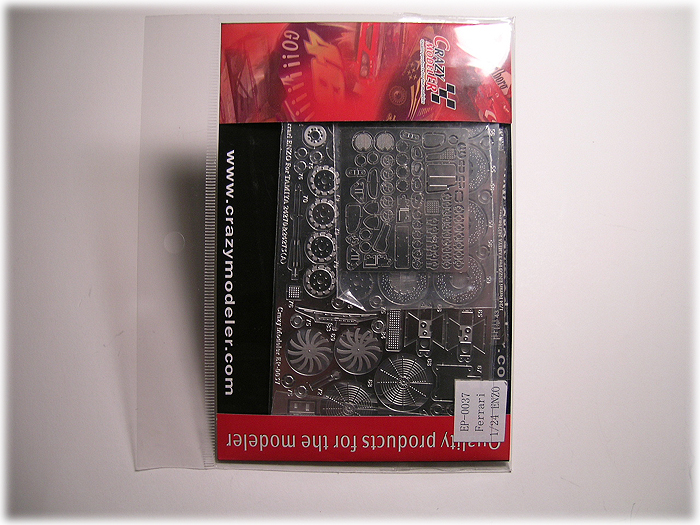 Crazy Modeler's etching set. These are very crazy indeed. 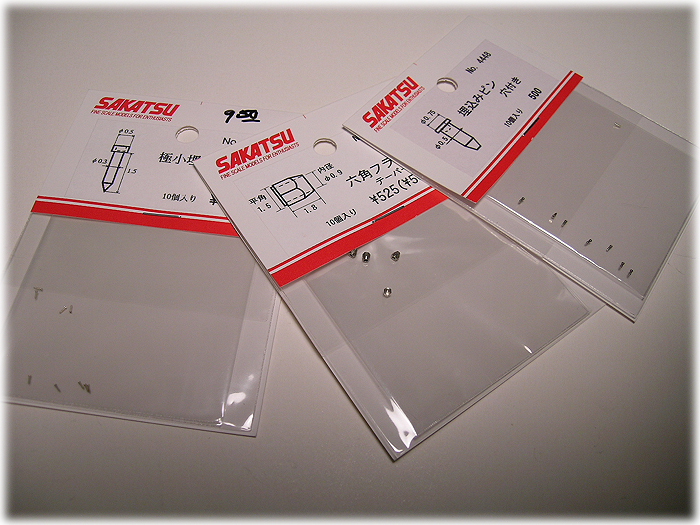 Sakatsu tuned parts.  And of course, SMS' parts. 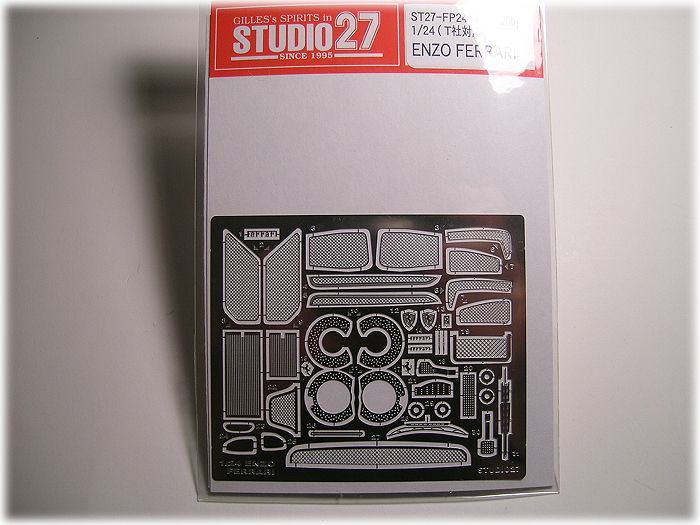 S27 as well... 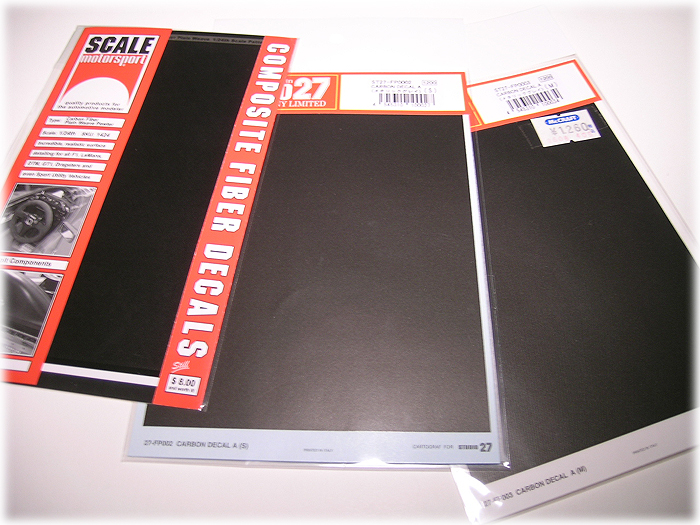 Some CF decals... 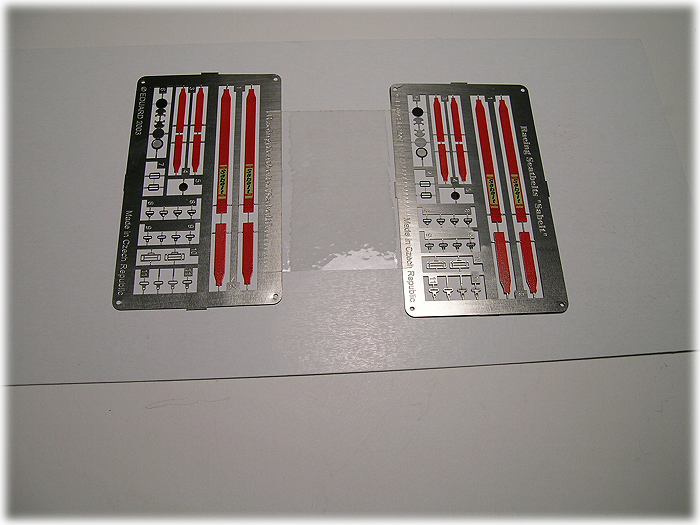 Eduard's etching seatbelt. If they don't turn out to be good, I might just use something else. 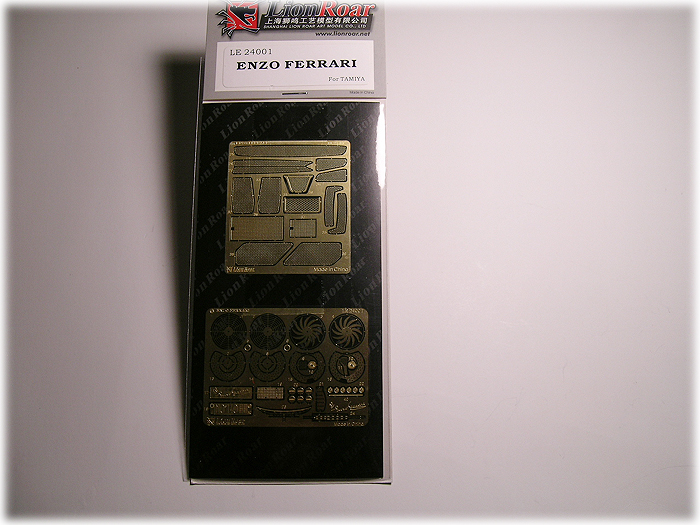 Lion Roar's... 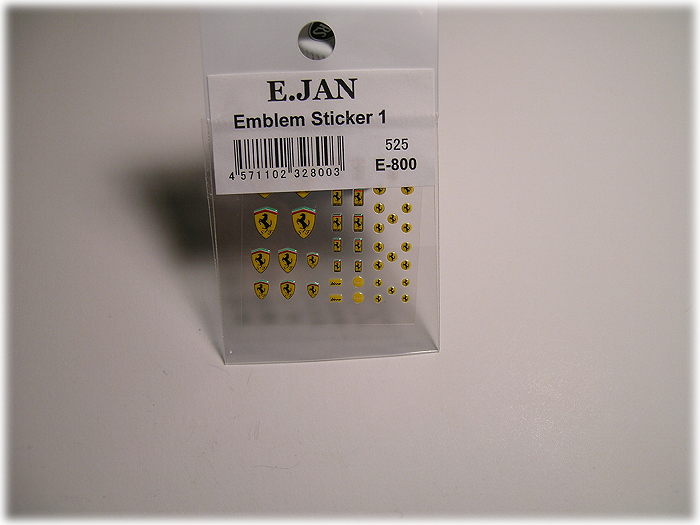 These look very toy-ish at first, but quite satisfying when applied. 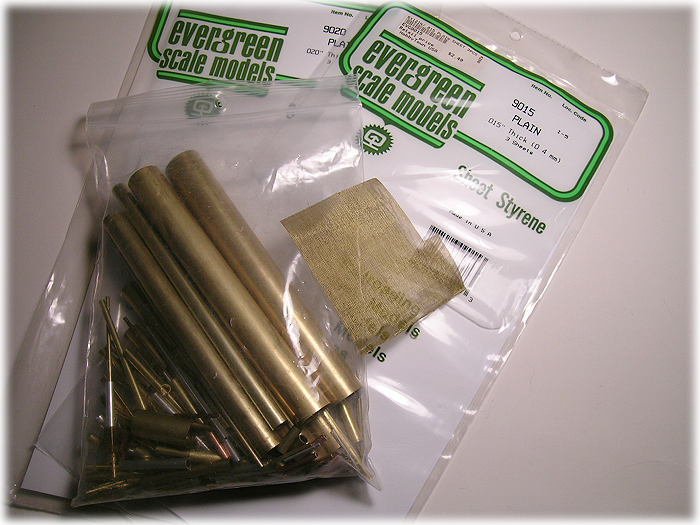 And some scratch building materials... I am certain that you were wondering why I have multiple detail parts for this kit.  I have been planning on building this kit for the past two years and just bought whatever the market has offered so far. Another words, it would be caused by my lack of planning...  To be continued...
__________________
-- CifeNet |
|

|

|
|
06-07-2007, 10:07 PM
|
#2 | |
|
AF Enthusiast
Thread starter
Join Date: Feb 2003
Location: Chicago
Posts: 528
Thanks: 2
Thanked 17 Times in 16 Posts
|
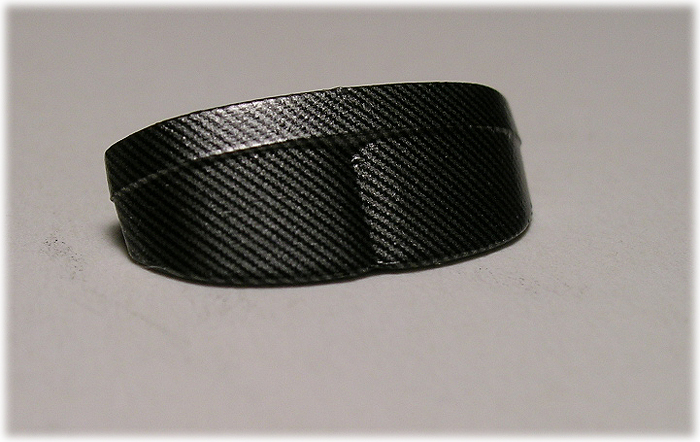
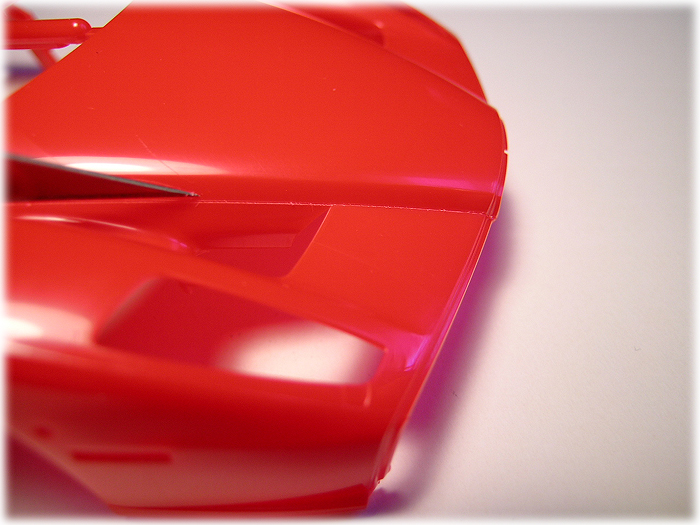 I decided to open the front hood for this model, so I cut the front peice without thinking too much. Whatever happens here, I will take care of it later. 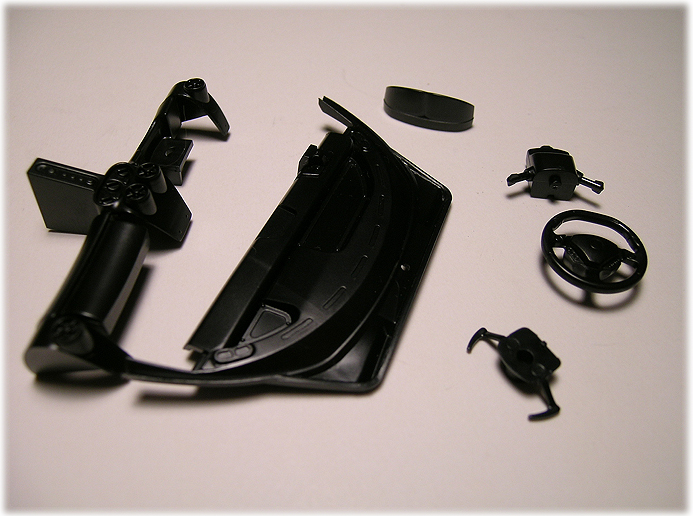 Preparing the front dashboard assembly...  This part will need some detail up work...  Adding minor details on the steering wheels as well. 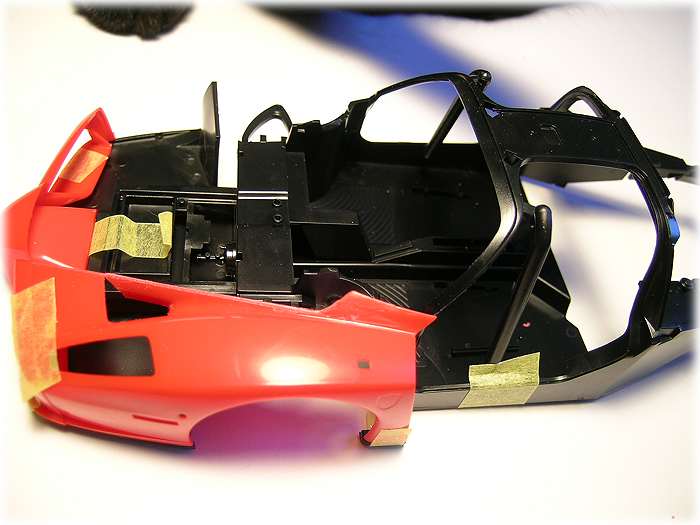 I am trying to test fit the front fender area to understand the work load involving the opening the hood. 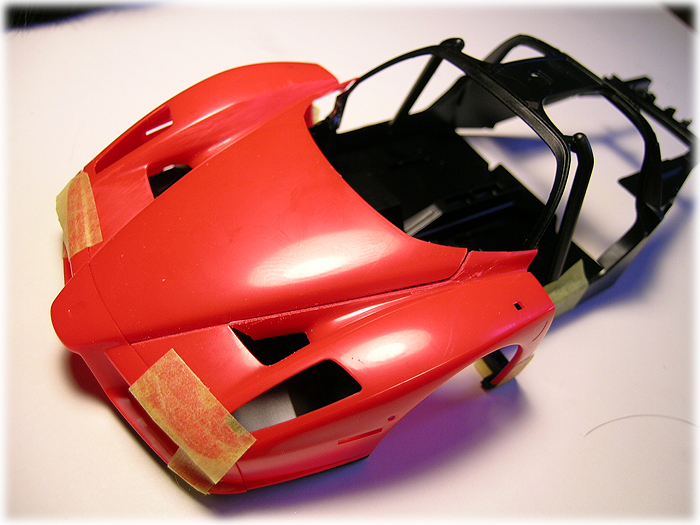 It doesn't look good and it is going to be tough to get everything fit correctly. Now I am regretting what I have done. But I still don't want to think about this too much now. 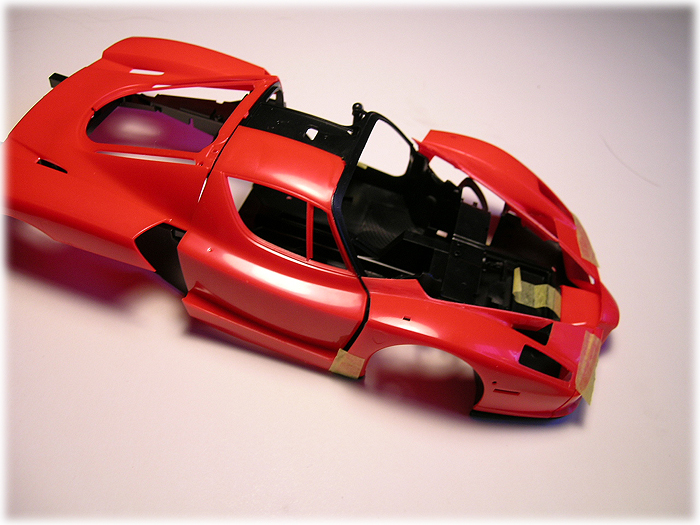 I must say that Tamiya has done an excellent engieering on this kit. Even Revell has shown their capability to cast and produce a fine Enzo kit, I think the kit itself it work of an art for Tamiya...  Starting with engine, I applied Testor's Metalizer Aluminum and gave little polishing. I also add some minor details. 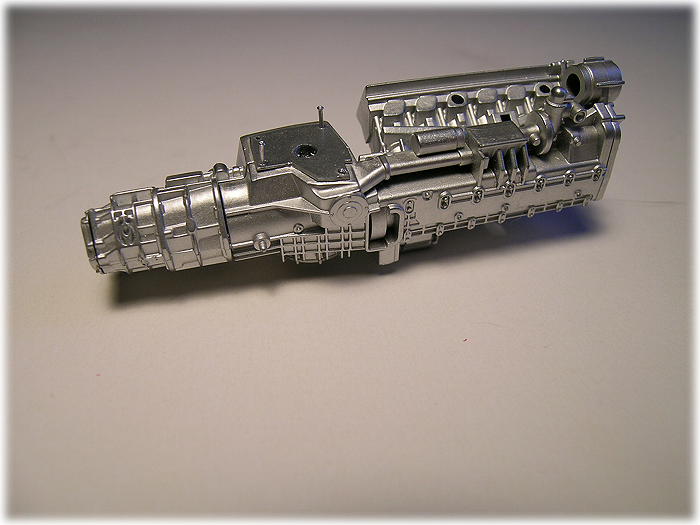 Adding rivets... 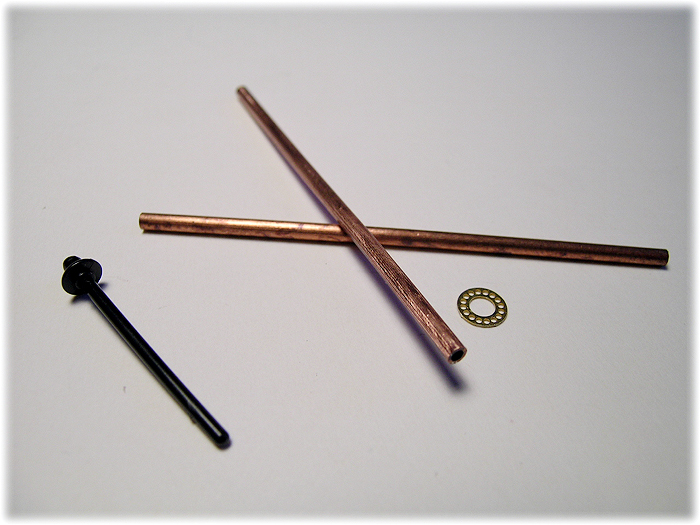 Axle shaft is being replaced with my left over parts... 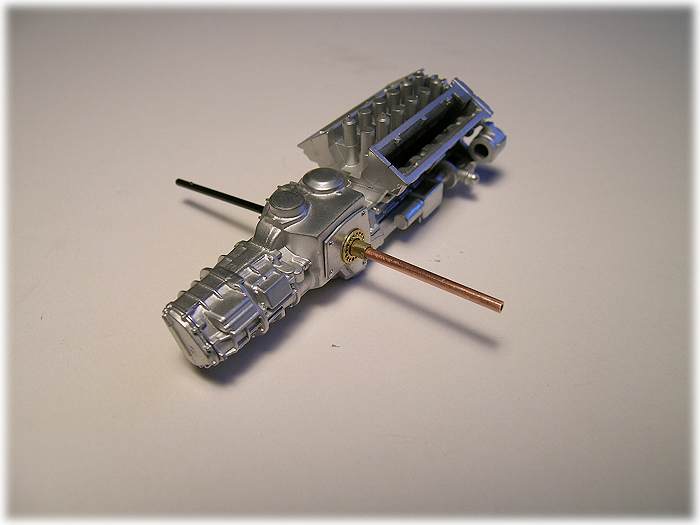 Drive shaft being installed here. 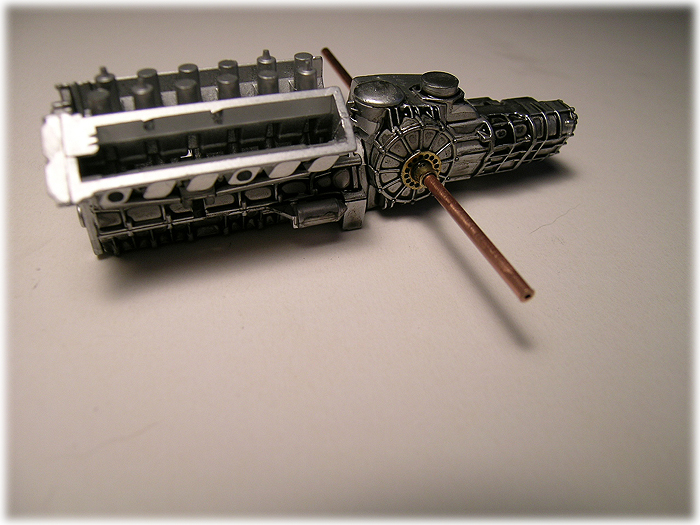 I would like to give an excessive "dirty" feel to this engine here. Most of the engine won't show when the kit is complete, I would like to highlight the engine details by giving a heavy wash. It will be a big contrast when everything is assembled. 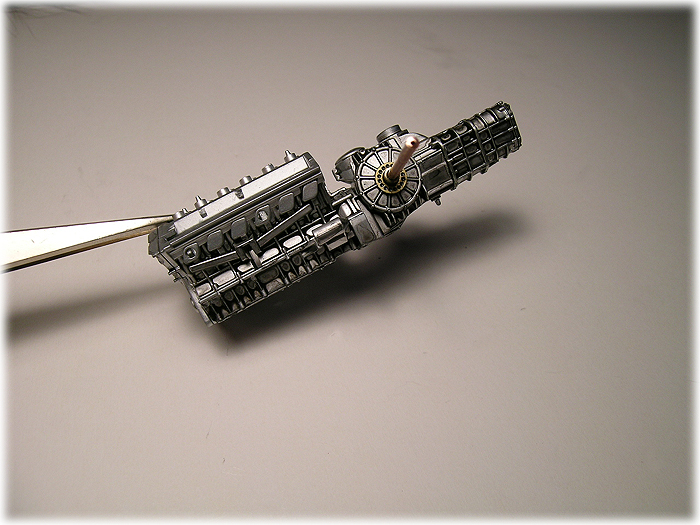 Like this... Dirty and oily. After everything is complete, I will give a nice "thinner" wipe to the surface to remove excessive wash.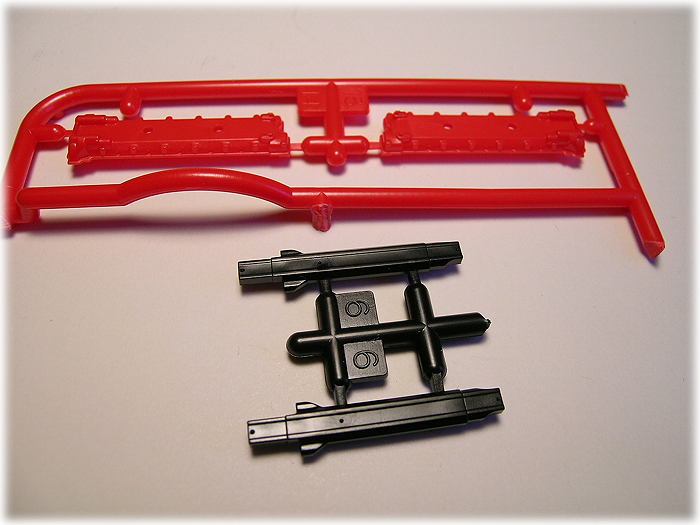 Getting into the valve cover assembly now... 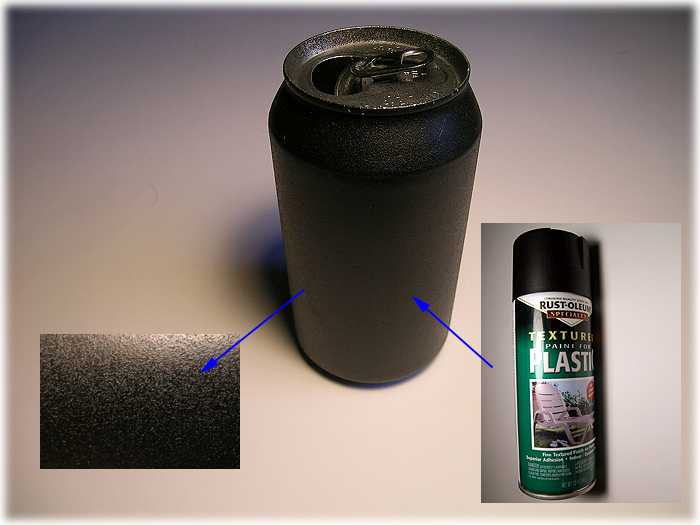 I wanted to give some rough texture, so I took an easy route. This is the texture paint for plastic, I think it works okay for what I want to achieve. 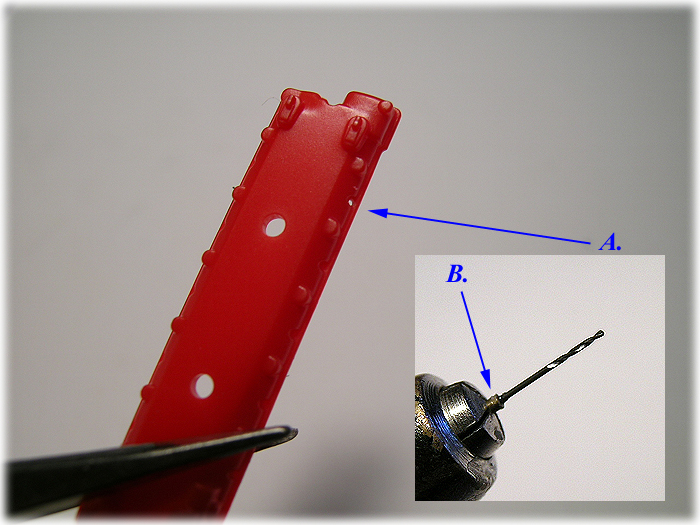 Rivat is going into (A), I had to modify my drill (B) to hold the drill bit because it was quite small... 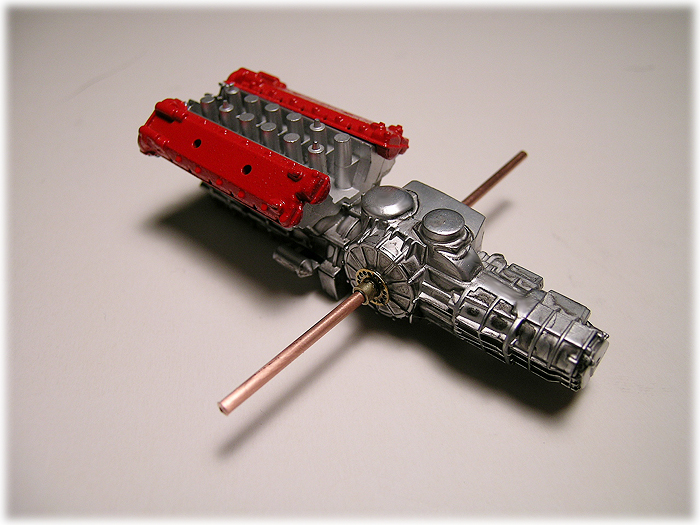 I am satisfied with the texture of the valve cover now. 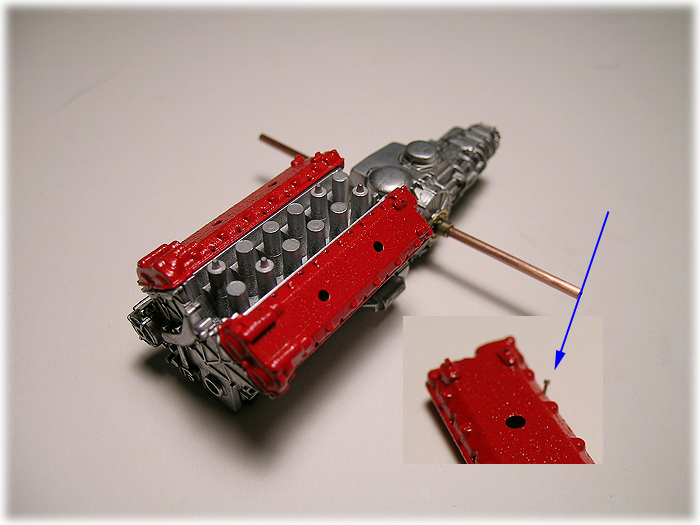 The rivets are being installed here. Each of the rivet costs roughly USD $0.90 x 10 = USD $9.00 x 2 valve cover = USD $18.00 for just rivets... I must be losing my mind.  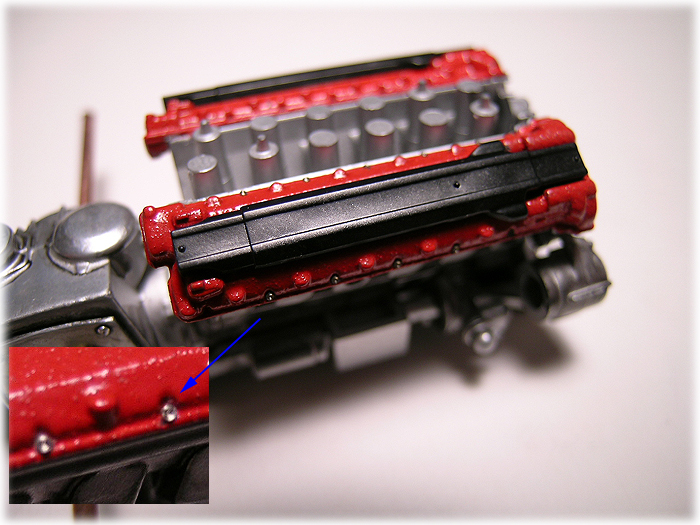 They are extremely small, but they do add details to this. 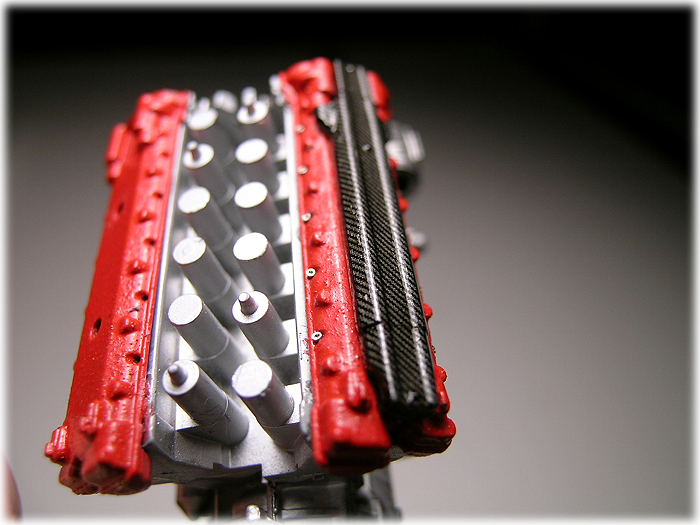 Now starting the carbon fiber decal work, the electric coil cover on the valve cover gets a carbon fiber dress here.  Adding a smoke coat, the carbon fiber gets some depth and the coat protects the decal from chipping off... More to come...
__________________
-- CifeNet |
|
|
|
|
|
06-07-2007, 10:25 PM
|
#3 | |
|
AF Enthusiast

Join Date: Mar 2003
Location: Zephyrhills, Florida
Posts: 981
Thanks: 4
Thanked 5 Times in 5 Posts
|
Re: 1/24 Tamiya Ferrari Enzo "Build Diary"
Off to an incredible start!!!! I have built a few of these.... Pay special attention to the fitment of the rear engine cover!!!!! I will be watching this one!!!
DaveT |
|
|
|
|
|
06-07-2007, 10:44 PM
|
#4 | |
|
AF Enthusiast
Thread starter
Join Date: Feb 2003
Location: Chicago
Posts: 528
Thanks: 2
Thanked 17 Times in 16 Posts
|
Re: 1/24 Tamiya Ferrari Enzo "Build Diary"
 More decal work... I know this isn't correct, but my concept for the dashboard is to cover "EVERYTHING" with carbon fiber. I think it is okay to bend rules here and there when it comes to the scale modeling. If we want to stick 100% true in real life, where would be our creative mind in this hobby?  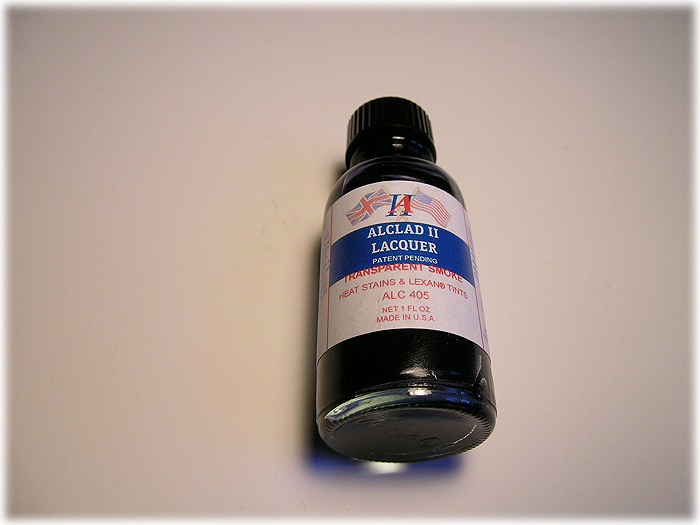 I bought this Alclad thinking it might help me detailing the exhaust better, but I haven't seen the actual color yet. I will find out soon...  To be honest, it could be just my kit that is bad, I am quite disappointed in the quality of the chrome plated parts... 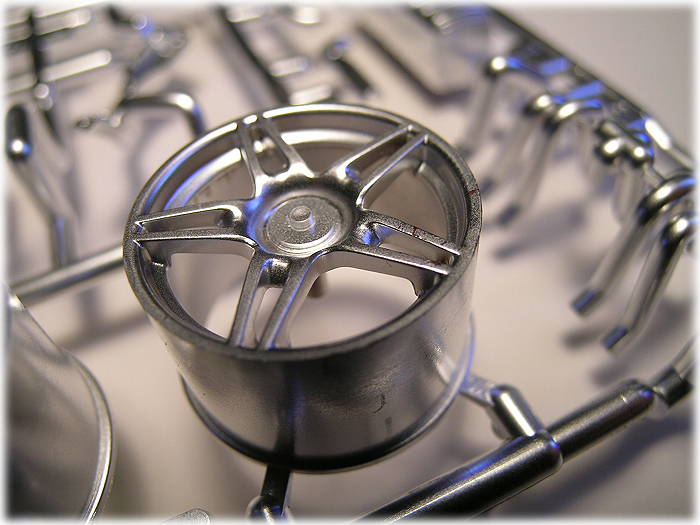 Not good at all... 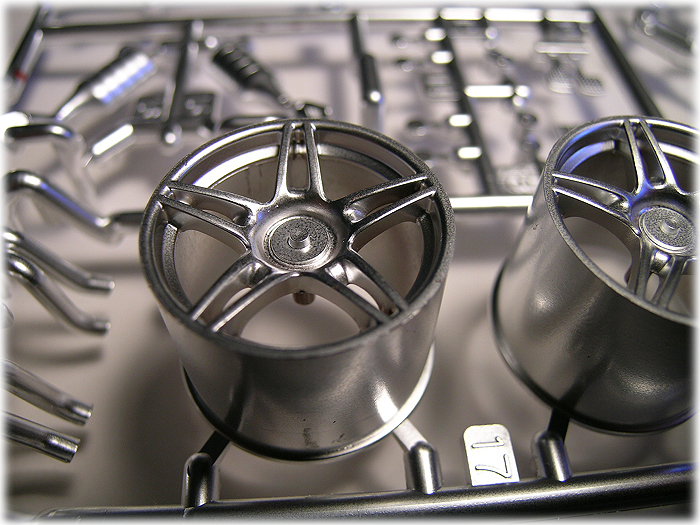 Maybe it was just mine that is horrible...  Exhaust parts... 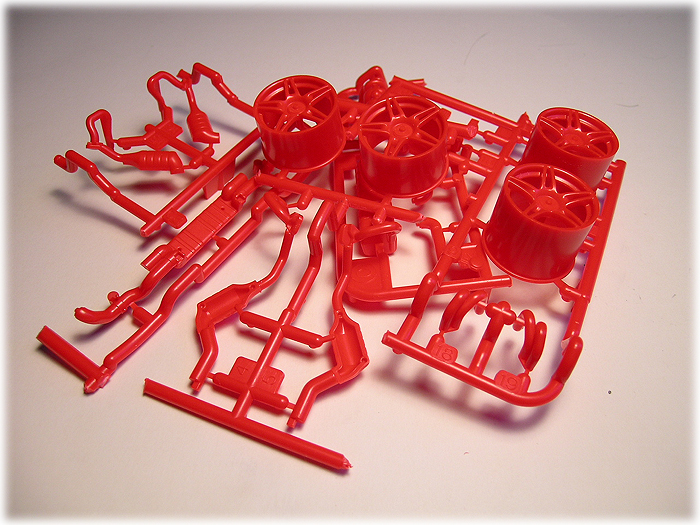 I decided to remove everything and do my own. I used CSC also known as "Castrol Super Clean". The magic purple liquid does a job well. 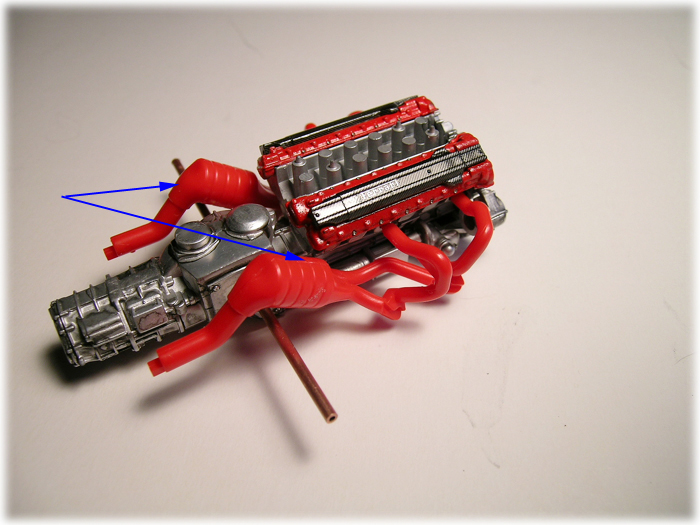 These (blue arrows) seams will need to be filled. 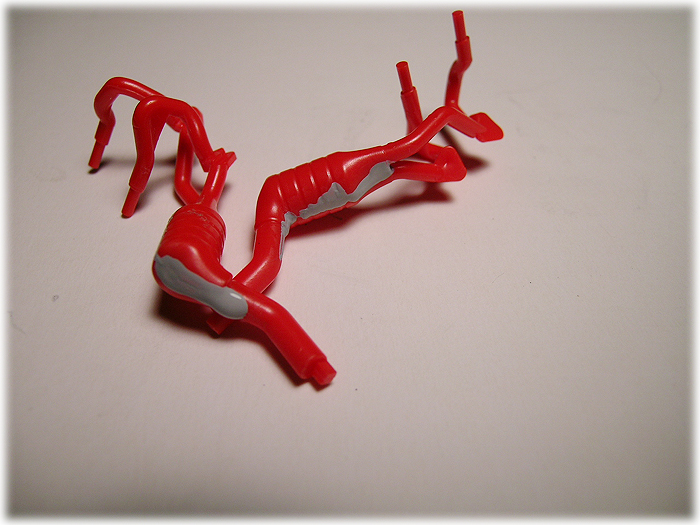 I used Gunzo's surfacer 500 to do this kind of job... 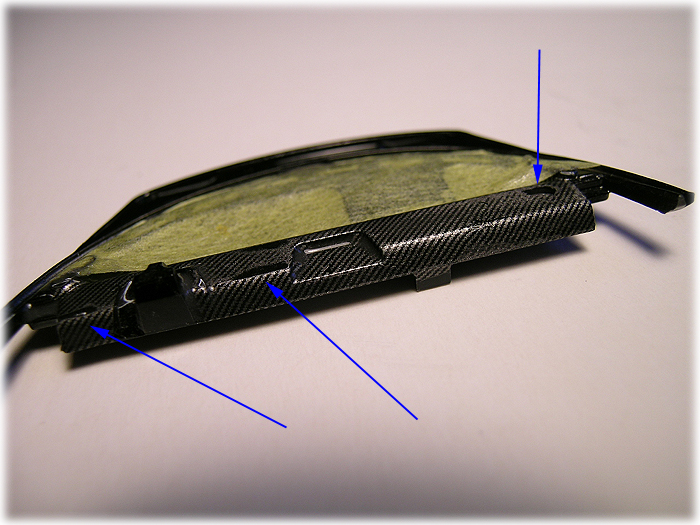 I got bored working on the exhaust area, so I moved on to another "boring" part... Getting carbon fiber decals on the dashboard... Again, I am covering everything here because I want this to be very shiny shiny carbon fiber dashboard. When working with carbon fiber, I noticed that I have to repeat the task multiple times because I fail to successfully lay down the decal. Sometimes, I just patch up the bad areas locally as shown with the blue arrows. 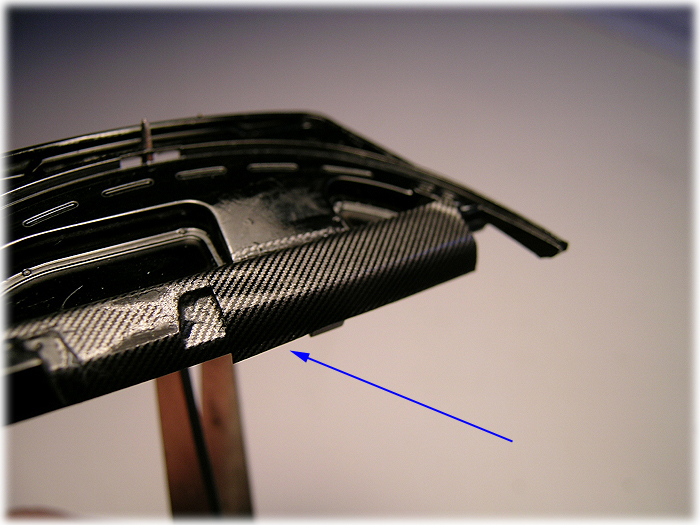 Trying again... I think I perform the repair for my mistakes more often than the work itself. 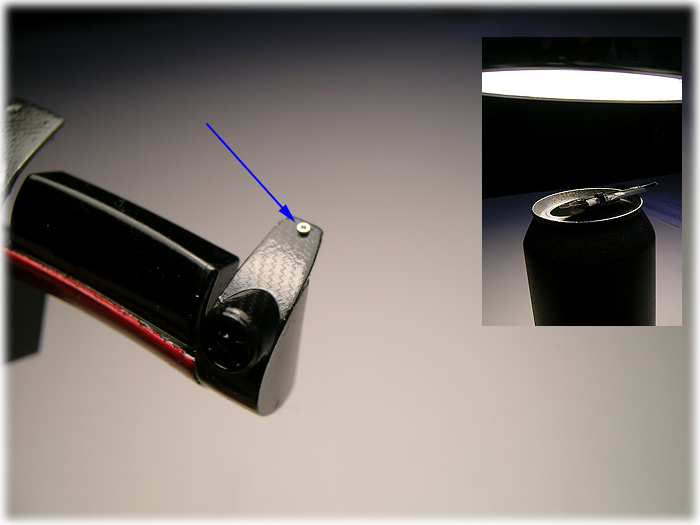 Some fellow modelers use hair dry-er to cure the carbon fiber decals, but I like to use 60w light bulb to cure and help adhering better to curves. Adding Sakatsu rivets... 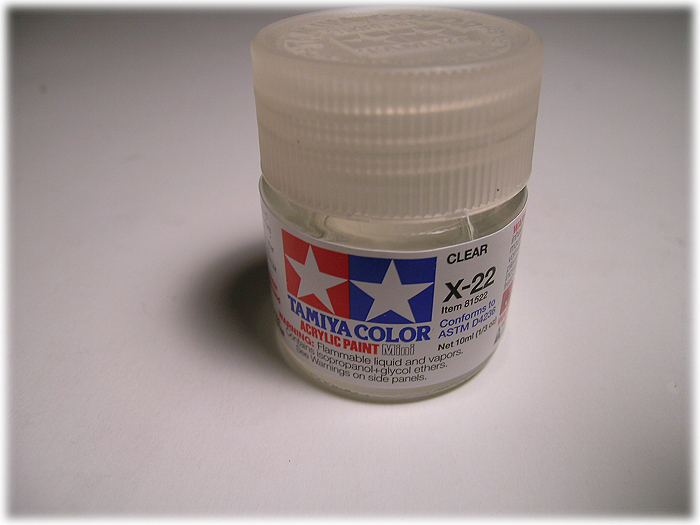 Smaller etching parts, I just use this acrylic clear as a glue. It does hold small parts okay and it won't make mess on surfaces. 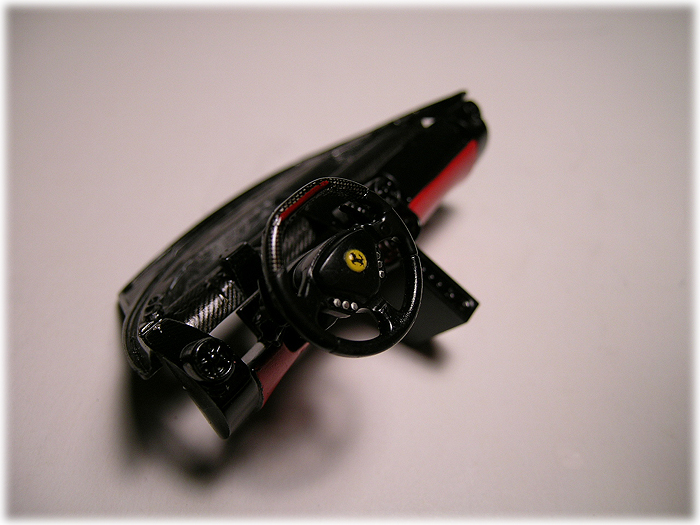 The dashboard... 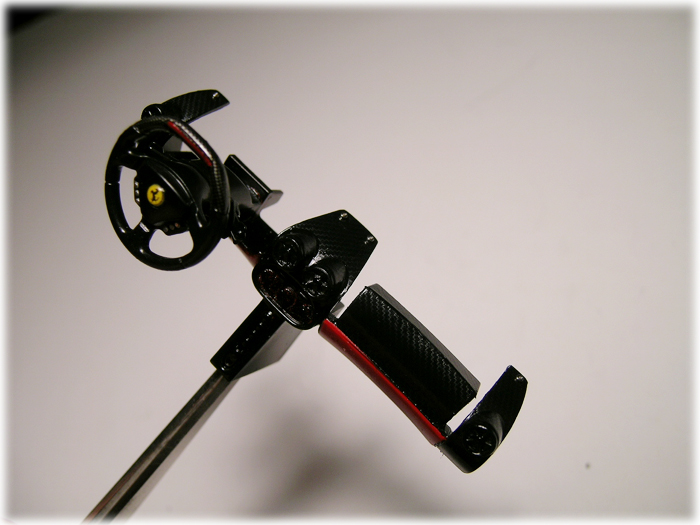 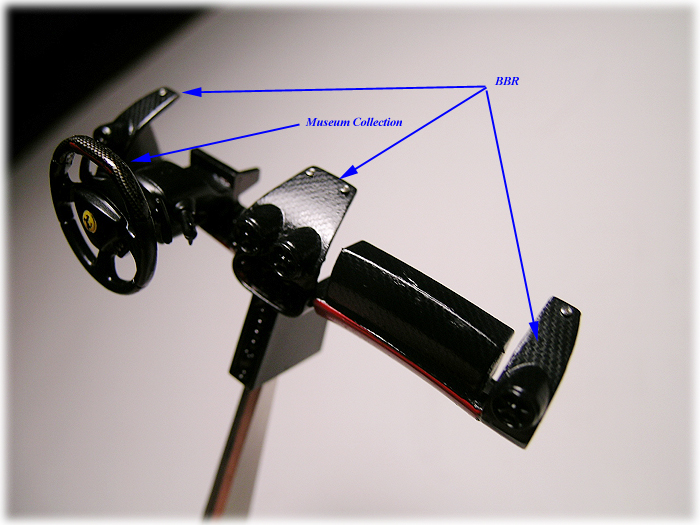 I used different carbon fiber decals to make things interesting. I personally like BBR's decal because they have the pronounced textures. 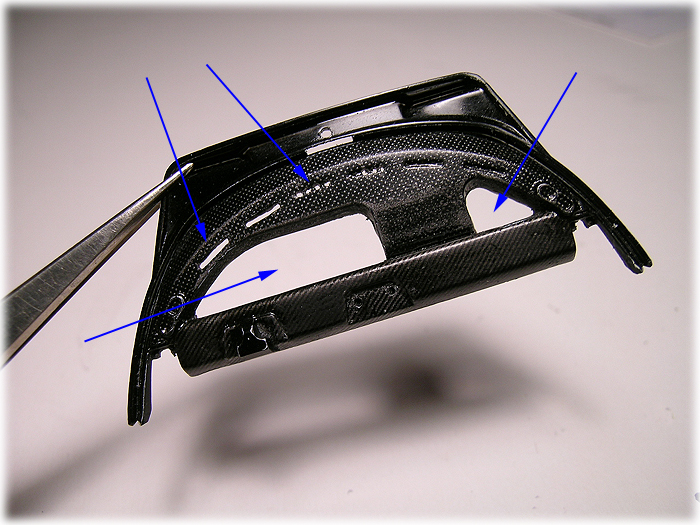 I am really bad at this... More mistakes to repair and more mess I made. I just sand them out and reapply till I am happy with the result. 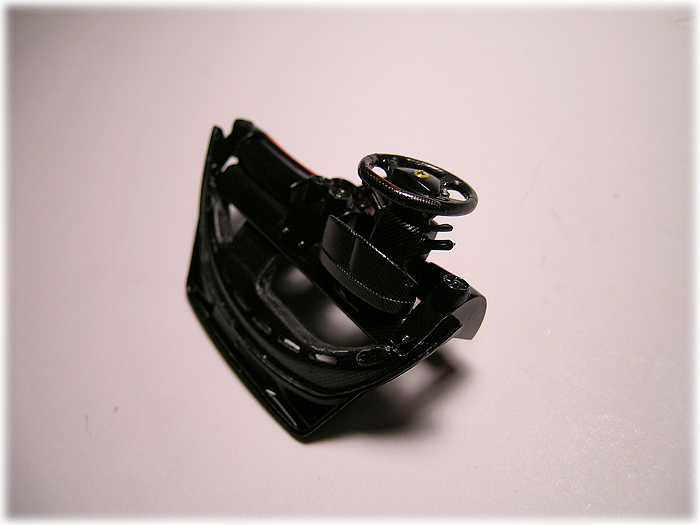 I think it is about 50% complete. I also opened the dashboard covers. 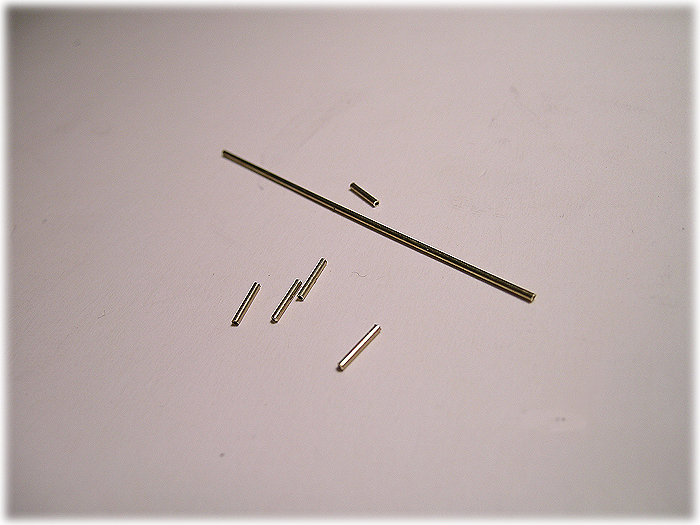 Let's go back to engine work now. I am using brass pipes to make electric wiring for fuel injection system... Cut and bend... Cut and bend... x 12... 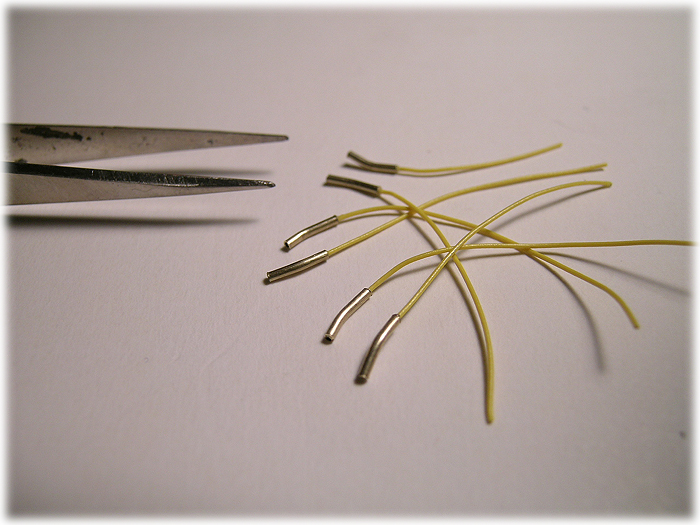 And add yellow wirings... The correct color should be black, but then again, it won't show off much. So I go with what I like. 
__________________
-- CifeNet |
|
|
|
|
|
06-07-2007, 10:50 PM
|
#5 | ||
|
AF Enthusiast
Thread starter
Join Date: Feb 2003
Location: Chicago
Posts: 528
Thanks: 2
Thanked 17 Times in 16 Posts
|
Re: 1/24 Tamiya Ferrari Enzo "Build Diary"
Quote:
I remeber your work very well. Simply incredible... It is helping me tremendously for my build. I just hope I can come somewhere near to yours with mine... Thanks for the heads up on the rear engine cover.
__________________
-- CifeNet |
||
|
|
|
|
06-07-2007, 11:20 PM
|
#6 | |
|
AF Enthusiast
 Join Date: Jul 2005
Location: Cheshire, Connecticut
Posts: 872
Thanks: 0
Thanked 1 Time in 1 Post


|
Re: 1/24 Tamiya Ferrari Enzo "Build Diary"
Oh my God, this is incredible. I'm watching this FOR SURE! The work you do it so amazingly detailed!
__________________
 
|
|
|
|
|
|
06-07-2007, 11:39 PM
|
#7 | ||
|
AF Enthusiast
Thread starter
Join Date: Feb 2003
Location: Chicago
Posts: 528
Thanks: 2
Thanked 17 Times in 16 Posts
|
Re: 1/24 Tamiya Ferrari Enzo "Build Diary"
Quote:
__________________
-- CifeNet |
||
|
|
|
|
06-08-2007, 12:04 AM
|
#8 | |
|
AF Enthusiast
Thread starter
Join Date: Feb 2003
Location: Chicago
Posts: 528
Thanks: 2
Thanked 17 Times in 16 Posts
|
Re: 1/24 Tamiya Ferrari Enzo "Build Diary"
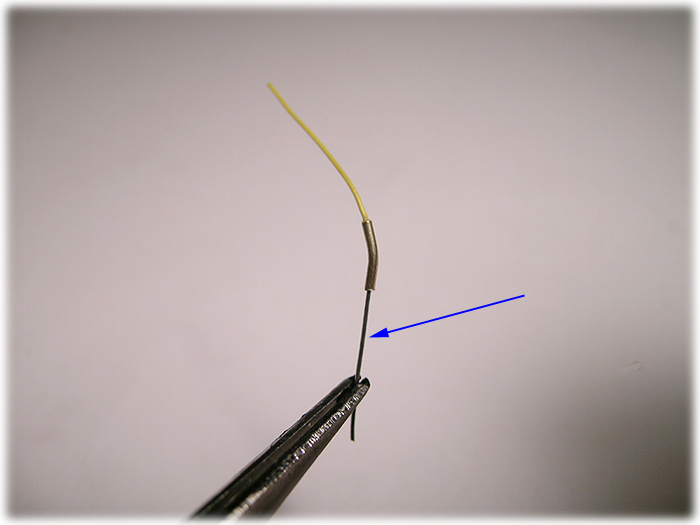 Continuing the electric wiring for fule injection, I added a thin wire as the blue arrow is shown here. This will be used to mount this unit onto the engine later. 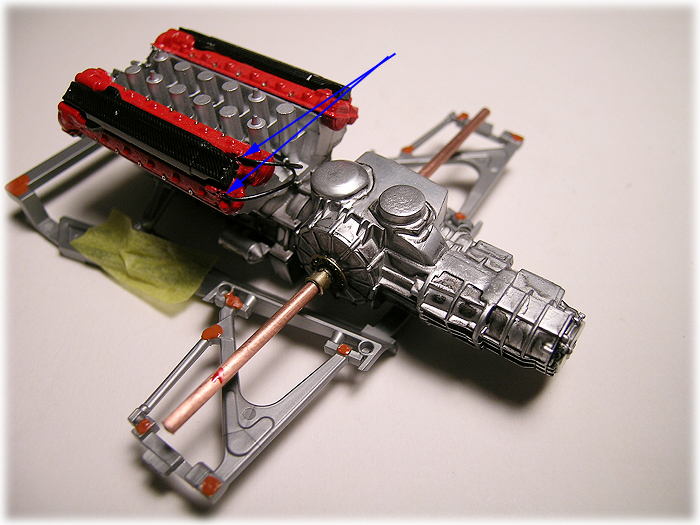 I added knock sensors, I am hoping they are knock sensors. No? 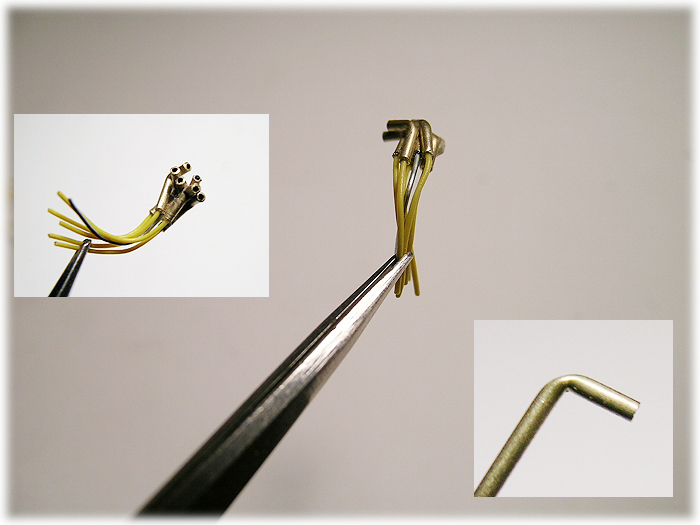 I made a "distributor" like element, it looks very bad so I decided not to use this one...  Drill 12 holes onto the top of the engine area and... 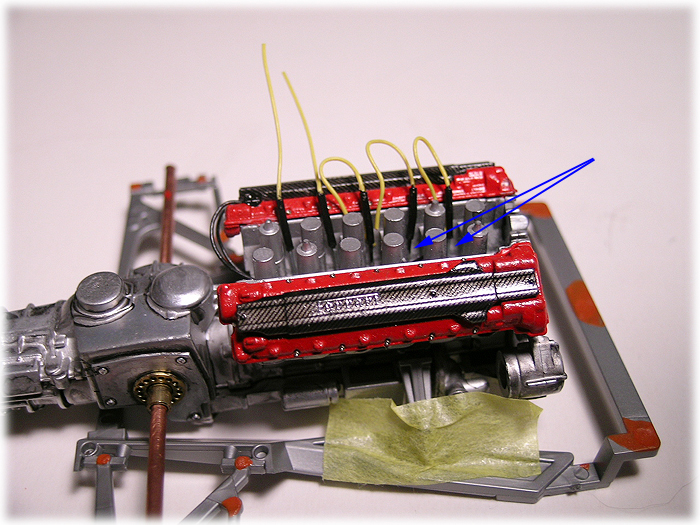 Inserting the electric wirings just like this... 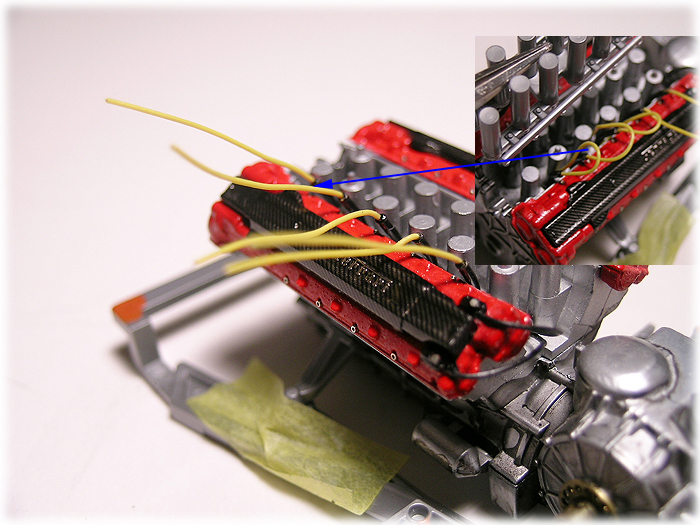 Hopefully, I can arrange the wiring uniformly and neatly (sub picture), everything will look organized at the end. 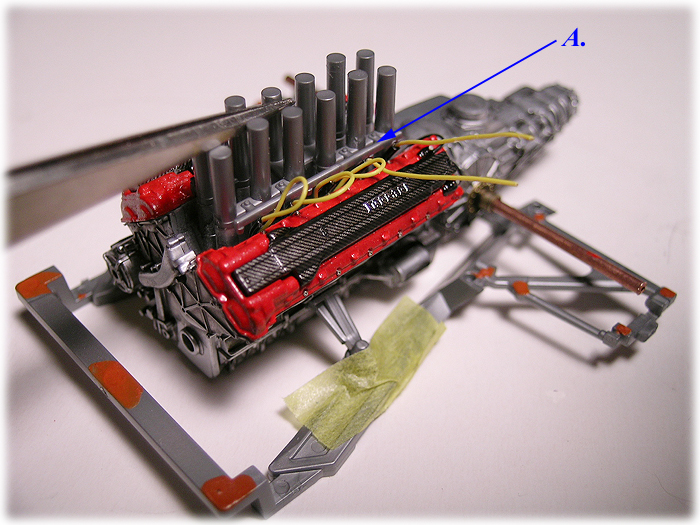 This is the fuel rail(A), I do have photo etching part for this, but decided to go with what Tamiya has provided. I suppose if I don't like it, I can always replace this later on; I don't let this confus my mind for now. 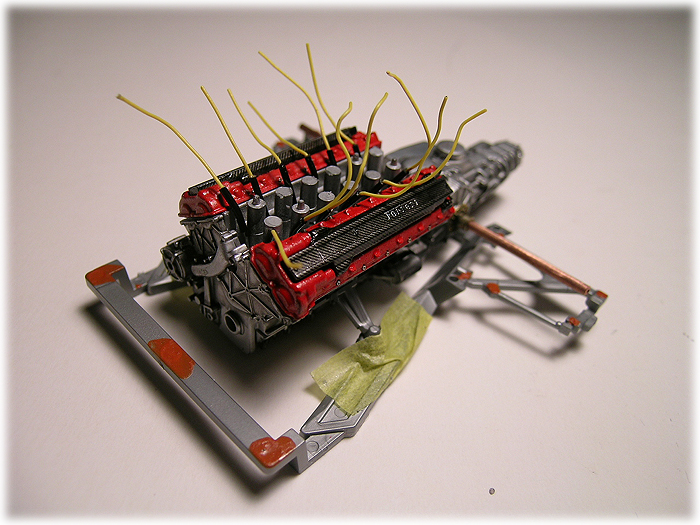 All 12 of them are ready to go here. 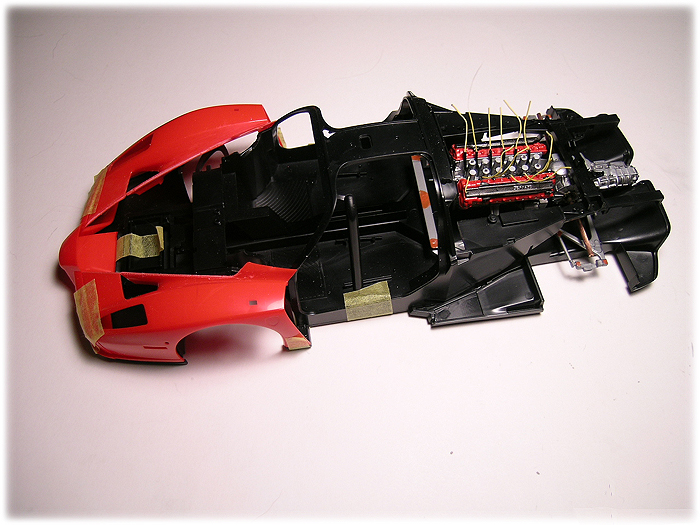 Some testing fitting. I get bore easily working on same part for a long time, I performed some dry-fitting test to see what I have accomplished so far. I can see that I haven't done much yet...  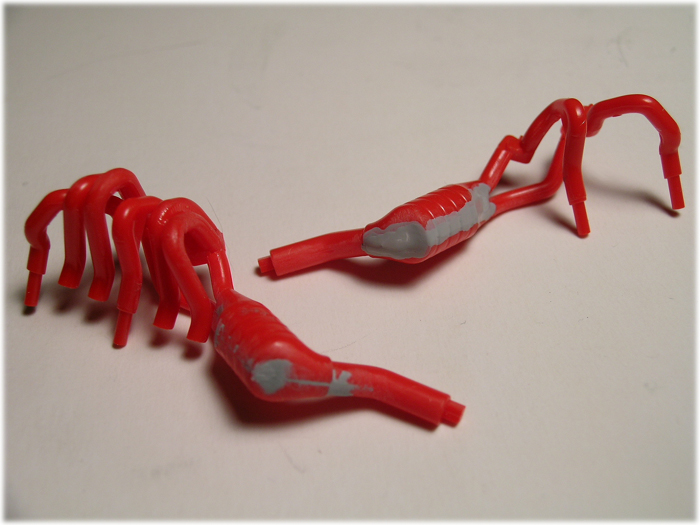 Moving onto the exhaust parts again. I do jump around from one to another, please forgive me for making this diary very direction-less... 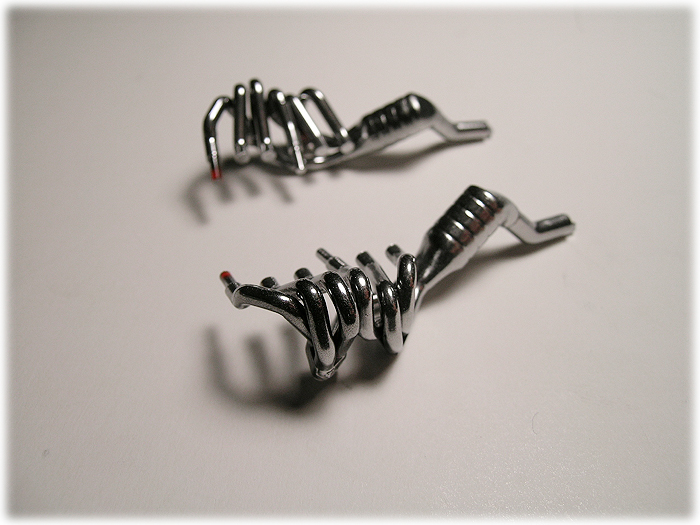 Alclad Chrome does its job quite decent. Somewhat rough on the surface, but I think it works out because they are exhaust pipes which doesn't have to be pretty. 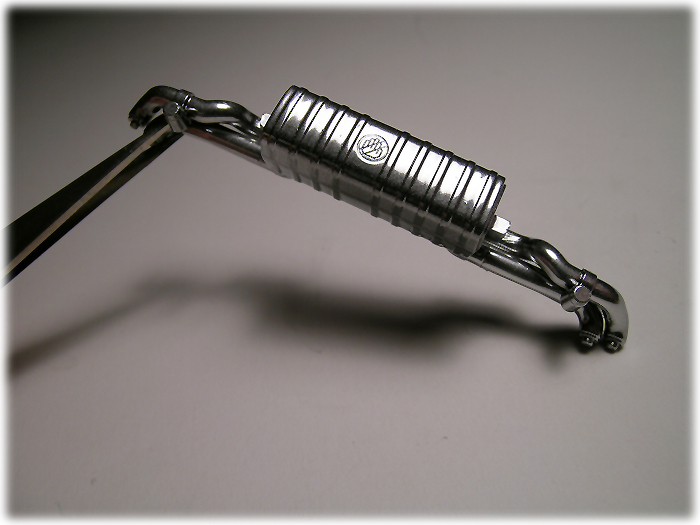 The muffler unit was also dressed up with a light coat of Alclad Chrome after gloss black enamel paint. 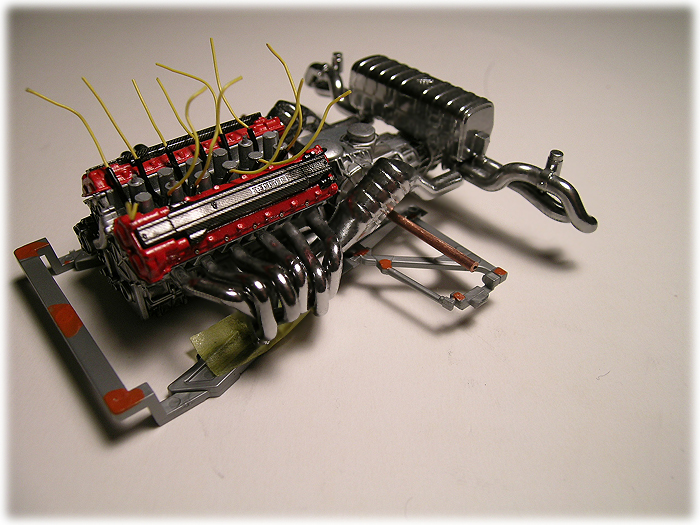 The picture came out actually darker because these are bit too bright for my camera to capture... 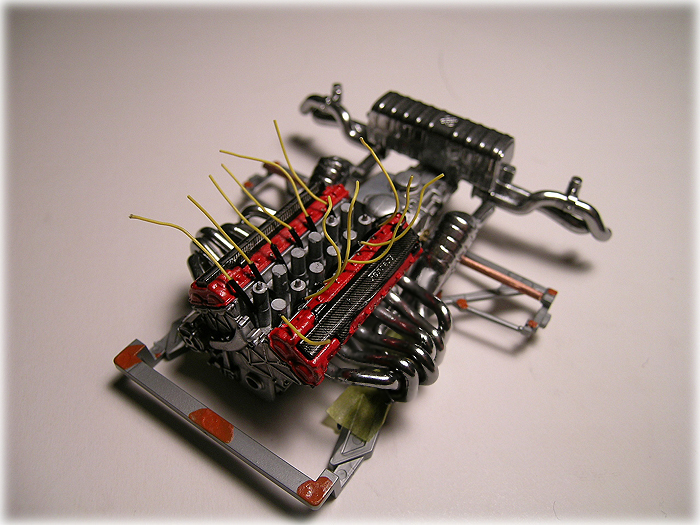 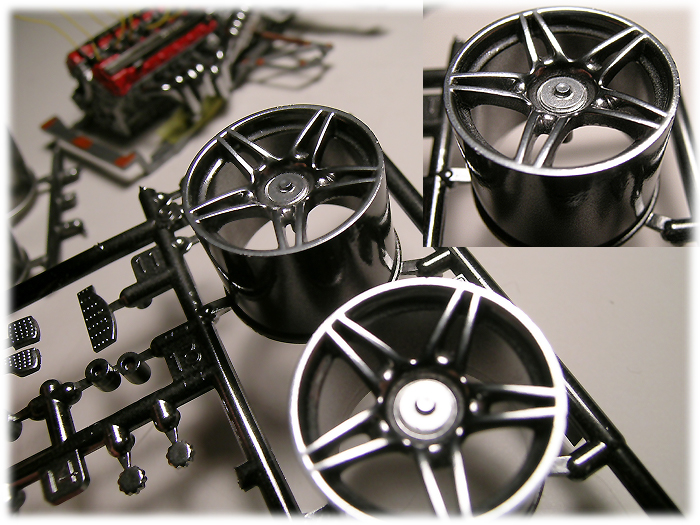 I also gave a light coat of Alclad polished alumimium for the wheels, I would like these wheels to be very dark to give an aggressive look overall. Not a good idea?... Thank you all for keeping up with this diary...
__________________
-- CifeNet |
|
|
|
|
|
06-08-2007, 12:10 AM
|
#9 | |
|
AF Enthusiast
Join Date: Jul 2005
Location: Cheshire, Connecticut
Posts: 872
Thanks: 0
Thanked 1 Time in 1 Post
|
Re: 1/24 Tamiya Ferrari Enzo "Build Diary"
I know there are a billion and a half reference shots out there for the Enzo, I just like to use this wallpaper site for reference. Here's the page with the engine, so you can detail well
. Four different resolutions:http://www.netcarshow.com/ferrari/2002-enzo/08.htm
__________________
|
|
|
|
|
|
06-08-2007, 12:23 AM
|
#10 | ||
|
AF Enthusiast
Thread starter
Join Date: Feb 2003
Location: Chicago
Posts: 528
Thanks: 2
Thanked 17 Times in 16 Posts
|
Re: 1/24 Tamiya Ferrari Enzo "Build Diary"
Quote:
Unfortunately, you just made my life as twice as hard! After seeing all these pictures, I now certainly have more things I want to add... But I don't think my skill is going to back that up.  Thanks again,
__________________
-- CifeNet |
||
|
|
|
|
06-08-2007, 12:23 AM
|
#11 | |
|
AF Enthusiast

Join Date: Aug 2005
Location: Chengdu. CHN
Posts: 1,269
Thanks: 20
Thanked 36 Times in 19 Posts
|
Re: 1/24 Tamiya Ferrari Enzo "Build Diary"
Oh my god... What a super luxury WIP...
|
|
|
|
|
|
06-08-2007, 12:32 AM
|
#12 | ||
|
AF Enthusiast
Thread starter
Join Date: Feb 2003
Location: Chicago
Posts: 528
Thanks: 2
Thanked 17 Times in 16 Posts
|
Re: 1/24 Tamiya Ferrari Enzo "Build Diary"
Quote:
 Thanks,
__________________
-- CifeNet |
||
|
|
|
|
06-08-2007, 12:41 AM
|
#13 | |
|
AF Enthusiast
Join Date: Aug 2005
Location: Chengdu. CHN
Posts: 1,269
Thanks: 20
Thanked 36 Times in 19 Posts
|
Re: 1/24 Tamiya Ferrari Enzo "Build Diary"
You bet buddy!!! I love all your works of art! Your website inspired me a lot! And this built is rather damn luxury... look at those stuff... Also very very nice handcraft and painting skills!
|
|
|
|
|
|
06-08-2007, 02:11 AM
|
#14 | |
|
AF Newbie
Join Date: Nov 2005
Location: perth
Posts: 93
Thanks: 1
Thanked 2 Times in 2 Posts
|
Re: 1/24 Tamiya Ferrari Enzo "Build Diary"
great progress ! thats alot of detail so far.
I really like the detailing on the steering wheel buttons, and would you be able to tell us where u got the rivets from?
__________________
   
|
|
|
|
|
|
06-08-2007, 02:39 AM
|
#15 | |
|
AF Enthusiast

Join Date: Mar 2003
Location: Rostock
Posts: 1,569
Thanks: 0
Thanked 0 Times in 0 Posts
|
Re: 1/24 Tamiya Ferrari Enzo "Build Diary"
Incredible diary. Thanks for sharing your ideas of products to use for certain steps of work. This helps me alot since I normally don´t really know which products to use to achieve certain effects. Keep the updates coming and welcome to AF, you may stay here forever and share your great way of working with us!
__________________
Recently finished Projects:
Porsche 911 Carrera RS 3.0 Current Projects: Ferrari 250 GTO LM 1962 (chassis #3387)   |
|
|
|
|
|
|
POST REPLY TO THIS THREAD |
 |
| Thread Tools | |
|
|

