|
|
|

|
|
| Search | Car Forums | Gallery | Articles | Helper | AF 350Z | IgorSushko.com | Corporate |
|
| Latest | 0 Rplys |
|
|||||||
| Car Modeling Share your passion for car modeling here! Includes sub-forum for "in progress" and "completed" vehicles. |
 |
 Show Printable Version | Show Printable Version |  Email this Page | Email this Page |  Subscribe to this Thread
|
|
|
Thread Tools |
 04-25-2007, 12:37 PM
|
#1 | |
|
Authorized Vendor

Join Date: Oct 2005
Location: Vicenza - veneto de rassa
Posts: 3,909
Thanks: 6
Thanked 46 Times in 41 Posts
|
Hi guys,
someone asked me, in my threads, how I'll do custom PE parts: this time I taken some step-by-step pict over the process. This would be a brief tutorial, so feel free to ask me here (no PM plizz) what's unclear or skipped. Before all I want to thanks (a LOT!) two fellows, without them contribution and help I'll done nothing. First one is Jaykay640: he was (and is) super inspiring with his McLaren thread, and super-helpful with his answers: you're GIANT! The second is my friend Motociclante from the ita forum: he done really a huge research on PE techniques and materials, in particular on the UV device: thanks you too. Things you need: Transparent acetate for ink-jet or laser, you'll also ask a service to print your artwork on a slide hi res prnter for offset printing, if youre able to locate one: they're losting due the direct to plate printing tech. Paper tape (masking tape) and double side tape. UV device: you'll buy one or make your stuff: I done mine with an old scanner as box, four UV 12V lamps, few cables  : the web is full of tutorial about do something like that, just do a research, all the refs I have are in italian. : the web is full of tutorial about do something like that, just do a research, all the refs I have are in italian.Developing solution and acid: I'm still using some great stuff designed for plate etching (that is a bit different from electronic etching): BTW you'll use some thinned (water) caustic-soda as developer and ferric-cloride as acid: I don't like ferric cloride cos do much dirty and oxid. Some toluene solvent (nitro), or acetone, to remove the laquer after the etching. Pre-coated plates, ready for etching. You'll try the job with the famous UV laquer Positiv20, I tried: you'll achieve good result but for the little parts I need and for the cost I prefere ready boards. You'll find all from an electronic supplier. Let's start, please reply after "the end" And, at least, no hurry, like ever in modelling: you'll do all in 1 hour working quiet
__________________
 gio gio
Last edited by gionc; 04-25-2007 at 02:53 PM. |
|

|

|
|
04-25-2007, 01:57 PM
|
#2 | |
|
Authorized Vendor
Thread starter
Join Date: Oct 2005
Location: Vicenza - veneto de rassa
Posts: 3,909
Thanks: 6
Thanked 46 Times in 41 Posts
|
Re: How to do your own PE parts in 1 hour ;)
Step 1: Artwork.
Everyone here still using great PE stuff from good manufacturers: you know already how your PE shoud be! Anyway you need to know very little to start. The narrowed line you will do (as also for the smaller hole) is approx (to work in safety) 0.1mm plus 25% tolerance, I know some great manufacturer do smaller, but we, at home, aren't they LOL. So 0.1-0.2 mm minimum with a great printer device and good tools and acid, and a great eye to overlap slides: if you do it wrong of 0.1mm you already screwed up you job! I'm speaking of 2 sides etching: so we'll design different details (ex. engravings) in front and back side: following you'll see that I designed sprues just in the back side to allow part's removing. Just 2 words on the design: if you haven't any CAD/graphic design skills, meanwhile you learn, feel free to use this file (4 point harness/belts) to do your experiments: www.gionc.it/gioseatbelt.pdf (sorry Mods, I need to host in my site since photobucket don't allow pdf or other vector upload, if you have a solution to host here just let me know.) So: design our shapes. In that case I'm designing something for my 360CS build: basically I want to add pulleyes, belts and details and Tamiya offers a timing part's cover melted with belts and stuff... so I designed mine: overlapping as a template a 1/1 tamiya part's scan and next overlapping a detailed ferrari technical draw: first step:  I designed my stuff as a sketch just over the Tamiya 360 modena part's scan. Followin the almost completed job: 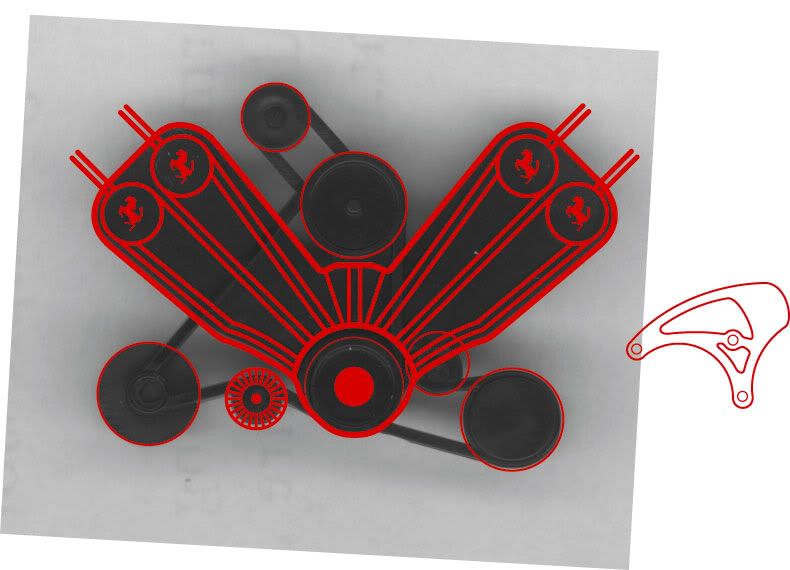 There I overlapped and detailed my job on a Ferrari tech, draw: like you'll see shapes I drawn match the draw: tamiya people done a great job! I started to add details like alternator and pumps backings. At least alternator was designed out of 11 parts: in 6x6x6 mm! 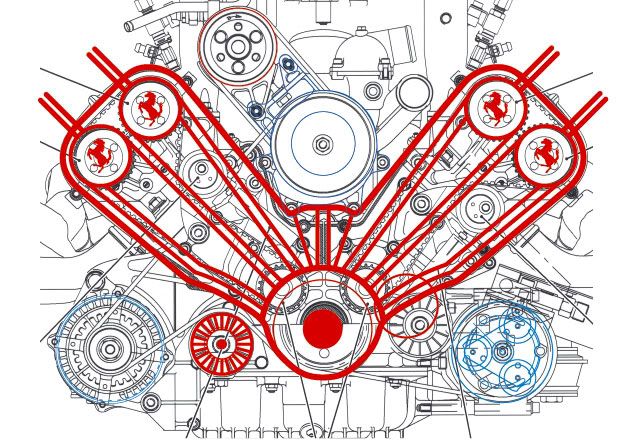 This is the finished job, front side: 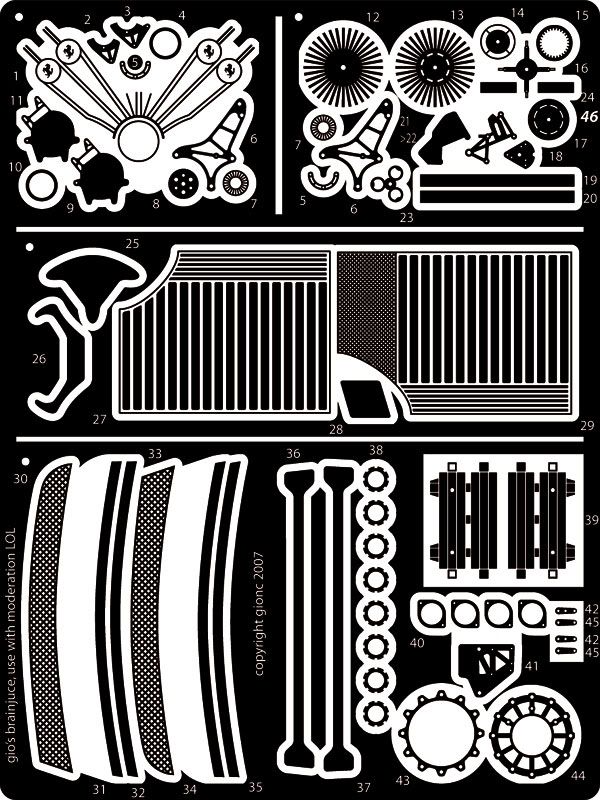 Important thing: less is the stuff that acid have to etch, less is the time, the acid and plate temperature, more the quality. So is good stuff to surround all and fill any space you don't need to etch. So I mirrored the job and added stuff like sprues to keep all toghether. 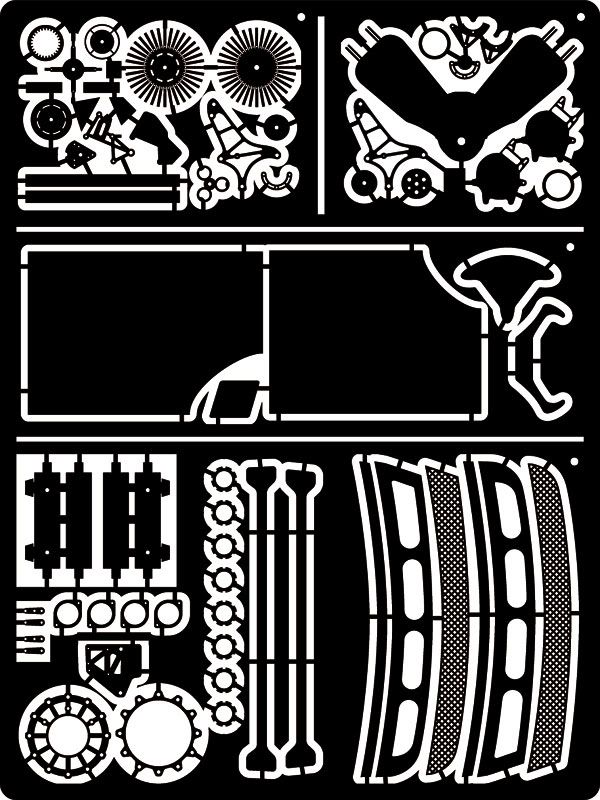 Doing the mirror job you need to draw some cross to allow next step: overlap's setup. 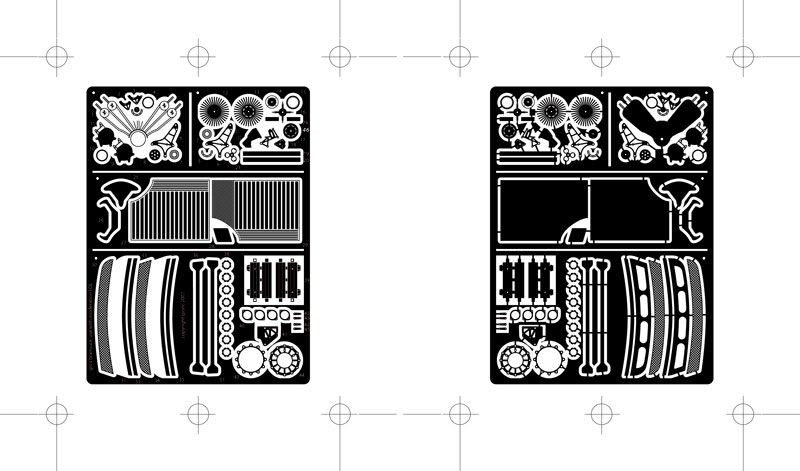
__________________
gio
|
|
|
|
|
|
04-25-2007, 02:12 PM
|
#3 | |
|
Authorized Vendor
Thread starter
Join Date: Oct 2005
Location: Vicenza - veneto de rassa
Posts: 3,909
Thanks: 6
Thanked 46 Times in 41 Posts
|
Re: How to do your own PE parts in 1 hour ;)
Time to print: I used a 9600x2400 dpi ink jet printer: enough for my needed. Just be sure to set up blacks at 100% for each ink in CMYK and gain a bit inks set up in the print dialog, you need a opaque black. Media needed are ink jet's films for presentation, better the quality, better the result. In print dialog choose "mirrored" or "emulsion back": you need to expose plates in contact with the ink, to avoid refractions that the film could do.
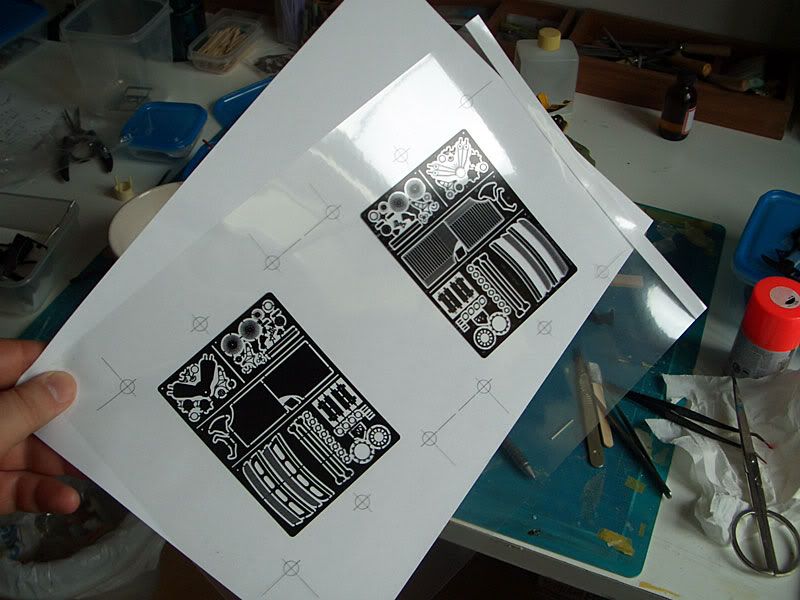 Now is time to cut the film: you have to perfectly and carefully overlap ink on ink the two drawings, little cross are done for that. Remember that a 0.1mm misallignement would burn all your 0.1 mm details, so take time, do attempt and fix with tape when you don gol! Now we have to glue slides togheter with double side tape: we need a pocket, or a sandwiches with the pre-sensybilized plate inside: 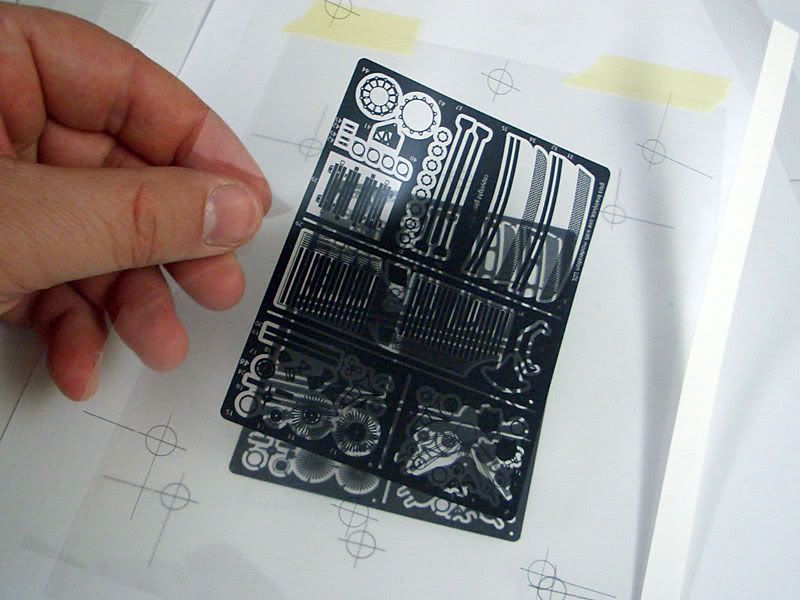   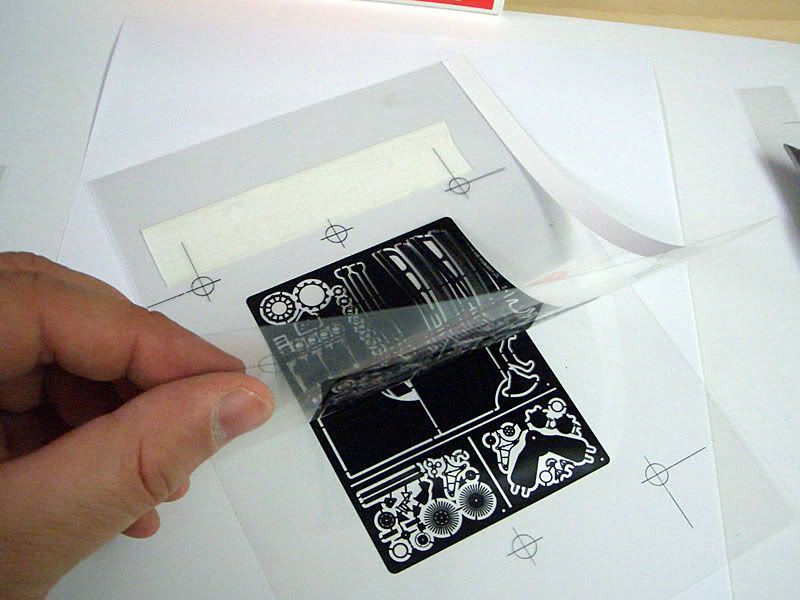 How you'll see the overlap's set up is good: 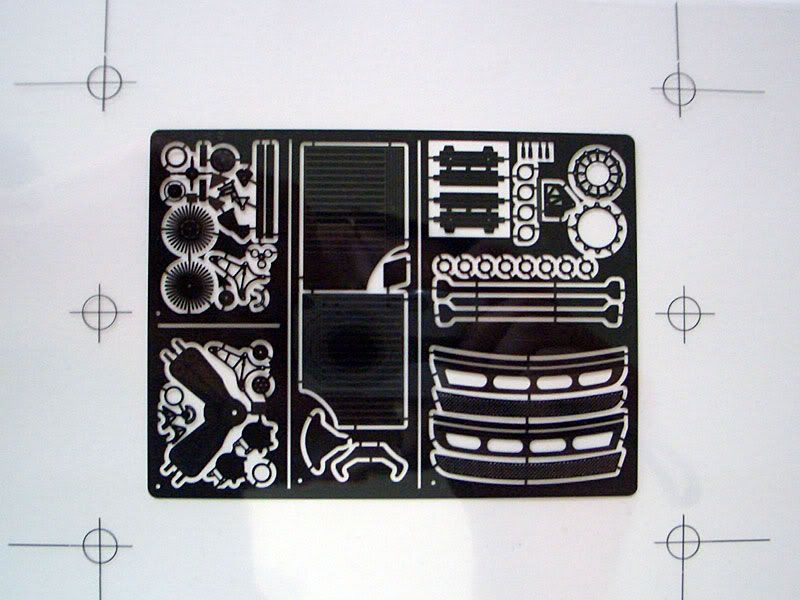
__________________
gio
|
|
|
|
|
|
04-25-2007, 02:38 PM
|
#4 | |
|
Authorized Vendor
Thread starter
Join Date: Oct 2005
Location: Vicenza - veneto de rassa
Posts: 3,909
Thanks: 6
Thanked 46 Times in 41 Posts
|
Re: How to do your own PE parts in 1 hour ;)
I guess you'll lost 10 minutes after the "print launch" if you work at the sloth speed
 So we have 50 min. left: more than needed So we have 50 min. left: more than needed   I guess we deserve a good beer before the etching I guess we deserve a good beer before the etching Time to cut th plate in the desired size (do it with a sharp knife since scissor could bend it) and peel the protection tape: you'll do it quickly at daylight, be sure to avoid overexpositions. 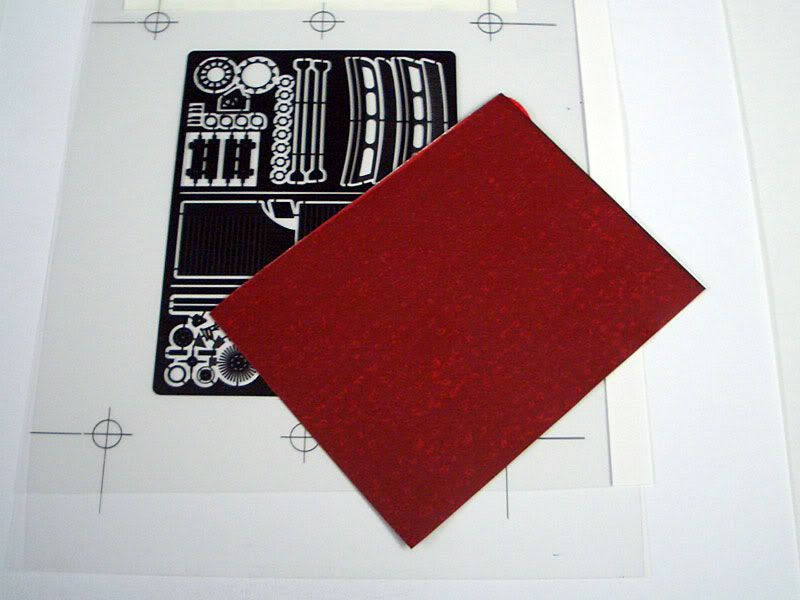 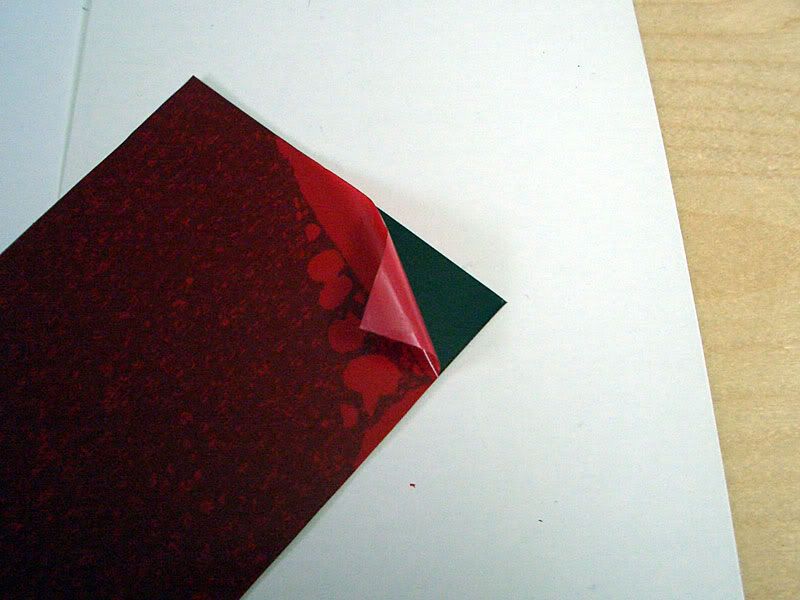 Insert the plated (peeled LOL) in the "pocket" you done with slides, fix it with tape and expose it in the UV device. Normally it need 2-3 minutes each side. I done a kind set-up on my UV device pulling tall the glass board approx 10-12 cm over lams: it help me a smooth and costant exposition, so times are a bit longer: approx 6 min/side. Also with old developer you may help chemicals with 2-3 mins more of exposition. So other 12 mins, 38 left, we have to start run  (just in case you want ask: my device isn't do by paper LOL I just filled with cardboard to avoid UV rays go around LOL) Develop the board: it would take a couple mins for side with 20° warm solution, this is teh result: 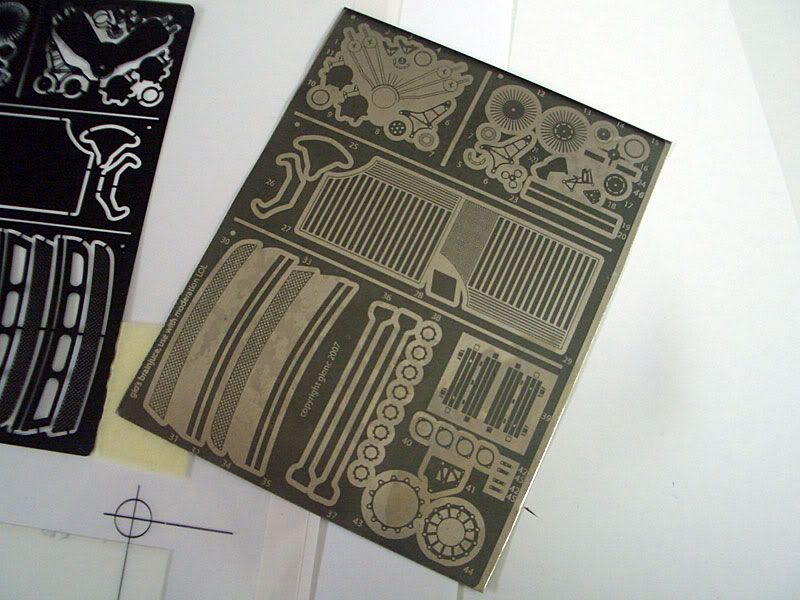 Like you'll see holes are now bare metal and stuff we need to keep are protected by a gray/green/blue laquer. 33 mins left: time to etch. Etching solution I used need to be warmed at approx 45° (I believe) and need to be stirred often. Or you buy a etching station with pump and warmer or... 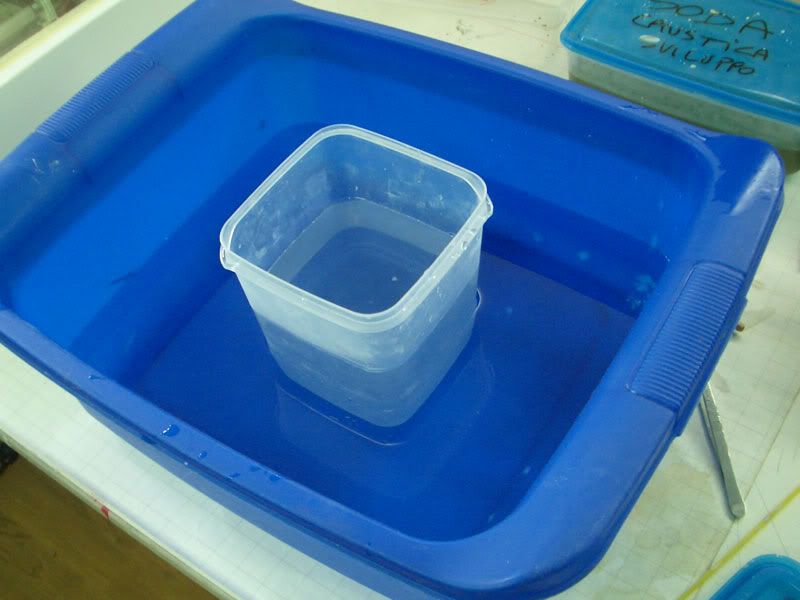 I put warm water in the big blue container, later the chemical reaction help to keep the temperature HI, may be useful cut your board in several parts, etching times may be different: 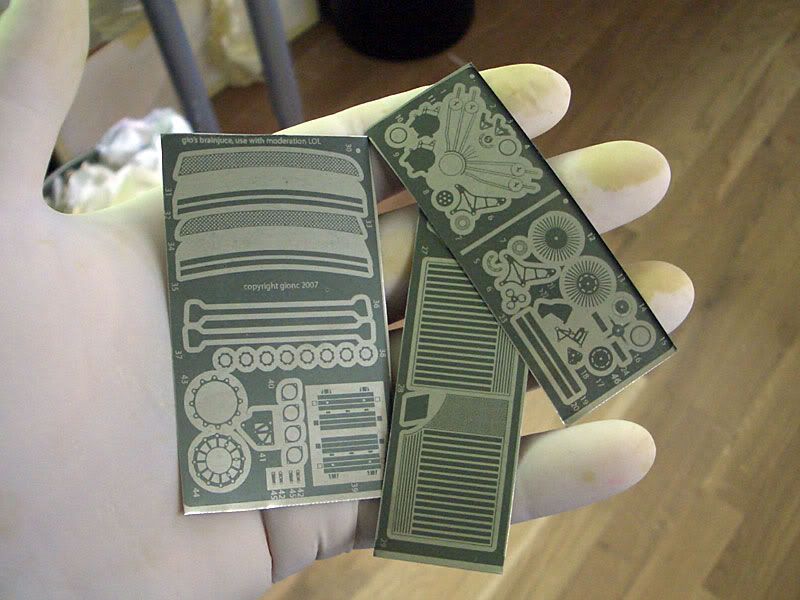 I found this solution to keep parts: 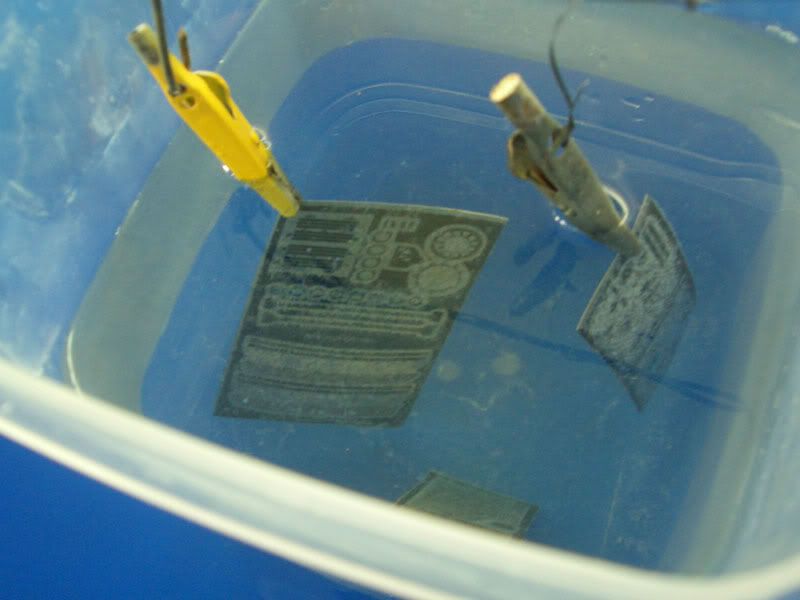 despite at begin acid is transparent, it quickly become cloudy: look what happened: it eat me a new pincher in few minutes! May be was a strange material, old two dirty pinchers are ok! 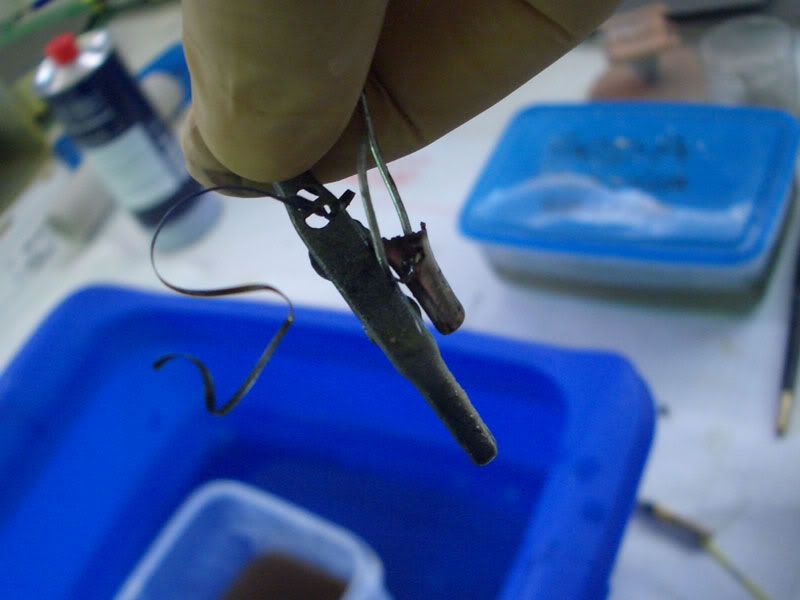 Every so often mix the solution, stirring it with a plastic wand and check it: you'll see that acid start to eat  Finally after 20-25 (30/40 with 3-4 times used acid) is time to wash your etched plate under water, dry it and wash on solvent to clean from the laquer: 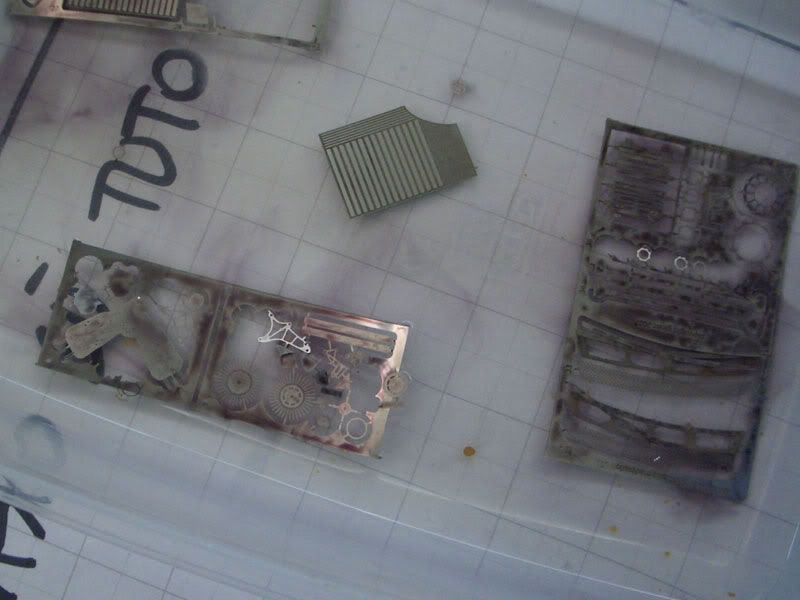 After cleaning, this is the result (1h later 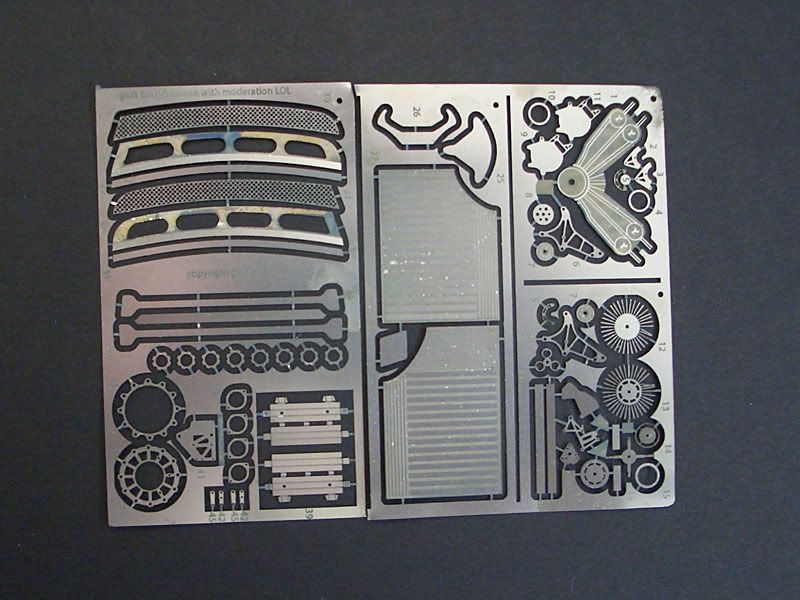 THE END! thanks a lot guys for read it, sorry if something was unclear (also for shi##y english) and be free to ask, if I can I'll answer. ciao gio
__________________
gio
|
|
|
|
|
|
04-25-2007, 02:46 PM
|
#5 | |
|
AF Enthusiast

Join Date: Aug 2005
Location: Chengdu. CHN
Posts: 1,269
Thanks: 20
Thanked 36 Times in 19 Posts
|
Re: How to do your own PE parts in 1 hour ;)
Uncountable thanks man!!!! You're the best!!!! and THIS THREAD IS A KILLER!!!!!
|
|
|
|
|
|
04-25-2007, 03:17 PM
|
#6 | |
|
AF Regular

Join Date: Sep 2006
Location: Winschoten
Posts: 480
Thanks: 0
Thanked 0 Times in 0 Posts
|
Re: How to do your own PE parts in 1 hour ;)
Nice tutorial.
maybe im going to etch my own stuff too |
|
|
|
|
|
04-25-2007, 03:25 PM
|
#7 | |
|
AF Enthusiast
 
Join Date: Mar 2006
Location: German Autobahn 7
Posts: 654
Thanks: 0
Thanked 0 Times in 0 Posts
|
Re: How to do your own PE parts in 1 hour ;)
WOW.
 |
|
|
|
|
|
04-25-2007, 03:42 PM
|
#8 | |
|
AF Premium User
 
Join Date: Mar 2003
Location: Mexico City
Posts: 379
Thanks: 1
Thanked 0 Times in 0 Posts

|
Re: How to do your own PE parts in 1 hour ;)
Wow! PRICELESS CONTRIBUTION!!!
Thank you very much!
__________________
Rodrigo Mexico    Hey!!! monkeys can't recreate things with such perfection. Hey!!! monkeys can't recreate things with such perfection.Respect the evolution!!!  (message to people making fun of our hobby) (message to people making fun of our hobby)
|
|
|
|
|
|
04-25-2007, 03:54 PM
|
#9 | |
|
AF Enthusiast

Join Date: Mar 2007
Location: Lisle, Illinois
Posts: 809
Thanks: 0
Thanked 2 Times in 2 Posts

|
Re: How to do your own PE parts in 1 hour ;)
damn only if I had the money to do this
that is awesome that you can make your own PE parts
__________________
Steve |
|
|
|
|
|
04-25-2007, 04:13 PM
|
#10 | |
|
Razor Sharp Twit
 
Join Date: Mar 2004
Location: london
Posts: 5,863
Thanks: 0
Thanked 25 Times in 21 Posts
|
Re: How to do your own PE parts in 1 hour ;)
for those interested, maybe you can give an indication of the costs involved for the required supplies and/or services.
__________________
AF's Guidelines Read them. __________________  Currently in the process of re-hosting my photos. If any go missing, drop me a PM. |
|
|
|
|
|
04-25-2007, 04:14 PM
|
#11 | |
|
Captain Over Engineer
Join Date: Feb 2003
Location: New York, New York
Posts: 6,711
Thanks: 27
Thanked 29 Times in 23 Posts

|
Re: How to do your own PE parts in 1 hour ;)
Awesome! Thanks Gio...thats all I need, one more project to build my models. They'll never be finished now. I'm going to want PE for everything.
__________________
-Mike AF Director of Media / Photographer  mike.lawrence@automotiveforums.com | AutomotiveForums.com | Flickr Gallery |
|
|
|
|
|
04-25-2007, 04:27 PM
|
#12 | |
|
AF Enthusiast
Join Date: Oct 2004
Location: Schweinfurt
Posts: 1,229
Thanks: 1
Thanked 13 Times in 13 Posts
|
Re: How to do your own PE parts in 1 hour ;)
I will try that some time in the future. Many thanks for the tutorial...I always wanted to know how this is done. Great pictures!
|
|
|
|
|
|
04-25-2007, 04:49 PM
|
#13 | |
|
AF Enthusiast

Join Date: Jun 2002
Location: Osijek
Posts: 2,329
Thanks: 0
Thanked 9 Times in 7 Posts

|
Re: How to do your own PE parts in 1 hour ;)
Great Gio!
It reminds me on time when I made my electronic devices. :-)
__________________
Zeljko Segin http://www.hrmodeler.com - Fast wheels - my pages My current project - ..... 
|
|
|
|
|
|
04-25-2007, 05:32 PM
|
#14 | ||
|
Authorized Vendor
Thread starter
Join Date: Oct 2005
Location: Vicenza - veneto de rassa
Posts: 3,909
Thanks: 6
Thanked 46 Times in 41 Posts
|
Re: How to do your own PE parts in 1 hour ;)
Quote:
UV coated plates: something like 7-8$ for a 100x250 mm 0.10mm thick nickel board. (what I used) Brass and steel cost more, as per more thickness. Acid: from 8 to 13-15 $ for 1 Kg (mine was the best one) , it work with 3 liters of water, I use 1 liter a time, you'll use the solution several times: I used also moths after but you'll have even dirty results: but at least you'llwash better or sand. Developer: approx 3 $, it works with 1 lt. water, you'll use the same times of the acid: but developing times may come slow. I guess no other Services: slide print approax 15 bucks each A4, but the quality is fine, I used for my montecarlo project and come out superb. Services: etching: approx 20-25 $ for each A4 (210x297 mm something like 6 good sets) and something like 130 $ for una-tantum tooling (for slides etc.) so you'll pay the same for 1 or 10.000 sets: I used a ita professional srvice for my montecarlo project, done by stainless steel, and it come out superb.
__________________
gio
|
||
|
|
|
|
04-25-2007, 05:32 PM
|
#15 | |
|
Authorized Vendor
Thread starter
Join Date: Oct 2005
Location: Vicenza - veneto de rassa
Posts: 3,909
Thanks: 6
Thanked 46 Times in 41 Posts
|
Re: How to do your own PE parts in 1 hour ;)
Thanks guys I appreciated a lot
__________________
gio
|
|
|
|
|
|
|
POST REPLY TO THIS THREAD |
 |
|
|


