|
|
|

|
|
| Search | Car Forums | Gallery | Articles | Helper | AF 350Z | IgorSushko.com | Corporate |
|
| Latest | 0 Rplys |
|
|||||||
| WIP - Motorsports Post topics for any "Work In Process" motorsports vehicles in this sub-forum. |
 |
 Show Printable Version | Show Printable Version |  Email this Page | Email this Page |  Subscribe to this Thread
|
|
|
Thread Tools |
 02-08-2022, 05:10 AM
|
#16 | |
|
AF Enthusiast
Thread starter
Join Date: Mar 2009
Location: Madrid
Posts: 649
Thanks: 109
Thanked 68 Times in 67 Posts
|
Re: Lancia "Deltona" Repsol 1993 - Hasegawa 1/24
Durante este periodo largo sin poner ninguna actualización, me he dedicado a analizar las posibilidades que tenía para poner bisagras en todas las piezas del coche que recorté, es decir, capó, portón trasero y puertas, empezando por el portón trasero. Ponía en práctica todo lo que pensaba, por lo que todo no era viable hasta el final. Aquí os indico todo lo que hice con él. Y después vino el capó, con su test, que aunque no tiene terminadas las bisagras, ya se como tiene que funcionar. Solo aviso que voy a escribir mucho en esta entrada!!
During this long period without adding any updates, I have been analyzing the possibilities I had to put hinges on all the parts of the car that I cut out, i.e. bonnet, tailgate and doors, starting with the tailgate. I put into practice everything I thought, so everything was not feasible until the end. Here is what I did with it. And then came the bonnet, with its test, that although the hinges are not finished, I know how it has to work. Just a warning that Im going to write a lot in this post! Empezamos por el portón trasero. Lo primero que hice fue intentar poner un eje de giro para que el portón trasero girara, digamos que fijo como el de la foto. Pero me di cuenta que el portón necesitaba salir de su posición, por lo que el eje de giro debia estar más hacia delante. Lets start with the tailgate. The first thing I did was to try to put a pivot shaft for the tailgate to rotate, lets say fixed like the one in the picture. But I noticed that the tailgate needed to come out of its position, so the pivot should be more forward. 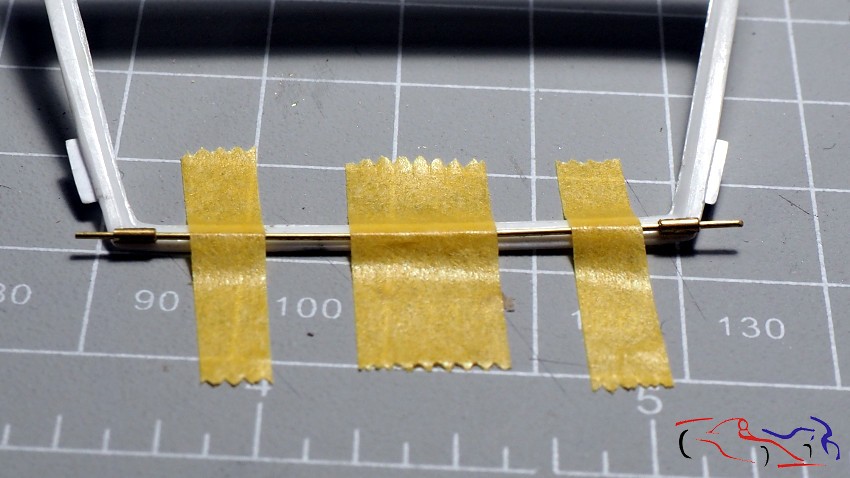 Y tanto le di vueltas, que me di por vencido por que veia la solución muy lejana, decidiendo dejar el portón abierto. Para ello, hice en latón, unas bisagras fijas, tal y como muestro a continuación. Además, en ese análisis de como hacerlas, pensé en dos variantes: la definitiva con las piezas de latón recreando las bisagras (en las dos primeras fotos), y la primera, con tubo de latón doblado. Como véis, no he estado parado todo este tiempo!! I thought about it so much, that I gave up because I saw the solution very far away, deciding to leave the gate open. To do this, I made some brass fixed hinges, as shown below. Also, in this analysis of how to make them, I thought of two variants: the final one with the brass pieces recreating the hinges (in the first two photos), and the first one, with bent brass tube. As you can see, I havent been standing still all this time! 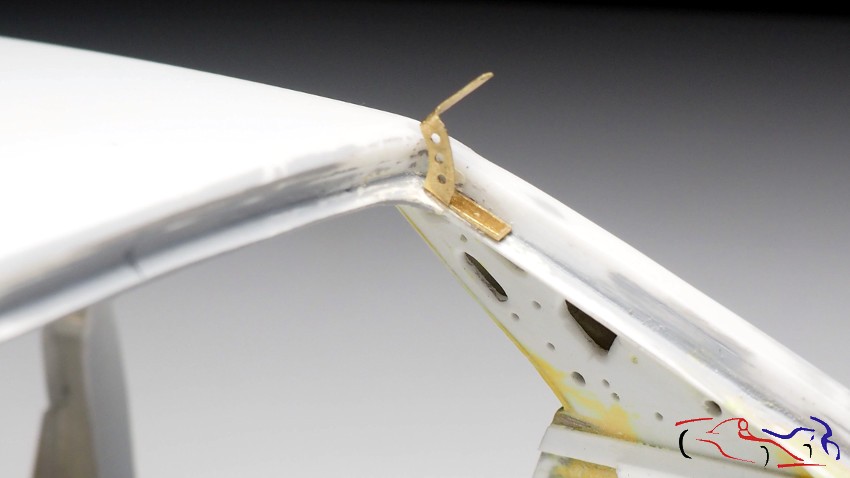 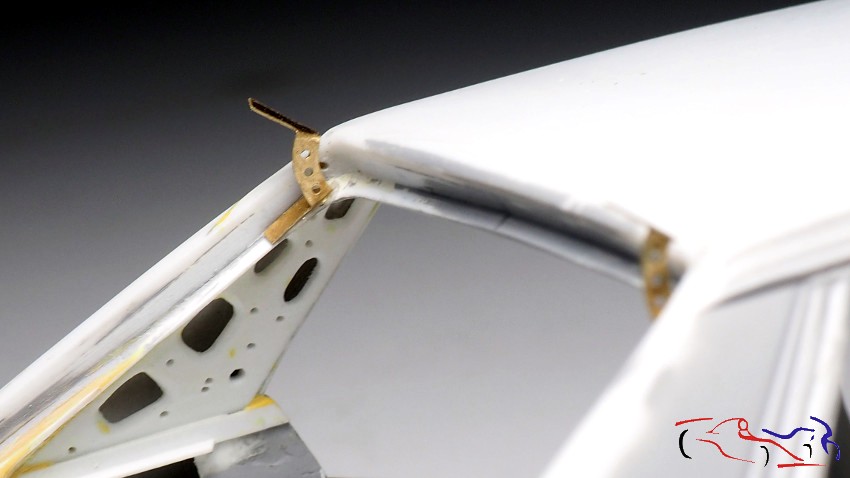 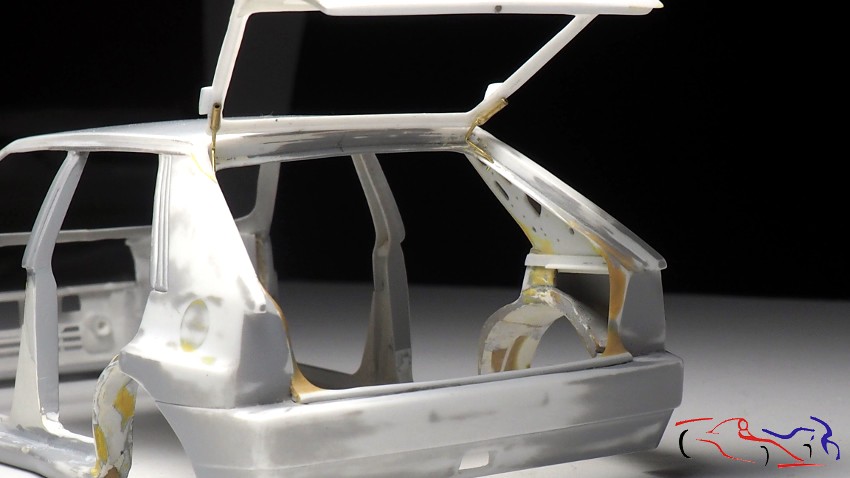 Y en ese momento, me llegó el Lancia Delta Integrale de Italeri a escala 1/12, en el que vi, la solución aportada por la marca italiana. Dicha solución, aunque no muy real, recortaba el marco de la carrocería por el que pasarían el tubo anclado en el portón, cuyo eje de giro se situaba en la carrocería, en la parte de detrás muy cerca del marco. Y decidí copiarlo. Tomé medidas e hice pruebas .mil pruebas, hasta que di con las medidas correctas, pasando a hacer la pieza definitiva como se ve en la foto. Tened en cuenta que ese tubo va metido en otro que es el que se pegará a la carrocería, permitiendo que la pieza gire: And at that moment, I received the Lancia Delta Integrale from Italeri in 1/12 scale, in which I saw the solution provided by the Italian brand. This solution, although not very real, cut out the frame of the bodywork through which the tube anchored in the tailgate would pass, whose axis of rotation was located in the bodywork, in the rear part very close to the frame. And I decided to copy it. I took measurements and made tests .thousands tests, until I found the correct measurements, and then I made the final piece as shown in the photo. Keep in mind that this tube goes into another one that will be glued to the body, allowing the piece to rotate: 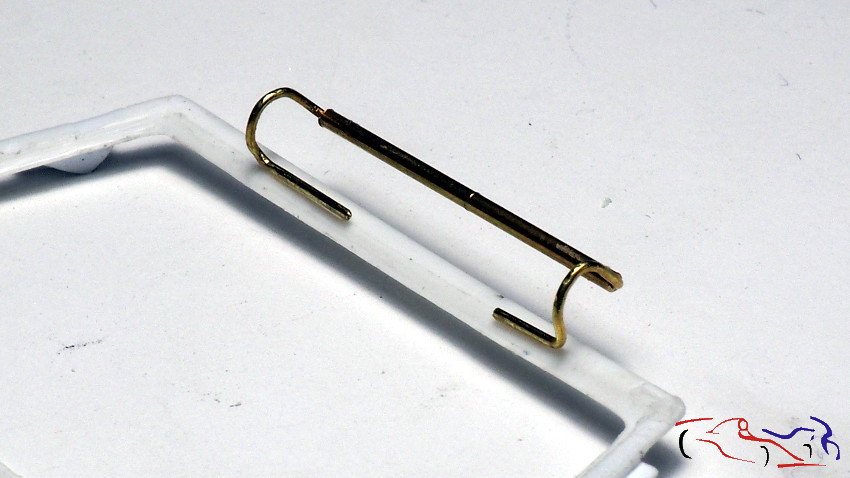 A su vez, recorté el marco del portón que hice en la carrocería . At the same time, I cut out the door frame, that I made on the bodywork .. 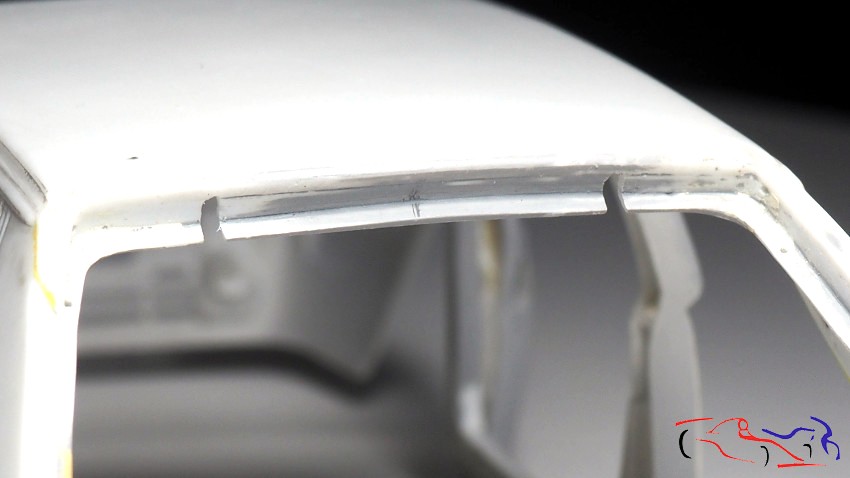 Siendo éste el resultado una vez abierto y cerrado: This is the result, opened and closed: 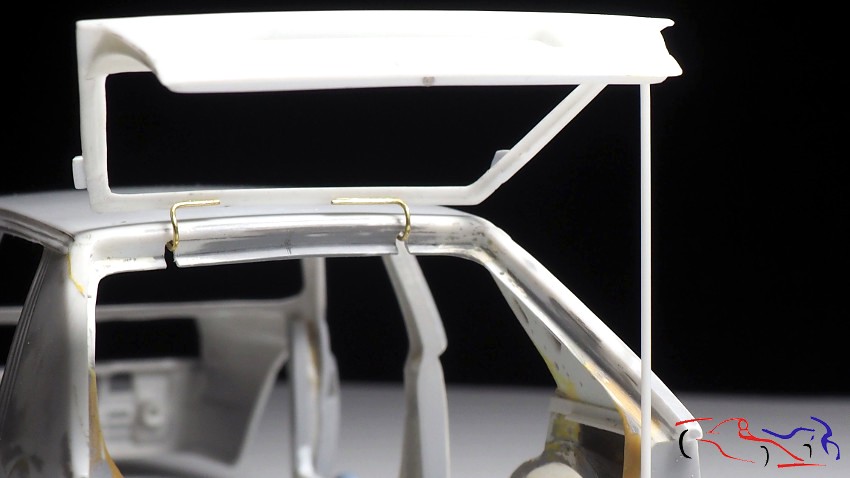 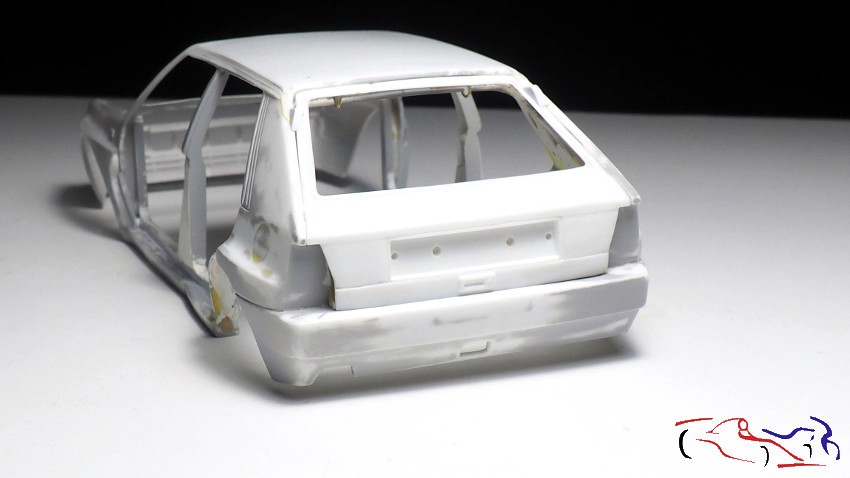 Aquí os muestro, donde va fijada la bisagra, con BlueTack para las pruebas. Here I show you, where the hinge is fixed, with BlueTack for testing. 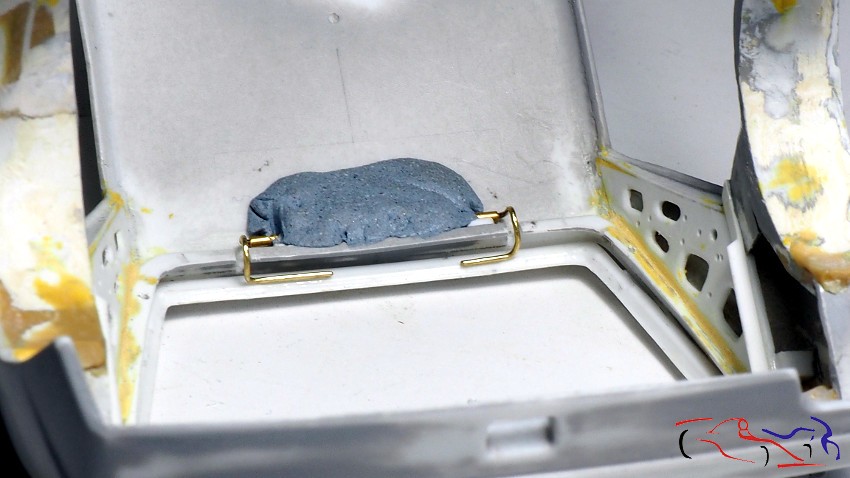 Y una vez pensado el portón trasero, nos movemos hacia el capó, ya que al tener el motor de Claudio de Bellis pendiente, el tener este asunto solucionado me permitirá avanzar con él. Para hacer estas bisagras, hay que tener en cuenta que el capó pivota por la bisagra y sale por delante de la rejilla y de los faros, tapándolos un poco por la parte superior. Esto es determinante para ver donde se pone el angulo de giro. Y en principio, intento hacerlo como el coche real, como vemos en la siguiente foto. Pero toda esa bisagra, aunque es muy pequeña, es enorme para el espacio que tengo. Además, una de esas piezas se me partió en la soldadura, por lo que no me sirvieron And once we have thought about the tailgate, we move on to the bonnet, as having the Claudio de Bellis engine pending, to have this issue solved will allow me to move forward with it, with the engine. To make these hinges, we have to take into account that the bonnet pivots with the hinge and comes out of the grille and the headlights, covering them a little at the top. This is decisive to see where the pivot angle is. And at the beginning, I try to do it like the real car, as we can see in the following picture. But all that hinge, although it is very small, is huge for the space I have. Besides, one of those pieces broke during the welding process, so they were no good for me 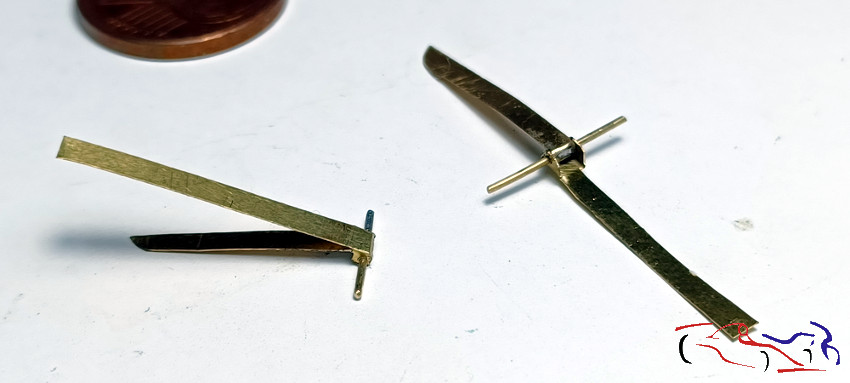 Pero para pensar en la solución, debía saber del espacio que disponía, incluyendo el superior hacia el capó. Por loq ue me dediqué a poner los nervios del capó, realizados en 3D por Claudio de Bellis, que se invluyen en el conjunto del motor. Decir que aunque yo había realizado dicha pieza, esta es más real. Y lo primero que hago es eliminar los pivotes que sobresalían para fijar el capó en la cuna del motor. Los corto y limo la parte que sobresalía en dicha pieza correspondiente a la bisagra simulada. Y pegamos la pieza al capó con ciano, ajustándola a las rejillas. Una vez pegada, repasé los bordes de toda la pieza para que dejaran un contorno libre, y redondeando las esquinas conforme al modelo real. But thinking about the solution, I had to know how much space I had, including the space above the bonnet. So I decided to put the bonnet ribs, made in 3D by Claudio de Bellis, which are integrated in the whole engine. Although I had made this part, this one is more real. And the first thing I do is to remove the pivots that protruded to fix the bonnet to the engine cradle. I cut and file the part that protruded on the piece corresponding to the simulated hinge. And we glued the piece to the bonnet with cyano, adjusting it to the grilles. Once glued, I reworked the edges of the whole piece to leave a free contour, and rounding the corners according to the real model. 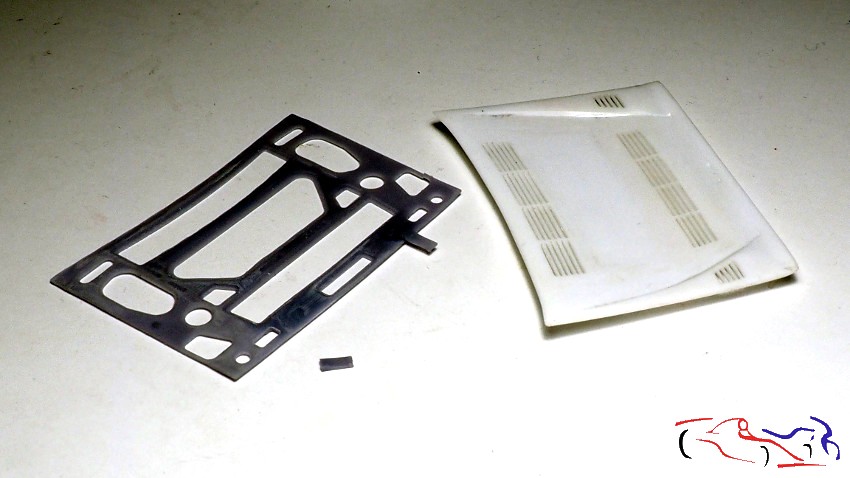 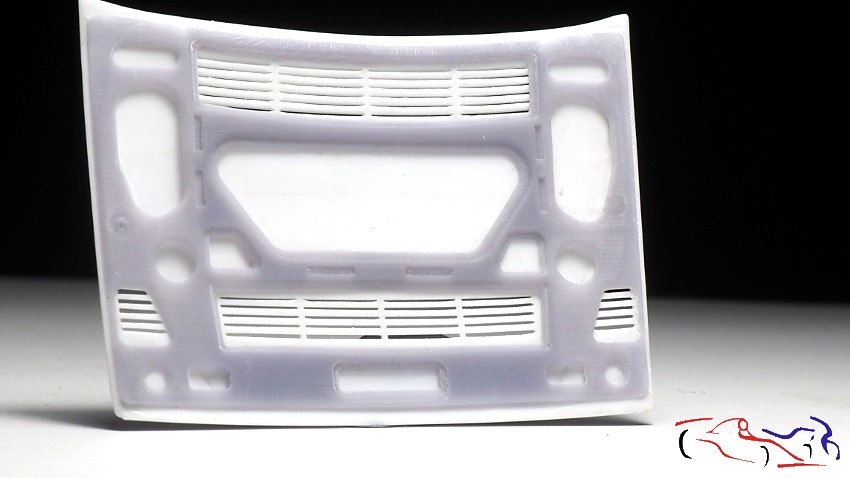 Vamos a revisar ahora el espacio que tengo para poner la bisagra. Para ello ponemos la cuna y colocamos la rejilla en su posición, fijandola con cinta adhesiva transparente de doble cara. We are now going to check the space I have to put the hinge. To do this, we put the cradle in place and place the grille in position, fixing it with double-sided transparent adhesive tape. 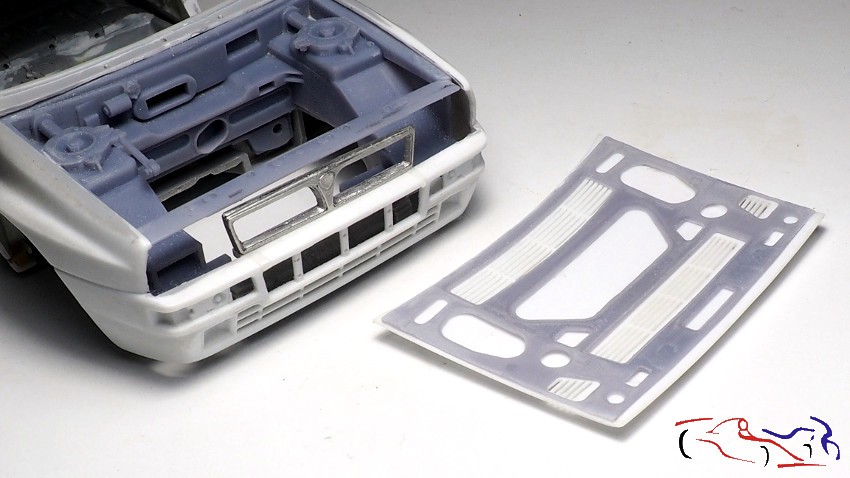 Desde aquí, vemos el espacio que hay y me doy cuenta que la barra transversal donde se apoyan las bisagras es quizás demasiado ancha y haya que ponerla más fina. Pero eso lo dejamos para más adelante. Lo que si tengo que hacer, es abrir esos dos huecos hacia adelante, para que las bisagras puedan moverse. Recordad que esos agujeros estaban pensados para poner los que eliminé de la pieza de los nervios del capó. También observé, que la rejilla de metal blanco de un TK de Studio27 que usaré, sobresale un poco hacia adelante. Tendré que hacer una fijación que sea más fiable. From here, we can see how much space there is and I show that the cross bar where the hinges rest is perhaps too wide and needs to be made thinner. But well leave that for later. What I do have to do, is to open those two holes forward, so that the hinges can move. Remember that those holes were intended to put the ones I removed from the bonnet rib piece. I also noticed, that the white metal grille from a Studio27 TK that I will use, stands out a bit to the front. Ill have to make a fixing that is more reliable. 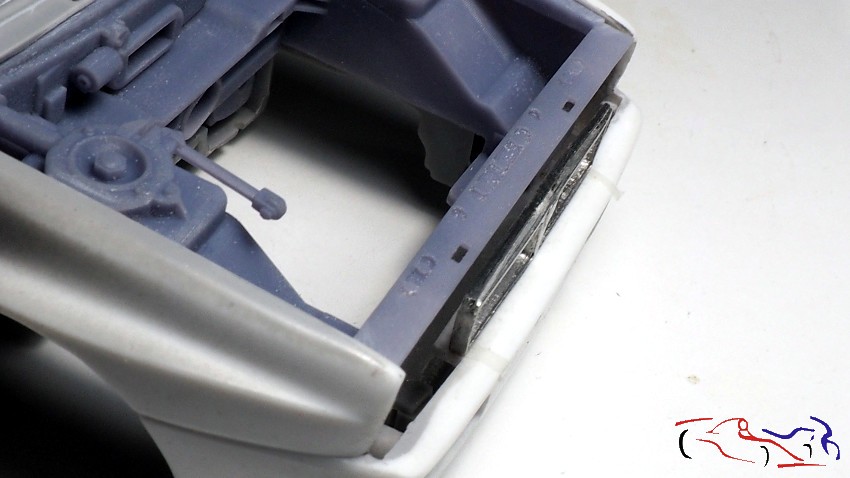 Y si la vista es posterior, tenemos una prolongación en la carrocería que se puede aprovechar, justo debajo de la rejilla. And if the view is from the rear, there is an extension in the bodywork that can be exploited, just below the grille. 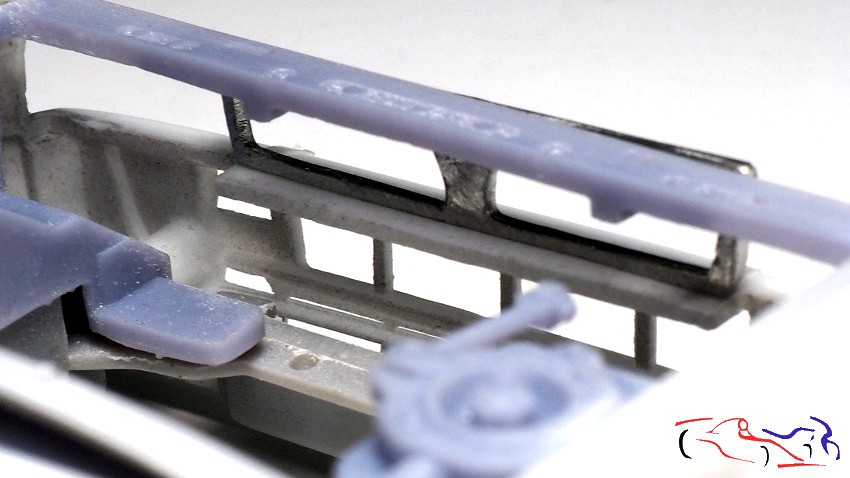 Y ahora montamos todo un poco para ver los encajes. Si véis, la pieza d ela rejilla está adelantada respecto al capó, por lo que la tengo que poner más hacia detrás. A su vez, véis que no toca por su parte inferior la carrocería. Esto es debido a que la he elevado un poco porque tanto abajo como arriba, el coche real tiene un espacio que hayq ue mantener. Para ello, hice una pieza donde va montada dicha rejilla y con un tope para que no se mueva hacia detrás, favoreciendo su posición a la hora de pegarla. And now we put everything together a bit to see the fittings. If you can see, the grille piece is advanced with respect to the bonnet, so I have to put it further back. At the same time, you can see that it doesnt touch the lower part of the bodywork. This is because I have raised it a little because both below and above, the real car has a space that must be maintained. To do this, I made a piece where the grille is mounted and with a stop so that it does not move backwards, facilitating its position when gluing it. 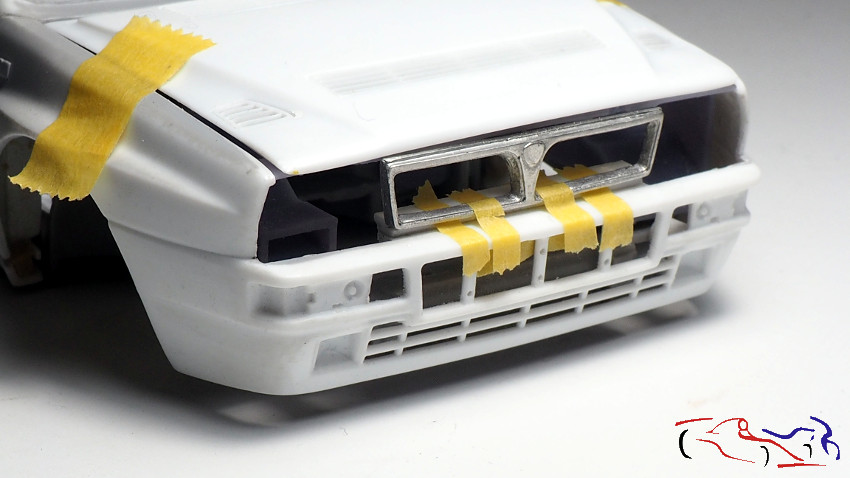 Y como no, las bisagras. Es un tubo soldado a una pletina de latón, cortada de un fotograbado de un interiro de unas llantas. And of course, the hinges. It is a tube soldered to a brass plate, cut from a photoengraving of the inside of a wheel rim. 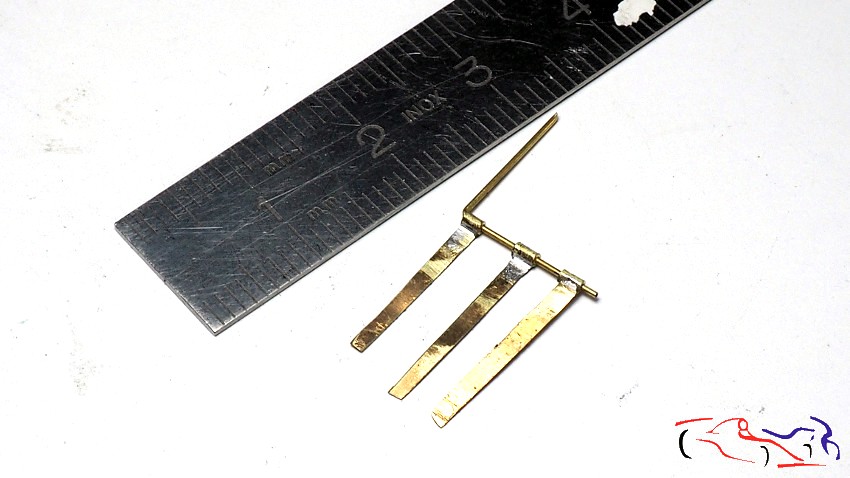 Hice tres por si una se me rompía, cosa que sucedió, al doblarlas de acuerdo al espacio que tenía. I made three in case one broke, which it did, folding them according to the space I had. 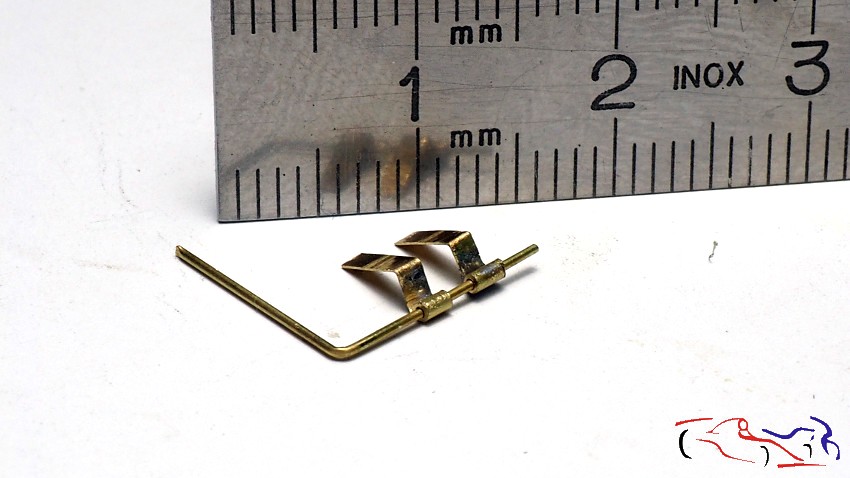 Y ahora os muestro como irán colocadas. La izquierda está en posición de capó cerrado, y la derecha de capó abierto. El tubo soldado irá fijado con un redondo interno, que en forma de U irá colocado en dos agujeros hechos en la rejilla, y así podrá girar. And now I show you how they will be positioned. The left one is in closed bonnet position, and the right one in open bonnet position. The welded tube will be fixed with an internal round, which in a U-shape will be placed in two holes made in the grille, so it will be able to rotate. 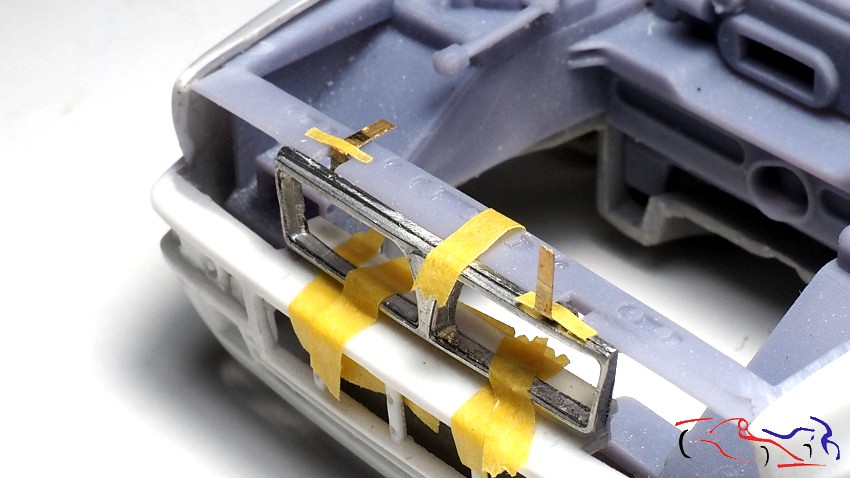 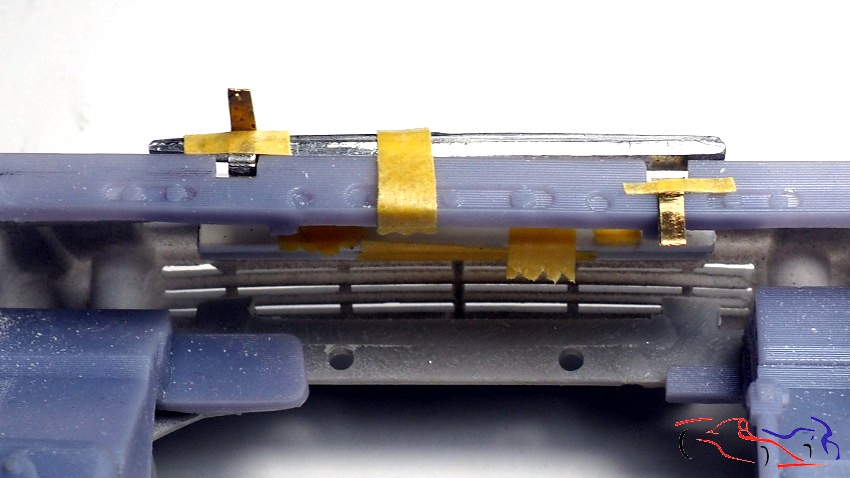 Como véis, el espacio es mínimo y tengo que trabajar casi a la décima de milimetro. Aun así, creo que si que lo tengo enfilado, y puedo ser más optimista de pasar al siguiente paso: las bisagras de las cuatro puertas!! Pero primero tengo que fijar las del capó y mostrarlo!! (y no se si empezaré otro kit más rapidito para hacer a la vez sin tanta compliacaión :-)). As you can see, the space is minimal and I have to work almost to the tenth of a millimetre. Even so, I think Ive got it lined up, and I can be more optimistic about moving on to the next step: the hinges for the four doors! But first I have to fix the bonnet hinges and show it off! (and I dont know if Ill start another model quicker to do at the same time without so much complication :-)).. Garcias por ver y comentar!! Thanks for watching and commenting! |
|

|

|
|
02-10-2022, 04:13 PM
|
#17 | |
|
AF Regular
Join Date: Aug 2011
Location: Torino
Posts: 390
Thanks: 175
Thanked 62 Times in 58 Posts
|
Re: Lancia "Deltona" Repsol 1993 - Hasegawa 1/24
Super detailed job on the hinges Jesus! I really like your incredible precision!
 Something to learn from you! Something to learn from you! |
|
|
|
|
|
02-10-2022, 04:26 PM
|
#18 | ||
|
AF Enthusiast
Thread starter
Join Date: Mar 2009
Location: Madrid
Posts: 649
Thanks: 109
Thanked 68 Times in 67 Posts
|
Re: Lancia "Deltona" Repsol 1993 - Hasegawa 1/24
Quote:
|
||
|
|
|
|
09-06-2022, 10:34 AM
|
#19 | |
|
AF Enthusiast
Thread starter
Join Date: Mar 2009
Location: Madrid
Posts: 649
Thanks: 109
Thanked 68 Times in 67 Posts
|
Re: Lancia "Deltona" Repsol 1993 - Hasegawa 1/24
Ya ha pasado mucho tiempo desde el post anterior de Febrero de 2022, y una vez terminado el Audi R8, volvemos con el Lancia Delta, ya que he estado trabajando sobre las bisagras del capó y de la puerta delantera derecha durante este tiempo pasado. Por tanto, en esta actualización y en la siguiente, solo hablaré de bisagras. Y empezamos con la del capó. Analizando el coche original en fotos, se puede observar que el eje de giro de las bisagras está más abajo que la línea inferior del capó, y que forma una doble L hasta que se fija en dicho capó. Esto es debido a que es necesario que la calandra delantera qué por detrás del capó abierto, o en otras palabras, que el capó abierto se coloca delante de la calandra. Para ello, realizo las siguientes piezas con latón: la superior será la pieza que va fijada en la trasera de la calandra de forma fija, y las dos de debajo, serán cada una de las pestañas irán metidas en el tubo superior, y que girarán porque estarán pegadas al capó, de tal manera que el tubo superior, será el eje de giro:
There is a lot of time simce the previous post on Febreuaty 2022, and having finished the Audi R8, we are back to the Lancia Delta, as I have been working on the bonnet and right front door hinges during this past time. So, this and the next update, I will only talk about hinges. And we start with the bonnet hinge. Analyzing the original car pictures, you can see that the pivot axis of the hinges is lower than the lower line of the bonnet, and that it forms a double L until it is fixed on the bonnet. This is because it is necessary that the front grille is placed behind the open bonnet, or in other words, that the open bonnet is placed in front of the grille. For this, I make the following pieces with brass: the upper one will be the piece that is fixed to the rear of the grille in a fixed way, and the two below, will be each one of the tabs that will go into the upper tube, and that will turn because they will be glued to the bonnet, in such a way that the upper tube, will be the axis of rotation: 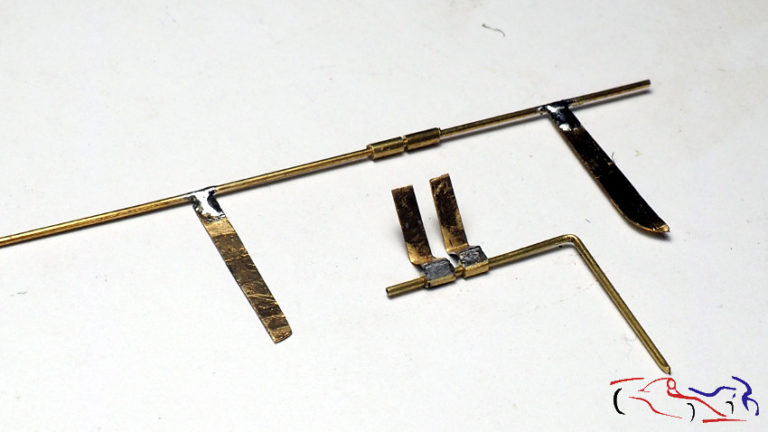 Y para pegarlo a la parte trasera de la calandra, lo sujeto todo para que el ciano haga su efecto. Podemos ver las dos piezas de los extremos, en forma de doble L que serán las que al ir pegadas al capó, girarán a la hora de abrirse. And to stick it to the rear part of the grille, I hold it all together so that the cyano can make its effect. We can see the two pieces at the ends, in the shape of a double L, which will be the ones that will be glued to the bonnet and will rotate when it is opened. 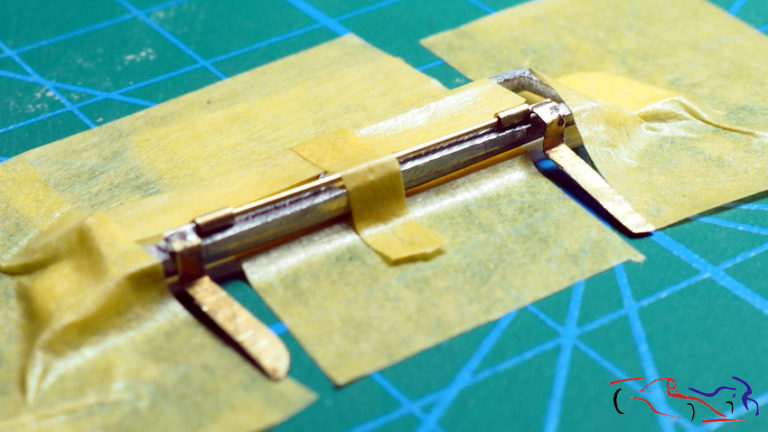 Y este es el resultado. Pero ..la doble L de esas piezas, el tubo y los dobleces, necesitan un espacio mayor del que tenía, por lo que el capò no llegaba a cerrarse. Funciona bien, pero el resultado no es fino. Podéis verlo en el siguiente video: https://youtu.be/BFGUv9JquV8 And this is the result. But ..la double L of those pieces, the tube and the bends, need more space than I had, so the bonnet didnt close. It works well, but the result is not fine. You can see it in the following video: https://youtu.be/BFGUv9JquV8 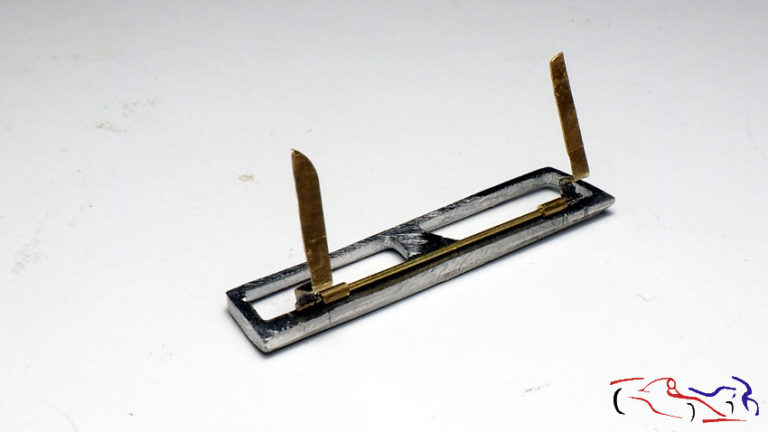 Entonces, estuve pensando en hacer la bisagra con imanes: si colocamos un imán, junt a otro que está fijo, el primero se puede mover sin separarse. Si a ese que se puede mover, le pegamos una pieza, esa pieza gira. Esta es la idea. Y para empezar, necesito más espacio con lo que recorto un poco la parte delantera de la pieza donde se apoyan las bisagras. Esta pieza de resina, es la cuna del motor del TK de Claudio de Bellis So, I was thinking about making the hinge with magnets: if we place a magnet next to another one that is fixed, the first one can move without separating. If we glue a piece to the one that can move, that piece rotates. This is the idea. And to start with, I need more space, so I cut a little bit the front part of the piece where the hinges rest. This resin piece is the engine cradle of Claudio de Belliss TK. 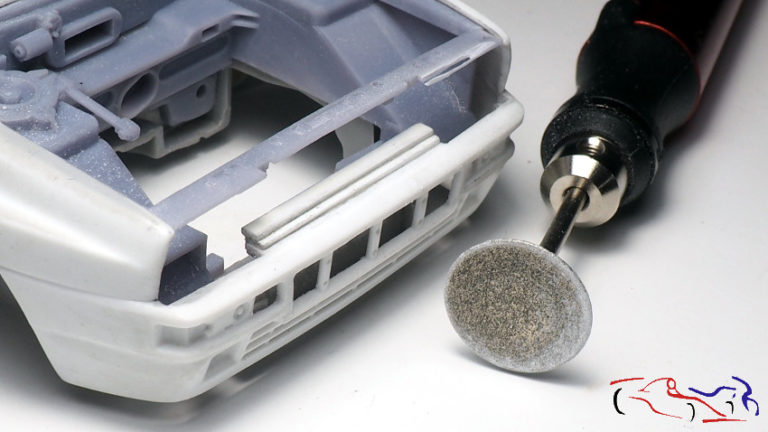 Lo siguiente es hacer las bisagras. Para ello, corto unas tiras de latón, de unos 2mm, y las fijo en la mesa con cinta d enmascarar. Despues cojo la tira de imanes alineados y la coloco junto al latón, para que queden unos 3 imanes dentro del ancho del latón, y los fijo con más cinta de enmascarar. Ahora, deposito unas gotas de ciano para que esos 3 imanes, se peguen al latón. Si hubiera tenido imanes de 2mm de largo, los hubiera usado en lugar de poner 3. Estos imanes son de 1mm de diametro y de menos de 1mm de alto. The next step is to make the hinges. To do this, I cut some strips of brass, about 2mm, and fix them to the table with masking tape. Then I take the strip of aligned magnets and place it next to the brass, so that there are about 3 magnets inside the width of the brass, and fix them with more masking tape. Now, I put a few drops of cyano so those 3 magnets stick to the brass. If I had 2mm long magnets, I would have used them instead of 3. These magnets are 1mm in diameter and less than 1mm high. 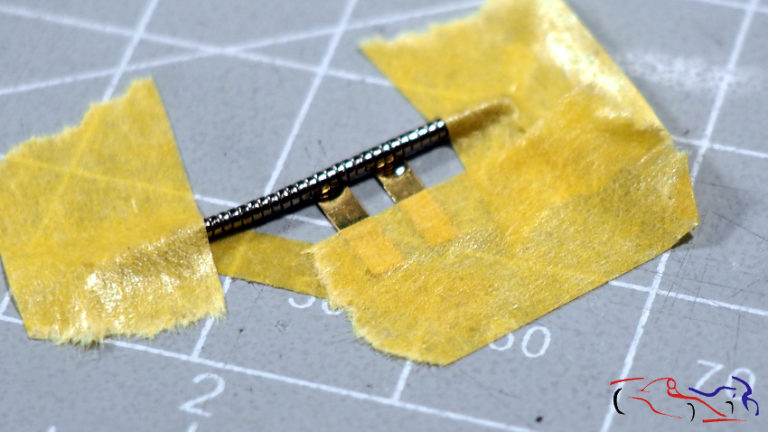 Unas vez secos, separo los imanes que no están pegados, y doblo las tiras de laton en foma de doble L. (las medidas ya las había cogido y en las tiras de laton ya estaban marcados por donde debía doblar). Y ahora, tenía que hacer unas fijaciones para colocar los imanes de los extremos. Para eso, corté más tiras de latón, les pegué en los extremos unos imanes cuadrados, y doblé las tiras en forma de L para fijarlas en la base de la calandra, pero por dentro de ésta, como aparece en la siguiente foto. La calandra está horizontalmente girada hacia la cámara para dejar ver el juego de imanes. Once they are dry, I separate the magnets that are not glued, and I bend the brass strips in a double L shape (I had already taken the measurements and the brass strips were already marked where I had to bend). And now, I had to make some fixings to place the magnets at the ends. For that, I cut more brass strips, glued some square magnets on the ends, and bent the strips in an L shape to fix them to the base of the radiator grille, but inside it, as shown in the following picture. The grille is horizontally turned towards the camera to show the magnet set. 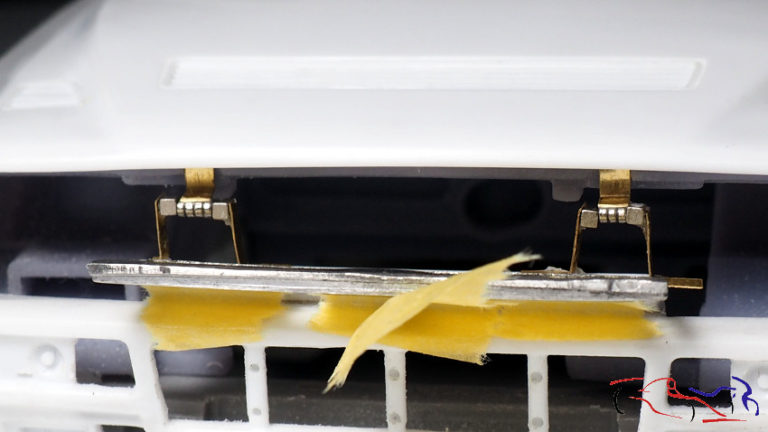 En as siguientes fotos, vomos como queda una vez abierto, sorteando la calandra delantera: In the following pictures, you can see how it looks like once it has been opened, avoiding the front grille: 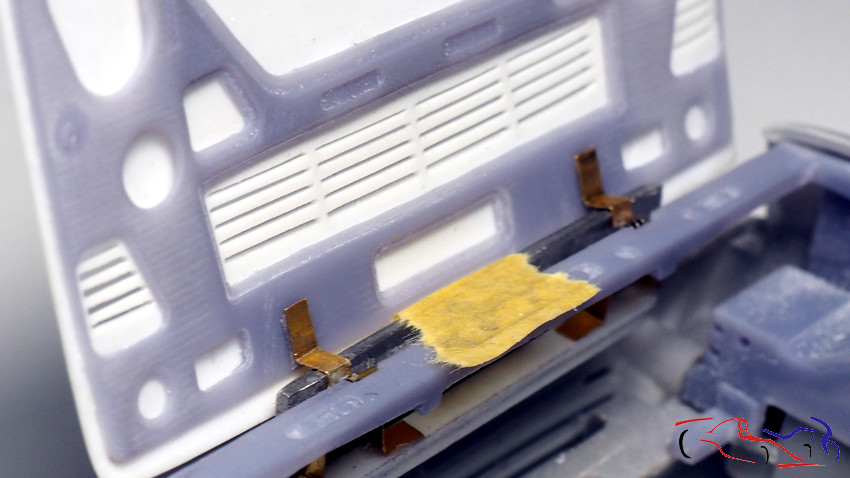  SI quitamos la calandra, vemos como quedarían las bisagras: In the following pictures, you can see how it looks like once it has been opened, avoiding the front grille: 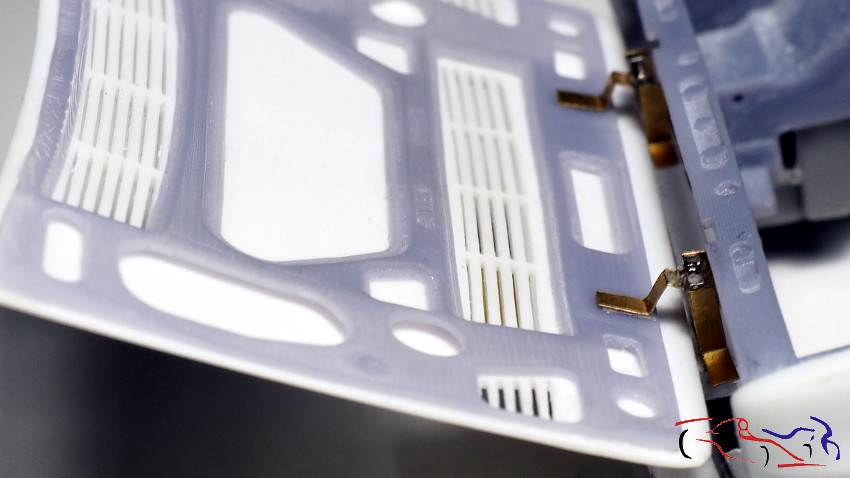 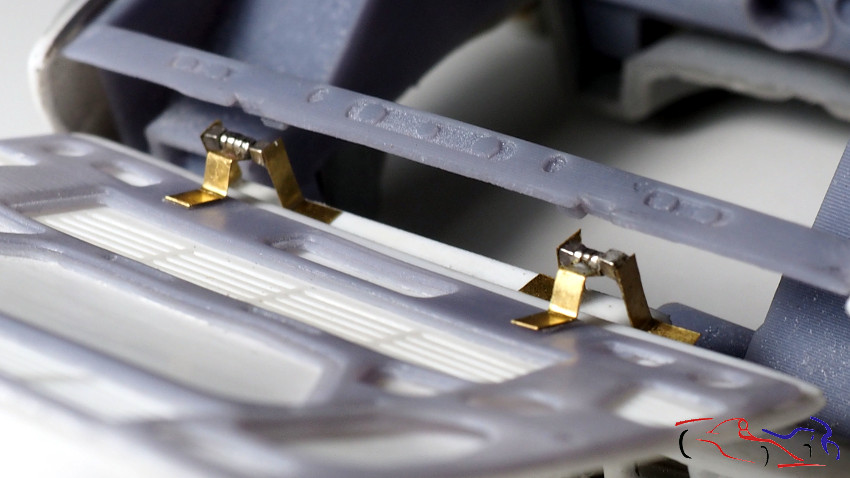 Deciros, que las bisagras del capó, las pegué al mismo después de fijas las piezas d elos imanes cuadrados, y poniedo las piezas movibles en su posición de cerrado. puse cinta adhesiva de doble cara sobre éstas, y coloqué el capó en su posición sobre la carrocería. Presioné y ya estaba listo. También hau que destacar, que usar bisagras con imanes te permiten quitar y poner las piezas sin problemas, por ejemplo, para pintarlas. Aquí os muestro el capó separado de la carrocería. Just to let you know I glued the bonnet hinges to the bonnet after fixing the square magnets, and putting the movable parts in their closed position. I put double-sided tape over them, and put the bonnet in its position on the bodywork. I pressed and it was ready. Its also worth noting that using hinges with magnets allows you to remove and put on the parts without any problems, for example, to paint them. Here I show you the bonnet separated from the bodywork. 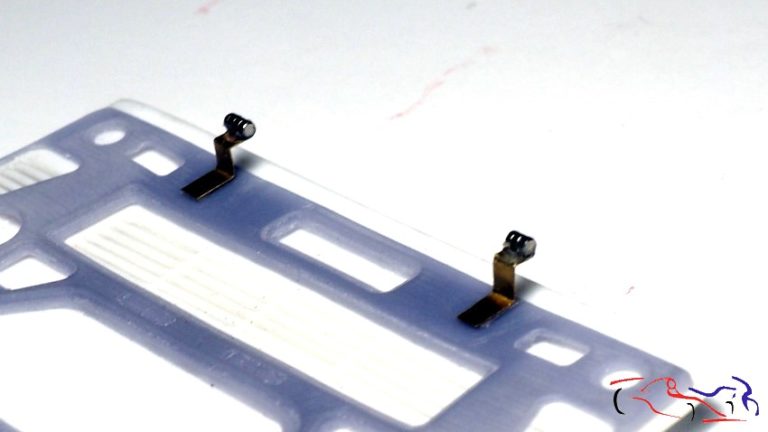 Pero para haceros una idea de como funciona, en este video lo veréis claramente: https://youtu.be/UyEZtN1d9Ms But to give you an idea of how it works, you can see it clearly in this video: https://youtu.be/UyEZtN1d9Ms Una vez tenemos claras las bisagras del capó, vams con las de las puertas, y lo primero que hacemos es rebajar el grosor de todos los perfiles de las puertas, ya que facilitarán su apertura. Usamos el minitaladro y afinamos con lima: Once we are clear about the bonnet hinges, we move to the door hinges, and the first thing we do is to reduce the thickness of all the door profiles, as they will make it easier to open them. We use the mini drill and sharpen them with a file: 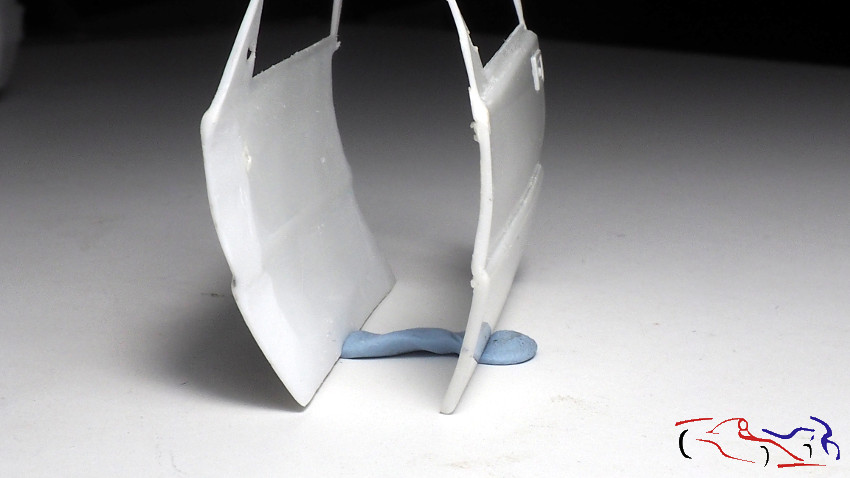 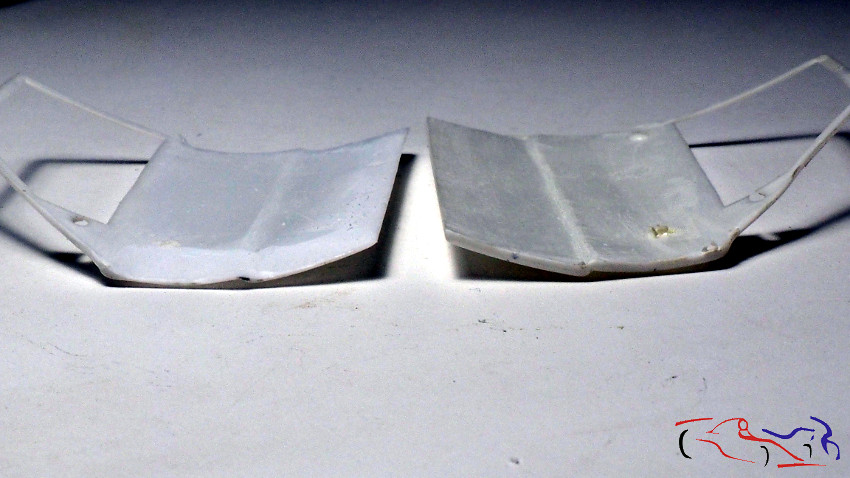 Y empezamos con la puerta del copiloto, y con la misma técnica de los imanes, haciendo estas piezas: una central que irá pegada a la carrocería y dos en los extremos con forma de L: And we start with the passenger door, and with the same technique as with the magnets, making these pieces: a central one that will be glued to the bodywork and two at the ends in the shape of an L: 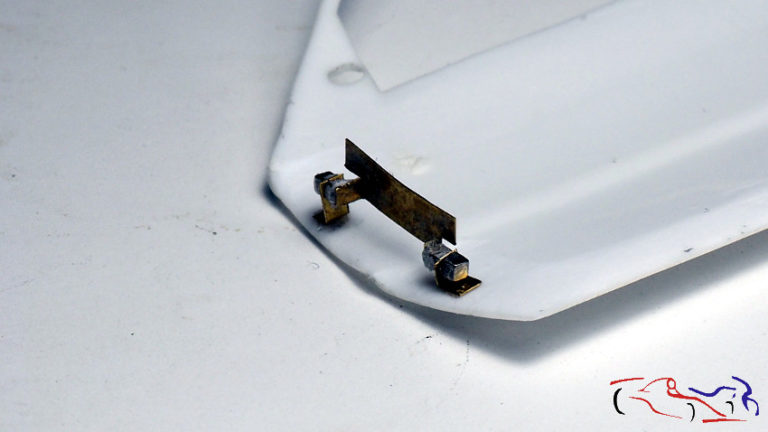 Pero el problema es el espacio, y la curvatura de la puerta. Recordemos que la bisagra tiene que ser totalmente vertical, para que se abra correctamente. En este caso, al abir la puerta, choca con la base de la bisagra But the problem is space, and the curvature of the door. Remember that the hinge has to be completely vertical in order to open correctly. In this case, when opening the door, it hits the base of the hinge 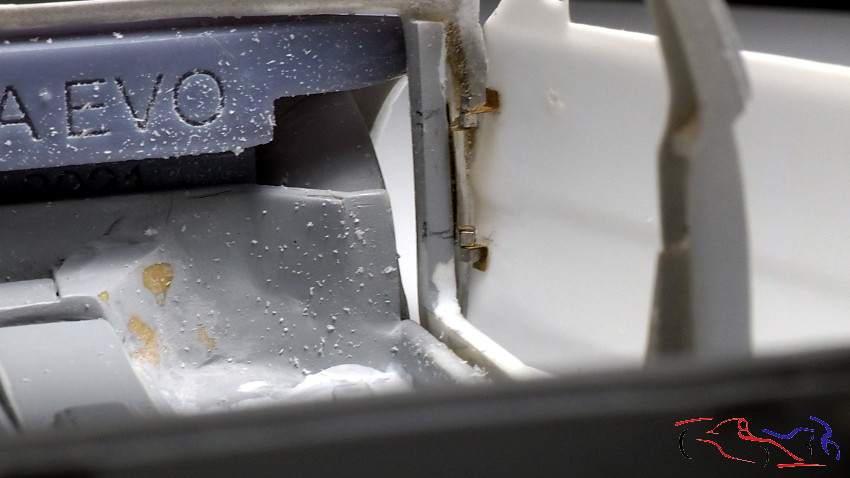 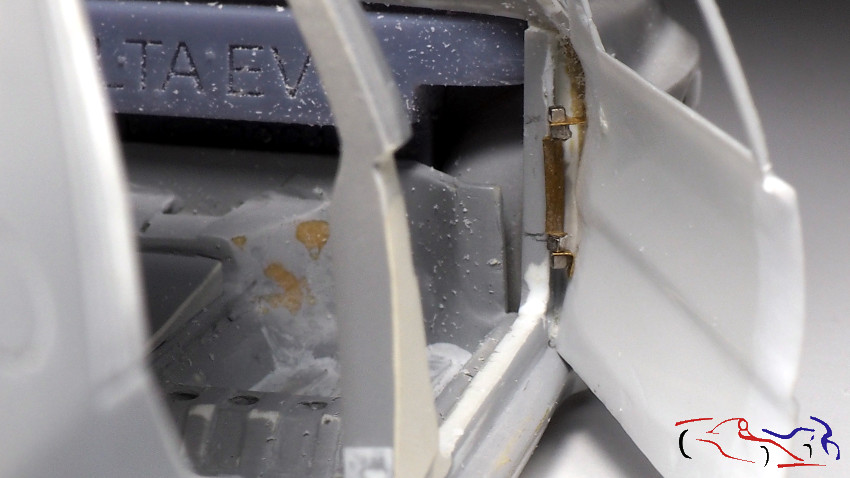 Entonces, pasamos al plan B, con bisagra de ejes de latón, pero primero, eliminamos el interior de la carroceria para operar y adelgazar mejor la carrocería. Podeis ver el lado derecho ya eliminado, y el izquierdo, sin eliminar. Deciros que esta parte que elimino, fue la que añadí en su momento: Then, we went to plan B, with a brass axle hinge, but first, we removed the inside of the body to operate and thin the body better. You can see the right side already removed, and the left side, without removing. Tell you that this part that I remove, was the one that I added at the time: 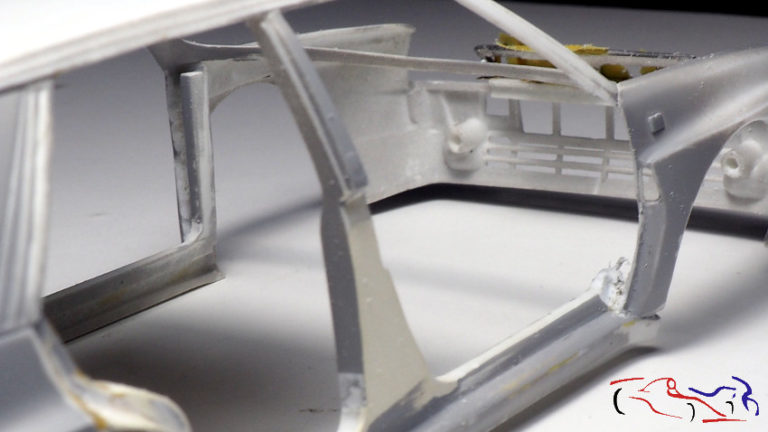 Y aquí veis el tipo de bisagra que voy a usar. And here you see the type of hinge Im going to use. 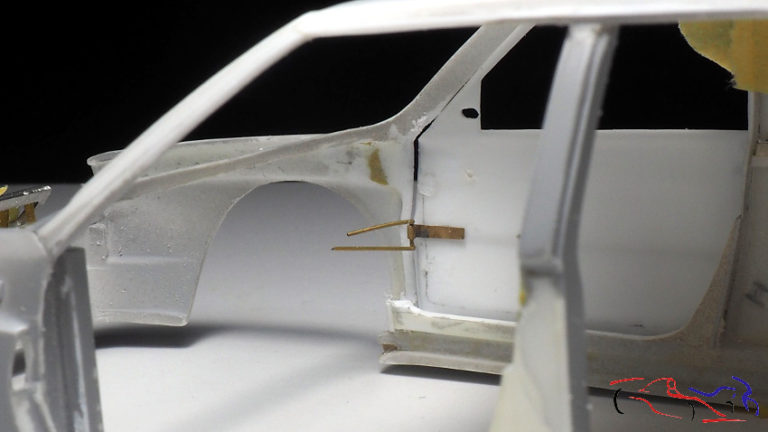 Deciros que este fue un primer intento, que cambié posteriormente, dejando los vástagos en la puerta .pero eso ya lo explicaré en el siguente post!! Gracias por ver y comentar!! I have to tell you that this was a first attempt, which I changed later, leaving the stems in the door . but Ill explain that in the next post! Thanks for watching and commenting! |
|
|
|
|
|
11-24-2022, 04:20 AM
|
#20 | |
|
AF Enthusiast
Thread starter
Join Date: Mar 2009
Location: Madrid
Posts: 649
Thanks: 109
Thanked 68 Times in 67 Posts
|
Re: Lancia "Deltona" Repsol 1993 - Hasegawa 1/24
Continuamos con otra entrada del Lancia Delta. En la entrada anterior, nos quedamos en un tipo de bisagra que después de probarla, no me gustaba mucho. Y aquí está la nueva. Como veis en el centro, he puesto una bisagra completa, y alrededor, el resto de piezas para hacerla. La base en una varilla que ha sido doblada en esa forma después de introducirla dentro de un tubo para que se gire. Ese tubo irá pegado en la carrocería, y los extremos de la varilla, se introducirán en sendos tubos pegados en la puerta:
We continue with another entry of the Lancia Delta. In the previous one, we stayed on a type of hinge that after testing it, I didnt like very much. And here is the new one. As you can see in the centre of the picture, I have put a complete hinge, and around it, the rest of the pieces for making it. The base is a rod that has been bent into that shape after inserting it into a tube to turn it. That tube will be glued to the body, and the ends of the rod will be inserted into the tubes glued to the door: 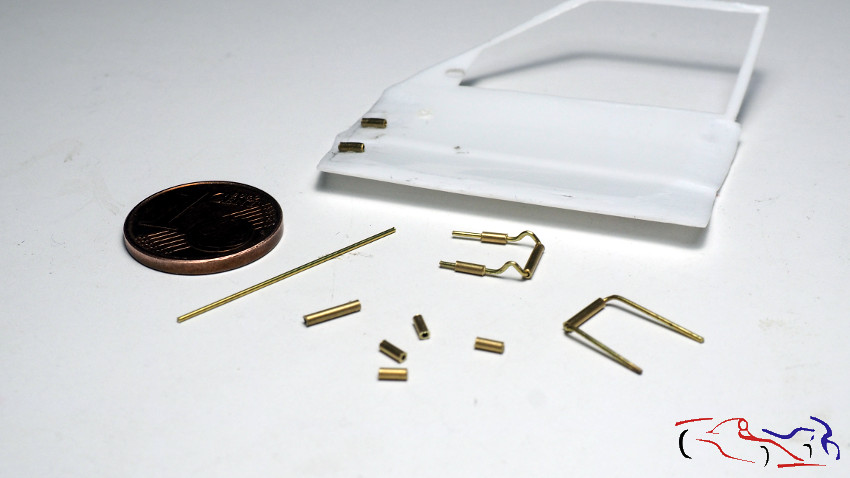 En la siguiente foto, podéis ver la bisagra pegada a la carrocería: In the following picture, you can see the hinge attached to the body: 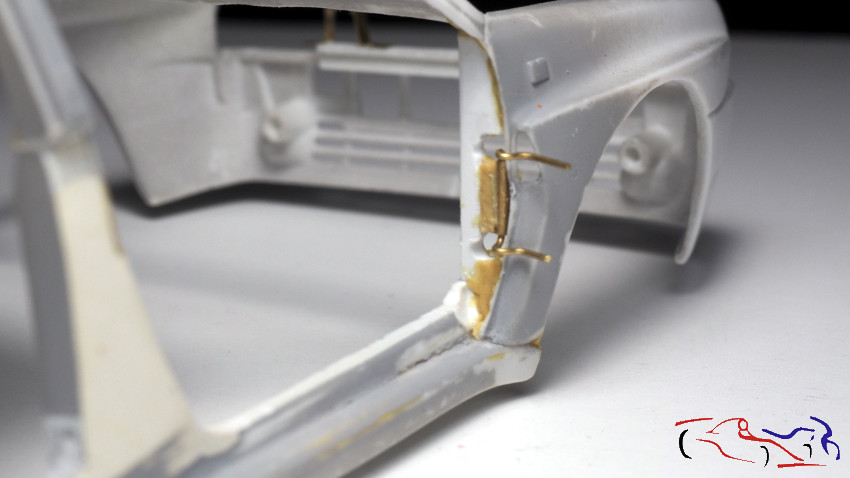 y con los dos tubos pegados en la puerta: and with the two tubes added to the door:  Pero para este trabajo, tuve que retirar la parte interior que había puesto en la carrocería, y de esa manera, poder situar mejor la bisagra: But for this job, I had to remove the inner part that I had put on the body, so that I could better position the hinge:  Por supuesto, las uniones fueron rellenadas con masilla epoxy Of course, the joints were filled with epoxy putty 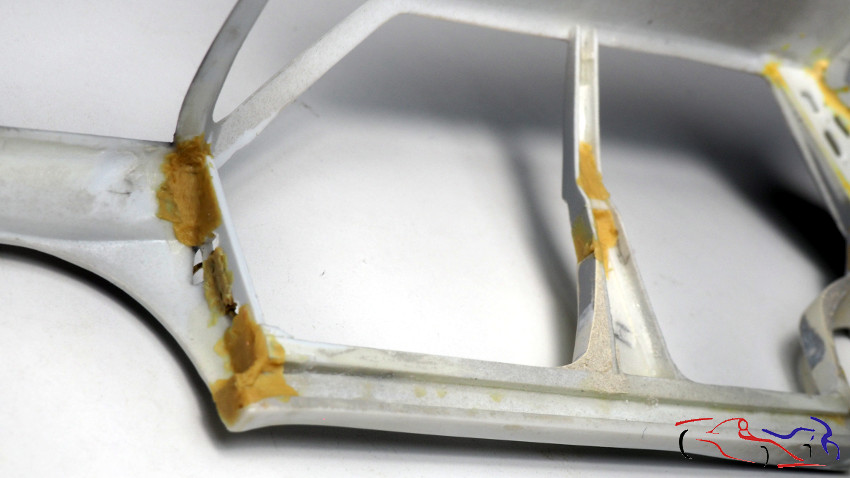 ..haciendo de esta manera, las bisagras de las dos puertas delanteras. making the hinges of the two front doors in this way. 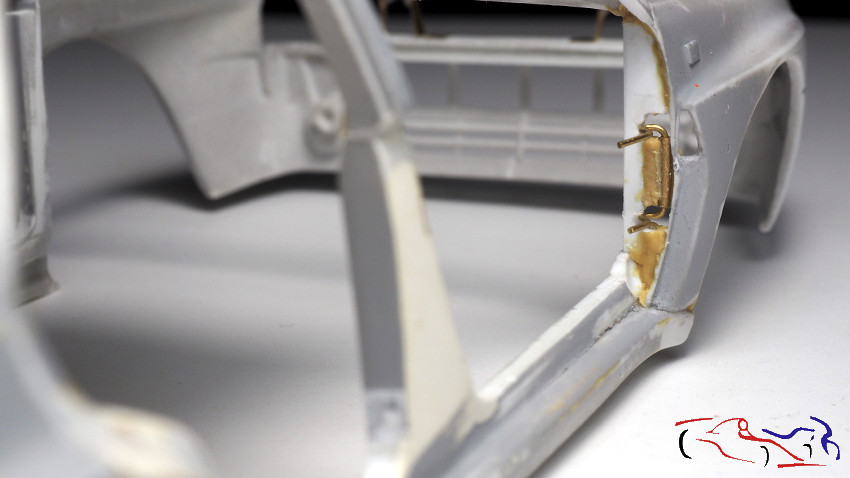 Para las puertas traseras, me decidí por usar imanes. Primero realizo la parte de las bisagras que van en los pilares centrales de la carrocería, pegando los imanes a una tira de latón, lo más perpendiculares posible a la barra. Primero junto todos los imanes para poder manejarlos mejor, y después los separo cuando ya están pegados: For the rear doors, I decided to use magnets. First I made the hinges that go on the central pillars of the body, gluing the magnets to a brass strip, as perpendicular as possible to the bar. First I put all the magnets together to be able to handle them better, and then I separate them when they are already glued: 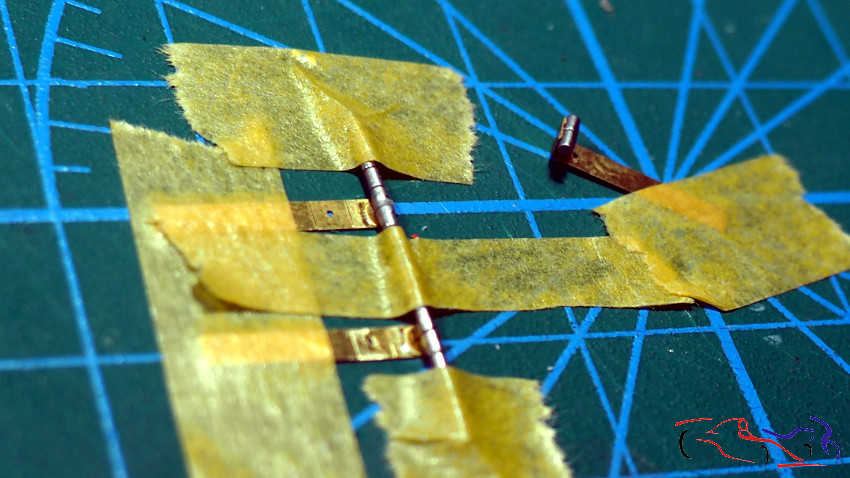 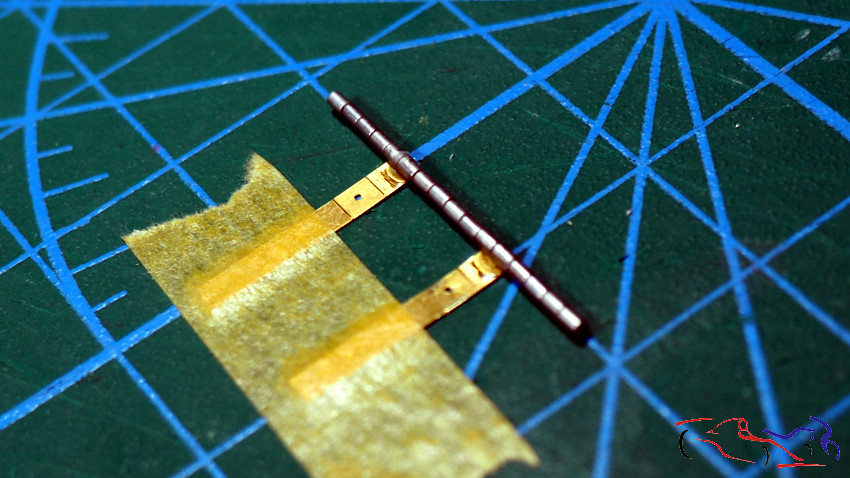 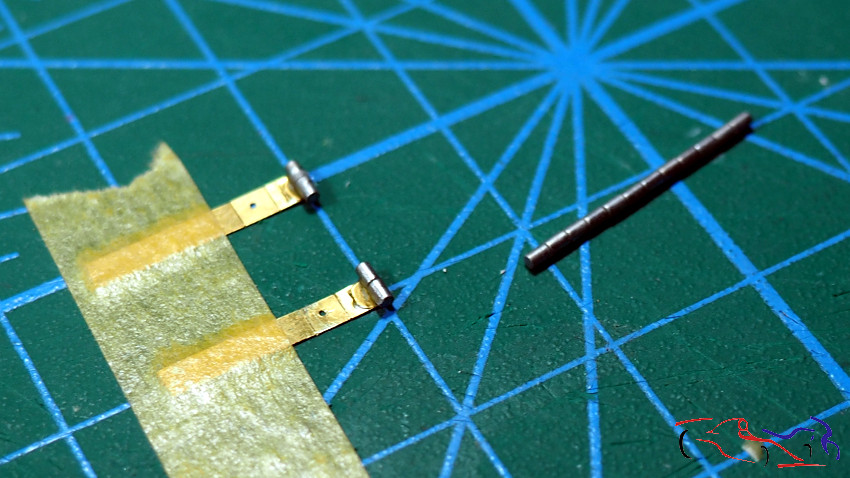 Doblo la última parte de la tira unos 45 grados, por una marca que había marcado antes de pegar los imanes, y los situo en su lugar, con cinta de doble cara. Marco sobre el pilar, y rebajo su hueco para poder colocarlos más fácilmente. También practico un agujero en el medio para fijarlos mejor, con un remache de metal. I bend the last part of the strip about 45 degrees, along a mark I had made before gluing the magnets, and place them in place, using double-sided tape. I mark on the pillar, and lower the hole so that I can place them more easily. I also drill a hole in the middle to fix them better, with a metal rivet. 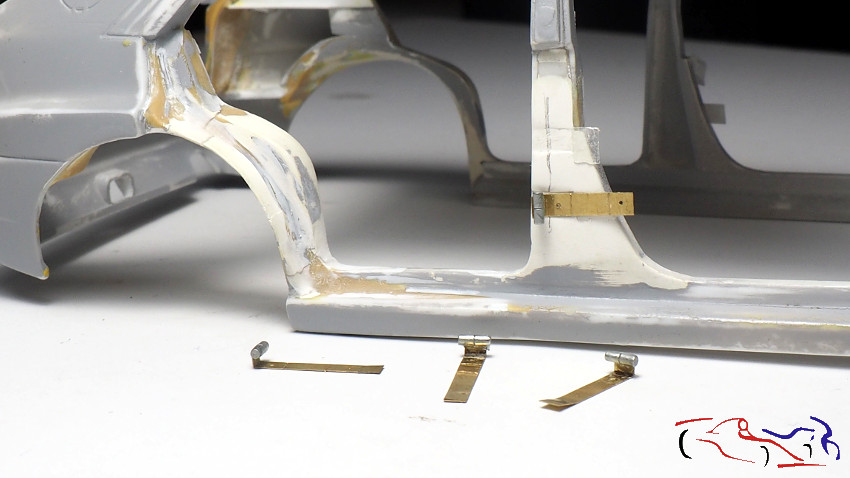 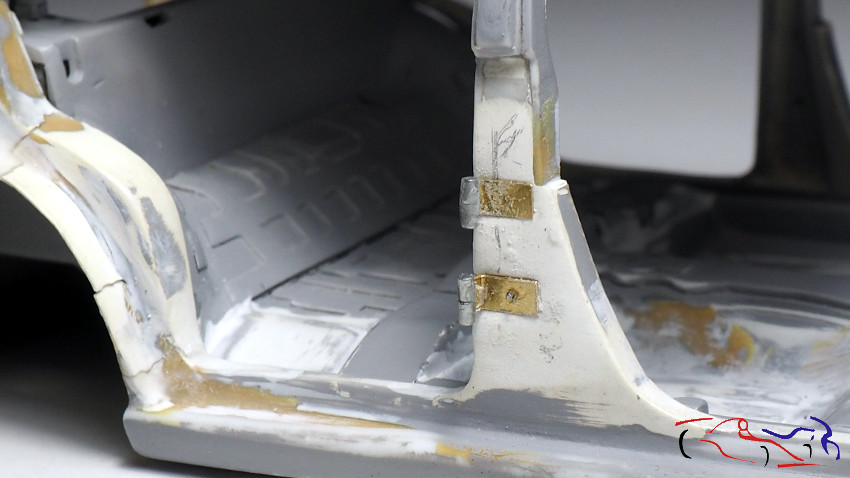 Para las puertas, utilizo imanes cuadrados, que pongo en las bisagras, arriba y abajo, Después coloco la puerta y pego con ciano dichos imanes, que dando de esa manera al abrirse: For the doors, I use square magnets, which I put on the hinges, top and bottom. Then I place the door and glue the magnets with cyanide, which give the door the same effect when it opens: 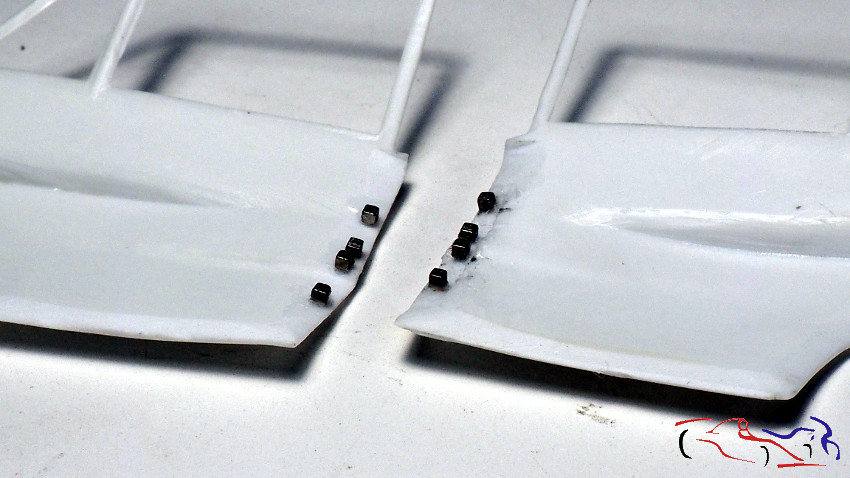 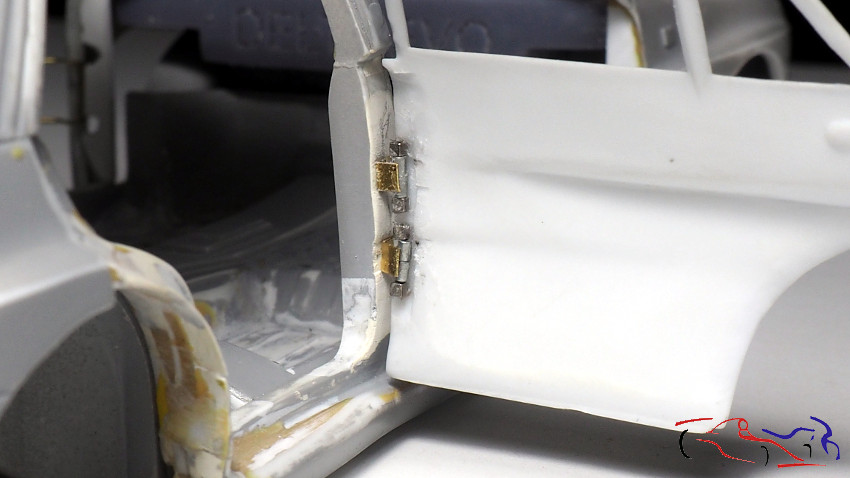 Y aquí, las dos puertas del lado derecho abiertas!! Las del izquierdo seguirán el mismo proceso. And here, the two doors on the right-hand side are open! The ones on the left will follow the same process. 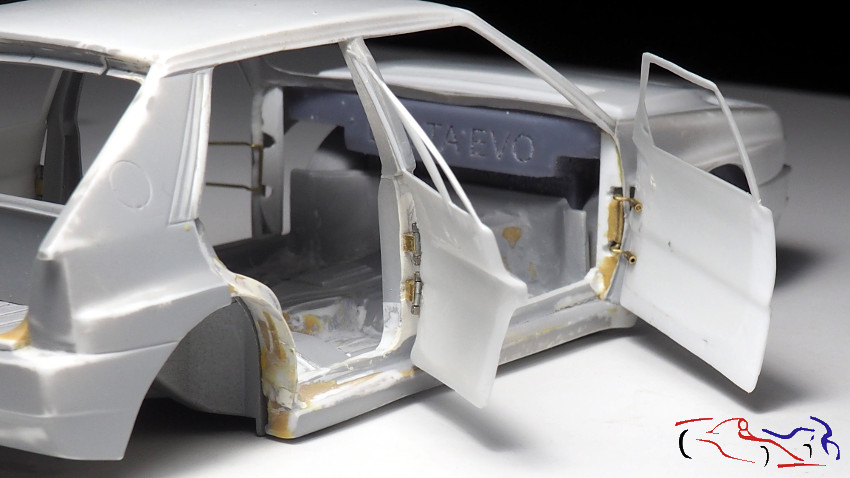 Y desde las puertas, nos vamos a asegurar las bisagras del capó. Primero levantamos la situación de las bisagras, añadiendo una base de latón a la base. En la segunda foto, vemos el frontal con el faro de la derecha: And from the doors, we go to secure the bonnet hinges. First we raise the hinge situation, adding a brass base to the base. In the second photo, we see the front with the headlight on the right: 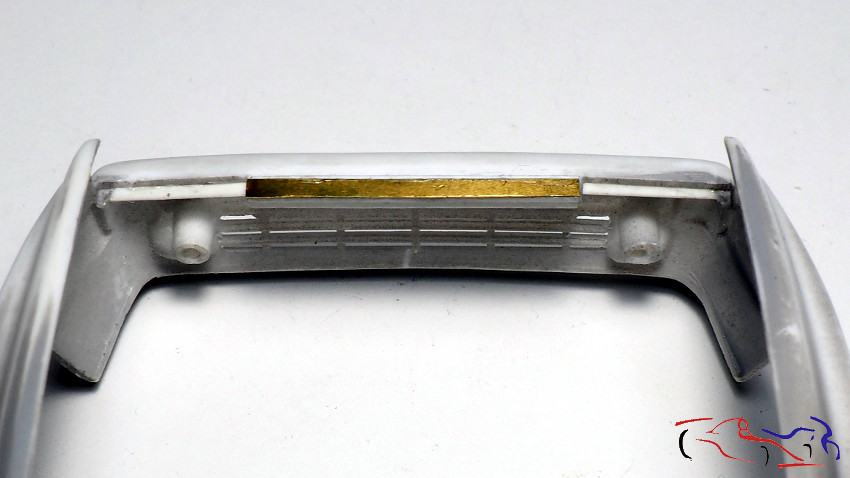 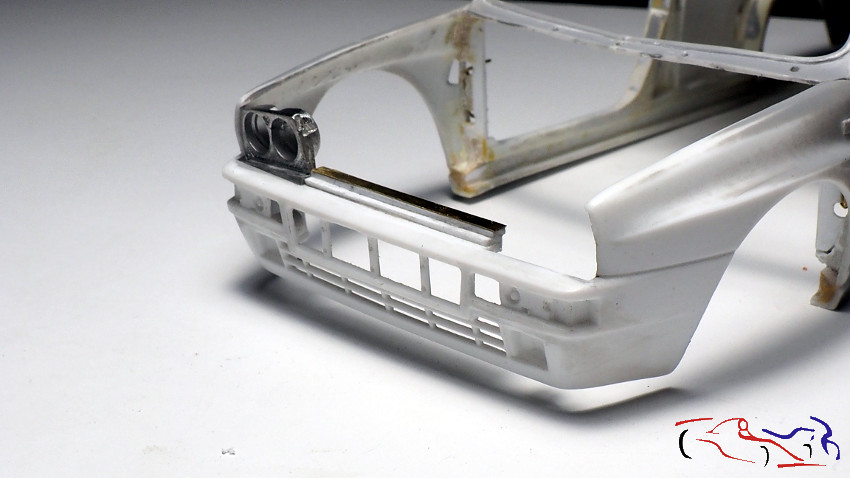 Creamos la parte de las bisagras que van pegadas a la carrocería, Pero para pegarlas, las unimos al capó, y después de situarlo en el hueco de la carrocería, lo pegamos con ciano: We create the part of the hinges that are glued to the bodywork, but to glue them, we join them to the bonnet, and after placing it in the hollow of the bodywork, we glue it with cyano: 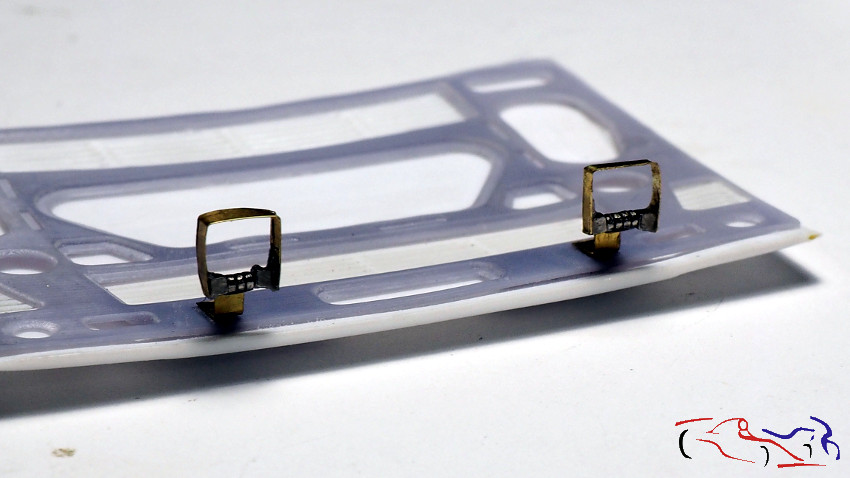 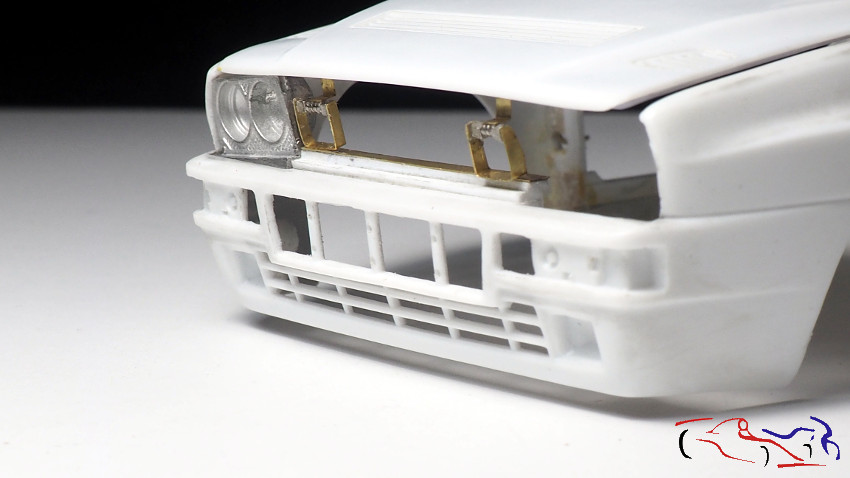 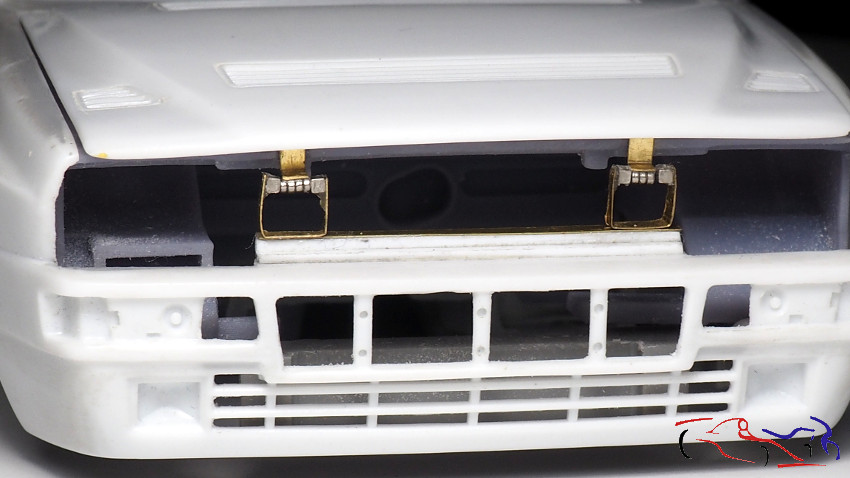 Ahora vemos la carrocería cerrada, y abierta!! Now we see the body closed, and open! 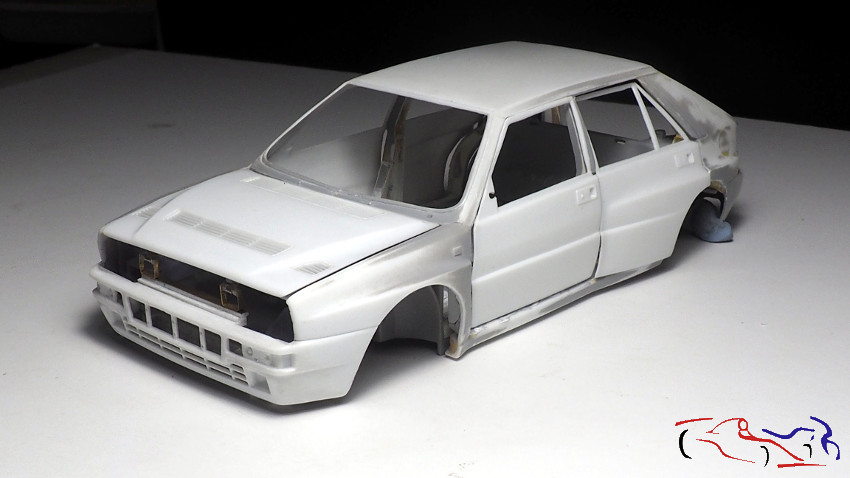 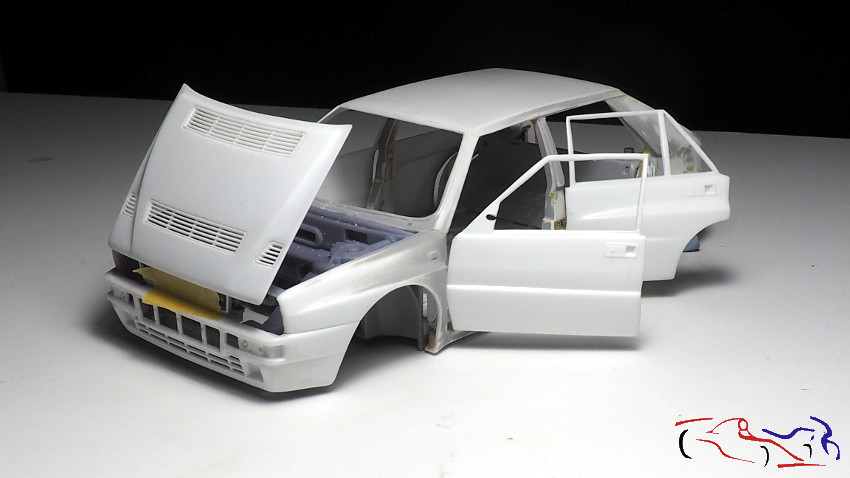 Ahora es el turno de los interiores de las puertas: e la primera foto, el interior original delantero. A la derecha el mofificado. Y en las dos siguientes fotos, su situación en la puerta Now its the turn of the door interiors: in the first picture, the original front interior. On the right, the modified one. And in the next two photos, its position on the door. 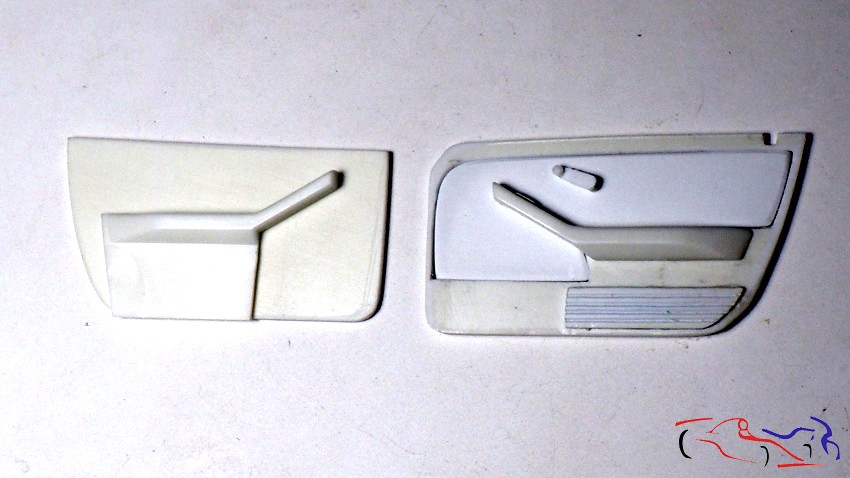 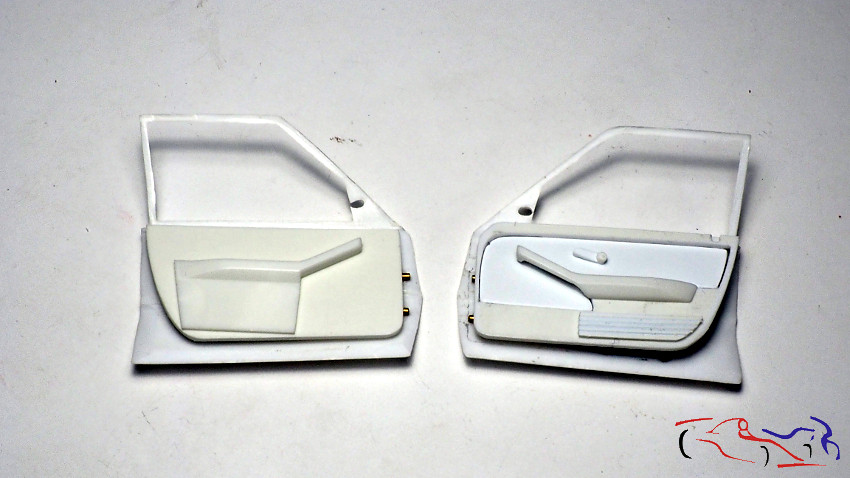 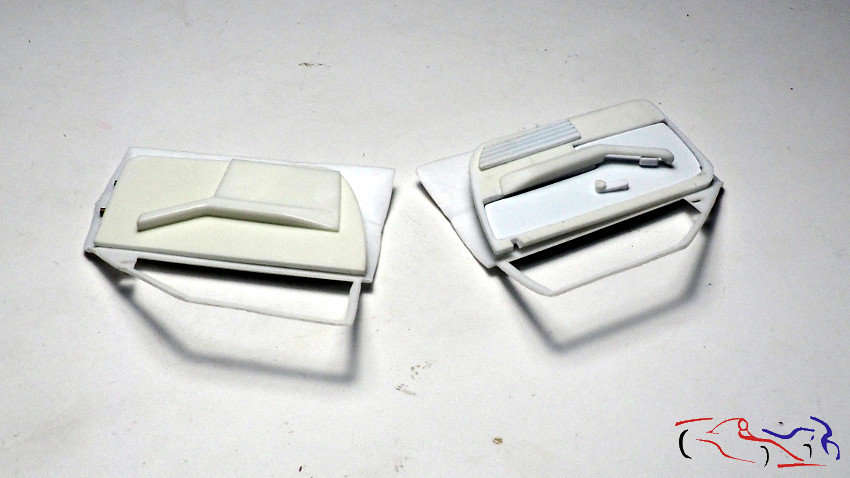 Y como se hace ese interior? Partimos de la puerta, a la que colocamos cinta adhesiva. Colocamos la puerta en su lugar, y dibujamos el hueco de la puerta desde el interior de la carrocería. Retiramos la puerta y la cinta adhesiva, poniéndola en un trozo de plástico. Recortamos por la marca pintada, retiramos la cinta adhesiva, y ya tenemos el panel interior. Deberemos rebajar tod el contorno ya que irá una tira de plastico muy fino por todo el alrededor, ya que el guarnecido va en negro, y los laterales en blanco, y asi se pinta mejor, todo separado! And how is this interior made? We start from the door, to which we put adhesive tape. We put the door in place, and draw the door opening from the inside of the body. Remove the door and the masking tape and place it on a piece of plastic. Cut out the painted mark, remove the masking tape, and we have the inner panel. We will have to cut all the contour as it will be a very thin strip of plastic all around, as the trim goes in black, and the sides in white, and so it is better painted, all separate! 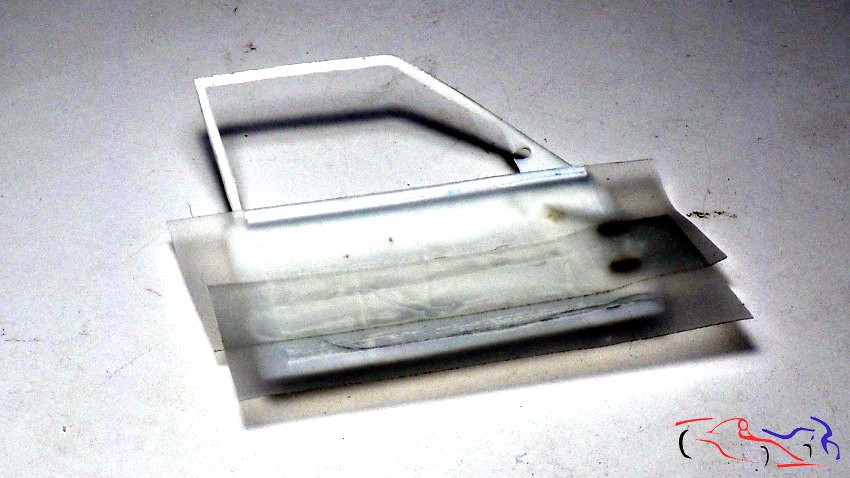 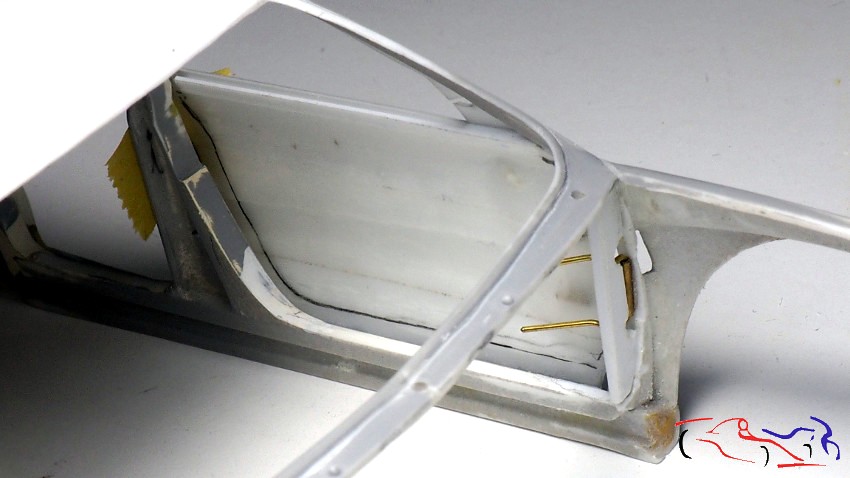 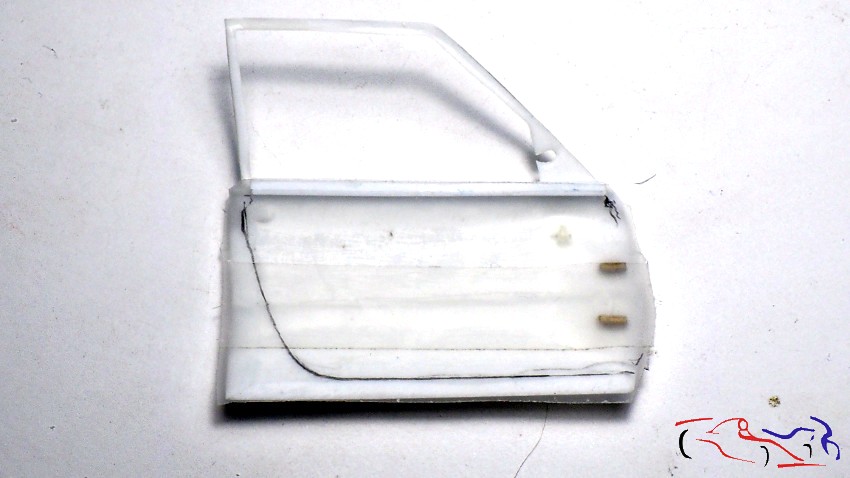 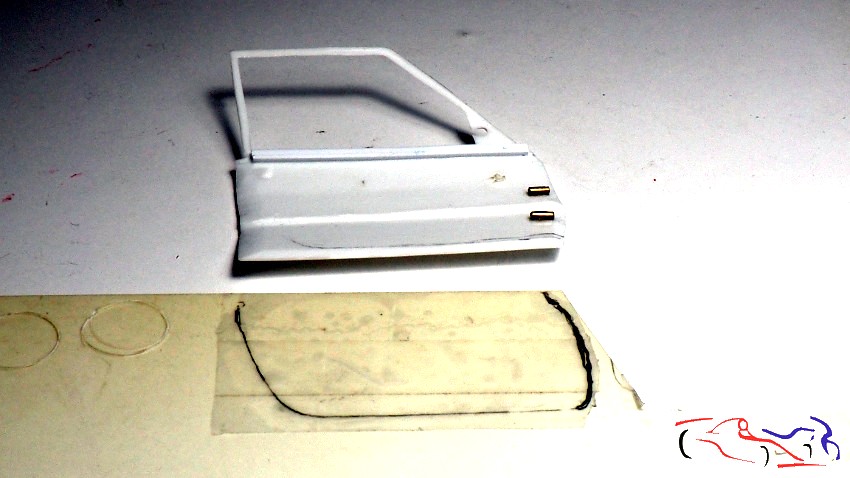  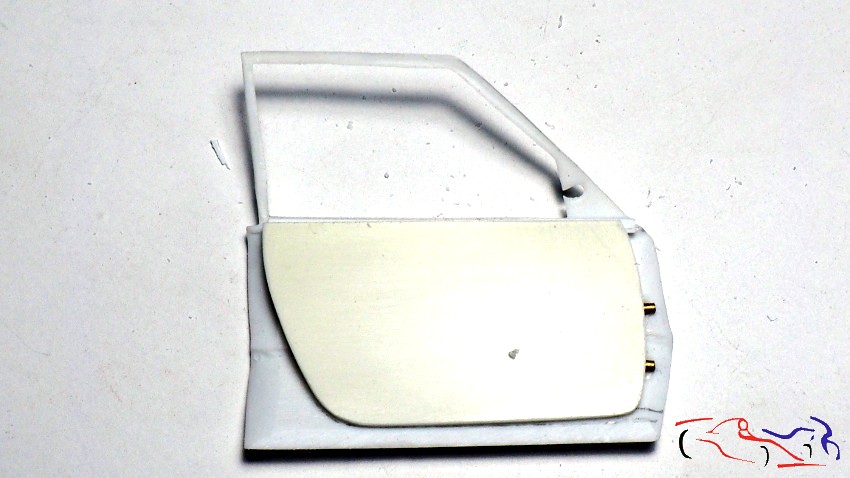 Una vez hecho el contorno, hacemos un hueco. Y sobre el hueco, hacemos una pieza con la misma forma dle hueco según las imágenes de la época, porque esa parte va pintada como si fuera terciopelo.. En la parte del contorno, pegamos el resposabrazos y agarradera, y un embellecedor inferior, asi como le hacemos una marca para el pestillo de la puerta Once the outline is done, we make a hole. And on the hollow, we make a piece with the same shape of the hollow according to the images of the time, because that part is painted as if it were velvet In the part of the contour, we glue the armrest and handle, and a lower trim, as well as we make a mark for the latch of the door. 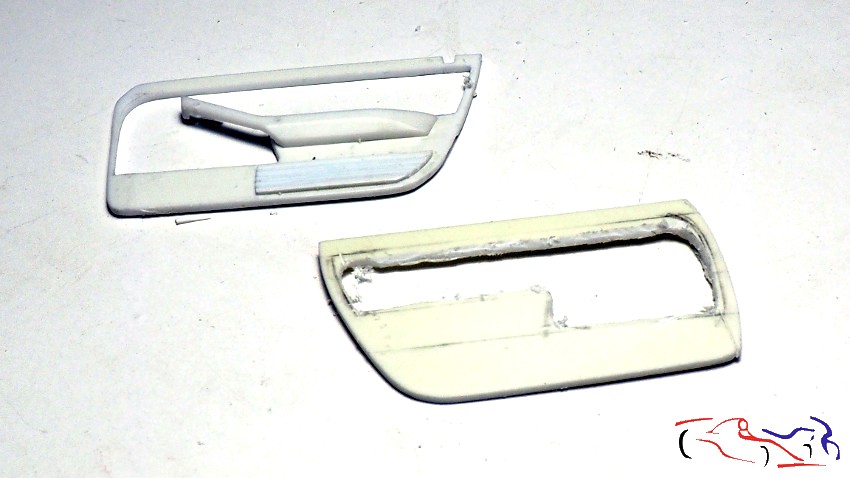 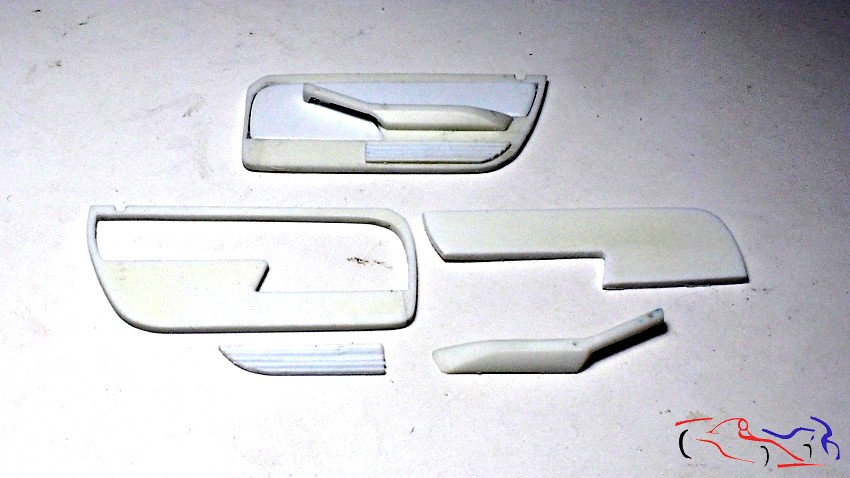 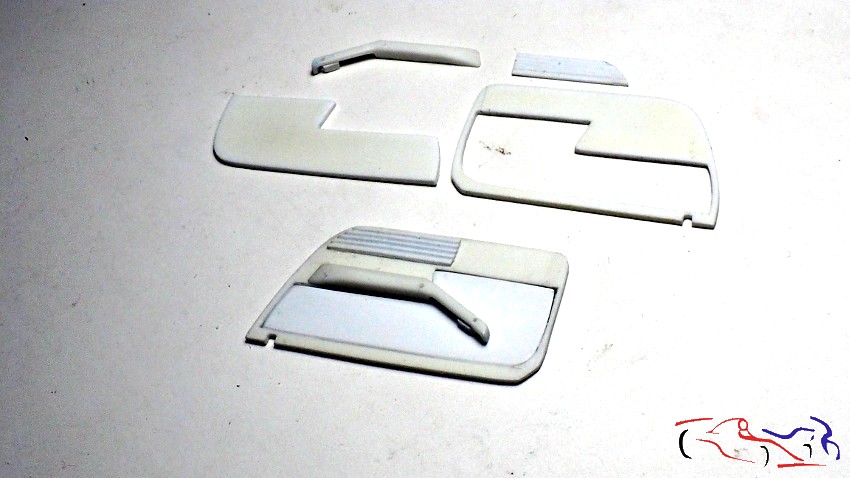 El siguiente paso, es hacer los laterales del interior, sobre una base que descansará lo realizado en el paso anterior. También, le ponemos al marco interior de la puerta, esa tira fina donde irá colocado las tiras negras de plastico que impermeabilizan el interior cuando la puerta está cerrada. Otra incorporación añadida es una ranura en la parte superior del guarnecido, para colocar el cristal y que quede más fijo y real. The next step is to make the sides of the interior, on a base that will rest what was done in the previous step. Also, we put to the inner frame of the door, that thin strip where will be placed the black plastic strips that waterproof the interior when the door is closed. Another addition is a groove in the upper part of the trim, to place the glass and make it more fixed and real. 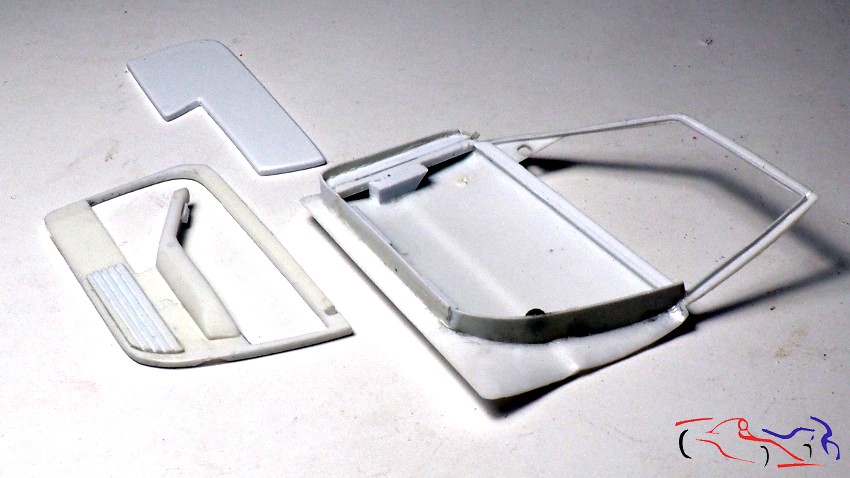 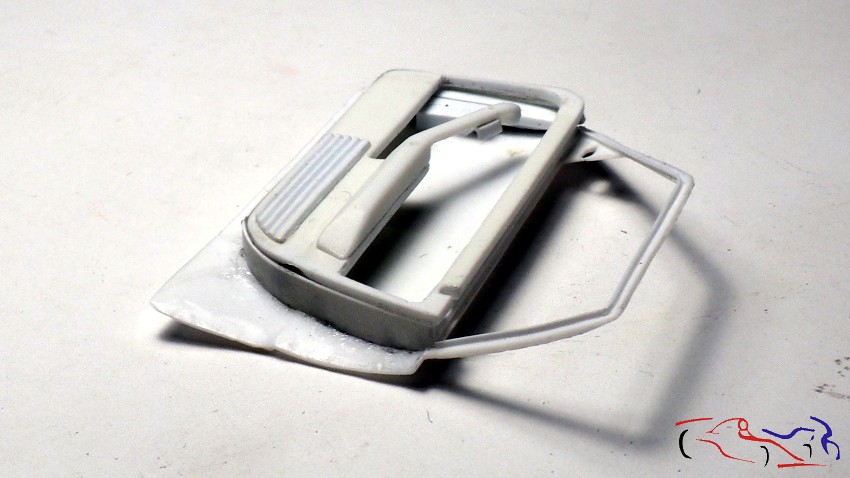 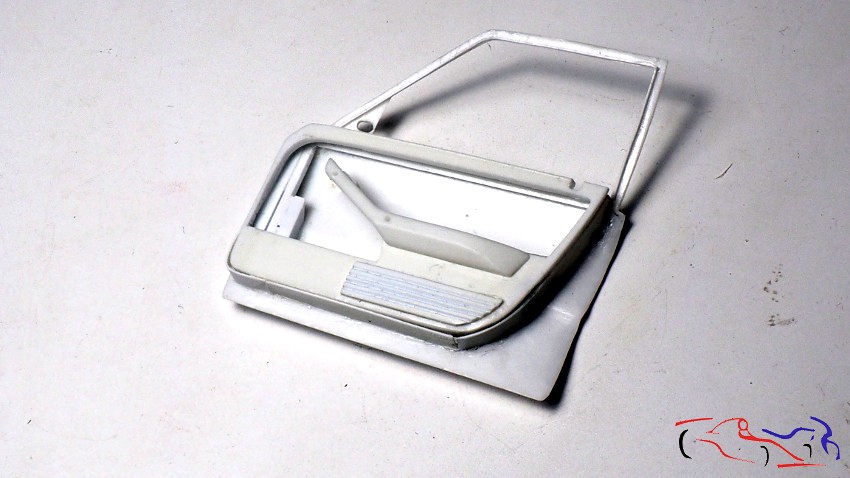 Finalizaremos con la colocación de dos imanes, para que la puerta se quede cerrada y no se abra. Hacemos un agujero en el lateral delantero del pilar centra de la carrocería, de 1 mm de diametro, y colocamos el imán. Ponemos la puerta en su lugar sin el guarnecido, y en el lateral, dejamos caer otro imán, que pegaremos con ciano en el lugar que se quede, atraido por el imán de la carrocería, tal y como puestra la segunda foto. We will finish with the placement of two magnets, so that the door remains closed and does not open. We make a hole in the front side of the central pillar of the body, 1 mm in diameter, and place the magnet. We put the door in place without the trim, and on the side, we drop another magnet, which will stick with ciano in the place that remains, attracted by the magnet of the body, as shown in the second photo. 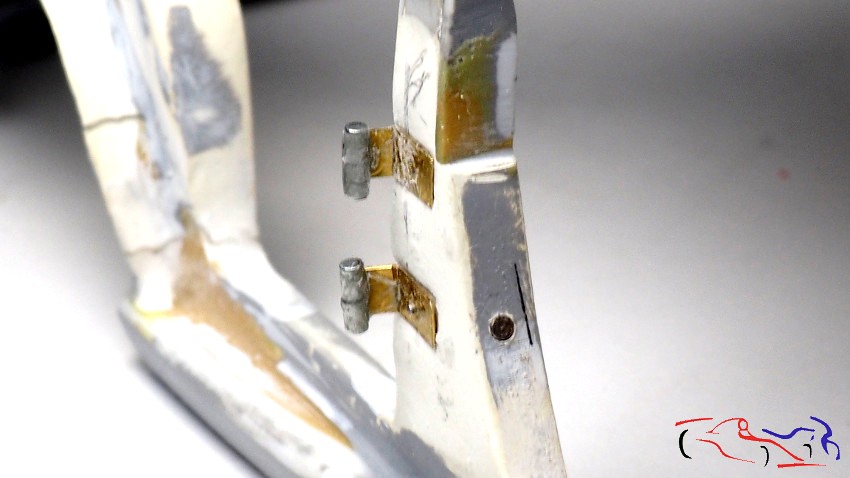 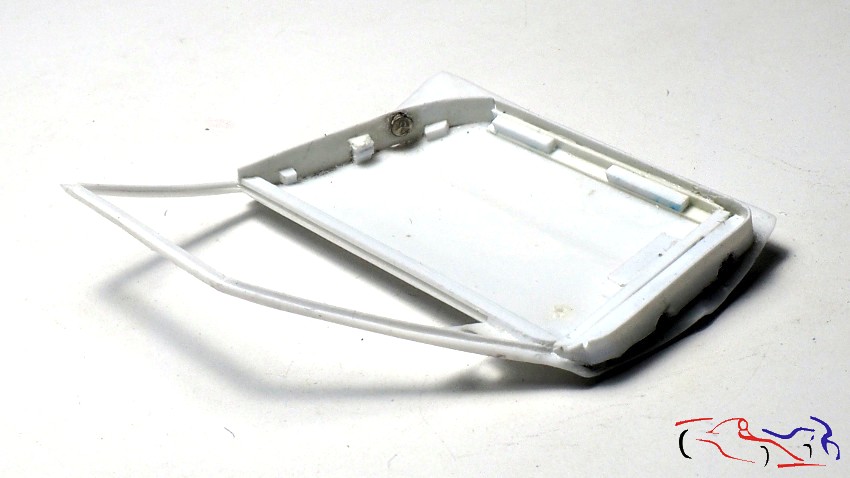 Ahora toca enmasillar todo finamente para después imprimar. Ha sido un proceso largo y tedioso porque hay que hacer cuatro puertas, y cada una con su medidas correspondientes. Gracias por ver y comentar. Now its time to putty everything finely and then prime it. It has been a long and tedious process because four doors have to be made, and each one with its corresponding measurements. Thanks for watching and commenting. |
|
|
|
|
| The Following User Says Thank You to JesusM For This Useful Post: |
mrgixxer (11-27-2022)
|
|
11-24-2022, 10:33 AM
|
#21 | |
|
AF Enthusiast

Join Date: Oct 2012
Location: Doornenburg , Netherlands
Posts: 502
Thanks: 80
Thanked 74 Times in 74 Posts
|
Re: Lancia "Deltona" Repsol 1993 - Hasegawa 1/24
This is car modeling next level, can't wait to see the result
__________________
my English is not perfect but hopefully be readable |
|
|
|
|
|
11-24-2022, 10:53 AM
|
#22 | ||
|
AF Enthusiast
Thread starter
Join Date: Mar 2009
Location: Madrid
Posts: 649
Thanks: 109
Thanked 68 Times in 67 Posts
|
Re: Lancia "Deltona" Repsol 1993 - Hasegawa 1/24
Quote:
|
||
|
|
|
|
11-27-2022, 02:15 AM
|
#23 | |
|
AF Enthusiast
Join Date: Mar 2009
Location: Rio de Janeiro, Brazil
Posts: 1,209
Thanks: 6
Thanked 144 Times in 136 Posts
|
Re: Lancia "Deltona" Repsol 1993 - Hasegawa 1/24
Best Lancia ever!!!!!
__________________
https://www.instagram.com/denilsonvm_modelcars/ |
|
|
|
|
|
11-27-2022, 03:24 AM
|
#24 | ||
|
AF Enthusiast
Thread starter
Join Date: Mar 2009
Location: Madrid
Posts: 649
Thanks: 109
Thanked 68 Times in 67 Posts
|
Re: Lancia "Deltona" Repsol 1993 - Hasegawa 1/24
Quote:
|
||
|
|
|
|
03-03-2023, 09:52 AM
|
#25 | |
|
AF Enthusiast

Join Date: Oct 2005
Location: Monza
Posts: 1,150
Thanks: 21
Thanked 56 Times in 38 Posts
|
Re: Lancia "Deltona" Repsol 1993 - Hasegawa 1/24
Silently admiring...
|
|
|
|
|
|
|
POST REPLY TO THIS THREAD |
 |
|
|


