|
|
|

|
|
| Search | Car Forums | Gallery | Articles | Helper | AF 350Z | IgorSushko.com | Corporate |
|
| Latest | 0 Rplys |
|
|||||||
| WIP - Motorsports Post topics for any "Work In Process" motorsports vehicles in this sub-forum. |
 |
 Show Printable Version | Show Printable Version |  Email this Page | Email this Page |  Subscribe to this Thread
|
|
|
Thread Tools |
 08-20-2008, 02:11 AM
|
#16 | |
|
AF Fanatic

Join Date: Dec 2004
Location: Up the creek with no paddle
Posts: 5,888
Thanks: 7
Thanked 16 Times in 15 Posts
|
Re: Audi R8C LeMans 1999 Provence Moulage 1:43
You aced that jaykay!
__________________
Guideline for happy modeling: Practice on scrap. Always try something new. Less is more. "I have a plan so cunning, you could put a tail on it and call it a weasel" - Edmund Blackadder |
|

|

|
|
08-20-2008, 02:20 AM
|
#17 | ||
|
Authorized Vendor

Join Date: Oct 2005
Location: Vicenza - veneto de rassa
Posts: 3,909
Thanks: 6
Thanked 46 Times in 41 Posts
|
Re: Audi R8C LeMans 1999 Provence Moulage 1:43
Quote:
 Once a time, fantastic job Jay. Sometime is better I remember myself that YOU are the one that inspired me with PE over your MacLaren buildup. And once a time, fantastic result. Lately I purchased the "etching pool" you showed in the old work, with stirring and warmer: result is incredible, all troubles I got with thick plates (0.3-0.5) are fixed and quality is pro. I didn't know this audi, very kind design: for the convex roof area and for the headlamp/fender edges design: this part looks much like a '60 Carrera6, or at least remind me those. Tuned! I want to see how you'll do with those special custom parts
__________________
 gio gio
|
||
|
|
|
|
08-20-2008, 04:28 AM
|
#18 | |
|
AF Regular
Join Date: Dec 2007
Location: Cologne
Posts: 230
Thanks: 3
Thanked 6 Times in 6 Posts
|
Re: Audi R8C LeMans 1999 Provence Moulage 1:43
boy o boy, you make me speechless...again ! the etching is so cool and the new wheels do look great also. please conzinue with your 1/43 Lotus, really looking to this one.
daniel -germany- |
|
|
|
|
|
08-20-2008, 09:01 AM
|
#19 | |
|
AF Enthusiast

Join Date: Sep 2006
Location: USA, Florida
Posts: 590
Thanks: 3
Thanked 6 Times in 6 Posts
|
Re: Audi R8C LeMans 1999 Provence Moulage 1:43
Fantastic work jaykay I really love what you done with the wheels the new centers really make a huge difference. I just start to clean up a Audi R8 LeMans 2001 Provence Moulage kit have the same brake disc and photo etch wheel centers. I really don't have the skill to make my own resin parts at this time maybe one day it's hard to just finish a kit. Keep up the good work.
__________________
Regards, Dave |
|
|
|
|
|
08-27-2008, 07:10 PM
|
#20 | |
|
AF Enthusiast
Thread starter
Join Date: Aug 2005
Location: where "sky grey" is a colour
Posts: 822
Thanks: 3
Thanked 32 Times in 29 Posts
|
Re: Audi R8C LeMans 1999 Provence Moulage 1:43
Thanks fort he replies guys!
Here comes some more progress. It was time for paint! I worked on this at the same time as I painted the wheels but it took quite a bit longer. Generally the paint scheme with black and silver is not too complicated but theres enough room for problems :-) After sanding the primer I decided to do black first and put on a good layer of Zero gloss black. That was a good decision because I was a bit shocked about the surface quality in some areas and the gloss black really showed that. So it was sanding again! Then I masked the black areas on the sides. The kit comes with shaped black decal stripes to do the edges of those areas but the print was crap ( no proper edge ) and I decided to mask it myself. Masking was tricky even with very thin flexible tape because especially with the small radiuses around the 1:43 wheel houses the tape has a tendency to pull back and leave traces of glue which in the end makes for a rough paint edge . Anyway, after masking I put on a layer of ZERO Porsche Carrera GT Silver. The paint is very thin and covers beautifully. It does have its tricky downsides though. Because it dries so fast it easily builds up a rough surface in tricky corners like the insides of the fenders where you get air turbulences and after that theres no spraying over that and covering it up. I sprayed at about 10 psi and should probably go lower still. On top of that the silver is mercilessly showing any surface imperfections and there still were some :-( Its not something to blame on it .I just had to learn that in future applications I have to prepare the surfaces even better ( like Alclad quality .) and cant rely on the clear coat fixing things. So heres the body after black, silver and a layer of 2K-clear: After sanding this it was time for decals. They were easy to work with but the printing wasnt overly impressive. On some ( like the Unionjacks ) the different colours werent positioned properly and for example the driver names on the cockpit sides were way too big. 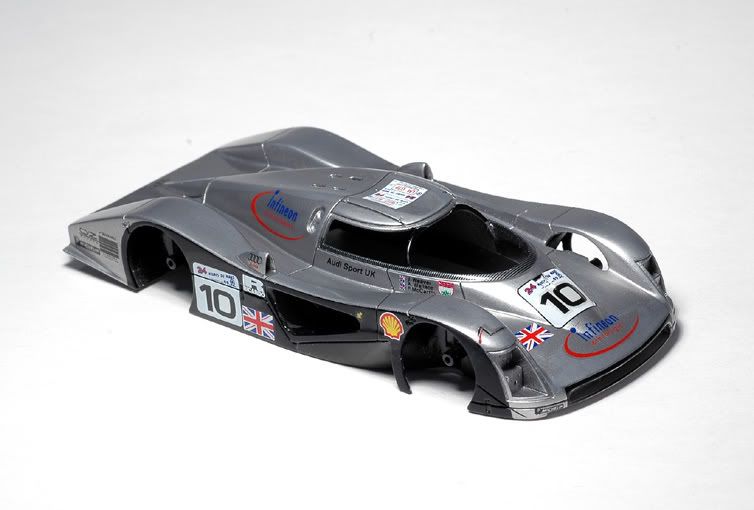 I didnt wanna get into redoing decals though so i went on with them with the exception of a round decal on the left front fender that was supposed to represent a solar cell. That was a colourful blob and I will try to do something a bit metallic/reflective. Around the lower window edge and the sidepod openings I added CF decals from Crazy Modeler and BBR. The ones in the sides were toned down somewhat using a mix of matt clear and matt black through the airbrush. Then everything was covered with another layer of 2K-clear which was again sanded and finally polished. 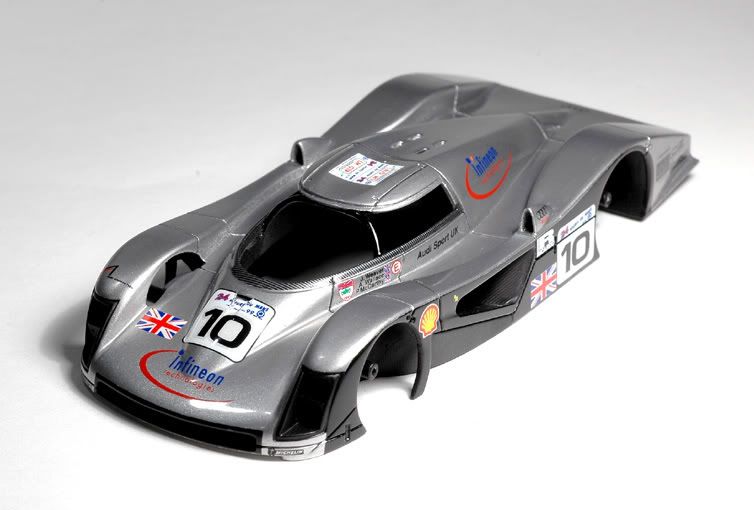 At first you hardly see a difference before and after that final clear layer, but in between those pictures lies a lot of work :-) After that I airbrushed the wheel houses, the headlights, front air intake and the lower rear end ZERO Jet Black. On top of the 2K-clear you dont have to mask super tidy because right after application you can easily wipe away excess paint with Isopropyl alcohol. 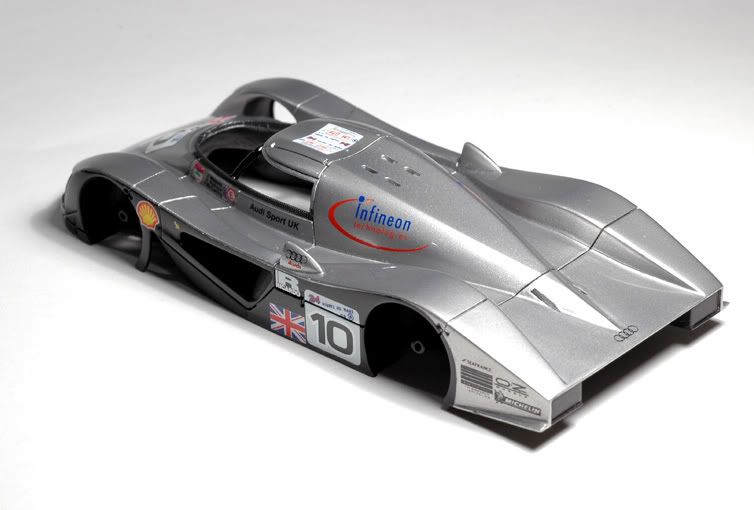 The carbonized surfaces in the sidepods were then covered with a very thin layer of matt clear. They do shine a bit more on the original but like this look very clean. Especially the ones in the holes were not reachable for sanding so glossy was no option. For that I would have had to make them separate parts to glue in after painting. 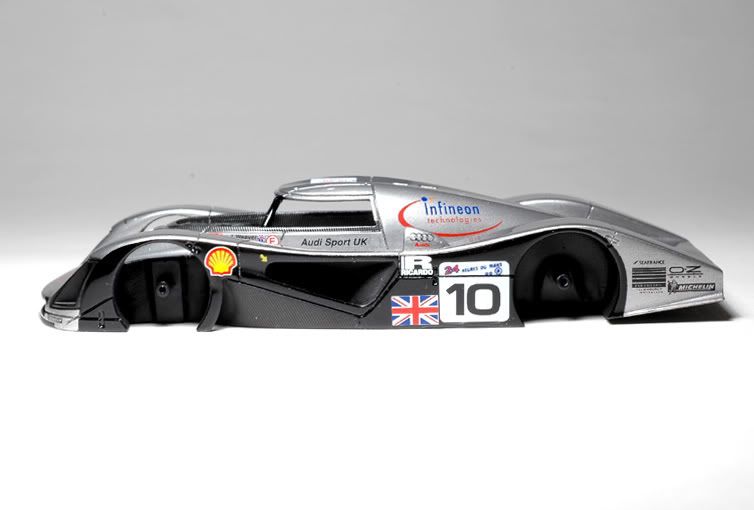 Like on the original the carbon areas dont bang out now from a distance but show up when you get closer with your eyes. Another picture from the front: 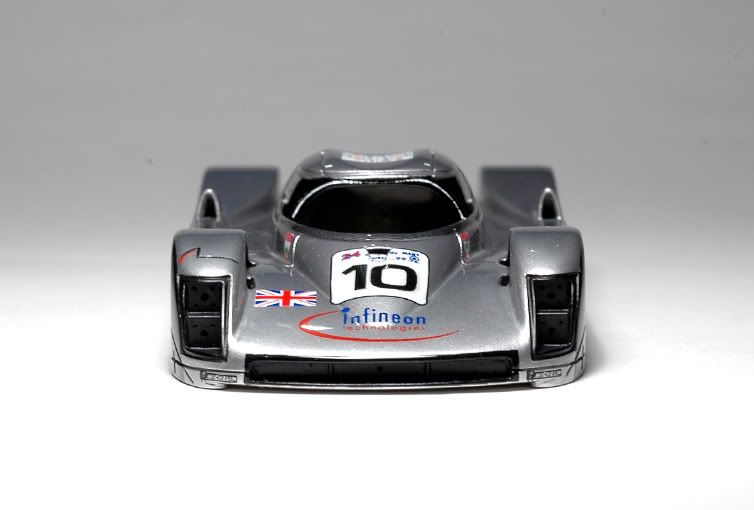 Around the air intake sits a black sticker that makes the opening appear bigger and edgier than it really is. I have no idea what for!? Simulate they needed more cooling air than they really did? Optical sandbagging!?? It doesnt really improve the looks IMHO but it was there on the car so it goes on the model Heres a picture to show the surface quality indicator capabilities of ZERO silver: 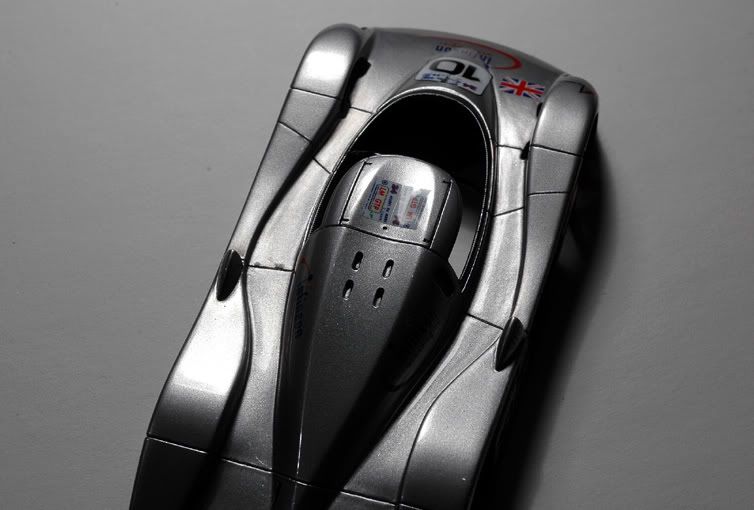 Especially on the lower surfaces between the greenhouse and the fenders you see traces of sanding. These areas are always a bit tricky to sand on 1:43 LeMans prototypes. For future projects I now know the surface has to be even better and I cant rely on the clear fixing things. Doing spot repairs with a brush like with normal colours is also not really possible. You can do that normally and the black blades behind the front wheels show that. I think I mentioned during the body modifications that I waited to thin them out from behind until the last moment to not breaking them off during handling. Good idea ..but didnt help a lot :-( At some point I stopped counting how often I broke them off during painting and sanding. At least one of them snapped after each layer of paint. Especially after the final clear layer that hurt! After that point the repairs get a bit patchy but they are doable. If I were to build this again Id replace the blades with styrene bits from the beginning. Metal could work as well but it might break off the resin body more easily causing much bigger problems in the process !? Well, the paintjob is not price worthy but its o.k. Looks like i have to add some extra silly detail bits to distract from that :-) See you for that! |
|
|
|
|
|
08-28-2008, 08:42 AM
|
#21 | |
|
AF Enthusiast
Join Date: Sep 2006
Location: USA, Florida
Posts: 590
Thanks: 3
Thanked 6 Times in 6 Posts
|
Re: Audi R8C LeMans 1999 Provence Moulage 1:43
Really nice work the finished turned out great even if there are some minor flaws. I really appreciate your explanation of your work you got me thinking should I spray gloss black on my Audi R8 before the silver.
__________________
Regards, Dave |
|
|
|
|
|
08-28-2008, 01:46 PM
|
#22 | |
|
AF Regular
Join Date: Oct 2004
Location: no, Washington DC
Posts: 146
Thanks: 0
Thanked 0 Times in 0 Posts
|
Re: Audi R8C LeMans 1999 Provence Moulage 1:43
always a pleasure to read the updates.
I learn so much from your builds and threads. So inspiring, and a joy to follow. All I can say is Thanks, and thanks again.
__________________

|
|
|
|
|
|
09-04-2008, 02:15 PM
|
#23 | |
|
AF Enthusiast
Thread starter
Join Date: Aug 2005
Location: where "sky grey" is a colour
Posts: 822
Thanks: 3
Thanked 32 Times in 29 Posts
|
Re: Audi R8C LeMans 1999 Provence Moulage 1:43
@sileightsix: You're welcome :-)
Gday everybody for some more build progress! While I worked on the paintjob I showed you last time I also slowly but surely worked away on the cockpit. I didnt go too far with detailing things because most wont be visible anyway after assembly. Nevertheless I did a bit couldnt resist :-) First up this is the seat already finished and ready to be mounted: 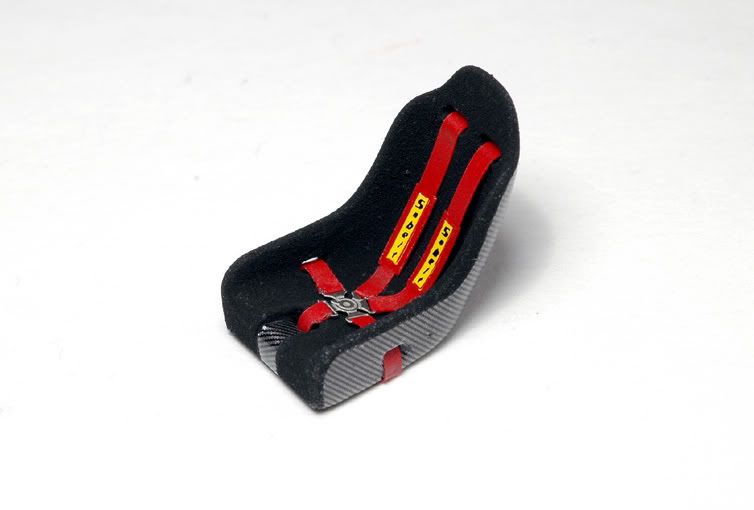 The kit resin piece was a very blocky affair and looked a lot like some fighter ejector seat :-) I shaved away a good deal of material around the back to make it look more like a weight saving bucket seat. The top end needed some shaping as well and I sanded away the moulded in seat belts and made holes for new belt hardware. This was followed by a black base coat, CF decals and clear coat on the outside and a rough layer of matt black for the fabric inside. Then I installed the belt which is a leftover from my BBR 911 GT1, added decals and it was ready. Here you have it in the finished cockpit: 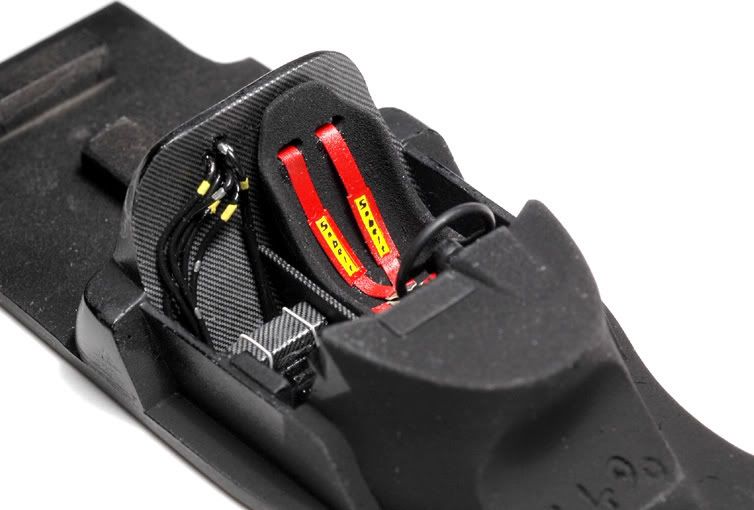 The only modifications I did to the cockpit were sanding away some moulded in cables on the rear wall before painting and adding the low wall to the right of the seat. I then painted the parts gloss black, added CF decals, covered them with matt clear, painted the top of the dashboard a rough matt black like the seat and added that rectangular PE piece next to the binnacle that got the same paint treatment. Then I added new cables to the firewall and souped them up a bit with yellow and silver paint, more or less like on the original. Heres another view with the steering wheel visible. 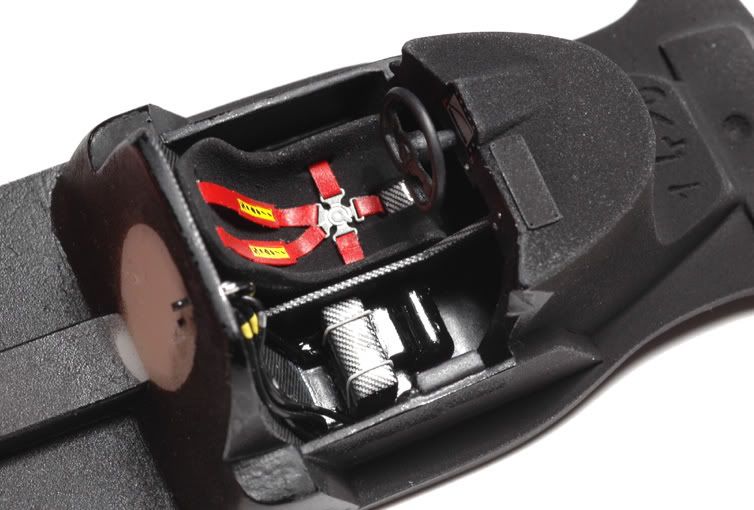 Its the kit piece just cleaned up a bit. I decided not to do anything to it although it is seriously oversized, but once the cockpit is in place this will hardly be noticeable. Whenever I build the open sister R8R Ill have to do something about it though .:-) After the exterior paint was done I also started adding details. The first pieces were the two floor parts on the undersides of the sidepods to minimize the possibility of breaking the parts behind the front wheels furthermore :-) 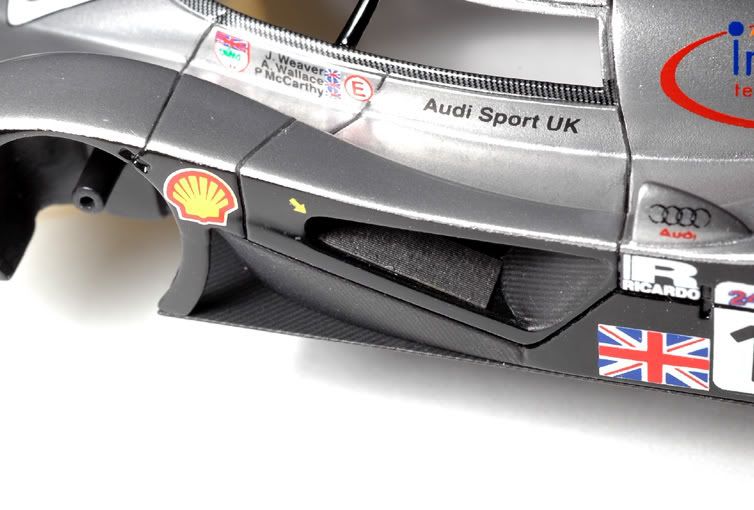 Before installation they went through the typical paint sequence of gloss black, CF decals and matt clear. Inside the doors I then installed my custom etched radiators. The fuel filler cap was next. Its made from two layers of PE with a thin layer of ZERO Jet Black to not lose the fine details. Looks better than the decal that came in the kit 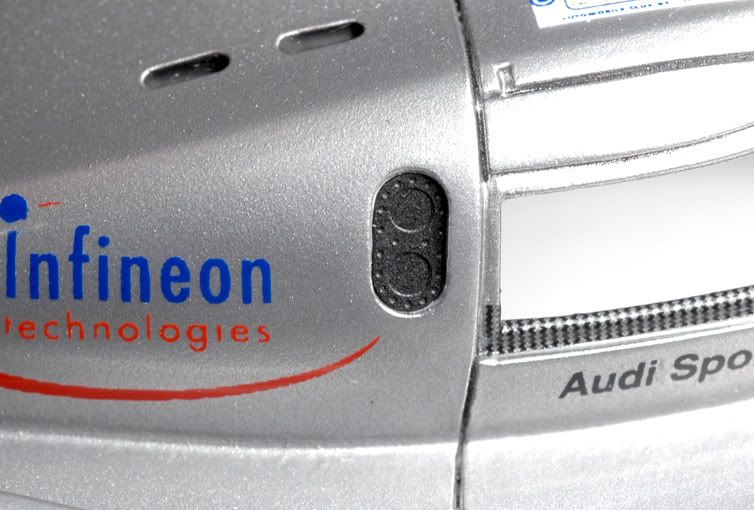 The final pieces for this update were some NACA-duct covers on the rear deck. It seems like the team found out at the LeMans test session they didnt need that much cooling ( probably for the rear brakes ) and closed them for the race. The ducts dont exist on the model so I etched the parts, gave them the same paint treatment as the rest of the body and just glued them in place. 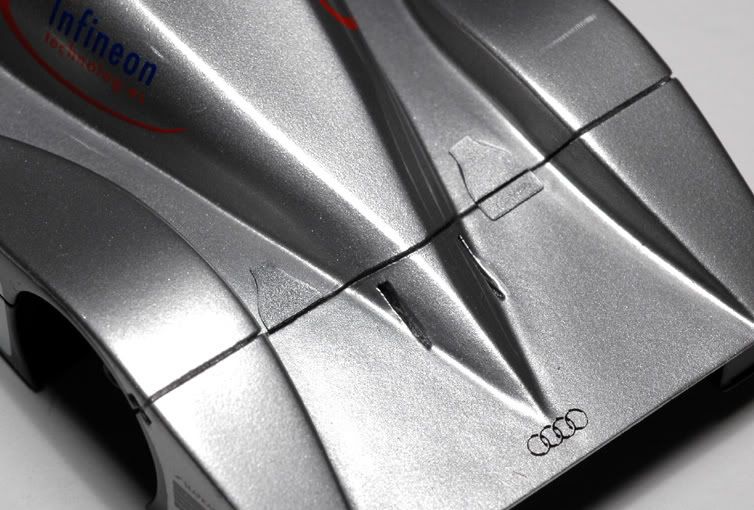 It would look better if they were sitting flush with the rest of the surface but I decided this will have to do :-) So much for today. Hope you liked it! |
|
|
|
|
|
09-05-2008, 02:05 AM
|
#24 | |
|
AF Fanatic
Join Date: Dec 2004
Location: Up the creek with no paddle
Posts: 5,888
Thanks: 7
Thanked 16 Times in 15 Posts
|
Re: Audi R8C LeMans 1999 Provence Moulage 1:43
Slurp!
Your skill always impresses and amazes. You manage to make 1/43 look like a 1/12 
__________________
Guideline for happy modeling: Practice on scrap. Always try something new. Less is more. "I have a plan so cunning, you could put a tail on it and call it a weasel" - Edmund Blackadder |
|
|
|
|
|
09-16-2008, 03:12 PM
|
#25 | |
|
AF Enthusiast
Thread starter
Join Date: Aug 2005
Location: where "sky grey" is a colour
Posts: 822
Thanks: 3
Thanked 32 Times in 29 Posts
|
Re: Audi R8C LeMans 1999 Provence Moulage 1:43
Hey guys! It took a bit longer than expected, but heres a new update!
The reason for that were the clear parts I had to work with. They are not the biggest fun to start with because you can easily mess them up .which I sure did! When I was casting the rims and messing around with resin I said to myself you should cast those clear vacform pieces, so if you ruin them you have the master to do new ones. The casting worked a treat on the BBR window pieces ..but not on the Provence ones. The resin and clear plastic liked each other so much, they decided to become one:-( So there was my reason to make new parts .dohhhh! For a start heres a shot of the real windscreen: 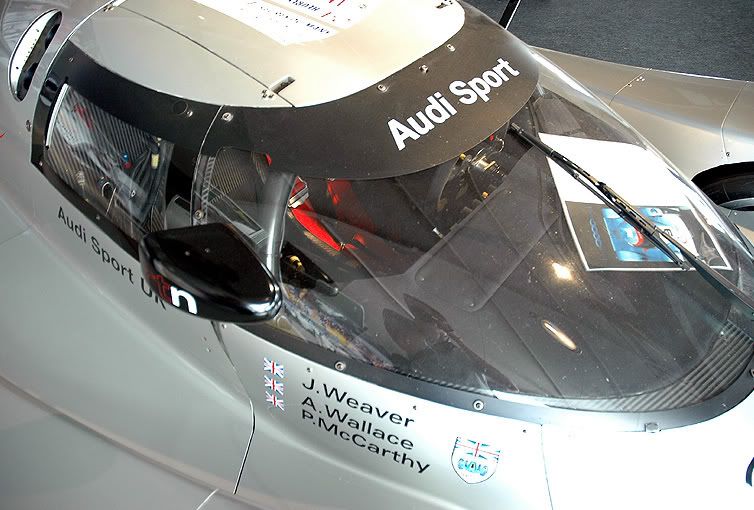 and next up heres the result of my efforts on the model. 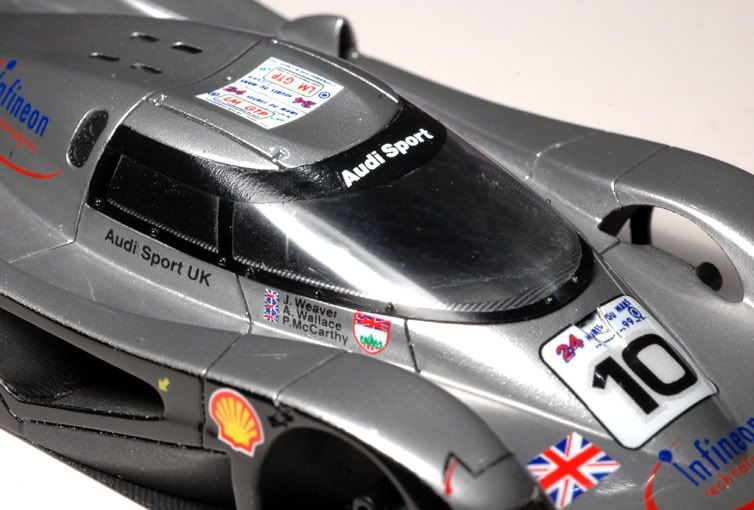 After shaping the clear plastic came the lengthy process of trimming and fitting, sanding, polishing and finally waxing. The result is o.k. but could be improved somewhat. I painted the black ceramic frame from the inside and then fitted the piece to the body with 0,5mm brass rivets. I could have tried to use glue and hide the glue marks under the black paint but that was too likely to turn into a mess so I didnt. At the top end I added the sun visor decal from the kit. At the same time i also worked on the headlights. The originals look like that: 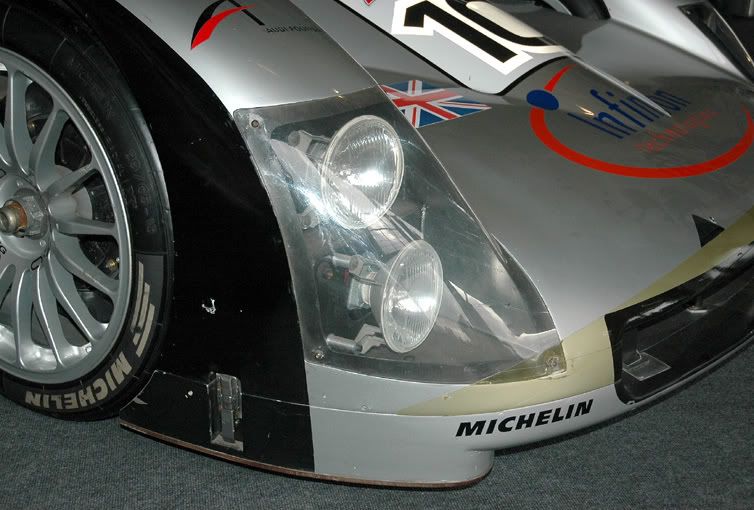 Gio, you are right! They look a lot like a Carrera 6. Never occured to me! In the kit came some of those nasty self sticking lenses .which werent gonna go on my Audi :-) I decided to try something more detailed and made 3mm diameter reflectors from aluminium on the lathe. Those were then combined with some metal and clear plastic bits. In the next picture you can see the kit lenses on the left, the parts for two headlights in the middle and one assembled to the right. 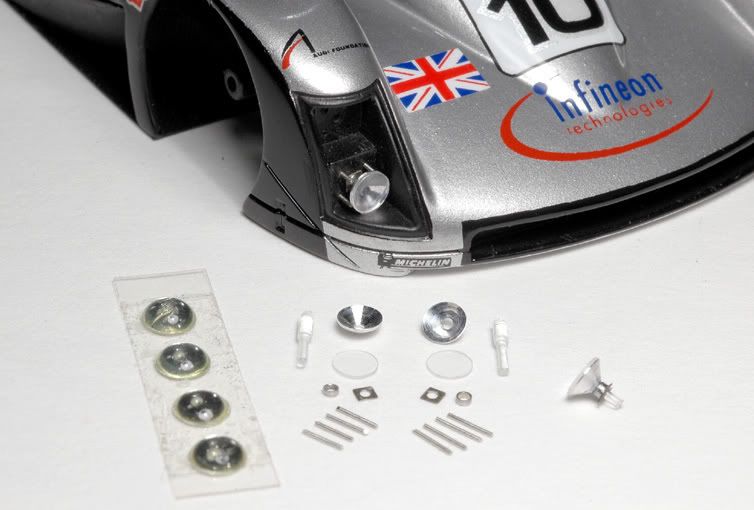 In the back theres one already mounted. When building the body I added PE parts in the headlight housings that had a hole pattern which I now used as a drill template. Otherwise it would have been near impossible to get the holes placed nicely. Next up is the left headlight cluster finished. After mounting the lights ( note that the upper one is angled towards the outside as per the original :-) I covered them up with newly made clear covers. These were fixed with plastic rivets ( 0,3mm styrene thread made from sprues over a candle and the ends heated so they form a head ). Glue would have been a no-go here. 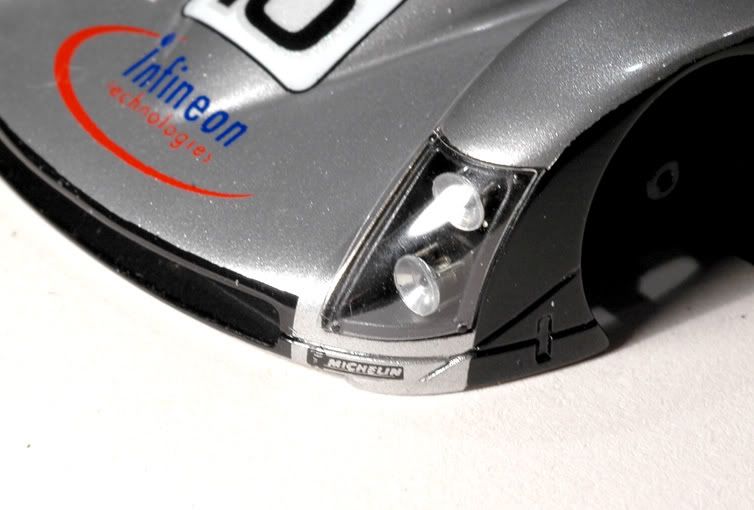 The headlights are not 100% like the Originals but fairly close in that scale. You have to look quite close anyway:-) The trickiest part with details like that usually is not to make the parts but getting them glued together without messing them up completely So much for today. More to come soon i hope :-) |
|
|
|
|
|
09-16-2008, 03:16 PM
|
#26 | |
|
AF Fanatic
Join Date: Dec 2004
Location: Up the creek with no paddle
Posts: 5,888
Thanks: 7
Thanked 16 Times in 15 Posts
|
Re: Audi R8C LeMans 1999 Provence Moulage 1:43
Brilliant

__________________
Guideline for happy modeling: Practice on scrap. Always try something new. Less is more. "I have a plan so cunning, you could put a tail on it and call it a weasel" - Edmund Blackadder |
|
|
|
|
|
09-16-2008, 04:39 PM
|
#27 | |
|
AF Enthusiast

Join Date: Oct 2005
Location: Monza
Posts: 1,150
Thanks: 21
Thanked 56 Times in 38 Posts
|
Re: Audi R8C LeMans 1999 Provence Moulage 1:43
Fantastic job on the headlights !!!!!!!!!!!!!!
Robi |
|
|
|
|
|
09-18-2008, 08:10 AM
|
#28 | |
|
'wannabe race driver'

Join Date: Aug 2008
Location: BAYERN
Posts: 258
Thanks: 81
Thanked 25 Times in 19 Posts
|
Re: Audi R8C LeMans 1999 Provence Moulage 1:43
Hello jaykay,
superb job on the lights, Congrats, very accurate and well done!!! That's what MODELING is all about. You said: "The headlights are not 100% like the Originals but fairly close in that scale. You have to look quite close anyway:-) The trickiest part with details like that usually is not to make the parts but getting them glued together without messing them up completely " Now thats exactly my point of view. It's the individuel way of bringing things as close to reality as possible and that should be done in everyone's stylish way of modeling! You can't copy reality in scale 100%, you have to kind of transform it into scale. What i mean is that certain things have to look good in the depending scale. Of course, one of the major points in our hobby are the skills of transforming our ideas into the demanded subject. Again, teriffic work (and SKILLS!)! Bye Jochen |
|
|
|
|
|
09-18-2008, 08:13 AM
|
#29 | |
|
AF Newbie
 Join Date: Jul 2004
Location: Aalst(Belgium)
Posts: 34
Thanks: 0
Thanked 0 Times in 0 Posts
|
amazing details. Great job.
|
|
|
|
|
|
09-18-2008, 06:32 PM
|
#30 | |
|
AF Enthusiast
Thread starter
Join Date: Aug 2005
Location: where "sky grey" is a colour
Posts: 822
Thanks: 3
Thanked 32 Times in 29 Posts
|
Re: Audi R8C LeMans 1999 Provence Moulage 1:43
Hard on the heels of the last one heres another update.
Im a bit quicker now because I can finally attach bits that have been lying around finished. First up were the brakes. The custom etched pieces were airbrushed with shades of Alclad. 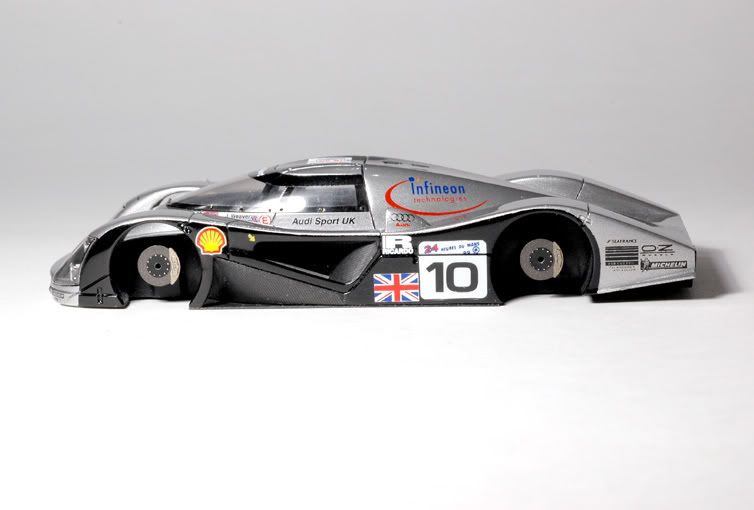 They do look a bit small i think and the front ones might actually be bigger than the rears on the real car, but I dont have the proper reference material to tell. To be honest though they are hardly visible after mounting the wheels anyway :-) 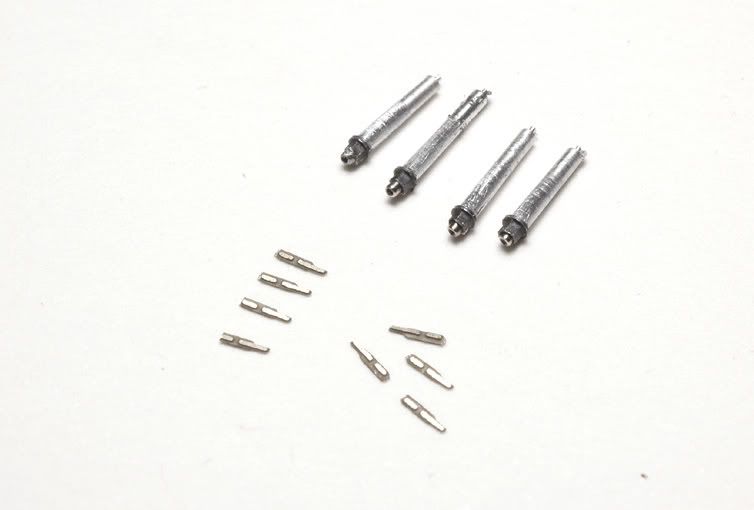 To mount the wheels i turned stub axles from aluminium and milled hex nuts on the ends. Theres a centre hole on each with a tiny bit of tubing ( injection needle ) added. Max diameter of the centre lock nuts is 1,2mm and the hex nuts are hardly visible without magnifiers but they are there, and its much the same for the etched body fasteners :-) 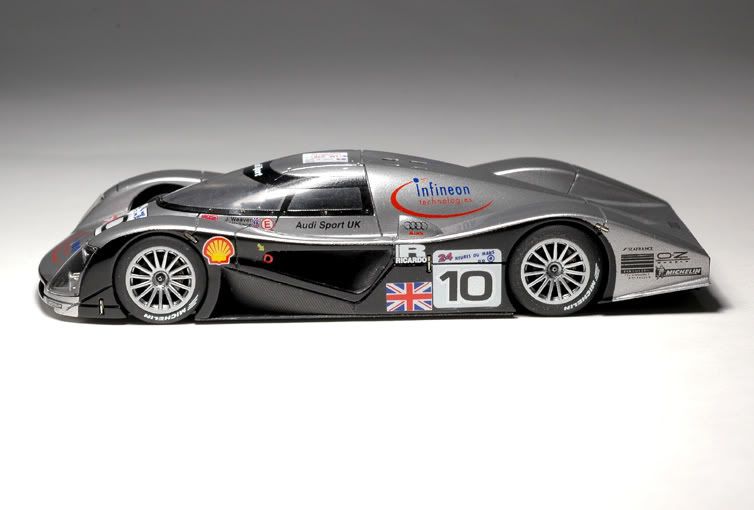 The Michelin-Logos on the tires are from the kit and they were fixed with Tameo "Extra Strong" decal softener. A thin coat of matt clear made the remains of glossy carrier film disappear. I also mounted the tiny red openers in both doors. Finally for today, a view from the front with the installed Audi-Logo. 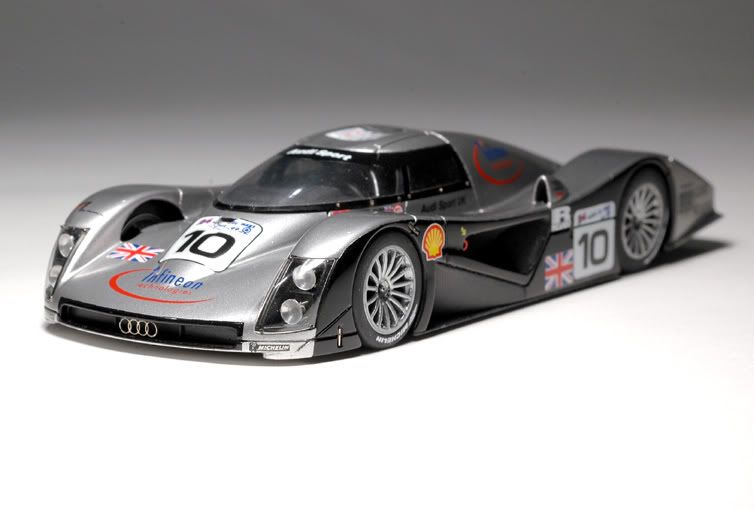 Thanks again for all the praise! Its my encouragement to get better and avoid more mistakes on the next project ( and there are enough to get rid of really! :-) |
|
|
|
|
|
|
POST REPLY TO THIS THREAD |
 |
|
|