|
|
|

|
|
| Search | Car Forums | Gallery | Articles | Helper | AF 350Z | IgorSushko.com | Corporate |
|
| Latest | 0 Rplys |
|
|||||||
| WIP - Street Post topics for any "Works In Progress" street vehicles projects in this sub-forum. |
 |
 Show Printable Version | Show Printable Version |  Email this Page | Email this Page |  Subscribe to this Thread
|
|
|
Thread Tools |
 10-09-2013, 06:32 PM
|
#1 | |
|
AF Enthusiast

Join Date: Aug 2001
Location: Austin, Texas
Posts: 2,828
Thanks: 17
Thanked 163 Times in 79 Posts
|
Short WIP of 1/24 Marussia B2
As requested in the completed B2 thread, here's a brief WIP.
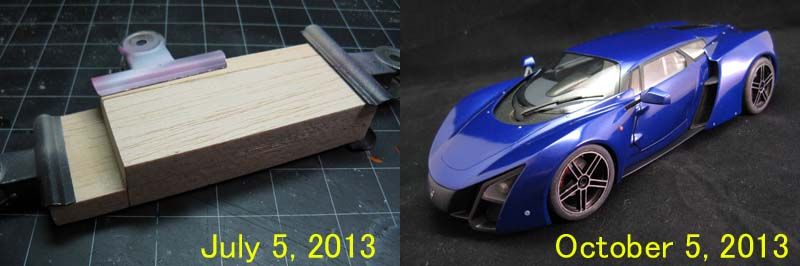 This project is almost entirely scratchbuilt. "Almost" because tires were 3D-printed and copied in urethane rubber. I thought of making tires myself, but I couldn't get fine tip scribers (like 0.1, 0.15 mm) because of limited time and budget.  My favorite style of scratch-building is vacuum forming, using balsa wood as a master. Balsa wood is easy to cut and sand, and vacuum-formed plastic parts are friendly to ordinary glue and other modeling materials. I cut out a lot of plastic templates, in order to make symmetrical master parts. 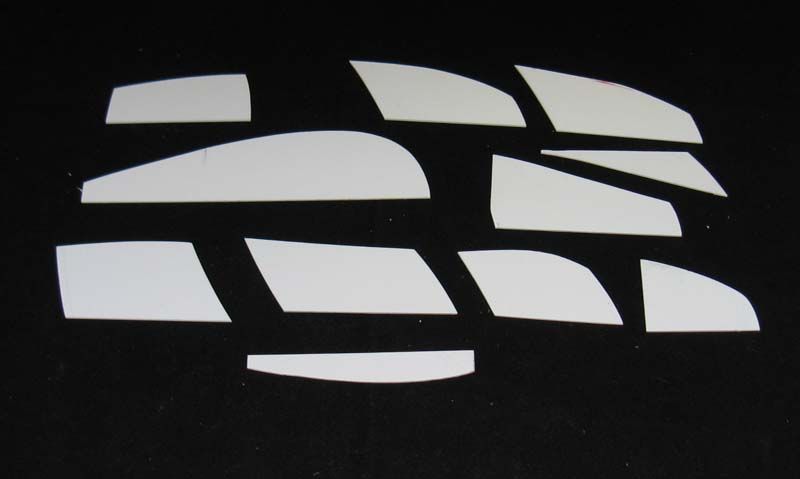 This gif animation shows how the body is segmented. 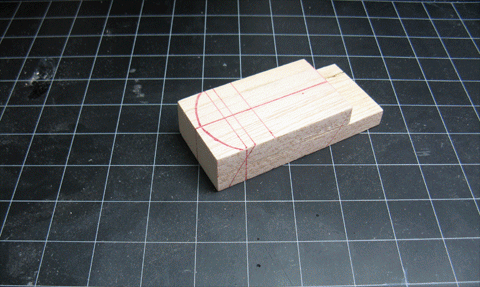 I used blue dye to color the wood glue when putting layers of balsa wood sheets together. When a block of balsa is cut and sanded, the glue appears as contour lines (much like a topographic map), that are used to achieve symmetry. If these lines aren't identical between left and right parts, you know they are not symmetrical. 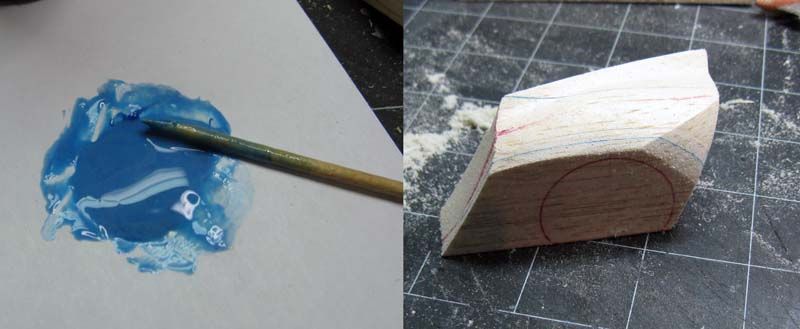 My vacuum forming machine has a limited work area, so I have to make large parts in pieces and put them together later. Vacuum forming masters have to be smaller than the desired size in order to take the thickness of plastic into account. 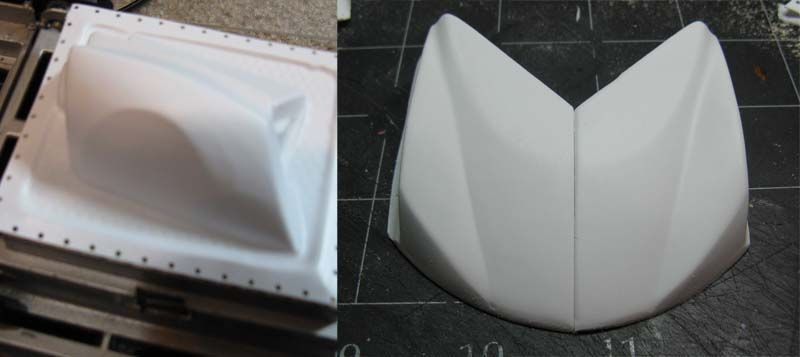 The core balsa block was frequently used to align both the balsa master and vacuum-formed parts. 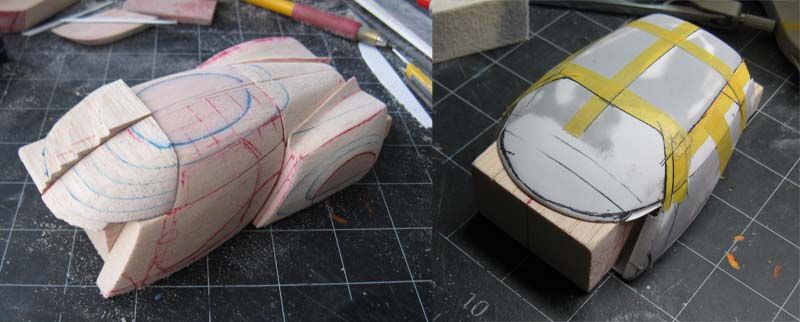 I used a lot of masking take to get symmetry right. The rear bumper and diffuser are made with styrene sheets. 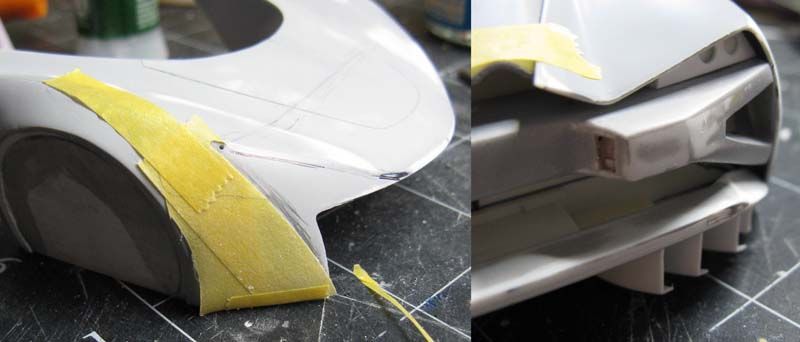 In-progress exterior is shown here. In this early stage, I prefer applying primer with a brush, then sand and smooth until all imperfections are corrected. Then I use spray primer for the final inspection and even surface. 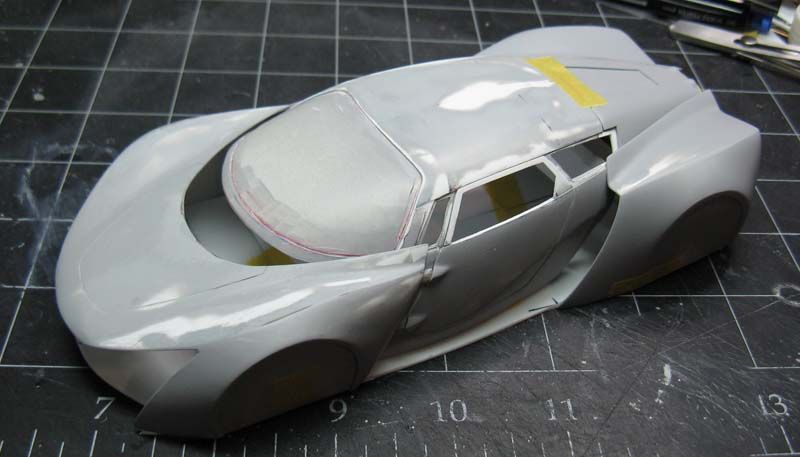 Here's a unique way of making a wheel. I don't have a working lathe, so I had to be creative by having Shapeways print this handy rim maker. It's a 10cm-thick jig with four holes, 20, 21, 22 and 23 mm, to get the approximate wheel sizes of 17, 18, 19, and 20 inch. While a piece of plastic is held in a hole, two more layers of styrene are glued to reinforce the part. Once I get the thickness of 1.5mm or so, the part retains its circular shape, and it's strong enough for resin casting. Wheels' center part is Evergreen plastic pipe, and the spokes are made with ten pieces of plastic. 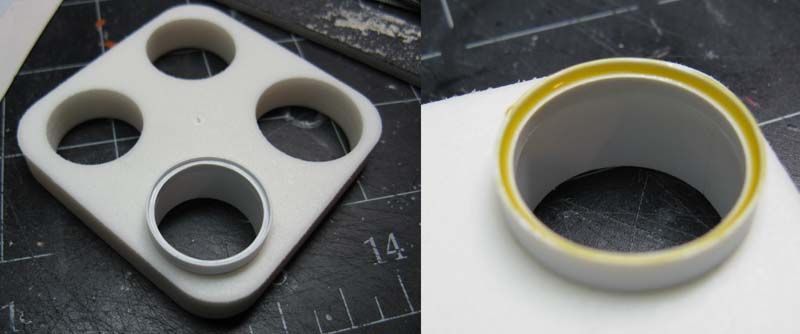 Rotors and calipers were made with layers of styrene, and the calipers were copied in Tamiya Light-Curing putty (UV putty). UV putty cures in 2 minutes, and it instantly became my favorite material. The down side is the relatively expensive price, but I only use a small amount each time. 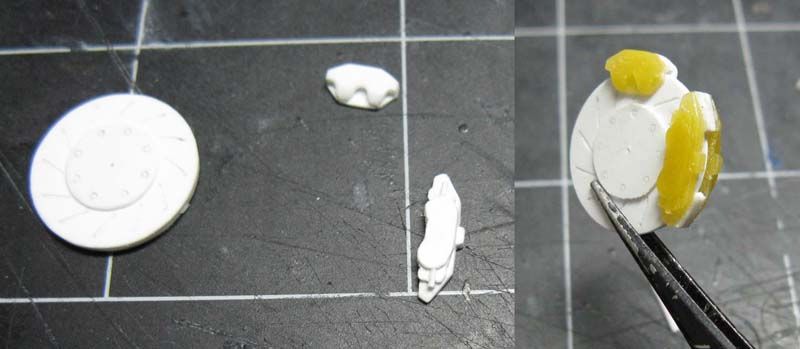 This picture was taken on September 14th (3 weeks before the Austin contest). Almost all exterior parts were ready, but no interior yet. 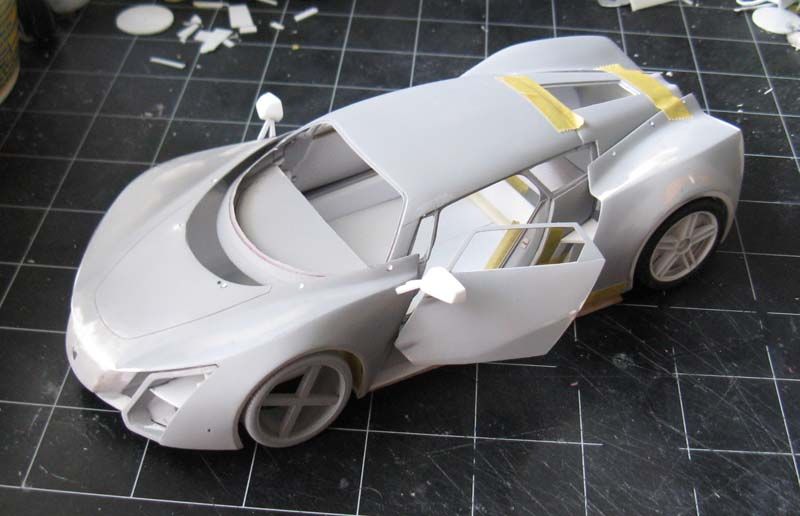 One of the most irritating things is when your trusted tool breaks right in the middle of a project. In my case, OLFA hobby knife's metal holder snapped. Lucky, I had not just one but two new ones in my tool box, so I didn't have to use my backup X-acto. 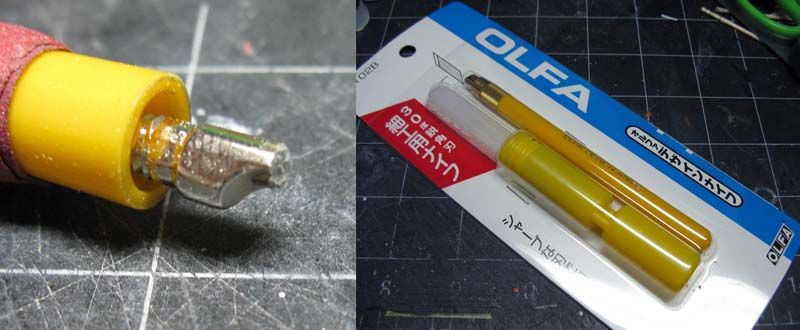 Another trick I found was to use masking tape to obtain symmetry. Mark the center line and top and bottom locations precisely on both sides of the plastic sheet, and cut one half, then apply the masking tape on the other side to cut the other half. This is simple and easy to do, so I'll be using this method more often. 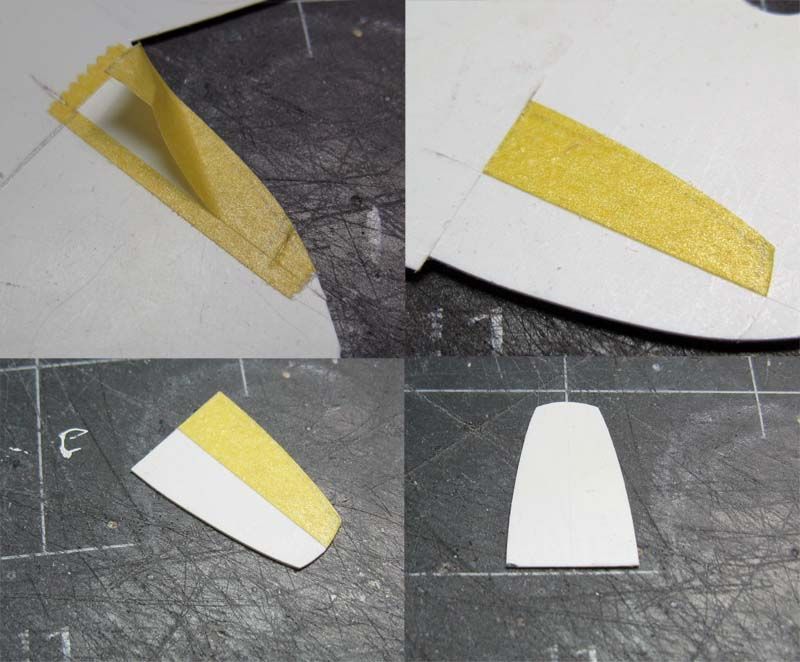 Most of the interior parts, including the center and driver-side display shrouds, are vacuum formed. Steering components are made with layers of plastic and plastic rods. 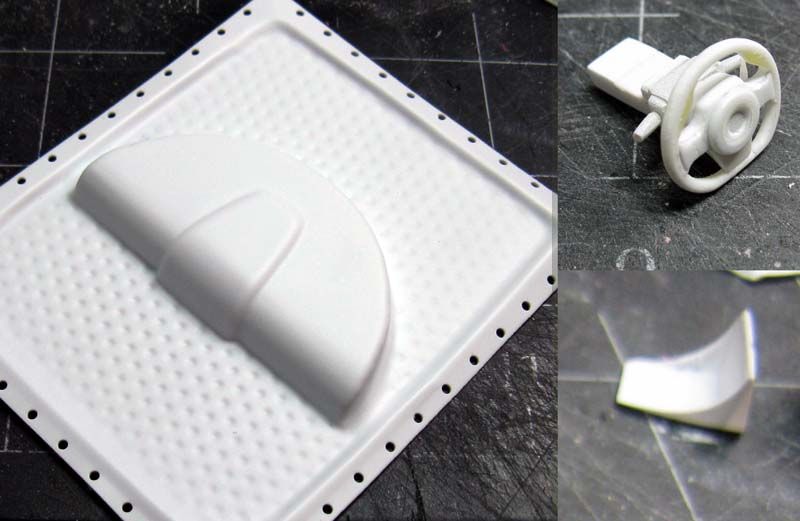 Back of the seat was vacuum formed, and the front cushion was made with pieces of plastic, which were curled and bent to get rid of the flat appearance as much as possible. Then the side was filled with Tamiya Epoxy Putty. Finished seat was copied with thermoplastic clay (aka. Oyumaru) and polyester putty (Bondo Body Filler).  These are templates for the inner door panels. Top two pieces are used to shape the front and back sides of a balsa sheet for the top 2/3 of the door. The bottom template is just the outline of the entire inner door panel. The handle and arm rest (not pictured) are laminar styrene. 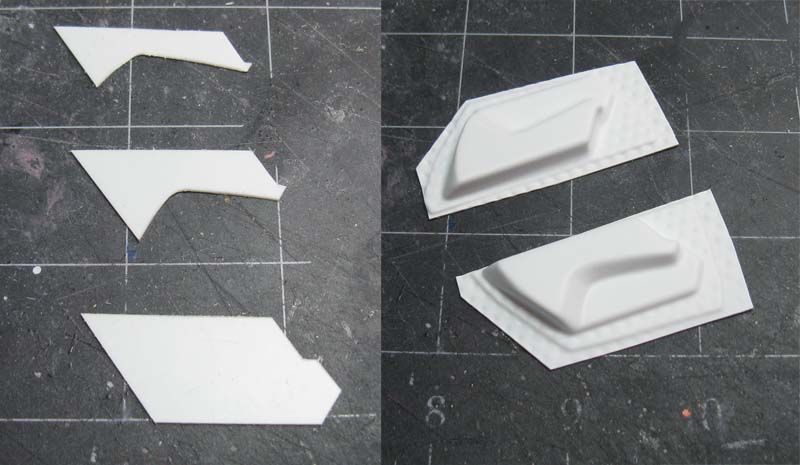 Because the deadline was getting close, I had make compromises. One of them was the ventilator outlet on the dashboard. I just couldn't find any easy solution to make the little dividers. In 1/12 scale, those can be cut out from styrene sheet, but in 1/24... I didn't want to glue pieces of heat-stretched plastic rod. Any alternative ideas? 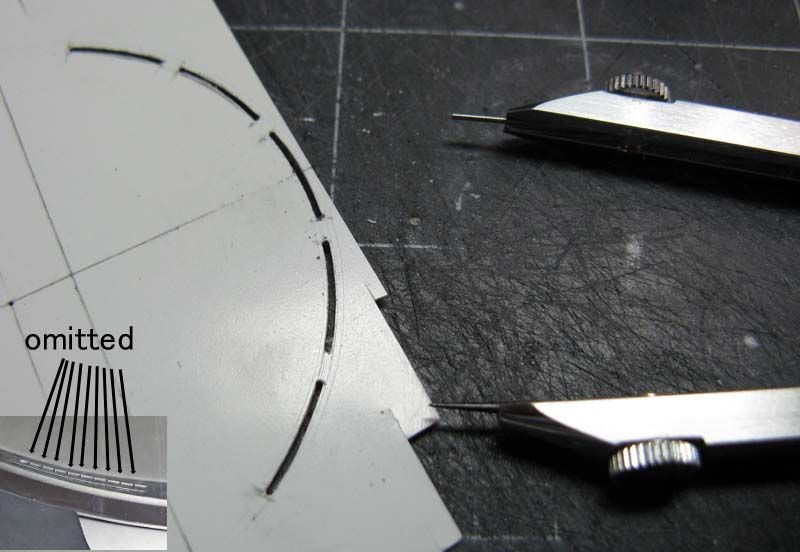 A lot of masking tape was used to make window masks. 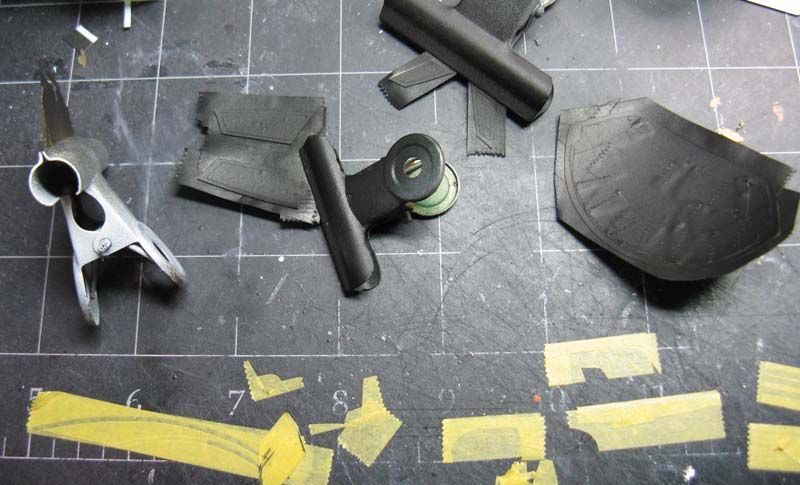 IIRC, the last component I fabricated was the wiper, which was made with thin strips of styrene. 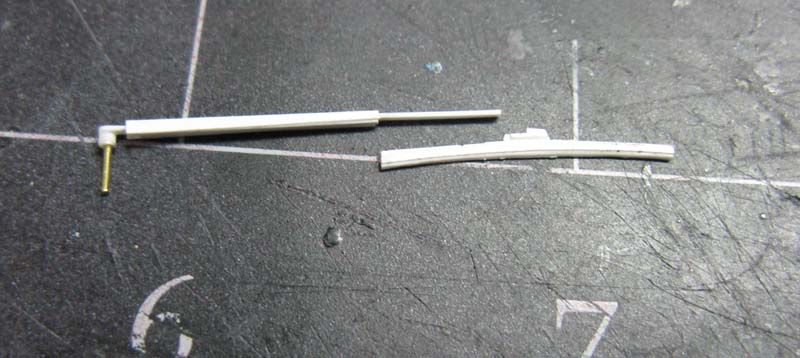 Almost all parts are ready. It's not pictured here, but the master for the LED turn indicators and stop lights was made with styrene. I used Creos rivet marker to simulate eight outer LEDs on a piece of plastic, then used a drill bit to make an indentation in the center. The part was cut out from the sheet, and copied with clear resin. (I hope you can see it in the rear view photo of the finished model.) Oh, and the engine room...? I put a piece of black plastic, and used tinted plastic for the window, so no one would pay attention.   Here are brighter pictures of the finished model. Body color is actually a lot darker in person because it's Tamiya TS-51 Racing Blue. I tried to custom mix my own blue, but I just couldn't get the desired color, so ended up with an easy solution. (I had to finish the model!) TS-51 was coated with Testors Wet Look Clear lacquer splay. 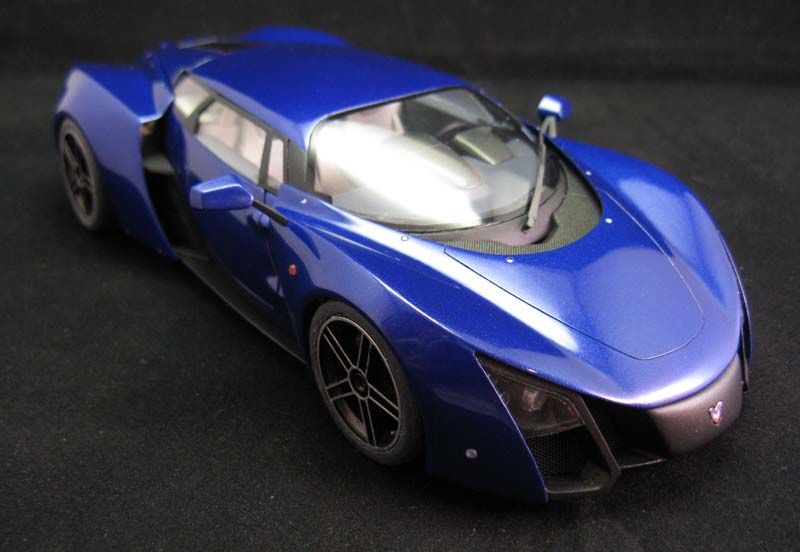 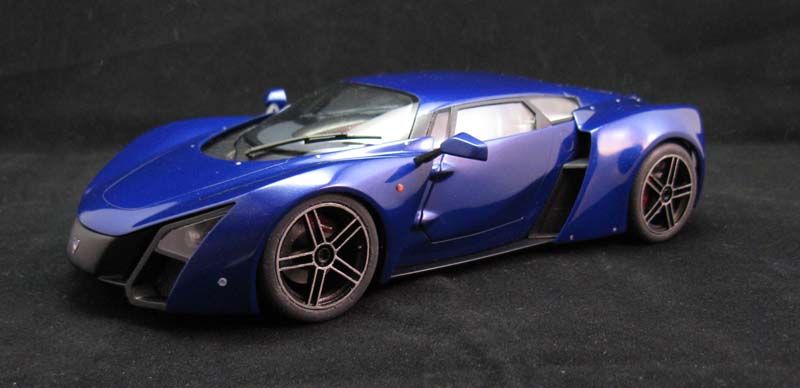 So, that's how I made my B2 model. As you can see, there aren't very many parts because this is a simple curbside-plus with separate doors. I don't say scratch-building is easy, but it's not something so difficult that only master craftsmen can do. I started scratch-building sci-fi robots when I was only sixteen. What you need is passion to keep the momentum going, and I encourage everyone to try. My goal of this project was not only to make this model in time for a contest, but also to find a way to scratch-build a car as quickly as possible, and I call three month a success. Next is to keep this momentum and get back to a bunch of unfinished projects, like the 333SP and many more! If you have any questions, please feel free to ask. |
|

|

|
| The Following 12 Users Say Thank You to hirofkd For This Useful Post: |
|
10-09-2013, 06:59 PM
|
#2 | |
|
AF Enthusiast

Join Date: Oct 2008
Location: Auckland
Posts: 2,761
Thanks: 51
Thanked 136 Times in 134 Posts
|
Re: Short WIP of 1/24 Marussia B2
WOW, thanks an amazing way to build a car!!!
How did you find the Tamiya UV putty to sand? mine always fills the file & seems quite gummy...
__________________
 It's Not wheather you Win or Lose, its how you look while you play the Game |
|
|
|
|
|
10-09-2013, 10:33 PM
|
#3 | |
|
AF Enthusiast

Join Date: Sep 2010
Location: Vancouver
Posts: 775
Thanks: 56
Thanked 73 Times in 69 Posts
|
Re: Short WIP of 1/24 Marussia B2
Many thanks for taking the time to post this WIP. It is very interesting and motivating.
Amazing work you did here and congratulations for doing it in three months!
__________________
Christophe. 
|
|
|
|
|
|
10-10-2013, 02:17 AM
|
#4 | |
|
Loser

Join Date: Aug 2007
Location: Moscow
Posts: 1,170
Thanks: 110
Thanked 248 Times in 195 Posts
|
Re: Short WIP of 1/24 Marussia B2
Thank you Hiro for such brief but interesting WIP. You are a MASTER!
 Only three month??? I can't believe.
__________________
Best regards, Mikhail   
Last edited by stratos75; 10-10-2013 at 07:53 AM. |
|
|
|
|
|
10-10-2013, 07:41 AM
|
#5 | |
|
AF Fanatic

Join Date: Sep 2002
Posts: 5,085
Thanks: 66
Thanked 119 Times in 92 Posts
|
Re: Short WIP of 1/24 Marussia B2
Great model, thanks for sharing

__________________
My Fotki Album |
|
|
|
|
|
10-10-2013, 08:02 AM
|
#6 | |
|
AF Enthusiast
Join Date: Jan 2002
Location: Washington, Washington DC
Posts: 2,383
Thanks: 129
Thanked 102 Times in 95 Posts
|
Re: Short WIP of 1/24 Marussia B2
Amazing job Hiro!
|
|
|
|
|
|
10-10-2013, 08:15 AM
|
#7 | |
|
AF Regular

Join Date: Mar 2012
Location: Sydney
Posts: 139
Thanks: 11
Thanked 10 Times in 10 Posts
|
Re: Short WIP of 1/24 Marussia B2
"Amazing" is not enough to explain my.... oh, I don't have a word. Thank you for sharing your great job!!!
__________________
Umihito We can learn from mistakes. 
|
|
|
|
|
|
10-11-2013, 02:13 AM
|
#8 | |
|
AF Regular

Join Date: Dec 2012
Location: Czech Republic
Posts: 124
Thanks: 97
Thanked 20 Times in 15 Posts
|
Re: Short WIP of 1/24 Marussia B2
Amazing work! Thanks for sharing.
|
|
|
|
|
|
10-11-2013, 10:40 AM
|
#9 | |
|
AF Newbie

Join Date: Jul 2009
Location: Tagil
Posts: 19
Thanks: 3
Thanked 3 Times in 3 Posts
|
Re: Short WIP of 1/24 Marussia B2
Fantastic work.
|
|
|
|
|
|
10-11-2013, 02:44 PM
|
#10 | |
|
AF Regular

Join Date: Feb 2012
Location: Lawrenceville, Georgia
Posts: 215
Thanks: 17
Thanked 27 Times in 27 Posts
|
Re: Short WIP of 1/24 Marussia B2
Incredibly impressive talent! Your work is truly inspirational!! Phenomenal job!! KUTGW!!
|
|
|
|
|
|
10-21-2013, 05:48 AM
|
#11 | |
|
AF Enthusiast

Join Date: Dec 2004
Location: Germany
Posts: 3,431
Thanks: 28
Thanked 79 Times in 73 Posts
|
Re: Short WIP of 1/24 Marussia B2
outstanding !!
__________________
Micha       
|
|
|
|
|
|
10-21-2013, 02:06 PM
|
#12 | |
|
AF Regular

Join Date: Jul 2009
Location: Menden - The door to the Sauerland
Posts: 164
Thanks: 19
Thanked 16 Times in 11 Posts
|
Re: Short WIP of 1/24 Marussia B2
I don't like the design of the Original, but your work is absolutely amazing.
__________________
Best regards ...and put the glue always on the right place  Dirk |
|
|
|
|
|
10-21-2013, 04:58 PM
|
#13 | |
|
AF Regular

Join Date: Mar 2013
Location: Fort Worth, Texas
Posts: 244
Thanks: 18
Thanked 13 Times in 13 Posts
|
Re: Short WIP of 1/24 Marussia B2
You should go work with Tamiya, Fujimi, or Aoshima because your just too awesome.
__________________
HellaScale Model Club |
|
|
|
|
|
10-23-2013, 09:57 AM
|
#14 | |
|
Authorized Vendor

Join Date: Oct 2005
Location: Vicenza - veneto de rassa
Posts: 3,909
Thanks: 6
Thanked 46 Times in 41 Posts
|
Re: Short WIP of 1/24 Marussia B2
Bellissimo job for a very ugly subject!!!!!
Jokes apart, the tip with coloured glue on balsa is awesome to see over sculpting/sanding: congrats. Warmforming, uh? Fantastic...
__________________
gio
|
|
|
|
|
|
10-23-2013, 08:50 PM
|
#15 | |
|
AF Enthusiast

Join Date: Aug 2012
Location: Canada
Posts: 546
Thanks: 121
Thanked 45 Times in 40 Posts
|
Re: Short WIP of 1/24 Marussia B2
Fantastic work Hiro!
I really like the balsa and vacu-form technique ...true that the Mattel vac-u-form machine doesn't allow for very big pieces to be made For the dash grills, it might be possible to use wire adhered from beneath styrene panel, but if wanted flush then using fine wire bent in center to raise up, or alternately, mildly scratch backside of panel (with scriber) slightly to recess wire closer to top surface |
|
|
|
|
|
|
POST REPLY TO THIS THREAD |
 |
|
|