|
|
|

|
|
| Search | Car Forums | Gallery | Articles | Helper | AF 350Z | IgorSushko.com | Corporate |
|
| Latest | 0 Rplys |
|
|||||||
| Car Modeling Share your passion for car modeling here! Includes sub-forum for "in progress" and "completed" vehicles. |
 |
 Show Printable Version | Show Printable Version |  Email this Page | Email this Page |  Subscribe to this Thread
|
|
|
Thread Tools |
 07-31-2005, 01:16 PM
|
#1 | |
|
AF Enthusiast

Join Date: Oct 2003
Location: Marietta, Georgia
Posts: 1,159
Thanks: 8
Thanked 32 Times in 29 Posts
|
"How-to: Fiberglass"
How-to, Simulate Fiberglass in Scale
While working on the 1/12th scale Tamiya Porsche 935 Turbo I thought the parts in the kit would lend themselves well to an actual fiberglass pattern or effect. After several tests, this is the method that I came up with which seems to best replicate the scale-look of fiberglass. 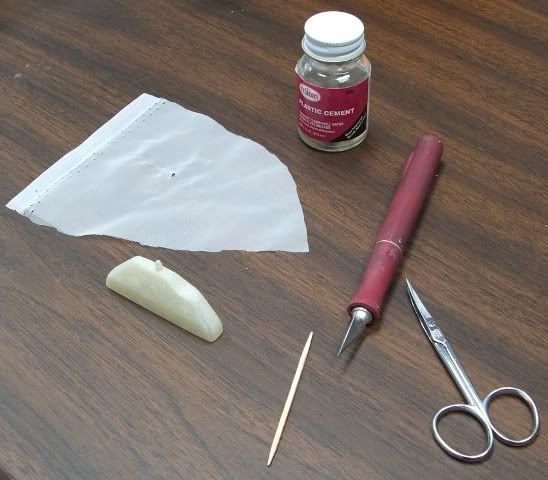 In this first picture you can see the tools and materials needed for this process. The cloth I used is just a simple sheer cloth picked up from any fabric store. Its the type that would be used for making curtains or something similar. Youll need liquid cement for plastic, scissors, an x-acto knife and toothpick or other tool for pressing the cloth into the crevices of the plastic part. 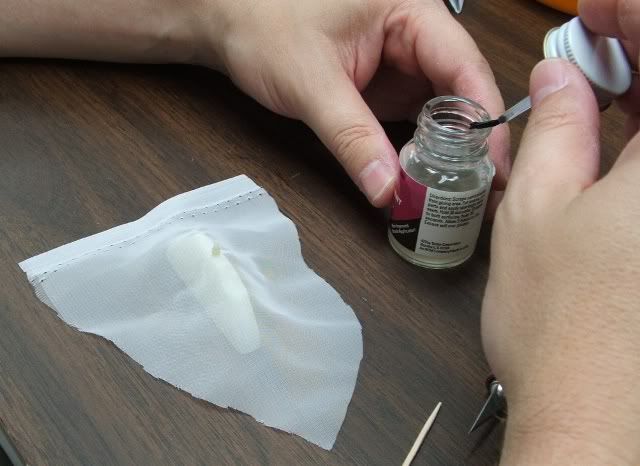 Here, you can see that Ive cut a hole in the cloth for the mounting pin of the kit part to protrude through and then simply draped the cloth over the part. Keep the mounting pins and holes of parts as clean as possible to avoid difficulties attaching the parts during your assembly. 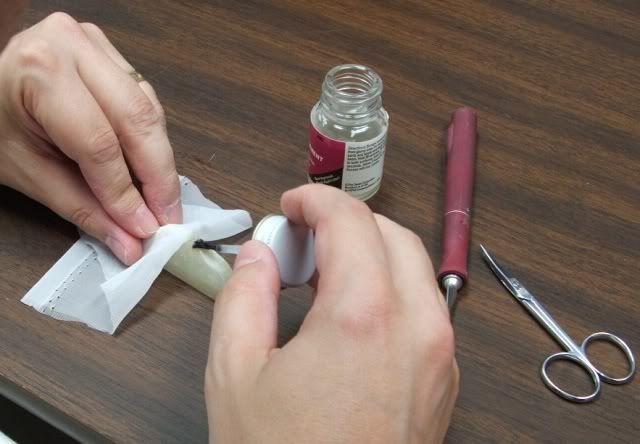 Choose your starting point, pull the cloth back and apply a layer of liquid cement to the kit part. Apply a generous amount of cement and give it a minute to soften the plastic. The brand of cement and the amount applied will determine your wait time for the plastic to soften. What you want to achieve is enough softening for the cloth to actually press into the softened plastic without the plastic really oozing through the cloth. 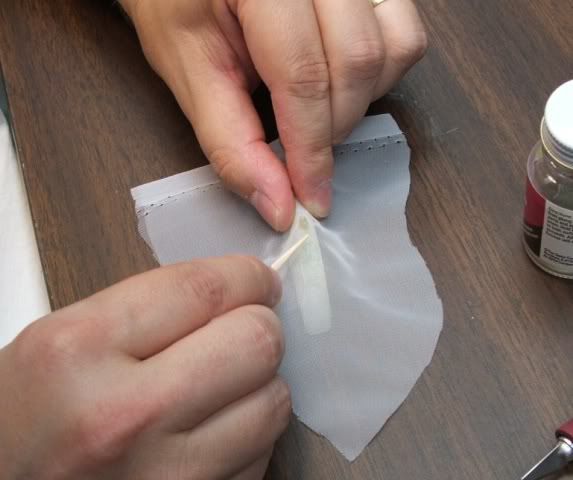 Pull the cloth back over the softened plastic and begin pressing and working the cloth into the plastic with a toothpick. You may have to work with it for a few minutes until the plastic starts to set-up or harden again to ensure the cloth doesnt pull away as you move to the next section. 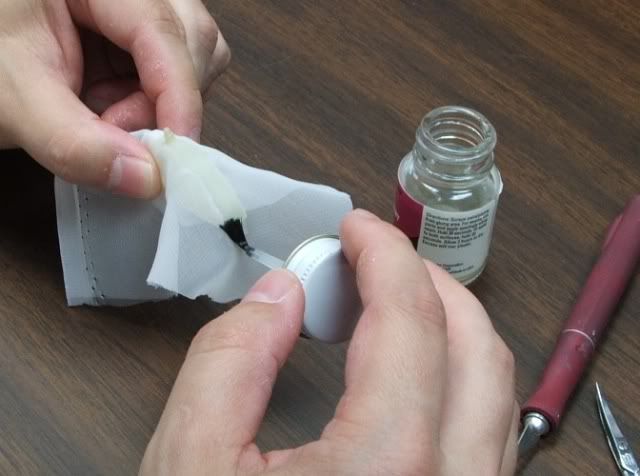 After the plastic has begun to set-up and harden, paint a thin layer of plastic cement over the cloth. This process just seals the cloth to the plastic and smoothes out the texture a little bit. 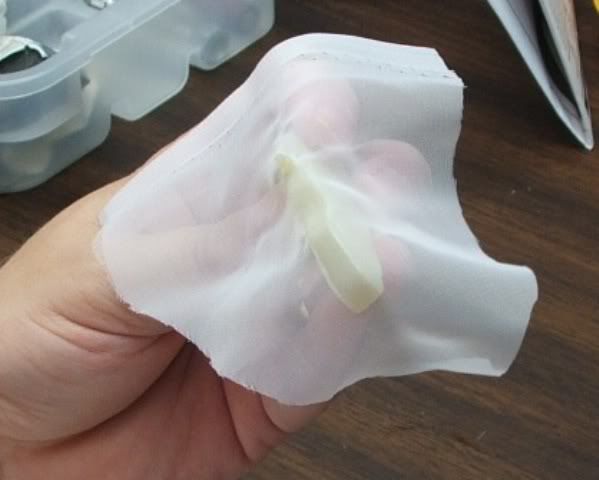 Heres the result of the process to this point. 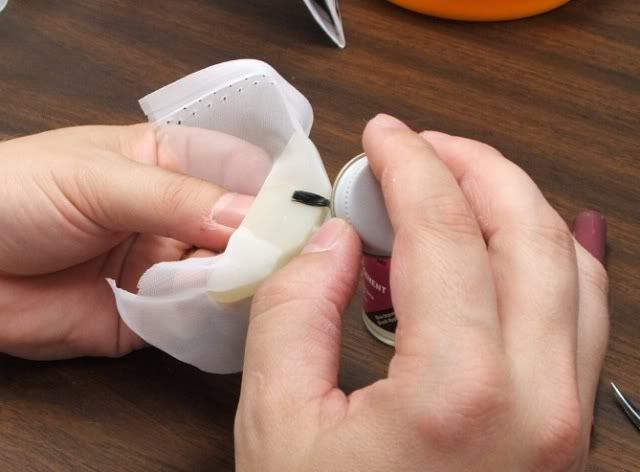 Continue the above steps working your way around the part. Work in sections as you soften the plastic with the liquid cement and pressing the cloth into the plastic. 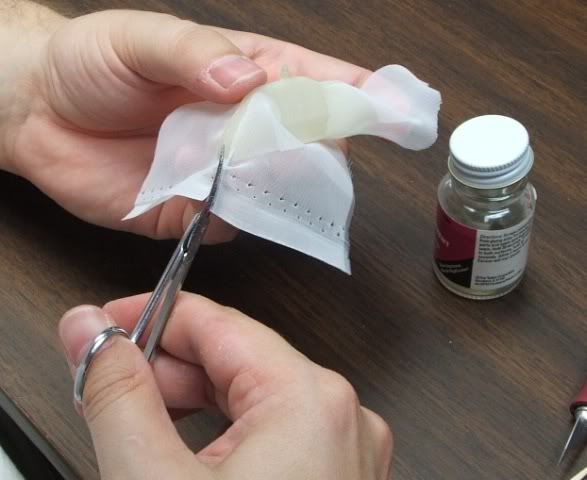 Inevitably, just like working with a flat decal on a curved surface, you may have to make small cuts in the cloth to get it to conform to the part. Just apply a little more cement and keep working it in until the cloth stays where you want it. Keep in mind, real fiberglass is worked in sheets and cut where necessary also. 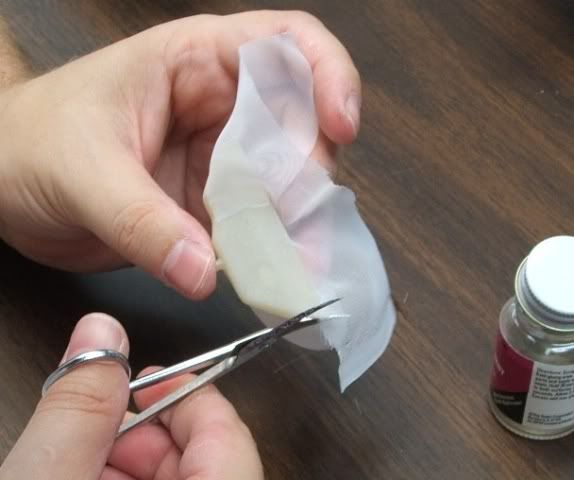 A little more cutting and one side is almost complete. 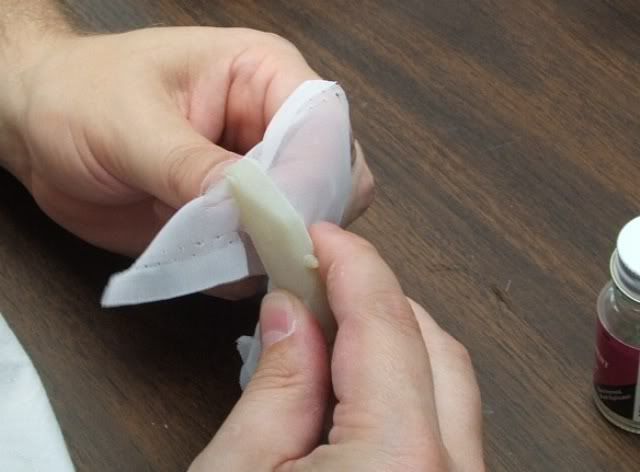 After the cut mentioned above and working the cloth around the corner.  One side completed. Just repeat this process of applying the liquid cement in small sections to soften the plastic, press and work the cloth into the softened plastic making cuts in the cloth where necessary to make it conform then apply a thin layer of cement on the cloth to even out the texture and seal the cloth to the plastic. 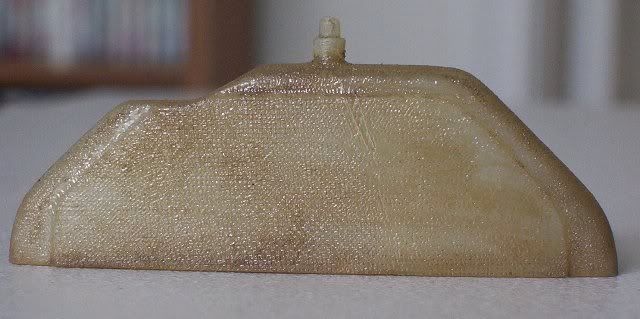 Heres the completed part with a wash of Tamiya X-19 smoke, X-22 clear and some dirty acrylic brush cleaner as the thinner. I washed the parts with this mixture to get the effect you see here. You can mix your wash to get the effect you desire from very clean new fiberglass to very dirty used fiberglass. As a note: this particular kit part was molded in a translucent tan color which helps with the overall look. Parts molded in other colors will have to have a light coat of primer (I recommend tamiya Fine White primer as it wont cover up the texture youve worked hard to achieve) then apply a wash of Tamiya XF-59 Desert Yellow or XF-60 Dark Yellow directly to the white primer to get the basic tan color. After that wash has dried thoroughly you can then apply your dirty wash for the final effect. Hopefully, some of you will find this helpful to achieve that extra texture and detail we all strive for while trying to duplicate realism in our scale models. Thanks for looking ..
__________________
Eric Cole Other Model Pictures Here: http://s5.photobucket.com/albums/y197/justdande/ |
|

|

|
|
07-31-2005, 01:22 PM
|
#2 | |
|
AF Enthusiast
 Join Date: Jul 2002
Location: Oahu, Hawaii
Posts: 2,790
Thanks: 0
Thanked 1 Time in 1 Post

|
Great how to. I wonder how well it'll work with 1:24 parts.
__________________
AF MODELING FAQ  ~ 1987 Toyota Corolla GTS Coupe Sprinter ~ "Oh what a feeling.- Toyota |
|
|
|
|
|
07-31-2005, 01:23 PM
|
#3 | |
|
Captain Over Engineer
 Join Date: Feb 2003
Location: New York, New York
Posts: 6,711
Thanks: 27
Thanked 29 Times in 23 Posts


|
Re: "How-to: Fiberglass"
Awesome tutorial Eric. It was even better watching it in person. Great work. Are you sure that sheer isnt Deanna's?
__________________
-Mike AF Director of Media / Photographer  mike.lawrence@automotiveforums.com | AutomotiveForums.com | Flickr Gallery |
|
|
|
|
|
07-31-2005, 01:29 PM
|
#4 | |
|
AF Enthusiast

Join Date: Jan 2005
Location: Dunfermline, Scotland
Posts: 635
Thanks: 0
Thanked 0 Times in 0 Posts
|
Re: "How-to: Fiberglass"
Superb how-to and great pics. I spose you for 1/24 scale you just need cloth which has a tighter mesh.
__________________

|
|
|
|
|
|
07-31-2005, 01:41 PM
|
#5 | |
|
AF Fanatic

Join Date: Sep 2002
Posts: 4,699
Thanks: 8
Thanked 74 Times in 68 Posts
|
Re: "How-to: Fiberglass"
Awesome!
__________________
There is a lesson in every kit. |
|
|
|
|
|
07-31-2005, 01:57 PM
|
#6 | |
|
AF Fanatic

Join Date: Dec 2004
Location: Up the creek with no paddle
Posts: 5,888
Thanks: 7
Thanked 16 Times in 15 Posts
|
Re: "How-to: Fiberglass"
Great tutorial - from idea through to presentation!
Thanks for sharing 
__________________
Guideline for happy modeling: Practice on scrap. Always try something new. Less is more. "I have a plan so cunning, you could put a tail on it and call it a weasel" - Edmund Blackadder |
|
|
|
|
|
07-31-2005, 02:29 PM
|
#7 | |
|
AF Fanatic

Join Date: Apr 2004
Location: somerdale, New Jersey
Posts: 4,660
Thanks: 63
Thanked 38 Times in 35 Posts

|
Re: "How-to: Fiberglass"
WoW!!! That's a great tip!! Gotta try it!
|
|
|
|
|
|
07-31-2005, 02:43 PM
|
#8 | |
|
AF Newbie
Join Date: Jun 2005
Location: windsor
Posts: 9
Thanks: 0
Thanked 0 Times in 0 Posts
|
Re: "How-to: Fiberglass"
Thanks for the tutorial Eric, very well present.
I suppose the procedure will be the same if I use fabric softener paper ? |
|
|
|
|
|
07-31-2005, 04:29 PM
|
#9 | |
|
AF Enthusiast

Join Date: May 2003
Location: Sunshine Coast, AUSTRALIA
Posts: 2,215
Thanks: 16
Thanked 8 Times in 8 Posts
|
Re: "How-to: Fiberglass"
Thanks for the tip Eric!
__________________
Rob 
|
|
|
|
|
|
07-31-2005, 04:45 PM
|
#10 | ||
|
AF Enthusiast
Thread starter
Join Date: Oct 2003
Location: Marietta, Georgia
Posts: 1,159
Thanks: 8
Thanked 32 Times in 29 Posts
|
Re: Re:
Thanks all.....
Quote:
__________________
Eric Cole Other Model Pictures Here: http://s5.photobucket.com/albums/y197/justdande/ |
||
|
|
|
|
07-31-2005, 09:03 PM
|
#11 | |
|
Registered User

Join Date: Sep 2003
Location: Hendersonville, North Carolina
Posts: 940
Thanks: 0
Thanked 2 Times in 1 Post
|
Re: "How-to: Fiberglass"
Thanks for the tutorial, Eric. I'll be using this technique soon.
|
|
|
|
|
|
08-03-2005, 07:04 AM
|
#12 | |
|
AF Enthusiast

Join Date: Aug 2002
Posts: 906
Thanks: 0
Thanked 3 Times in 3 Posts
|
I've used camera lense cleaning cloths to achieve the same effect (on the interior cockpit of my Fujimi 917), but remember that the cloths and the fabric sheets are perfect for the "chopped matt" construction of blown-in fiberglass whereas the above sheer fabric method is perfect for woven fiberglass construction!
Great job, great tutorial and thanks for taking the time to show it to us! Bill
__________________
Bill "Why yes, that IS my bare, carbon fiber Enzo in Scale Motorsport's "How to Carbon Fiber Decaling video!" |
|
|
|
|
|
08-03-2005, 08:26 AM
|
#13 | |
|
www.hiroboy.com vendor

Join Date: Oct 2002
Location: Cheltenham
Posts: 3,842
Thanks: 0
Thanked 2 Times in 2 Posts
|
Re: "How-to: Fiberglass"
Nice "How To" Thanks
 |
|
|
|
|
|
08-03-2005, 08:36 AM
|
#14 | |
|
Sweet, sweet tiny Hondas.
 Join Date: Jul 2003
Location: Austin, Texas
Posts: 5,720
Thanks: 48
Thanked 89 Times in 65 Posts
|
Re: "How-to: Fiberglass"
Great idea! Thanks for sharing.
__________________
It ain't cool 'till your wife hates it. Imagine a world without Alabama Recent builds: Rocket Bunny FR-S and stock BRZ Toyota bB Bro-style Civic K20 powered SiR converted EK WIP I build slowly and poorly. 
|
|
|
|
|
|
08-03-2005, 02:29 PM
|
#15 | |
|
Getting Old...
Join Date: May 2003
Location: Lugano, Switzerland
Posts: 753
Thanks: 0
Thanked 0 Times in 0 Posts
|
Re: "How-to: Fiberglass"
Awesome. Saw the other pieces in your build-up and have been hoping you'd do a how-to.
Thanks. Murray |
|
|
|
|
|
|
POST REPLY TO THIS THREAD |
 |
|
|


