

|
| Search | Car Forums | Gallery | Articles | Helper | AF 350Z | IgorSushko.com | Corporate |
|
| Latest | 0 Rplys |
|
|||||||
| WIP - Motorsports Post topics for any "Work In Process" motorsports vehicles in this sub-forum. |
 |
 Show Printable Version | Show Printable Version |  Email this Page | Email this Page |  Subscribe to this Thread
|
|
|
Thread Tools |
|
|
#721 | |
|
AF Enthusiast
Thread starter
Join Date: Nov 2008
Location: Norwich
Posts: 649
Thanks: 21
Thanked 111 Times in 87 Posts
|
Re: 1/8 Porsche 935/78 'Moby Dick'
Hello Alex,
Well, better to find out now, than after spending hours applying the Martini stripes! It's weird (to me, anyhow - most people reading this thread are probably already thinking 'I know why that's happened'!) but there was no indication of trouble while the filler was being applied and smoothed, or during the priming and painting stage - and this all happened over a period of several weeks. It's only in the last couple of weeks that I've noticed the problem, but we've had this warm / dry weather in the UK for the last month (makes a change from the normal wet summer, I suppose). For what it's worth I've been using Mr Hobby 'Mr White Putty' - has anyone else had problems with this, or could it be a combination of temperature, poor application, etc? I did wonder if some of it could be caused by the panel flexing and twisting - as it's not completely rigid - but most of the crazing is in areas where I can't imagine there's any flexing going on. I've been busy enough working on getting the roof fitted, etc, so I've not investigated further. I need to check the fit of these panels onto the car, so once that's done I'll probably set-to with the coarse wet-n-dry and see what's what. Worst case scenario is that I have to completely re-paint both panels, but I can't leave them as they are. I know my photos aren't always great, but even I would struggle to cover up this problem! At least I've had the practice of painting them the first time around... SB |
|
|
|

|
|
|
#722 | |
|
AF Regular
Join Date: Jun 2015
Location: Dunfermline
Posts: 370
Thanks: 38
Thanked 51 Times in 50 Posts
|
Re: 1/8 Porsche 935/78 'Moby Dick'
Mr hobby filler is lacquer based and will react with your automotive primer? I find they don't play nice. Nor does the green toluene stuff either. Not unless you are putting acrylic on top. Milliput is a pain but works fine.. even better is real car body filler but it need to gas out for a bit even after it has 'gone off'.
|
|
|
|

|
|
|
#723 | |
|
AF Regular
Join Date: Jun 2015
Location: Dunfermline
Posts: 370
Thanks: 38
Thanked 51 Times in 50 Posts
|
Re: 1/8 Porsche 935/78 'Moby Dick'
Just for example my 360 had a perfect bonnet and days later it started showing shrinking and warping of filler under paint. Painful but a lesson learned.
 |
|
|
|

|
|
|
#724 | |
|
AF Enthusiast
Thread starter
Join Date: Nov 2008
Location: Norwich
Posts: 649
Thanks: 21
Thanked 111 Times in 87 Posts
|
Re: 1/8 Porsche 935/78 'Moby Dick'
Hello again,
I've had a productive few weeks - one of the main reasons for not posting more updates is that if I'm not careful I'll end up showing too much! It's at the stage now where the end is very much in sight, so I want the final reveal to be a good one. One of the other reasons for not updating more often is that Photobucket just seems to be less reliable than before. I uploaded six photos for this post...four arrived in my account, two are still in transit and might arrive sometime tomorrow. Kinda annoying, really... Anyway, after sanding back the cracked areas on the bodywork, I'm of the opinion that the cracks are actually in the top layer of the fibreglass, rather than purely in the paint, primer or filler. Maybe the filler has caused the cracking, as most of the affected areas were in places where the filler had been applied more heavily - but it's a bit of a new one to me. Lesson for the future - put more work into smoothing the fibreglass before applying the filler! Despite cutting everything back with various grades of paper to a smooth finish, the fine cracks re-appeared after the primer was applied. At this stage I'm resigned to living with it - I'm not prepared to strip back these parts again, and I'm not even sure how to best deal with the cracks given that I'm convinced they're in the fibreglass. I could apply more resin and sand it back again, but the cracks are so fine that you'd end up removing about 99% of the resin! It's not a disaster. Some of the areas will be covered by decals, some by more paint, and the rest will just have to be as it is. There's enough other bits on the model that won't be totally perfect. Besides, after forty years there's probably a few gel-cracks on the full-size car, so I'm actually being quite accurate...! So, first photo tonight: 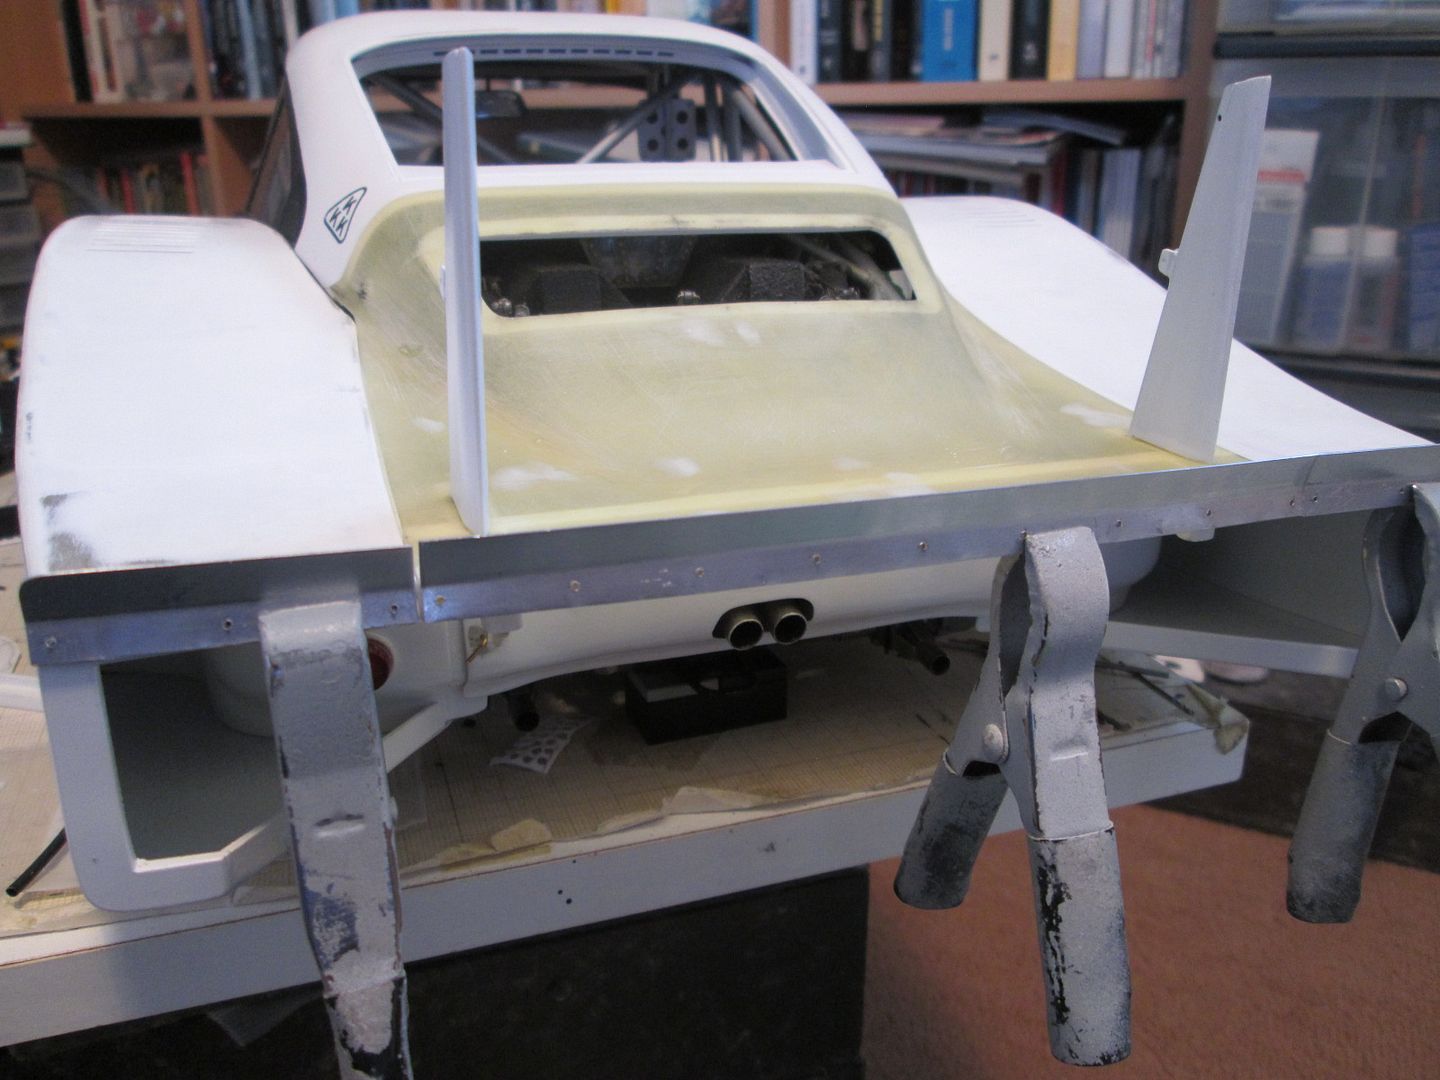 To avoid the warping that affected the first engine cover panel (after I cut and glued it to adjust the shape) I modified the mould and re-made it. I added some more width along the sides, and tweaked the curve where it meets the two outer wing panels. Having fixed the positions of these two (more on this later) I could trim the new engine cover to suit. I removed the styrene surround from the grill opening on the Mk1 panel and re-fitted this to the Mk2. Underneath, there's a length of 4mm box-section across the full width which attaches to a couple of mounting sections which locate positively onto the chassis outriggers. The wing support posts are pinned into this, and I also re-used parts of the original support blocks. Higher up in the engine bay I've added a couple of brackets to the frame, and have drilled and pinned the panel in place. Once it's on, it's on! The trim tabs on the back edge are made from 0.016" aluminium. I spent several hours working on these - straightening out the ali after cutting, marking and drilling the holes, getting them bent to shape, etc. Styrene would have been easier in some respects, but it would have been difficult to get the bends, and they would have needed painting afterwards. In ali, they just need to be glued and pinned in place and that's it. While I was at it, I also made the gurney for the main wing: 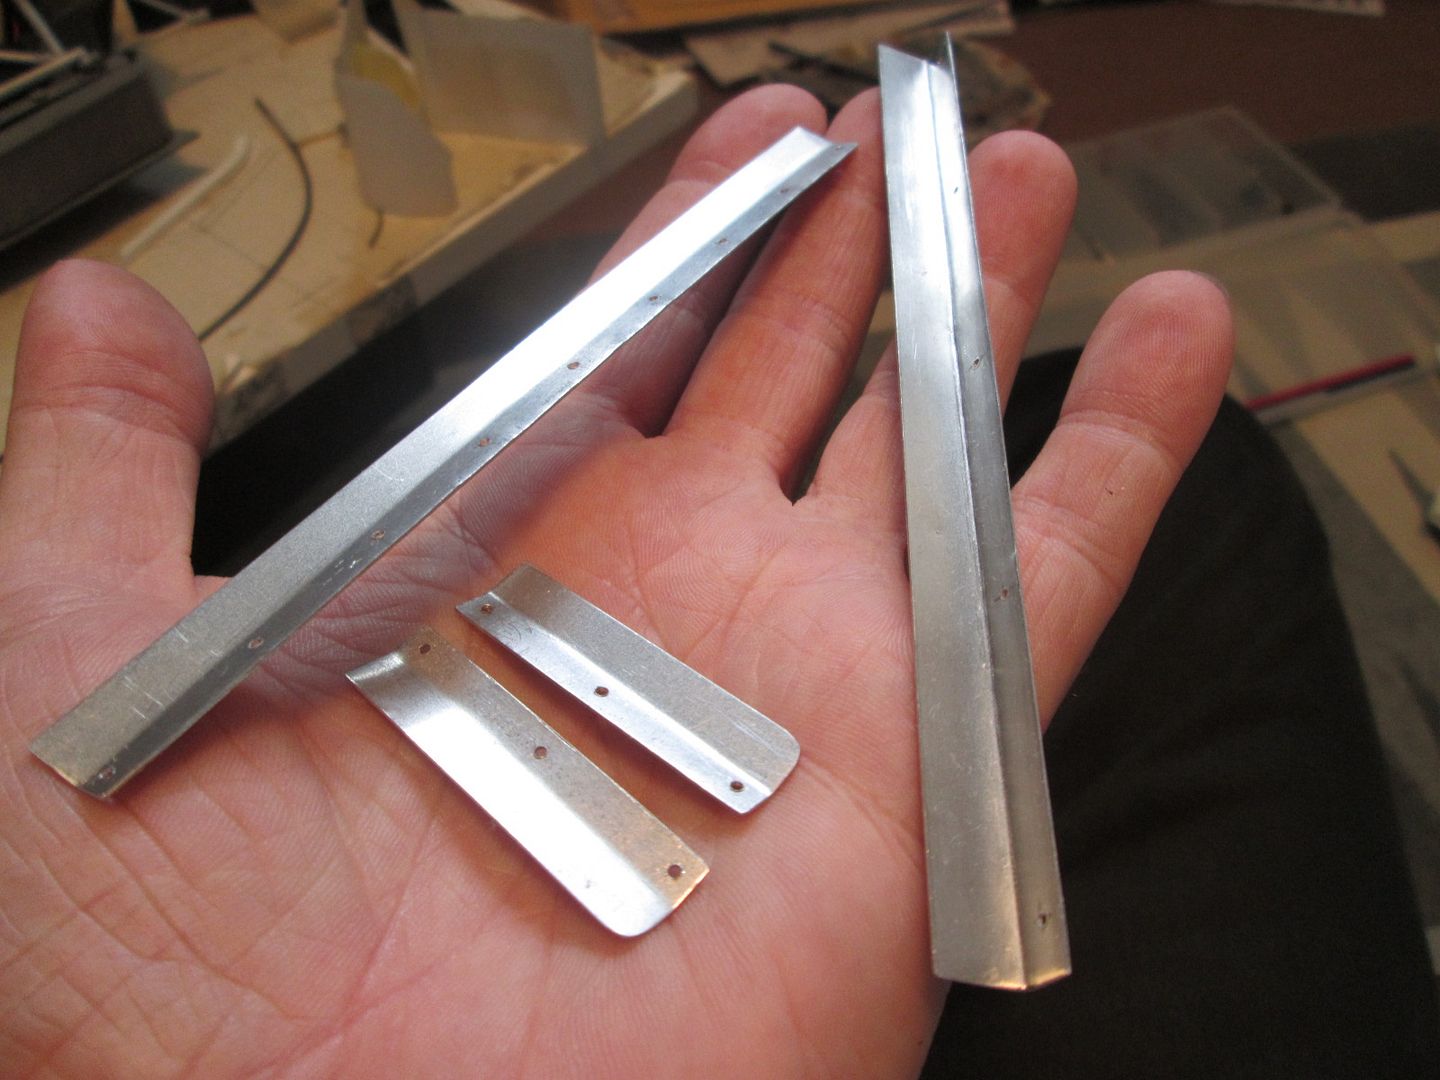 The main reason for making these when I did was that I wanted to drill all the mounting holes before priming and re-painting the various panels they would be attached to. I lost a bit of the paint when I drilled through the lower bumper section earlier, so this was a situation I was keen to avoid repeating. All the outer panels for the rear of the car have now been re-primed and re-sprayed with three coats of Tamiya X-2 white. Rubbed-down with fine Micromesh in between coats, and a spray of 'Purity Seal' varnish afterwards before applying decals... At the front, after re-primering the nose I made the decision to cut the two sets of bonnet louvres. I've fitted the exit ducts from the front rads (photo missing) so could adjust the position of the template to get the louvres in just about the right place. As with the rear, I reckon each slot took about 45 minutes to drill, cut, file and fettle into shape...good job I was on holiday last week and could spend the time 'getting in the zone'! 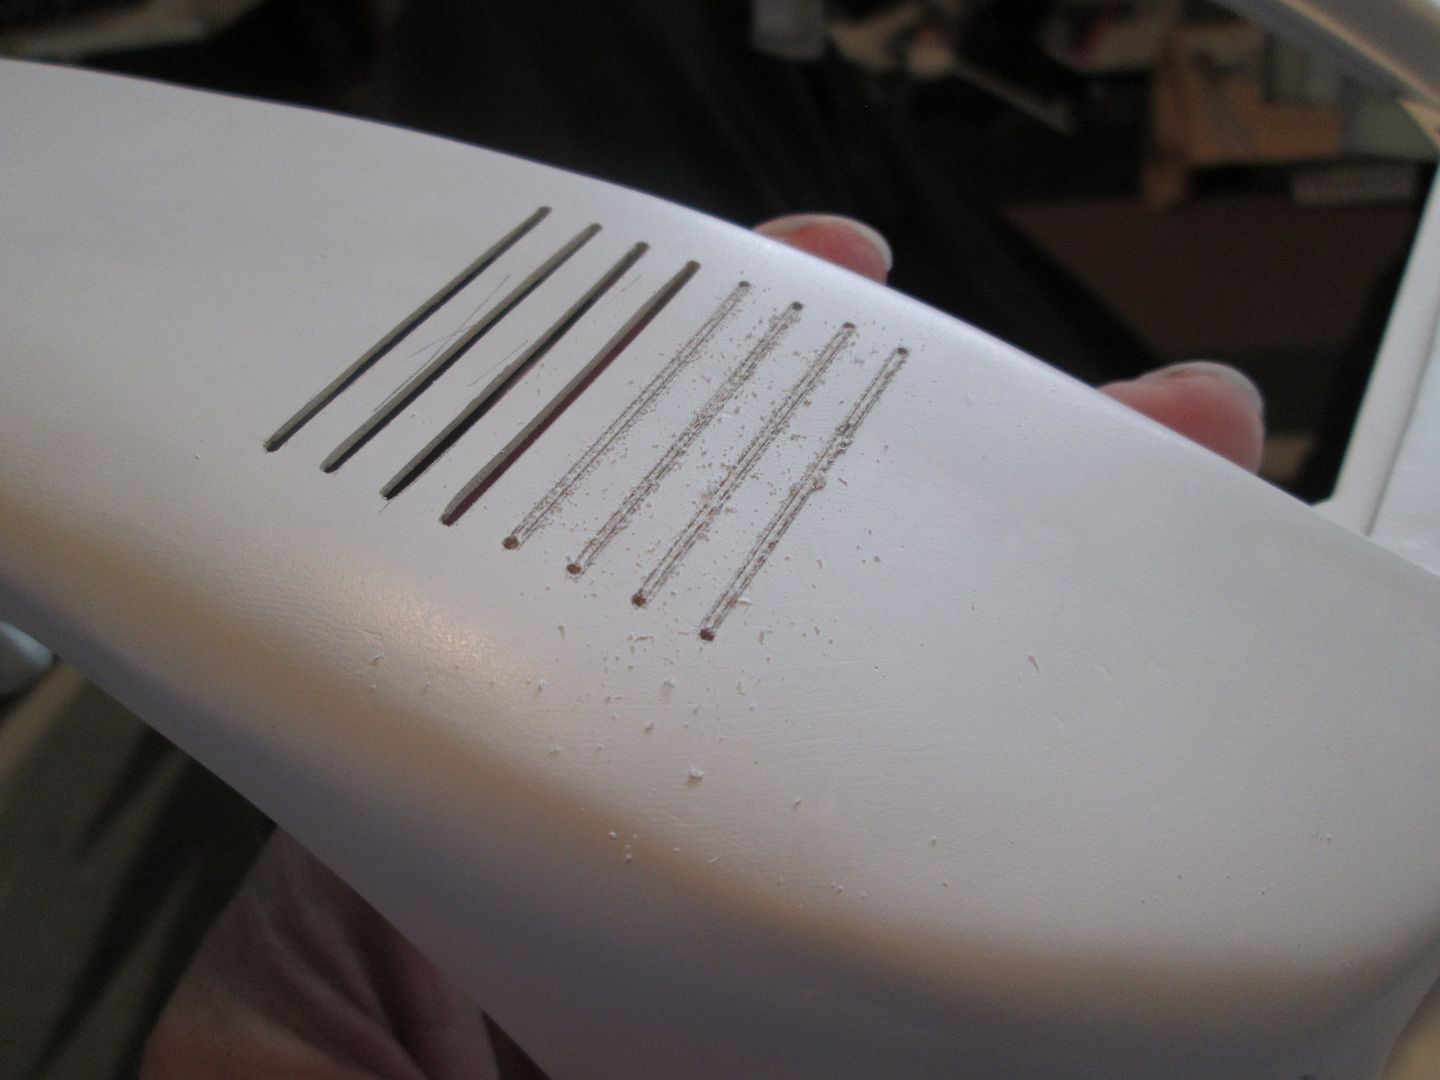 Despite my best efforts it was inevitable that there would be some slips and mishaps, and you can see some marks in the primer. This justifies my decision to cut them now, as I would be cursing if I'd just marked some carefully painted (or decalled) Martini stripes. Speaking of decals, I've started applying them to some of the panels. Here's the bonnet in progress: 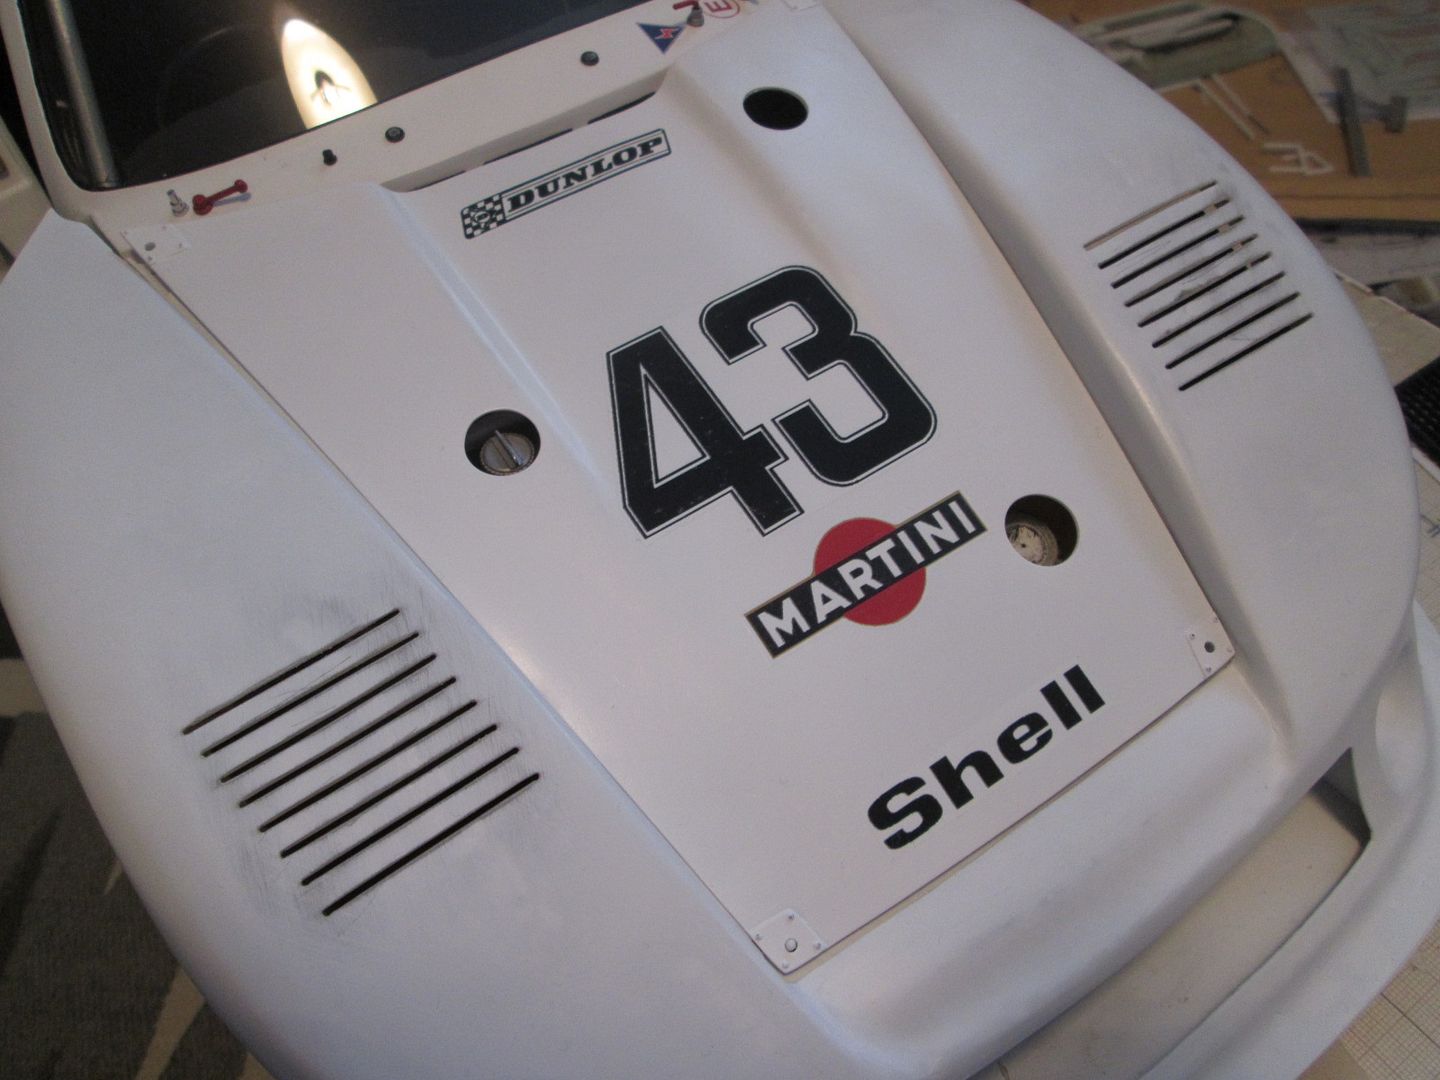 I've printed out some more versions of the small Porsche shield to fit between the 'Martini' and 'Shell' logos and will apply this later during the week - I just need to check some more photos to confirm the style. The engine cover is done, I've got the decals ready for the lower bumper, and the wing and end-plates are ready for assembly. So, lots going on, and still more to do. I'll give all the decalled panels another coat of Purity Seal to seal them in, and then I can paint the inner faces, etc. Hopefully I can get the rear wing assembled this week and with the grill fitted that would be the engine cover finished. The nose and door extension panels need another coat of primer before spraying the top coats, then I have to make a decision on the stripes. Still work to be done on the doors and window frames, but that's under control. My main concern is that we'll soon be into September, so I've maybe got five or six weeks before the weather starts getting Autumnal - it's bad enough that it's now getting dark before 9.00pm! If I'm going to paint any element of the stripes, it's got to be in these next few weeks - anything after that will be indoor jobs. That's it for today - have a good week. SB |
|
|
|

|
|
|
#725 | |
|
AF Moderator
 Join Date: Sep 2002
Location: Fort Worth, Texas
Posts: 3,246
Thanks: 31
Thanked 314 Times in 241 Posts
|
Re: 1/8 Porsche 935/78 'Moby Dick'
Amazing job on opening the louvers! I could never do this straight, and end up messing things up. I guess it is a bit easier on a larger scale, but this is just me making excuses!
Looks superb as always.
__________________
The client is not always right. - Enzo Ferrari ItalianHorses.net    
|
|
|
|

|
|
|
#726 | |
|
ItaloSvensk
Join Date: Mar 2009
Location: Marstrand
Posts: 3,383
Thanks: 1,077
Thanked 296 Times in 270 Posts
|
Re: 1/8 Porsche 935/78 'Moby Dick'
I dare to make a little critic sb.
Note I think u are the best modeller around in those kinda models and your work is the most impressive i´ve ever seen. I think however there is something mistaken in the lines of the front windshield, as if the main frame doesnt have the proper shape. In 911s usually it comes forward, I dunno how to explain this properly but I think u understand what I mean. I try add 2 pics to make you understand what I dare to say. I dunno if it is still possible to correct it, probably not cause u mention that passage as a non returning point in the build up. I hope you understand for me is very hard to move ANY kind of criticism to an amazing skilled modeller as you are.
__________________
Paolo - LoveGT40 Modelworks website www.alsoldatino.com my YT channel : https://www.youtube.com/channel/UCIp..._as=subscriber FB: https://www.facebook.com/alsoldatino |
|
|
|

|
| The Following User Says Thank You to lovegt40 For This Useful Post: |
ScratchBuilt (09-02-2018)
|
|
|
#727 | |
|
AF Enthusiast
Thread starter
Join Date: Nov 2008
Location: Norwich
Posts: 649
Thanks: 21
Thanked 111 Times in 87 Posts
|
Re: 1/8 Porsche 935/78 'Moby Dick'
Blimey, Paolo - couldn't you have mentioned this about two years ago?!
No, it's okay! I understand what you're saying - I've just taken some more photos tonight which are more of a match for the details you've indicated. If Photobucket performs, I'll try to post them up tomorrow. The current shape of the windscreen is actually different from how I first made it - you can see here how I extended the curve of the top edge, as I wasn't happy with the original: 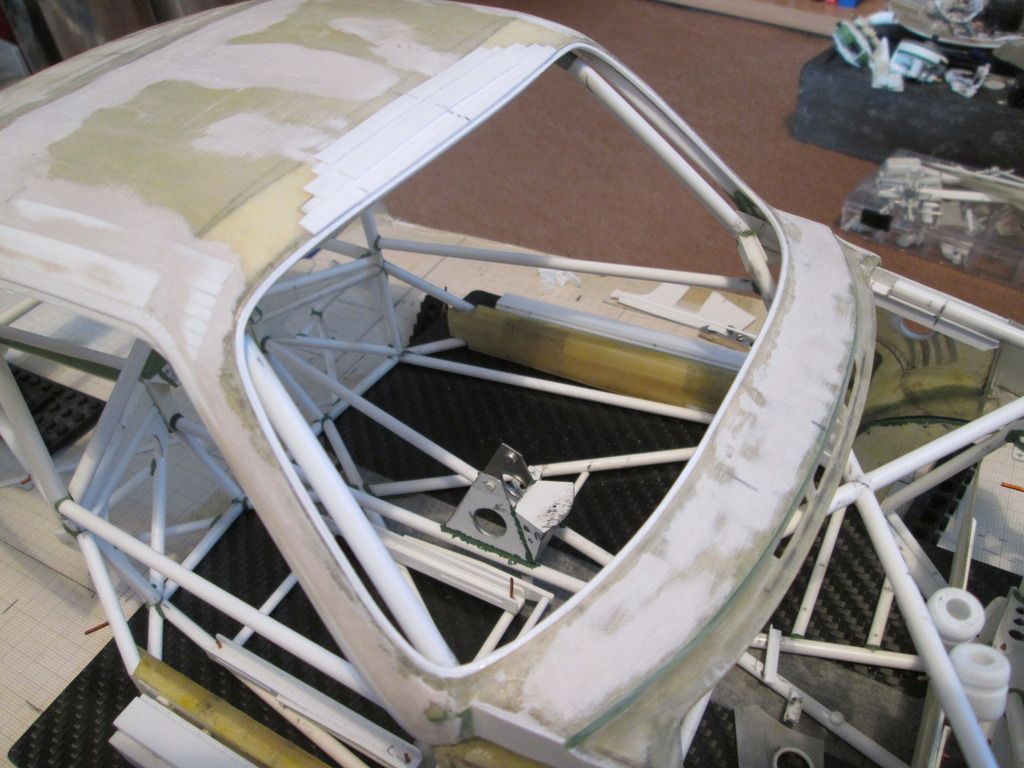 ...and the original: 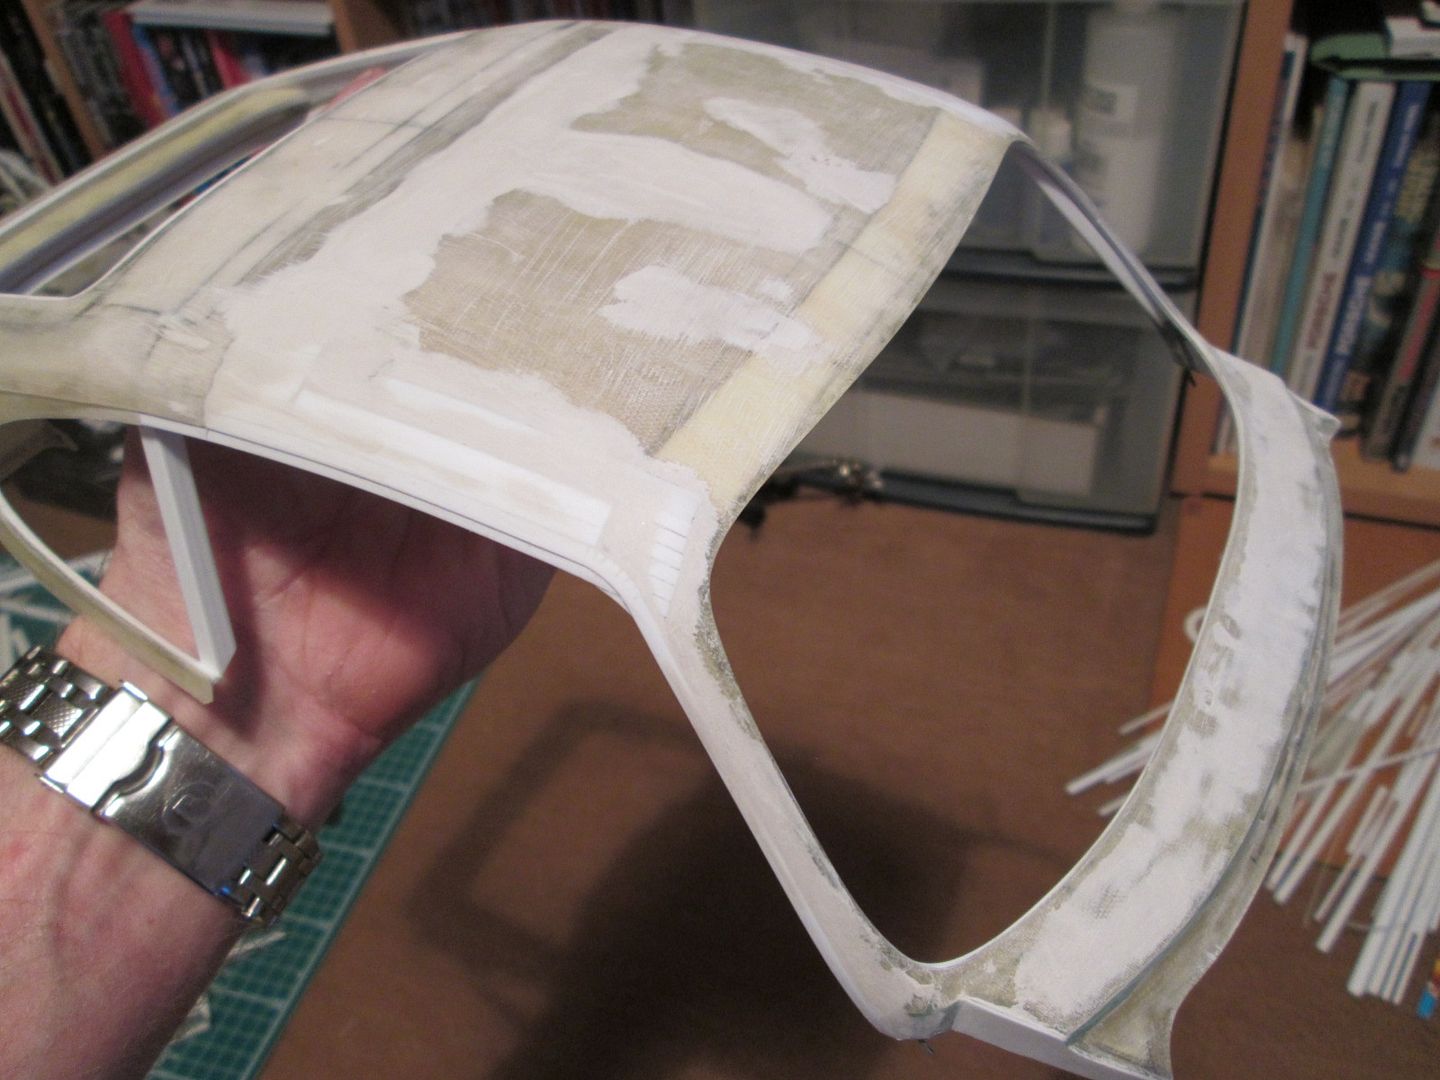 I said a long time ago that the accuracy of this project was going to be limited by the lack of hard information - there's going to be plenty of details on this that are not 100% correct! Getting the roof and glasshouse to actually come together as a whole has been one of the biggest challenges of all, and I'm pleasantly surprised it works as well as it does. I've certainly passed the point of no return, though...! The main reason for updating tonight, though, is that I've had a successful week with the paintwork. As well as continuing to work on assembling the rear wing and engine cover, I've been working towards getting some stripes on the rear wheelarches. Plan A - mask and airbrush the red section, then add the blue stripes with decals. I made a template for the shape of the panel from draughting film and marked up where the stripes were going to be - cross-referencing the Tamiya decal sheet with period photos and photos of both the Museum car and the Freisinger rebuild confirmed that the livery is slightly different on all of them! However, as I would be scanning the Tamiya decals, that was what I had to work to. I photocopied the template, and used this to add 2mm Tamiya vinyl masking tape to start blocking out the red section: 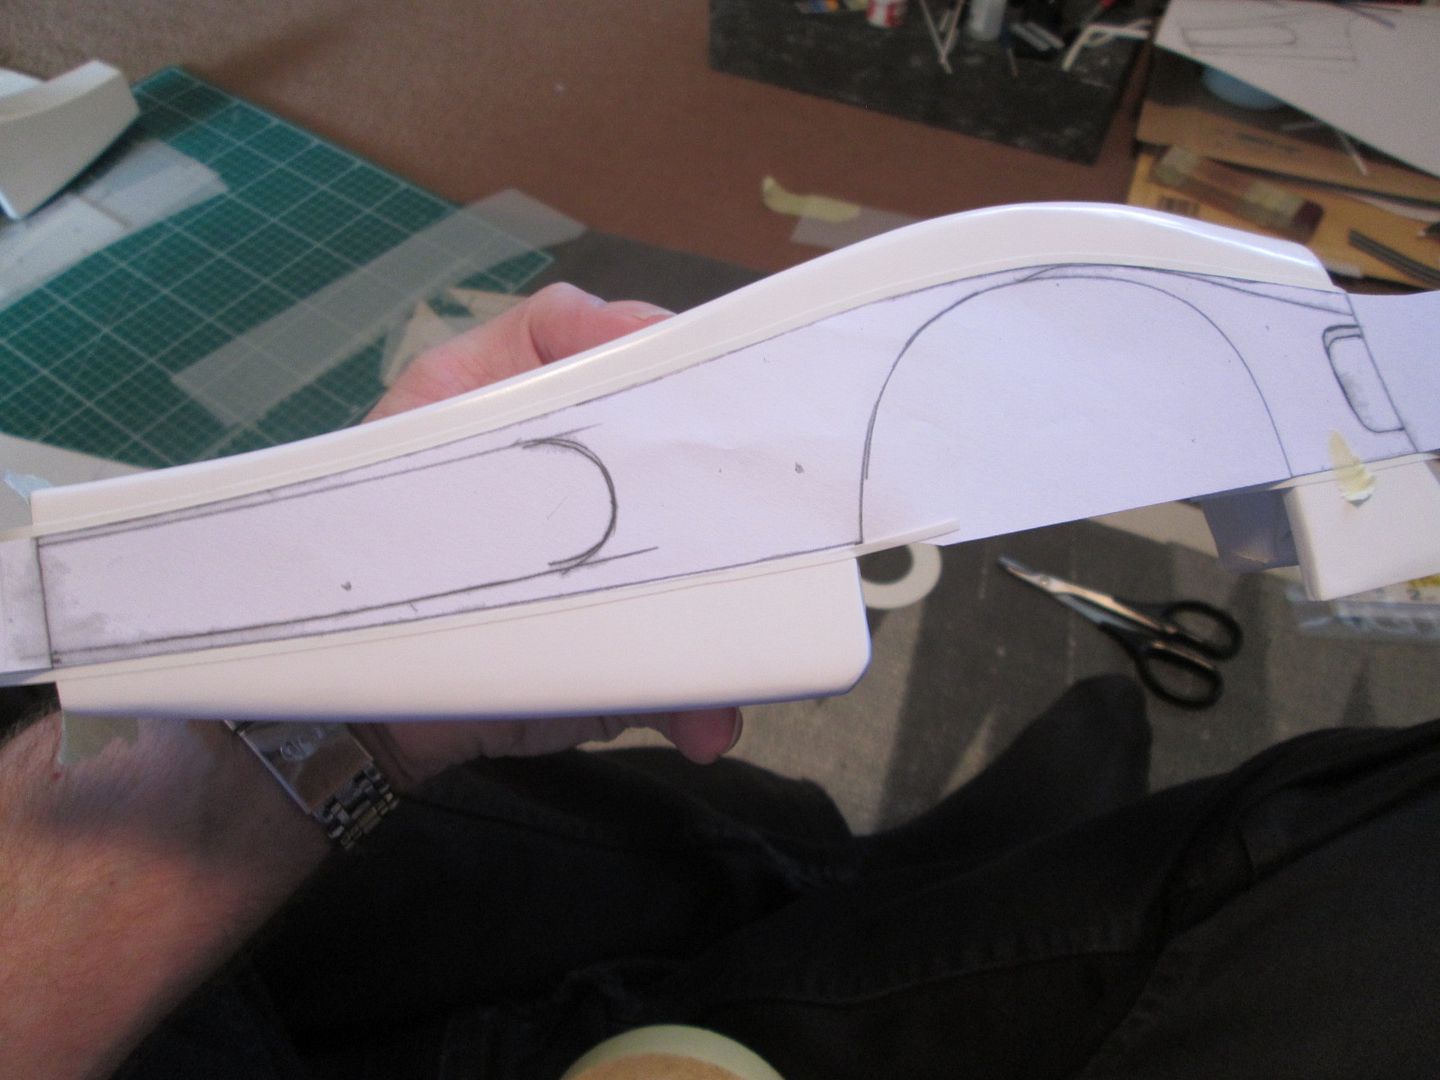 Two more masks were added for the white areas at each end, again, lined with the 2mm vinyl. More draughting film and regular masking tape was used to protect the rest of the panels from overspray. In all, it took over an hour to apply all the masking to each panel. Rather than airbrusing straight over the white with X-7 Red, I applied a basecoat of TS-31 Bright Orange from a can. The red airbrushed over this with no problems - just a couple of light coats - and looks better for it: 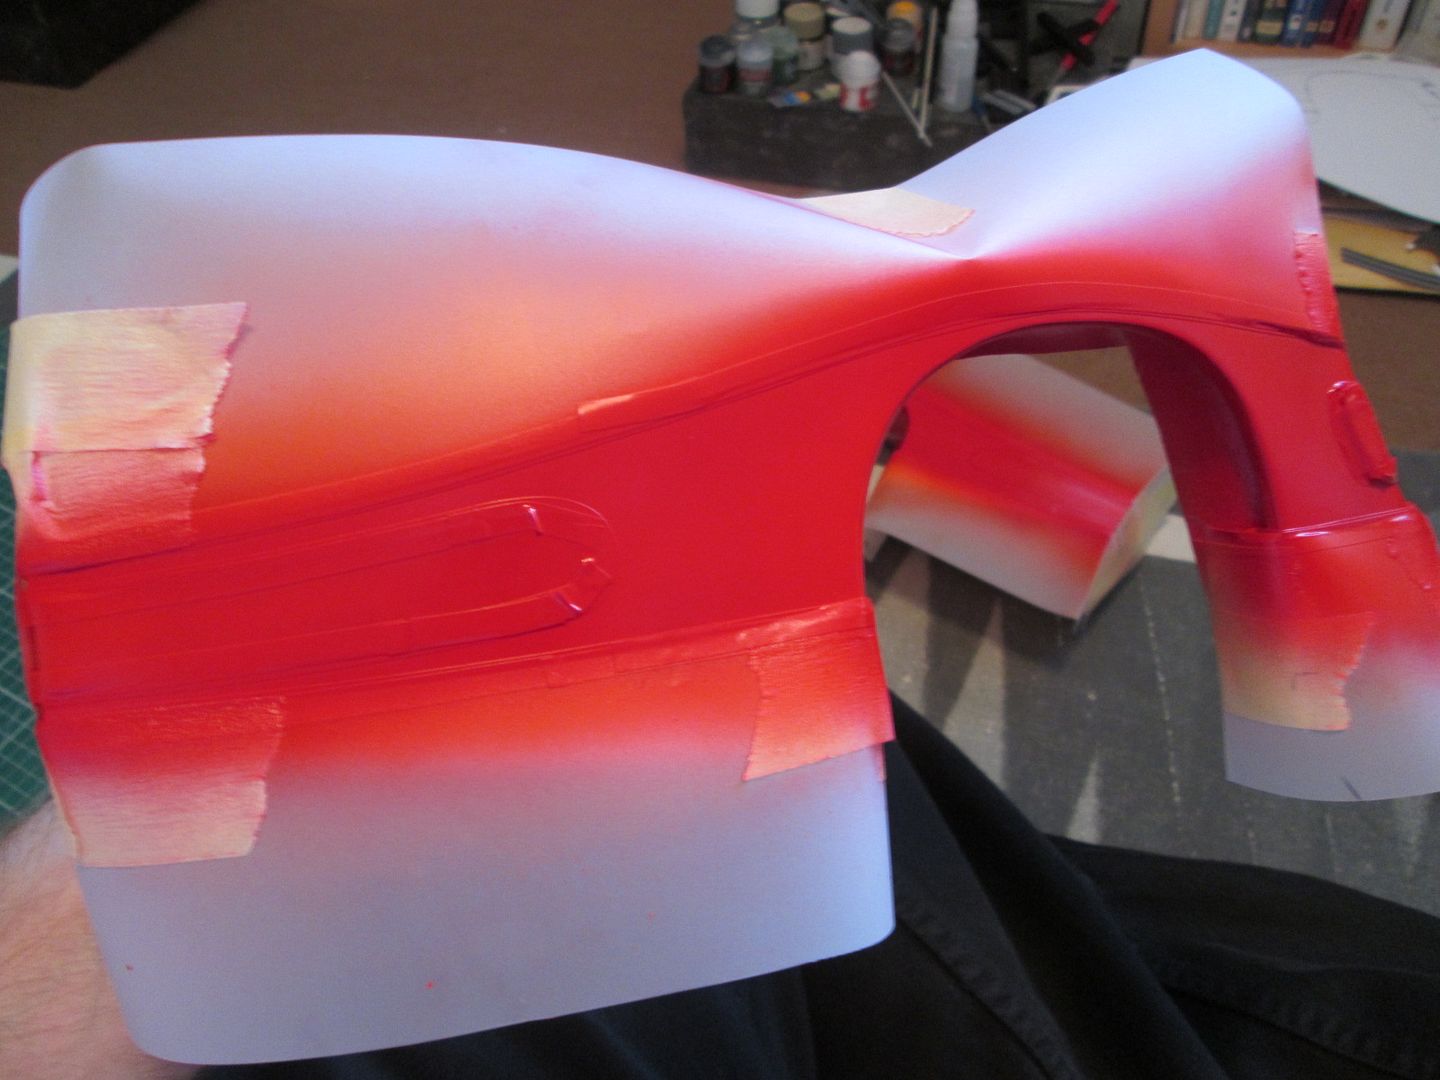 So, I started masking the first panel at about 10.00am yesterday, sprayed the first orange coat at about 11.30am, then started masking the second. By about 2.00pm I'd airbrushed both panels with the red and left them to dry. I didn't want to leave the masking on any longer than necessary, so by late afternoon I started to carefully remove it:  Success! No problems with the masking at all - no paint removed, crisp lines, and only a couple of small areas where I had slight overspray onto the white. These were rectified this afternoon with 8000-grade Micromesh and water. So, the plan is working - so far. I'm sure you can all understand how pleased (and relieved) I feel - I was very nervous about doing this, and it would have been a major disappointment if it didn't go to plan. Earlier in the week I started working with the decal sheet to pick out the sections I would need and begin re-sizing them, prior to printing them on decal film. I've also been tidying up the edges and improving the colour. I printed a few this afternoon on photo paper (to check the colour) and couldn't resist trying them in position: 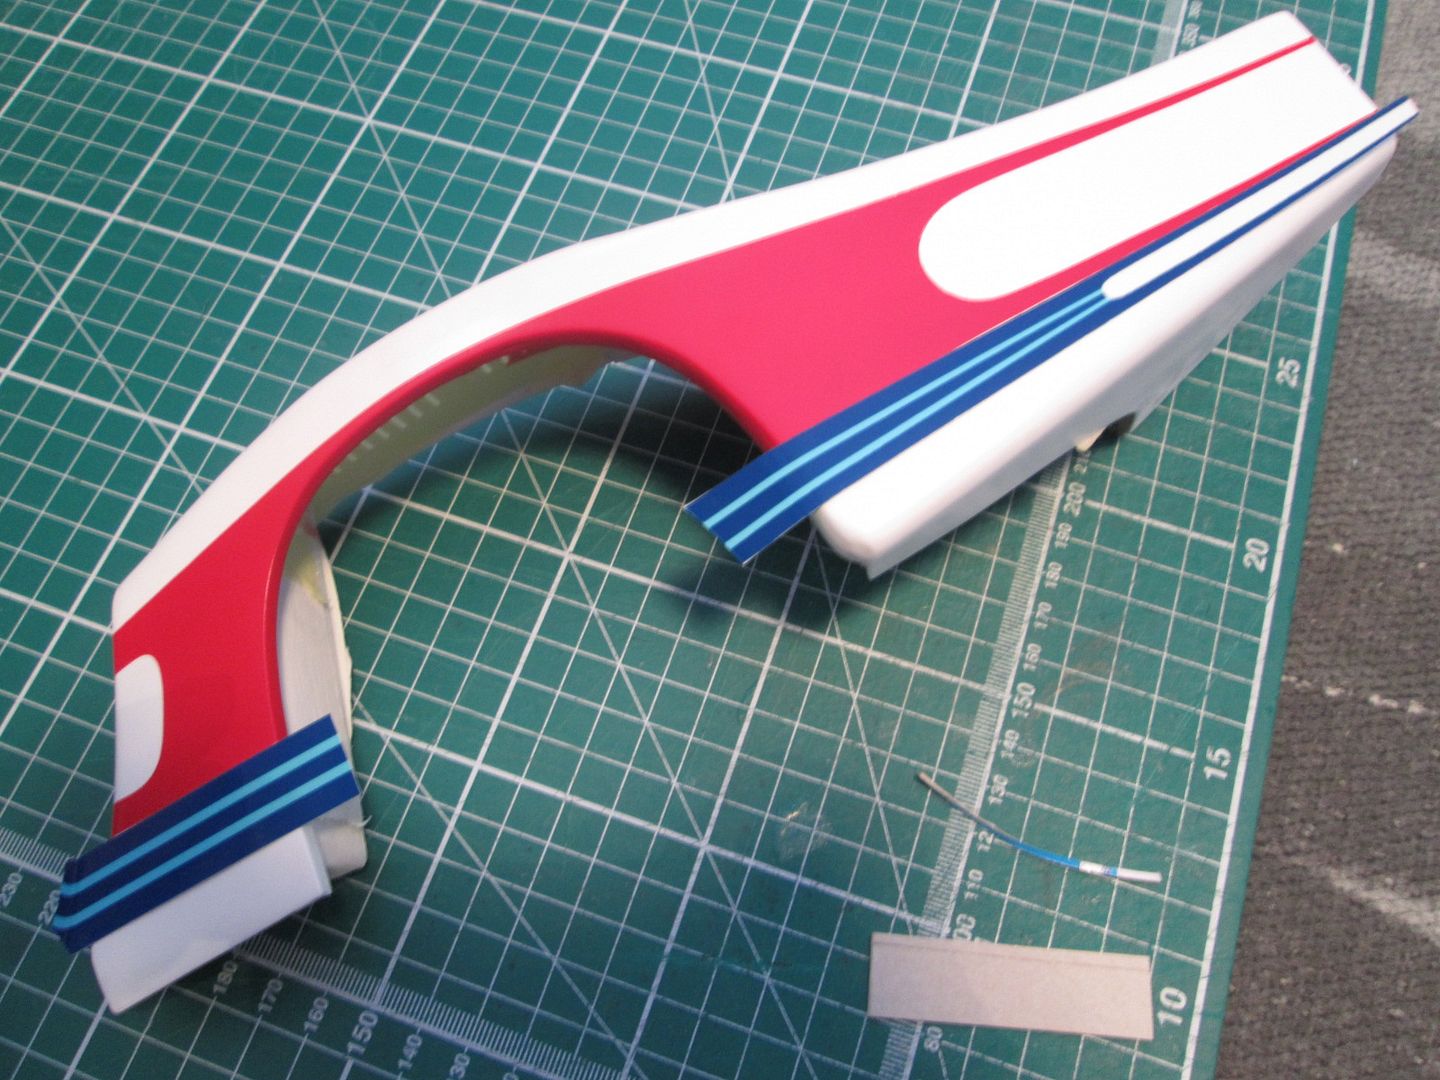 Suddenly, the finish line seems that little bit closer! So, this week's project will be to keep working on the rest of the stripes for the rear arches, get them printed onto clear decal paper, and maybe apply them to the panels next weekend. The upper stripes will almost certainly have to be split into two or three parts to curve properly; they also flow onto the top of the panel and over some of the louvres, so that's the next challenge. Then it will be time to start on the nose... SB |
|
|
|

|
|
|
#728 | |
|
ItaloSvensk
Join Date: Mar 2009
Location: Marstrand
Posts: 3,383
Thanks: 1,077
Thanked 296 Times in 270 Posts
|
Re: 1/8 Porsche 935/78 'Moby Dick'
YOu are right, I hope I could advise you 2 years ago. Problem was I didn’t notice this issue until you place the clear part on the windshield frame now, after the point of non return.
Keep on this amazing model sb.
__________________
Paolo - LoveGT40 Modelworks website www.alsoldatino.com my YT channel : https://www.youtube.com/channel/UCIp..._as=subscriber FB: https://www.facebook.com/alsoldatino |
|
|
|

|
|
|
#729 | |
|
AF Moderator
 Join Date: Sep 2002
Location: Fort Worth, Texas
Posts: 3,246
Thanks: 31
Thanked 314 Times in 241 Posts
|
Re: 1/8 Porsche 935/78 'Moby Dick'
Nice!
Seeing your hand next to the fender once again made me realize how huge this thing it!
__________________
The client is not always right. - Enzo Ferrari ItalianHorses.net    
|
|
|
|

|
|
|
#730 | |
|
AF Enthusiast
Thread starter
Join Date: Nov 2008
Location: Norwich
Posts: 649
Thanks: 21
Thanked 111 Times in 87 Posts
|
Re: 1/8 Porsche 935/78 'Moby Dick'
Right, here's a couple of photos which hopefully confirm that the windscreen is closer to the correct shape:
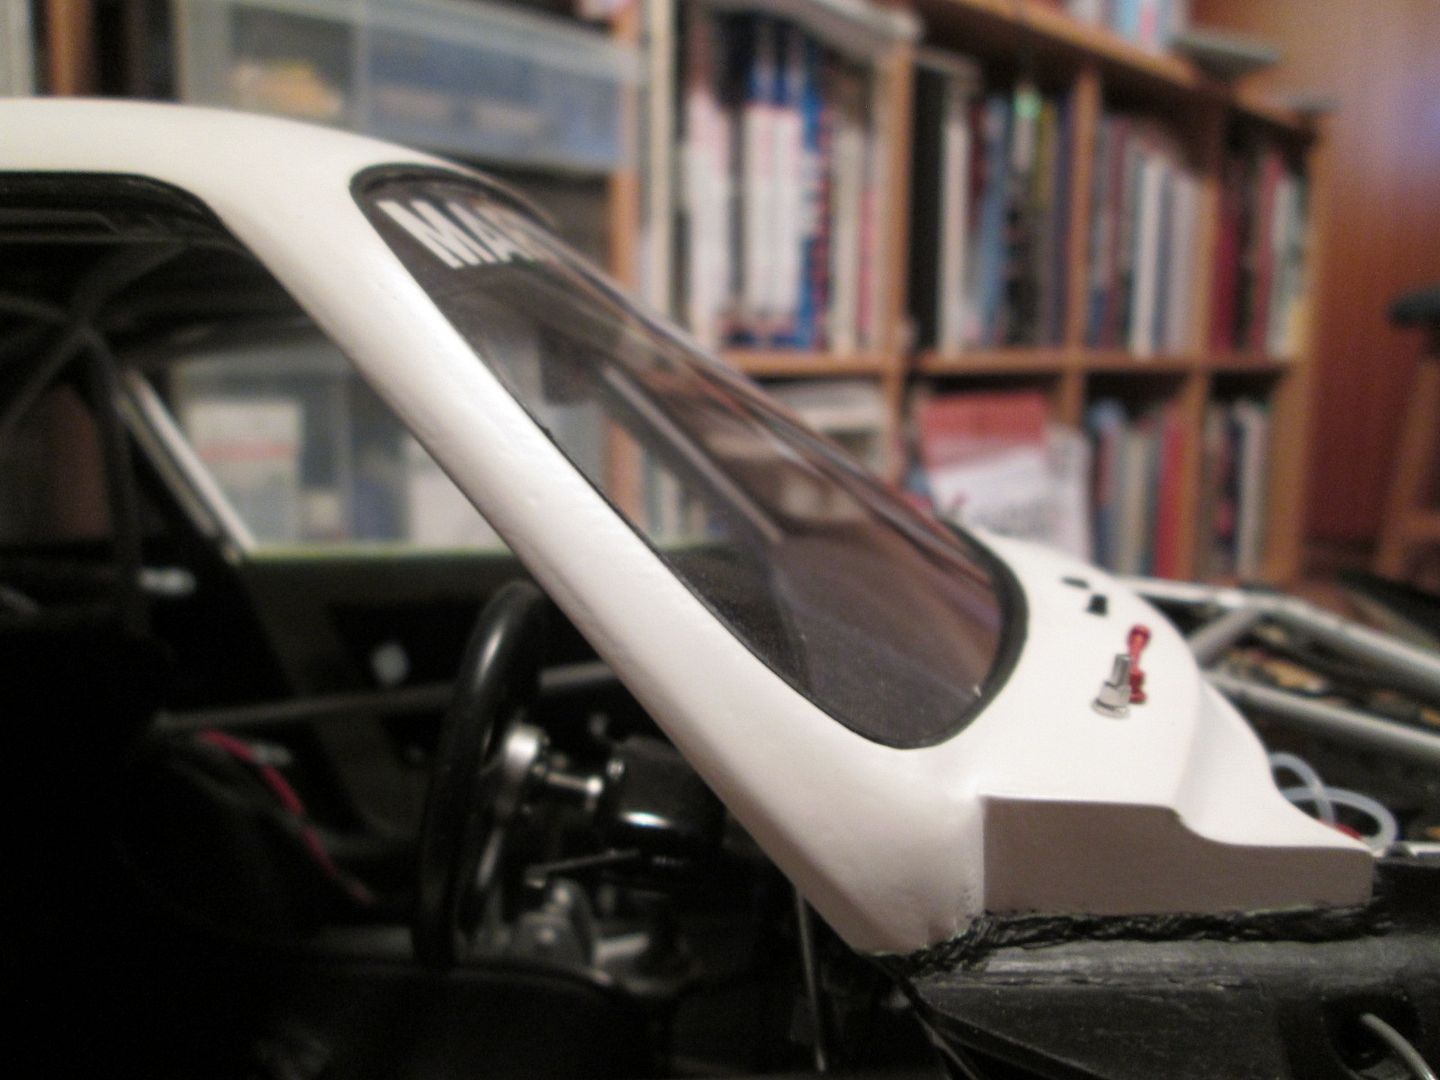 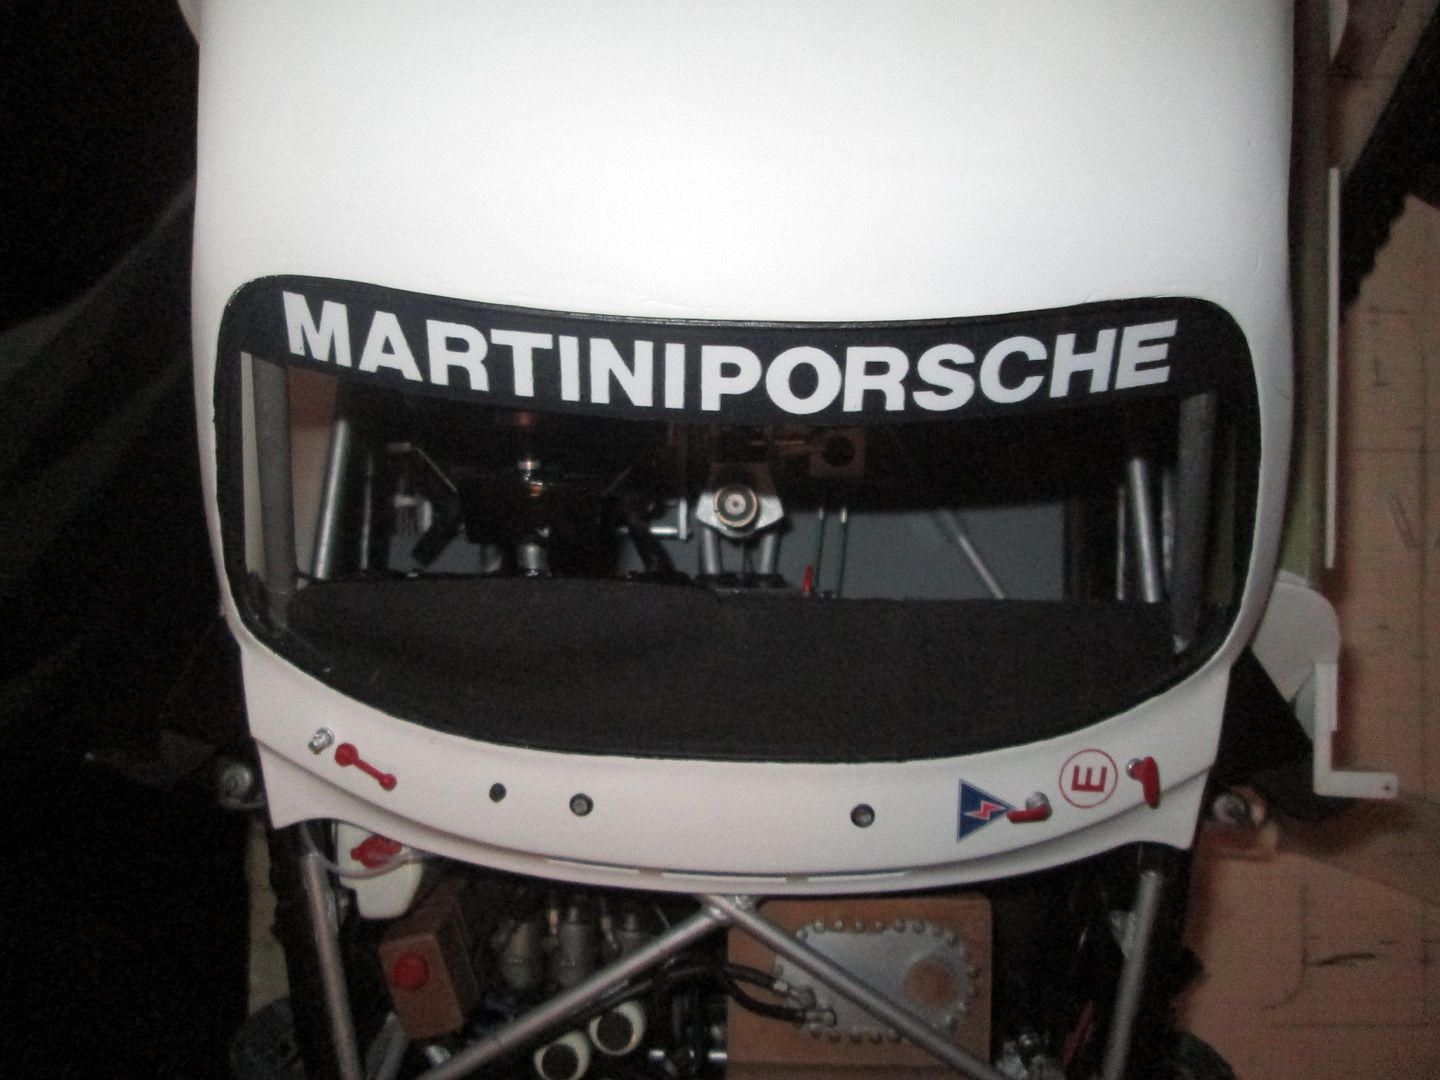 The original curve of the top edge was definitely much flatter, and would have caused problems when it came to fitting the windscreen. I extended the curve so it was more a of a match for the lower edge, and I'm happy with the result. Life was so much easier when I was making models that didn't have roofs! Here are the two photos that didn't upload properly last night. Here's the underside of the engine cover, with the length of 4.8mm box running across, the reinforcing plates where the wing posts connect, and the two mounting 'cups' which locate onto the ends of the chassis outrigger tubes. Once it's in place, it's quite secure - especially when I add a couple of body pins at the front corner.  I wanted to drill and pin the ali gurney tabs, as I wasn't convinced how good a purely glued joint would be. I also needed the help to get it aligned properly during assembly! The pins are all 0.8mm styrene rod, with a washer added at each end, and glued together. They've all been trimmed to length now, and the underside of the panel painted black. Here's the assembled rear wing and engine cover: 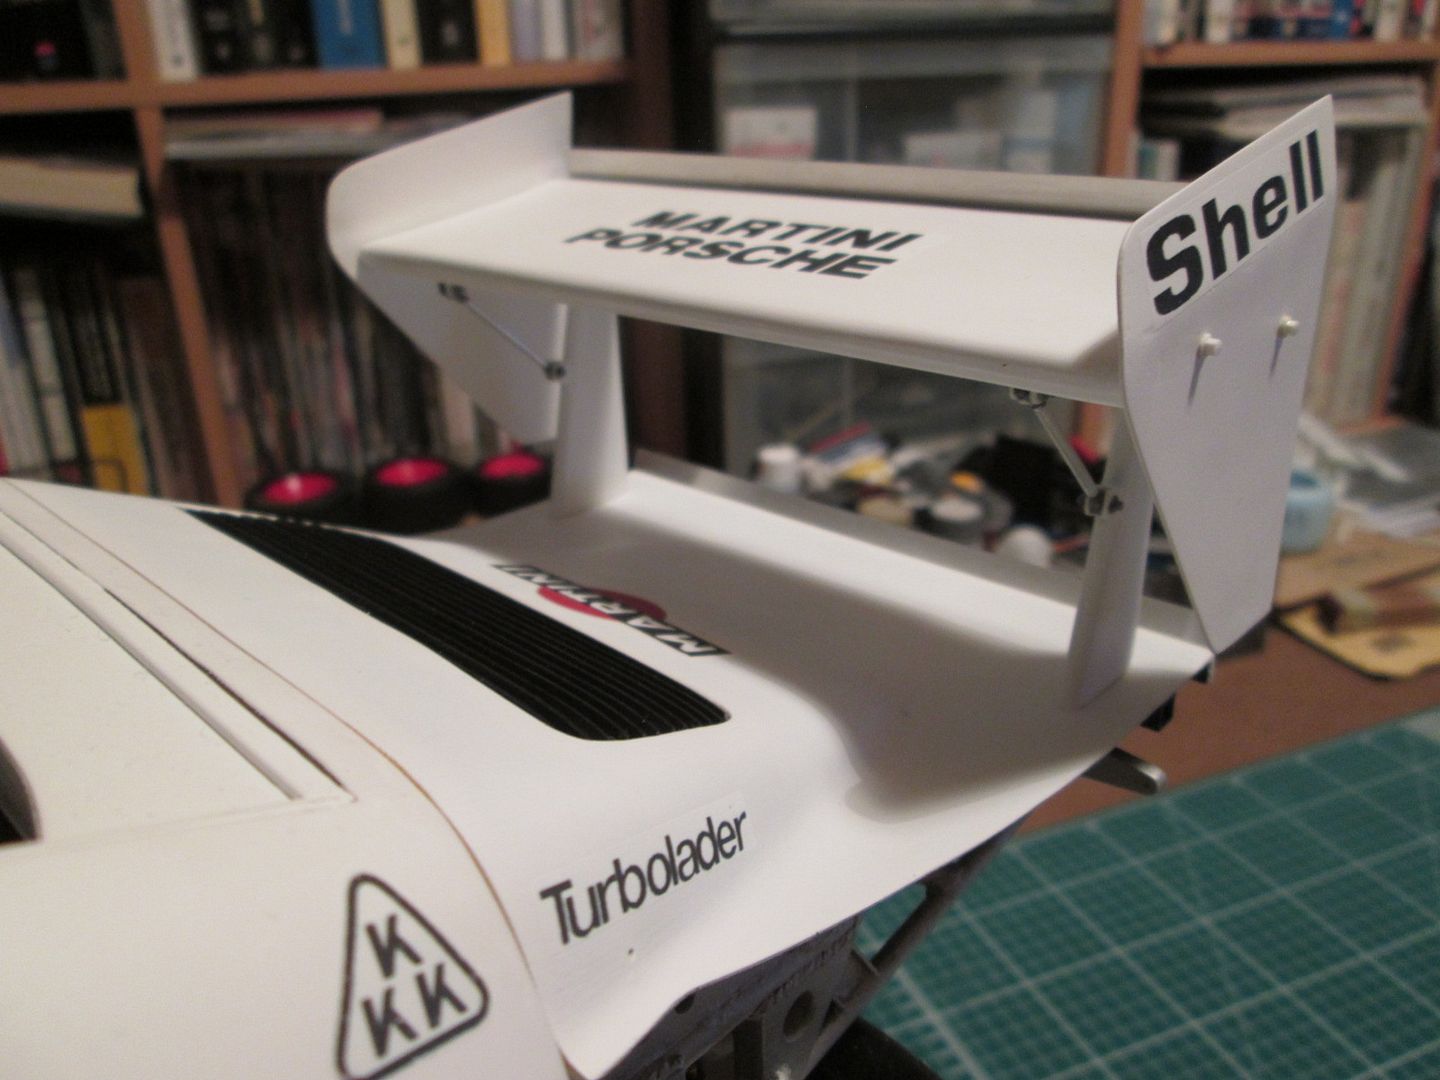 The black grille was recovered from the mk1 cover and glued into position. The wing itself is fully glued and pinned together now, but is currently a (very firm) push-fit into the bodywork. I don't want to risk gluing it in, and setting up a possible distortion. That's me up to date for now. Still got plenty to do with the two doors, but nothing that should be affected by the weather getting Autumnal over the coming weeks. In between working on the decals for the rear arches I'll be sorting out the patterns and masks for the nose section - probably won't be ready to spray the red this weekend, but hopefully next weekend. If all the airbrushing is done by the end of this month, I'll be happy. Have a good week, SB |
|
|
|

|
|
|
#731 | |
|
AF Moderator
 Join Date: Sep 2002
Location: Fort Worth, Texas
Posts: 3,246
Thanks: 31
Thanked 314 Times in 241 Posts
|
Re: 1/8 Porsche 935/78 'Moby Dick'
Lots of tasty bits in your photos. Enjoy reading/watching your work.
__________________
The client is not always right. - Enzo Ferrari ItalianHorses.net    
|
|
|
|

|
|
|
#732 | |
|
AF Enthusiast
Thread starter
Join Date: Nov 2008
Location: Norwich
Posts: 649
Thanks: 21
Thanked 111 Times in 87 Posts
|
Re: 1/8 Porsche 935/78 'Moby Dick'
So, you know how it is when you've got everything worked out in your head about what you're going to do, and how you're going to do it. A plan, right? Well, I had one of those - paint the red section of the Martini stipes, fiddle around with the 1/24 decal sheet, adjust them to suit, print them out, apply to the bodywork. A really great plan.
Then I had a shower. Nothing odd about that, just a normal early morning shower as part of my normal morning routine. During the course of the shower, I somehow convinced myself that, actually, painting the stripes was definitely the way to go. What could possibly go wrong...? So, using the patterns I'd made to work out the decal shapes, I masked-up the lower sections of stripes on the two rear wheelarch extensions. I would spray the X14 Sky Blue first, re-mask the bits I wanted to stay this colour, then re-spray with the X3 Royal Blue: 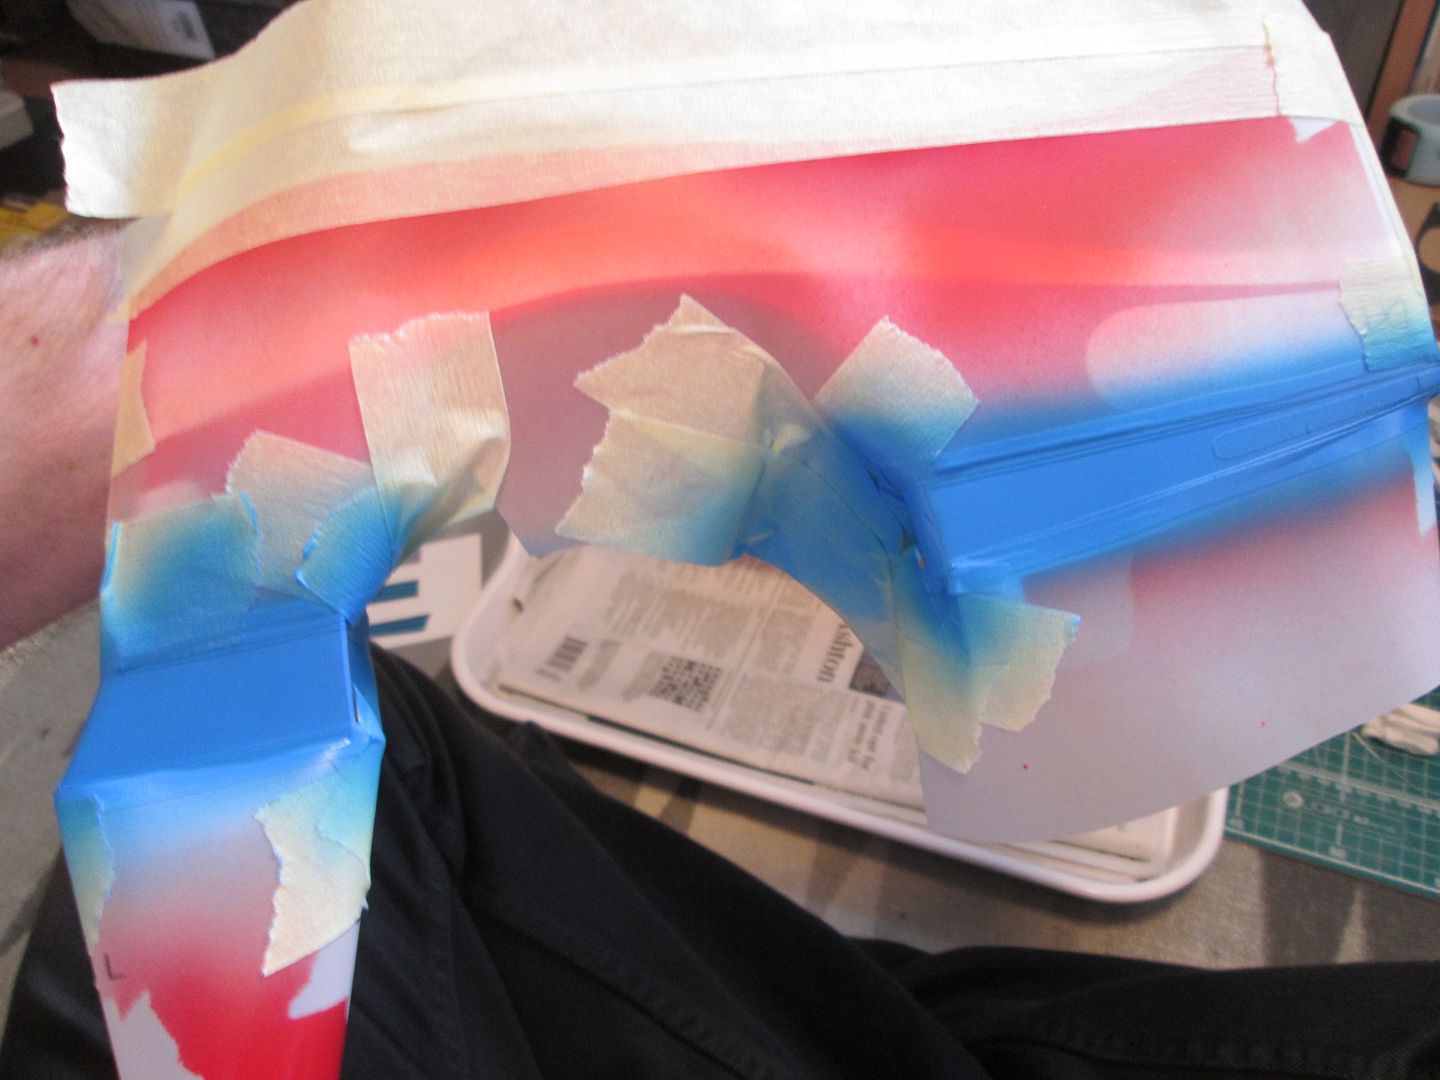  It took most of Saturday morning to get both panels masked and sprayed with the Sky Blue. The Royal Blue went on mid-afternoon, and by late afternoon I was un-masking...  If you thought I was pleased with how the red sections turned out last week, you can imagine how I felt when I saw these! Even at this stage they make the car look totally different from the plain white I've become used to. So, by Saturday night I'm thinking that maybe on Sunday I can get the upper stripes painted too. I played around with draughting film patterns again, but as the upper stripes also cover part of the sides too, I decided to mask them free-hand with the white Tamiya tape:  As I hadn't had any issues with the Tamiya vinyl tape I was confident that this would be okay - no lifting so far. As before, I made sure the rest of the panel was protected from overspray, then applied the Sky Blue and then the Royal Blue. Here's the end result: 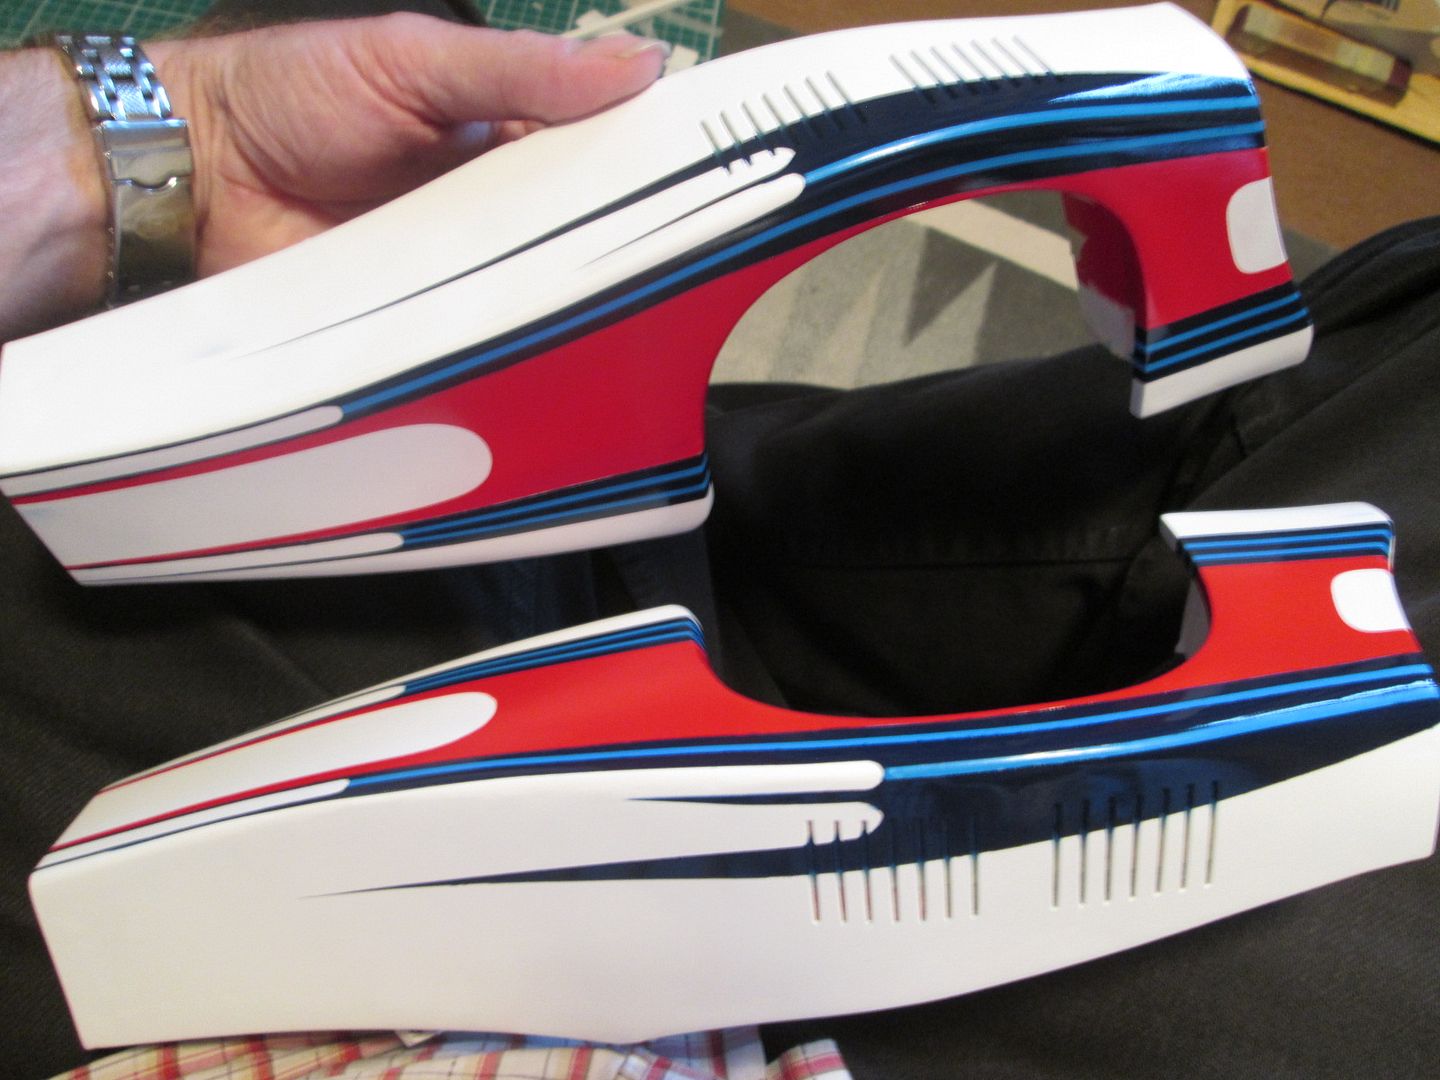 There was a couple of small patches of blow-under, easily fixed again with fine Micromesh. The masking over the louvre slots worked well - a little touching-up required this week, but no big deal. But you know what? Right now I just don't care! I am so happy with these! This is the most complicated bit of masking and spraying I've ever done, and it has worked out so much better than I dared to hope. I'm itching to mount them on the car and show you the photos, but I'm at the stage now where I don't want to spoil the surprise! So, all I have to do now is to make any corrections, varnish them, add a couple of decals, re-varnish and then paint the insides. At this stage I should point out that my first priority at the weekend was actually to paint the red section on the nose. First up, use the paper template to apply the 3mm vinyl tape:  X7 Red over TS31 Bright Orange:  ...and the end result: 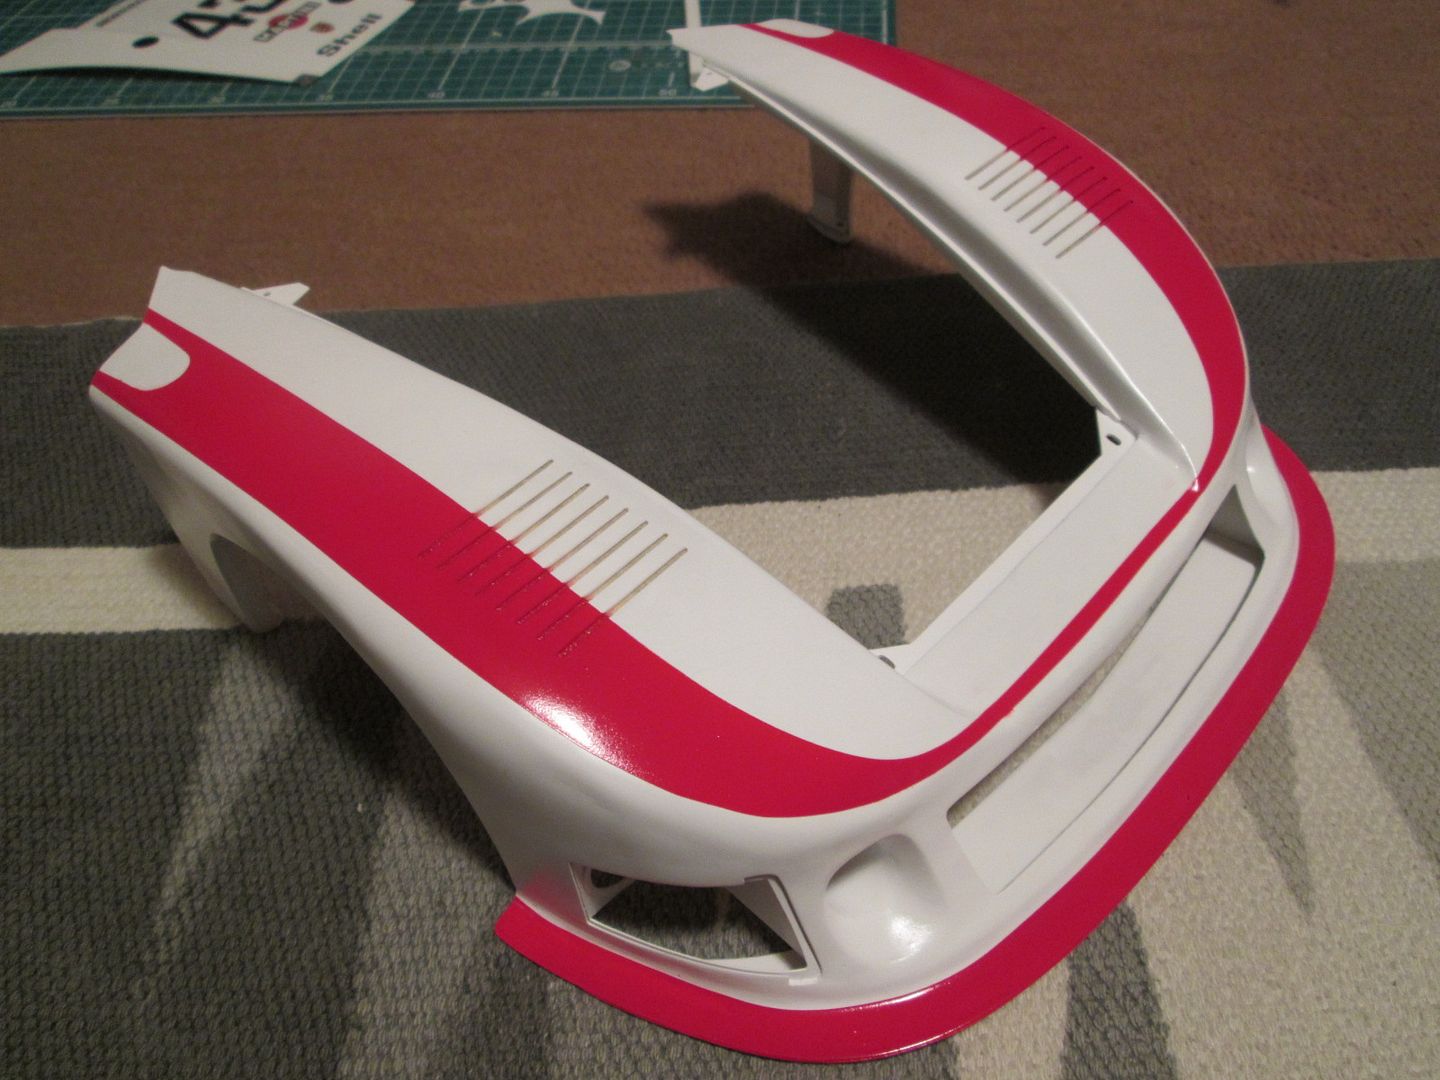 The trailing edges will extend onto the door extension panels, but I'll mask and paint these later once the doors are fitted. Next Saturday I'll spray the inner section of the blue stripes, and the following weekend I'll add the band around the mid-section / headlights / cooling ducts. Mustn't forget to spray the mesh grille too. The only problem I have now is that it's too dark to paint in the evening when I get home from work, and I won't have any more holiday until (hopefully) sometime in November. So, it's just weekends for painting from now on...and the waiting is killing me! Still, there's other things to do in the mean-time, so I'll just have to use the time productively. As always, have a good week, SB |
|
|
|

|
|
|
#733 | |
|
AF Modelrater
 Join Date: Jul 2002
Location: Forks Township, Pennsylvania
Posts: 12,894
Thanks: 18
Thanked 63 Times in 56 Posts
|
Re: 1/8 Porsche 935/78 'Moby Dick'
Holy.....that looks fantastic!! Brilliant work with the masking and spraying, I am envious of your skills!
__________________
|
|
|
|

|
|
|
#734 | |
|
AF Moderator
 Join Date: Sep 2002
Location: Fort Worth, Texas
Posts: 3,246
Thanks: 31
Thanked 314 Times in 241 Posts
|
Re: 1/8 Porsche 935/78 'Moby Dick'
Terrific masking job!
__________________
The client is not always right. - Enzo Ferrari ItalianHorses.net    
|
|
|
|

|
|
|
#735 | |
|
AF Regular
Join Date: Jun 2015
Location: Dunfermline
Posts: 370
Thanks: 38
Thanked 51 Times in 50 Posts
|
Re: 1/8 Porsche 935/78 'Moby Dick'
So looking forward to the finished product but I'll miss the build. :/
|
|
|
|

|
| ||||||||||||||||||||||||||||||||||||||
 |
POST REPLY TO THIS THREAD |
 |
|
|