|
|
|

|
|
| Search | Car Forums | Gallery | Articles | Helper | AF 350Z | IgorSushko.com | Corporate |
|
| Latest | 0 Rplys |
 10-06-2007, 07:59 AM
|
#46 | ||
|
Authorized Vendor

Join Date: Oct 2005
Location: Vicenza - veneto de rassa
Posts: 3,909
Thanks: 6
Thanked 46 Times in 41 Posts
|
Re: 1/8th Scratchbuild - Porsche RS60
Quote:
__________________
 gio gio
|
||

|

|
|
10-07-2007, 06:46 PM
|
#47 | ||
|
AF Enthusiast
Thread starter

Join Date: Jul 2005
Location: London
Posts: 899
Thanks: 3
Thanked 11 Times in 10 Posts
|
Re: 1/8th Scratchbuild - Porsche RS60
Quote:
I hope you realise just how cool that comment reads!  A pal of mine wrote his thesis on Giugiaro many years ago - he'd have given anything to interview someone working for him back then! A pal of mine wrote his thesis on Giugiaro many years ago - he'd have given anything to interview someone working for him back then! |
||
|
|
|
|
10-08-2007, 02:38 PM
|
#48 | |
|
Authorized Vendor
Join Date: Oct 2005
Location: Vicenza - veneto de rassa
Posts: 3,909
Thanks: 6
Thanked 46 Times in 41 Posts
|
Re: 1/8th Scratchbuild - Porsche RS60
Virtual thesis uh...
I chatted with the "guy" (LOL I joke but he's great, also an awesome super-prized modeler, someone will have seen his martini's wwwwide cinquecento with TR engine and some cool full detail deltas) -ok sorry, on the answer- he heard nothing about the srink you meant but he decribed very well the way they used at Giugiaro's Italdesign (years ago before rapid proto): I'll report despite there're no news I guess: - 1/10 Skeleton done by plywood sections with 20 mm offset - Filled with synthetic clay, he said that they bought the product in UK - Clay's surplus was cutted out and checked with Perspex negative shapes (zory I hve the word in ITA but I can't to find a tech. translation, the word is DIMA= negative section, the external transversal section) (ok I guess they worked exatly like you until now LOL, the difference I guess is that the clay remain (almost) soft, and the secret in in the next step: - Obviously also them needed an hard surface to play with: they used a laser pantograph (not a scanner) that milled down the model from a Bayer resin block.
__________________
gio
|
|
|
|
|
|
10-26-2007, 07:57 PM
|
#49 | |
|
AF Enthusiast
Thread starter
Join Date: Jul 2005
Location: London
Posts: 899
Thanks: 3
Thanked 11 Times in 10 Posts
|
Re: 1/8th Scratchbuild - Porsche RS60
...et voila!
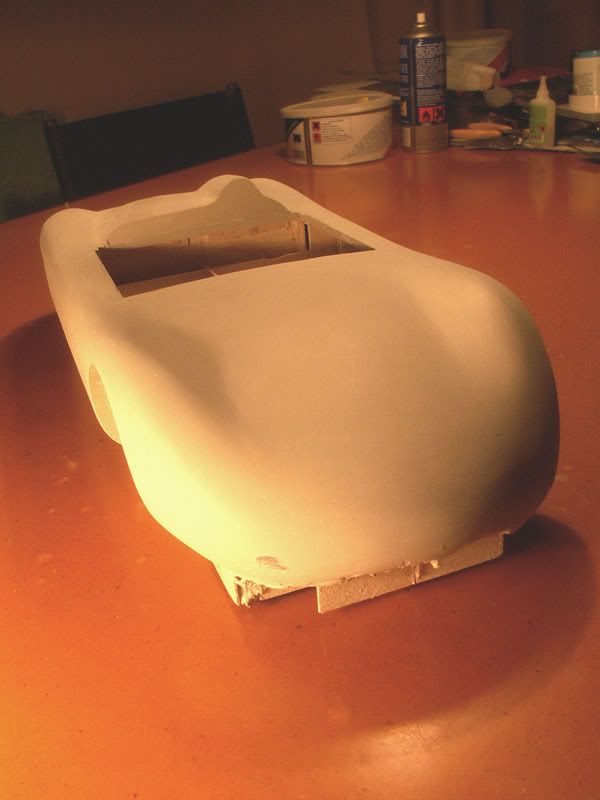 3kg's of filler later and things are starting to look less ugly. 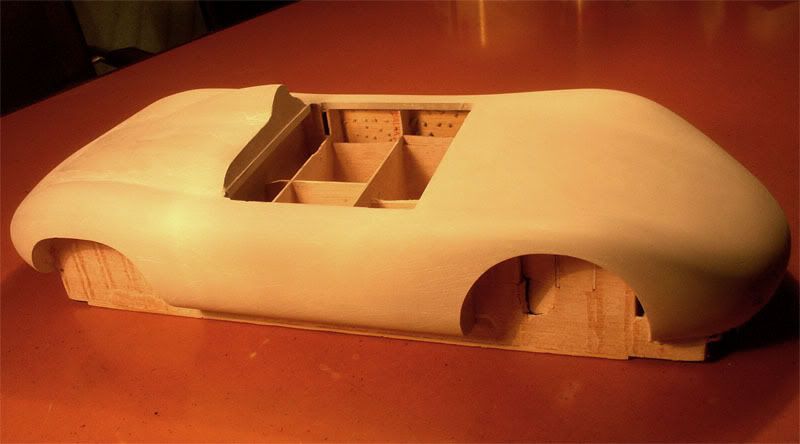 Finally, I've got enough filler on the frame so that I can start carving away - I guess this is where the 'artisan' element starts. I've got enough material slapped on to give me an oversize thickness of anywhere between 0.5mm and 1.5mm so I just have to start sanding intil the guide ribs start showing. That's the theory, but I'm only kidding myself as I've already started 'knocking back' the rough bits and it's taken me about 3 hours of sanding already! I think these updates will be rather slow!  Got to admit that I'm really enjoying the whole scratchbuilding process though - may have to flog off all my 1/12th Tamiya's!  |
|
|
|
|
|
10-26-2007, 10:23 PM
|
#50 | |
|
AF Newbie
 Join Date: May 2007
Location: Okahurst, New Jersey
Posts: 33
Thanks: 0
Thanked 0 Times in 0 Posts
|
Now that is impressive to say the least.
 Are you planning to use any power tools to assist in the sanding or is this going to be all hand done? Are you planning to use any power tools to assist in the sanding or is this going to be all hand done?Best regards, Larry |
|
|
|
|
|
10-26-2007, 10:57 PM
|
#51 | |
|
AF Fanatic

Join Date: Dec 2004
Location: Up the creek with no paddle
Posts: 5,888
Thanks: 7
Thanked 16 Times in 15 Posts
|
Re: 1/8th Scratchbuild - Porsche RS60
Whoa! She lives!!
She looks good already 
__________________
Guideline for happy modeling: Practice on scrap. Always try something new. Less is more. "I have a plan so cunning, you could put a tail on it and call it a weasel" - Edmund Blackadder |
|
|
|
|
|
10-27-2007, 11:00 AM
|
#52 | |
|
Getting Old...
 Join Date: May 2003
Location: Lugano, Switzerland
Posts: 753
Thanks: 0
Thanked 0 Times in 0 Posts
|
Re: 1/8th Scratchbuild - Porsche RS60
wow! very impressive. let the schooling continue.....
Murray |
|
|
|
|
|
10-27-2007, 11:17 AM
|
#53 | |
|
Authorized Vendor
Join Date: Oct 2005
Location: Vicenza - veneto de rassa
Posts: 3,909
Thanks: 6
Thanked 46 Times in 41 Posts
|
Re: 1/8th Scratchbuild - Porsche RS60
SSSSSuperb stuff! And pedagogical thread.
__________________
gio
|
|
|
|
|
|
11-12-2007, 05:46 AM
|
#54 | |
|
AF Newbie
 Join Date: May 2005
Location: Groningen, The Netherlands
Posts: 54
Thanks: 0
Thanked 0 Times in 0 Posts


|
Re: 1/8th Scratchbuild - Porsche RS60
Any updates yet? I am looking every day to see more of this awesome build.
|
|
|
|
|
|
11-12-2007, 06:57 AM
|
#55 | |
|
AF Enthusiast
Thread starter
Join Date: Jul 2005
Location: London
Posts: 899
Thanks: 3
Thanked 11 Times in 10 Posts
|
Re: 1/8th Scratchbuild - Porsche RS60
I'm still shaping the bodywork and I've now got the extra dimensional data that I've been waiting for. Hopefully, I'll have some pictures up at the weekend.
|
|
|
|
|
|
11-12-2007, 01:27 PM
|
#56 | |
|
AF Enthusiast
Join Date: Aug 2005
Location: where "sky grey" is a colour
Posts: 822
Thanks: 3
Thanked 32 Times in 29 Posts
|
Re: 1/8th Scratchbuild - Porsche RS60
Hi cinqster
Since you didn't get my PM ( i do remember now that you mentioned again having trouble with those ) here's my message again...well part of it. Back then i suggested automotive polyester body filler ( the stuff you get at auto stores or supermarkets that's white with red hardener making pink putty...) over yellow Urethane foam for shaping the body. The stuff sticks to pretty much anything ( i use it on styrene, resin, metal or whatever else i build with ) and you can sand it to a smooth surface. Well it looks like you got beyond that point by now:-) Very nice! Secondly in post 45 you asked about a "cling film" to check the surface of your model. If i understand that right the answer to what you're looking for is "DYNOC". That's a thin painted film used in clay modeling to check surfaces. It usually comes in silver ( perfect for your Porsche :-) but also black, red and other colours. You drop it in warm water, take it of the carrier paper and then stick it on your model. It's not a decal though. It's flexible without Microsol and you can peel it off and re-use it a couple of times. The bad part is, that it's hard to get ( normally not in small quantities ) and not exactly cheap either... The cheaper alternative for you would be to use household tin foil that you can get to stick on your surface usually with a bit of water ( and it should follow the soft surfaces of the RS60 quite nicely ) or the transparent foil you use to cover and preserve food ( a bit of water sprayed on the surface helps again...at least it does on clay ). All these help to read the highlights on your model a bit better than the matt surface you have right now. Anyway progress looks great on a serious challenge you chose! I'm impressed and wait for more :-) |
|
|
|
|
|
11-12-2007, 03:37 PM
|
#57 | |
|
AF Enthusiast
Thread starter
Join Date: Jul 2005
Location: London
Posts: 899
Thanks: 3
Thanked 11 Times in 10 Posts
|
Re: 1/8th Scratchbuild - Porsche RS60
Wow, cheers JK! Now that you mention the brand name that was exactly what was mentioned to me - how do you know all this stuff!
I'm at the point of having over half of the body sanded back down to the black ribs but the problem is that the grid of black lines makes it even more difficult to eyeball the body curves. When I was doing the bodywork on my 1/1 car I used to switch off all the garage lights, use one hand-held spotlight and wet the body with soapy water - this forms a smooth film and stays wet longer so you can see any unwanted waves etc when moving the light source - worked really well as my painter didn't have to do any body prep at all! I was hoping to do this method on the model but if I even gently wet the surface the balsa edges expand and stand slightly proud of the surface. Hopefully, once I'm done and the balsa edges are cut out I'll have a uniform filler surface to work with again so I'll then be able to try it. In the meantime though I will try the household foil idea out - many thanks for it! John |
|
|
|
|
|
11-12-2007, 04:54 PM
|
#58 | |
|
AF Enthusiast
Join Date: Aug 2005
Location: where "sky grey" is a colour
Posts: 822
Thanks: 3
Thanked 32 Times in 29 Posts
|
Re: 1/8th Scratchbuild - Porsche RS60
Yeah...i was afraid the thing with the black ribs was gonna happen to you when you first showed it :-) You were to quick progressing before i had a chance to warn you...
If i remember correctly you wanted to do a CFRP-laminat from this body at some point anyway, right? If i were you i'd not bother about getting the surface of this body buck to perfection because you will quite probably have to do it again on the laminat anyway...so why do it twice!? |
|
|
|
|
|
11-12-2007, 09:38 PM
|
#59 | |
|
AF Newbie

Join Date: Feb 2004
Location: Guadalajara Mex/San Francisco U.S., California
Posts: 50
Thanks: 0
Thanked 0 Times in 0 Posts
|
Re: 1/8th Scratchbuild - Porsche RS60
nice progress until now, now you´ll have the chance to feel your model, you´ll add and sand so much bondo! I think only 20% of the bondo you apply will stay in the model, the other 80% will go to the trash container.
This is the part when you start to make both sides symmetrically, and I use this tool (contour gauge) to help me in this process, this is one of the most useful tools for modelmaking. It´s really cheap (like $10USD). This gauge is perfect for getting the correct contour of a specific area, so you can make the mirror side of it in the other side of the model.  also as a suggestion, because I don´t know what kind of filler are you using, but I found that the Evercoat Spot lite putty it´s the best spot and scratch filler for our hobby, really easy to sand, doesn´t leave any spots, cures really quick (beacuse of the hardener). it can be a time saver at the end of your sanding process.  Nice work, and please keep up with the updates!
__________________
Best regards Ever Lopez "JELP" |
|
|
|
|
|
11-13-2007, 05:52 AM
|
#60 | |
|
AF Enthusiast
Thread starter
Join Date: Jul 2005
Location: London
Posts: 899
Thanks: 3
Thanked 11 Times in 10 Posts
|
Re: 1/8th Scratchbuild - Porsche RS60
Cheers for the advice guys. I'm hoping that the frame is accurate enough to not need to use a profile guage too much. I've got into the habit of checking the profiles with the outside pattern of the ribs I made originally (eg. the offcuts) - at least I was wise enough to save and number them!
Most of the rib edges seem to have around 0.5mm accuracy when I sand to them, so it becomes more an issue of 'feeling' the curve as you say Jelp. I'm also fortunate in that although the car is very curvy the sides are slablike - infact they are absolutely flat front to back between the wheel arches. There's the curvature of the profile but this becomes a process of sanding a cylinder shape, which is not too difficult. The rib grid will also help me locate items like the light housings in on the model surface. An issue though is that I'm going to have to scribe the detail lines before I remove the ribs and I loose the lines where they cross the ribs which will mean a re-scribe in places. Hope this makes sense! One of the ideas I had to keep things symmetrical was to make formers for the wheel arch shapes. 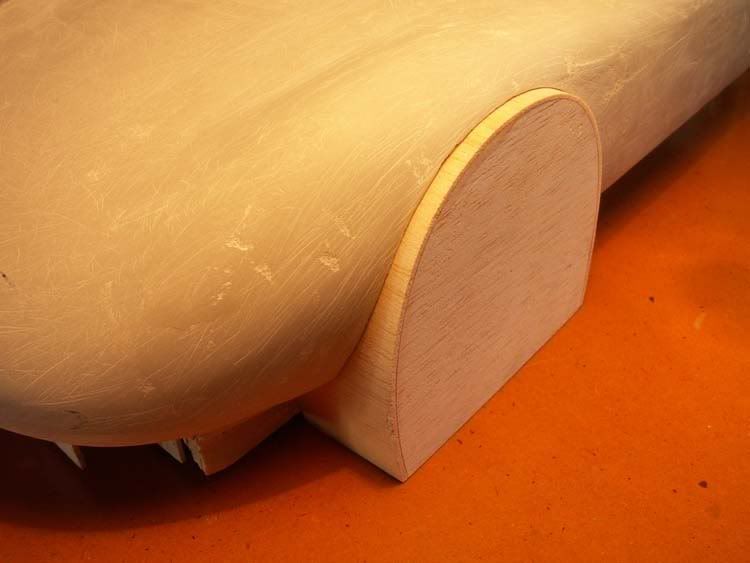 My intention was to make just one that could be used on each side and re-use it. The bad news was that I had to brake the thing to remove it when the filler had dried. Fortunately, I made two just in case this happened! 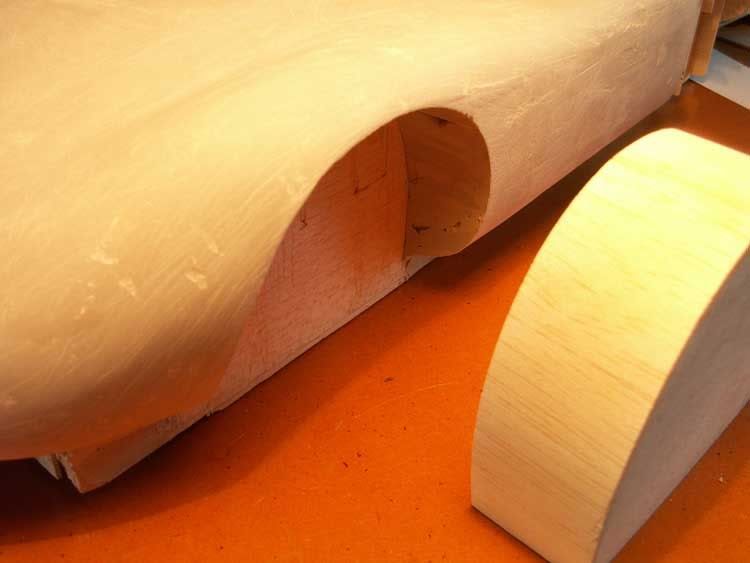 On the surface of the former I added a layer of polyester draughting film ( the stuff used to be used for engineering drawings) so that it would release from the filler OK. They were still difficult to remove though - hence I broke them. Hope this may be food for thought for anyone foolish enough to try such a project! |
|
|
|
|
|
 |
POST REPLY TO THIS THREAD |
 |
|
|


 :
:
