|
|
|

|
|
| Search | Car Forums | Gallery | Articles | Helper | AF 350Z | IgorSushko.com | Corporate |
|
| Latest | 0 Rplys |
|
|||||||
| WIP - Motorbikes Post topics for any "Works In Progress" motobikes projects in this sub-forum. |
 |
 Show Printable Version | Show Printable Version |  Email this Page | Email this Page |  Subscribe to this Thread
|
|
|
Thread Tools |
 10-31-2009, 08:49 AM
|
#16 | ||
|
AF Newbie
 
Join Date: Oct 2009
Location: New York City, New York
Posts: 23
Thanks: 0
Thanked 0 Times in 0 Posts
|
Re: Bimota Tesi 1D
Quote:
About the welding on the exhaust pipes, wow, you guys make it sound easy, the sprue technique is very hard, I break the plastic all the time, or it doesn't get thin enough, I run out of sprue, lol. I did try another way, does this looks good enough for a first time for me? Or should I try harder? I also added the holders for the spring.  |
||

|

|
|
10-31-2009, 09:14 AM
|
#17 | |
|
AF Newbie
Join Date: Oct 2009
Location: New York City, New York
Posts: 23
Thanks: 0
Thanked 0 Times in 0 Posts
|
Re: Bimota Tesi 1D
Also a few update on some details, got to do some touch up on the front break on the aluminum, got crazy trying to do the brembo writing and the chain with the black little dots for the pins, do you guys have any tricks on how to do very tiny writings? Also I am waiting for some studio detail parts to add some hose clamps, the corrugated hose looks good I think.
 |
|
|
|
|
|
11-01-2009, 02:08 PM
|
#18 | |
|
AF Enthusiast
Join Date: May 2004
Location: Kalmar
Posts: 2,047
Thanks: 66
Thanked 25 Times in 25 Posts
|
Re: Bimota Tesi 1D
The trick with doing the tiny lettering is to use very dilluted paint and a fine tip brush. Dip the brush in paint and just touch one end of a letter, you will see the paint flow through the letter. If you get any outside the letter you can take it away using a fine abrasive paper and then drybrush new paint if the sanding took any away. Drybrushing means you dip the brush in paint but then take most of it off on a paper towel. This way just a tiny amount of paint will remain on the brush and no paint will reach the lettering through capillary action.
Hard to say how the weldings look before you get some primer or paint on. They might look a bit "high". /Joel
__________________
Visit my FB page www.facebook.com/one12th |
|
|
|
|
|
11-02-2009, 10:50 AM
|
#19 | |
|
AF Newbie
Join Date: Oct 2009
Location: New York City, New York
Posts: 23
Thanks: 0
Thanked 0 Times in 0 Posts
|
Re: Bimota Tesi 1D
Thanks for the tip about the small writing, I will try that for sure.
How the welding look now?  |
|
|
|
|
|
11-02-2009, 10:55 AM
|
#20 | |
|
AF Newbie
Join Date: Oct 2009
Location: New York City, New York
Posts: 23
Thanks: 0
Thanked 0 Times in 0 Posts
|
Re: Bimota Tesi 1D
Also I resand all the parts I had made white to change the color ro red, some parts are black with the new design I am working on. I didn't spray any clear coat yet, then I have to find the way to make those decals.
    |
|
|
|
|
|
11-02-2009, 06:01 PM
|
#21 | |
|
AF Enthusiast
Join Date: Sep 2005
Location: Greenville, Illinois
Posts: 540
Thanks: 1
Thanked 1 Time in 1 Post
|
Re: Bimota Tesi 1D
The center section of body work looks like sculpture with that red paint on it! Your pipes don't look perfect but, it is an improvement over the box pieces.
Mark |
|
|
|
|
|
11-02-2009, 10:38 PM
|
#22 | ||
|
AF Newbie
Join Date: Oct 2009
Location: New York City, New York
Posts: 23
Thanks: 0
Thanked 0 Times in 0 Posts
|
Re: Bimota Tesi 1D
Quote:
Thanks. |
||
|
|
|
|
11-04-2009, 09:02 PM
|
#23 | |
|
AF Enthusiast
Join Date: Sep 2005
Location: Greenville, Illinois
Posts: 540
Thanks: 1
Thanked 1 Time in 1 Post
|
Re: Bimota Tesi 1D
The sculpture comment was meant to be good.
 In my opinion your pipes look good but, just need cleaned up in a couple areas. I put arrows were a little more smoothing would make your finish a little cleaner. In my opinion your pipes look good but, just need cleaned up in a couple areas. I put arrows were a little more smoothing would make your finish a little cleaner. I tried to Photoshop in some heat stain to see what it would look like but, I don't think it came out correctly. I am enjoying watching your build and hope to see it continue as it is coming along nicely. 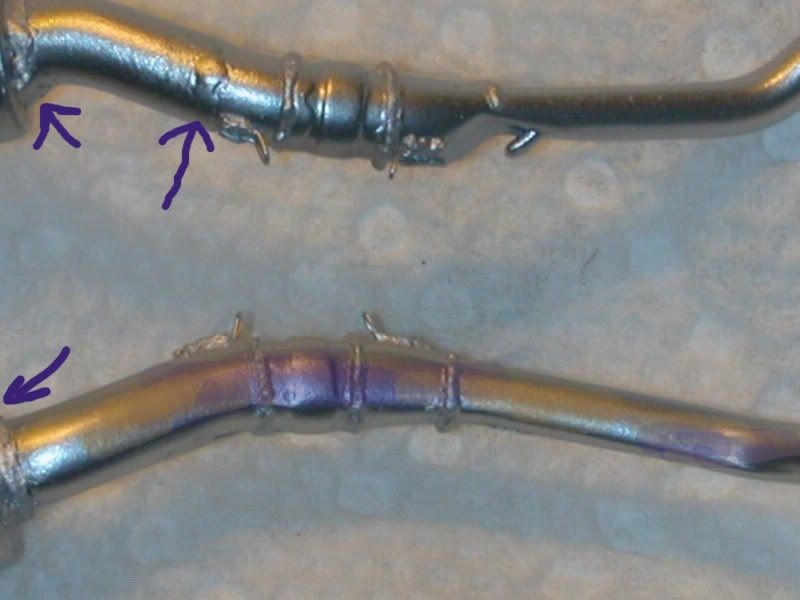 |
|
|
|
|
|
|
POST REPLY TO THIS THREAD |
 |
|
|

