|
|
|

|
|
| Search | Car Forums | Gallery | Articles | Helper | AF 350Z | IgorSushko.com | Corporate |
|
| Latest | 0 Rplys |
|
|||||||
| WIP - Street Post topics for any "Works In Progress" street vehicles projects in this sub-forum. |
 |
 Show Printable Version | Show Printable Version |  Email this Page | Email this Page |  Subscribe to this Thread
|
|
|
Thread Tools |
 09-25-2002, 04:08 PM
|
#1 | |
|
AF Enthusiast

Join Date: Nov 2001
Location: No where
Posts: 1,344
Thanks: 7
Thanked 16 Times in 5 Posts
|
Need help with Tamiya S2000
I'm having trouble lowering this car. Has anyone done it? I need some help. I want to lower it by 1cm. Thanks
|
|

|

|
|
09-25-2002, 04:15 PM
|
#2 | |
|
Horizontally Opposed
 Join Date: Mar 2001
Location: Las Vegas, Nevada
Posts: 16,856
Thanks: 0
Thanked 11 Times in 9 Posts


|
Seems like it would be best to bend all the a-arms up by the same amount, since the geometry is so complicated. You'd have to tweak the driveshafts and steering arm, too...
Is this for the Spoon S2000 Race car?  |
|
|
|
|
|
09-25-2002, 04:31 PM
|
#3 | ||
|
AF Enthusiast
Thread starter
Join Date: Nov 2001
Location: No where
Posts: 1,344
Thanks: 7
Thanked 16 Times in 5 Posts
|
Quote:
OMG You spying on me ?!:finger: It sure is! I can get some pics tonight.  Tamiya did a great job on the suspension that I'm scare to screw around with it. But I figure if I don't do anything to it, the wheels are gonna be 1cm below the wheel arch, totally wrong. |
||
|
|
|
|
09-25-2002, 04:38 PM
|
#4 | |
|
AF Enthusiast

Join Date: Aug 2001
Location: Austin, Texas
Posts: 2,828
Thanks: 17
Thanked 163 Times in 79 Posts
|
The S2000 employs the double wishbone configuration, so cut the arms, and relocate them. Insert metal rod to reinforce. Lowering the front suspension will make the steering rod interfere with the chassis, so test fit, and modify the chassis frame, so that the rod can freely move.
|
|
|
|
|
|
09-25-2002, 04:41 PM
|
#5 | |
|
Horizontally Opposed
Join Date: Mar 2001
Location: Las Vegas, Nevada
Posts: 16,856
Thanks: 0
Thanked 11 Times in 9 Posts
|
I've decided I want to make the same car with my other S2k kit, too. Are you making the early version or the more recent one?
Did you get your Fujimi Work Emotion 17"s? Do they come with brakes? If not, you're going to have to modify the wheel hub anyway... but still it's more complicated than just gluing it in the new position, since parts of the suspansion arms are up inside the wheel...  |
|
|
|
|
|
09-25-2002, 05:34 PM
|
#6 | |
|
AF Enthusiast

Join Date: Apr 2002
Posts: 577
Thanks: 0
Thanked 0 Times in 0 Posts

|
wooo pics eh~?
how is the mini goin~!????????????
__________________
Current Project: Tamiya Nissan Skyline R34- 70% Next Project: Honda S2000 type V, Subaru Impreza WRX STi, Modulo DC5, Veilside MRS http://community.webshots.com/user/a_bathing_ape Go to that site to view images of my models and other car pics..enjoy! 
|
|
|
|
|
|
09-25-2002, 07:12 PM
|
#7 | |
|
AF Enthusiast
Thread starter
Join Date: Nov 2001
Location: No where
Posts: 1,344
Thanks: 7
Thanked 16 Times in 5 Posts
|
Body side view
 Butt view  Under body  Front suspension  Rear suspension  Work Emotion CR vs Stock S2000 Wheel 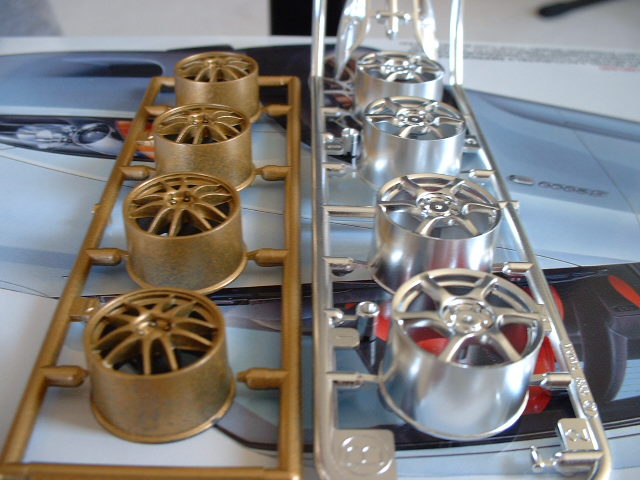 Notice the S2000 wheels are bigger   |
|
|
|
|
|
09-25-2002, 07:16 PM
|
#8 | |
|
Horizontally Opposed
Join Date: Mar 2001
Location: Las Vegas, Nevada
Posts: 16,856
Thanks: 0
Thanked 11 Times in 9 Posts
|
Looks cool so far.
That's the still-stock suspension?Did you map out the jagged edge on the mask, or just do it by hand? What are you planning to do for the white decals? What colors are your Blue and Yellow? Have you got a fuel filler cap to go in the back yet?  |
|
|
|
|
|
09-25-2002, 07:18 PM
|
#9 | ||||
|
AF Enthusiast
Thread starter
Join Date: Nov 2001
Location: No where
Posts: 1,344
Thanks: 7
Thanked 16 Times in 5 Posts
|
Quote:
 Quote:
As you can see in the last pic. And no, they don't come with brakes. BTW, I'm making this version  |
||||
|
|
|
|
09-25-2002, 07:21 PM
|
#10 | ||
|
Horizontally Opposed
Join Date: Mar 2001
Location: Las Vegas, Nevada
Posts: 16,856
Thanks: 0
Thanked 11 Times in 9 Posts
|
Quote:
Working on suspension pics... |
||
|
|
|
|
09-25-2002, 07:23 PM
|
#11 | ||
|
AF Enthusiast
Thread starter
Join Date: Nov 2001
Location: No where
Posts: 1,344
Thanks: 7
Thanked 16 Times in 5 Posts
|
Quote:
|
||
|
|
|
|
09-25-2002, 07:36 PM
|
#12 | ||||
|
Horizontally Opposed
Join Date: Mar 2001
Location: Las Vegas, Nevada
Posts: 16,856
Thanks: 0
Thanked 11 Times in 9 Posts
|
I hope this helps:
This applies mainly to the front; I think I'll have to take a good look at my own kit to see if this will work for the back. 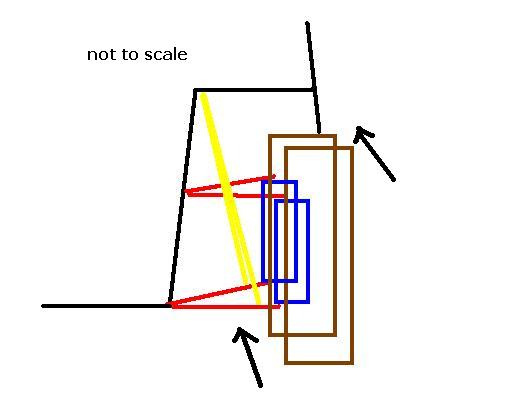 In this diagram, the red parts are the wishbones, the blue boxes are the wheel hub, the brown is the wheel/tire, and the yellow is the shock/strut part. If you can pivot the wishbones at the hinges where they connect to the frame, the whole wheel assembly should swing up and in as shown. I tried to point out where these hinges are, you can see they're all molded in... It may be a challenge for you to do this since you already have it painted and assembled...  Quote:
Looks good.Quote:
Are you gonna cut them out by hand?Quote:
|
||||
|
|
|
|
09-25-2002, 07:41 PM
|
#13 | |
|
Horizontally Opposed
Join Date: Mar 2001
Location: Las Vegas, Nevada
Posts: 16,856
Thanks: 0
Thanked 11 Times in 9 Posts
|
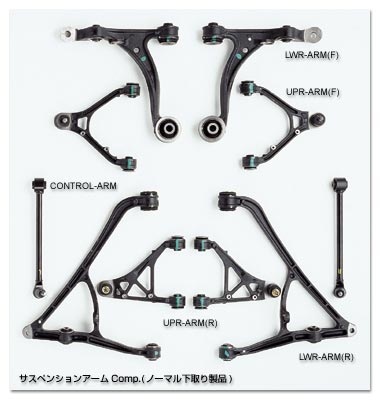
Since you're digging through the suspension, here's a pic of all the wishbone parts, so you'll know which are which...
 |
|
|
|
|
|
09-25-2002, 10:10 PM
|
#14 | |
|
AF Enthusiast

Join Date: Apr 2002
Posts: 729
Thanks: 0
Thanked 1 Time in 1 Post
|
cant wait to see the spoon s2000 completed! looks great so far.
|
|
|
|
|
|
09-25-2002, 10:43 PM
|
#15 | |
|
AF Enthusiast
Thread starter
Join Date: Nov 2001
Location: No where
Posts: 1,344
Thanks: 7
Thanked 16 Times in 5 Posts
|
Awww~ finally...the front is lowered, after breaking almost every part on it, LOL
Thanks Jay for the diagrams! It works! Now for the rear~ |
|
|
|
|
| ||||||||||||||||||||||||||||
|
POST REPLY TO THIS THREAD |
 |
|
|