|
|
|

|
|
| Search | Car Forums | Gallery | Articles | Helper | AF 350Z | IgorSushko.com | Corporate |
|
| Latest | 0 Rplys |
|
|||||||
| WIP - Street Post topics for any "Works In Progress" street vehicles projects in this sub-forum. |
 |
 Show Printable Version | Show Printable Version |  Email this Page | Email this Page |  Subscribe to this Thread
|
|
|
Thread Tools |
 03-01-2002, 04:30 PM
|
#16 | ||
|
AF Fanatic

Join Date: Feb 2002
Posts: 2,622
Thanks: 0
Thanked 0 Times in 0 Posts
|
Quote:
:finger: :finger: :finger: Last edited by daggerlee; 03-01-2002 at 07:15 PM. |
||

|

|
|
03-01-2002, 06:03 PM
|
#17 | |
|
AF Enthusiast
Join Date: Jan 2002
Location: swindon
Posts: 107
Thanks: 0
Thanked 0 Times in 0 Posts
|
:evillaugh
__________________
Rich. 
|
|
|
|
|
|
03-02-2002, 12:39 PM
|
#18 | ||
|
R.I.P. DAD 3/25/11
 
Join Date: May 2001
Location: Mount Vernon, New York
Posts: 6,253
Thanks: 10
Thanked 6 Times in 6 Posts


|
Quote:
I guess it's safe to say Warren, you're all thumbs!  
__________________
Why do banks charge you a "non-sufficient funds fee" on money they already know you don't have?
|
||
|
|
|
|
03-07-2002, 07:17 PM
|
#19 | |
|
"P-Man"

Join Date: Mar 2001
Location: Manawatu
Posts: 15,179
Thanks: 0
Thanked 3 Times in 3 Posts
|
Spent today building and wiring the motor. Most parts fitted well but still needed a little bit of cutting and sanding in places.
The only bugger about the engine is it says to add decal 13 to both halfs of the rocker covers, but there isn't a decal 13 !!! Leads have been added so far and once the engine is fitted to the chassis, other wiring like starter motor/alt/fuel lines etc will be added. Has a fair bit of chrome on the engine which needs to be removed so the glue can stick parts together. The whole engine has been glued together with Kristal Klear as there are lots of different paint colours which may bleed onto another colour. Chassis is being built at the moment and is being a real pain to get it all glued and set into place. There is very little that holds the rear diff in place and has taken a while to get it to fit nice and neat. Most of the parts have been given a "Welded" on look by using Kristel Clear to bond the parts together better. Pics will fellow later on in the weekend 
__________________
Current Build.....1/12 Scale Camaro......Almost finished!!!    View All My Models Here. |
|
|
|
|
|
03-08-2002, 02:06 PM
|
#20 | |
|
"P-Man"
Join Date: Mar 2001
Location: Manawatu
Posts: 15,179
Thanks: 0
Thanked 3 Times in 3 Posts
|
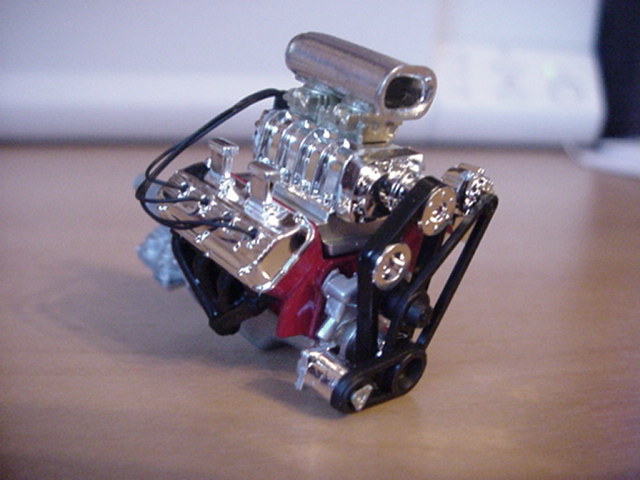
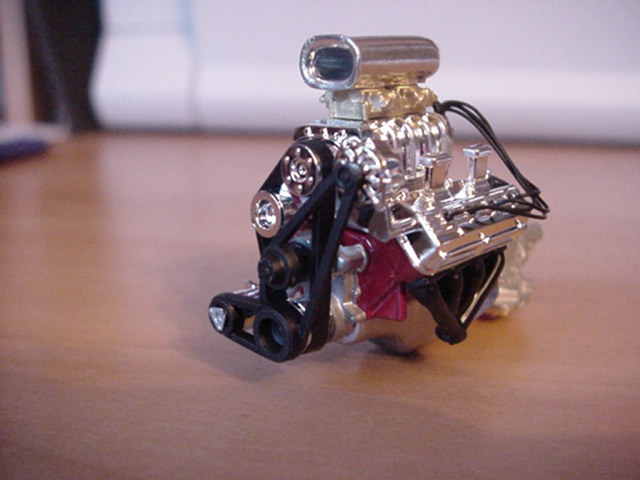
Here is the heart of Willys
__________________
Current Build.....1/12 Scale Camaro......Almost finished!!! View All My Models Here. |
|
|
|
|
|
03-08-2002, 02:09 PM
|
#21 | |
|
"P-Man"
Join Date: Mar 2001
Location: Manawatu
Posts: 15,179
Thanks: 0
Thanked 3 Times in 3 Posts
|
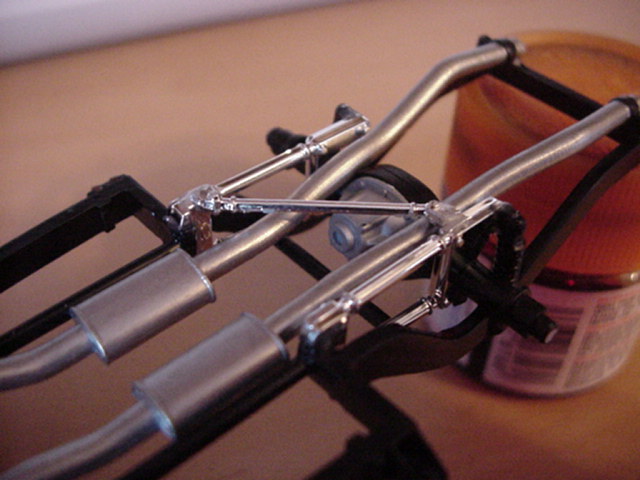
Here is the detail of the rear setup which has good detail but hard to get just fitting and sitting right.
 Final shot of the engine just sitting in the chassis. Hopefully get the wheels and the rest of the running gear on it then get the body on to check the ride height etc. 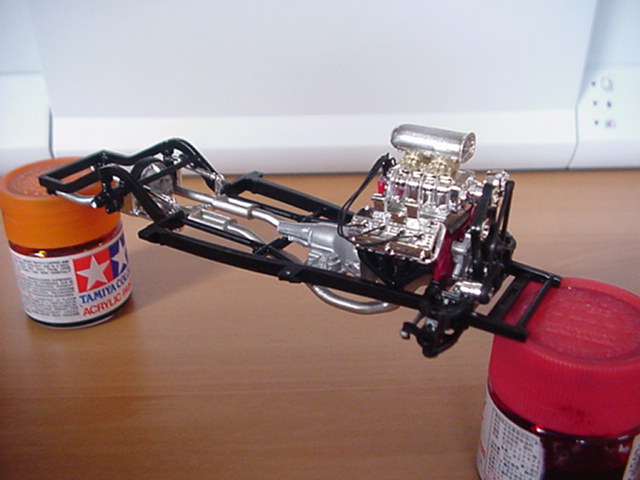
__________________
Current Build.....1/12 Scale Camaro......Almost finished!!! View All My Models Here. |
|
|
|
|
|
03-08-2002, 02:35 PM
|
#22 | |
|
AF Fanatic
Join Date: Feb 2002
Posts: 2,622
Thanks: 0
Thanked 0 Times in 0 Posts
|
 wow!! absolutely stunning!! how'd you paint the belt assembly? |
|
|
|
|
|
03-08-2002, 04:55 PM
|
#23 | |
|
AF Enthusiast
 
Join Date: Jan 2002
Posts: 1,074
Thanks: 0
Thanked 0 Times in 0 Posts
|
Very very nice Pman...
|
|
|
|
|
|
03-08-2002, 05:42 PM
|
#24 | |
|
AF Enthusiast
 
Join Date: Nov 2001
Location: Baltimore, Maryland
Posts: 326
Thanks: 0
Thanked 0 Times in 0 Posts
|
Warren , the page with #13 decal on that instruction sheet is left over from the drag version "Big John"Mazmanian '41 Willy's kit.
See the scan below.:bandit: Mike  The real valve covers were finned with Big Johns name engraved on them the decals were SUPPOSED to give the look of fins. Keep up the good work !!
__________________
Old age and treachery will overcome youthful exuberance everytime !!
 |
|
|
|
|
|
03-09-2002, 01:27 AM
|
#25 | |
|
"P-Man"
Join Date: Mar 2001
Location: Manawatu
Posts: 15,179
Thanks: 0
Thanked 3 Times in 3 Posts
|
Thanks for the comments guys
Daggerless....the belts were painted by hand with a very tiny brush for the detail around the pulleys etc. Tom_S8....Cheers Mike......Thinks for the info on the decals. I think alot of the molds are from that kit as there are a few parts on the 'tree's" that are spare. UPDATE FROM TODAY. Chassiss is about 80% finished now. After getting it all together(see pic below) i've had to do some major lowering of the front end as it looked more like a bloodly 4X4  . .Springs were cut and holes drilled deeper so that the front end could sit alot lower to the ground. Most pics i've seen of these cars have there front wheels tucked well up inside the guards. So today has been a big muck around getting the car to look right in its stance. When the front end has dried enough i shoot a pic to give you a look and see what you all think. Next job will be the colour....still have no idea as to what i'll do This pic was before it was taken apart and lowered about 5mm in the front.... 
__________________
Current Build.....1/12 Scale Camaro......Almost finished!!! View All My Models Here. |
|
|
|
|
|
03-09-2002, 07:12 AM
|
#26 | |
|
I'm still here

Join Date: Nov 2001
Location: Auckland
Posts: 5,630
Thanks: 0
Thanked 0 Times in 0 Posts
|
looking very tidy so far Pman
__________________

|
|
|
|
|
|
03-09-2002, 09:08 AM
|
#27 | |
|
AF Enthusiast
Join Date: Jan 2002
Location: swindon
Posts: 107
Thanks: 0
Thanked 0 Times in 0 Posts
|
What do you use for the wires on the engine?
__________________
Rich.
|
|
|
|
|
|
03-09-2002, 09:34 AM
|
#28 | |
|
AF Fanatic
Join Date: Feb 2002
Posts: 2,622
Thanks: 0
Thanked 0 Times in 0 Posts
|
Did you mask while painting the belt assembly at all?
|
|
|
|
|
|
03-09-2002, 02:14 PM
|
#29 | |
|
"P-Man"
Join Date: Mar 2001
Location: Manawatu
Posts: 15,179
Thanks: 0
Thanked 3 Times in 3 Posts
|
Nismo Kid......The wires are brought from the model shop and you just cut to what ever length you want. They have very tiny copper in them so they can be molded to shape.
Daggerlee.....No masking, just a steady hand and time
__________________
Current Build.....1/12 Scale Camaro......Almost finished!!! View All My Models Here. |
|
|
|
|
|
03-09-2002, 02:28 PM
|
#30 | ||
|
Horizontally Opposed
Join Date: Mar 2001
Location: Las Vegas, Nevada
Posts: 16,856
Thanks: 0
Thanked 11 Times in 9 Posts
|
Looks great so far!
Quote:
I'm thinking of trying my TR's flat 12.  The heads seem to have tiny little leads right where the wires would go. Now all I need is the diagram of which wire goes where... The heads seem to have tiny little leads right where the wires would go. Now all I need is the diagram of which wire goes where...  |
||
|
|
|
|
|
POST REPLY TO THIS THREAD |
 |
| Thread Tools | |
|
|


