|
|
|

|
|
| Search | Car Forums | Gallery | Articles | Helper | AF 350Z | IgorSushko.com | Corporate |
|
| Latest | 0 Rplys |
|
|||||||
| WIP - Motorsports Post topics for any "Work In Process" motorsports vehicles in this sub-forum. |
 |
 Show Printable Version | Show Printable Version |  Email this Page | Email this Page |  Subscribe to this Thread
|
|
|
Thread Tools |
 01-10-2020, 03:01 PM
|
#61 | |
|
Loser

Join Date: Aug 2007
Location: Moscow
Posts: 1,170
Thanks: 110
Thanked 248 Times in 195 Posts
|
Re: Lancia Delta S4 Marlboro Beemax 1/24
It has. I point it out because the rest of your work is incredible. I don't like only the coil springs. They are too thick and don't have variable pitch of turns.
__________________
Best regards, Mikhail   
|
|

|

|
|
01-10-2020, 04:38 PM
|
#62 | ||
|
AF Enthusiast
Thread starter
Join Date: Mar 2009
Location: Madrid
Posts: 649
Thanks: 109
Thanked 68 Times in 67 Posts
|
Re: Lancia Delta S4 Marlboro Beemax 1/24
Quote:
 |
||
|
|
|
|
02-05-2020, 01:05 PM
|
#63 | |
|
AF Enthusiast
Thread starter
Join Date: Mar 2009
Location: Madrid
Posts: 649
Thanks: 109
Thanked 68 Times in 67 Posts
|
Re: Lancia Delta S4 Marlboro Beemax 1/24
Continuamos con el Delta S4 Marlboro, y aquí os muestro una imagen del motor con varias partes superpuestas sin pegar, para ver como encajan:
We continue with the Delta S4 Marlboro, and here I show you an image of the engine with several superimposed parts without hitting, to see how they fit: 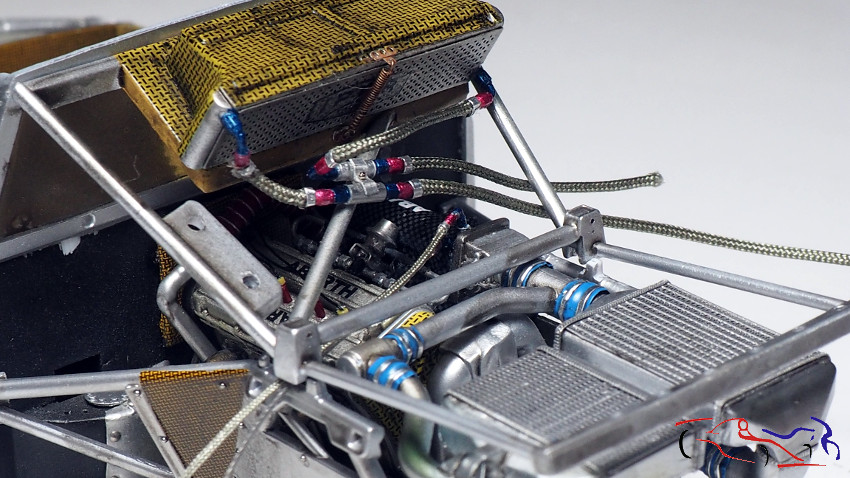 Pero vamos al principio. Para hacer los cables de las bujias, utilizo uno de T2M de 0,4 mm, que introduzco por las bobinas rojas que hice en metal. También, he recortado cable rojo y amarillo, y he usado su funda para introducir el cable negro. La amarilla va pegada a las bobinas, y la roja al extremo contrario: But lets go to the beginning. To make the spark plug wires, I use a 0.4 mm T2M, which I introduce through the red coils I made in metal. Also, I have trimmed red and yellow wire, and used its sheath to insert the black wire. The yellow is glued to the coils, and the red to the opposite end: 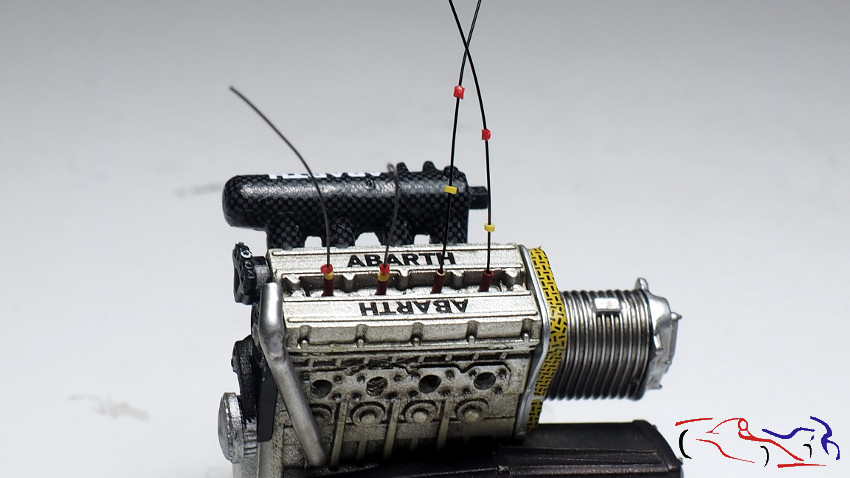 Aquí vemos como están colocados los cables y las fundas roja y amarilla. Decir que entre las fundas rojas, hay un hueco para otro cable, que irá conectado a la centralita situada en el cortafuegos trasero. Here we see how the cables and the red and yellow sheaths are placed. Say that between the red covers, there is a hole for another cable, which will be connected to the switchboard located in the rear firewall. 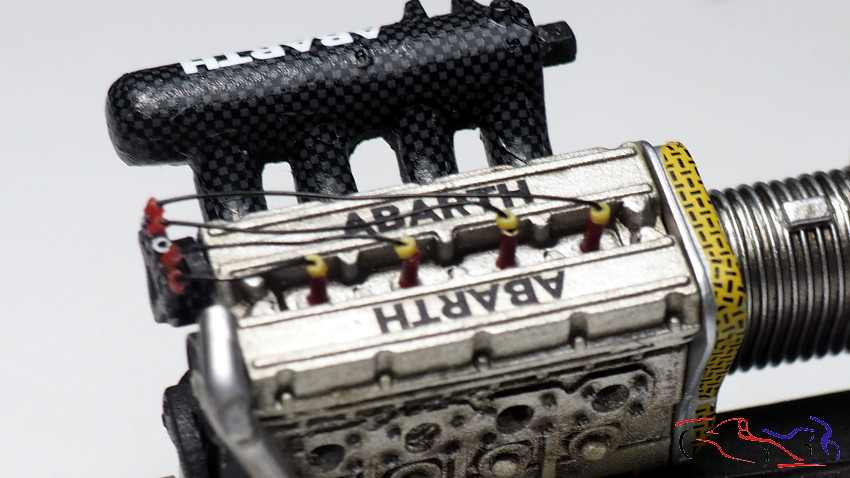 En la siguiente foto, ya hemos colocado tanto los tubos de escape con el turbo, como los dos radiadores grandes traseros: In the following photo, we have already placed both the exhaust pipes with the turbo, and the two large rear radiators: 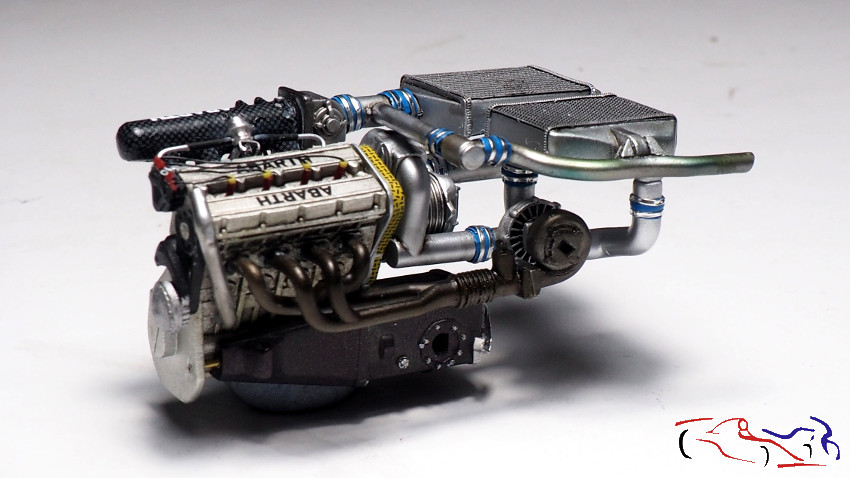 Vemos también el sistema de inyección colocado entre el bloque motor y la entrada de aire que está forrada con fibra de carbono: We also see the injection system placed between the engine block and the air inlet that is lined with carbon fiber: 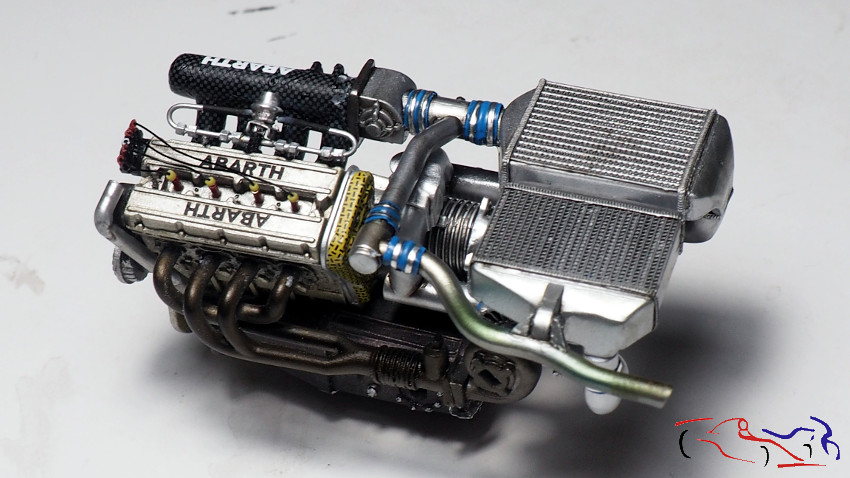 No da la sensación de haber visto un aparato similar en alguna película (Enterprise de Start Treck!!)??? Does not it seem to have seen a similar device in any movie (Start Treck Enterprise !!) ??? 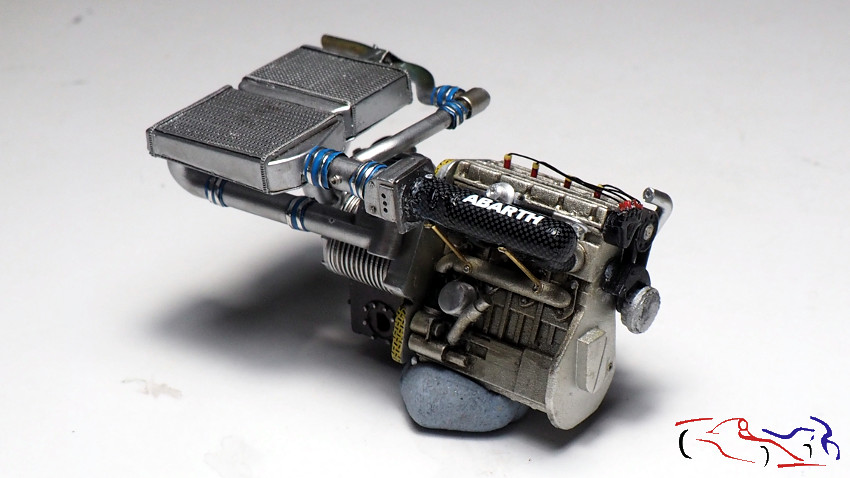 En esta foto, vemos también, dos soportes realizados con tubo de cobre, que sujeta la bombona de entrada de aire: In this photo, we also see two supports made of copper tube, which holds the air inlet cylinder: 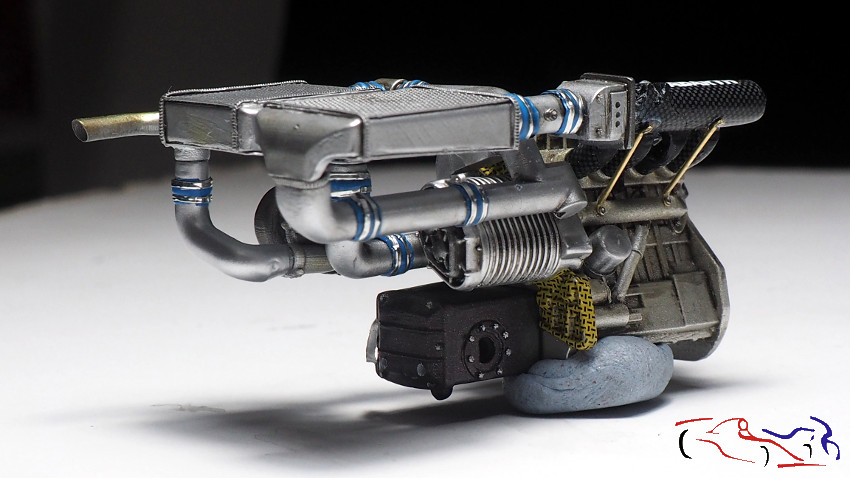 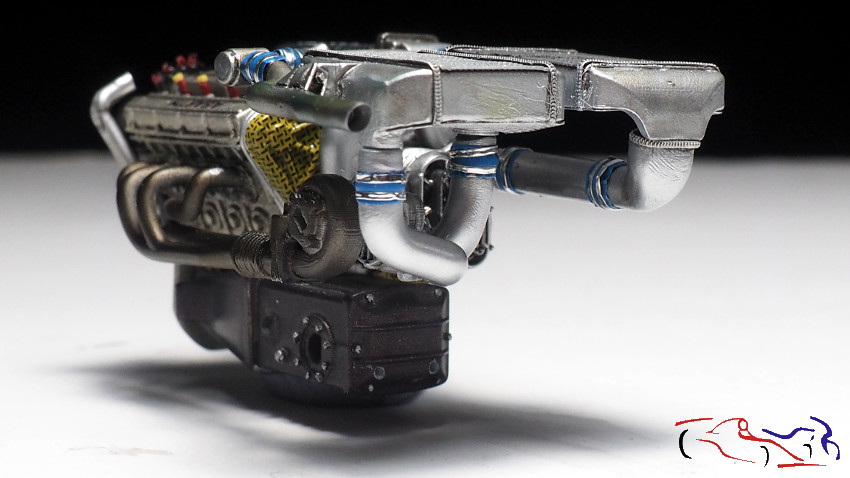 Pasamos al radiador del techo. De los extermos, salen dos racores cuyos tubos se unen en na pieza que los conecta y sujeta al arco. Esa pieza está realizada con dos tubitos cortados, y un trozo de lata ajustado con un tornillo de metal en el centro, como sujección a la barra de aluminio transversal: We pass to the ceiling radiator. From the outer, two fittings come out whose pipes are joined in a piece that connects them and fastened to the arch. This piece is made with two cut tubes, and a piece of can adjusted with a metal screw in the center, as a fastener to the transverse aluminum bar:  En al siguiente foto, vemos todos los tubos conectados, y el muelle, un poco oxidado, que fija el radiador. Este muelle es uno que hay para detallar las motos, que he estirado un poco para que se ajuste a las medidas del radiador. Y como sujecciones, he usado unas chapitas agujereadas de un fotograbado. In the next photo, we see all the connected pipes, and the spring, a little rusty, that fixes the radiator. This spring is one that there is to detail the motorcycles, which I have stretched a bit to fit the radiator measurements. And as fasteners, I used a few holes boring a photogravure. 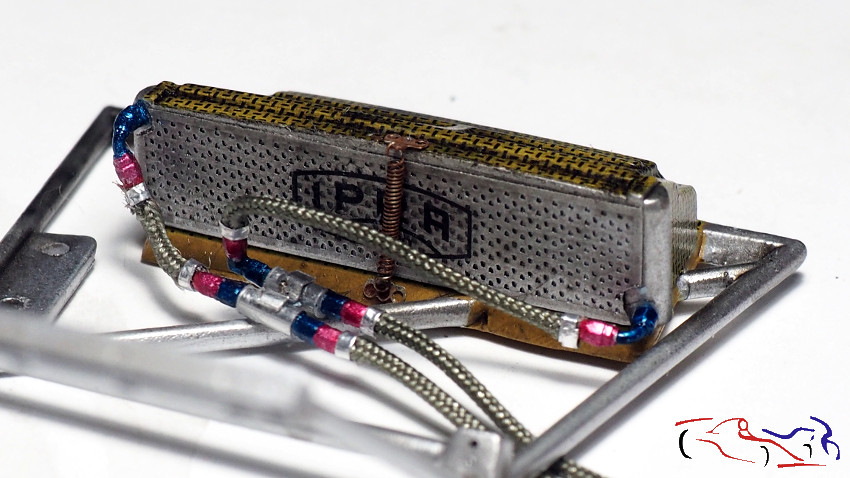 Vamos con los paneles laterales del motor. Una vez ensuciados con humo diluido, vamos a ponerles los remaches, pero no usaré los habituales, sino bolas de soldadura de 0,5 mm. Pongo un poco de pegamento (ciano o cola blanca diluida) con un palillo, humedezco la otra punta del palillo para coger la bolita, y la pongo en el agujero correspondiente. EL resultado es bueno y muy barato!! We go with the engine side panels. Once soiled with diluted smoke, we are going to put the rivets, but I will not use the usual ones, but 0.5 mm solder balls. I put some glue (cyano or diluted white glue) with a stick, moisten the other end of the stick to take the ball, and put it in the corresponding hole. The result is good and very cheap! 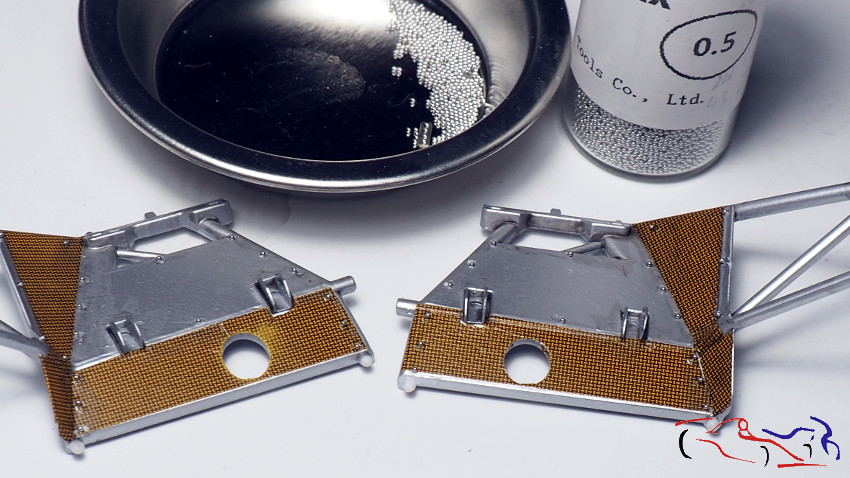 Aquí podemos ver el resultado Y si alguna se pierde? En el bote hay muuuuchas!! Here we can see the result And if any is lost? In the boat there are maaaaaaaaaaaany! 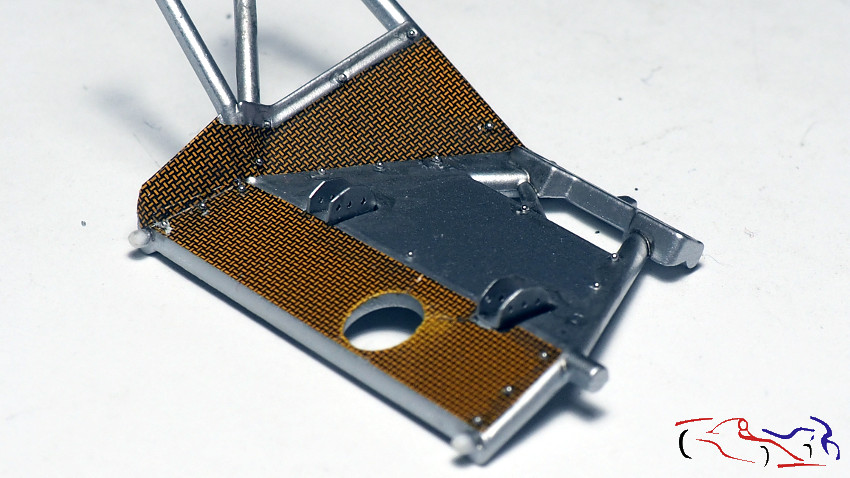 Una foto del tubo de escape, terminado a falta de una capa de barniz mate: A photo of the exhaust pipe, finished in the absence of a layer of matt varnish: 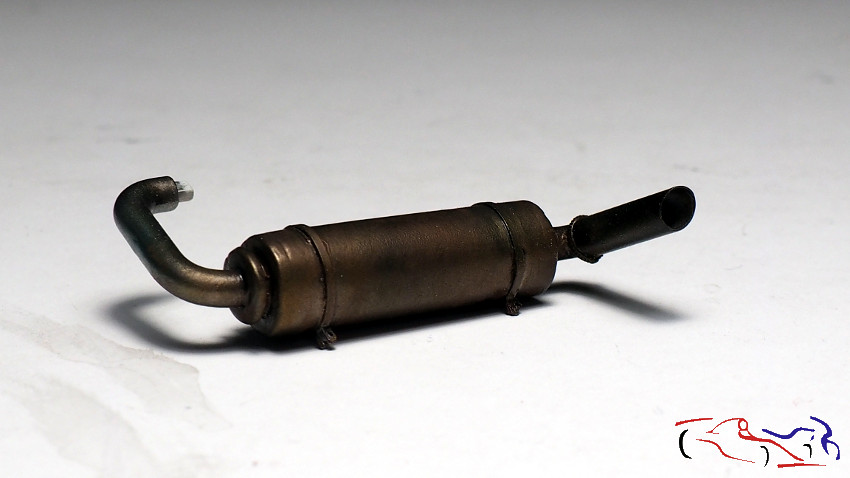 Otra pieza terminada: un depósito cn todos sus cables, listo para ponerlo en el cortafuegos trasero, en su parte derecha. Es una pieza del transkit de Andrea!! Another finished piece: a tank with all its cables, ready to be placed in the rear firewall, on its right side. Its a piece of Andreas transkit !! 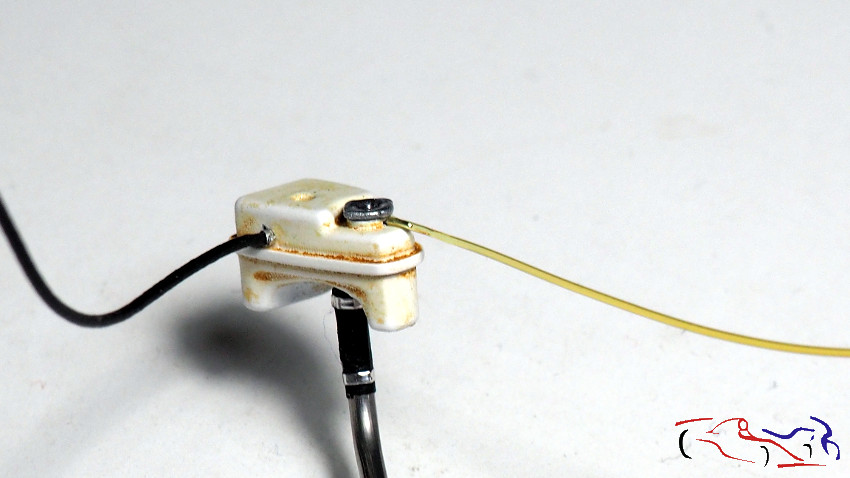 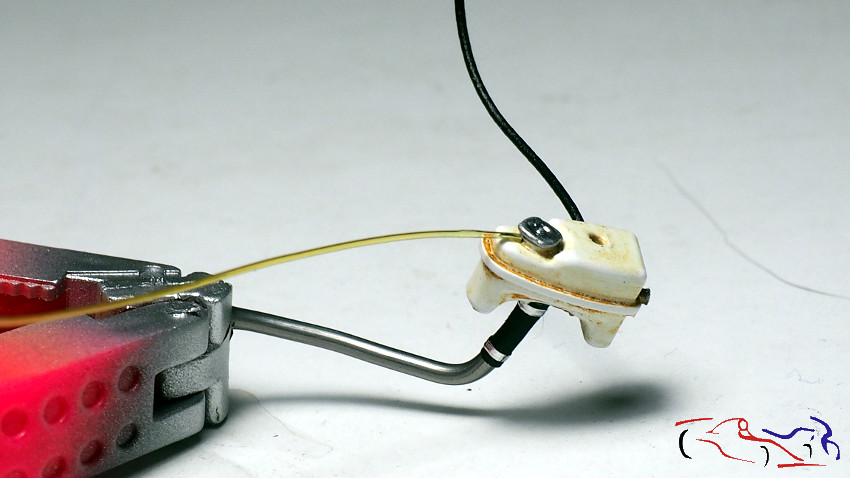 Debajo del radiador trasero, o filtro que está detrás del cockpit, en la parte de arriba, hay unos tubos que salen del mismo y van a los frenos traseros, con aire del exterior. Para imitarlos, cogemos muelle de TMF comprado en su día, al que le metemos por dentro, estaño grueso para que nos de la forma deseada. Under the rear radiator, or filter that is behind the cockpit, at the top, there are some pipes that come out of it and go to the rear brakes, with outside air. To imitate them, we take TMF spring purchased in its day, which we put inside, thick tin to give us the desired shape. 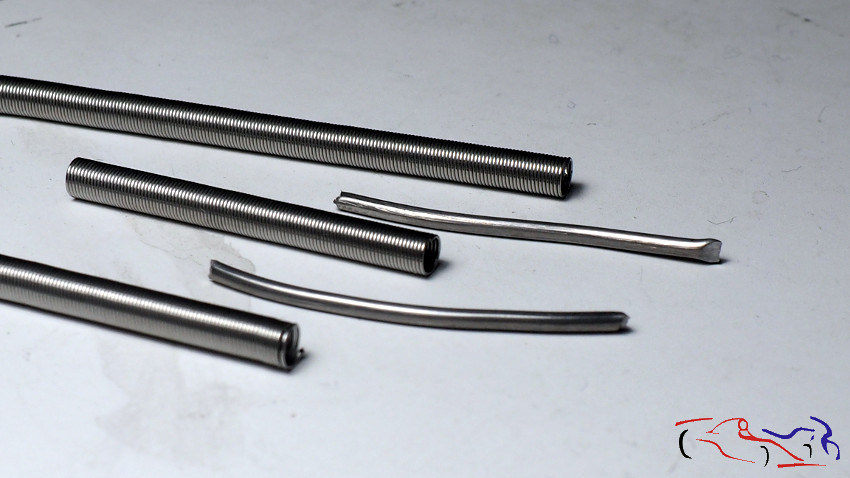 Metemos el estaño y lo metemos dentro del muelle, y lo pegamos con ciano: We put the tin and put it inside the dock, and stick it with cyano: 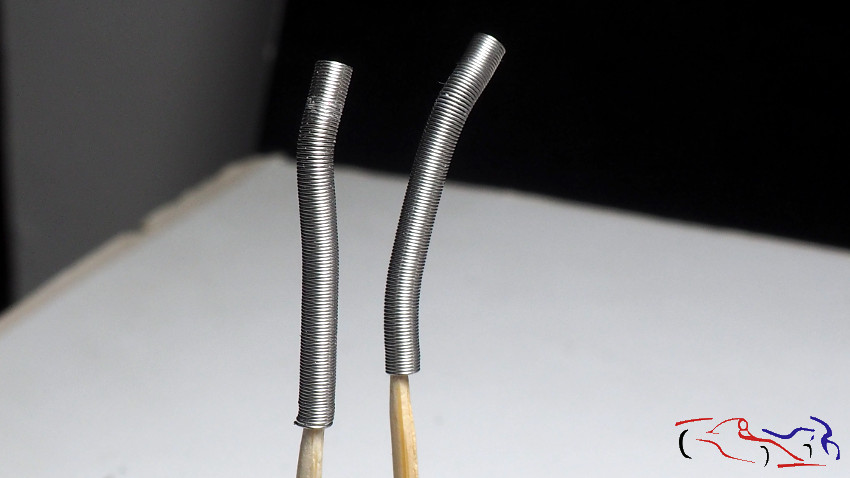 Como irán pintados de la misma manera que otro tubo del motor, aprovecho la ocasión para hacerlo. Este tubo, es un alambre doblado que he introducido por un termoretractil, para que se adapte al alambre con calor. Una vez ajustado, lo rodeo con hilo de metal fino de 0,2 mm, el cual lo pego con ciano por la parte que no se verá: As they will be painted in the same way as another motor tube, I take the opportunity to do so. This tube is a bent wire that I have introduced by a heat shrink, so that it adapts to the wire with heat. Once adjusted, I surround it with 0.2 mm thin metal thread, which I glue it with cyano on the part that will not be seen: 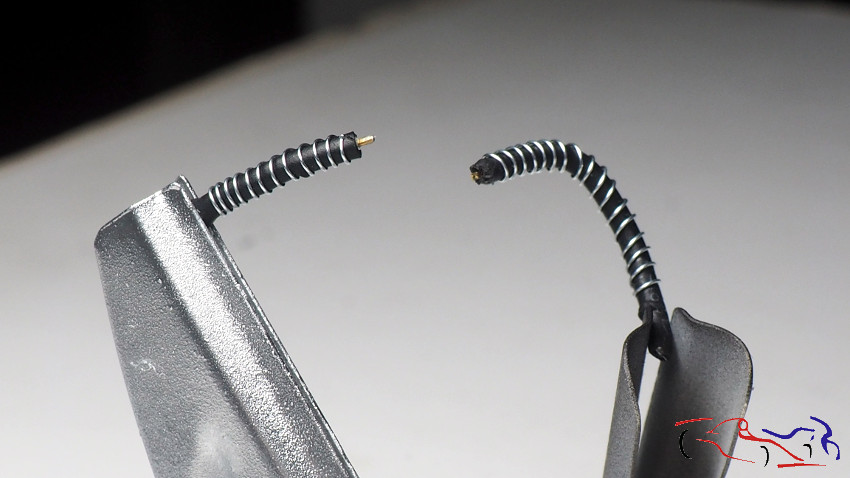 Para pintarlos, después de la imprimación Gravity, utilizo pintura roja de Zero, la que tiene para los Brabham de F1, la cual es un poco más oscura, perfecta para estas piezas: To paint them, after Gravity primer, I use Zeros red paint, the one he has for the F1 Brabham, which is a bit darker, perfect for these pieces: 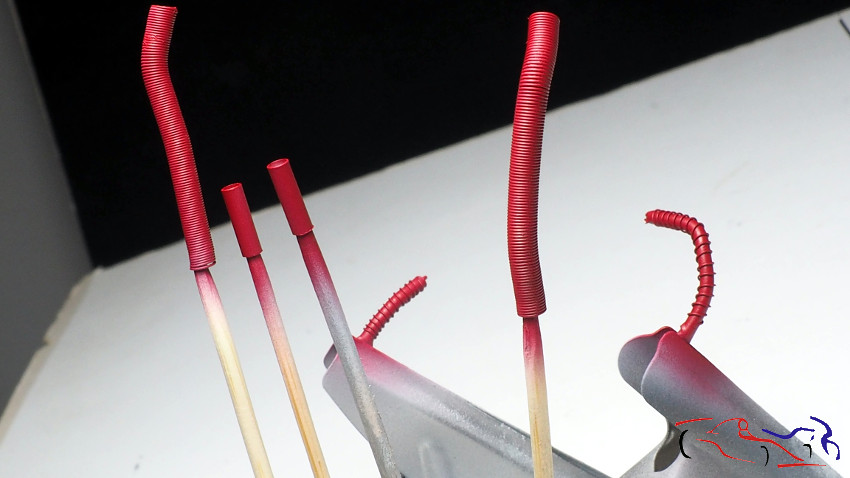 Una vez secos, paso una lija a los tubos del motor, para que elimine la pintura del cable fino de metal, y aparezca el color del mismo. Solo falta aplicar unos lavados para dar profundidad y uso: Once dry, pass an sandpaper to the motor tubes, so that it removes the paint from the thin metal cable, and the color of the same appears. It is only necessary to apply some washings to give depth and use: 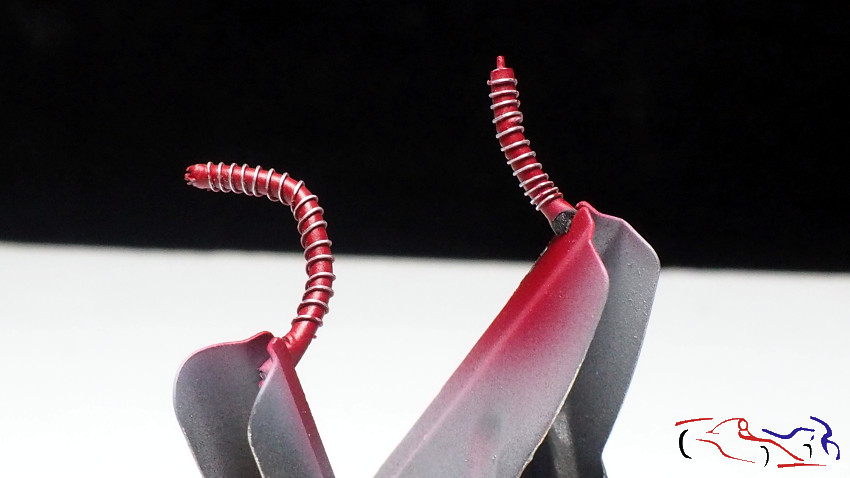 Y vamos pegando piezas. Le danos la vuelta al chasis y pegamos la parte del la caja de cambios que se verá: And we are gluing pieces. We flip the chassis and paste the part of the gearbox that will be seen: 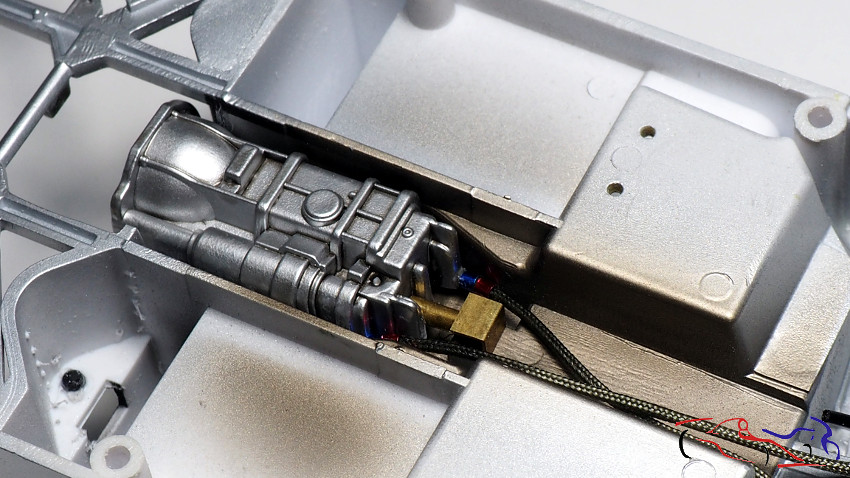 Y de ahí, nos vamos a la parte delantera. Os muestro las piezas existentes, que vamos a empezar a pegar. Los discos de freno y los amortiguadores los dejaremos para más adelante. And from there, we go to the front. I show you the existing pieces, which we are going to start gluing. We will leave the brake discs and shock absorbers for later. 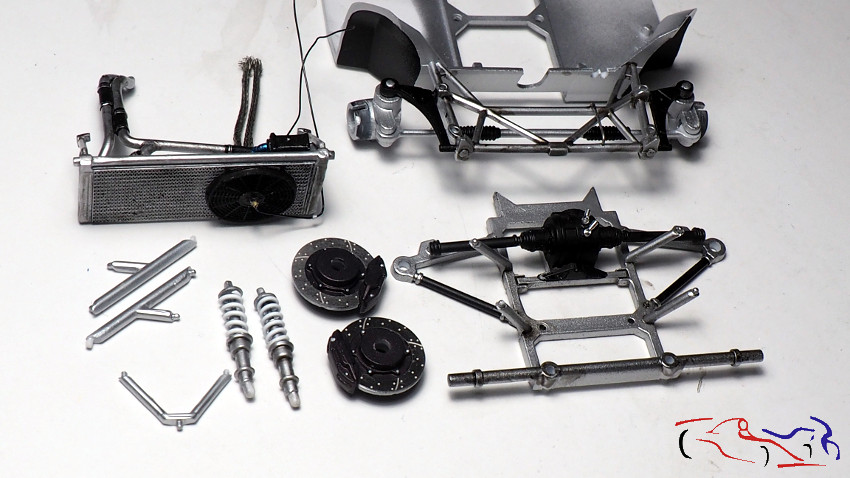 Y este es el resultado: And this is the result: 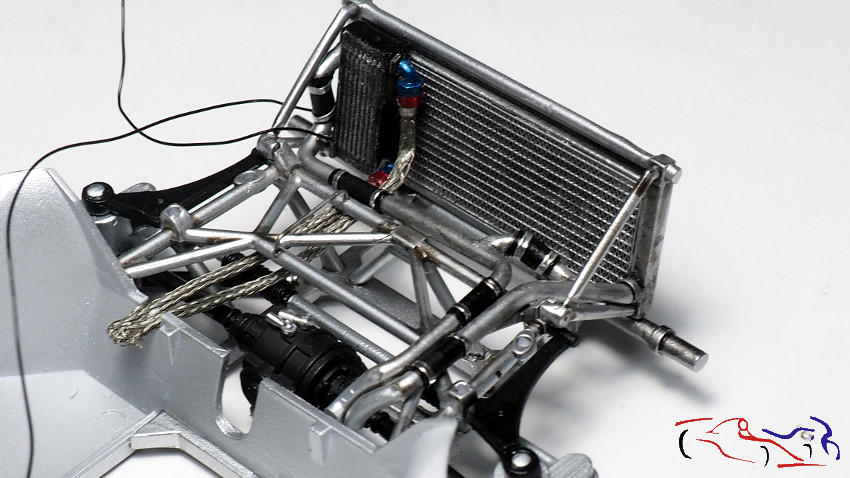 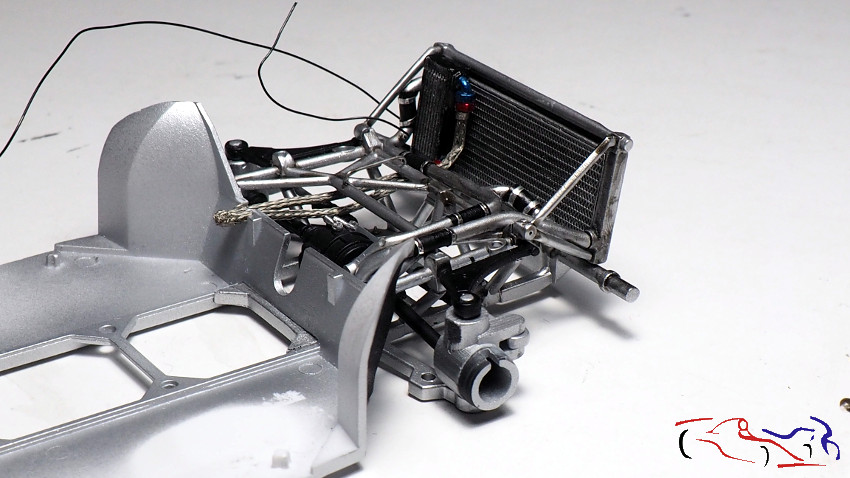 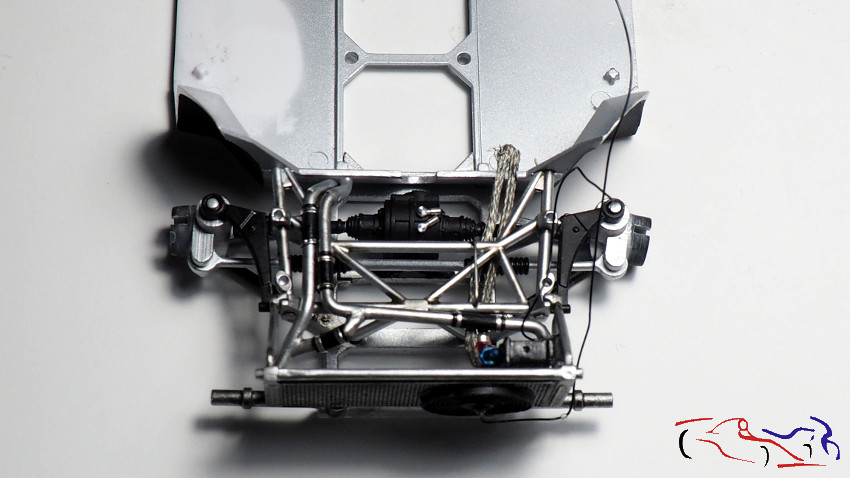 Para terminar hoy, os dejo unas fotos de la parte trasera del coche, con varias piezas colocadas sin pegamento: To finish today, I leave some photos of the back of the car, with several pieces placed without glue: 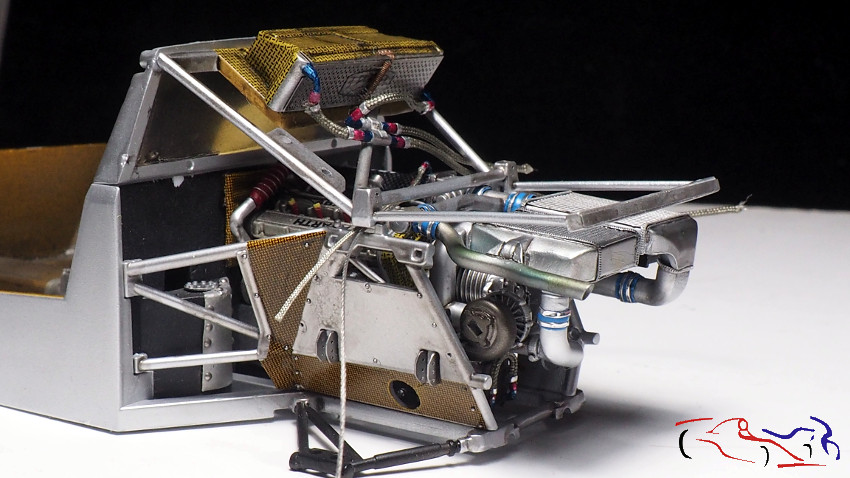 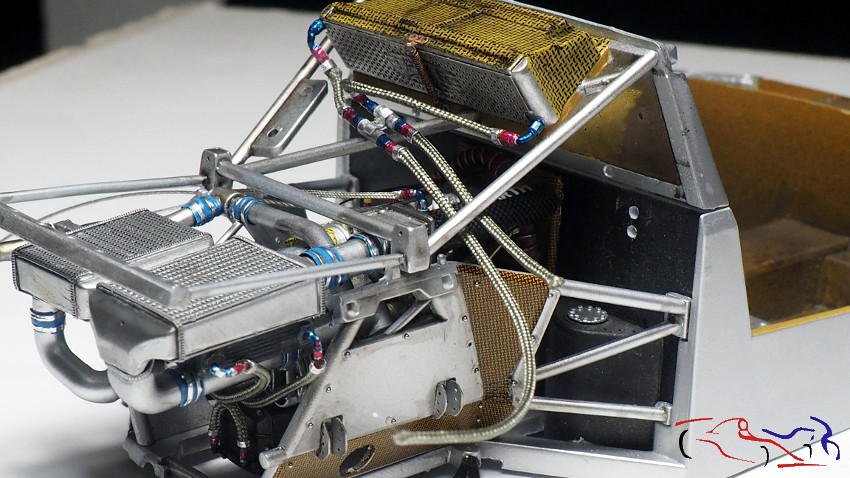 Espero que os haya gustado! Gracias por ver y comentar!! I hope you liked it! Thanks for viewing and commenting!! |
|
|
|
|
|
04-16-2020, 08:05 AM
|
#64 | |
|
AF Enthusiast
Join Date: Sep 2014
Location: Crownsville, Maryland
Posts: 638
Thanks: 16
Thanked 104 Times in 95 Posts
|
Re: Lancia Delta S4 Marlboro Beemax 1/24
Outstanding!
__________________
Motorsport Modeling |
|
|
|
|
|
04-16-2020, 01:23 PM
|
#65 | |
|
AF Regular
Join Date: Aug 2011
Location: Torino
Posts: 389
Thanks: 175
Thanked 62 Times in 58 Posts
|
Re: Lancia Delta S4 Marlboro Beemax 1/24
Really nice progress JesusM! Your S4 will be awesome!
 |
|
|
|
|
|
04-16-2020, 03:11 PM
|
#66 | |
|
AF Regular
Join Date: Aug 2011
Location: Torino
Posts: 389
Thanks: 175
Thanked 62 Times in 58 Posts
|
Re: Lancia Delta S4 Marlboro Beemax 1/24
Hi JesusM, I really admire your detailwork on the S4! I also plan to buikd it soon and already had a closer look to the kit. As I see that you haven't started the front panel of the car, I would like to share my observation on that part. When I looked at the front, there was always something strange about the proportion, so I made some comparision to the original. It revealed that the kit's headlight openings are wrongly proportioned, they are too small compare to the original. I enclosed some images which might be helpful for you to correct the kit's problem.
   |
|
|
|
|
|
04-16-2020, 04:28 PM
|
#67 | |
|
AF Enthusiast
Thread starter
Join Date: Mar 2009
Location: Madrid
Posts: 649
Thanks: 109
Thanked 68 Times in 67 Posts
|
Re: Lancia Delta S4 Marlboro Beemax 1/24
Yes and thanks for your help. I'm happy to work with your help. It makes the proyect bigger!!
And regarding your view of the front lights, to update the lights according to your suggestion is a bit difficult and maybe, the result can not be the expected. But let me check it and i'll let you know. Thanks again!! |
|
|
|
|
|
09-16-2020, 02:03 AM
|
#68 | |
|
AF Enthusiast
Thread starter
Join Date: Mar 2009
Location: Madrid
Posts: 649
Thanks: 109
Thanked 68 Times in 67 Posts
|
Re: Lancia Delta S4 Marlboro Beemax 1/24
Ya estamos de vuelta con el Lancia S4, puesto que desde Febrero no he mostrado nada, y mientras me dedicaba a otros kits durante el confinamiento de la pandemia. Mucho trabajo he ido haciendo, y aquí os lo muestro.
We are back with the Lancia S4, since since February I have not shown anything, and while I was dedicating myself to other kits during the confinement of the pandemic. I have been doing a lot of work, and here I show you. Empezamos con el chasis. La idea es terminar el chasis para empezar a pegarle las partes del motor que ya están listas. Para ello, lo primero que hacemos, es pegar los tubos, cables, y transmisión debajo del habitáculo. We start with the chassis. The idea is to finish the chassis to start gluing the engine parts that are already ready. To do this, the first thing we do is glue the tubes, cables, and transmission under the cabin.  Mientras se seca, cogemos el chasis propiamente dicho, y le colocamos las calcas de fibra. Podéis ver la pieza suelta, que es originalmente transparente, que se colocará en el centro del chasis, a la que le he eliminado parte de la calca para que se vea el trabajo realizado en la transmisión, y que hemos colocado en la foto anterior. While it dries, we take the chassis itself, and put the fiber decals on it. You can see the loose piece, which is originally transparent, which will be placed in the center of the chassis, from which I have removed part of the decal to show the work done on the transmission, and which we have placed in the previous photo. 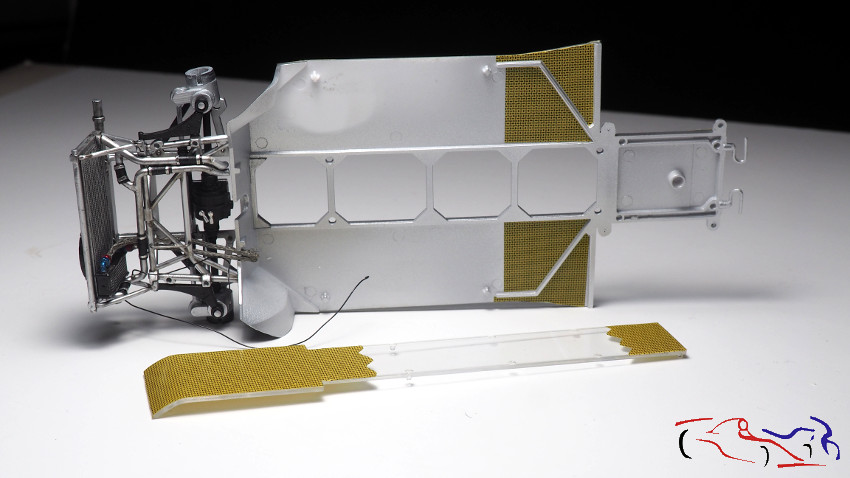 Si le damos la vuelta al chasis, vemos la calca de fibra colocada, y todo el resto enmascarado para ensuciarla. Y como primera etapa, le he dado una capa fina de barniz mate de AMMO MIG, que seca muy rápido. If we turn the chassis, we see the fiber decal in place, and all the rest masked to make it dirty. And as a first stage, I have given it a thin coat of AMMO MIG matte varnish, which dries very quickly.  Y lo primero que hacemos, es probar el Shaders de MIG, color Dirt, es decir sucio. Se aplica de forma muy fina, sin encharcar nada, y siempre sobre superficie mate. Se ha incidido sobre los bordes. And the first thing we do is try the MIG Shaders, Dirt color, that is to say dirty. It is applied very thinly, without puddling anything, and always on a matte surface. It has incised on the edges.. 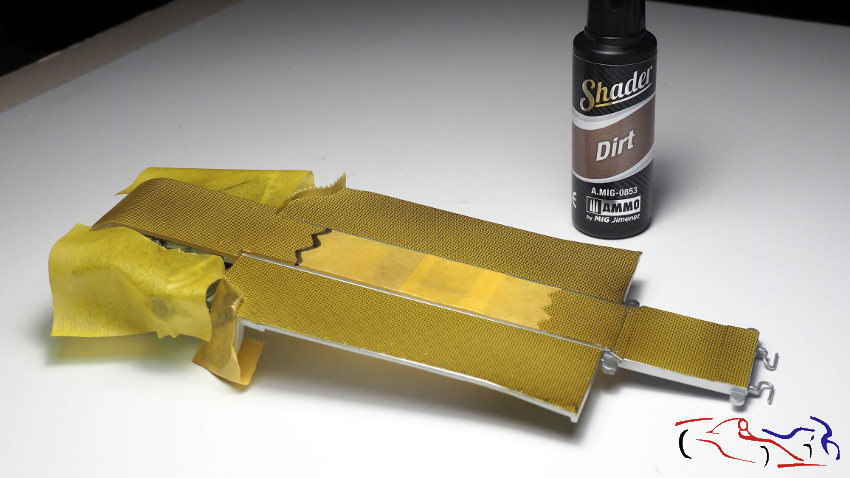 Lo siguiente es aplicar otra capa de barniz mate, para proteger lo anterior y poder continuar con los siguientes procesos. Y ahora toca aplicar los oilbrushers que aparecen en la foto, poniendo puntos de las diferentes pintiras repartidos sobre toda la superficie. Una vez puestos, cogemos un pincel plano, el diluyente y empezamos a difumiarlo todo, con movimientos longitudinales a lo largo del chasis. The next thing is to apply another layer of matte varnish, to protect the above and to continue with the following processes. And now its time to apply the oilbrushers that appear in the photo, putting dots of the different paints spread over the entire surface. Once they are in place, we take a flat brush, the thinner and begin to blur everything, with longitudinal movements along the chassis. 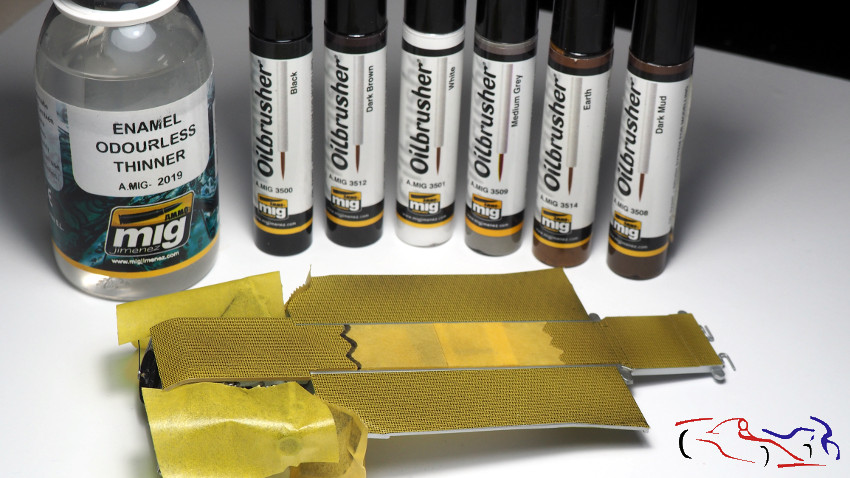 Y este es el resultado. Decir qye a los remacheso grandes y a las juntas, le he dado un lavado de negro mate XF-1 diluido. Y después, otra capa de barniz mate de MIG. And this is the result. Saying that to the large rivets and joints, I have given a dilute XF-1 matte black wash. And then another coat of MIG matte varnish. 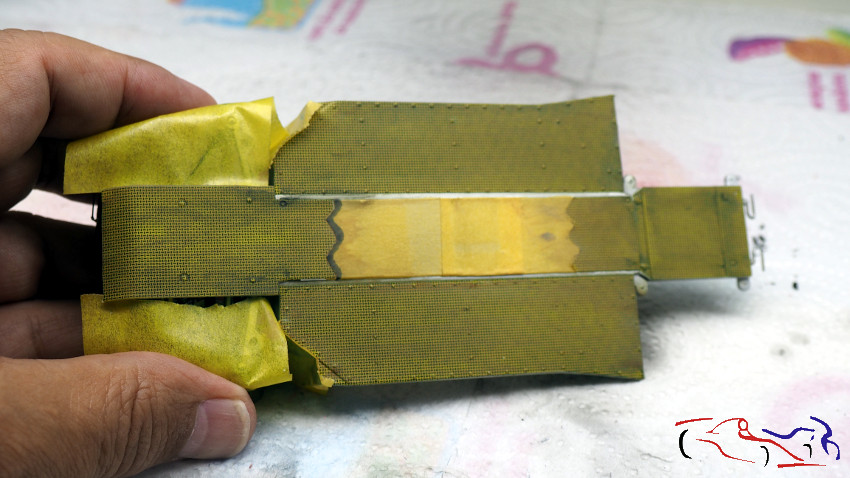 Para la parte transparente, lógicamente hay que tratarla también por la parte superior, en los extremos, puesto que la calca puesta debajo, aparece como blanca si se mira desde el otro lado, y se vería en el extremo del motor y debajo de la parte frontal. Por tanto, enmascaamos la parte transparente y pintamos con kevlar de Zero. For the transparent part, logically it must also be treated from the upper part, at the ends, since the decal placed underneath appears as white if viewed from the other side, and it would be seen at the end of the motor and under the front part. Therefore, we mask the transparent part and paint with Zeros kevlar. 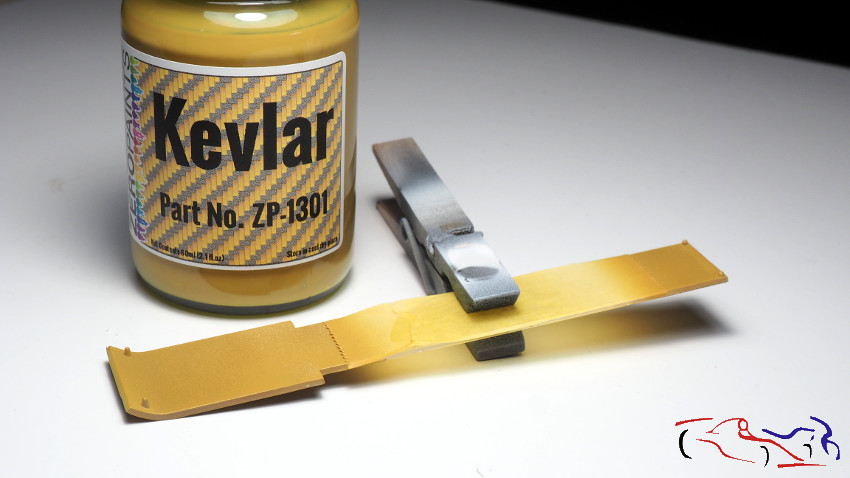 Una vez pintado, aplicamos un ligero ensuciado de negro mate XF-1 diluido, incidiendo en los bordes, Once painted, we apply a light soiling of diluted XF-1 matt black, focusing on the edges, 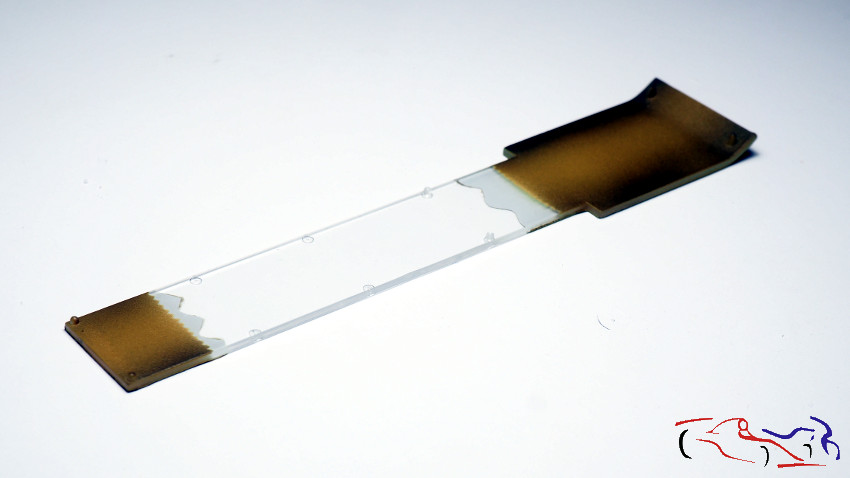 Siendo este el resultado, visto desde encima de la estructura. This being the result, seen from above the structure. 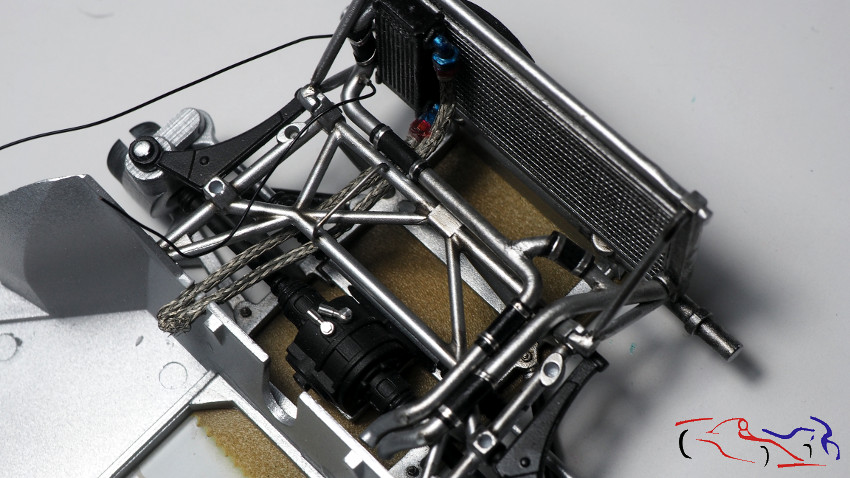 Y aquí, ya están pegados, el chasis y la pieza transparente. And here, the chassis and the transparent part are already glued. 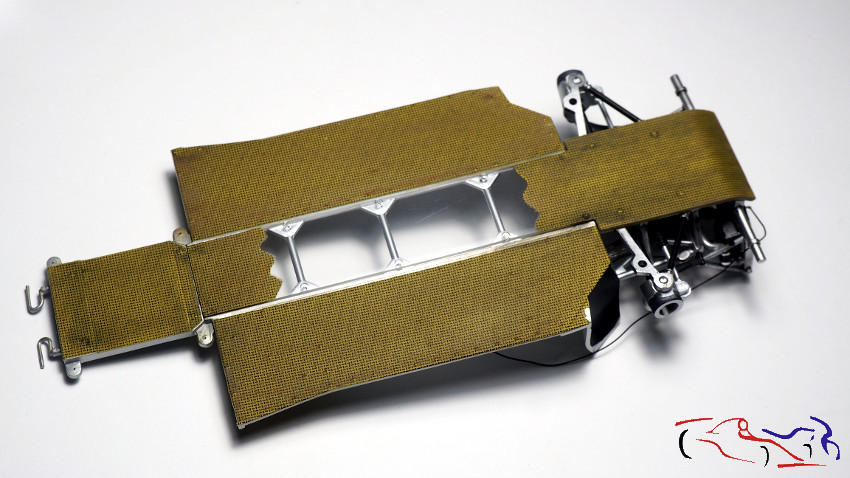 A su vez, pegamos el cockpit y el motor al chasis. In turn, we glue the cockpit and the engine to the chassis. 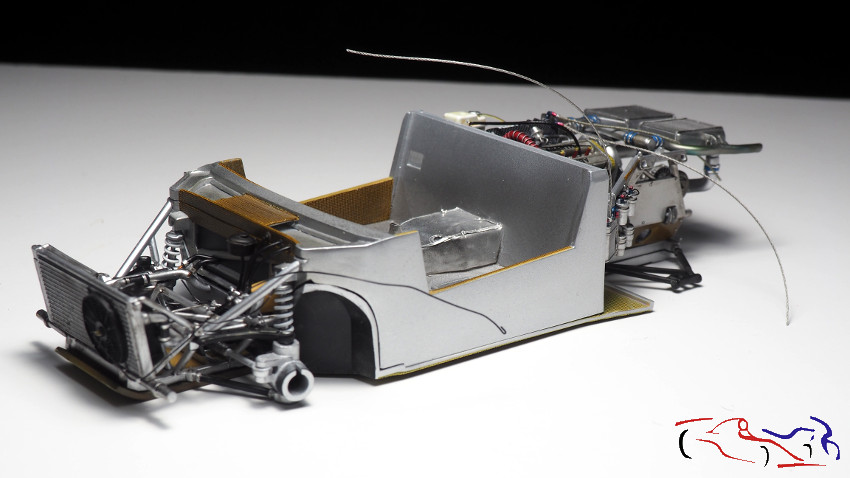 En la siguiente foto, os muestro el motor pegado al chasis. Los dos cables sueltos irán colocados en las tomas de una válvula que hay al lado de un escape. In the next photo, I show you the engine attached to the chassis. The two loose cables will be placed in the sockets of a valve next to an exhaust. 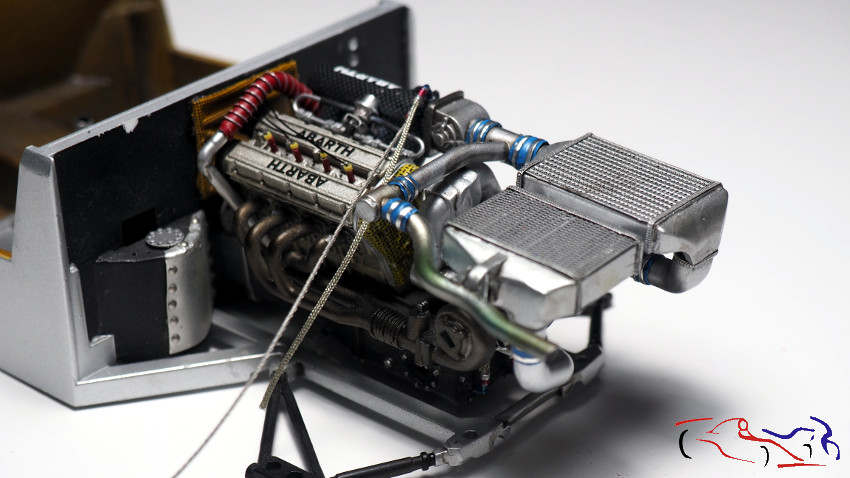 La vista desde el otro lado: Another view of the opposite side: 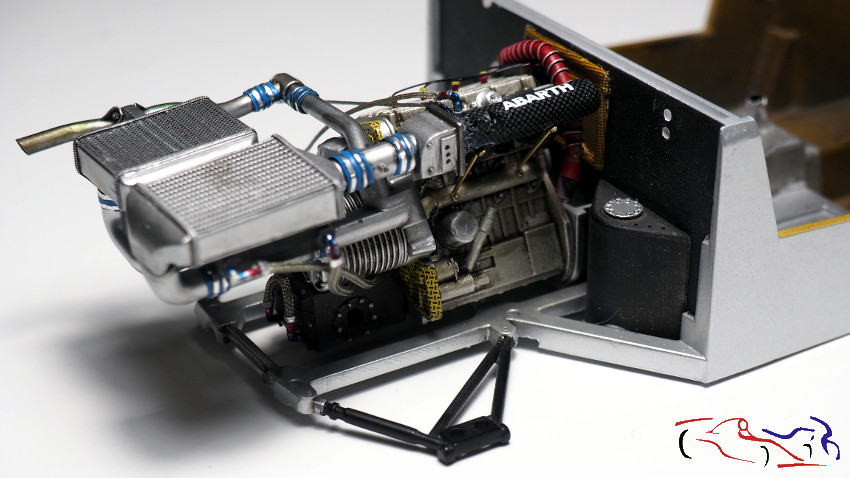 Entre el motor y la ruedas, existen estas piezas donde van sujetos la amoriguación y los triángulos superiores de la suspensión. Estas piezas van unidas al chasis por esos tubos de la izquierda, donde varios depositos están ubicados. Esta pieza es también de KMP, a la que le he añadido los distintos cableados. Esta pertenece al lado izuierdo en orden de marcha. La del otro lado, tienen un depósito de aceite. Between the engine and the wheels, there are these parts where the damping and the upper suspension triangles are attached. These pieces are attached to the chassis by those tubes on the left, where several tanks are located. This part is also from KMP, to which I have added the different wiring. This belongs to the left side in running order. The one on the other side, they have an oil reservoir. 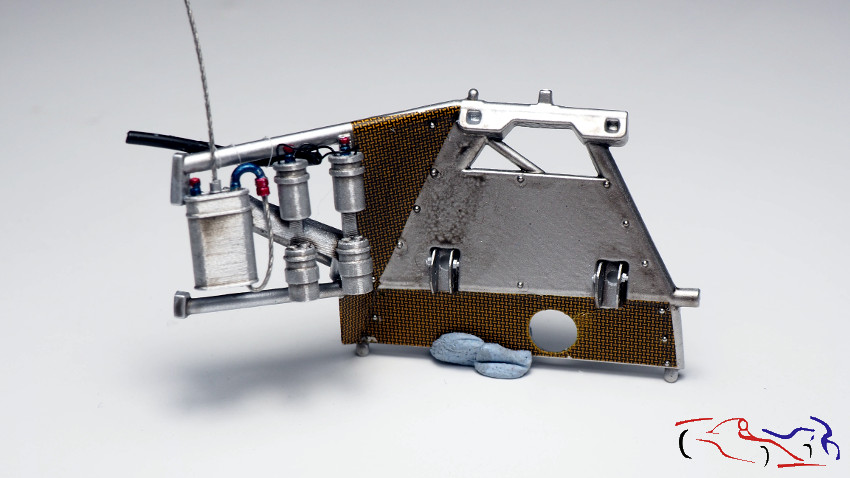 Para fijar este tubo de escape, y que no se caiga, le he puesto este tirante que tiene en sus extremos, unas láminas de aluminio con agujeros, a las que he fijado el tirante con tuercas. To fix this exhaust pipe, so that it does not fall, I have put this tie rod that has aluminum sheets with holes at its ends, to which I have fixed the tie rod with nuts. 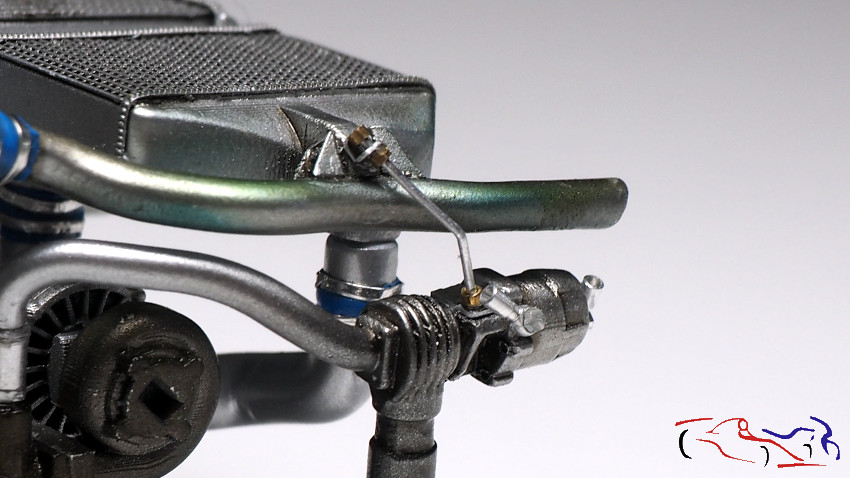 Más añadidos: este depósito que tiene un tubo de desagüe, y otro que va a la tapa de balancines. También se ve, la pieza de cobre con agujeros, que se encatga de sujetar los muelles del acelerador. More additions: this tank that has a drain tube, and another that goes to the rocker cover. It is also seen, the piece of copper with holes, which fits to hold the springs of the accelerator. 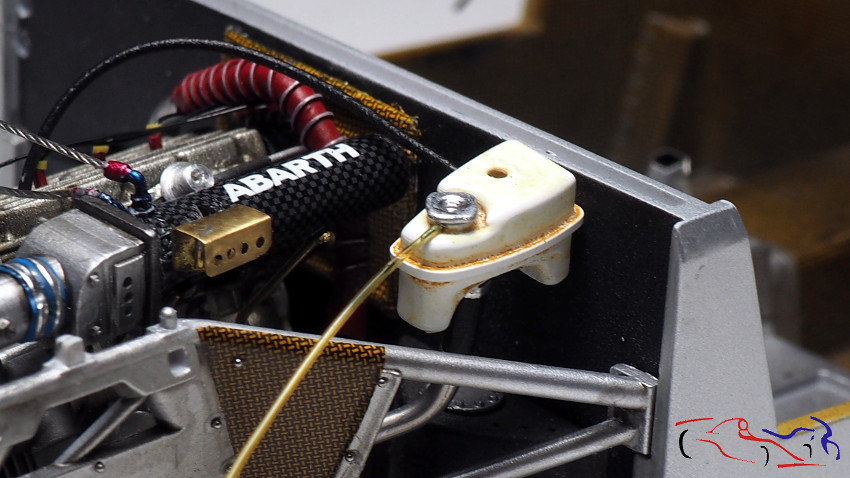 Otra vista del depósito: Another view of the tank: 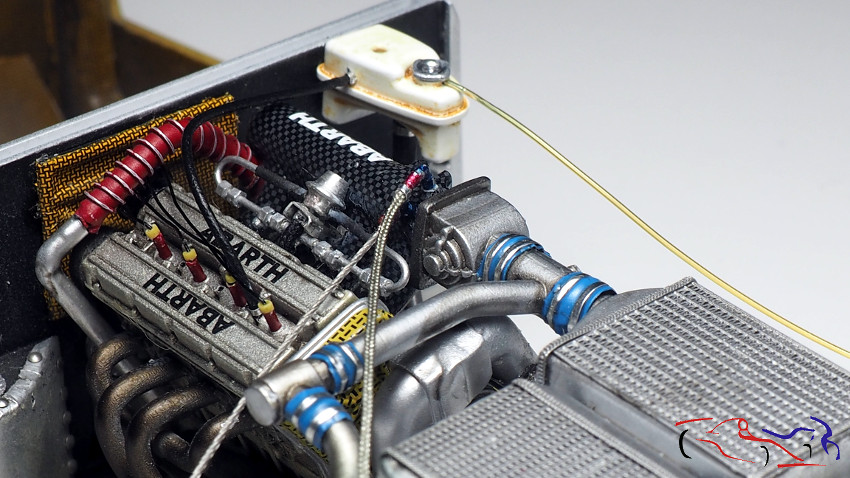 En la parte izquierda del motor y detrás del piloto, se situa la centralita, pieza de KMP que uso en lugar d ela del kit. La he pintado, le he puesto cables, la calca y unas fijaciones. On the left side of the engine and behind the pilot, the control unit is located, a KMP part that I use instead of the kit. I have painted it, I have put cables, the decal and some fixings. 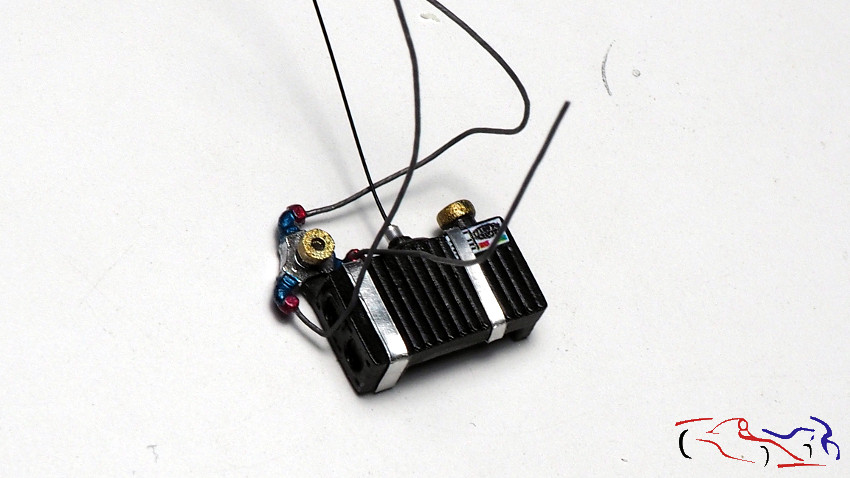 Y esta es la vista del chasis, con todo lo anteriormente dicho ya montado, y con la pieza transparente: And this is the chassis view with all previous mentioned already glued and with the transparent piece: 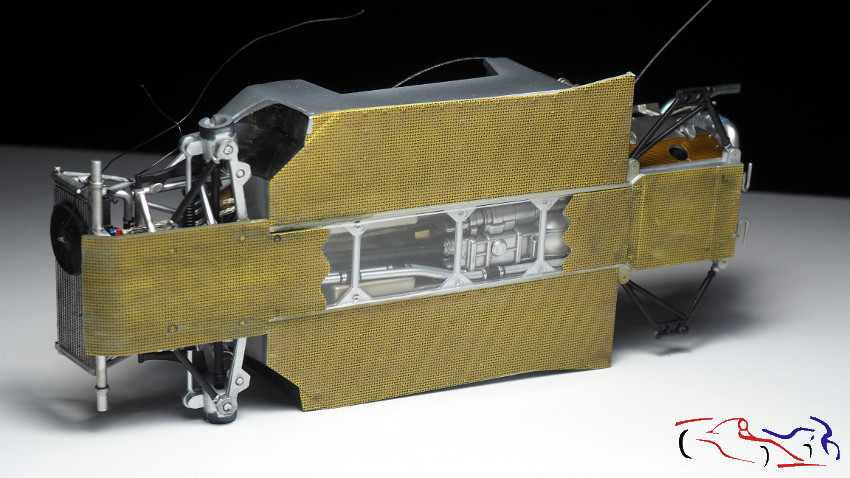 Más piezas: a la entrada de aire superior, le he añadido los tubos que hice anteriomente, y que sirven para airear el motor. More parts: to the upper air intake, I have added the tubes that I made previously, and that serve to aerate the engine. 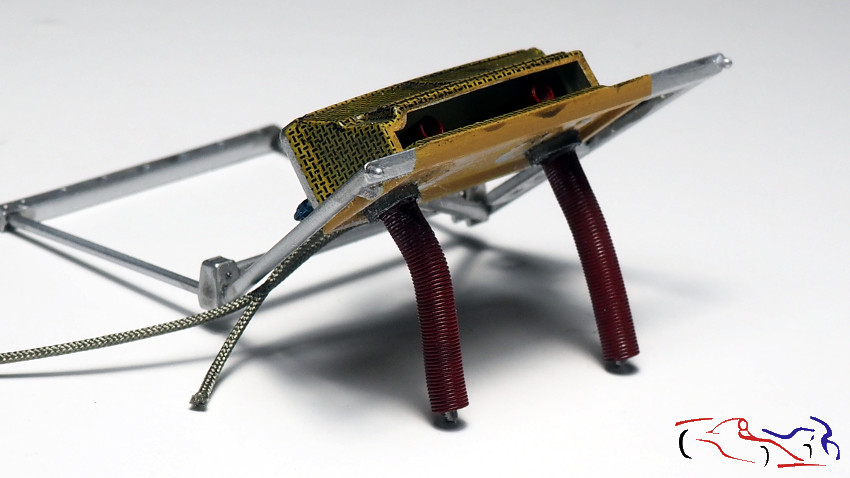 Pasamos a la amortiguación trasera. Vemos arriba a la izquierda, la pieza de KMP que usaré como base de la suspensión y del disco de freno. Vemos varios tubos de latón que he cortado para sustituir los d ela pieza original, en blanco en la foto. Los circulos de latón están soldados al tubo, y servirán para encajar los amortiguadores en la pieza de KMP. We move on to the rear shock. We see above on the left, the KMP part that I will use as the base of the suspension and the brake disc. We see several brass tubes that I have cut to replace the original part, white in the photo. The brass circles are welded to the tube, and will serve to fit the shock absorbers into the KMP part.. 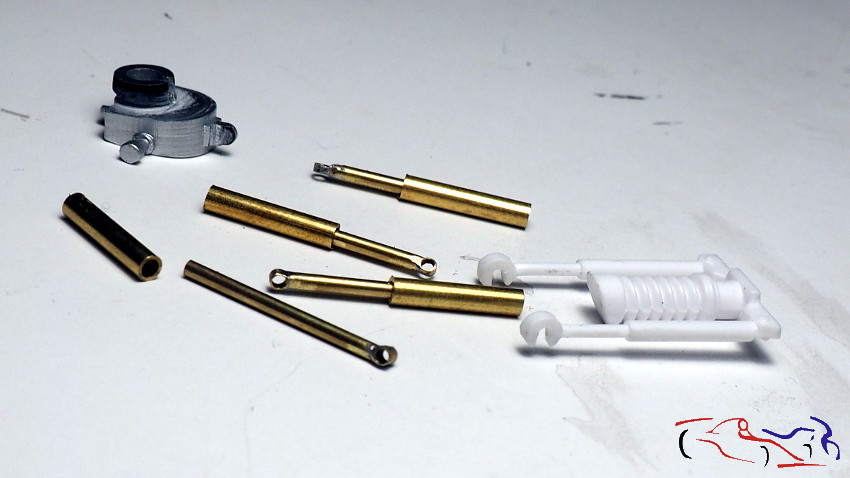 Para el muelle, usamos cable del mismo diámetro enrollado en un tubo. De éste obtendré los dos muelles necesarios. For the spring, we use cable of the same diameter wound on a tube. From this I will get the two necessary springs. 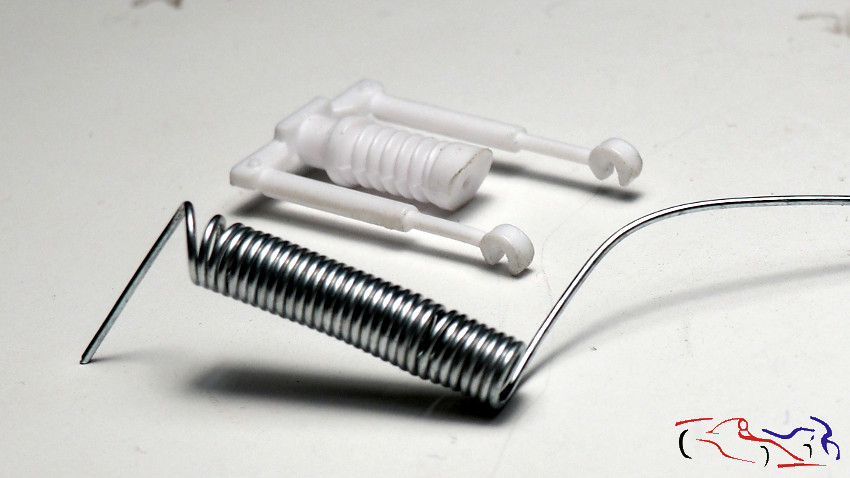 Para acoplar la pieza de KMP, le corto las fijaciones originales de los lados, y mediante unos agujeros en su lugar, introduzco un tubo de latón, que pego con cianocrilato. To attach the KMP piece, I cut the original fixings on the sides, and through some holes in their place, I insert a brass tube, which I glued with cyanoacrylate.  Y aquí tenéis una preinstalación de los amortiguadores, anclados al tubo de la pieza de KMP que sustituimos, que podemos comparar con la pieza original en blanco. And here is a pre-installation of the shock absorbers, anchored to the tube of the KMP part that we replaced, which we can compare with the original white part. 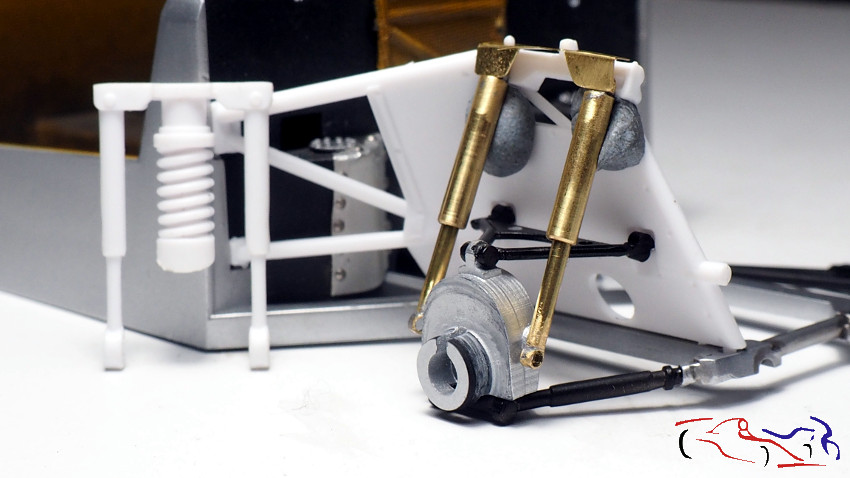 Vamos con más detalles. Al tubo que va por dentro del muelle, lo pongo en el minitaladro y lo araño con una lima, para simular las vueltas de la turca que fija el muelle. Después lo matizaremos con smoke diluido para dar profundidad. Lets go with more details. The tube that goes inside the spring, I put it in the mini-drill and scratch it with a file, to simulate the turns of the turkey that fixes the spring. Then we will clarify it with diluted smoke to give it depth. 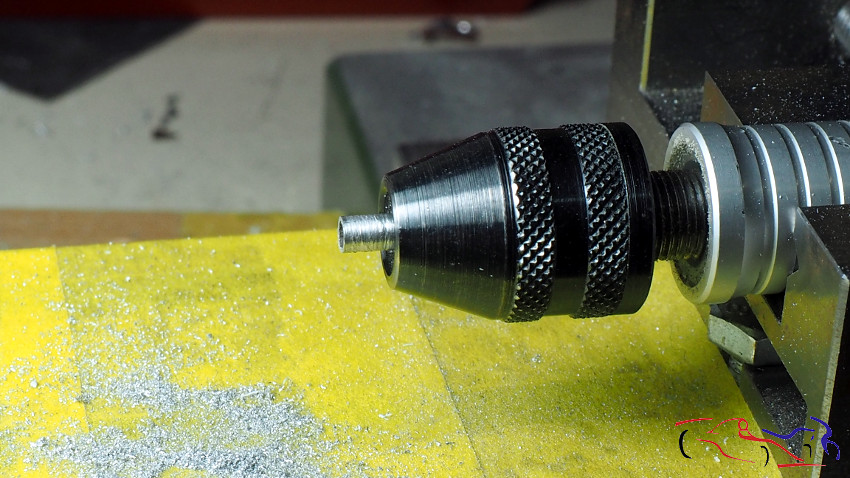 Pero tenía unas dudas respecto a la pieza supeior, donde van fijados los amortiguadores. Y para ello, fui haciendo piezas de plástico para al final, hacer la pieza de la derecha But I had some doubts about the upper part, where the shock absorbers are attached. And for that, I was making plastic pieces and, at the end, I made the piece on the right 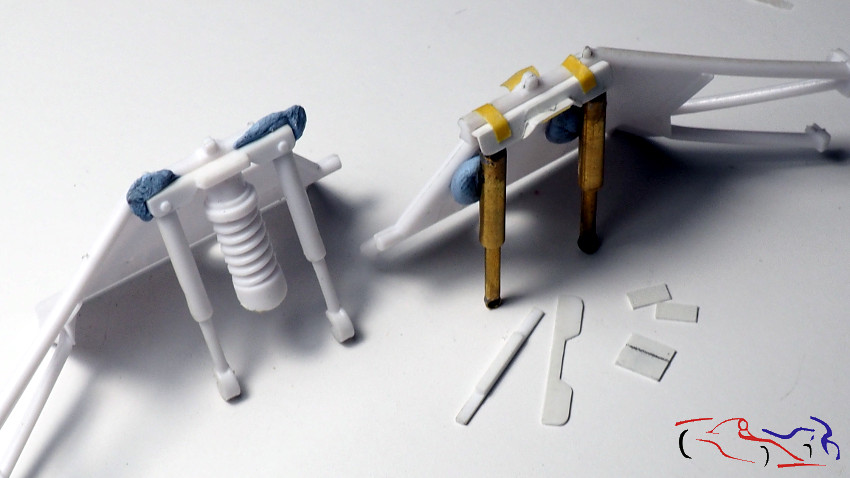 .y que aquí vemos colocada en su lugar, la pieza de la izquierda, y que podemos compararla con la original del kit: . and that here we see the piece on the left in place, and that we can compare it with the original of the kit: 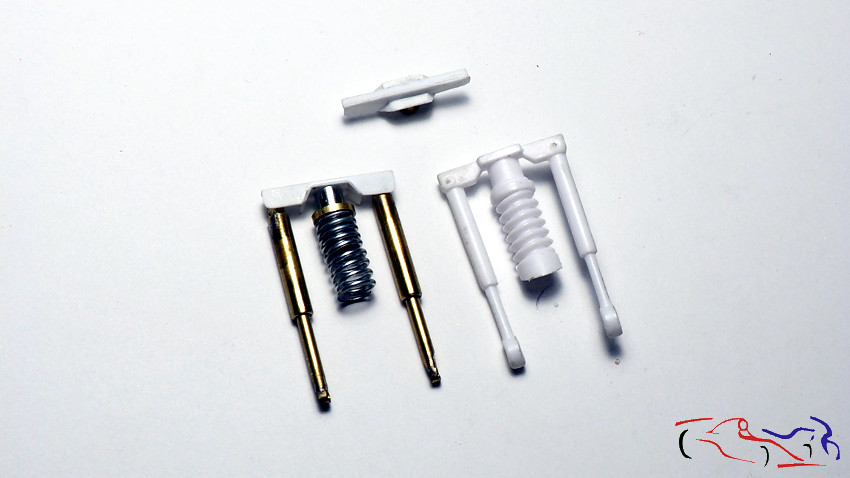 Y ahora, la comparamos también, pero la pieza fabricada ya está pintada. Decir que la parte metálica de abajo del amortiguador, es Bare Metal sobre el tubo de cobre. And now, we also compare it, but the manufactured part is already painted. Say that the metal part underneath the shock absorber is Bare Metal on the copper tube. 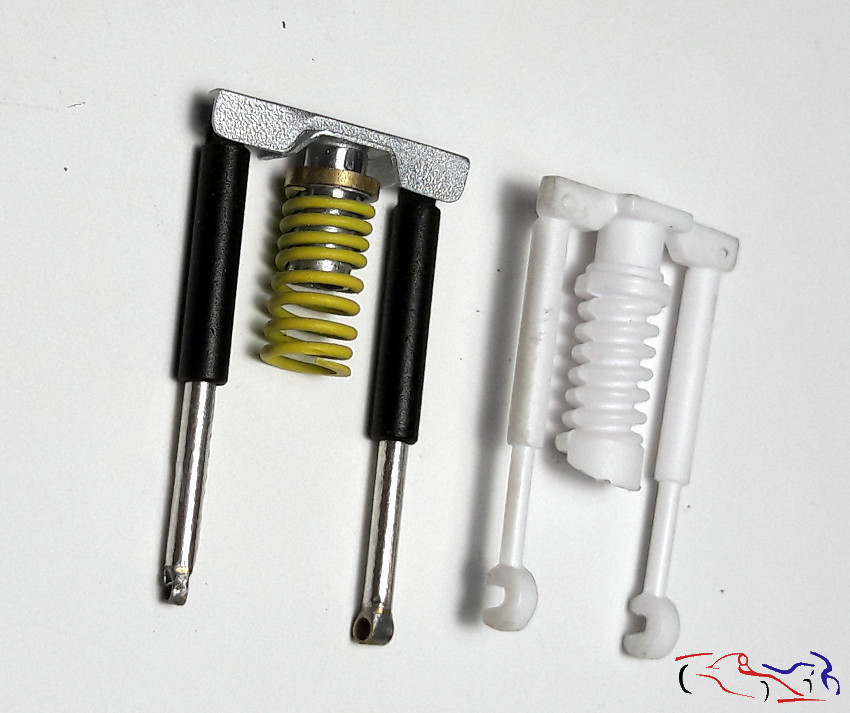 Y vamos poniendo más piezas, ahora en la parte delantera: Un depósito del diferencial delantero en negro (que torneé de aluminio) y las bombas d elos frenos, que se conectan con los botecitos que irán en ese espacio superior: And we are putting more pieces, now in the front part: A deposit of the front differential in black (that I turned from aluminum) and the brake pumps, which are connected with the little bottles that will go in that upper space: 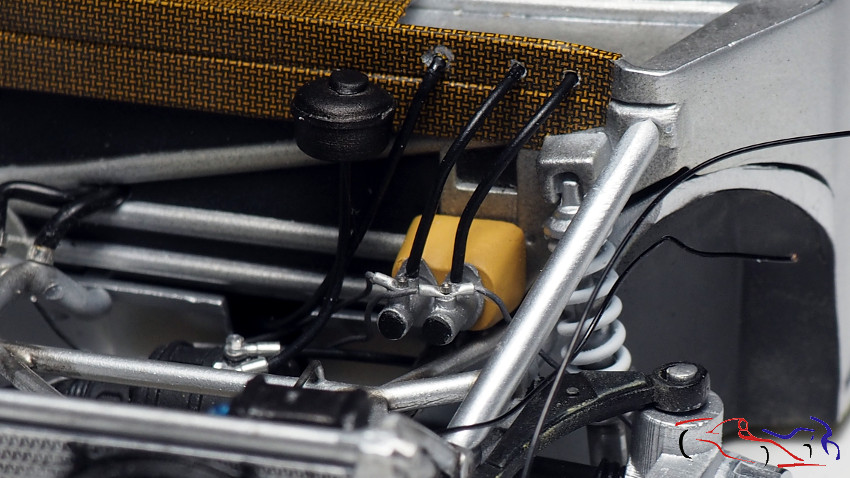 También vemos la batería, pieza de KMP, a la que puse los bornes de fotograbado, unidos a dos cables (uno negro (+) y un cable trenzado aplastado (-)), y una cinturón para la fijación de la misma. We also see the battery, a KMP part, to which I put the photo-etched terminals, attached to two cables (one black (+) and a flattened braided cable (-)), and a belt to fix it. 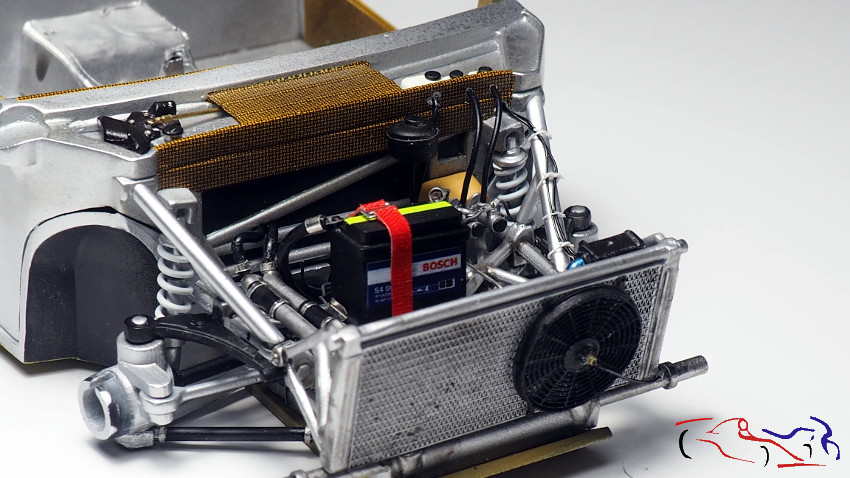 En esta foto, vemos también que los cables de la parte derecha en la foto, han sido conducidos por la barra de aluminio, y anudados con bridas hechas de plásticos estirado blanco. También vemos los depósitos en la parte derecha asuperior, y el motor de los limpiaparabrisas en la parte izquierda. In this photo, we also see that the cables on the right side in the photo, have been led by the aluminum bar, and knotted with ties made of white stretched plastics. We also see the deposits on the top right side, and the windshield wiper motor on the left side. 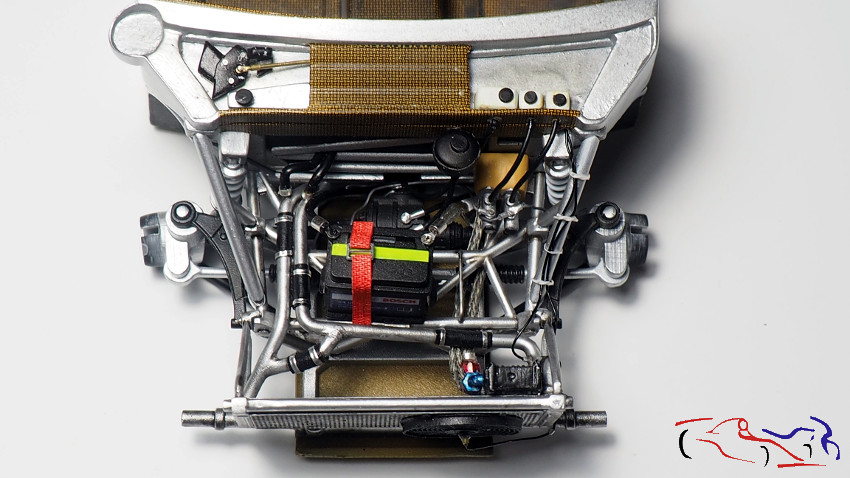 Ahora toca empezar a poner más piezas del motor, y del cockpit. Gracias por ver y comentar!! Now its time to start putting more parts of the engine, and the cockpit. Thanks for viewing and commenting!! |
|
|
|
|
| The Following User Says Thank You to JesusM For This Useful Post: |
Pettersson (09-16-2020)
|
|
09-16-2020, 02:12 AM
|
#69 | |
|
AF Regular

Join Date: Sep 2010
Location: Meerhout
Posts: 231
Thanks: 0
Thanked 25 Times in 25 Posts
|
Re: Lancia Delta S4 Marlboro Beemax 1/24
very nice build ,i love that
__________________
Do you think,I'm crazy |
|
|
|
|
|
09-16-2020, 10:18 AM
|
#70 | ||
|
AF Enthusiast
Thread starter
Join Date: Mar 2009
Location: Madrid
Posts: 649
Thanks: 109
Thanked 68 Times in 67 Posts
|
Re: Lancia Delta S4 Marlboro Beemax 1/24
Quote:
|
||
|
|
|
|
09-18-2020, 04:09 AM
|
#71 | |
|
AF Regular

Join Date: Feb 2006
Location: Parla - Madrid
Posts: 194
Thanks: 37
Thanked 30 Times in 27 Posts
|
Re: Lancia Delta S4 Marlboro Beemax 1/24
Really, an amazing work!!!
|
|
|
|
|
|
09-18-2020, 06:06 AM
|
#72 | ||
|
AF Enthusiast
Thread starter
Join Date: Mar 2009
Location: Madrid
Posts: 649
Thanks: 109
Thanked 68 Times in 67 Posts
|
Re: Lancia Delta S4 Marlboro Beemax 1/24
Quote:
|
||
|
|
|
|
09-19-2020, 03:27 AM
|
#73 | |
|
ItaloSvensk

Join Date: Mar 2009
Location: Marstrand
Posts: 3,383
Thanks: 1,077
Thanked 296 Times in 270 Posts
|
Re: Lancia Delta S4 Marlboro Beemax 1/24
very very nice build my Friend.
__________________
Paolo - LoveGT40 Modelworks website www.alsoldatino.com my YT channel : https://www.youtube.com/channel/UCIp..._as=subscriber FB: https://www.facebook.com/alsoldatino |
|
|
|
|
|
09-19-2020, 07:25 AM
|
#74 | ||
|
AF Enthusiast
Thread starter
Join Date: Mar 2009
Location: Madrid
Posts: 649
Thanks: 109
Thanked 68 Times in 67 Posts
|
Re: Lancia Delta S4 Marlboro Beemax 1/24
Quote:
|
||
|
|
|
|
10-01-2020, 02:23 AM
|
#75 | |
|
AF Enthusiast
Thread starter
Join Date: Mar 2009
Location: Madrid
Posts: 649
Thanks: 109
Thanked 68 Times in 67 Posts
|
Re: Lancia Delta S4 Marlboro Beemax 1/24
Seguimos con el Lancia Delta S4. En el anterior post, dejamos el motor colocado en el chasis, al cual le vamos a ir añadiendo más piezas. En la siguiente foto, vemos la pieza metálica que soportará el conjunto de la amortiguación, y a la izquierda, una serie de botes y cables que están unidos a la centralita que está por detrás, y antes del cortafuegos. Para los cables, cogí varias medidas y colores, y los estrechos, se hicieron con dos cables de estaño de 0,3 mm retorcidos entre si.
We continue with the Lancia Delta S4. In the previous post, we left the engine placed on the chassis, where we are going to add more parts. In the next photo, we see the metal piece that will support the damping assembly, and on the left, a series of boats and cables that are attached to the switchboard that is behind, and before the firewall. For the cables, I took various sizes and colors, and the narrow ones were made with two 0.3 mm tin cables twisted together. 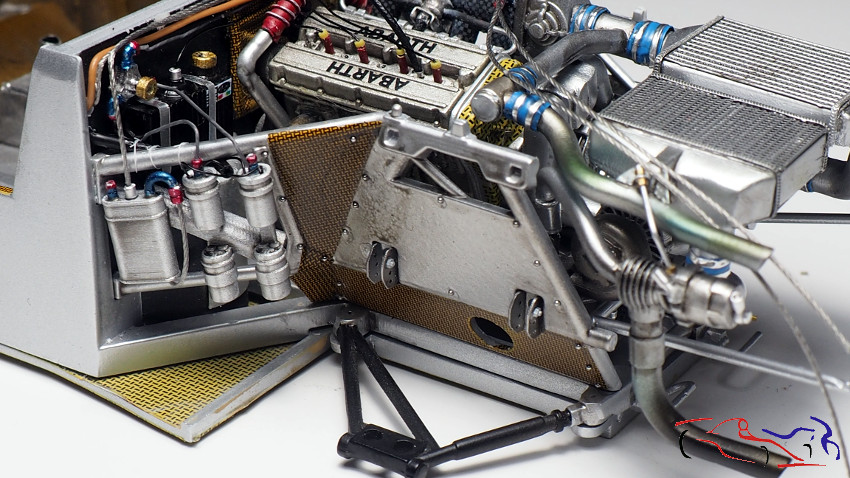 En la siguiente foto, vemos esos cables desde otra perspectiva. A su vez, esos cables que van a lo largo del cortafuegos. In the next photo, we see those cables from another perspective. In turn, those cables that go along the firewall. 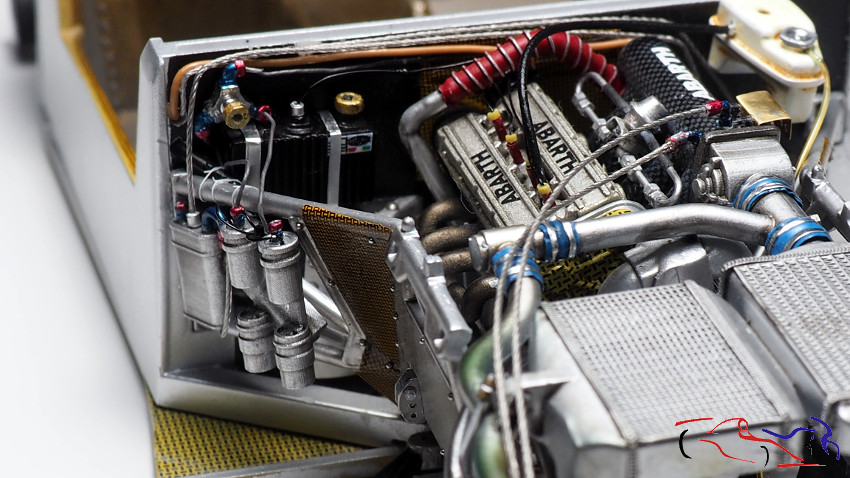 Esta es la vista desde el lado contrario, con la pieza metálica. Decir, que todas estas piezas ya han sido comentadas previamente cuando las fue haciendo. This is the view from the opposite side, with the metal part. Say, that all these pieces have already been previously commented when I was making them. 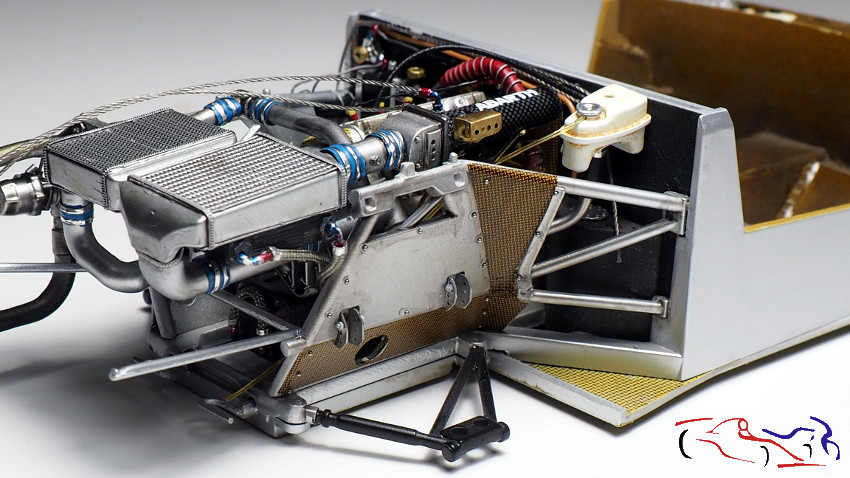 Siguiente paso, es colocar los conjuntos de amortiguador construidos por mi, y que sustituyen a los originales del kit. Dichos conjuntos están explicados en el anterior post. Next step is to place the shock absorber assemblies built by me, which replace the original ones in the kit. These sets are explained in the previous post. 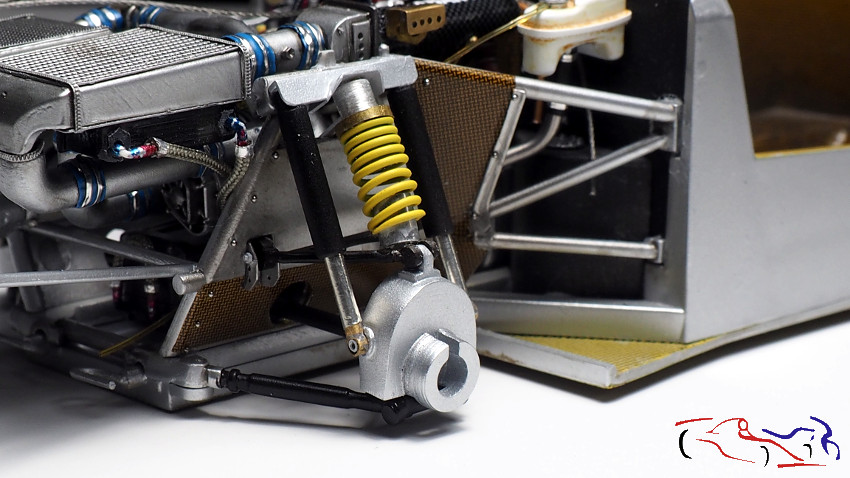 Aquí vemos el conjunto del otro lado: Here we see the set of the other side: 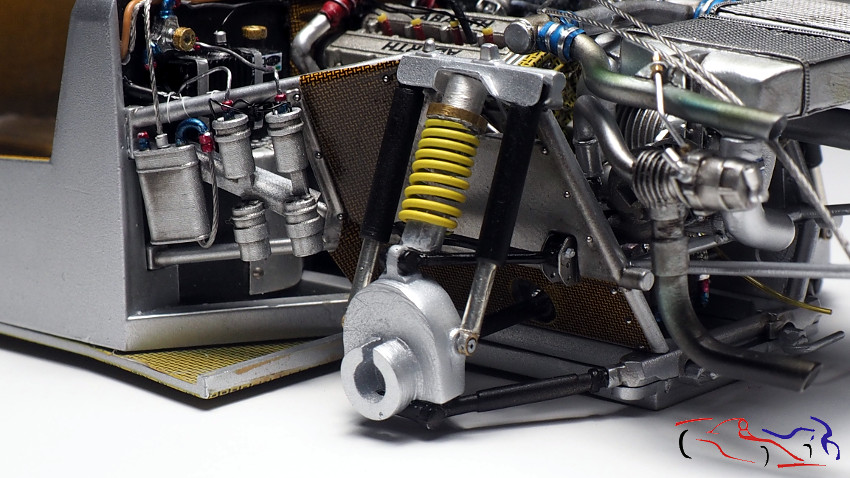 El siguiente paso es colocar el cristal del cortafuegos, y el conjunto superior con las barras metálicas, la entrada de aire y el filtro refrigerador del aceite que va en la parte superior, así como la entrada de aire del turbo con su filtro. Este conjunto lo pegué con ciano fuertemente porque al haber añadido o modificado muchas piezas, algunos puntos de unión no coincidían. The next step is to place the firewall glass, and the upper assembly with the metal bars, the air inlet and the oil cooler filter that goes in the upper part, as well as the turbo air inlet with its filter. I glued this set with cyano strongly because having added or modified many pieces, some joining points did not fit. 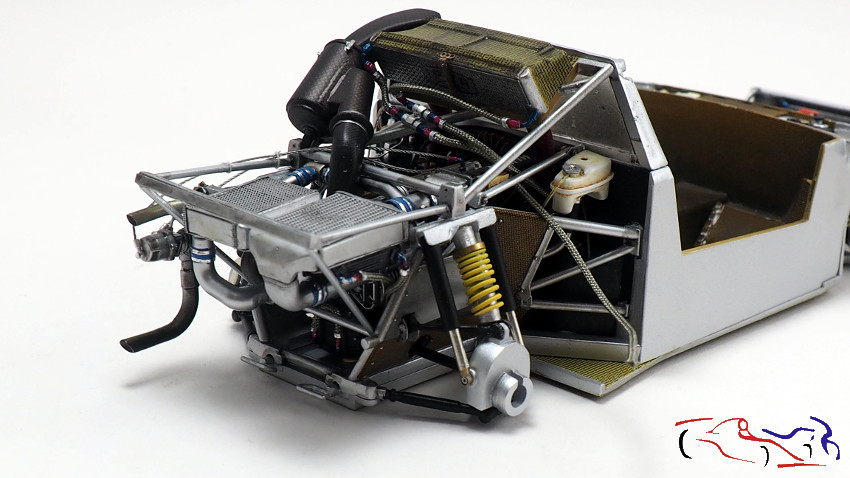 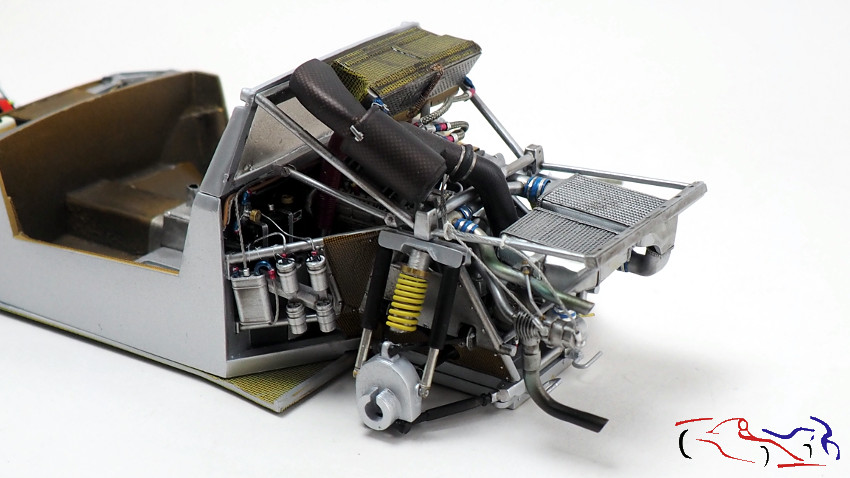 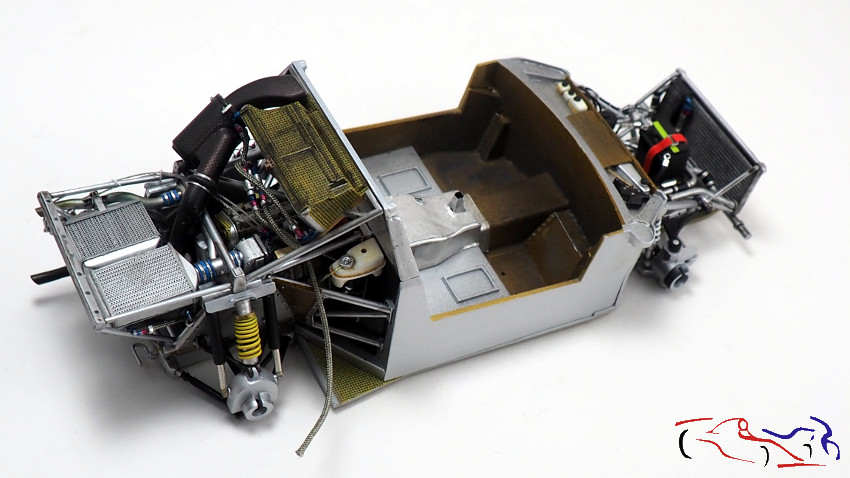 En las siguientes fotos, vemos en detalle distintas vistas del motor: In the following photos, we see in detail different views of the engine: 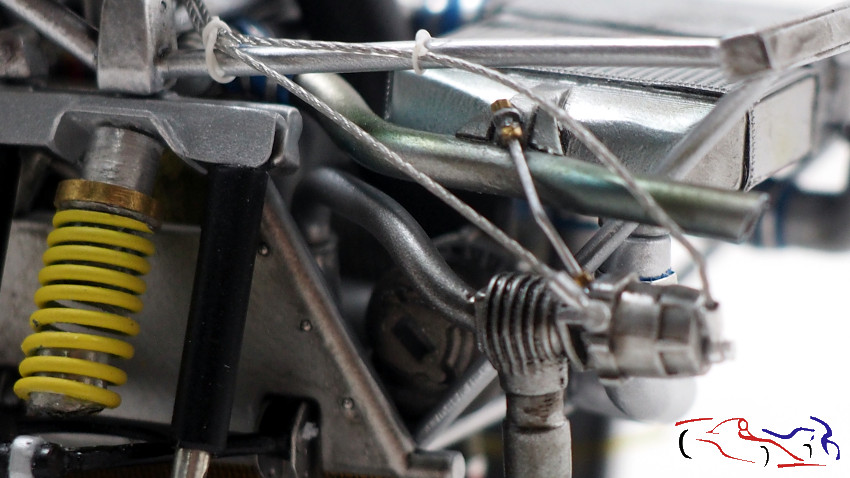 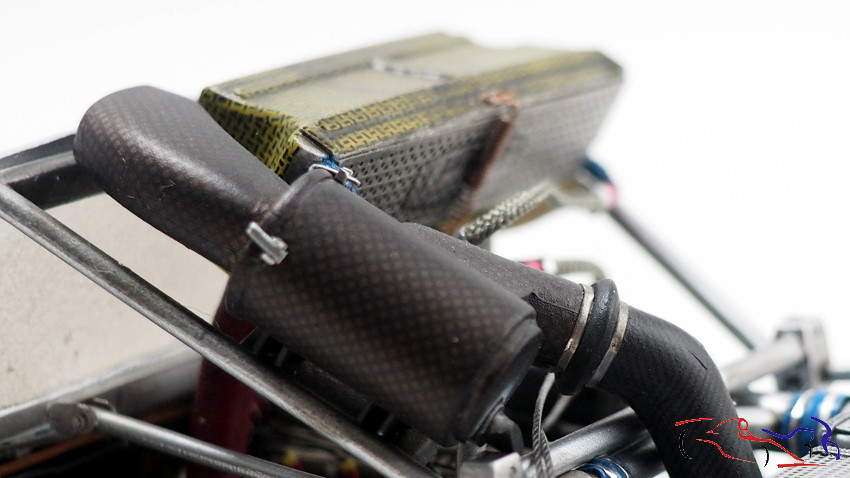 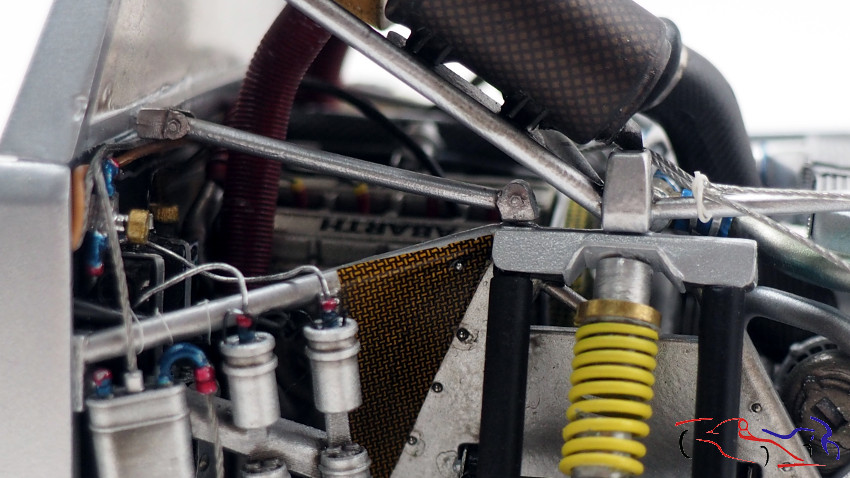 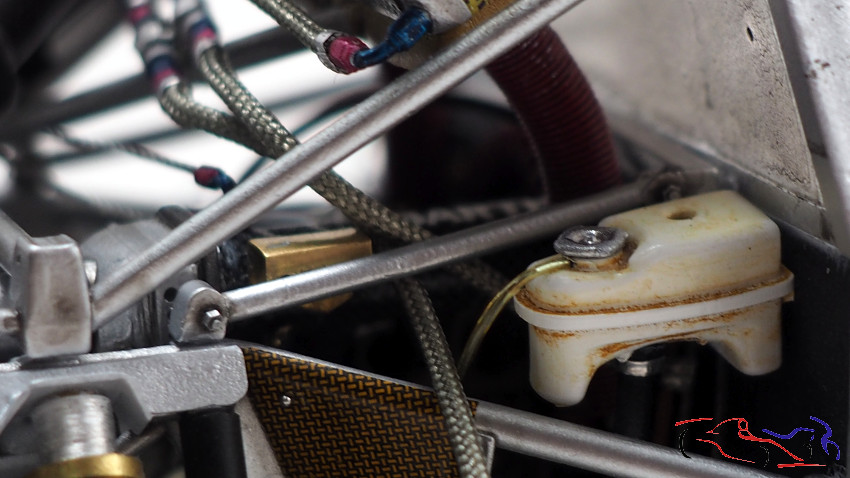 También se ha ensuciado ligeremente todo el conjunto con un lavado de color arena de AK, que una vez semiseco, se eliminó lo superficial con un bstoncillo, quedándose el color en las esquinas y bordes: The entire set has also been lightly soiled with a sand-colored wash from AK, which once semi-dry, the surface was removed with a small brush, leaving the color in the corners and edges: 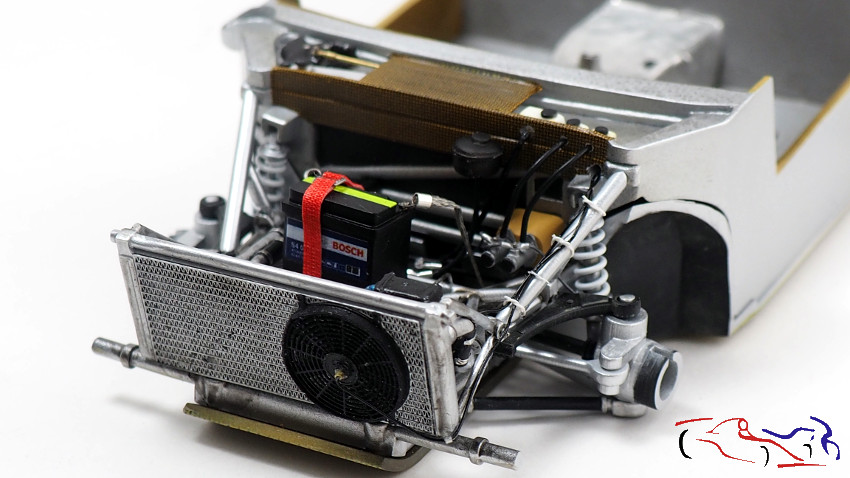 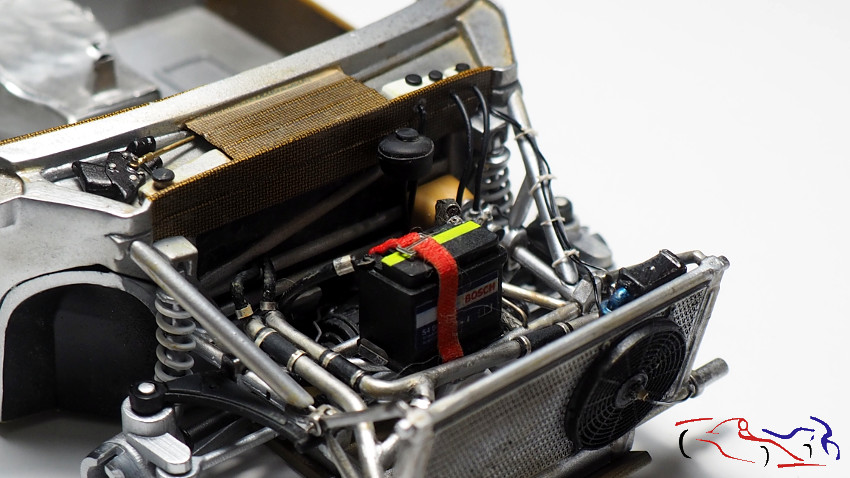 Siguiente paso fue colocar el silencioso con el tubo de escape: Next step was to place the silencer with the exhaust pipe: 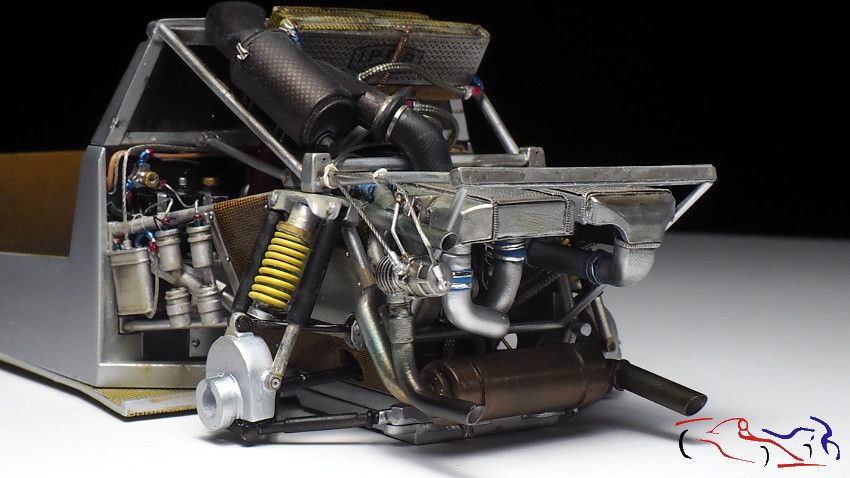 Vemos dentro de la toma de aire del techo, los dos tubos que sirven para refrigerar los frenos traseros: We see inside the roof air intake, the two tubes that serve to cool the rear brakes: 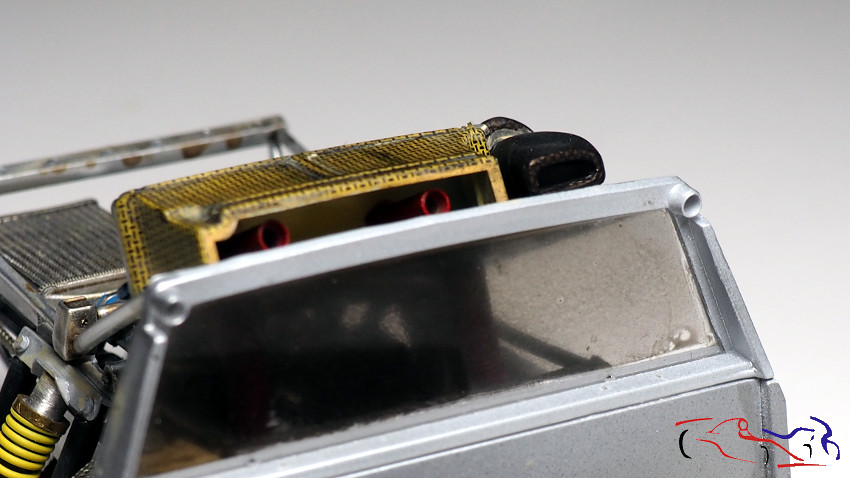 Ahora, el siguiente paso es terminar el salpicadero. Muchas piezas del fotograbado de HD, que nos harán dar un toque muy real al mismo. Una vez separadas del soporte, las coloco por color definitivo en sus soportes: Now the next step is to finish the dashboard. Many pieces of HD gravure, which will make us give it a very real touch. Once separated from the support, I place them by final color on their supports:  Viendo el detalle, la mayor parte de los pulsardores estaban formados por dos piezas que una vez pegadas daban volumen. Pero el problema es pegarlas porque son muy pequeñas, tener que hacerlo con ciano, y separadas del salpicadero para poder pintarlas aparte. Por lo que decidí cortar trocitos de plástico, del mismo grosor que las dos piezas del fotograbado, e irlas probando directamente en el salpicaderos para comprobar su tamaño: un trabajo pesado!! Looking at the detail, most of the pulsators were made up of two pieces that once glued together gave volume. But the problem is to stick them because they are very small, having to do it with cyano, and separated from the dashboard to be able to paint them separately. So I decided to cut pieces of plastic, the same thickness as the two pieces of the gravure, and test them one by one directly on the dashboard to check their size: a heavy job! 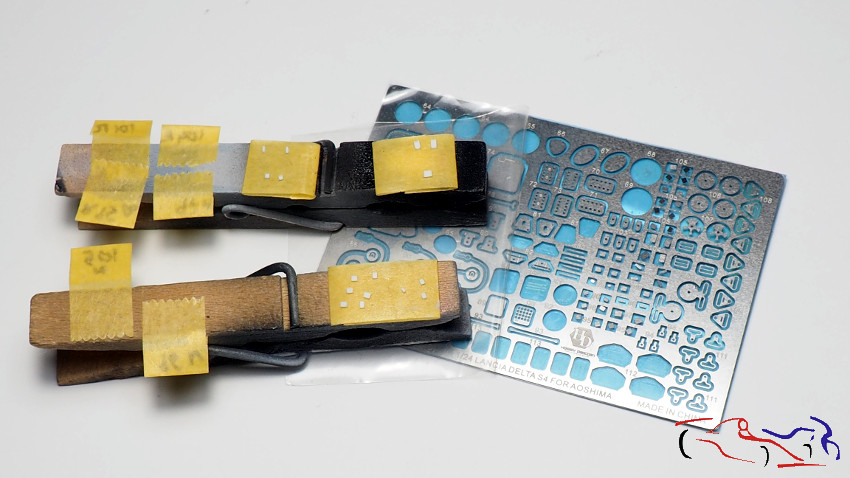 Y aquí, tenemos todas las piezas en sus soportes, imprimadas y pintadas: And here, we have all the pieces in their supports, primed and painted: 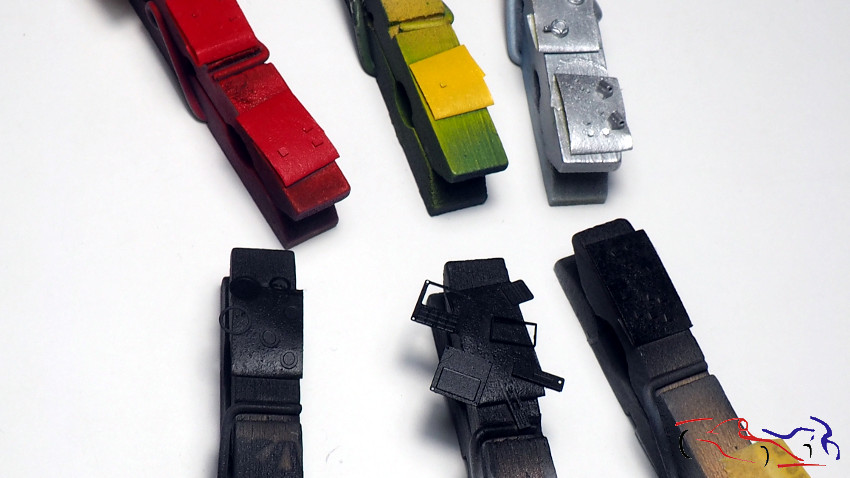 Y aquí, ya todo pegado en su sitio. LAs piezas grandes las pegué con ciano, y las pequeñas con cola blanca. Use las calcas del kit, poniéndolas encima del fotograbado: And here, everything is already in place. I glued the large pieces with cyano, and the small ones with white glue. Use the decals from the kit, putting them on top of the etched: 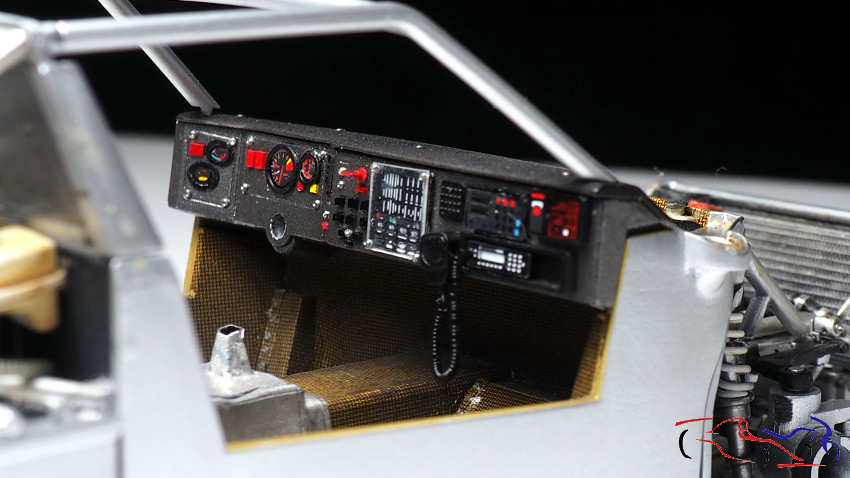 En el caso de la caja de los fusibles, la base son dos fotograbados superpuestos (el superior tenía una ventana para qe se viera la parte de debajo), y el problema era que solo tenía una calca con todo. Por lo que corté la calca en dos, pegué cada parte en su fotograbado, y después, los pegué entre ambos. Y lo iba a pegar pero en el coche Marlboro original, estos fisibles estaban recubiertos por una plancha de metacrilato. Por tanto, cogí la hoja de Evergreen transparente más fina, la recorté y al superpuse, para hacer los agujeros de las esquinas para introducir los tornillos. Una vez terminado, lo pegué con cola blanca. Destacar que no he pulido los cantos para que se vea que es un trozo de plástico y no de cristal. También se ve el corta corriente en el centro del salpicadero, y los muchos tornillos del set de fotograbado de HD. Decir que a todos los pulsadores y los relojes, tienen una capa de barniz brillante por encima. In the case of the fuse box, the base is two superimposed photo-etched parts (the upper one had a window so that the bottom part could be seen), and the problem was that i only had one decal for both parts. So I cut the decal in two, glued each part on its photoetch, and then glued them between the two. And I was going to glue it but in the original Marlboro car, has these fissures covered by a sheet of methacrylate. So I took the thinnest transparent Evergreen sheet, trimmed it and overlapped it, to make the corner holes for the screws. Once finished, I glued it with white glue. Note that I have not polished the edges to show that it is a piece of plastic and not glass. Also visible is the circuit breaker in the center of the dash, and the many screws from the HD gravure set. Say that all pushers and watches have a layer of glossy varnish on top. 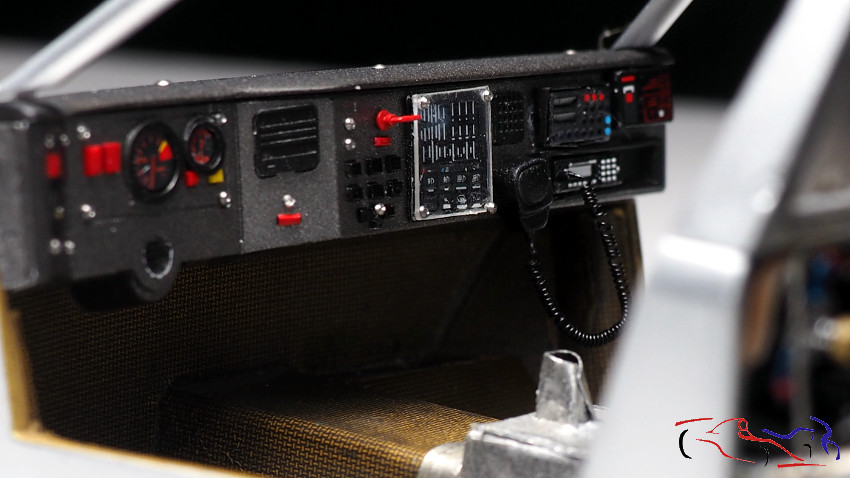 Pasamos a otras piezas de scratch del motor: los cables que sujetan los bujes traseros para que no se separen del coche en caso de accidente. Aquí veis uno terminado y el despiece del otro: We turn to other scratch parts of the engine: the cables that hold the rear hubs so that they do not separate from the car in case of an accident. Here you see one finished and the breakdown of the other: 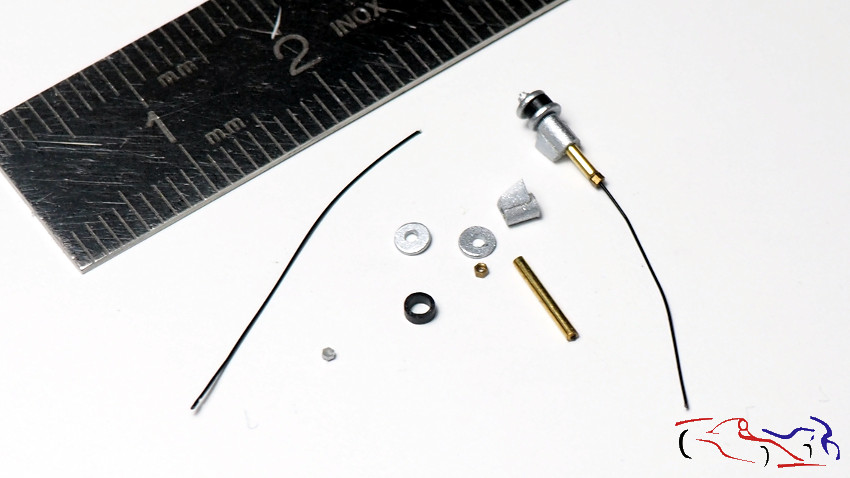 Y su posición en el motor. Vemos los tornillos de los amortiguadores ya puestos y el ensuciado con el lavado de color arena de AK: And its position in the engine. We see the damper bolts already in place and the one soiled with AKs sand-colored wash: 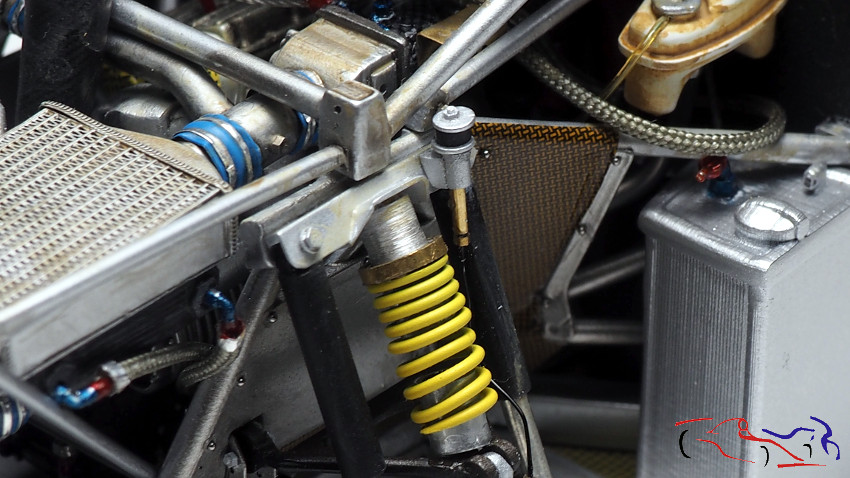 Y más a la derecha, el deposito de aceite del coche, pieza del tk de KMP (le falta conectar un par de tubos: And further to the right, the cars oil tank, part of the KMP tk (I still need to connect a couple of pipes: 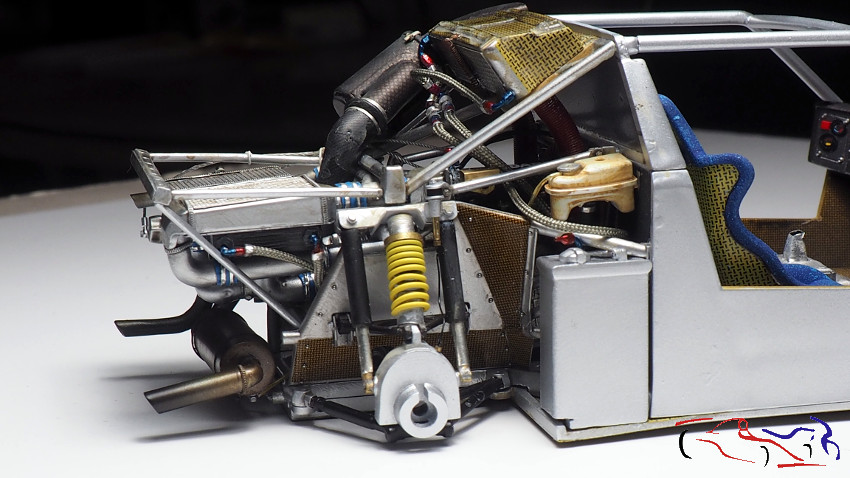 Y uno de esos tubos, es el que hago a continuación con tubo termoretráctil, estaño para el interior, y alambre muy delgado rodeándolo de principio a fin. Después, habrá que imprimarlo, pintarlo de un tono naranja y rasparlo por encima, para que el color del alambre aparezca: And one of those tubes is the one that I make below with heat shrink tubing, tin for the inside, and very thin wire surrounding it from beginning to end. Afterwards, it will have to be primed, painted an orange tone and scraped over, so that the color of the wire appears: 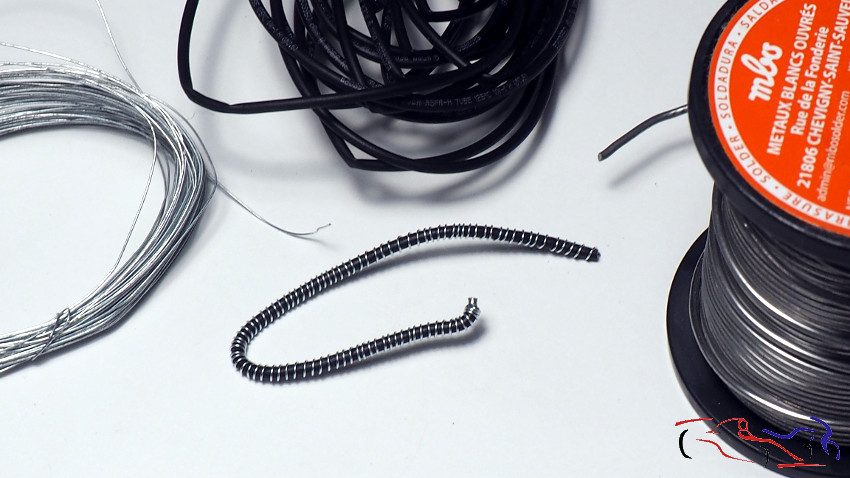 Gracias por ver y comentar!! Thanks for viewing and commenting!! |
|
|
|
|
|
|
POST REPLY TO THIS THREAD |
 |
|
|


