

|
| Search | Car Forums | Gallery | Articles | Helper | Air Dried Beef Dog Food | IgorSushko.com | Corporate |
|
| Latest | 0 Rplys |
|
|||||||
| WIP - Motorsports Post topics for any "Work In Process" motorsports vehicles in this sub-forum. |
 |
 Show Printable Version | Show Printable Version |  Email this Page | Email this Page |  Subscribe to this Thread
|
|
|
Thread Tools |
|
|
#571 | |
|
AF Regular
Join Date: Aug 2013
Location: australia
Posts: 333
Thanks: 35
Thanked 16 Times in 16 Posts
|
Re: 1/8 Porsche 935/78 'Moby Dick'
great work so far! incredible!
i have a few ideas for the texture. I'm not sure if it would be suitable but might be worth looking at. I have used a few 'anti chip' paints used on real cars, the one i used came with a special nozzle which attached to the compressor which basically splattered the paint on as it is thich stuff. Its usually used under front bumpers and side skirt under the doors so stones dont chip the paint. it might also be available in pressure packs? also, another idea like using sand paper is anti slip or grip tape, found in hardware or marine stores. it is generally a self adhesive tape. |
|
|
|

|
|
|
#572 | |
|
AF Enthusiast
Thread starter
Join Date: Nov 2008
Location: Norwich
Posts: 671
Thanks: 23
Thanked 116 Times in 91 Posts
|
Re: 1/8 Porsche 935/78 'Moby Dick'
Thanks guys - I was hoping that my last post would get you all thinking!
I was looking at a spray or paint-on technique first mainly because of the shape of the intercooler housings - as well as the main part to cover, you've got the three connecting pipes to the inlet manifolds, plus the pipes which run to the turbos. The sandpaper technique could work on the main body, but I might struggle to adapt it to the pipework. The caster sugar idea isn't bad, either. I actually thought of something similar at the weekend, when we were making pizza - semolina! Fine, granular, and smaller than the (new) glass blasting beads. I'm certainly going to invest in a new can of photo-mount before I do any more test pieces, as I'm sure that will help. I've got a variety of sandpaper sheets already, so I'll do some painting samples with those to see the results. Maybe I'll end up using a combination of techniques...? I had a look at RobRex's 935 build thread too - he got the sort of effect I'm looking for, but didn't really explain how! I know he used a lot of microballoons on the fibreglass parts, but I'm not sure about the intercoolers. Right, more testing required! Thanks once again, SB |
|
|
|

|
|
|
#573 | ||
|
AF Newbie
Join Date: May 2016
Location: Athens
Posts: 62
Thanks: 6
Thanked 7 Times in 7 Posts
|
Re: 1/8 Porsche 935/78 'Moby Dick'
Quote:
 |
||
|
|

|
|
|
#574 | |
|
AF Regular
Join Date: Aug 2009
Location: Anahiem, California
Posts: 217
Thanks: 5
Thanked 38 Times in 31 Posts
|
Re: 1/8 Porsche 935/78 'Moby Dick'
When trying to simulate a cast texture military modelers brush the plastic with strong liquid cement and let it soften the plastic then use a stiff bristled brush in a stippling effect to create a texture. Maybe this would work. Or there is always Scale Motorsports Fuex Fabric in the spray can.
|
|
|
|

|
|
|
#575 | |
|
AF Enthusiast
Join Date: Feb 2006
Location: Salonica
Posts: 1,336
Thanks: 138
Thanked 111 Times in 106 Posts
|
Re: 1/8 Porsche 935/78 'Moby Dick'
My two cents on this conversation.
I think that the easiest way to go is the fabric spray paints. They give nice texture when sprayed from distance and is ideal for 1/2 - 1/8. Also you can add more coats for more texture if you want. Τenco and Scale Motorsport give us these kind of paint. Grey and black from both and red only from SM. I made, years ago, a tutorial in Greek.  Some photo which included maybe can help you . Some photo which included maybe can help you .http://www.scalewheels-gr.com/thread/159/ Hope it helps, especially because you use sprays often... |
|
|
|

|
|
|
#576 | ||
|
AF Enthusiast
Join Date: May 2009
Location: Tucson, Arizona
Posts: 1,469
Thanks: 12
Thanked 126 Times in 120 Posts
|
Re: 1/8 Porsche 935/78 'Moby Dick'
Quote:
Also Tamiya makes some "asphalt" and "concrete" diorama paints that I have used to simulate on 1/12 - you would have to test it to see if it would be applicable - the Tamiya diorama paints are acrylic paints with ground ceramic to give the "cast" texture effect. they cost about $12-15 usd each and are about 100mL bottles. and can be applied with a brush like you enjoy using. Hope this is of help Cheers John |
||
|
|

|
|
|
#577 | |
|
AF Newbie
Join Date: Jan 2011
Location: dumbledore
Posts: 60
Thanks: 2
Thanked 3 Times in 3 Posts
|
Re: 1/8 Porsche 935/78 'Moby Dick'
I recently saw something like those textured paints in a local DIY store (duplicolor probably) something stone effectish. I was thinking of trying it for 1/12 dashboards, but haven't bought the can yet - it's around 12€ so probably 8-10 GBP. They (dupli..) also do something like "velvet" - but I haven't seen the can in the flesh yet. For the stone types (there are several) you get an impression of the effect on the cap.
It might be the right size for your cam covers. Maybe add a generous wet coat of black or something on top to even out the dips between the sand grain like structure thingies and maybe lightly sand it again to even out the peaks, too, then follow up with another, this time light, coat of paint / colour. May not have been Dupli-color - I need to check the pic I took on my phone, but it's something like this: https://s-media-cache-ak0.pinimg.com...be72837caf.jpg |
|
|
|

|
|
|
#578 | |
|
AF Enthusiast
Thread starter
Join Date: Nov 2008
Location: Norwich
Posts: 671
Thanks: 23
Thanked 116 Times in 91 Posts
|
Re: 1/8 Porsche 935/78 'Moby Dick'
Outstanding, everyone - thanks again!
I tried to post this one last week before going to Le Mans, but the forum was acting-up a bit. Now I'm back and have the rest of the day off, I'll do the update. Seriously, lots of great suggestions there - and several different ways of (hopefully) getting the desired effect. Before leaving for France I picked up a few more supplies locally: 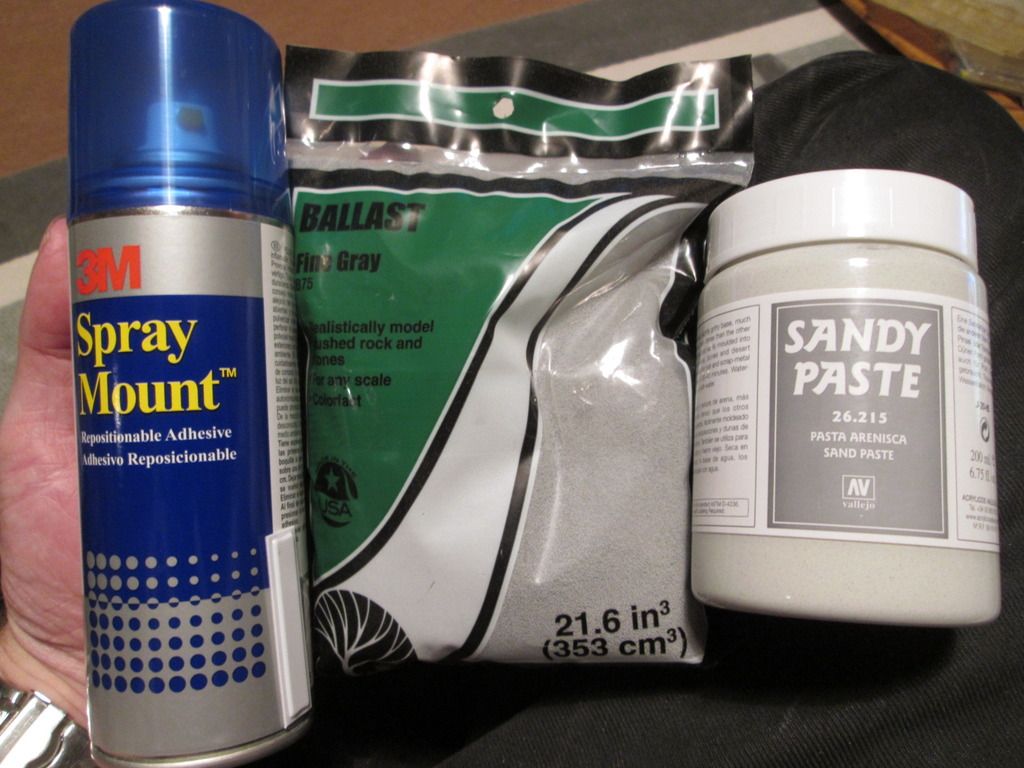 A new can of 3M spray-mount, some fine ballast from Woodland Scenics, and a pot of 'Sandy Paste' from Acrylicos Vallejo. I made up some more test-pieces - the new can of spray-mount certainly sprayed better than the old one I had used earlier, but didn't produce enough texture for the dry-brushing to pick out. It didn't stick too well, either - I did this batch of tests using the new fine ballast, and it simply rubs off at the lightest touch. Okay - I could try spraying something on afterwards to seal it in place, but I'm not overly optimistic... On the other hand, the new fine ballast does work well with PVA glue - see below, left. The 'Sandy Paste' is, as the name suggests, a fine sandy paste which can be painted-on as required - see below, right: 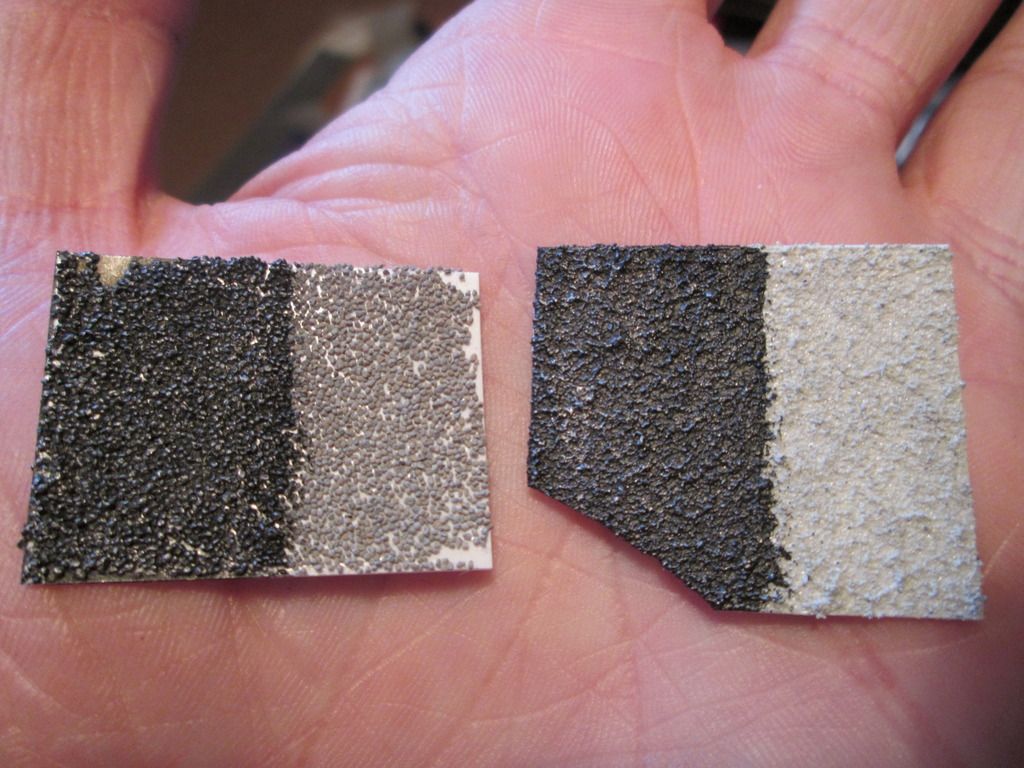 Right now I'm most excited by the sandy paste - I stippled it onto the test piece of styrene but wasn't impressed by the coverage at first. However I think the first coat gave the next coats something better to 'key' to, and after three applications I had the finish you see here. I'm going to try giving it a light sanding-down to remove any obvious high spots, but even as shown I think it will work. Overall, this has been a useful exercise for me - those of you who have followed my recent projects will probably agree that although I might try various ways of making the parts, I don't experiment with textures too much. This doesn't mean I'm going to be texturing everything in sight, but I'm certainly thinking about how I can use some of these ideas on other parts - brake calipers, perhaps, maybe some of the turbo parts? We'll see. Okay - now for a little tidying-up. Next, here's a close-up of the two little unknown intercooler valve-things, with some extra detailing added: 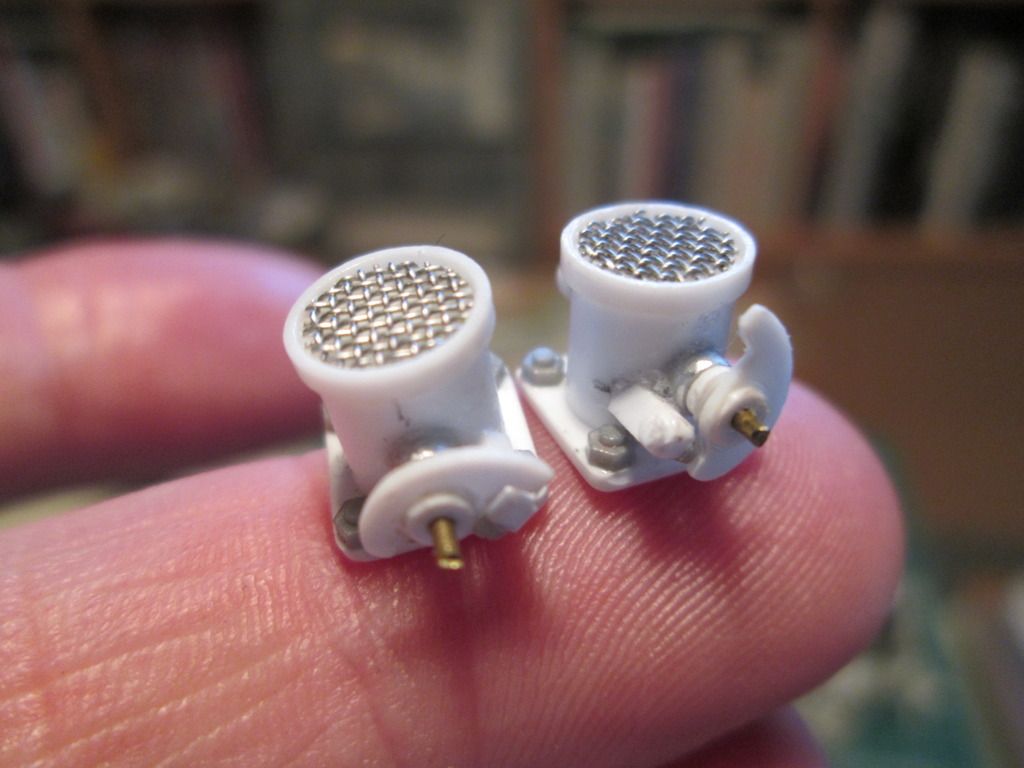 Finally made the clutch lever for the gearbox, too: 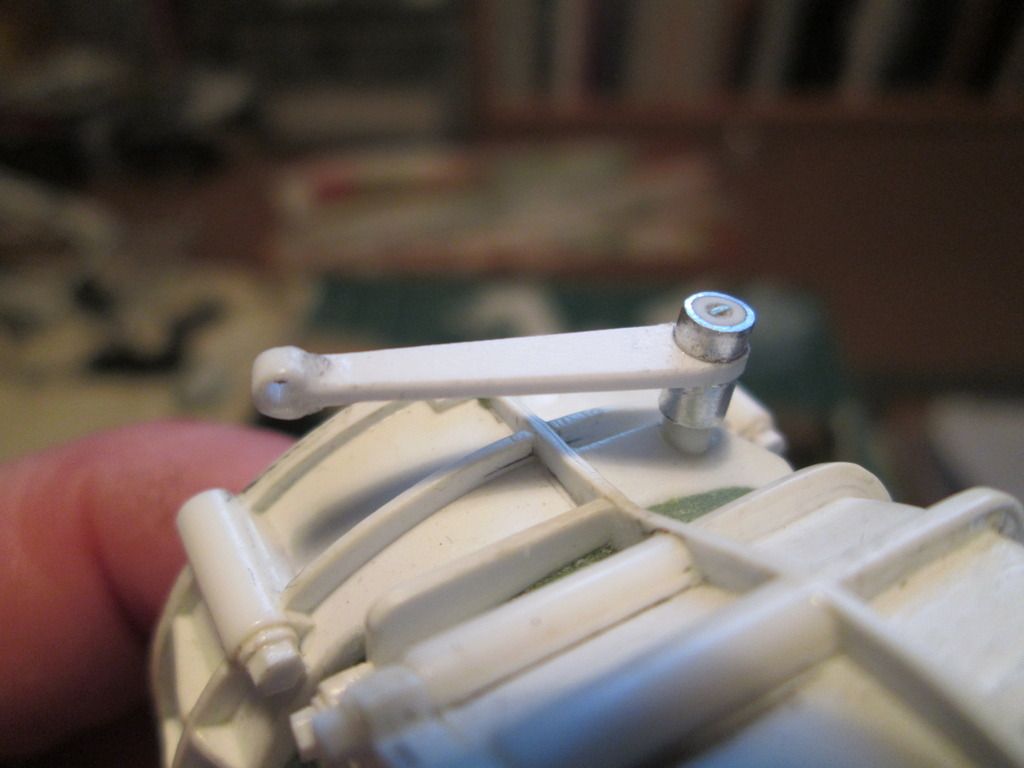 The other major project of the last couple of weeks has been back in the cockpit, working on the pedal-box area. In the photo below you can see I've added a large footrest which is pinned to a bracket on the floor, and will eventually be glued to a larger bracket hanging from below the front firewall. Getting this upper bracket right was a major pain - I couldn't do it with the parts in place, so I had to position everything, mark-up, dis-assemble, re-position using the marks, glue, then re-re-assemble to check the fit! Of course, it took maybe three or four attempts to get this done to my satisfaction... 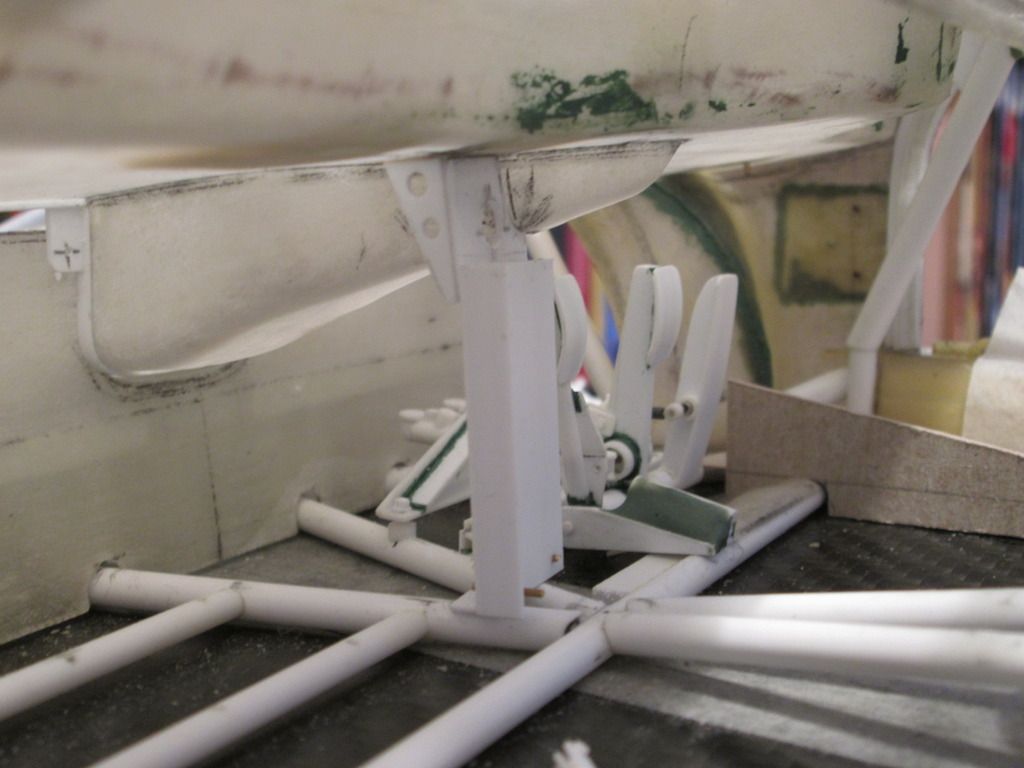 To the right of the footrest you can see the stay which supports the end of the pedal assembly and also shrouds the clutch cable. Either side of this there will be small fibreglass panels to give the driver somewhere to put his feet. Further right you can see a vertical cardboard panel - this is the start of a section which will eventually run down the right-hand side back to the seat, and which covers the throttle cable and also shrouds some of the pipework from the nose of the car as it runs through the cockpit. Not too many photo references for this, unfortunately, so I'm making it as best I can to fit the layout. Here's the same area a little later: 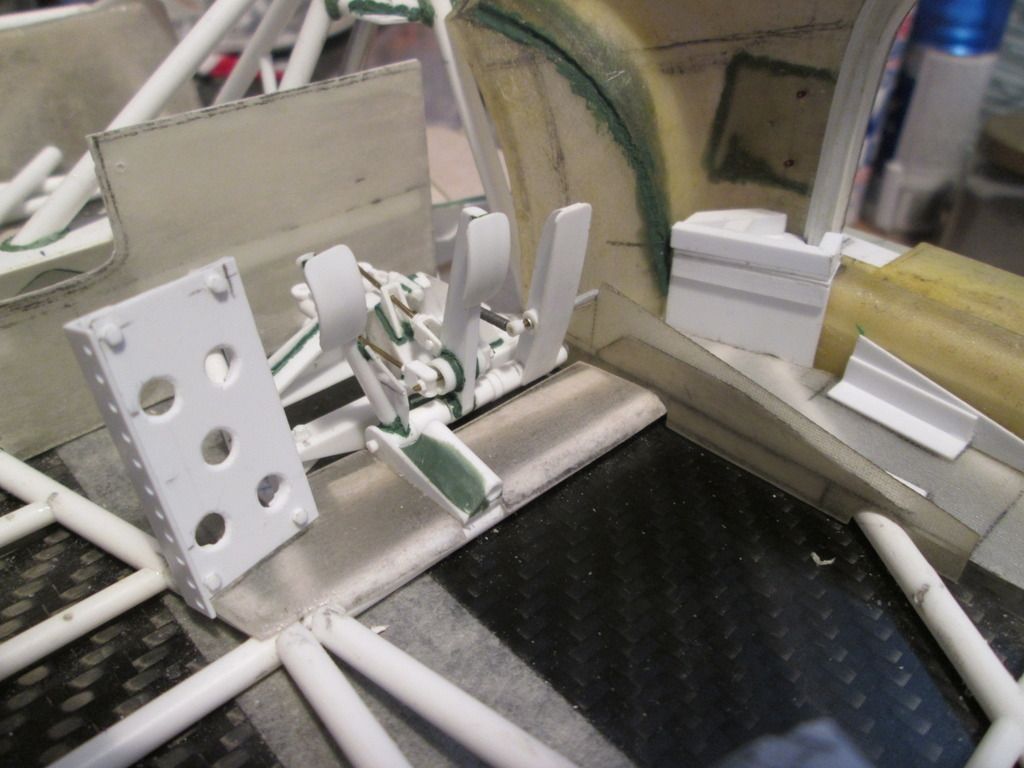 The footrest has been drilled and holed as per some of the reference photos, and the fibreglass floor panels have been trimmed into place. The cardboard pattern for the throttle cable cover has been replaced with one made from fibreglass, and I'm now working on making the top cover panel for this. In the corner where the door pillar meets the sill opening there's a white styrene construction. This is the start of the final lower mounting point for the main roll-cage structure - there's one on the other side, too. The actual joint is at the base of this structure, but I'll be disguising this and adding false mounting plates on top to match the real car. It should all be clear after the next update, honest! That's it for now. I'll post some of my LM photos once I've had a look at them - the Friday on-track display this year wasn't as good as in previous years, unfortunately, so there wasn't too much to shoot from a modelling point of view. No chance of doing any painting in the pitlane again, either: never seen so many people around the place! Managed to pick-up a nice 1:43 1977-winning 936 for the collection, too, and spent a while checking out the (Amalgam?) 1:8 Audi and Matra in the Spark shop - 3500 Euros, though... SB |
|
|
|

|
|
|
#579 | |
|
ItaloSvensk
Join Date: Mar 2009
Location: Marstrand
Posts: 3,383
Thanks: 1,077
Thanked 296 Times in 270 Posts
|
Re: 1/8 Porsche 935/78 'Moby Dick'
Farina or bicarbonato di sodio mixed with paint.... Try it
__________________
Paolo - LoveGT40 Modelworks website www.alsoldatino.com my YT channel : https://www.youtube.com/channel/UCIp..._as=subscriber FB: https://www.facebook.com/alsoldatino |
|
|
|

|
|
|
#580 | |
|
AF Enthusiast
Thread starter
Join Date: Nov 2008
Location: Norwich
Posts: 671
Thanks: 23
Thanked 116 Times in 91 Posts
|
Re: 1/8 Porsche 935/78 'Moby Dick'
Hello again,
Lots going on during the last few weeks - my main reason for not posting is that I've been jumping from one job to another and thinking 'I'll just do some more on that before I do an update...' and then going off and doing something else! However, progress is progress, and I'm now working towards being able to permanently fix the tube-frame chassis to the carbon floor. This means doing lots of little jobs now which will be much harder if I leave them until later. First up tonight, here's an updated shot of one of the front roll-cage mounting points: 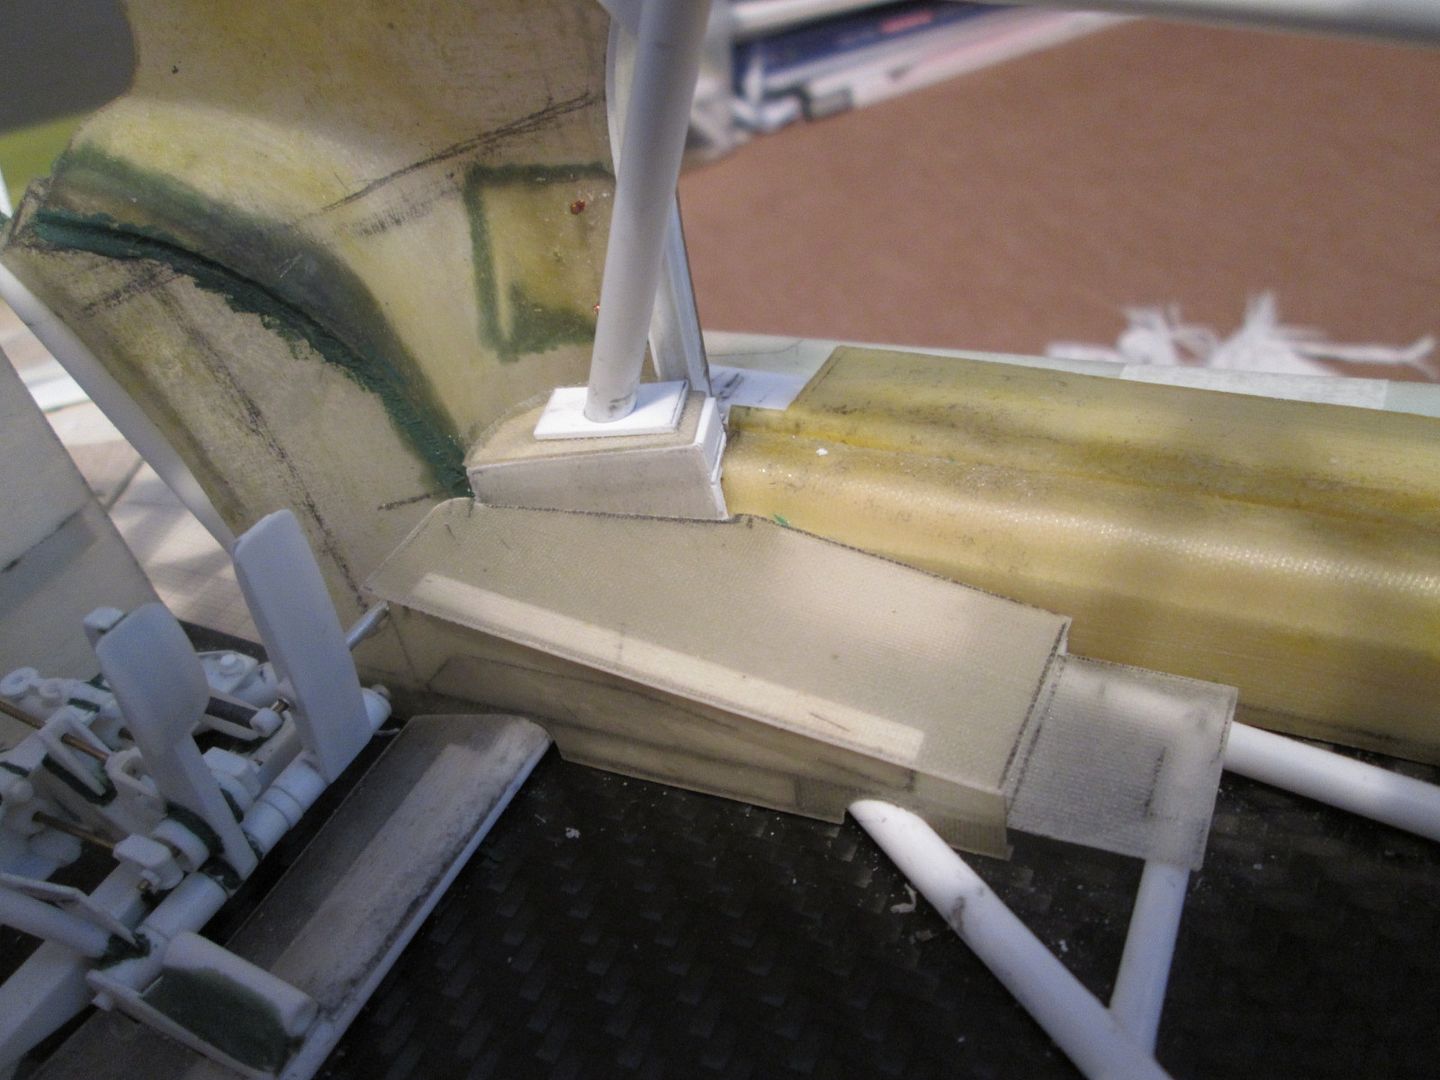 The styrene core now has a thin fibreglass top and side panel, and there's a fake 'foot plate' which will slide into place on final assembly. The cover for the throttle cable now has a top panel too, leaving a thin slot at the rear edge where the cable and pipework will exit. Next, I decided to use the 'Sandy Paste' on the intercooler housings: 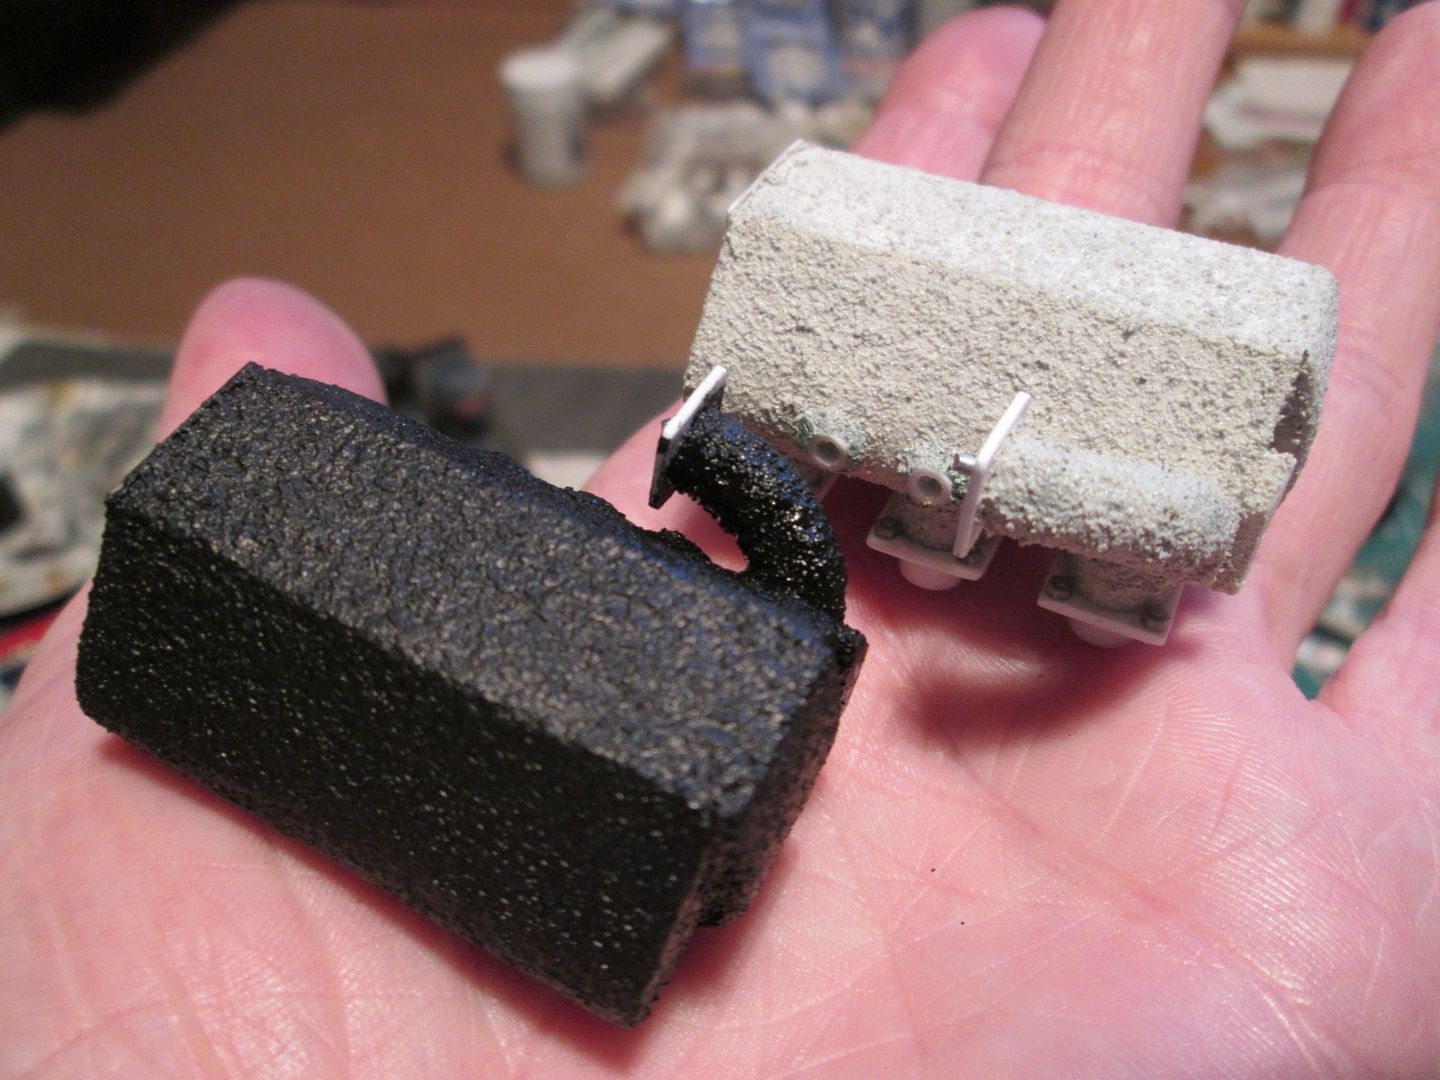 As with the test pieces it took three or four applications to get a consistent finish, but I'm pleased with the result. I had to remove the original hex-nut detailing from the six mounting flanges, as the paste needed a little cleaning-up and this was the easiest way. No problem - it also meant I could use some more of the 'Wave Option' details instead. The one in the foreground has been given a basecoat of Citadel 'Chaos Black' followed by a light drybrush with 'Scorched Brown' and 'Boltgun Metal' to make the texture stand out. Here they are on the engine: 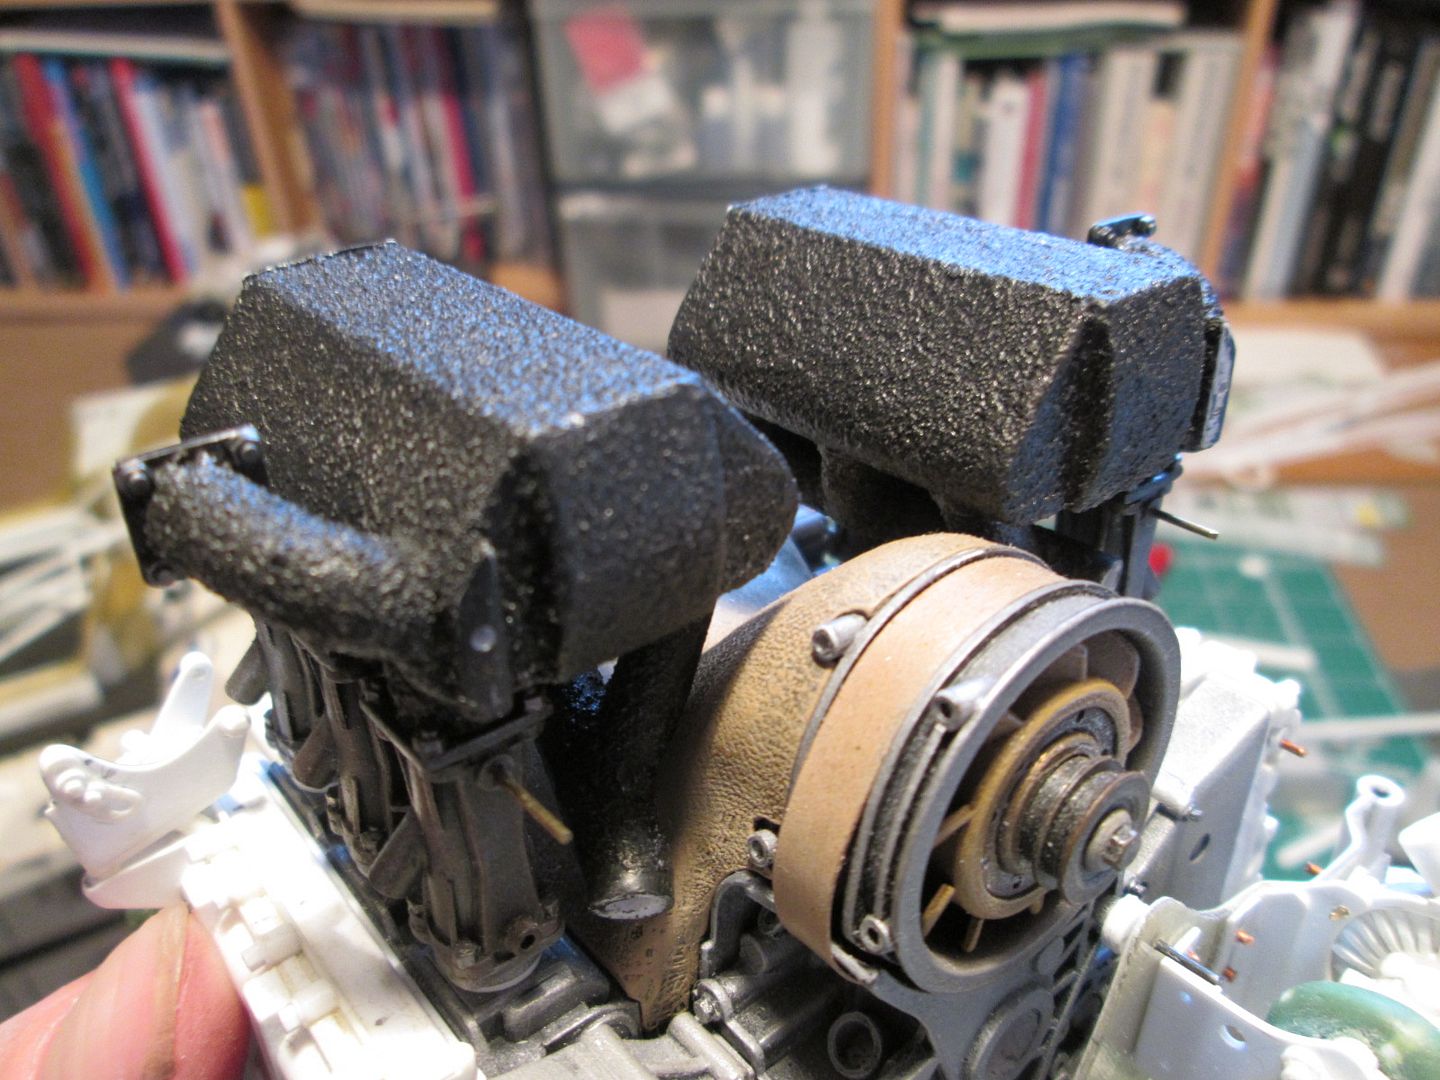 I gave the bicarb method a try, though - it did give a slight texture, but I didn't feel it would show up on the model, even with painting. It could have a use elsewhere, of course, so I'll file it away for the future! Next, some work on the carbon floor. It was always my intention to use the box-section outer sills as the main method of attaching the chassis to the floor. The question is: how? Well, there'll obviously be some glue involved eventually, but in the meantime I wanted something that was removable and repeatable, so that meant using some bolts. To start with I drilled four 4mm holes through the floor which lined up with the ends of the outer sills (so I could access the nuts). Short pieces of 4mm ali tube would fit through these holes and act as dowels to locate the parts together. Finally, some short M3 buttonhead screws and plain nuts would clamp the whole lot together: 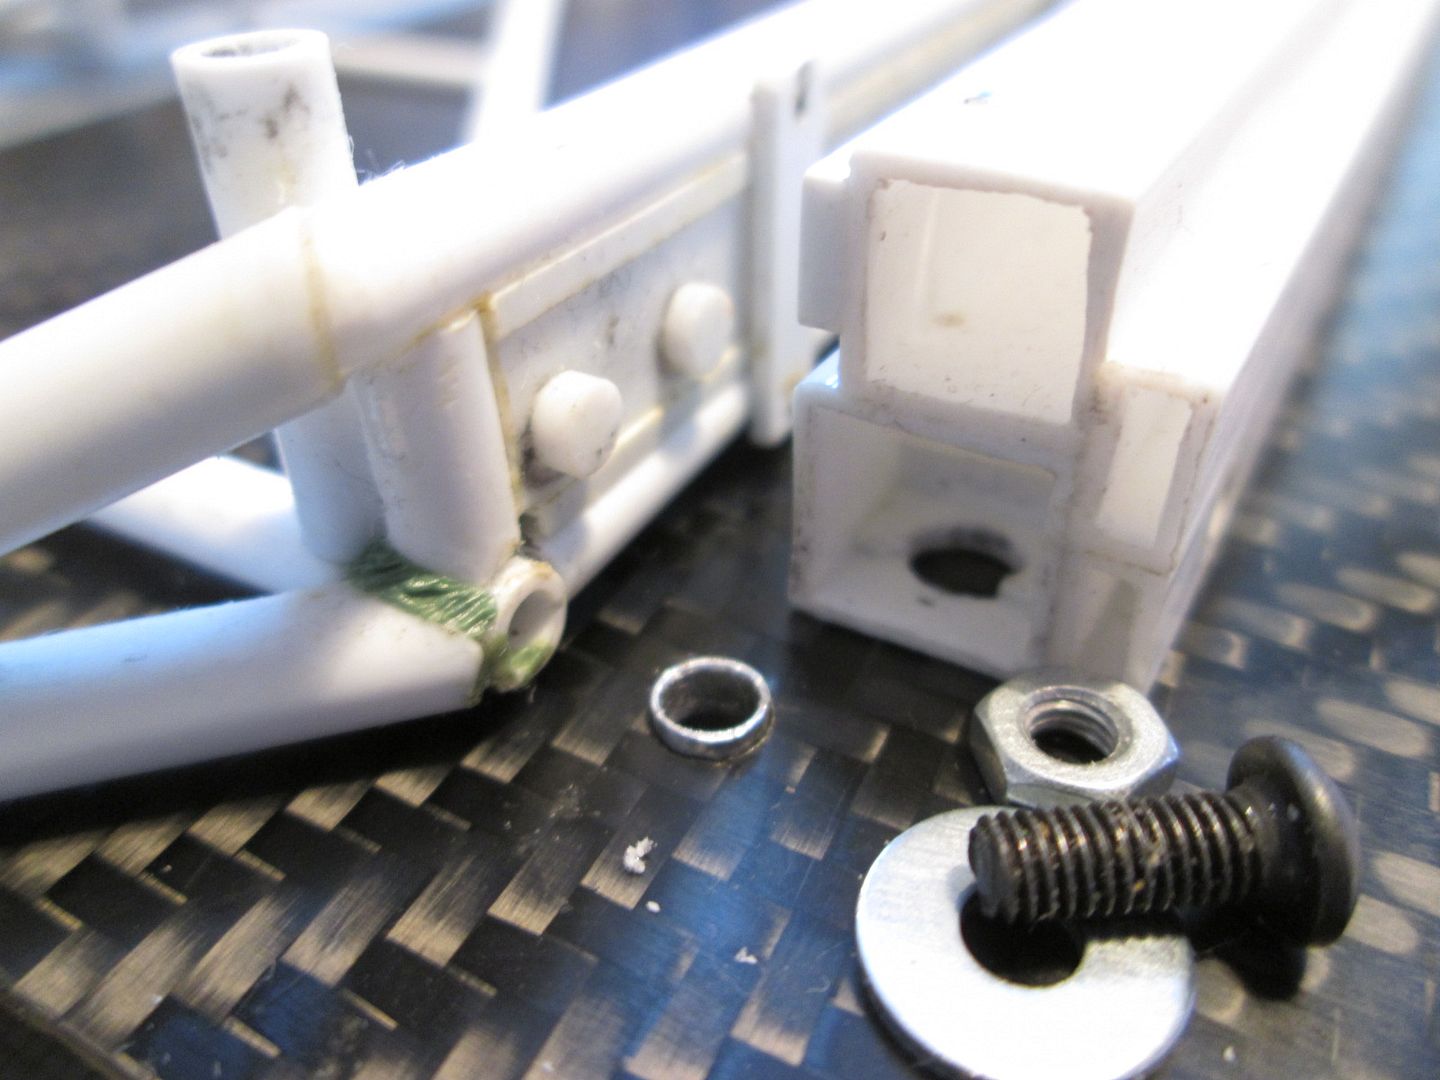 I've also added a pair of small brackets in the front of the chassis frame which give me two more fixing screws - these will be hidden when the fuel tank is dropped into place later. Finally, I've been spending some time detailing the front inner wheelarch panels, as these need to be fitted between the main chassis and the outer sills. Here's the left-hand panel: 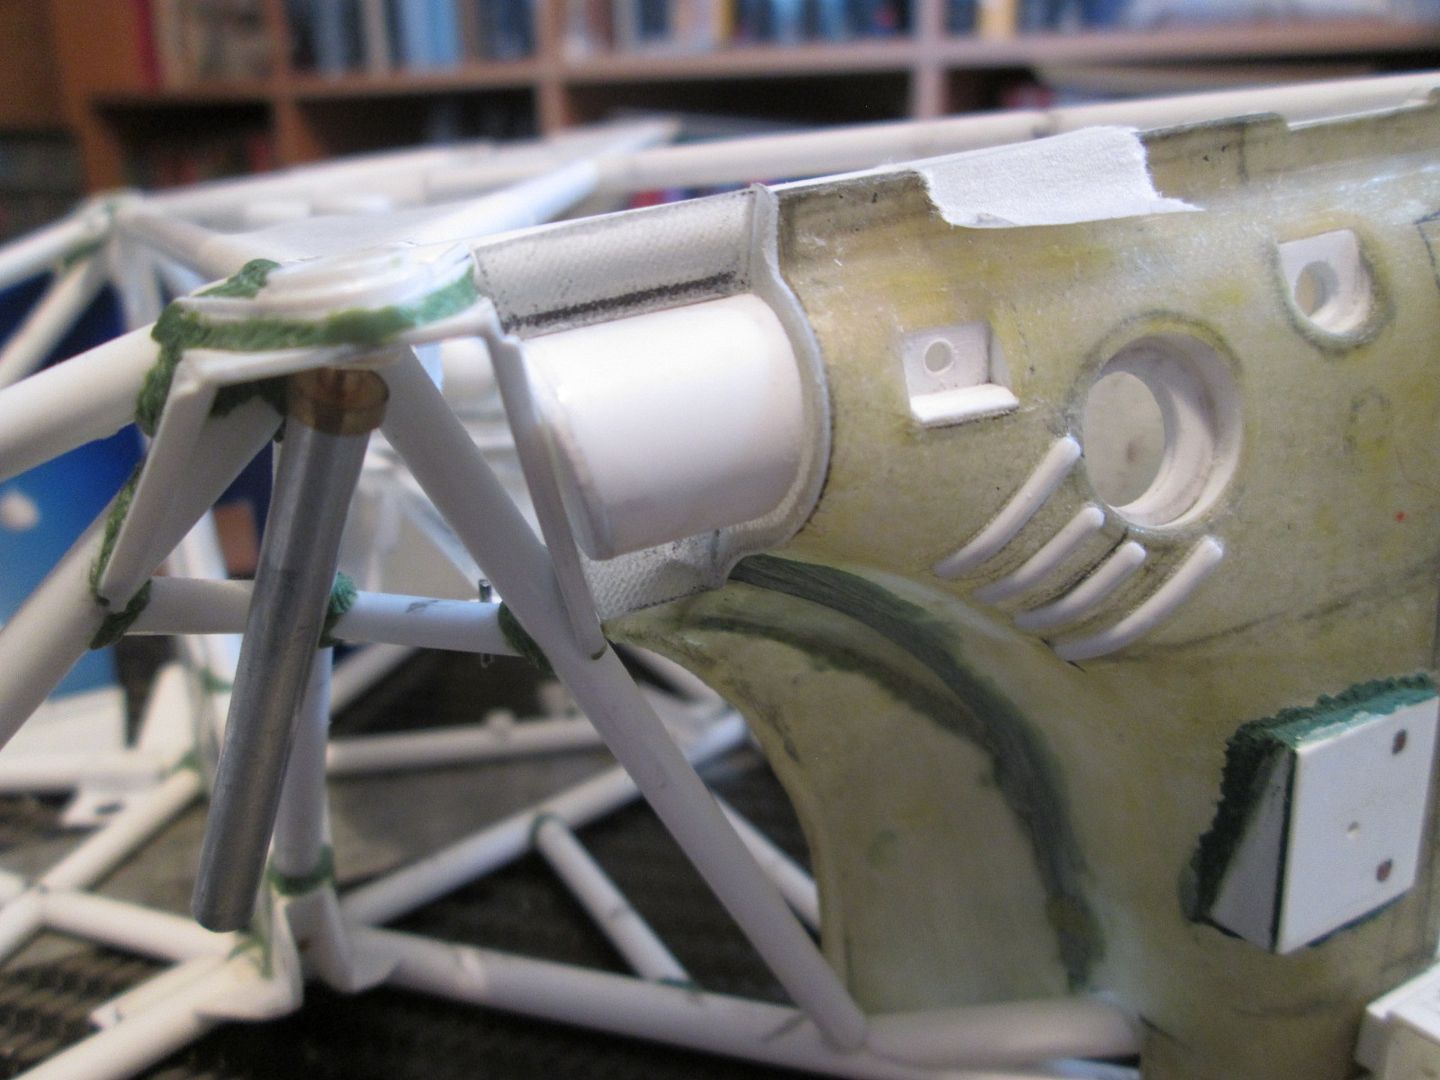 You can see that I've added three recessed holes of varying shapes and sizes (the largest being where the fuel filler neck would be on the original 911 road car), and some rib detailing made from half-round strip. There's still a few more holes, etc, to add but these are the main features; the right-hand side has received similar attention. The short section at the front end closes off the gap between the strut top mounting and the main wheelarch. On the real car this appears to be a fibreglass extension, but I've made mine as fabricated parts. The white styrene tube will be greenstuffed later to blend in with the main fibreglass section. I might have been able to make life easier by moulding these panels as one piece right from the start, rather than cutting them short, but it hasn't been difficult doing it this way: 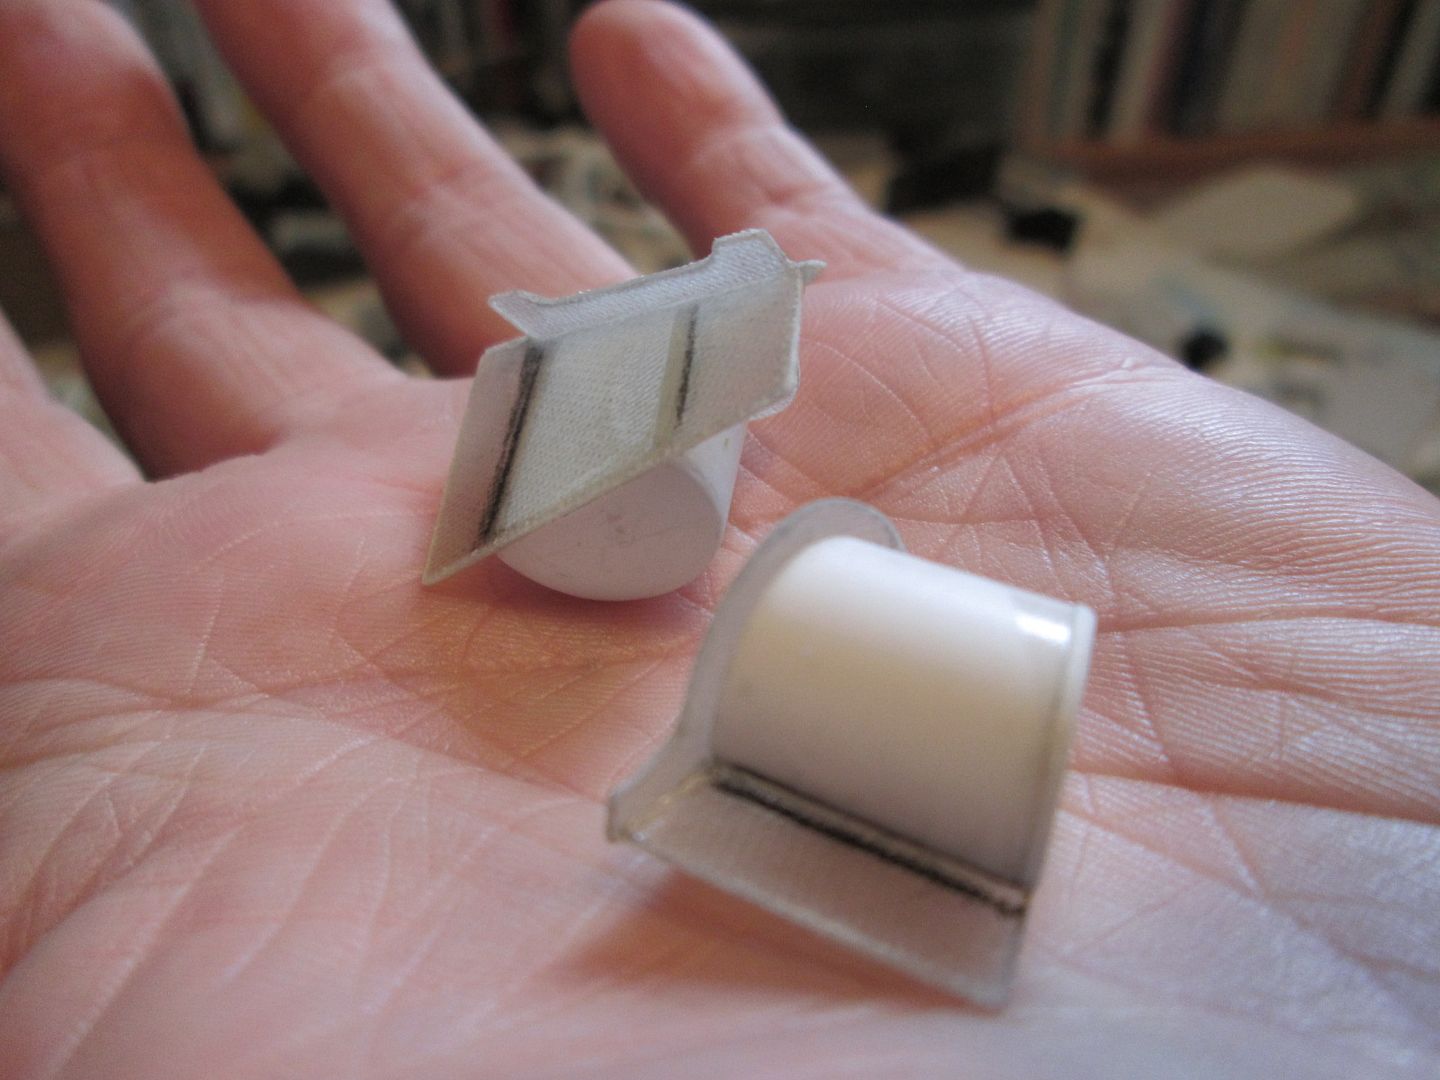 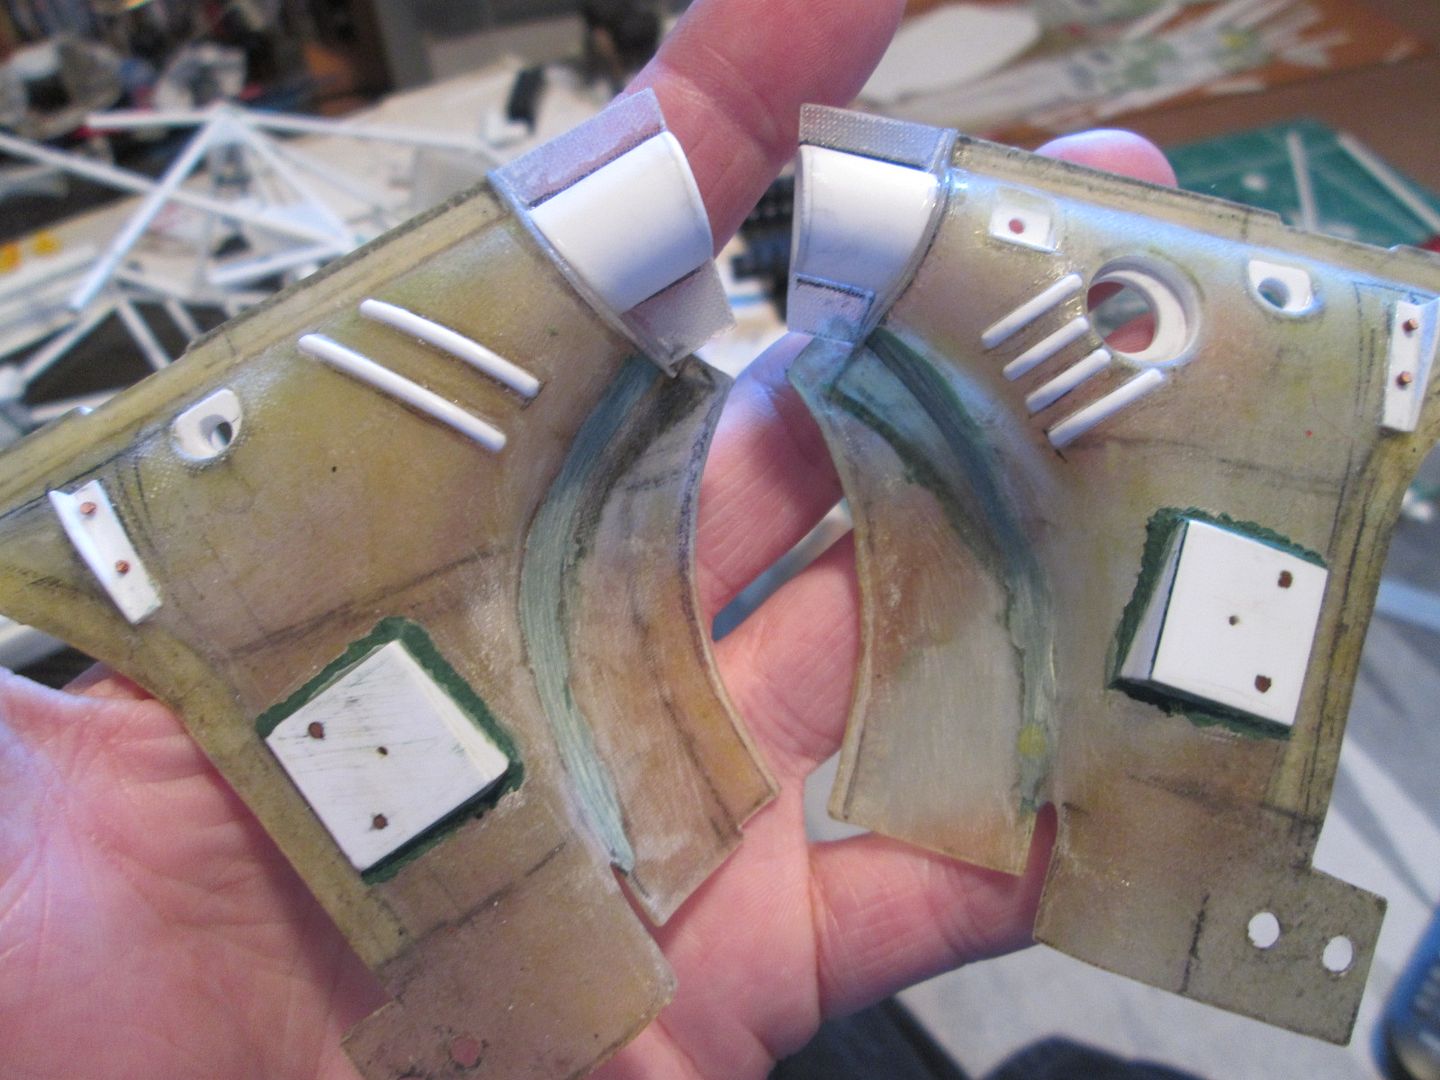 So, this just leaves the side panels which will close off the nose of the chassis. I started making some cardboard patterns for these a while ago, so I'll return to those and see what I can do. Then I need to do some tests to check the assembly sequence: if I fit and glue A, B, C and D, can I still fit E, and still be able to paint B and D afterwards?! That's why everything takes so much time, and why I've not been in a hurry to paint anything. I can't avoid it forever, though, so that's why I need to get the chassis fixed to the floor during the next few weeks - this will open up several more jobs I can do, and start the assembly process. All the best, SB |
|
|
|

|
|
|
#581 | |
|
AF Regular
Join Date: Mar 2005
Location: San Marcos, California
Posts: 331
Thanks: 52
Thanked 17 Times in 15 Posts
|
Re: 1/8 Porsche 935/78 'Moby Dick'
Another amazing update!
Trevor |
|
|
|

|
|
|
#582 | |
|
AF Enthusiast
Thread starter
Join Date: Nov 2008
Location: Norwich
Posts: 671
Thanks: 23
Thanked 116 Times in 91 Posts
|
Re: 1/8 Porsche 935/78 'Moby Dick'
Hello again,
Slowly moving towards the time when I can start fixing some of this stuff together. I'm just trying to do as much as I can before that point, as there's bound to be something I forget to do which instantly becomes twice as difficult when the floor is attached! First up, here's the main inner sides panels for the nosebox in an early stage: 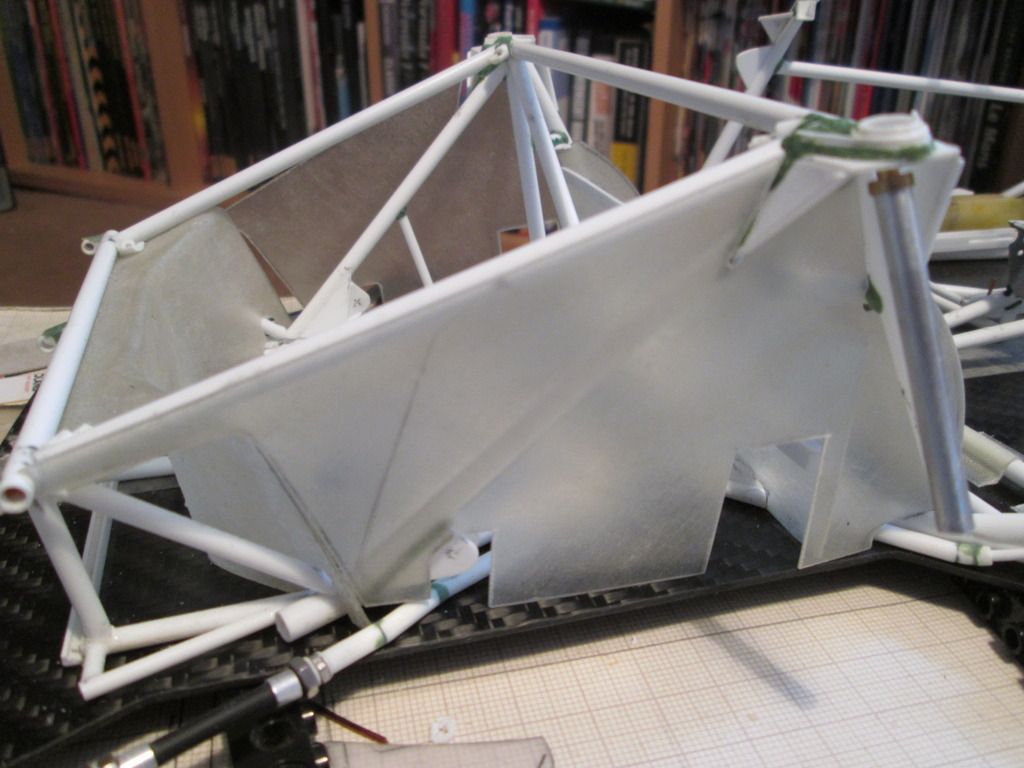 I'd made the cardboard patterns for these ages ago, but now was the time to cut them from sheet fibreglass. The cut-outs around the suspension strut top mount were tricky, but I've been able to do them without being too gappy. This particular lay-up came out at 0.55mm thick, but it's quite flexible - the innermost section is vertical where it meets the wheelarch, but it then twists slightly as it moves forward along the nose of the chassis. The cut-outs for the wishbone and steering help it to flex, too. Here's the view from above: 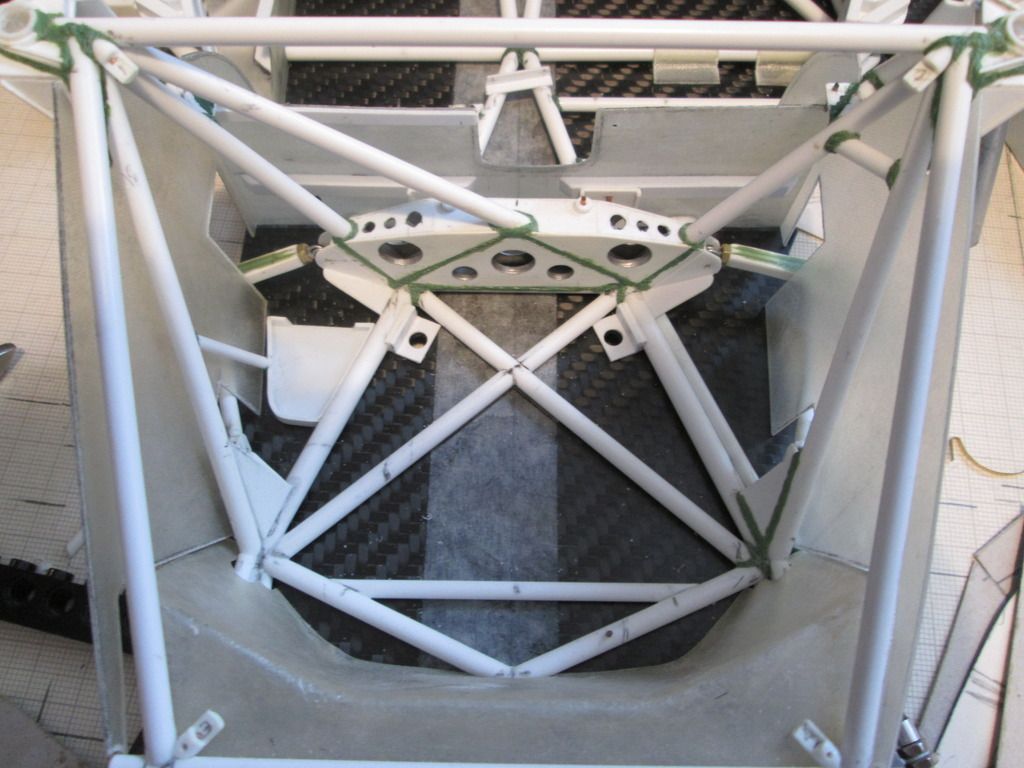 Since taking this photo I've opened out the holes around the leading leg of the wishbones, and made two curved sections which will blend the panel around the inside. There's also some small holes for where the two ali nose support frames will attach later. In the middle you can see the two extra brackets added to the chassis to attach to the floor - these will be covered once the fuel tank is in place. Next, I made two small internal panels which close-off the lower part of the nose of the car, behind the oil tank and fuel tank: 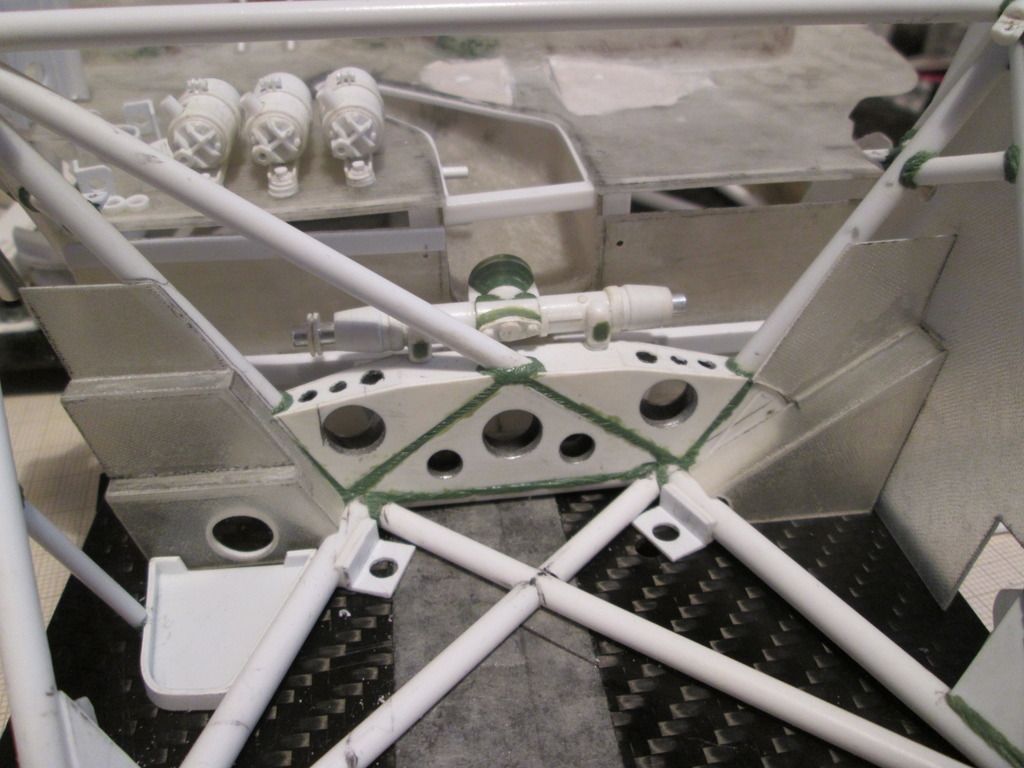 Neither are totally accurate to the real thing, but are the result of how I made the oil tank and fuel tank months ago. These will both be painted and glued into place later. Given that I've recently been trying to work out an assembly sequence, this also has to include parts such as the water and oil pipes running around the front of the chassis. Some of these have to pass through or into some of the body panels, so have been added to the sequence. Here's the right-hand side: 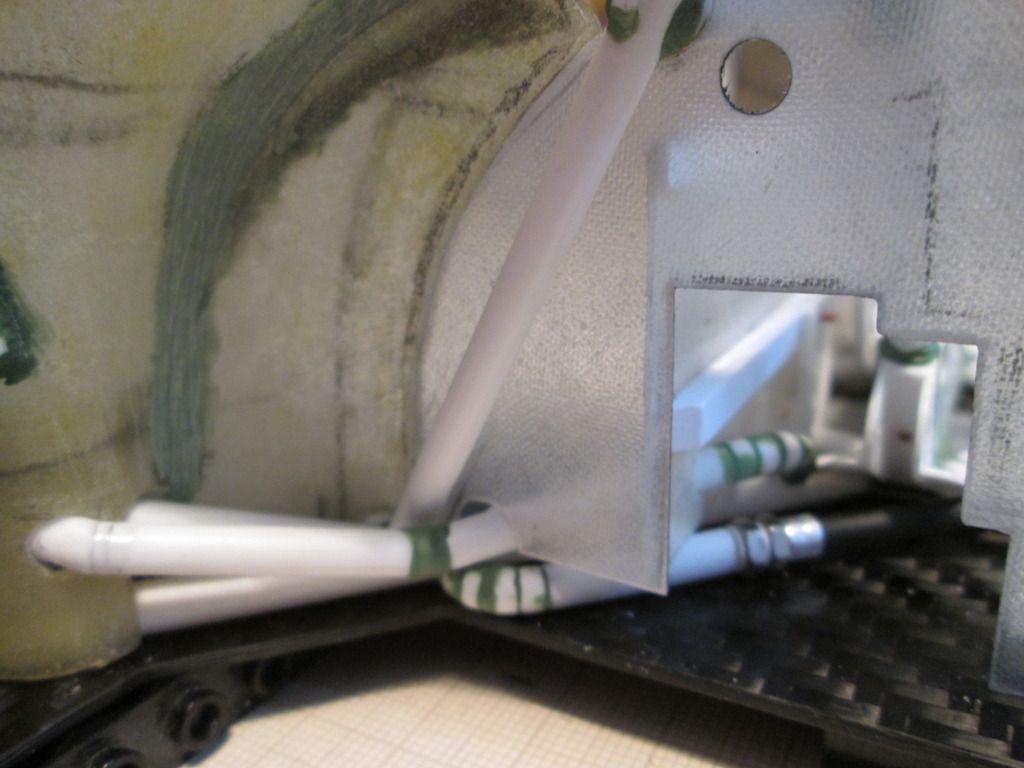 Here you can see how the hole in the side panel for the wishbone and steering has been opened out, with a stepped front edge to match the interior panel. The small hole at the top of the photo is where the front roll-bar will go - this will have to be modified slightly to allow for the adjuster mechanism to pass through. The bottom edge of the side panel and front bulkhead has been trimmed away so that the lower oil pipe is exposed, whereas the longer water pipe running to the intercooler comes out of the wheelarch, through a notch in the sidepanel, then through a hole in the bulkhead before attaching to the chassis. Currently this pipe is one-piece, but I might consider splitting it to make installation easier. My early thoughts on the assembly sequence concluded that the front firewall / dashboard panel would have to be fitted at the same time as the main roll-cage, as it would be impossible to add it afterwards. However, there's just too much stuff to sort out under there, and trying to do it with this panel in place would be incredibly difficult. So, I think I have the solution... 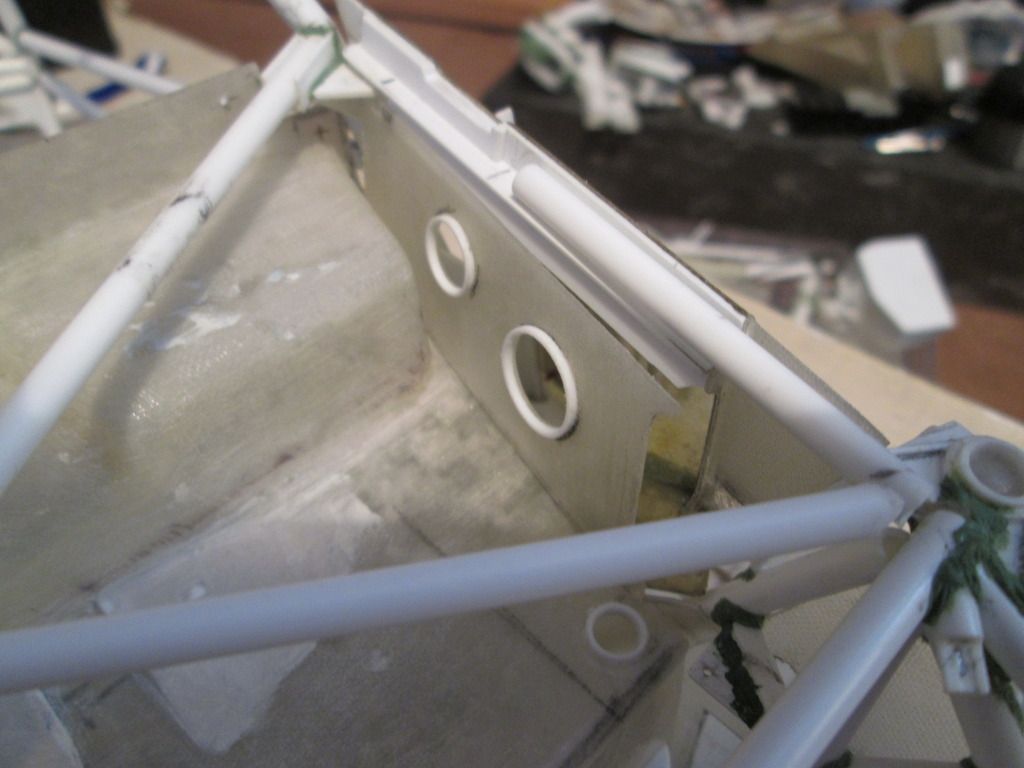 I've trimmed a section from the left-hand side of the firewall - this allows me to hook the right-hand side of the panel around the roll-cage, then rotate the whole lot into place through the cockpit. The panel you can see here with the two holes will eventually camouflage the join when the extra piece of firewall is replaced. I've added some styrene strip along the bottom to provide a step to locate the base, and a length of angle along the underside of the wheelarch panel will secure the top. I've done something similar on the other side, too. The firewall is intact, but the inner panel includes a cut-out to fit around the wash-bottle mounting, and two holes for routing various oil and fuel lines through into the cockpit - you can see two more holes through the firewall behind: 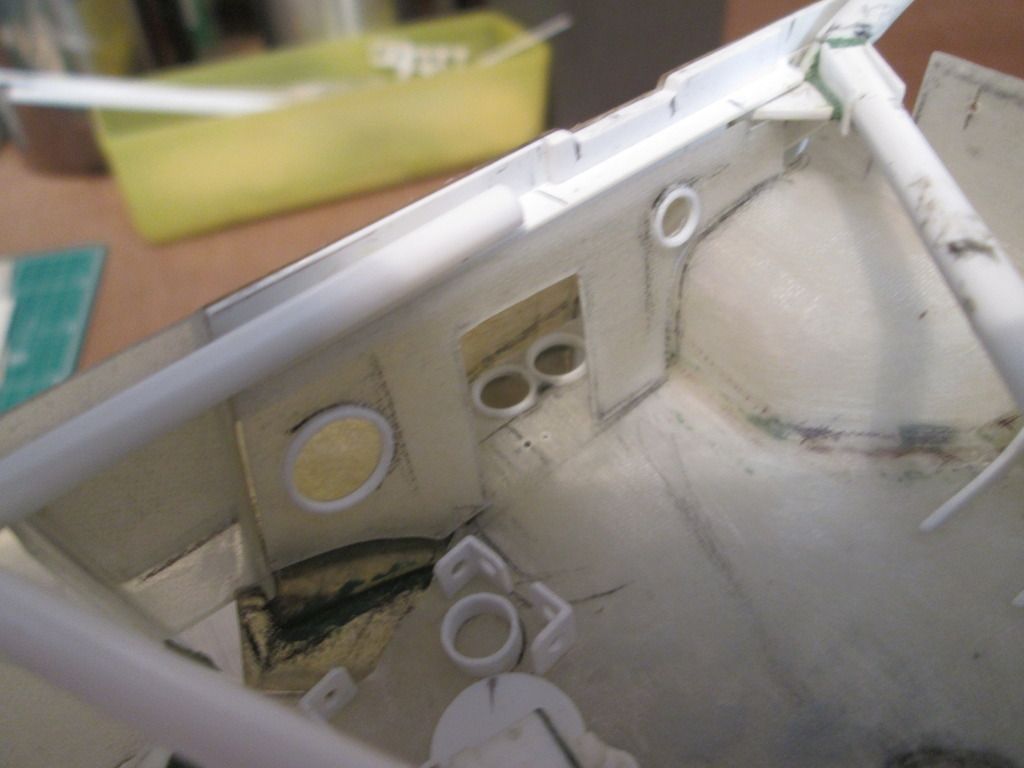 So, I reckon that I'll now be able to fit the wheelarch panels, main roll-cage, front bulkhead and the nose side panels, then drop the firewall on top to complete the structure. This should allow me to do most of the footwell detailing from above with relatively easy access. I can also detail the underside of the firewall before it goes in (wiring, electrical boxes, etc), which should help. Making progress... SB |
|
|
|

|
|
|
#583 | |
|
AF Enthusiast
Join Date: Oct 2008
Location: Auckland
Posts: 2,761
Thanks: 51
Thanked 136 Times in 134 Posts
|
Re: 1/8 Porsche 935/78 'Moby Dick'
Always Amazing!!!
__________________
 It's Not wheather you Win or Lose, its how you look while you play the Game |
|
|
|

|
|
|
#584 | |
|
AF Enthusiast
Thread starter
Join Date: Nov 2008
Location: Norwich
Posts: 671
Thanks: 23
Thanked 116 Times in 91 Posts
|
Re: 1/8 Porsche 935/78 'Moby Dick'
Continuing with detailing in the front of the car, after fiddling around with some of the oil pipes in the previous update I remembered that I needed to add a cold-oil return into the system:
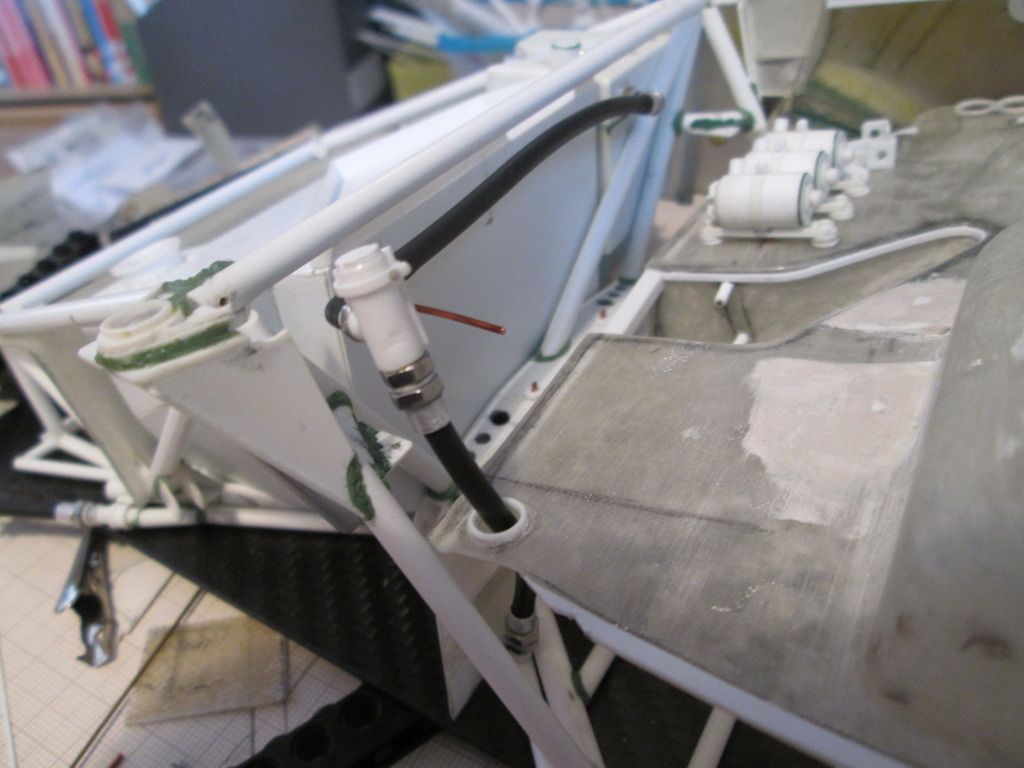 This small valve unit will attach to the upper X-frame and allows the cold oil to return to the main tank without having to pass through the cooler in the nose. At a pre-determined temperature the valve closes and the warm oil can be cooled. Next, a slight change of scene: windscreen. I started the next job by taping some draughting film to the roof section: 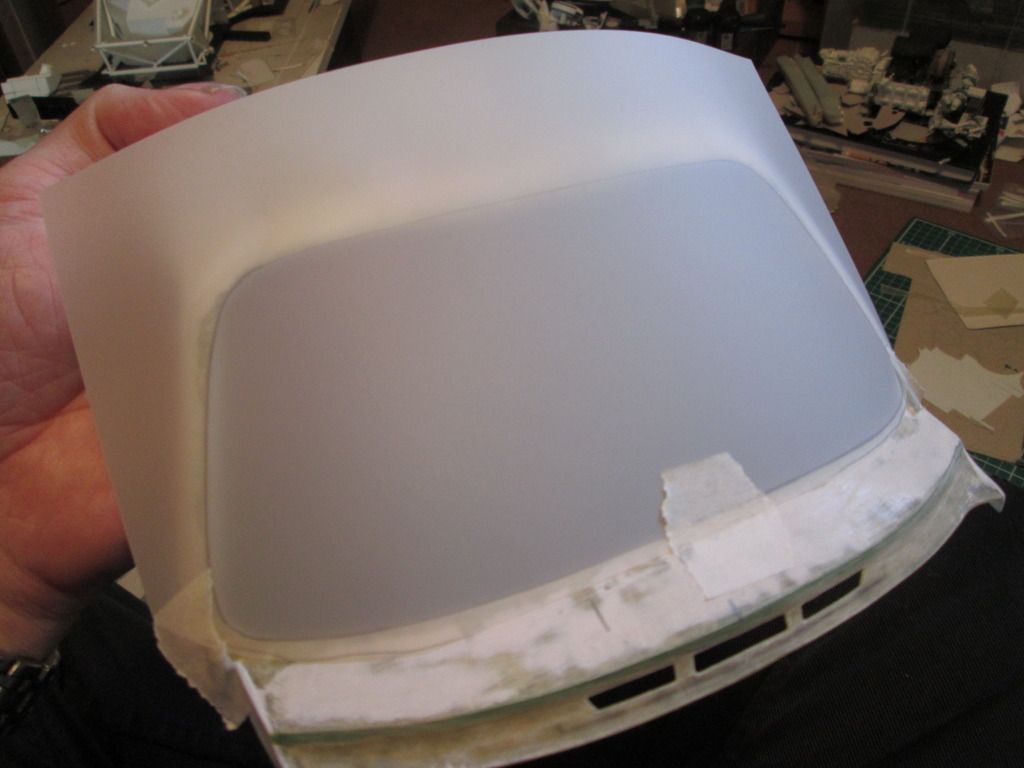 After cutting this out, it was obvious that the top edge of the windscreen opening needed some modification - the curvature of the screen didn't match. So, the first job was to create a lager lip around the inside edge with thin strip styrene - this will give me a firm fixing point for the screen later on. Next, I built up the top edge of the roof with wider styrene strips to get the approximate shape I wanted: 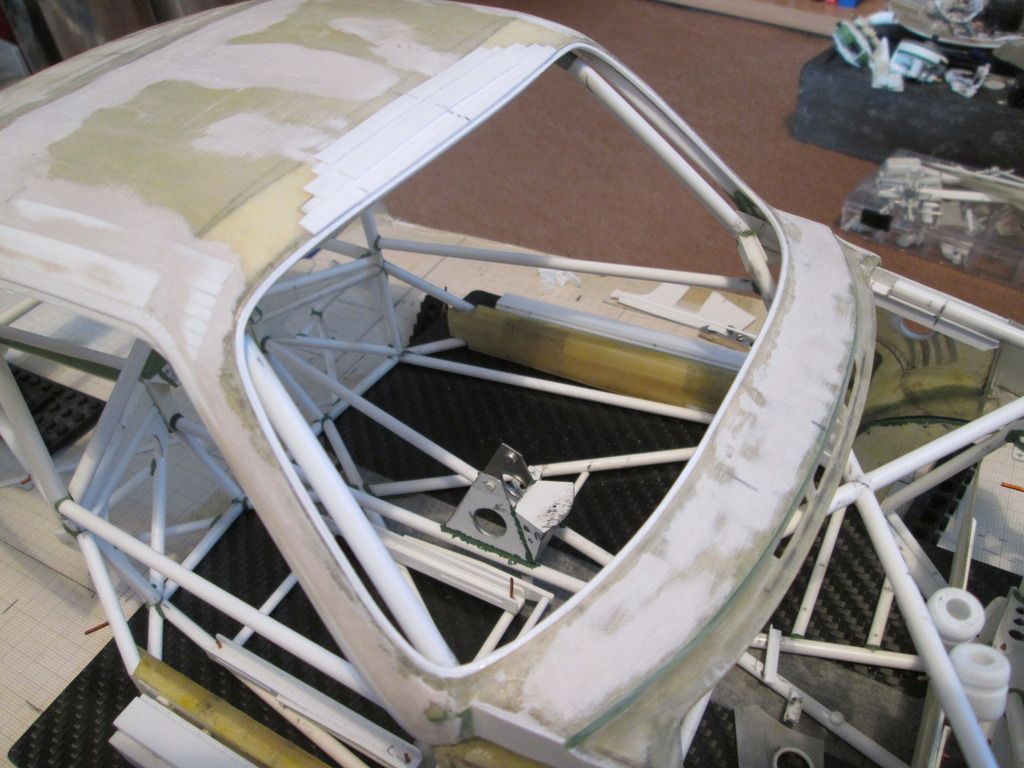 After some filler and fettling, I ended up with this: 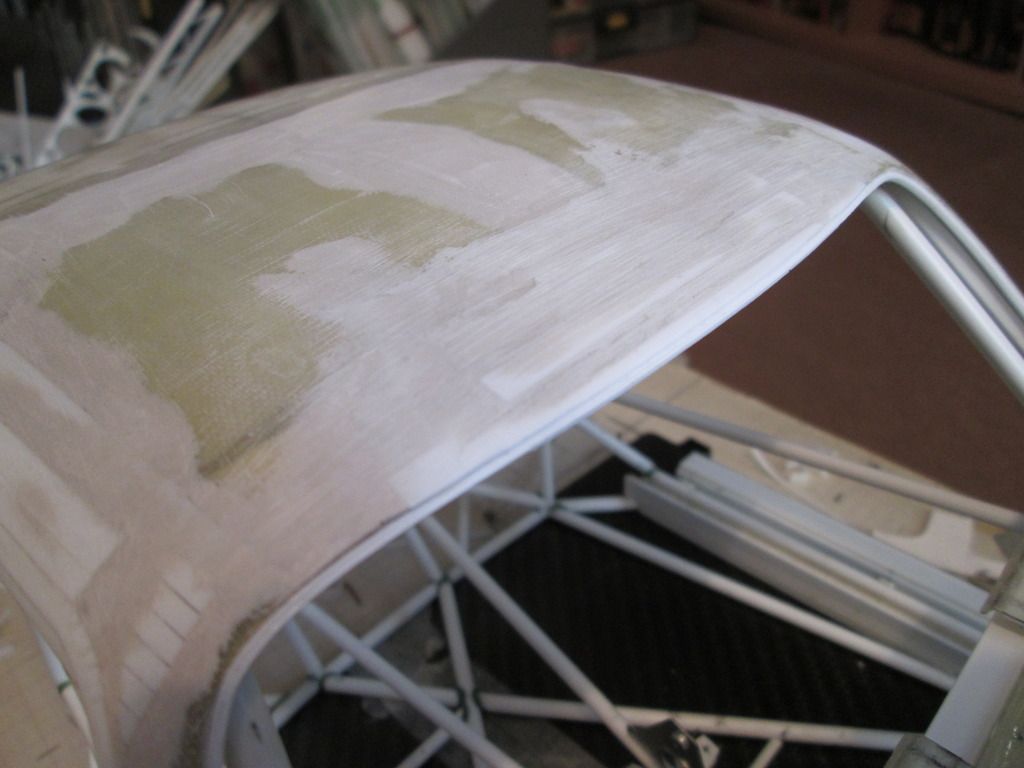 I've since obtained some thicker (0.6mm) clear plastic to use as the screen, so it won't be long before I cut what will hopefully be the final version. I've just got to work out (a) how I glue it in place and (b) how I add a 'seal' around the outside to camouflage the join. Next up - windscreen wiper. This is one of those parts that is so thin and fiddly that accuracy of the design is not the main concern - it's about making something that doesn't fall apart when you look at it! So, I turned a length of 1.6mm I-beam into a T-beam and used this as the blade, then added the arms made from thin strips of curved fibreglass: 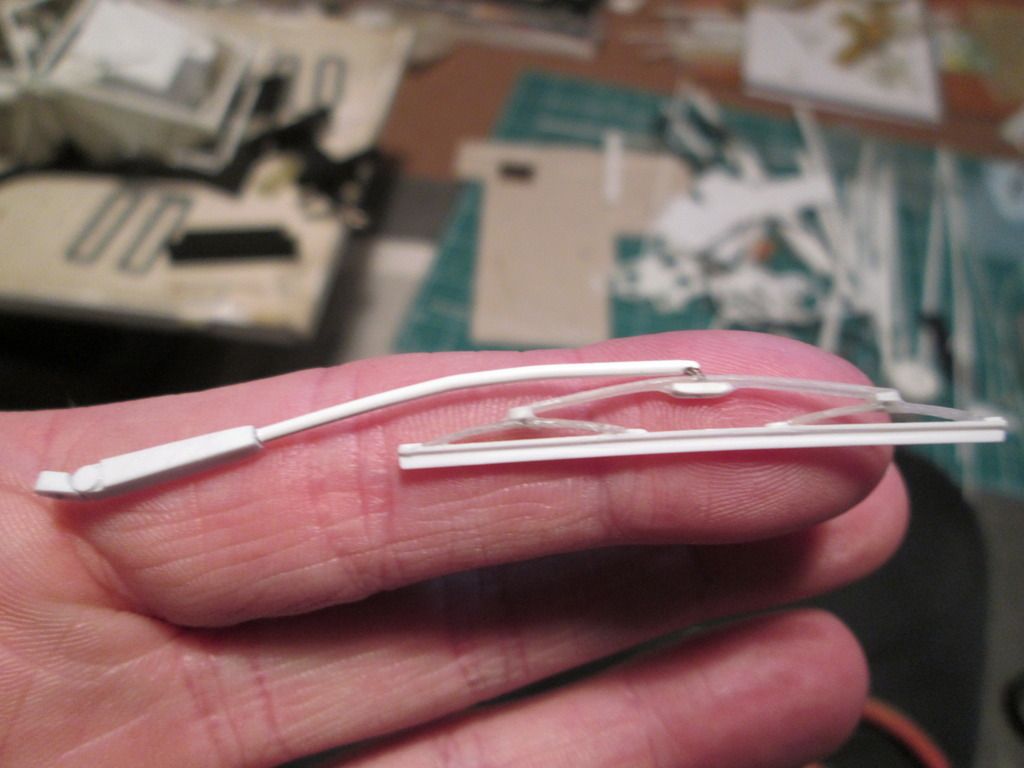 I didn't want to use styrene strip for the arms as I wanted to avoid the possibility of distortion. The main wiper arm is a length of plastic-coated wire rod, so this can be trimmed and bent to shape as required. After this, it made sense to make the wiper motor and drive assembly (even though it's buried away under the dashboard). There are no shots of this amongst the Freisinger photos, so I dug around online for appropriate images of regular 911's and used these as the main reference. Although the mechanism can drive a normal pair of wiper blades, many photos of the factory car show it with just a single wiper on the driver's side. Here's the mechanism plugged into the underside of the windscreen surround: 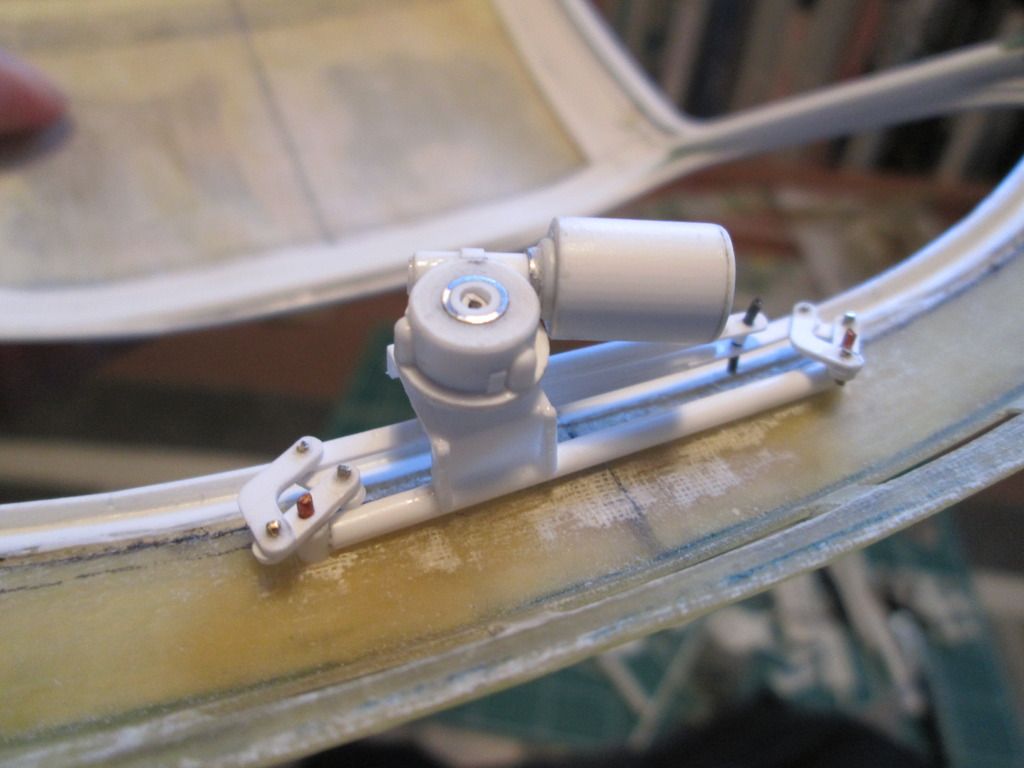 ...and flipped the right way up: 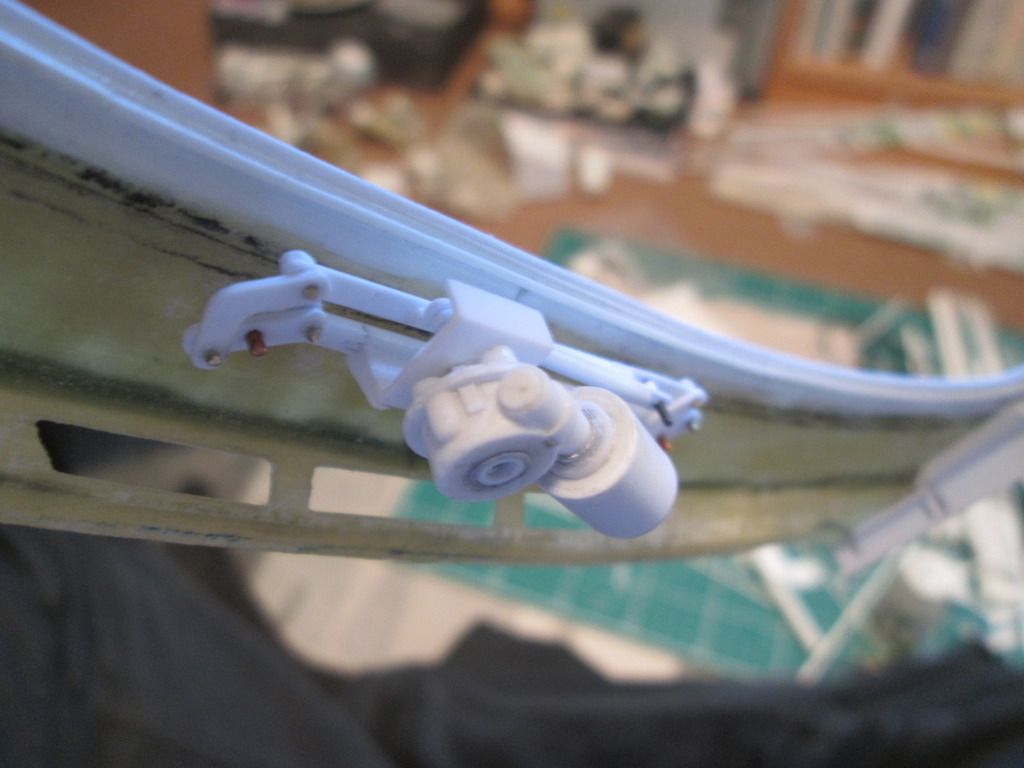 The measurements are all based on best-guesses and what-fits. The linkage isn't intended to be functional - it's just got to look 'kinda right'. I just need to do a little tidying of the pinned joints and add a few little details to the motor section. One side-effect of fitting this into place is that I now have to modify the dashboard top to fit around it - that's another job for the coming week. So, a bit of variety for this update. I've also been getting some supplies in place for some spray-painting - the bare-carbon floor might not be 'natural' for too much longer... All the best, SB |
|
|
|

|
|
|
#585 | |
|
AF Newbie
|
Re: 1/8 Porsche 935/78 'Moby Dick'
Holy $&@! Batman! That windshield wiper and motor are insane.
|
|
|
|

|
| ||||||||||||||||||||||||||||||||||||||
 |
POST REPLY TO THIS THREAD |
 |
|
|